Win11 TipsEnjoy life easier but more creative!2024-10-26T10:13:35.800Zhttps://win11-tips.techidaily.com/RichardHexoRevive Faulty Display on Windows 11 with New Driverhttps://win11-tips.techidaily.com/revive-faulty-display-on-windows-11-with-new-driver/2024-10-25T16:48:56.726Z2024-10-26T10:13:35.800ZRevive Faulty Display on Windows 11 with New Driver
Do you need help with your graphics driver on Windows? Maybe it’s not working properly, or you can’t get it to install correctly.
If you are experiencing problems such as screen flickering, black screen, or other graphical issues, you may need to reset your graphics card driver. This can be easily done on Windows 10 & 11, and there are various ways to do it.
So, when might you require resetting your graphics card drivers, and how can you do that?
Disclaimer: This post includes affiliate links
If you click on a link and make a purchase, I may receive a commission at no extra cost to you.
When You Might Require to Reset Graphics Card Drivers
There are many instances when resetting your graphics card drivers might be necessary. Here are the most common ones:
To fix screen issues : If yourscreen is flickering , blacking out, or otherwise displaying graphical issues, a driver reset can help.
To fix compatibility problems : If you’rehaving problems running games or other applications that require a certain version of graphics card drivers, but the wrong version is installed on your computer, you may need to reset the drivers in order to get them to work properly.
After Windows updates : If you recently installed new Windows updates, and your graphics card driver is behaving erratically afterward, a reset may help.
How to Reset Graphics Driver on Windows
On Windows 10 and 11, there are various ways to reset your graphics card driver. Here are the most common methods.
1. Restart the Graphics Driver Using Keyboard Shortcut
The most straightforward way to reset the graphics card driver on Windows is by using the keyboard shortcut. For that, use the key combinationWin + Ctrl + Shift + B. This key combination would instantly refresh your graphics driver on your Windows system. You will observe that your screen will be flashing for a second or two, and then all will be back to normal.
You should be aware that this activity is safe and won’t interfere with any of the apps that are already operating on your device. Furthermore, you can perform this activity without using theWindows administrator account .
Also, keep in mind that this keyboard shortcut might not function while you are playing games. This is because video games generally take command of the keyboard, preventing Windows from using it.
2. Reset the Graphics Card Driver Using Device Manager
If you are still facing display issues even after applying the keyboard shortcut to refresh your graphics card driver, you can try resetting it with the Device Manager.
Device Manager is available on all Windows versions and provides a list of all the hardware components connected to your PC. Here, you can find the graphics card driver as well, which can be reset if needed.
Here are the steps to use the Device Manager to reset the graphics card driver:
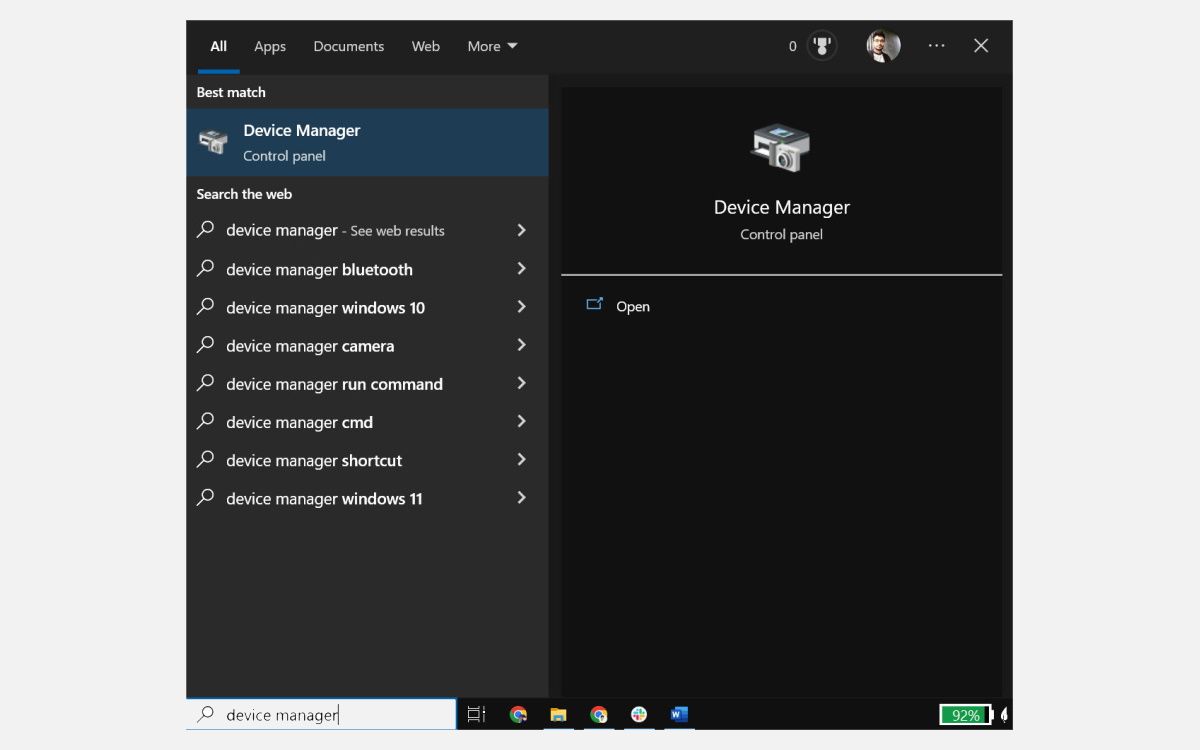
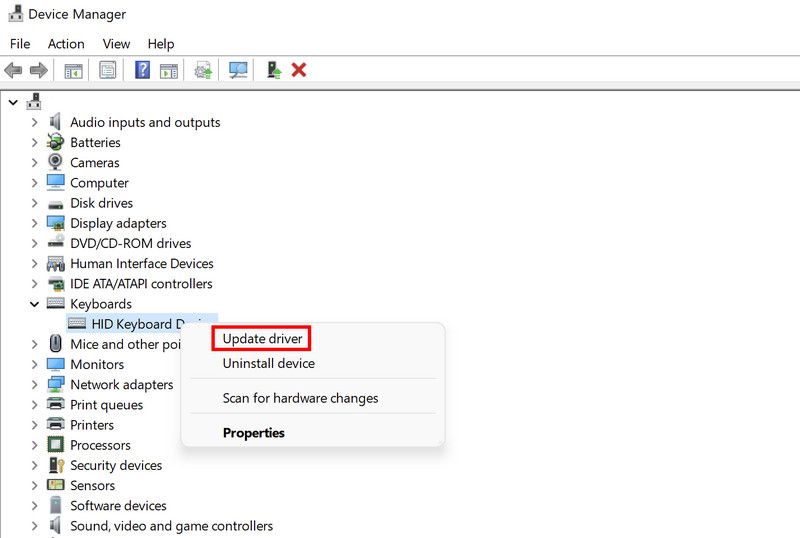
First,open the Device Manager by searching for it in the Windows search box and clicking on theDevice Manager icon from the Start menu**.**
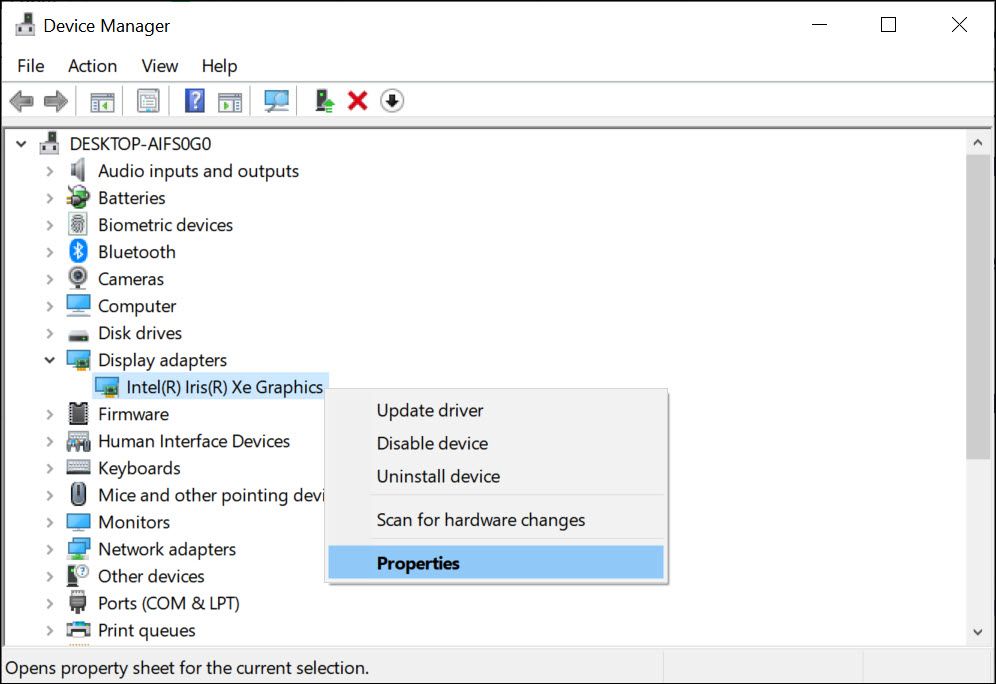
Then, locate and expand theDisplay adapters section in the Device Manager window.
Right-click on your graphics card driver and selectProperties from the context menu.
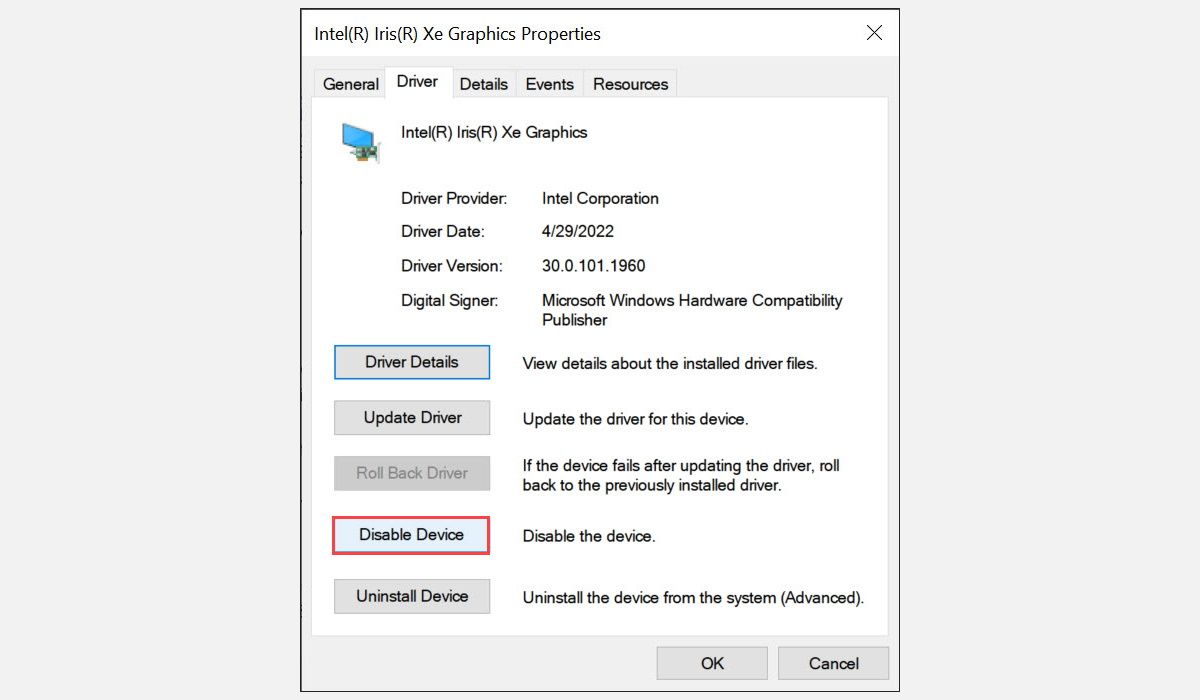
Under the Properties window, switch to theDriver tab and click on theDisable Device button.
5. Confirm the disable action and wait for a few moments.
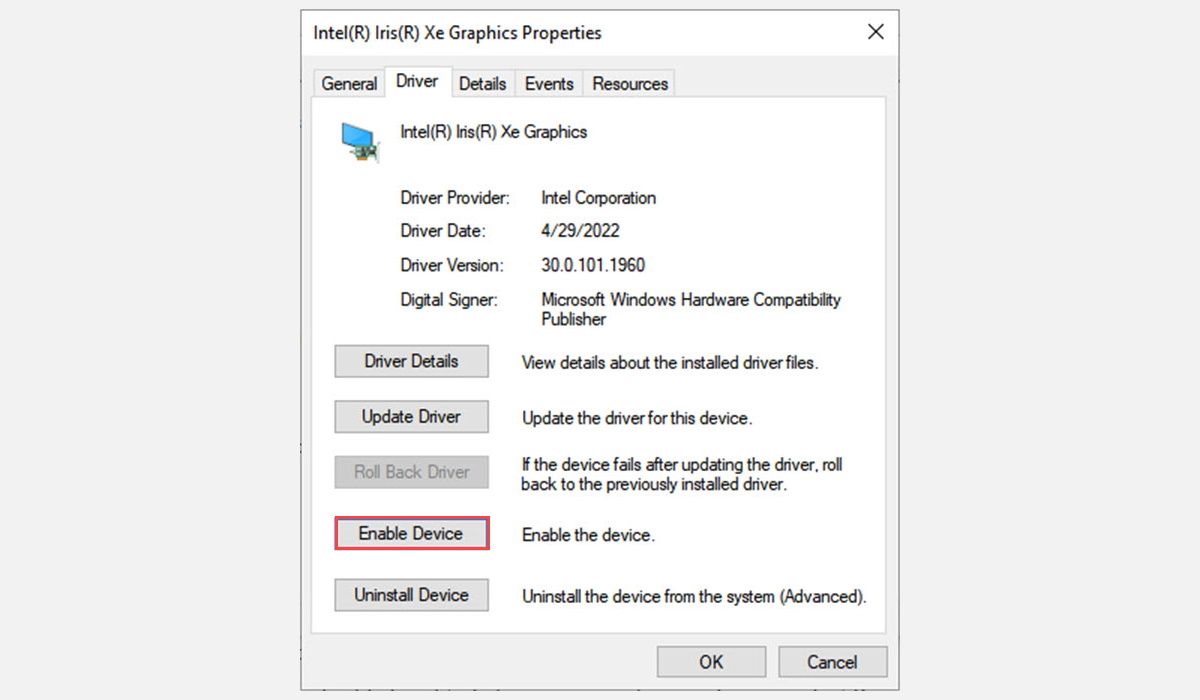
After the driver is disabled, again right-click on your graphics card driver, and selectProperties from the menu that appears.
Switch to the Driver tab, and click on theEnableDevice button.
Wait for the driver to be re-enabled.
This action will reset your graphics card driver and may clear up any display issues you were having.
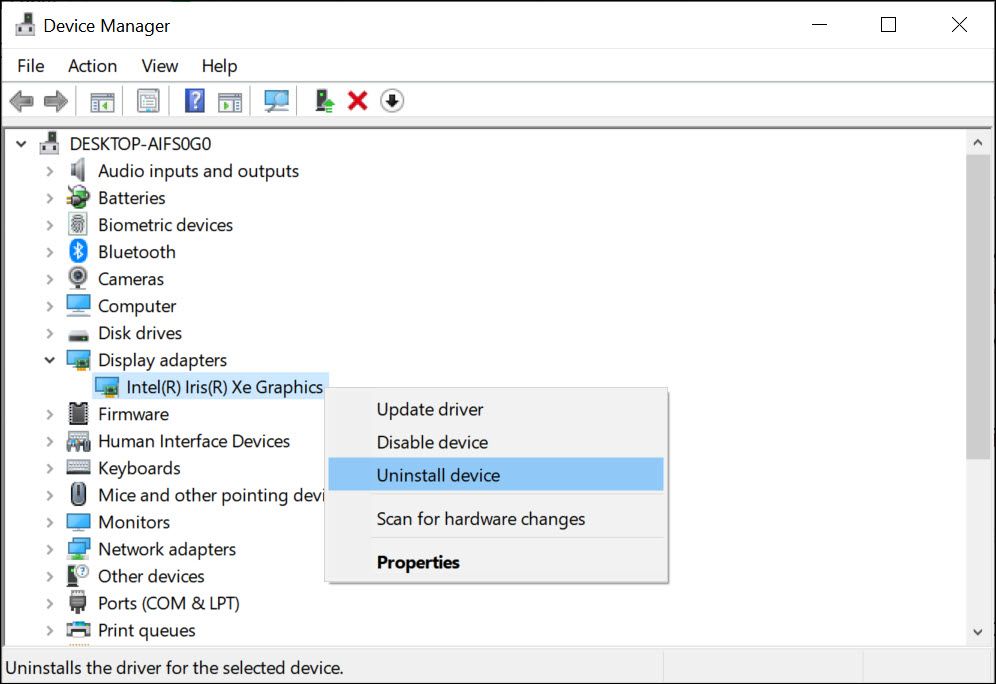
3. Uninstall and Reinstall the Graphics Driver to Reset It
If nothing else works, you can try uninstalling and reinstalling the graphics driver. Uninstalling the driver will remove it from your system completely, which should resolve any possible glitches or compatibility issues that might have been causing the display problems.
To uninstall and then reinstall the graphics card driver on Windows, follow these steps:
First, open the Device Manager by searching for it in the Windows search box and clicking on theDevice Manager icon from the Start menu.
Then, locate and expand theDisplay adapters section.
Right-click on your graphics card driver and selectUninstall device from the context menu.
Confirm the uninstall action to remove all its files completely.
After the driver is removed, reboot your device.
Windows will detect a missing driver and prompt you to install it automatically. If not, head to your graphics card manufacturer’s website and download the suitable drivers for your device.
Once you have installed the latest version of the graphics card driver, restart your system again. This should fix any display issues that you may have been experiencing.
What If the Graphical Issues Persist?
If you have performed all the troubleshooting steps mentioned above to reset your graphics card driver and still face display issues, you can try the following fixes:
Update Windows : Many graphical problems can be resolved by justupdating the Windows version that you are running. You can check for the latest updates in the Settings app and install them automatically or download the ISO file from Microsoft’s official website.
Update graphics drivers : Head to your graphics card manufacturer’s website and check for the latest available drivers. Download and install them accordingly to see if it resolves the display issues.
Run the Display Troubleshooter : Windows 10 and 11 come with an in-built troubleshooting tool. This tool can detect and resolve any glitches or compatibility issues with your graphics driver automatically.
Check your monitor : It is possible that the display problems are caused by your monitor itself, as not all monitors are compatible with all video cards. Try using a different monitor or check for its compatibility with the graphics card you have installed on your system.
Check hardware components : Examine your device’s cooling fan and other hardware components to ensure there is no blocking or dust on them. If blocked, clean it using a vacuum cleaner and check if the display issues persist.
Check connections : Check the cable connections between your PC and the monitor. Make sure the connections are secure, and no wires are loose. Also, try connecting a different cable, if possible, to make sure the issue is not with the cable itself.
Reach out to Customer Care : If none of the above steps work, contact your device or graphics card manufacturer’s customer care for further assistance. You can also opt for a professional to troubleshoot the issue.
Stay Away From Display Issues on Windows
You don’t want to be stuck in the middle of a project with display problems. The steps mentioned above should help you reset your graphics driver and fix any display issues that you may have been experiencing on your system.
Apart from that, make sure that you regularly update your graphics drivers and Windows version. Also, ensure that all your hardware components are in top-notch condition, and check for any loose connections before starting work on your PC.
]]>This Article Describes Revive Faulty Display on Windows 11 with New DriverStrategies for Win11's Update Failurehttps://win11-tips.techidaily.com/strategies-for-win11s-update-failure-0x30017/2024-10-25T16:44:01.340Z2024-10-26T11:05:35.840ZStrategies for Win11’s Update Failure #0X30017
The update error 0xC1900101 – 0x30017 pops up when the users try to either install a system update or upgrade to the latest Windows version. There can be a number of reasons behind this issue, such as insufficient space for the update, antivirus installation, and corruption issues within the system.
The following sections discuss the possible causes and troubleshooting methods for this error. Select the troubleshooting method that is most appropriate for your situation and proceed with it.
Disclaimer: This post includes affiliate links
If you click on a link and make a purchase, I may receive a commission at no extra cost to you.
What Causes the 0xC1900101 – 0x30017 Error?
Here are some common reasons behind the update error under consideration:
Insufficient space - You must have at least 16 GB of free space to upgrade to the latest version of Windows. If you have insufficient space on your computer, you can try removing the unnecessary, junk files to make space for the upgrade.
Antivirus interruption - Your third-party antivirus program or Windows Defender might be blocking the update as a result of a false alarm. If this scenario is applicable, you can try disabling or uninstalling the program to fix the problem.
Corrupt system files - The essential system or update files can be facing a corruption issue, which is leading to the update installation failure. Later in this guide, we discuss a couple of methods you can try to resolve these bugs and generic corruption errors.
Outdated drivers - All the installed drivers should be up-to-date for the system to successfully upgrade. It is best to look for outdated drivers in the Device Manager and upgrade them before you attempt to install the updates.
Outdated BIOS - Your BIOS itself might be outdated, affecting your system’s functioning and causing issues like the update error. In most cases, if your BIOS is outdated or faulty, you will also face common issues like a Blue Screen of Death.
Now that we know about the potential causes of the issue, let’s take a look at the solutions you can try to resolve the problem. Before proceeding, we recommend that you remove any unnecessary external peripherals like USB from your computer.
1. Free Up Storage Space
As we mentioned earlier, you must have at least 16 GB of free space on your system to install new updates. If you do not have storage space, the best way to clear it is by deleting the unnecessary apps and programs you have installed on your computer.
Apart from that, it also will be a good idea to remove the previous installation files from the system. In addition to clearing the space, this will also solve any interruption issues that these previous installation files may cause during the upgrade process. In case you are using two SSDs on your computer, remove one and then try installing the update.
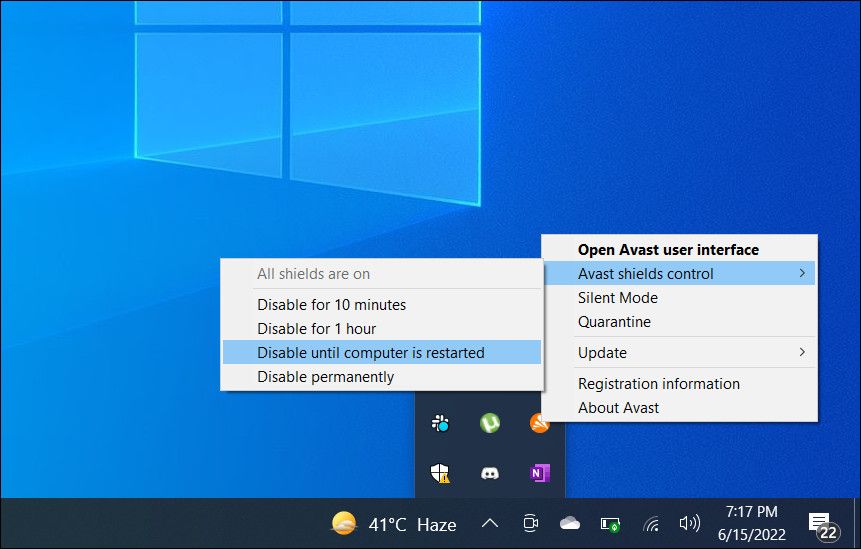
If you are using a third-party antivirus program on your computer, it may be blocking the system’s process of installing updates. The solution in this case is simple, as all that you need to do is disable or uninstall the security program temporarily.
Below, we have discussed the steps of disabling the antivirus using Avast. The steps for your antivirus program might differ slightly.
Here is how you can do that:
Right-click on theantivirus program icon in the taskbar.
ChooseShields control >Disable until the computer is restarted .
If you are not using a third-party security program, you can trydisabling Windows Defender as well. However, we highly recommend that you enable it back after installing the update. Keeping it disabled for a long time can expose your system to risks and potential threats.
3. Rule Out Corruption Issues
The next thing that we recommend doing is scanning the system for corruption issues using the built-in troubleshooting utilities in Windows.
To fix this, we will be using the Windows update troubleshooter, System File Checker, and DISM to find potential issues. Additionally, these utilities will resolve most of the problems they find on their own.
3.1 Use the Windows Update Troubleshooter
You can run the Windows Update troubleshooter via Windows Settings. Instructions on how to run the troubleshooter can be found in our guide onhow to fix Windows Update getting stuck .
Once the troubleshooter has finished scanning, check if any issues are identified. If so, the troubleshooter will recommend fixes that can resolve the issue. Click onApply this fix to proceed. In case the utility fails to identify the issues, click on Close the troubleshooter and move to the next method below.
As the name suggests, the System File Checker scans the protected system files for problems and replaces the unhealthy file components with their cached counterparts. DISM, on the other hand, is responsible for repairing a corrupt system image.
Hopefully, if the system cannot install updates because of corruption issues, these tools will eliminate the problem.
4. Update Your Drivers
Ideally, your drivers must be kept up-to-date at all times for the system to function smoothly. To check if there are any outdated drivers on your system, head over to the Device Manager utility.
Expand all sections, and look for any drivers with a yellow exclamation mark. This sign indicates that the driver is either outdated or corrupt. Once you have identified a faulty driver, right-click on it and chooseUpdate driver >Search the system for drivers .
Wait for the update process of the driver complete and check if the issue is resolved.
Finally, the issue can also be caused due to a bug or corruption issues within the BIOS. Fortunately, you can resolve most of these issues by updating the BIOS to the latest available version.
It’s good practice to update your BIOS when a new version comes out. And there are plenty ofreasons why you should update your PC’s BIOS , including unlocking additional hardware support.
Different motherboard manufacturers have different instructions for this, so we recommend visiting the manufacturer’s website for more information. Keep in mind, this can be a nerve-wracking and time-consuming process, so only proceed when you have enough time to spare.
Now You Can Upgrade Windows to the Latest Build
By now, you should be able to upgrade your operating system to the latest available version. In case nothing the troubleshooting methods above do not help, we recommend proceeding with a clean installation. This will automatically upgrade the system without any errors during the procedure.
]]>This Article Describes Strategies for Win11's Update FailureSecure Your PC with a Tailored Lock Pattern on Windows 11https://win11-tips.techidaily.com/secure-your-pc-with-a-tailored-lock-pattern-on-windows-11/2024-10-25T16:38:09.430Z2024-10-26T13:27:05.602ZSecure Your PC with a Tailored Lock Pattern on Windows 11
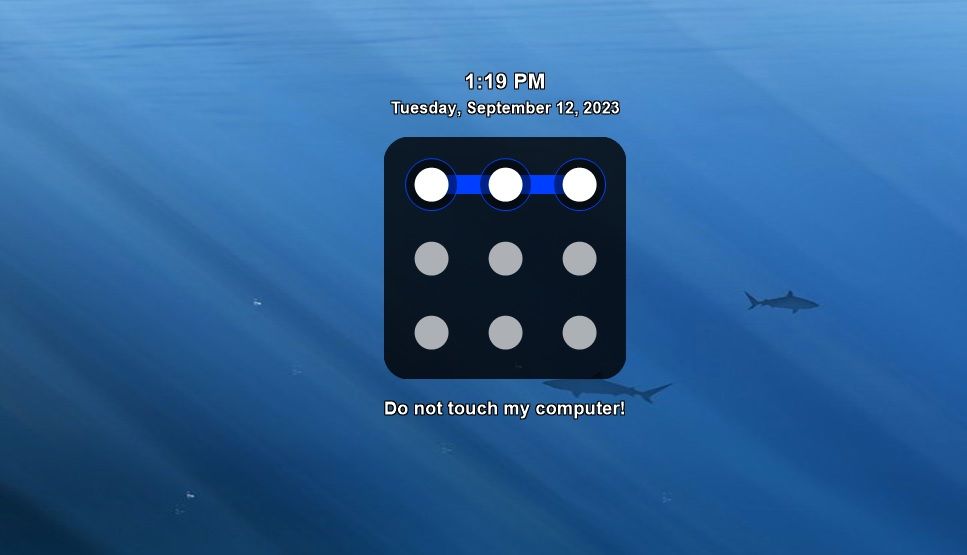
A pattern lock is a login method for securing a device with a preset pattern. It enables you to sign in to a device by inputting a unique pattern for connecting multiple circles. The Meta Quest 2 VR headset is an example of one device for which users must set pattern locks.
Most users secure their Windows PCs with passwords or PINs. However, you can also secure your PC by adding a custom pattern lock with 9Locker or Eusing Maze Lock. This is how you can set up a pattern lock for Windows 10 and 11 with those software packages.
Disclaimer: This post includes affiliate links
If you click on a link and make a purchase, I may receive a commission at no extra cost to you.
How to Add a Custom Pattern Lock With 9Locker
9Locker is freeware software with which you can set a pattern lock for a 3x3 grid. Then you can lock Windows with that pattern by running the software whenever you need to temporarily vacate your PC. This software also has additional features like an alarm and email alerts. You can set up a custom pattern lock with 9Locker as follows:
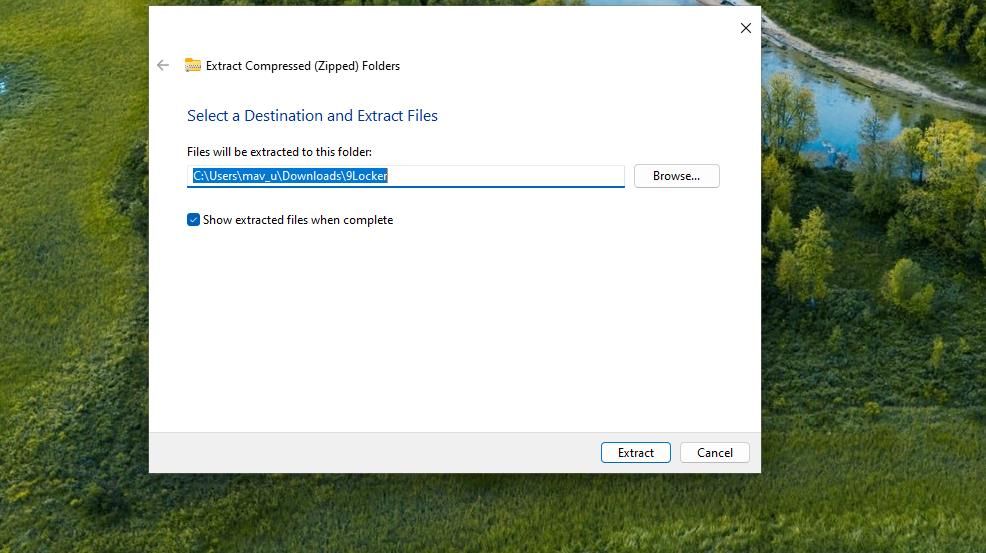
Open the 9Locker page on the Softpedia website and download the file.
Double-click the 9LockerSetup.exe file to bring up the installer.
Click Next once and select the I accept the terms in the license agreement radio button.
Then click Next to proceed with installation.
Press the setup wizard’s Finish button after installing 9Locker.
Now that 9Locker is installed, it’s time to set up a pattern:
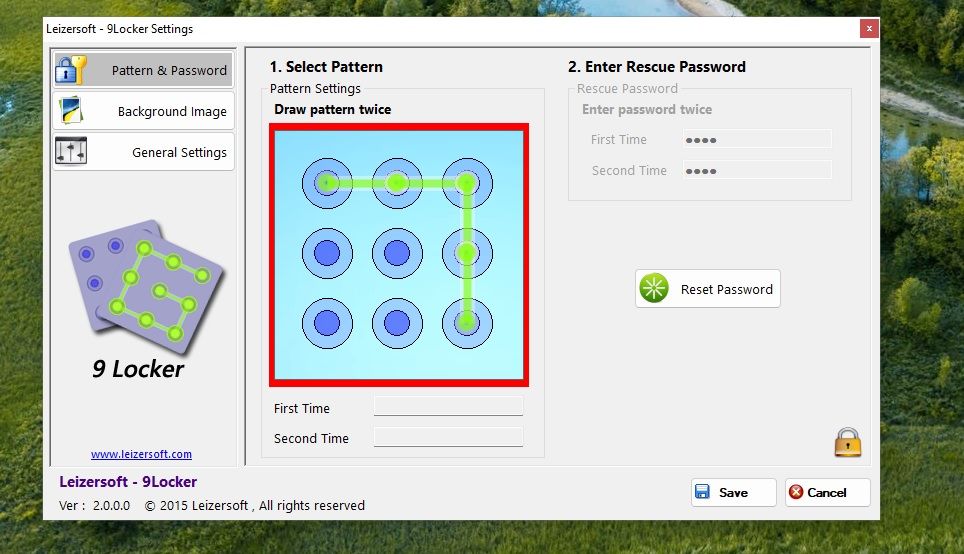
Open the 9Locker window by double-clicking that software’s desktop shortcut.
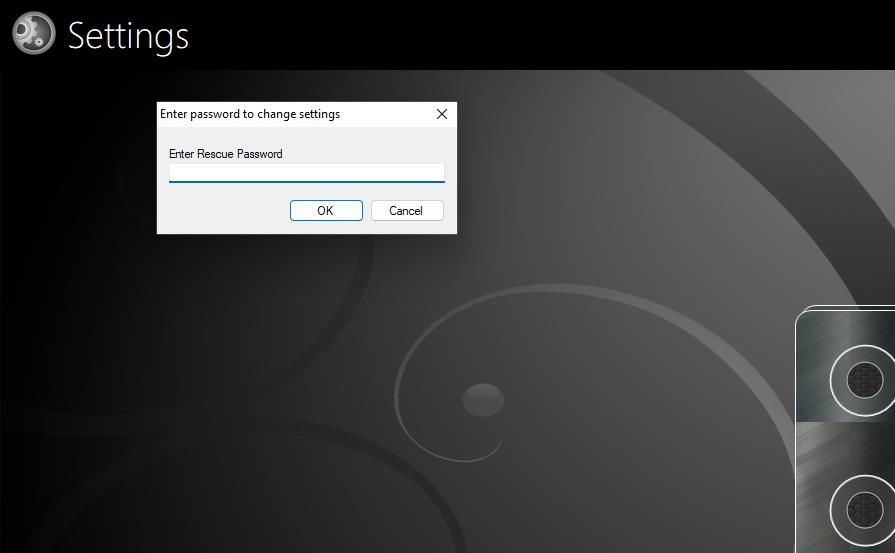
You’ll be prompted to input a pattern password after launching 9Locker for the first time. Click OK on the First Pattern window to remove the prompt.
Draw two matching patterns on the 3x3 grid to set a lock.
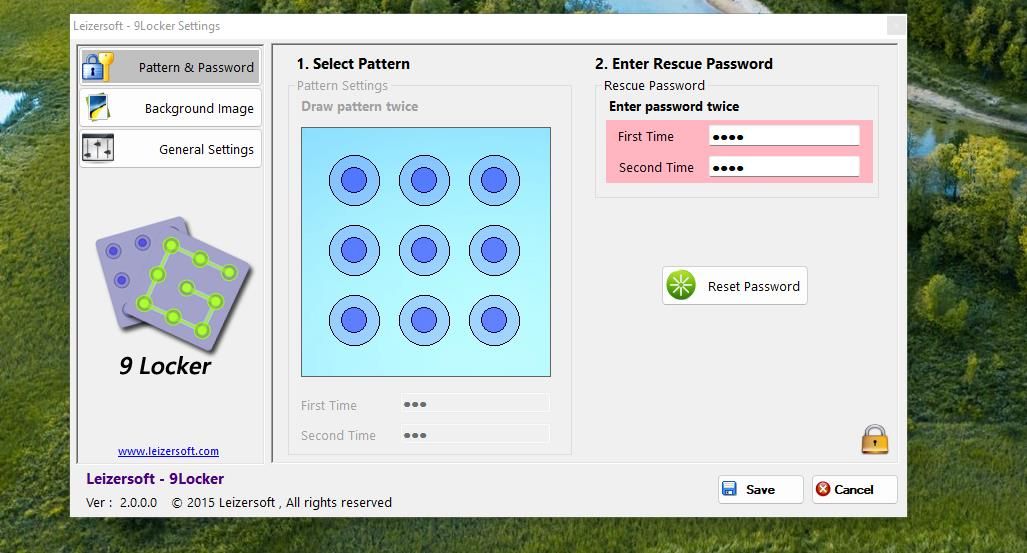
Click OK on the Rescue Password prompt that pops up.
Input a matching password within the First Time and Second Time text boxes.
Click Save to set your new pattern lock.
Now you can lock Windows anytime by activating the pattern lock. Double-click the 9Locker desktop shortcut to activate the pattern lock screen. Drag the mouse cursor across the circles on the 3x3 grid while pressing the left button to input the set pattern for unlocking Windows.
How to Customize 9Locker
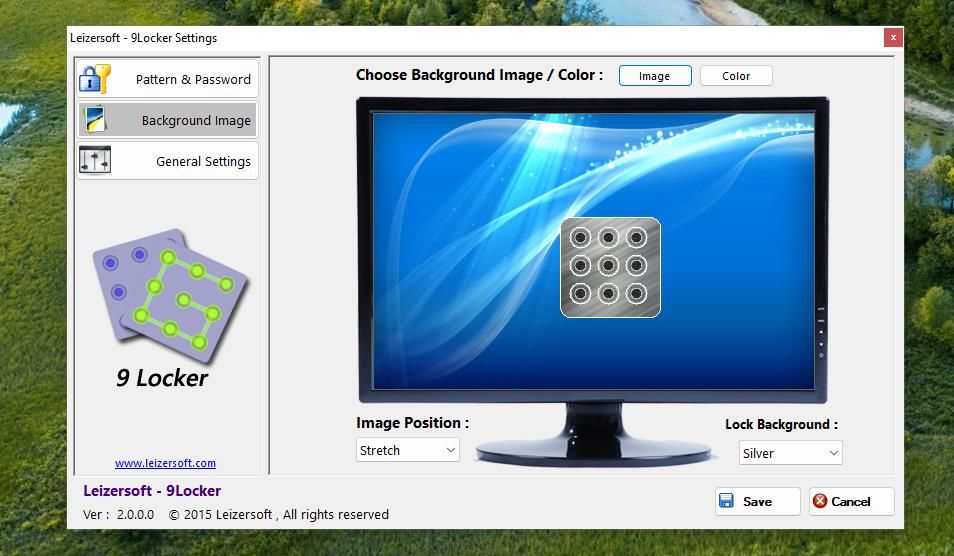
To access the 9Locker settings window, you’ll need to input your rescue password instead. Click Settings at the top left of the pattern lock screen. Input your rescue password and select OK.
You can select a different background image for the pattern lock screen. To do so, click the Background Image tab. Then click Image and choose one of the eight wallpapers for the pattern lock screen. Or you can select a custom background image from another folder.
Alternatively, you can set a solid color for the background. Click the Color button on the Background image tab. Then choose a color on the palette and select OK.
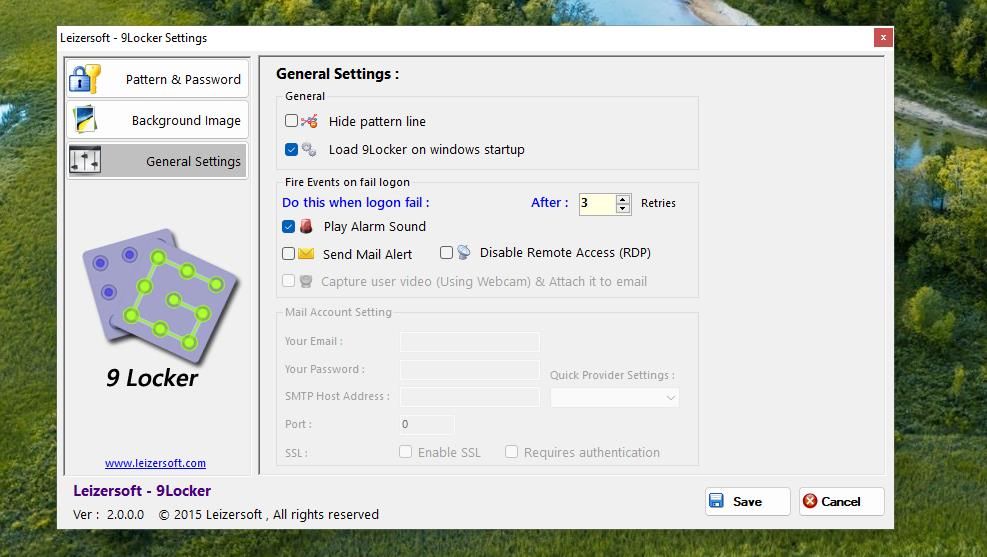
9Locker also has an alarm that’s set to go off after three failed pattern logins by default. There aren’t any sound settings for that alarm. However, you can disable it by deselecting the Play Alarm Sound checkbox on the General Settings tab. Or change the number of retries that set off that alarm by inputting a different value in the After box.
9Locker’s pattern lock screen should appear automatically with the Load 9Locker on Windows startup checkbox selected on the General Settings tab. However, I needed to add 9Locker to the startup folder to get the program to run at startup. If you need to do the same, check out how to utilize the Windows startup folder .
How to Add a Custom Patter Lock With Eusing Maze Lock
Eusing Maze Lock is an alternative to 9Locker that enables you to set a pattern lock on your Windows 11/10 PC much the same. However, this software also enables you to set locks on bigger 4x4 and 5x5 grids. This is how you can set up a pattern lock for your PC with Eusing Maze Lock:
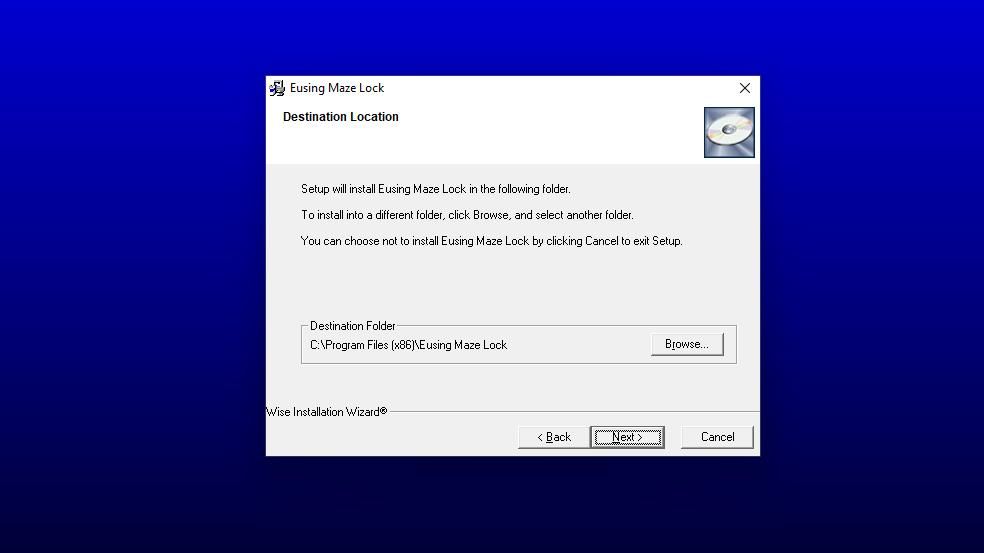
Click Next three times to install Eusing Maze Lock in a default Program Files directory.
Press the Finish button with the Launch Eusing Maze Lock checkbox selected.
An Eusing Maze Lock prompt for unlocking the preset pattern lock will appear. Click OK to close that prompt and bring up a configuration window.
Press the Reset Pattern button.
Select a 3 * 3, 4 * 4, or 5 * 5 pattern grid size on the drop-down menu.
Hold the left mouse button and drag your cursor over the circles to set a lock pattern.
Click OK on the reset lock pattern prompt.
Select Yes when asked to back up the lock pattern. Then select a backup folder and click Save.
Click OK on the Eusing Maze Lock window.
Now click the Eusing Maze Lock system tray icon or press the Windows key + Ctrl + A hotkey to bring up the lock screen for users to input the pattern lock you’ve set.
Inputting the correct pattern will remove the lock screen. You’ll set the alarm bells ringing if you input the wrong pattern a few times.
How to Customize Eusing Maze Lock
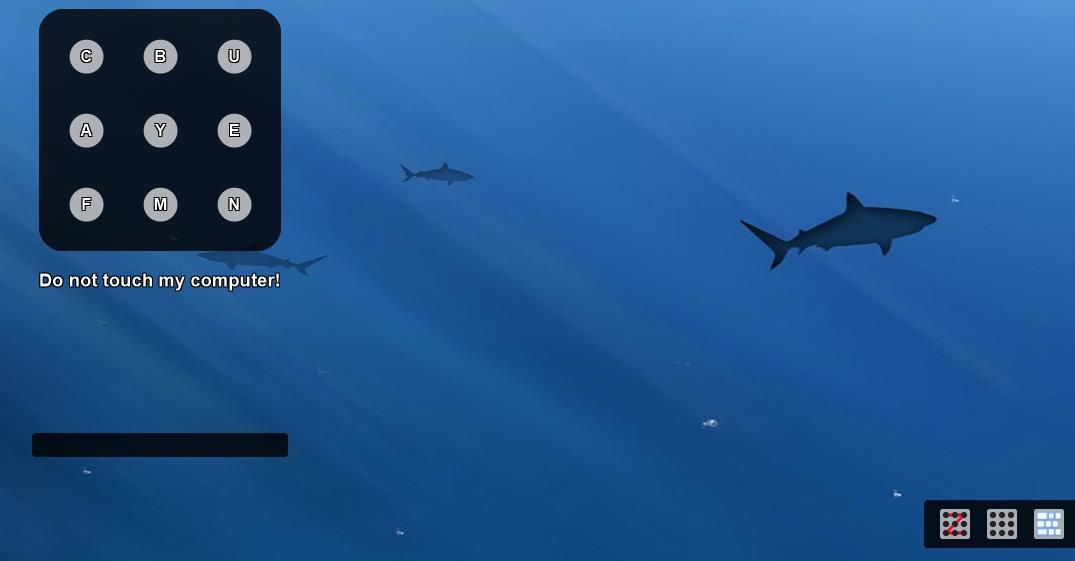
The Eusing Maze Lock pattern lock screen includes two alternative input options in the bottom right corner. Clicking the middle option will make the pattern lock invisible for more secure input. Or click the right button to input a pattern by pressing the keyboard letter keys for corresponding circles.
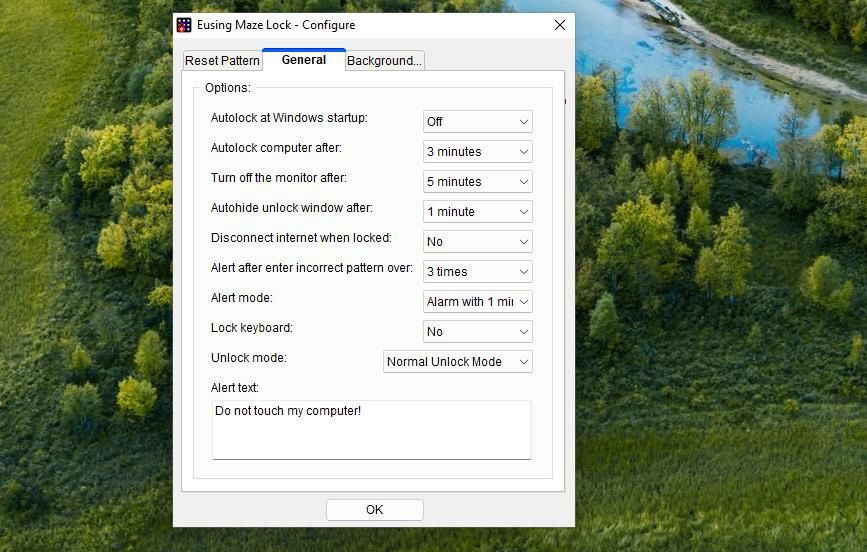
To access Eusing Maze Lock’s settings, right-click the software’s system tray icon, select Configure, input your pattern lock, and click the General tab. There you can add Eusing Maze Lock to the startup by selecting On from the Autolock at Windows startup drop-down menu.
Select an option on the Autolock computer after drop-down menu to set an inactive time for the pattern lock screen to automatically come on.
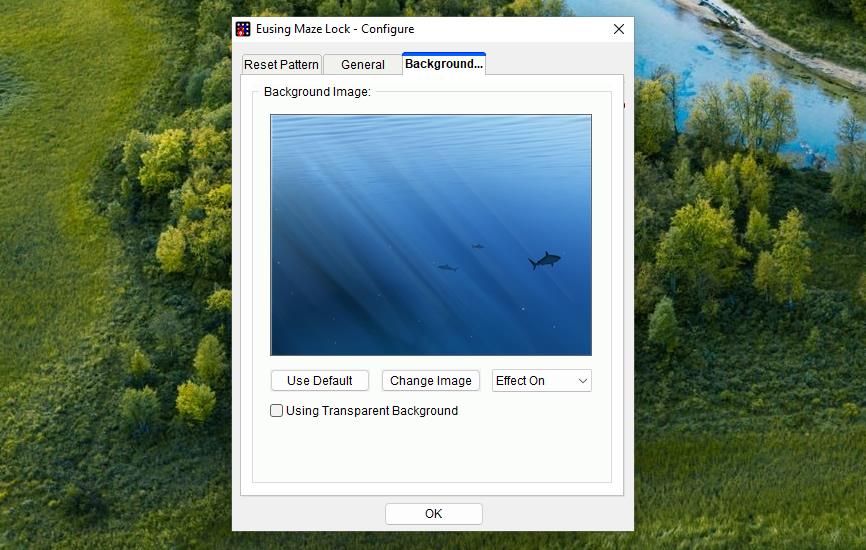
You can also set a custom wallpaper for the pattern lock screen on the Background tab. To do so, click the Change Image button to bring up a selection window. Select an image file for the background and click Open.
Lock Your Windows 10 or 11 PC Differently
Both Eusing Maze Lock and 9Locker provide an alternative to the standard Windows 10 OR 11 lock screen.
Admittedly, 3x3 (or even 5x5) pattern locks aren’t necessarily more secure than passwords. However, it can be easier to remember a pattern lock than a long password. The pattern lock screens’ alarms are also a unique security feature that the default Windows lock screen doesn’t offer.
Most users secure their Windows PCs with passwords or PINs. However, you can also secure your PC by adding a custom pattern lock with 9Locker or Eusing Maze Lock. This is how you can set up a pattern lock for Windows 10 and 11 with those software packages.
]]>This Article Describes Secure Your PC with a Tailored Lock Pattern on Windows 11Regain Your Favorite Windows Extras in 7 Simple Stepshttps://win11-tips.techidaily.com/regain-your-favorite-windows-extras-in-7-simple-steps/2024-10-25T16:33:28.086Z2024-10-26T08:05:49.231ZRegain Your Favorite Windows Extras in 7 Simple Steps
Optional features are those that you can add to get more functionality or support for certain file formats. For example, you can install different font packs or old Windows utilities like Paint and WordPad.
If you’re having trouble installing optional features, you’re not alone. Sometimes optional features may fail to install due to corrupt system files, an outdated Windows version, or incorrect configuration settings.
Fortunately, there are several ways to fix this problem and get the optional features running again. So, how can you fix the optional features not installing issue?
Disclaimer: This post includes affiliate links
If you click on a link and make a purchase, I may receive a commission at no extra cost to you.
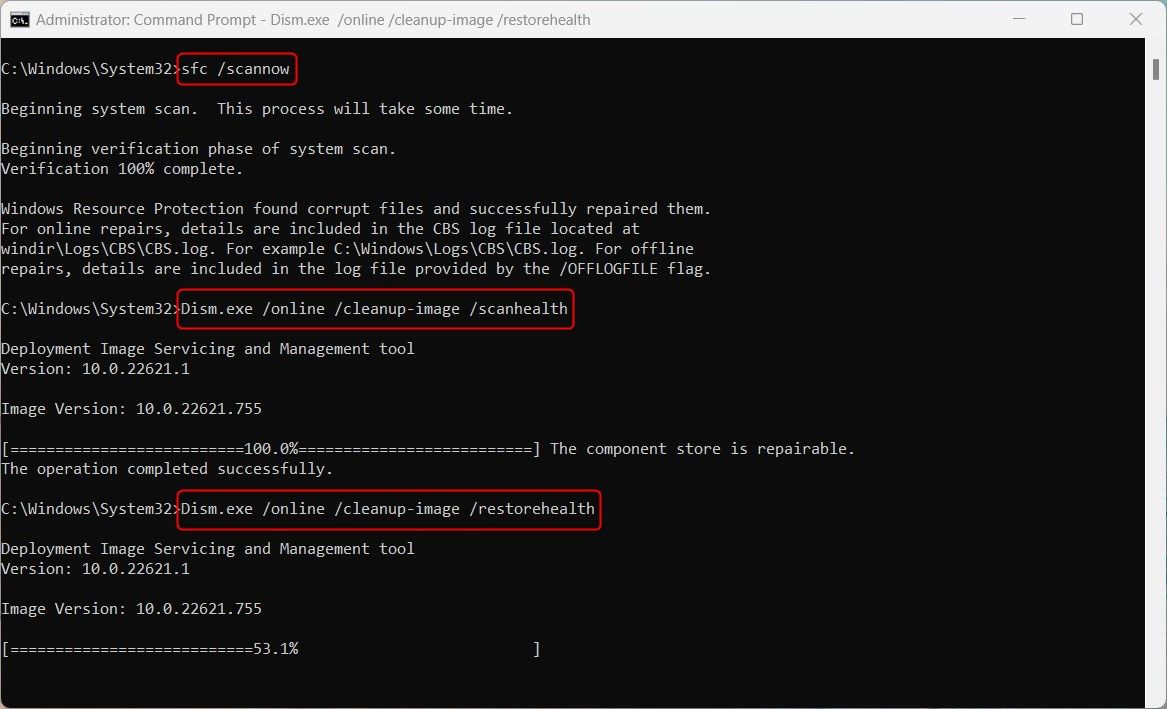
1. Use the DISM Tool
One of the first things you can try is using the Deployment Image Servicing and Management (DISM) tool. This tool is part of Windows, and you can use it to fix corrupt system files, including ones that could be causing problems when installing optional features.
To use the DISM tool, follow these steps:
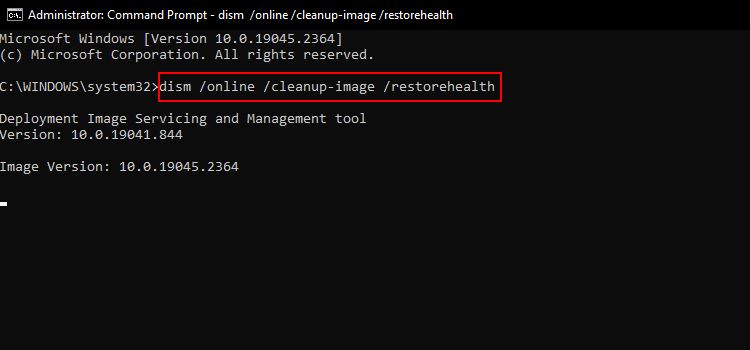
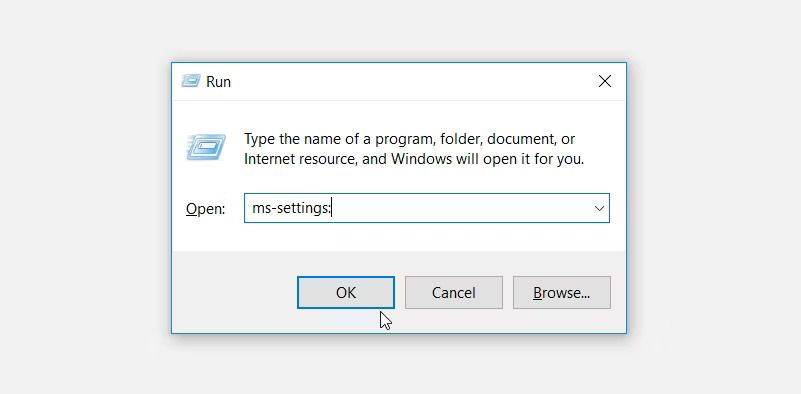
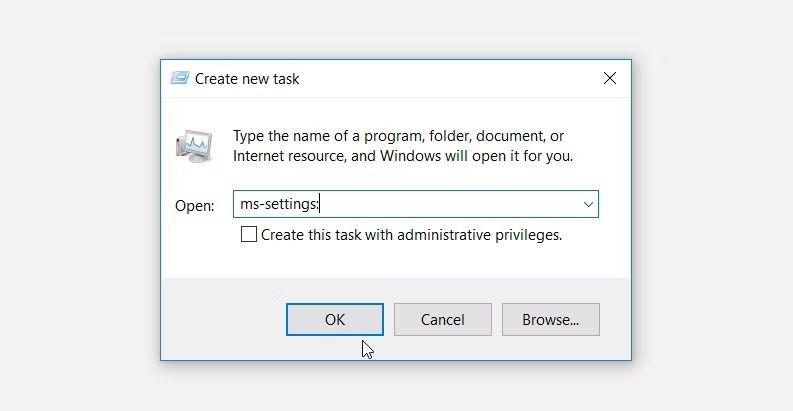
PressWin + Q to bring up the Windows search dialogue box.
Typecmd and clickRun as administrator to open the Command Prompt.
Typedism /online /cleanup-image /restorehealth and pressEnter .
This will start the DISM tool and begin scanning your system for any corrupt or missing files. If it finds any issues with your computer, it will automatically repair them.
Once the process is complete, you can restart your computer and try installing the optional feature again. If DISM does not work or throws an error code, make sure to go through theDISM not working fixes .
2. Run the System File Checker or SFC Utility
Another tool you can use to fix issues with optional feature installation is the System File Checker (SFC) utility.
SFC is a command-line utility on Windows, which means you can use it from the Command Prompt itself. It is a useful tool for troubleshooting and repairing problems with the system files on your computer, similar to the DISM tool.
To check your system using SFC, follow these steps:
Once SFC scans for errors, make sure to restart your computer.
Want to know the best part?
The best part is that the System File Checker not only helps you fix the optional features problem but also any other Windows issues. In fact, it’s one of the bestways to repair corrupted Windows files .
3. Reset the Windows Update Components
Windows Update Components include all the services, tasks, and programs that work together to make sure your Windows system is up-to-date and secure.
Resetting the Windows Update components might help solve the issue with optional feature installation. Here’s how you can reset the Windows Update components easily:
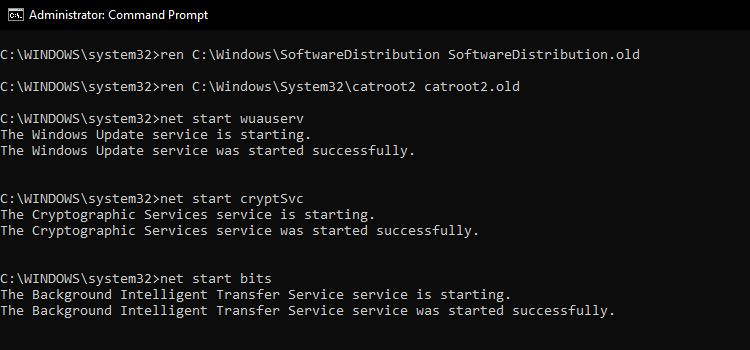
Open the Command Prompt utility as an administrator.
Type the following commands one after the other, pressingEnter after each one:
net stop wuauserv net stop cryptSvc net stop bits net stop msiserver ren C:\Windows\SoftwareDistribution SoftwareDistribution.old ren C:\Windows\System32\catroot2 catroot2.old net start wuauserv net start cryptSvc net start bits net start msiserver
This command will stop the Windows Update services, rename theSoftwareDistribution andcatroot2 folders, and then restart the services. This can help reset the update process and fix any issues that might be causing problems with optional feature installation.
While the commands may look intimidating, you don’t need to worry, as all the commands mentioned above will not cause any harm to your system.
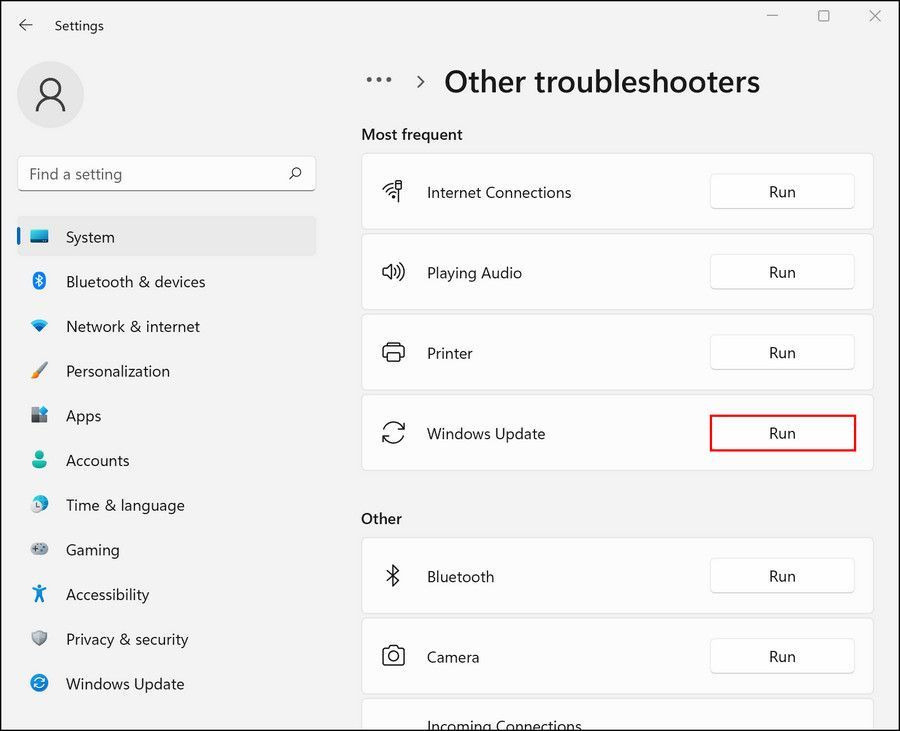
4. Run the Windows Update Troubleshooter
If the Command Prompt method did not work for you, you can use the Windows Update Troubleshooter to reset update components. This tool can help identify and fix problems with the update process, including issues that might be preventing optional features from installing.
Follow these steps to run the update troubleshooter on Windows:
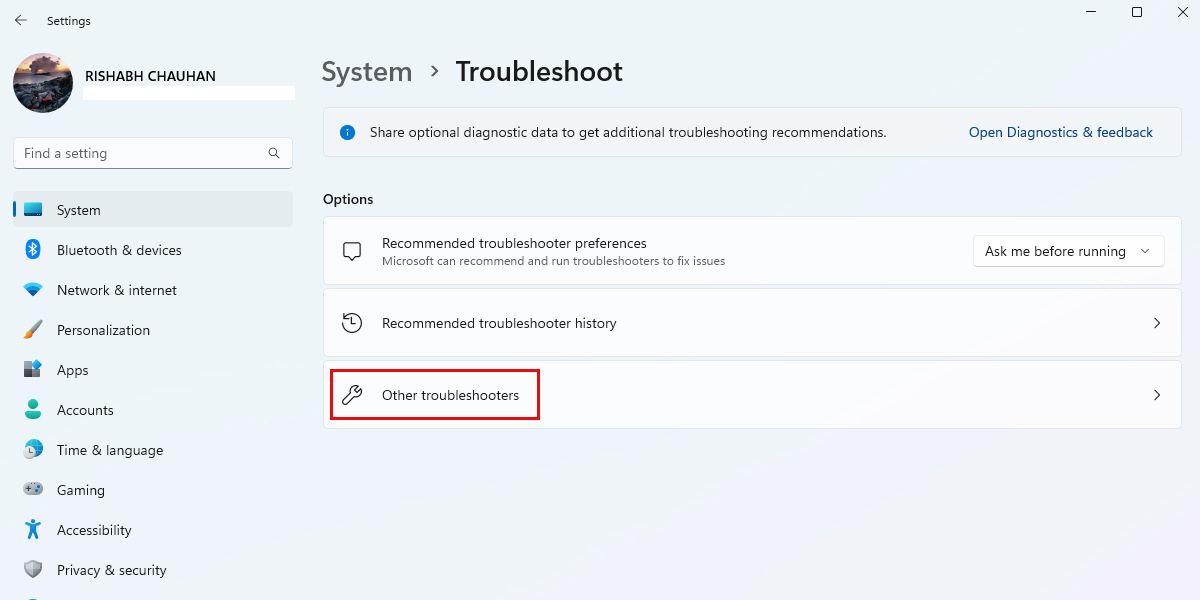
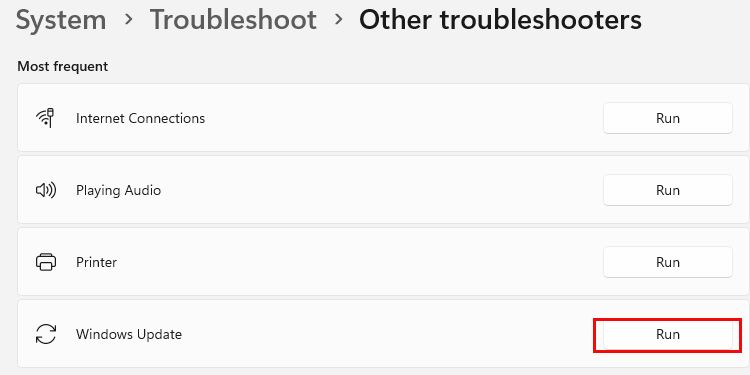
PressWin + I to launch the Settings app.
Scroll down and clickTroubleshoot > Other troubleshooters.
ClickRun next toWindows Update to run the troubleshooter.
Follow the prompts to complete the troubleshooting process.
If you’re using Windows 10, the Windows Update Troubleshooter is inSettings > Update & Security >Troubleshoot > Windows Update .
The troubleshooter will begin scanning your system for any issues with the update process and will offer suggestions for how to fix them. So, you just need to follow the prompts, and then tryinstalling the optional features again.
5. Update Windows to the Latest Version
If the issue with optional feature installation is related to outdated system files, you may be able to fix it by updating Windows to the latest version.
Updating Windows can help ensure that you have the latest security patches, bug fixes, and system files, which can help resolve any issues you may be experiencing.
Here’s how you can update Windows to the latest version:
PressWin + I to open the Settings app.
Click onWindowsUpdate > Check for updates on Windows 11. For Windows 10, click on Update & Security > Windows Update > Check for Updates .
That’s it. Now, you can install any update that is available for your computer.
By default, Windows automatically downloads and installs updates, but you can also check for updates manually by following the steps above.
6. Restart the Windows Module Installer Service
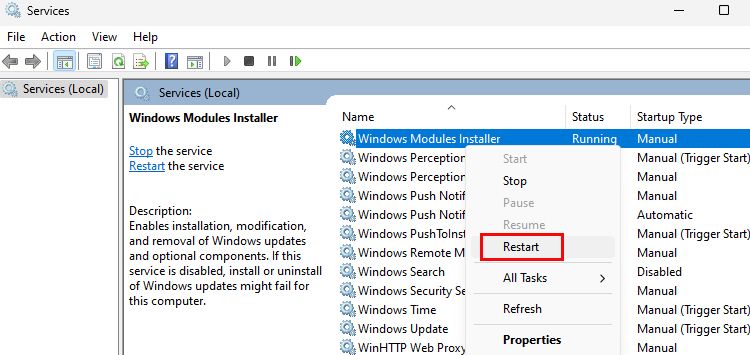
The Windows Module Installer service allows you to install, change, and remove Windows features and optional components. If it is not working properly, it can make it difficult to install optional features.
Follow the below-given steps to restart the Windows Module Installer service:
Open Windows search and typeservices .
Select the best match to open theServices app.
Scroll down and find theWindows Module Installer service.
Right-click on the service and selectRestart .
When you reset the module installer service, Windows tries to stop it and then start it again, which can help reset the installation process of optional features and fix any issues that might be causing problems.
Once the service restarts, try installing the optional feature again, and it should work now.
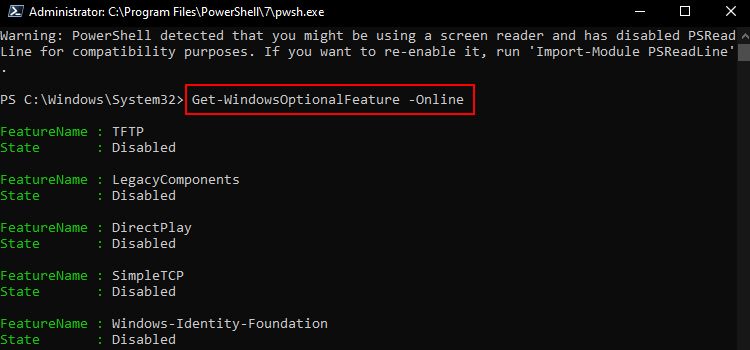
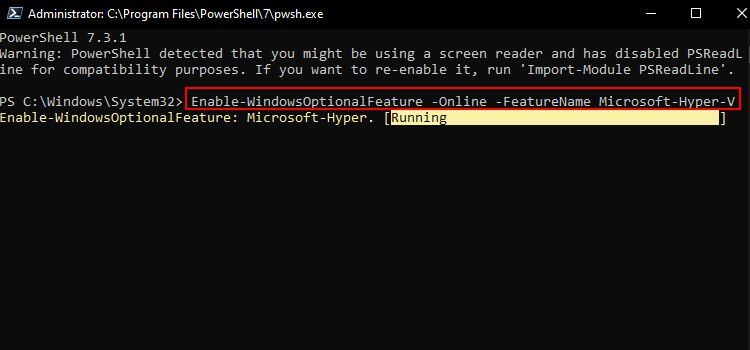
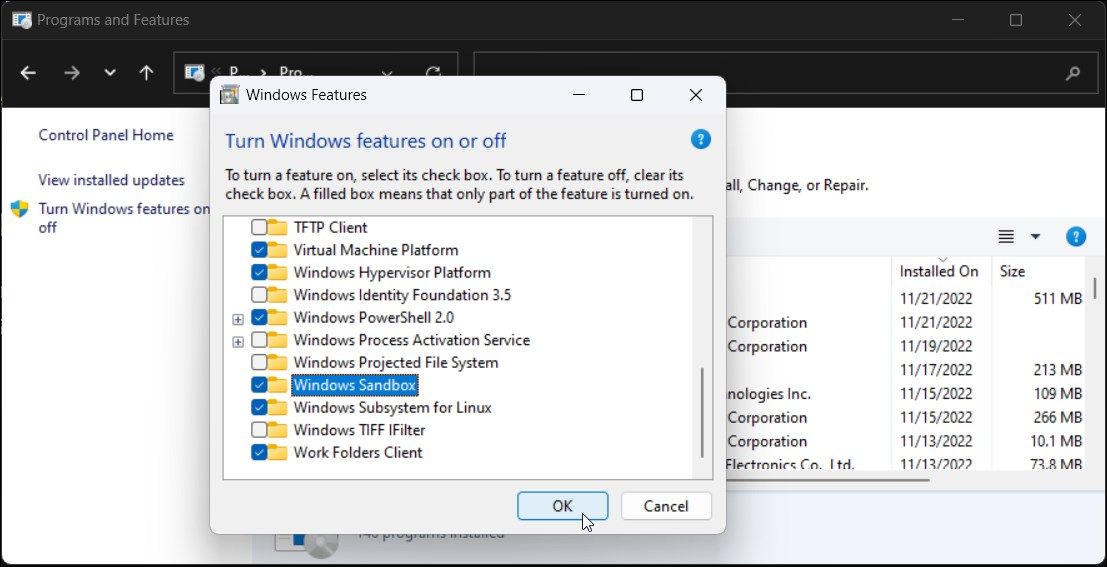
7. Restore Windows Features Using PowerShell
If all the above methods fail to work, restoring Windows features is your last resort. So, if you are unable to use or install an optional Windows feature, you might be able to fix the problem by using PowerShell to restore a particular feature.
Here are the steps for restoring Windows features using the PowerShell:
Type the following command and pressEnter : Get-WindowsOptionalFeature -Online This command will show you theFeatureName andState of every optional Windows feature that you can use. Make sure to copy the “FeatureName “ of the feature that you want to enable on Windows.
To turn on a certain feature, use the following command and replace “FEATURENAME “ with the feature’s name that you copied earlier: Enable-WindowsOptionalFeature -Online -FeatureName FEATURENAME
Restart your computer for the changes to take effect.
This will add the feature back to your system and should make it available for you to enable or disable in the features window.
This method only allows you to restore a specific feature and, not all the features at once. So, you need to copy and paste the same command and edit theFEATURENAME every time.
If these steps don’t fix the problem, you may need to ask Microsoft or a technical support professional for more help.
Get Back the Windows Optional Features
Hopefully, the issue with optional features not installing on your system should be fixed now. In any case, it is important to keep your system up-to-date and to follow best practices for maintaining your computer properly to help prevent issues like this from occurring.
]]>This Article Describes Regain Your Favorite Windows Extras in 7 Simple StepsUnveiling the Simple Steps for Changing Windows 11 Namehttps://win11-tips.techidaily.com/unveiling-the-simple-steps-for-changing-windows-11-name/2024-10-25T16:26:15.566Z2024-10-26T13:53:54.282ZUnveiling the Simple Steps for Changing Windows 11 Name
Have you got tired of using the same username for a long time? Were you assigned a random username when you created your account, but now you want to add a personal touch? If you want to change your username for any reason, Windows lets you do it easily. In fact, there are numerous ways to go about this. We have listed some of the simplest ones below.
Disclaimer: This post includes affiliate links
If you click on a link and make a purchase, I may receive a commission at no extra cost to you.
Before We Get Started…
Keep in mind that the first four methods discussed below can only be used to change the username of a local user account. If you use them to change the username of a Microsoft account, the change will be reversed the next time you restart your device.
So, if you want to change your Microsoft account username, we recommend directly using the last method—changing your username from Microsoft’s website. However, if you want to change the username of a local user account, you can use one of the first four methods mentioned below.
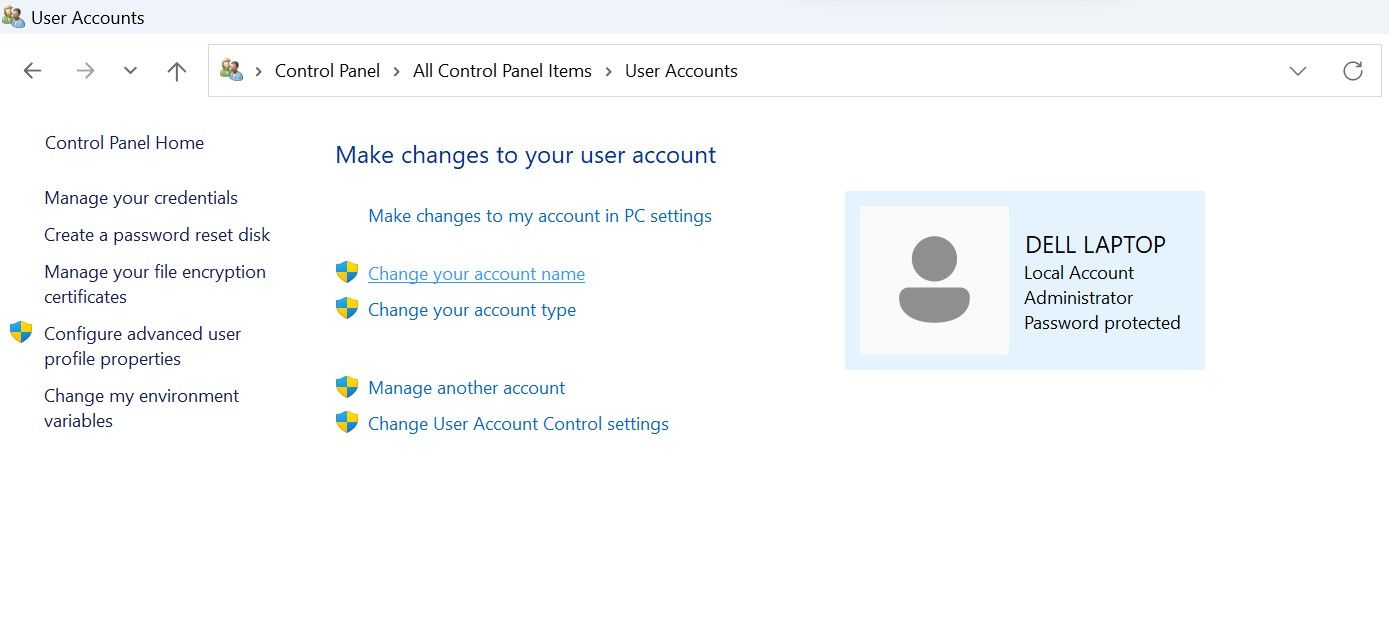
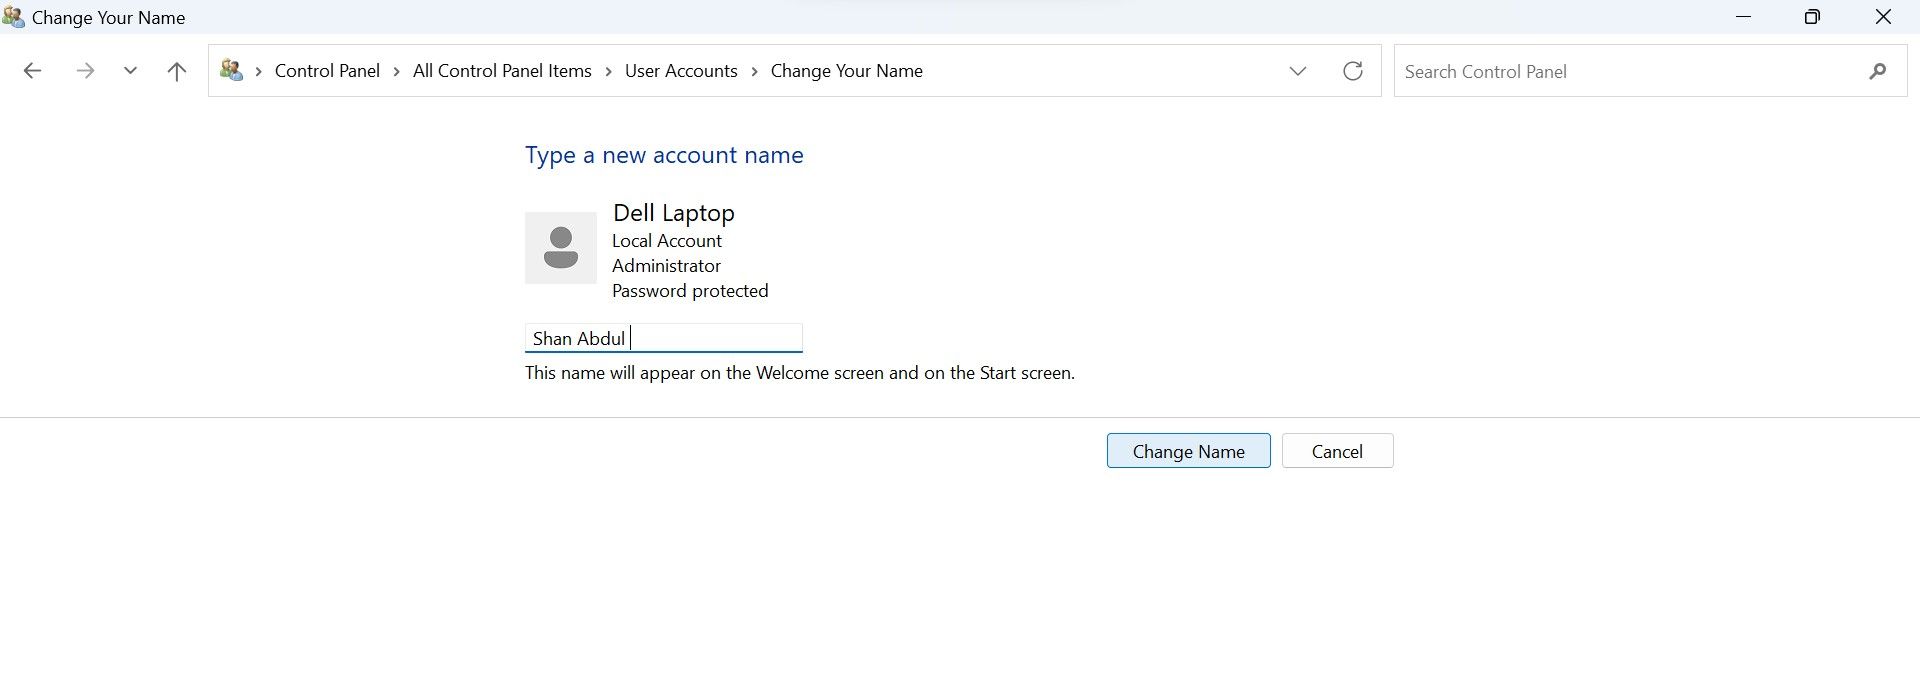
1. How to Change Your Username Using the Control Panel
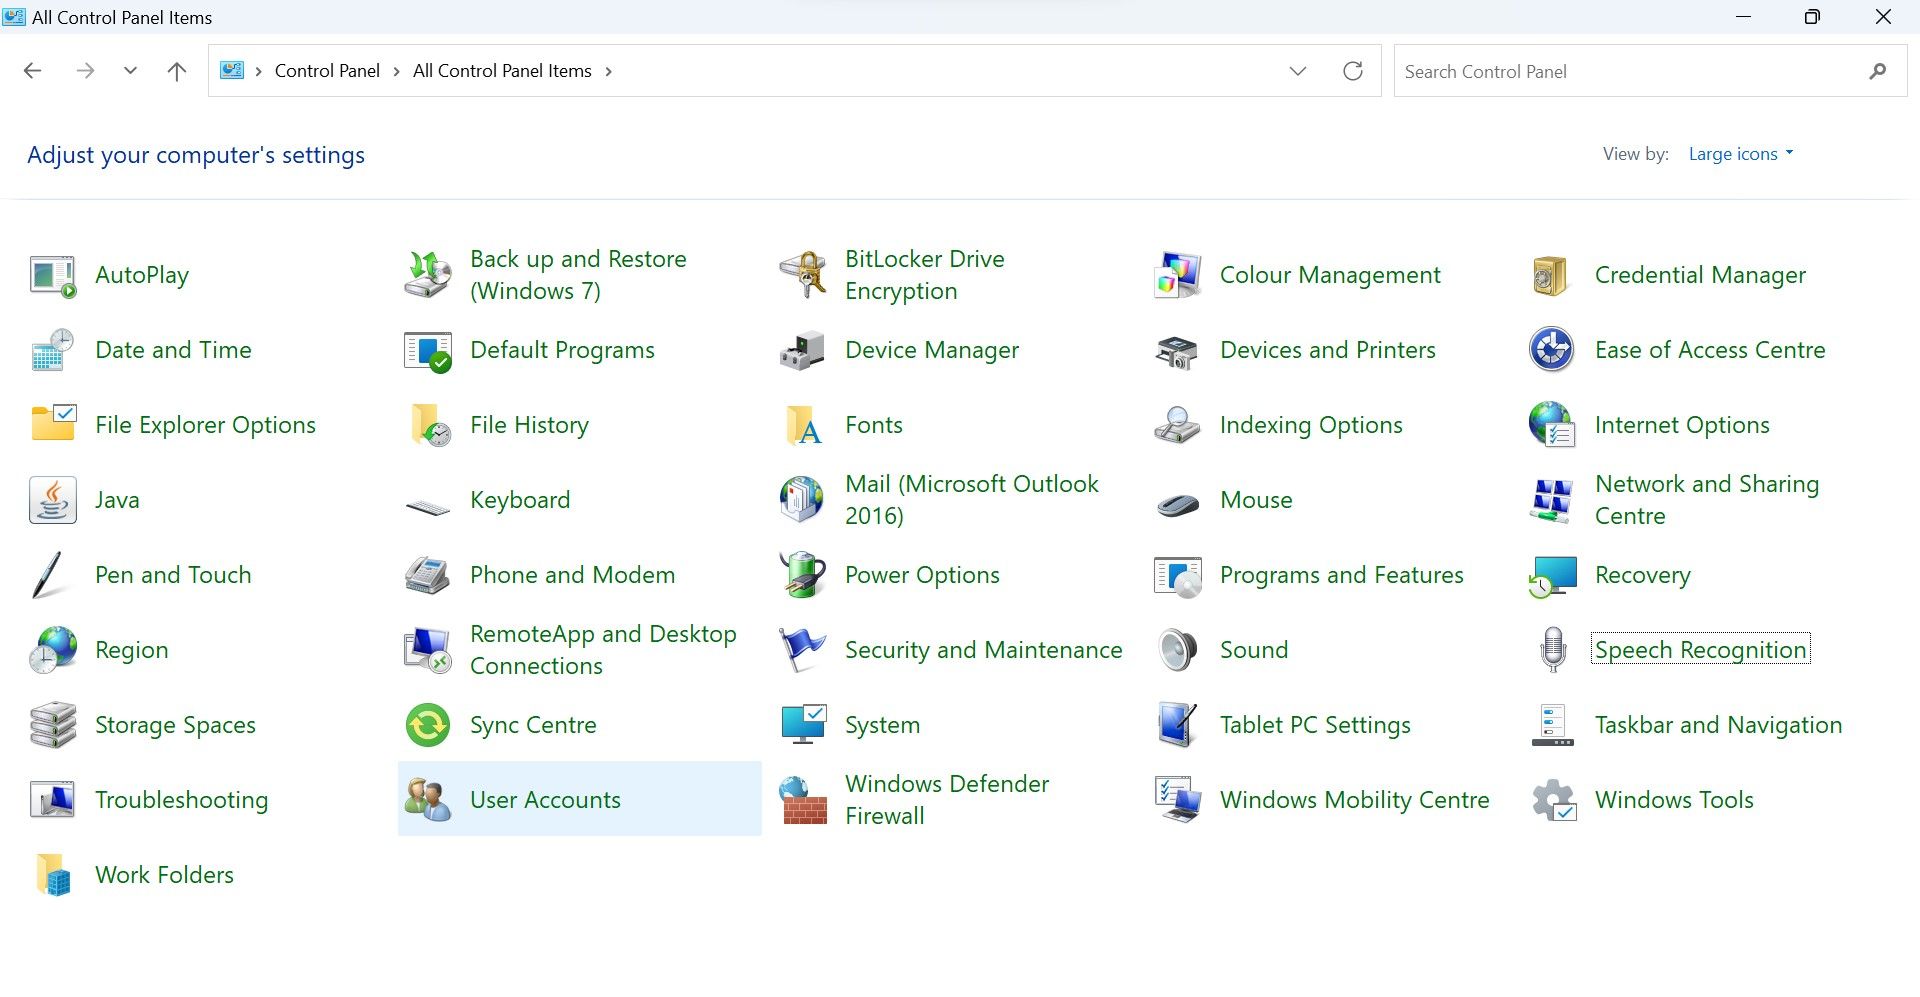
The Control Panel serves as the central hub in the Windows operating system. From changing the operating system’s appearance to configuring the connected hardware, the Control Panel allows users to tailor the entire OS. Among other customizations, users can change their usernames and manage their user accounts effectively.
To change your username using the Control Panel, follow these steps:
SelectLarge icons from theView by dropdown menu if it isn’t already selected.
Go toUser Accounts .
Click onChange your account name .
ClickYes in theUser Account Control (UAC) window.
In theNew account name field, type your new username.
After that, click onChange Name .
For this change to take effect, you need to sign out of your account and sign back in.
2. How to Change Your Username Using the Run Command
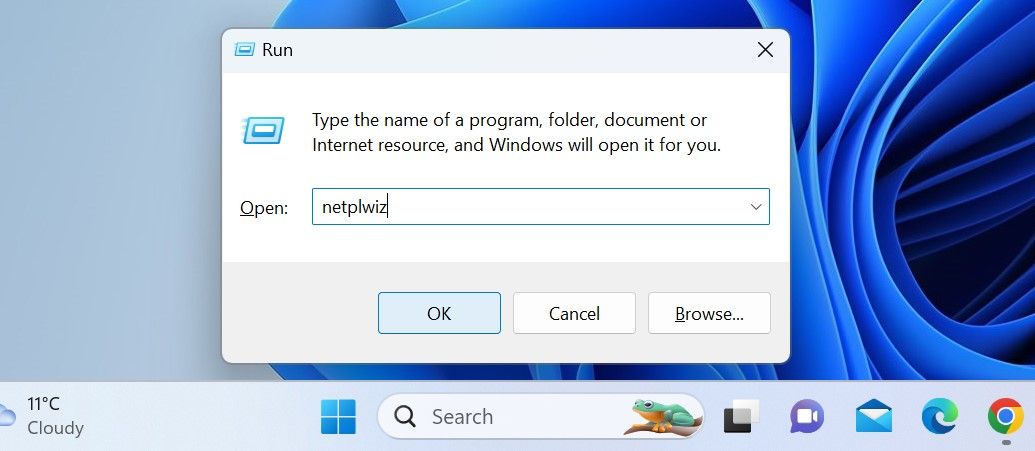
Using the Run command, Windows users can access any location on a computer whose path is known. It eliminates the need to navigate through numerous folders to reach our destination.
Using this utility, we can access the User Accounts settings via a simple command, “netplwiz,” which allows us to access the dedicated account management panel. From there, you can easily change your username.
To change your username using the Run command, follow these steps:
PressWin + R to launch theRun command .
Enter**”netplwiz”** in theRun command field and pressEnter .
ClickYes in theUser Account Control (UAC) window.
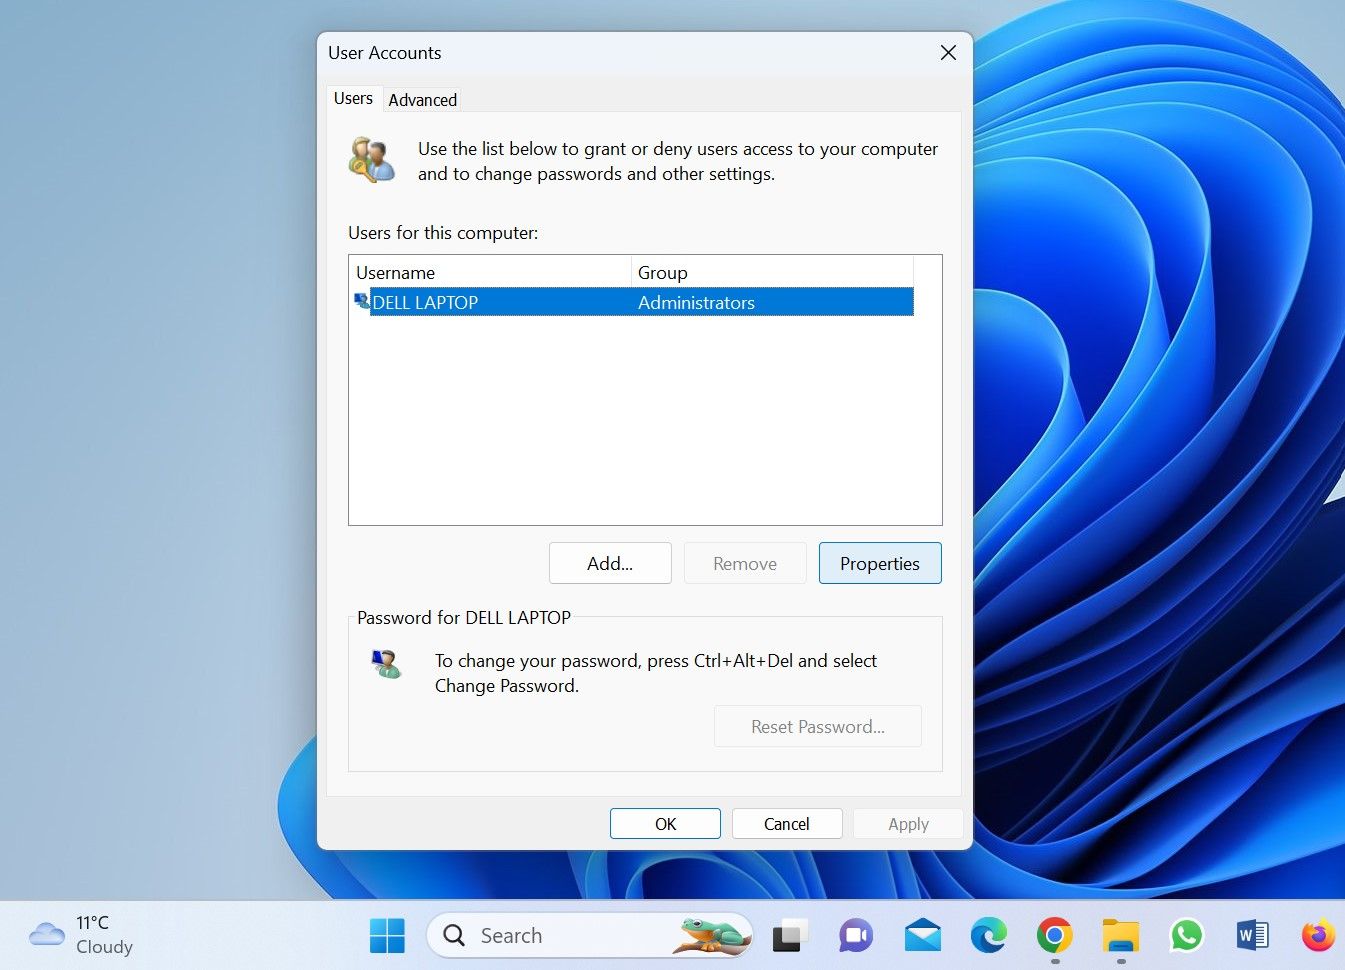
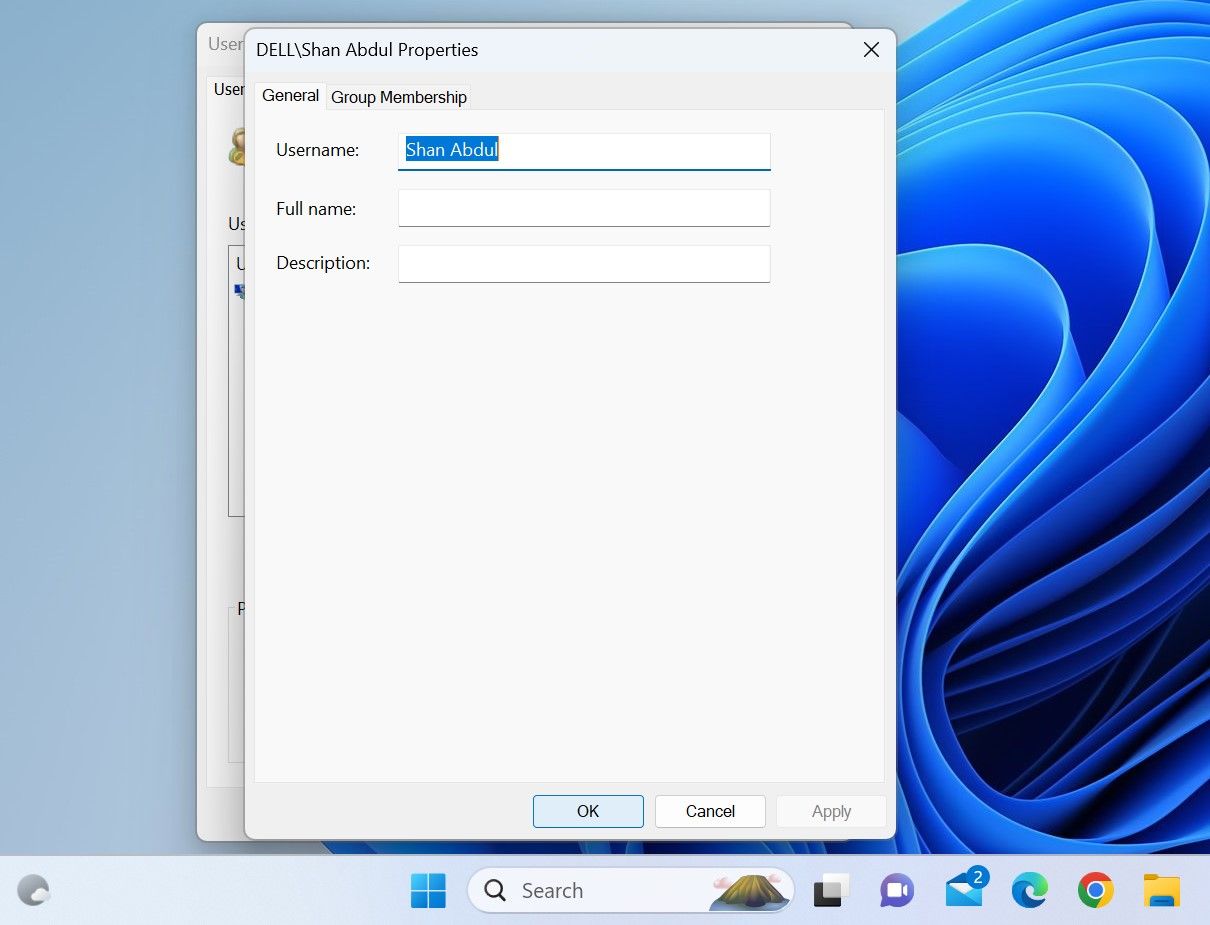
In theUser Accounts window, select the user account for which the username needs to be changed.
Click onProperties .
In theGeneral tab, you’ll see your existing username. Rename it to your liking after removing it.
Once the new username has been added, click theApply button andOK .
Then, log out of your account, and you’ll be greeted with your new username on the sign-in screen when you sign in.
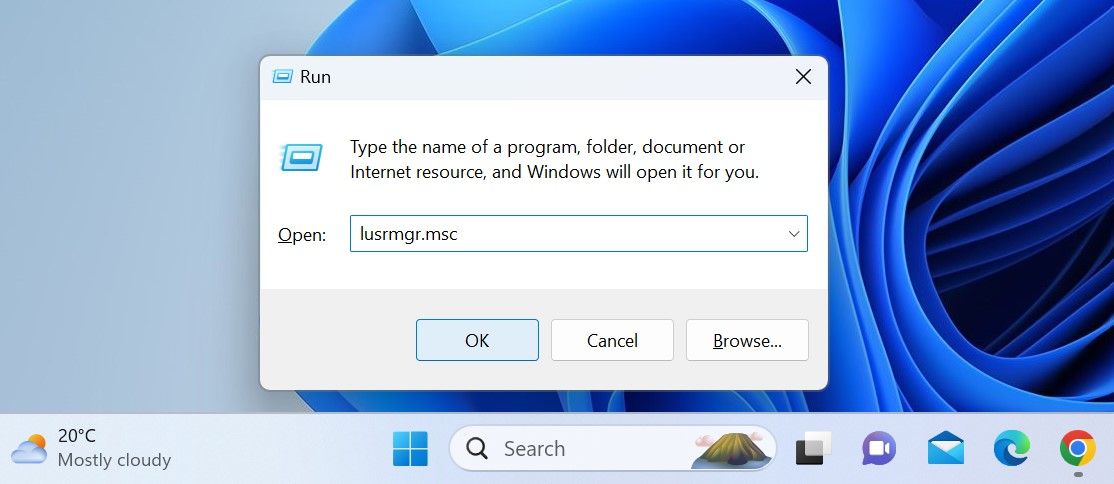
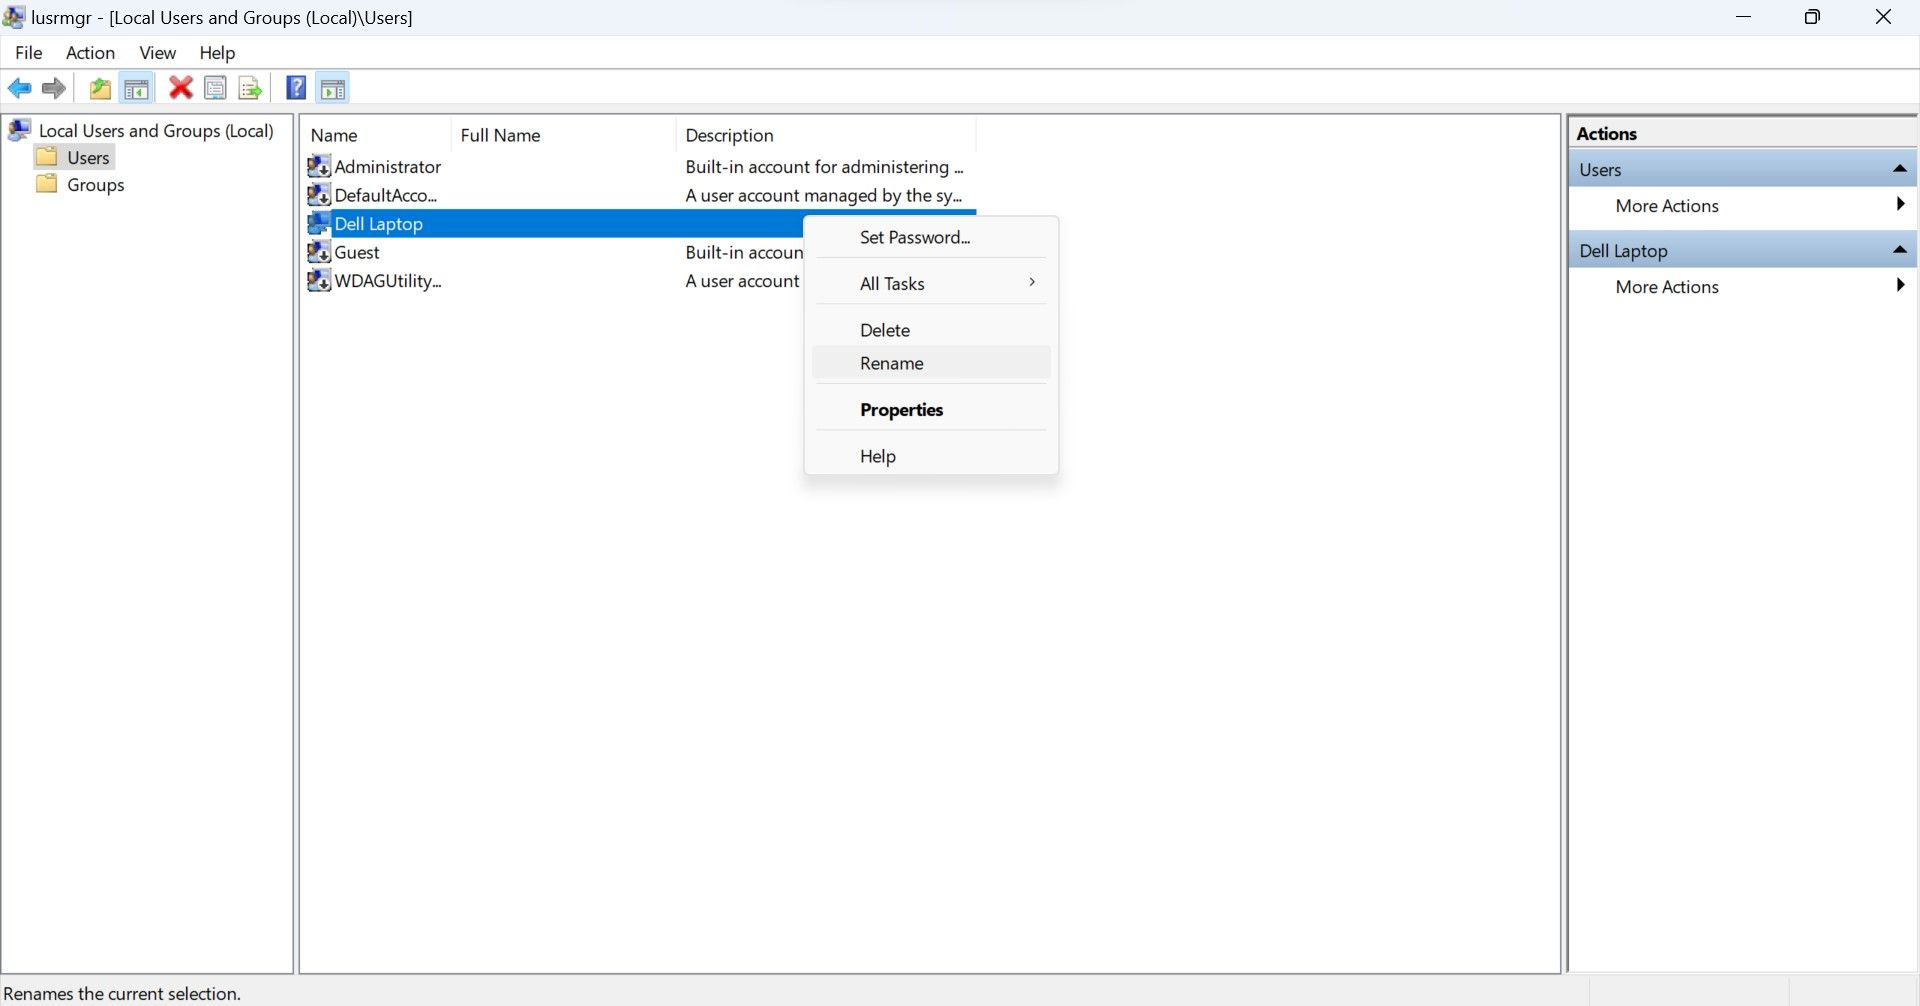
3. How to Change Your Username From Local User and Group Management Tool
If the “netplwiz” command does not work or gives an error when accessing the user account manager, you can use the local user and group management tool to change the username. This is the easiest way to modify your Windows username, as it allows you to simply rename your username directly—like you rename any folder.
Here’s how to change the username through the local user and group management tool:
PressWin + R to open the Run command.
Type**”lusrmgr.msc”** and pressEnter .
Click**”Yes”** in theUser Account Control (UAC) window.
Afterward, close the local user and group management tool, sign out of your account once, and you’ll see your new username on the sign-in screen.
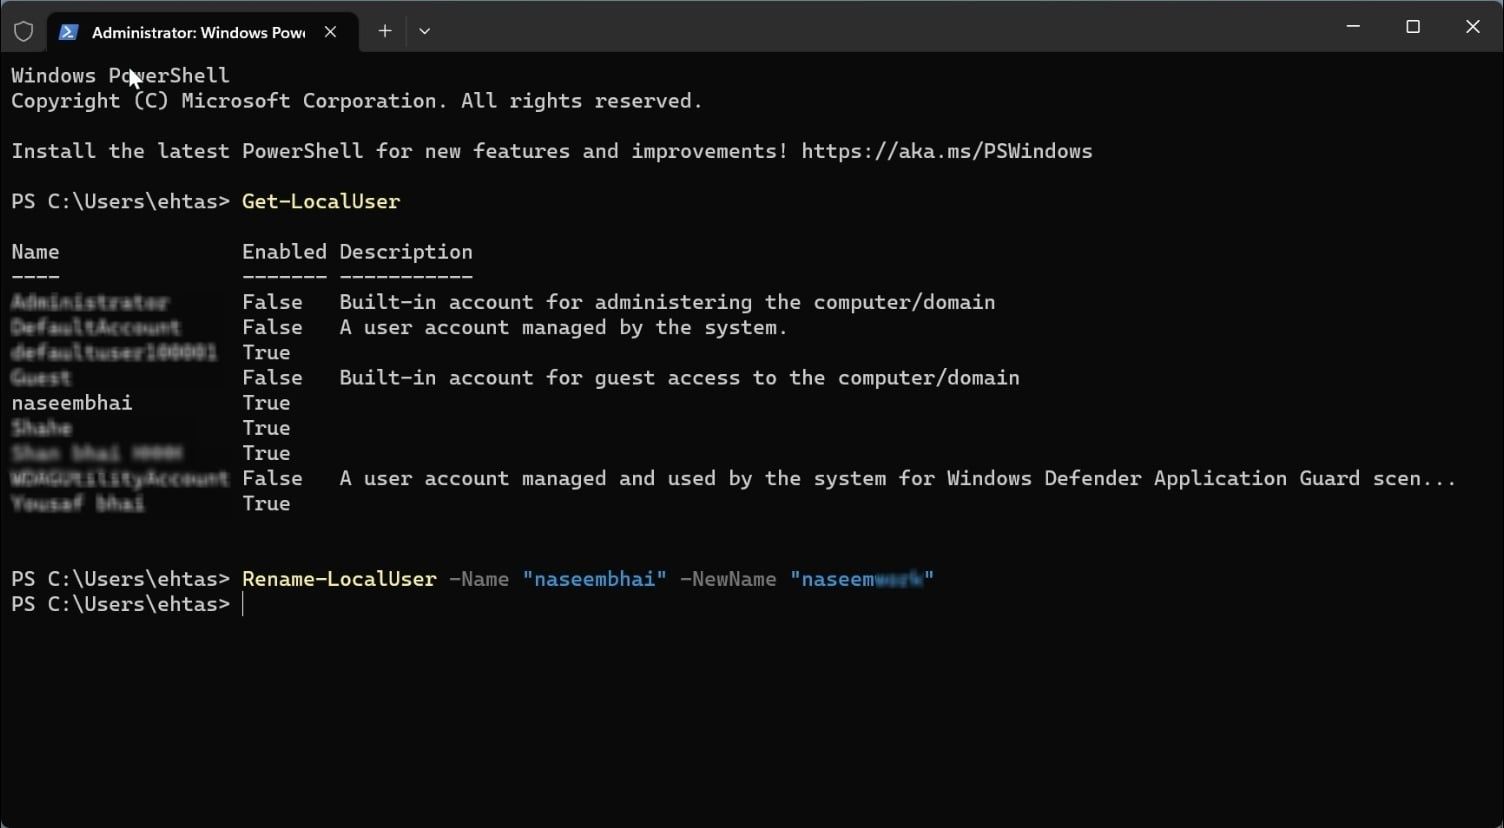
4. How to Change Your Username Using Windows PowerShell
Windows Powershell , an object-oriented automation engine, was designed primarily for IT administrators to automate tasks. Still, its simplicity and ease of use make it worthwhile for laypeople without programming experience.
Using its built-in cmdlets or writing custom scripts, you can make any changes to your Windows device that you usually make via GUI-based applications and settings. You can also change your username using it.
To change your username using the Windows PowerShell, follow these steps:
Type**”Windows PowerShell”** in Windows Search and open the Windows PowerShell app.
Type the following command and press Enter to find your current username: Get-LocalUser
Add the following command after entering your current username and the one you want to switch to: Rename-LocalUser -Name “Enter your current username” -NewName “Enter the new username”
HitEnter after adding the above command.
Then, log back into your account after logging out.
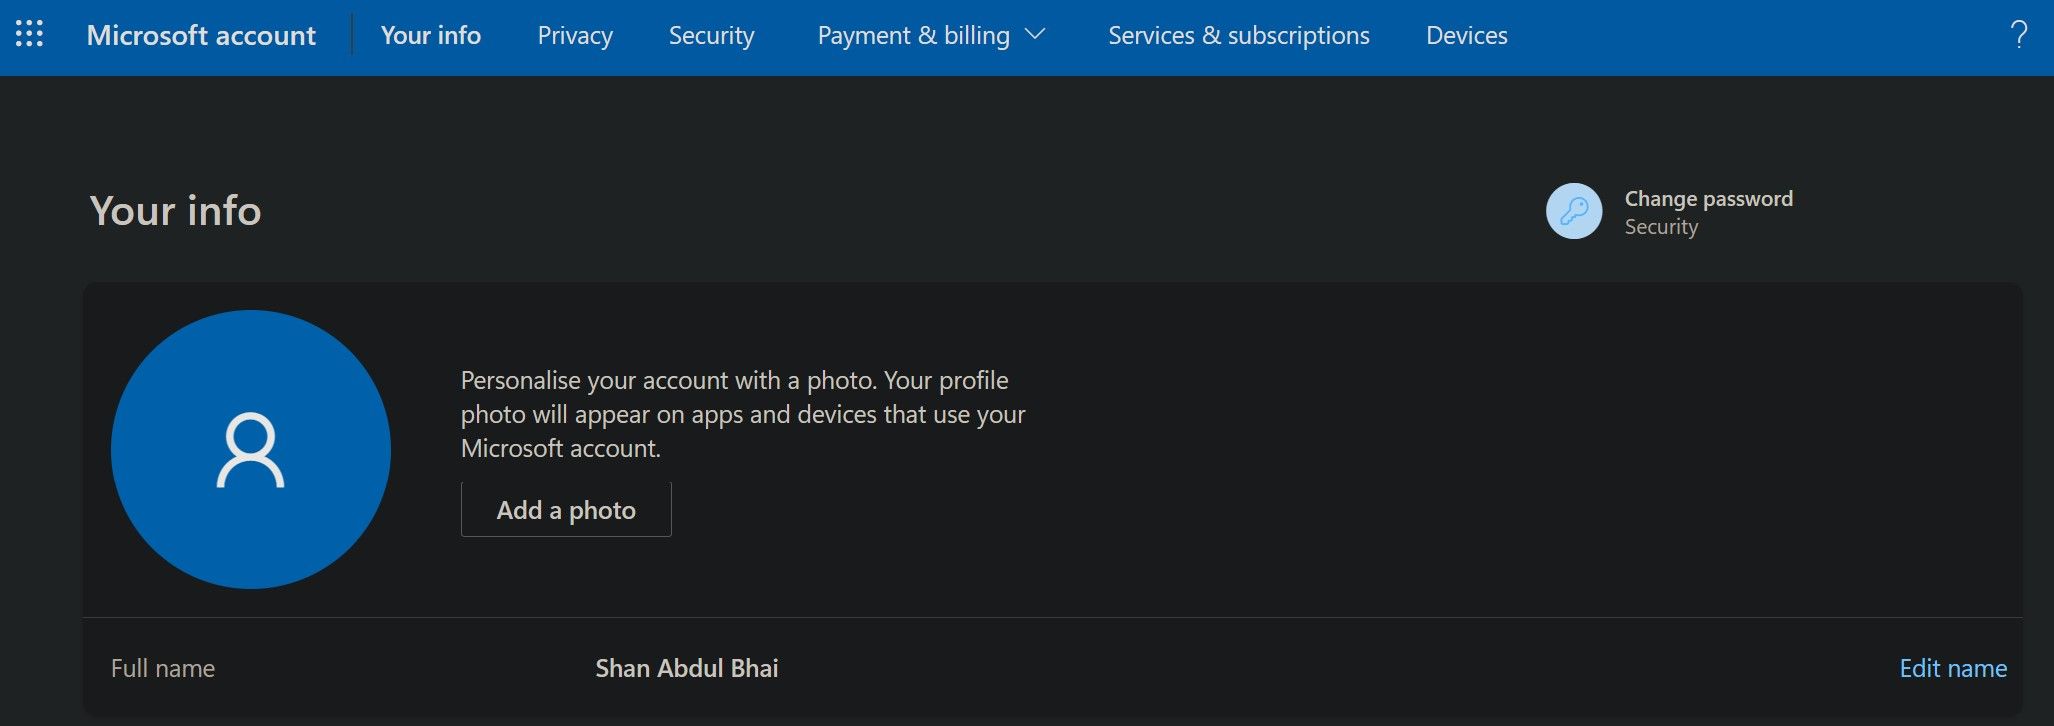
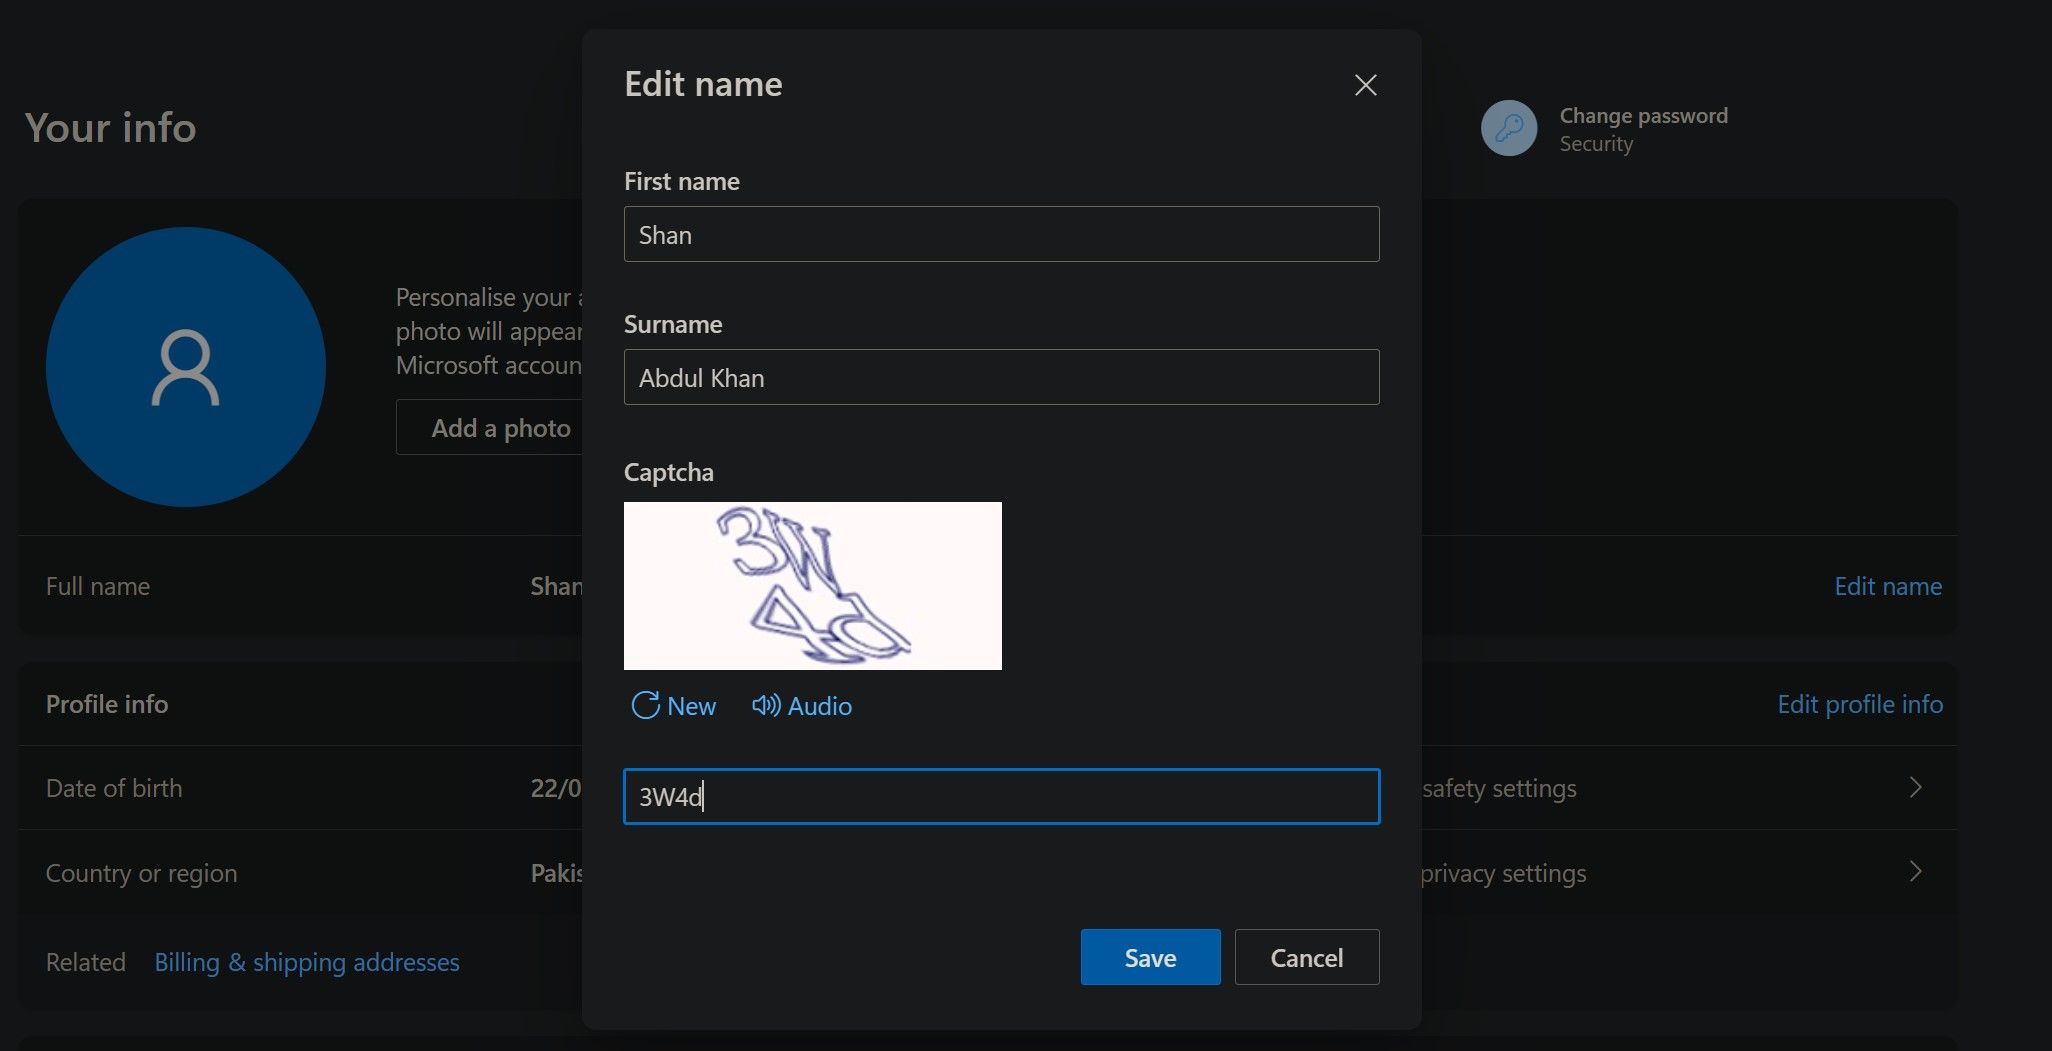
5. How to Change Your Profile Username From the Microsoft Website
If you use a Microsoft account on your computer, change your username on the Microsoft website. To update your profile username on the Microsoft website, follow these steps:
Remove your current username and add the one you wish to switch to.
After that, clickSave .
Changing the username associated with your Microsoft account may not take effect immediately. Sometimes, you may not see the new username after signing out from your account once, as we do in the other methods. To prevent that from happening, we recommendrestarting your device instead of just signing out.
Change Your Username With Ease
Your username doesn’t have to remain the same for the rest of your life. If you decide to change it, you can use the first four methods listed above to change the current username (of your local user account) to the one you prefer. Regardless of which way you opt, ensure you sign out of your account once. Only then will this change take effect.
You will need to change the username associated with your Microsoft account from the Microsoft website. Also, remember that changing your username does not automatically change the user profile folder name. Therefore, you’ll have to change it separately.
]]>This Article Describes Unveiling the Simple Steps for Changing Windows 11 NameInitiating SFC Tool for Windows File Integrityhttps://win11-tips.techidaily.com/initiating-sfc-tool-for-windows-file-integrity/2024-10-25T16:18:37.104Z2024-10-26T11:56:38.049ZInitiating SFC Tool for Windows File Integrity
Your Windows computer depends on operating system files to get the information it needs to run smoothly. But sometimes, these files can become corrupted or go missing from your PC, affecting your system negatively in various ways. For example, when something’s wrong with a critical system file, your computer might become slow or crash frequently.
An easy way to fix problematic system files is to use the System File Checker (SFC). This tool will scan your computer, check the integrity of each system file, and repair those that are damaged or missing.
Here’s what you need to know about running the SFC tool on Windows.
Disclaimer: This post includes affiliate links
If you click on a link and make a purchase, I may receive a commission at no extra cost to you.
How to Run a System File Checker Scan on Windows
To use the SFC, you need to run a single command in Command Prompt. Here’s how:
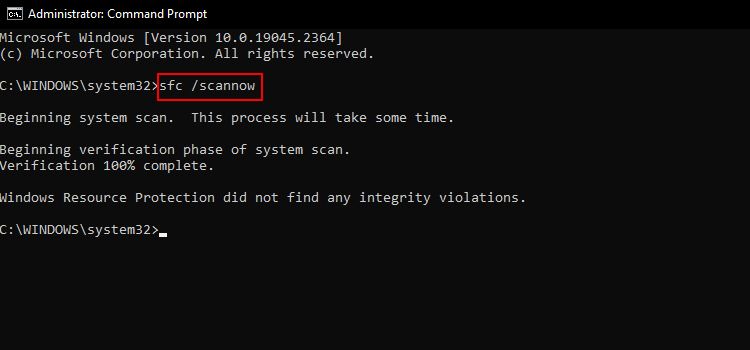
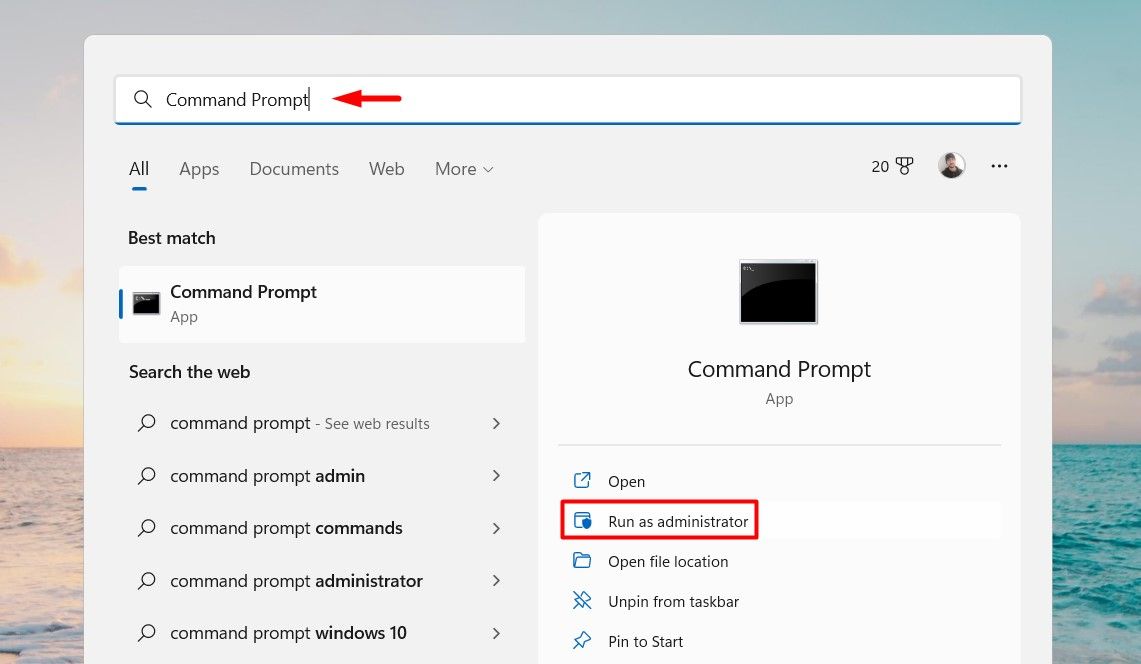
PressWin + S to open Windows Search and typecommand prompt in the search box.
This will bring upCommand Prompt in the search result. Click on theRun as administrator option.
ClickYes in the UAC prompt to allow Command Prompt to make changes to your computer.
In Command Prompt, enter the below command, and then hit theEnter key: SFC /scannow
After the System File Checker completes its scan, it will display a message in the Command Prompt window with the results.
If your system files are okay, you’ll see a message that says “Windows Resource Protection did not find any integrity violations.” If SFC found and fixed all problematic files, the message will read “Windows Resource Protection found corrupt files and successfully repaired them.”
On the other hand, if it found corrupted files but couldn’t repair any or all of them, the message will read “Windows Resource Protection found corrupt files but was unable to fix some of them.” And if SFC encounters a problem, the message will say “Windows Resource Protection could not perform the requested operation.”
Other SFC Commands You Can Run on Windows
TheSFC /scannow isn’t the only System File Checker Command you can run. Here are a couple more and what they do:
SFC Command
Description
/verifyonly
Run this command if you want SFC to check for problematic operating system files without fixing them.
/scanfile
Run this command if you want SFC to check a specific file for problems and fix it if it does have them. For example, Here’s the full command for checking and fixing theuser32.dll file:SFC /scanfile=c:\windows\system32\user32.dll
/verifyfile
Run this command if you only want to check a particular system file for problems. Even if SFC finds an issue with the file, it will not repair it. For example, Here’s the full command for checking theuser32.dll file:SFC /verifyfile=c:\windows\system32\user32.dll
/offbootdir
Run this command to tell the SFC which directory contains a bootable version of Windows. You need to do this every time you use the tool outside of Windows. For example, to select theE: drive on your PC, enter**/offbootdir=e:\**
/offwindir
Run this command to tell the SFC which folder in the directory — the one you specified with theSFC /offbootdir command — contains Windows. For example, enter**/offwindir=e:\windows** to tell the System File Checker that Windows is on theE: drive.
How to Run an Offline SFC Scan on Windows
There are a few scenarios that warrant the use of the SFC without logging into Windows. One such scenario is if the operating system files are so corrupted that Windows cannot start.
The important thing to remember about an offline scan is that you need to tell the SFC where to find Windows on the bootable drive. Here’s what a**/scannow** command would look like if you ran it offline:
That above command will tell SFC to look for Windows in theWindows folder on theD: drive. But keep in mind that the Windows version on the bootable media needs to be the same as the one installed on your PC for the scan and repair to be successful.
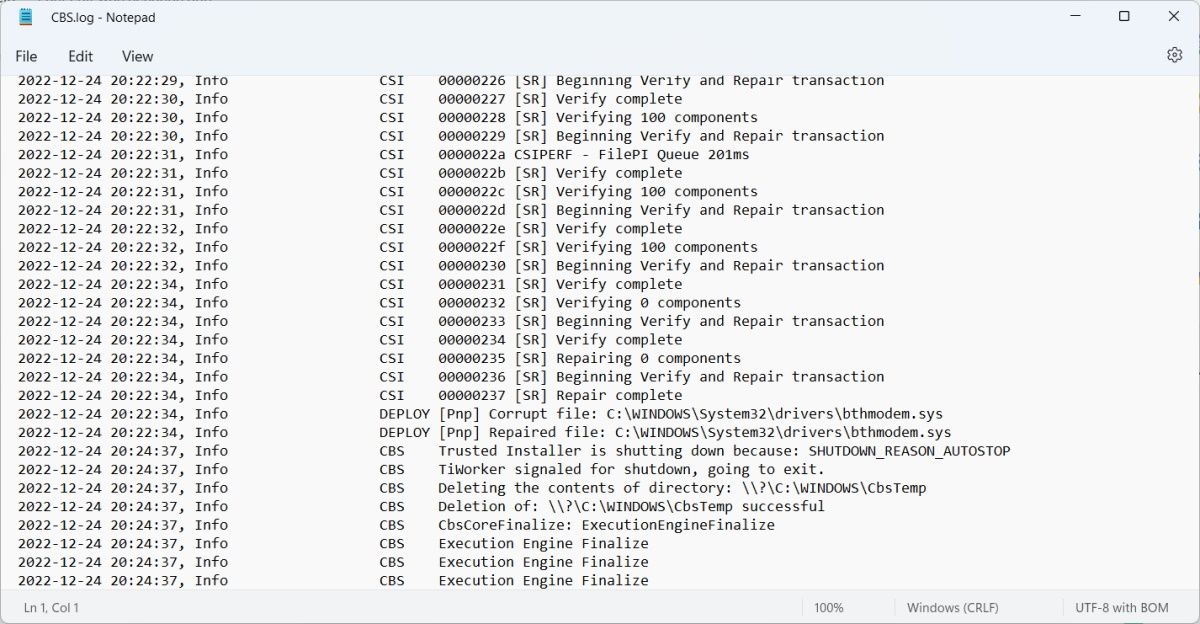
How to Find the SFC Log File On Windows
After the SFC does its thing, it will log the results of the scan and any repairs it made into a text file calledCBS.log . To open it, pressWin + R to open Windows Run, enter the below text, and clickOK :
%windir%\logs\cbs\cbs.log
The CBS.log file contains other logs besides those from the System File Checker. When looking through the entries, look for those that have an[SR] tag on them. Each entry will contain the date and time of the scan, along with the details of what happened.
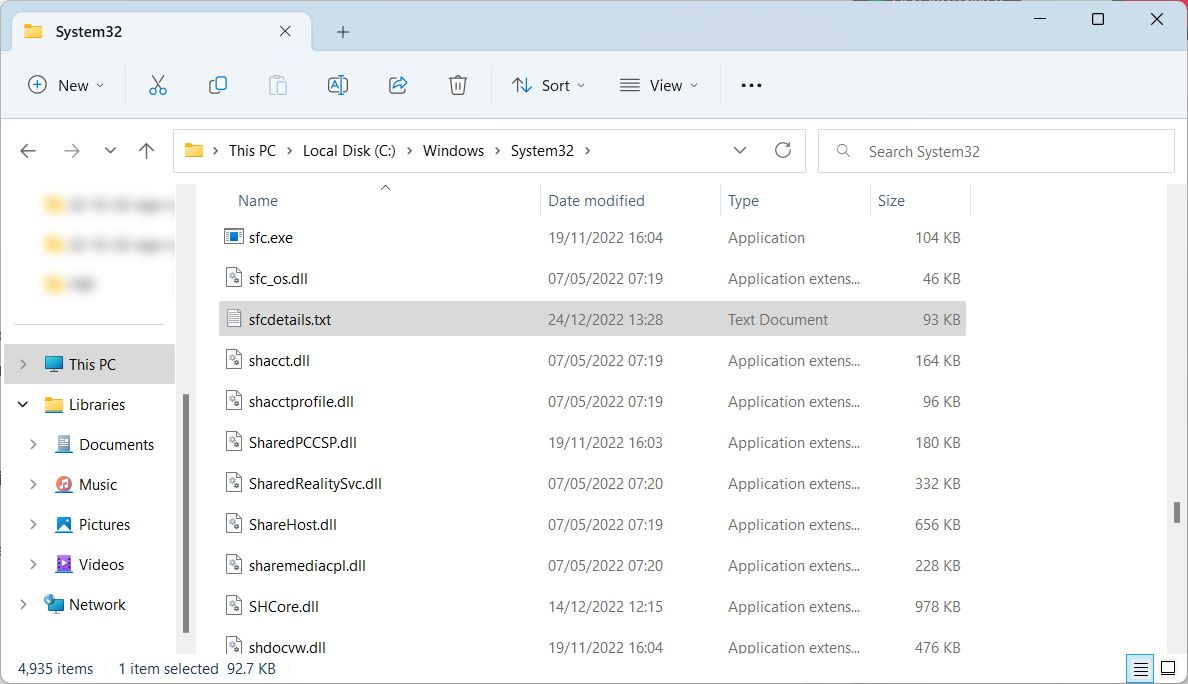
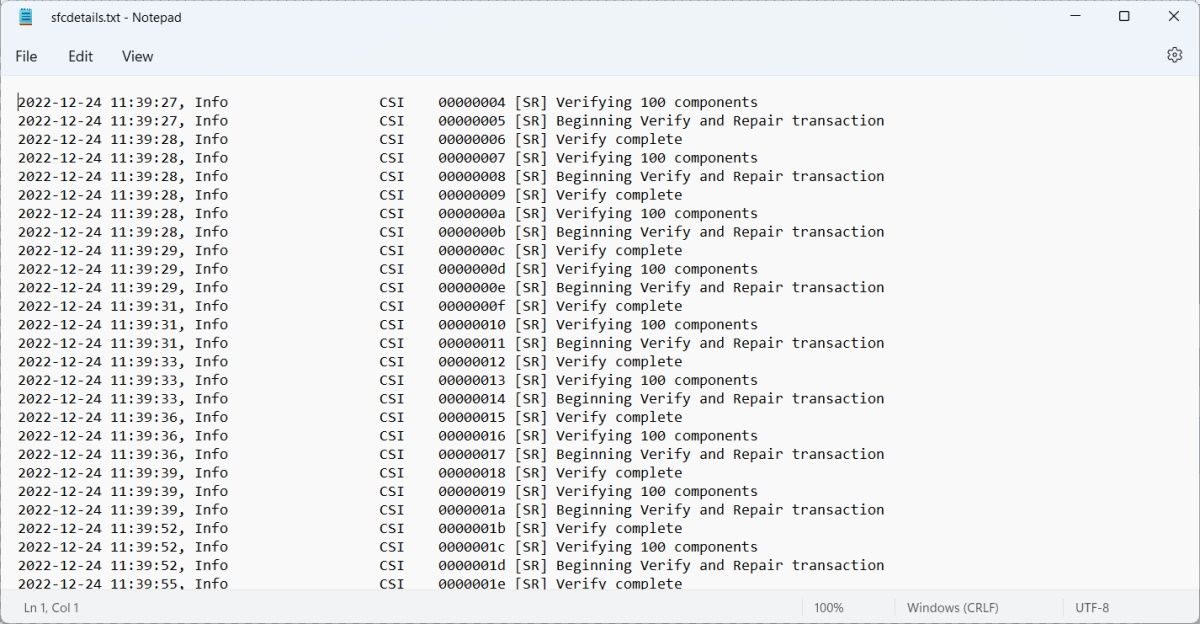
If you don’t want to bother with searching through theCBS.log file for the entries with the[SR] tag, you can extract them to a file calledsfcdetails.txt . To do that, open Command Prompt as an administrator, and run the below command:
You can findsfcdetails.txt by heading toThis PC > Local Disk (C:) > Windows > System32 .
You’ll see that the log file contains entries from the System File Checker only.
If you’re doing an offline scan, you can enable logging by simply specifying the file path with the following command structure:
/offlogfile=[offline log file path]
Just replaceoffline log file path in the square brackets with the actual path you want to store the offline log file in the offline directory. Then, insert this entire command after the**/windir** command when running an offline SFC scan.
Running the System File Checker, Demystified
We have only just begun to scratch the surface of what you can do with the System File Checker on Windows 10 and 11. However, now that you knowhow to run SFC (both in and out of Windows), you can use the tool effectively to troubleshoot problems with operating system files.
Using the SFC effectively is a necessary skill for every Windows user, and it’s just one of the many tools you can use to fix problems on your Windows computer.
]]>This Article Describes Initiating SFC Tool for Windows File IntegrityTransparency for Hidden Menu Items on Windows 11https://win11-tips.techidaily.com/transparency-for-hidden-menu-items-on-windows-11/2024-10-25T16:18:21.139Z2024-10-26T10:03:33.265ZTransparency for Hidden Menu Items on Windows 11
The system tray, which is part of the Taskbar and shows the apps you use frequently, among other things, can become overcrowded.
If that happens, you can remove a couple of app icons, as well as the hidden icons menu, to make it less cluttered. And if you can’t find the app icons you need or the hidden icons menu is missing, you can add those too.
Disclaimer: This post includes affiliate links
If you click on a link and make a purchase, I may receive a commission at no extra cost to you.
How to Show or Hide System Tray Icons on Windows 11
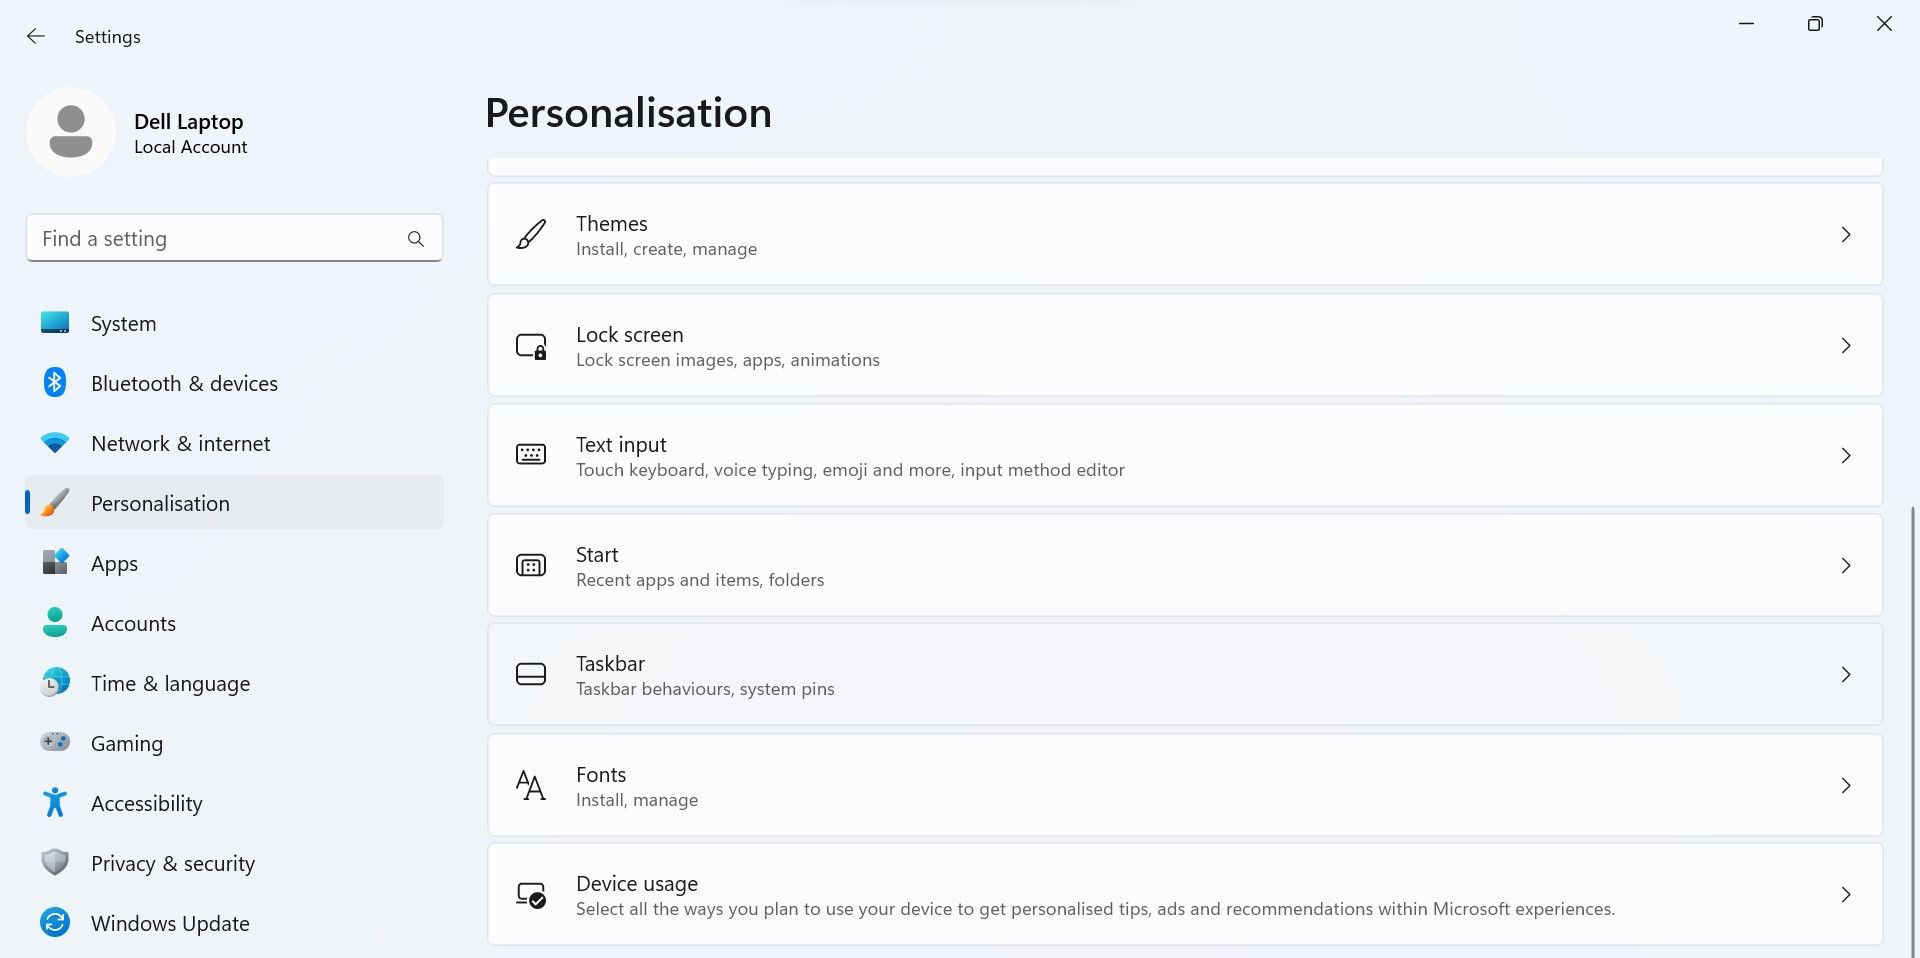
To show more icons in the system tray, you need to access the Taskbar’s settings by pressing Win + I, selecting Personalization on the left side menu, and then clicking Taskbar in the right panel.
In Taskbar settings, scroll down and expand the Other system tray icons section. Find the icon you want to show (its toggle will be set to Off if it isn’t in the system tray) and click on the toggle on its right to set it to the On position.
If you want to remove the system tray icon, simply set the toggle to Off.
Another way to remove icons from the system tray is to place them in the hidden icons menu. This is the menu that appears when you click the up caret icon in the system tray. When the menu is opened, the icon becomes a down caret.
To remove an icon from the system tray and place it into the hidden icons menu, click and drag it into the up caret. And when you expand the hidden icons menu, you will see that the icon is inside.
When you remove system tray icons from the settings, they will not appear in the hidden icons menu but will be removed completely.
To add the icon back in the system tray, click and drag it from the hidden icons menu and then place it in the system tray.
How to Show or Hide the Hidden Icon Menu
As mentioned earlier, the hidden icon menu is what appears when you click the up caret in the system tray. You can also hide and show this menu as you please.
Using the Settings App
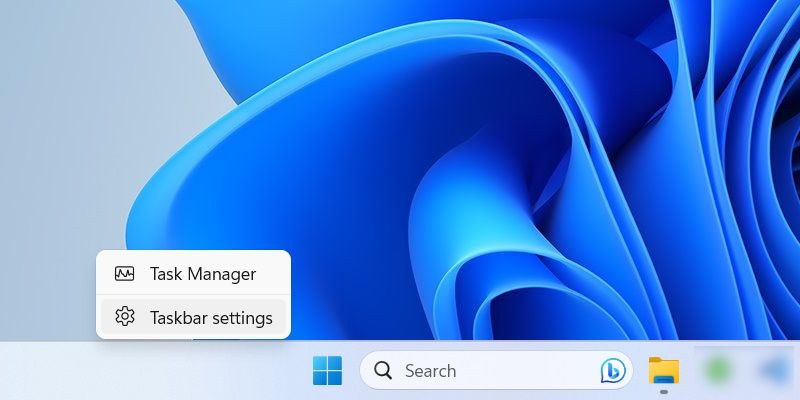
If you can’t see the hidden icon menu, you can show it from the Taskbar settings as well. To get there, right-click an empty part of the Taskbar and select Taskbar settings.
Scroll down until you reach the Other system tray icons section and expand it. To reveal the hidden icon menu, set the toggle next to the Hidden menu icon option to On. To hide it, set the toggle to Off.
Using the Registry Editor
If you’re not familiar with the Registry Editor, we recommend that you read our guide on what the Windows Registry is before continuing. It’s crucial that you know what you’re working with before moving forward. Also, be sure to make a backup of the Registry while you’re at it.
With that out of the way, you can open the Registry Editor by pressing Win + R, entering regedit in the text box, and then clicking on OK. In the UAC prompt, click Yes to launch the tool.
Next, double-click the SystemTrayChevronVisibility value in the right panel.
To show the hidden icon menu, set the Value data text box to 1 and click OK.
And to hide the hidden icon menu set the Value data text box to 0 and click OK.
Control the Icons that Appear in the System Tray on Windows 11
Whether you want to add icons or remove them from the system tray, the process is simple. Just go to the Taskbar settings and turn them on or off as needed. You can also hide or show the hidden icon menu in the process.
And if you want to show or hide the clock and date in the system tray, you can do that too.
If that happens, you can remove a couple of app icons, as well as the hidden icons menu, to make it less cluttered. And if you can’t find the app icons you need or the hidden icons menu is missing, you can add those too.
]]>This Article Describes Transparency for Hidden Menu Items on Windows 11우아한 Web용 M1V 영상 전환: 제공자 가격 0https://win11-tips.techidaily.com/web-m1v-0/2024-10-25T16:16:12.052Z2024-10-26T11:47:05.345ZCreate Stunning Presentations with These Free Apps and Software (Picks)
We use cookies to improve the services we offer you. By continuing to browse this site, you consent to keep them in accordance with our Privacy Policy .
Do you love taking a lot of photographs? Is videography one of your hobbies of choice? Are you seeking an excellent way to highlight your work? Whatever you require, the best slideshow maker allows you to restore your video and photo memories for a lifetime. What’s more, most of the software available today is free.
Fortunately, you will find many best free slideshow makers with music available today, running on Mac, Windows, mobile devices, and web. In this blog post, we will present everything you need to create the best photo slideshow software you can find in the market these days.
Best free photo slideshow software for desktop – Windows & Mac
The best free photo slideshow software is no doubt a vital tool for most people. No matter if you are putting together a photo collection for family, a business presentation, or just a simple slideshow with music. Whatever you require, the best slideshow maker which offers high-quality and professional results will be something you’ll wish to use.
Let’s take a look at the best desktop choice for Windows and Mac.
Licensing: free 7-day trial, paid subscription or lifetime version
Size: 58.2 MB
Our rating: 10/10
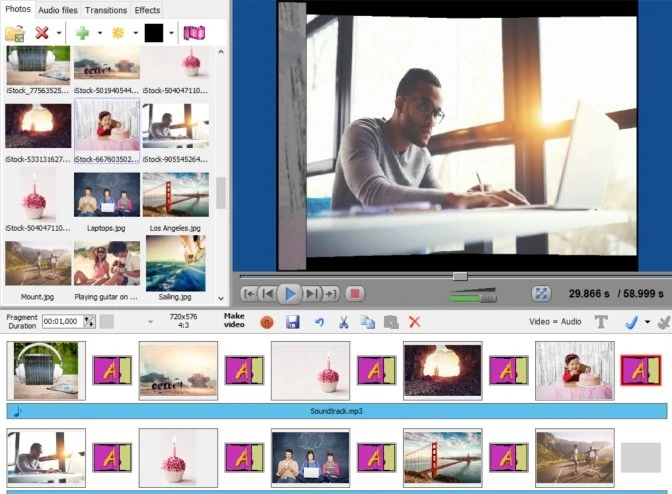
First on our list is Movavi Slideshow Maker. If you want to make a stunning slideshow from pictures or videos and add some music, this software is the easiest solution. Its intuitive interface allows you to use a large number of editing features and over 150 effects and filters. With this program, you can create amazing movies, even if you are a complete beginner.
Movavi’s slideshow maker software allows you to save your photo or video slideshow in all popular video formats and enables uploading it straight to YouTube, Vimeo, or Google Drive. This program has a trial version that you can download for free.
Key Features:
Save time with automatic slideshow creation
Join slides with dynamic transitions, enhance picture quality
Make your slideshow more personal by adding voice over
ThunderSoft Free Slideshow Maker is an excellently simple-to-use software package that allows you to create slideshow from your videos and pictures. You can include transition effects, play music, apply captions, use clip art, and so much more.
This one of the best slideshow makers with music provides different customization features that include effects, tunes, and transitions. The good thing about this software is that you can easily drag images on the timeline at the bottom of the page. You can also customize the preferred way by clicking on the “effects,” “transitions,” and “audio files” tab on top.
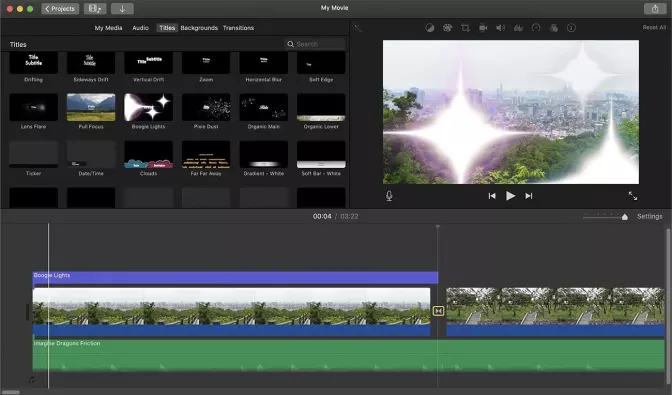
This famous photo slideshow maker with music from Apple has been around for quite a long time, and it has focused only on its one philosophy: ease of use in an elegant and clean interface. It’s a perfect place to begin if you prefer to learn to edit videos. That’s because the basic workflow of the software is the same as that of more sophisticated software.
Licensing: free version, paid home and pro versions
Size: 5.5 MB
Our rating: 6/10
The optimal slideshow software is NCH PhotoStage, for its easy operations and strong functionality. It has a very user-friendly interface that allows you to grasp the employing tricks within a few glances even if you are not computer savvy. What’s more, you can easily personalize your slideshow by including background music, transitions, as well as a time interval between each picture.
Licensing: free version, paid subscription or lifetime version
Size: 273.54 MB
Our rating: 8/10
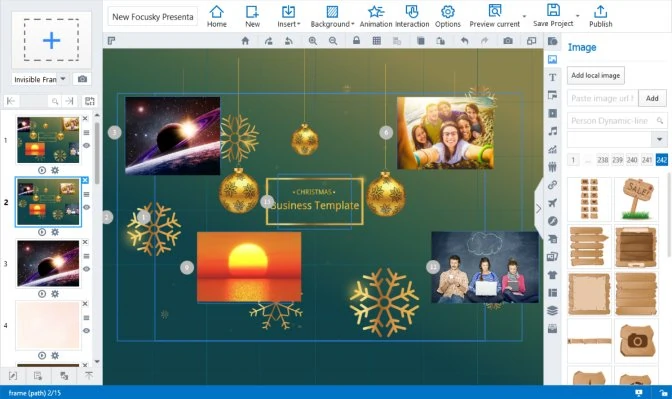
On the other hand, Focusky is a fully-featured best free slideshow maker with music made to help you make captivating offline and online documents for work or study. These files can be shared through Windows, Mac, or online. Therefore, the software allows you to make dynamic presentations that can be distributed to a vast number of users. That’s true irrespective of the operating system they use.
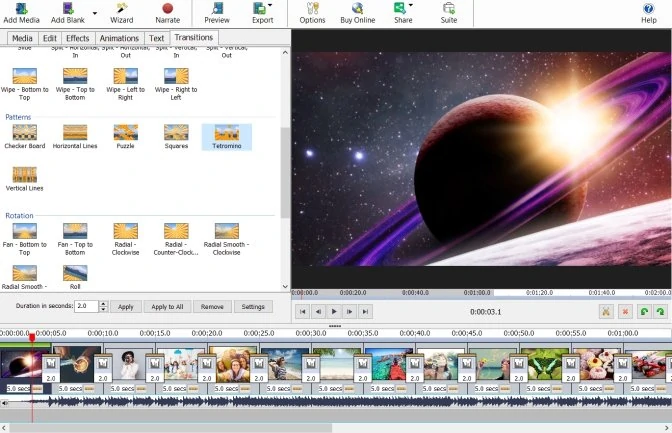
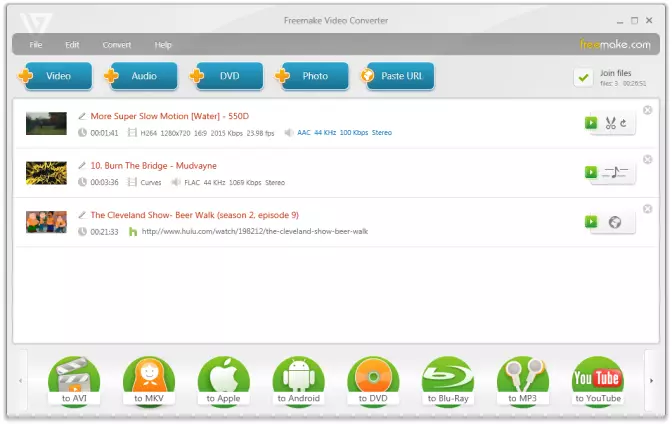
Freemake Video Converter is another software that enables businesses and individuals to make broadcast-quality videos and professional logos. You see, it’s a rather simple video creator that helps you create beautiful and powerful videos swiftly and effortlessly.
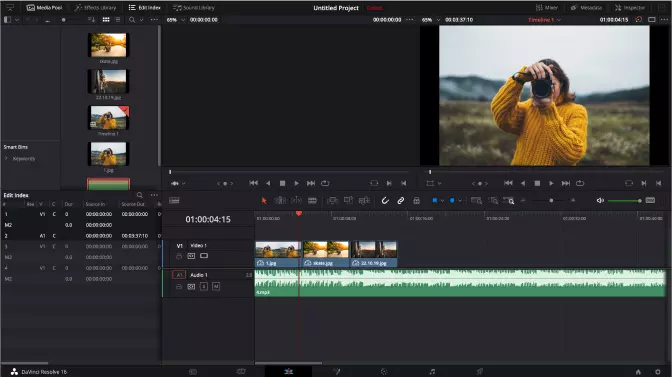
You can make videos for different uses within a few minutes, ranging from commercials, infographics, slideshows, and a lot more. With this platform, your imagination is only the limit. DaVinci Resolve has a vast video template catalog too, where you can pick your desired preset and begin your work from there.
Licensing: free trial, paid home and business licenses
Size: 700 MB
Our rating: 10/10
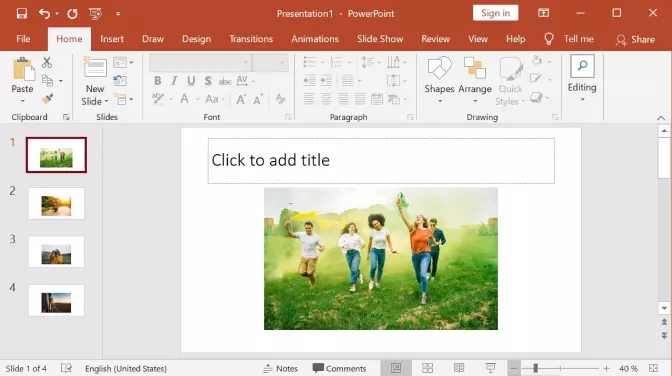
In case you didn’t know yet, PowerPoint functions by automating the process of making presentations by just automating the slideshow making procedure. If you are a user, all you need to do is upload images and choose a template of your choice, and the software does the rest.
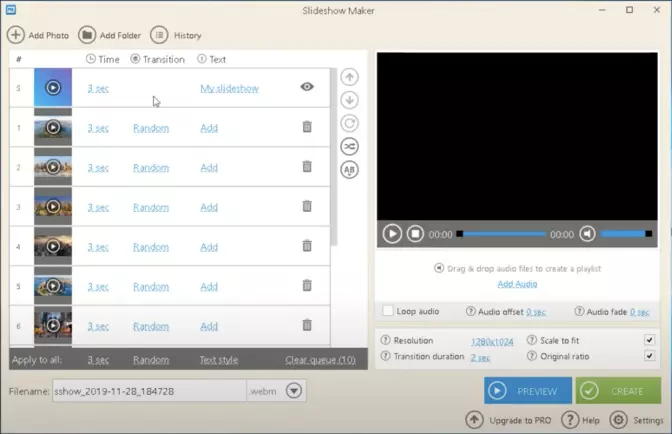
Icecream’s slideshow maker with music is another software where you can make a slideshow with any choice of music. It’s a flexible platform that enables you to create, collaborate, share, and present presentations and documents. Along with editing and drag-and-drop features, this photo slideshow maker is undoubtedly a responsive and flexible video creator.
Key Features:
User-friendly interface
Looping music
4K format support
Pros:
Simple interface
Various export formats
High-quality video processing
Cons:
No multiplatform
Trial limitations
Best free online slideshow makers
Free online slideshow makers do not fundamentally differ from each other and many desktop applications. Anyway, we’ll point out some general information and their features.
Licensing: free version, subscription to the premium version
Our rating: 6/10
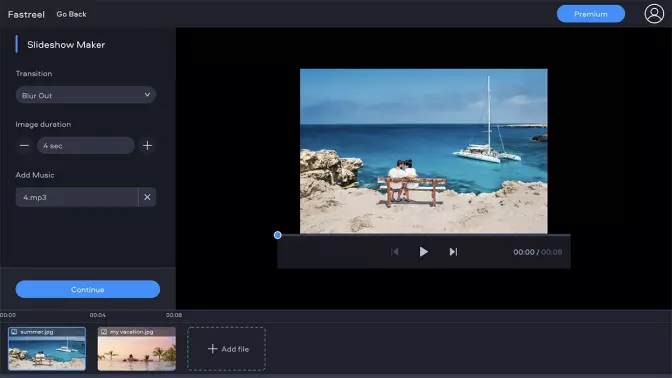
Fastreel is a simple online editor from Movavi. With its help, you can edit and cut videos and slideshows right in your browser. Registration is not required. The website has two options: online editing tools and ready-made templates.
Renderforest offers pretty good online tools to create high-quality videos, logos, mockups, and websites with minimal investment of time and effort. Use easily customizable scenes to create engaging videos in just minutes.
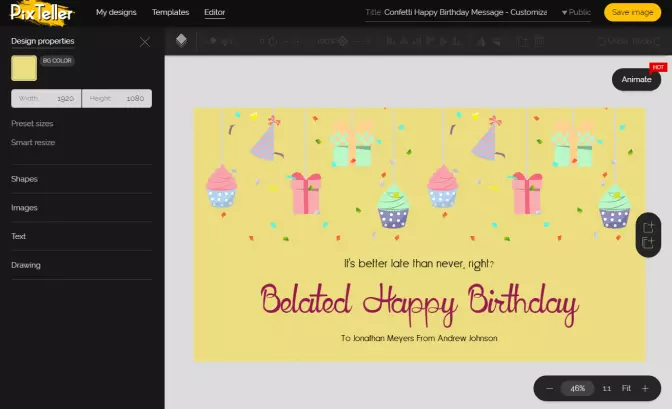
PixTeller is incredibly simple and straightforward to use. There are no ads; it starts quickly and works with no freezes. There is no limit for photos to upload. You can add beautiful transitions between photos, as well as music.
Adobe® Spark® is an integrated suite of multimedia content creation applications for mobile and web applications developed by Adobe®. It consists of three separate design apps: Spark Page, Spark Post, and Spark Video.
InVideo aims at the business and any other people who make presentations for professional purposes. It offers all the basic features you need to create an amazing video, from small intros to a full-fledged promotion video.
This online software offers a solution for the biggest challenges for photography experts, which is storing and managing RAW files. The business version gives you unlimited storage space for RAW files, regardless of file type.
Kapwing offers many tools for online video editing – and they are outstanding. One of the best features is Subtitler, which allows you to autogenerate subtitles for video in almost any language. And this is really useful!
Promo is a web-based visual content creation platform. This powerful web slideshow creator is a perfect choice if you don’t have much free time. What is more, it has a trial version, but you can also purchase a premium version.
Key Features:
Working online without any downloading needed
Great for making promo videos and ads for various social media
Animated subtitles
Pros:
Easy sharing of slideshows
Large collection of templates
Cons:
No ability to download created videos in the free version
Smilebox offers an easy way to create animated slideshows and offers a variety of templates for doing so. Although Smilebox has a free version, many features require a subscription. Apart from the web version, Smilebox offers separate installers for Windows and Mac.
Key Features:
Categories for templates
Includes templates for greeting cards, photo albums, and scrapbooks
Storage space for created slideshows
Pros:
Wide range of templates
Easy to save and share slideshows
Cons:
The interface can be confusing sometimes
Most of the features and templates require a subscription
Movavi Clips is an easy-to-use picture slideshow maker available for both Android and iOS. With this app, you can quickly turn your pictures into a slideshow video: upload your photographs to the app, add filters and effects, add transitions and music. You can also share the results with your friends on Instagram, Facebook, and YouTube.
With Pixgram, you can create a slideshow in three simple steps. It has all the same features as any online slideshow maker: mix pictures and videos into a collage, add music and video filters, and others. Developers claim that you can export the resulting video in HD quality.
Developed by Picadelic, this online alternative to the best free slideshow-making apps is a good choice if you plan to post your slideshow on Instagram, Facebook, or Twitter. The app has a variety of different cinematic effects for your slideshow. Note that if you’re using a free version of this app, you can save videos up to 30 seconds long.
Key Features:
More than 40 different styles
Instant previews
Mixed transitions
Glitch effects
Pros:
Slick design
Good performance
Reliability of work
Cons:
Limited functionality in the free version
Poor export video quality
Best free slideshow maker apps – for iOS [iPhone & iPad]
SlideLab offers many useful features – you can touch up pictures using filters, add transitions and background soundtrack, and many more. Save a slideshow on your phone or easily share it on social media.
With Slide Maker, you can enhance your photographs with filters, add free built-in or your own soundtracks to a slideshow, crop, and rotate pictures. This free slideshow-making app also adjusts the length of your slideshow for Instagram.
Videoshop is a powerful video editor that you can also use as a picture slideshow maker. It has a wide range of features: add music and sound effects, trim and rotate, apply filters and stickers. Additionally, the app provides advanced options, such as tilt-shift, distort effect, and screen capturing.
Key Features:
Enables video-editing options
Screen capture capability
Music and sounds processing
Pros:
High-tech design
Video-editing tools
Fast performance
Cons:
Some features behind a paywall
There are many so-called best slideshow makers for different devices with different capabilities. But if you’re seeking not a really reliable solution for your PC instead of any mobile or online slideshow makers – we recommend you to opt for Movavi’s video slideshow maker. It’s the best value for money mixed with a sleek design, fast performance, and a wide range of functionality. Check all the benefits you can get from this app right now!
To create a well-made slideshow follow the tips below:
Think about the purpose of your slideshow beforehand and choose photos and music accordingly
Use only high-quality photos and music
Keep the slideshow short to engage the audience
Add text, animation, video clips, and transitions to spice up the slideshow
Choose a user-friendly slideshow maker
How to choose a slideshow-making program?
There are several features that you should look for in a slideshow maker:
Usability – the program shouldn’t be too hard to use.
Available tools – choose software that has a sufficient number of editing tools and special effects.
Licensing – if you don’t create slideshows for commercial purposes, there’s no need to buy an expensive program, you can use free tools. Conversely, you might want to use expensive sophisticated software for creating ads or promo videos.
Support – check out what support is available – for example live chat, online, or email support.
What is the easiest way to make a photo slideshow?
To find out what’s the easiest way to make a slideshow, check out the video below.
Performance Monitor is a system monitoring tool on Windows that you can use to view real-time statistics about the applications you are running. But sometimes this tool fails to work correctly. If you’re facing such a problem on your computer, here are a few fixes you can try to solve it.
Disclaimer: This post includes affiliate links
If you click on a link and make a purchase, I may receive a commission at no extra cost to you.
1. Reboot your Computer
Whether you’re experiencing performance issues such as slow startup times, or if Performance Monitor isn’t working on your system, a simple reboot might do the trick.
Rebooting Windows clears out any conflicting programs or services that may be causing PerfMon to not work properly. It removes any unnecessary data stored in memory that might be responsible for the issue.
To restart your computer, follow these steps:
Open theStart menu.
Click on the Power button, then selectRestart .
Once the computer has restarted, open Performance Monitor and check if the issue has been resolved.
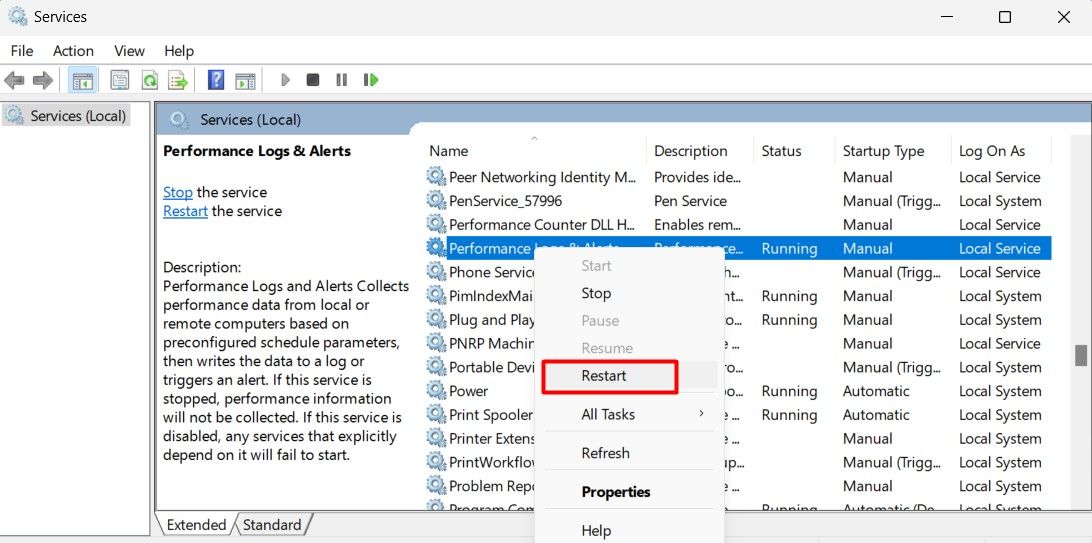
2. Restart the Performance Logs and Alerts service
If rebooting your computer doesn’t fix the problem, you can try restarting the Performance Logs and Alerts service. This service is responsible for monitoring system performance settings and generating alert messages when something is wrong.
To restart this service, follow these steps:
PressWin + R on your keyboard to open the Run command
Typeservices.msc in the dialog box and pressEnter .
In the Services window, scroll down toPerformance Logs & Alerts service.
Right-click on the service and select theRestart option.
After you follow the above steps, check if Performance Monitor is working correctly.
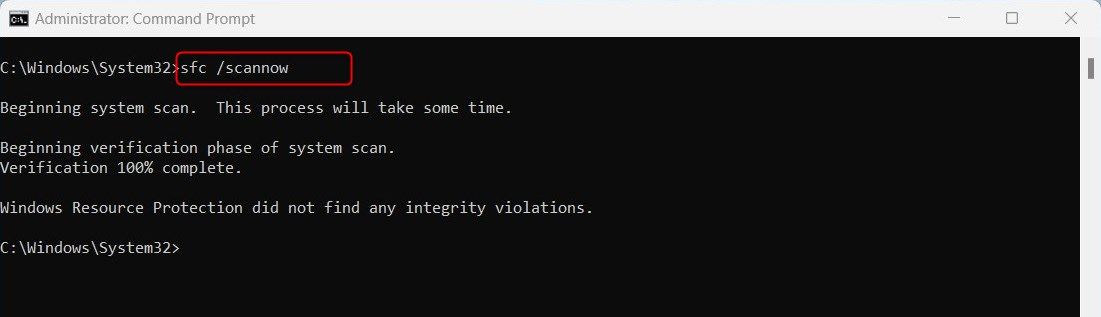
3. Run the System File Checker
The System File Checker is a handy Windows tool that can scan for and fix corrupted system files. It is useful when the Performance Monitor isn’t working due to a corrupt system file.
To run the System File Checker, follow these steps:
Click on the Start menu.
Typecmd in the search bar, then pressCtrl + Shift + Enter to open an elevated Command Prompt.
In the Command Prompt, type the following command and pressEnter : sfc /scannow
The scan will check for any corrupted system files and repair them.
After the scan is complete, restart your computer and check if Performance Monitor is working properly.
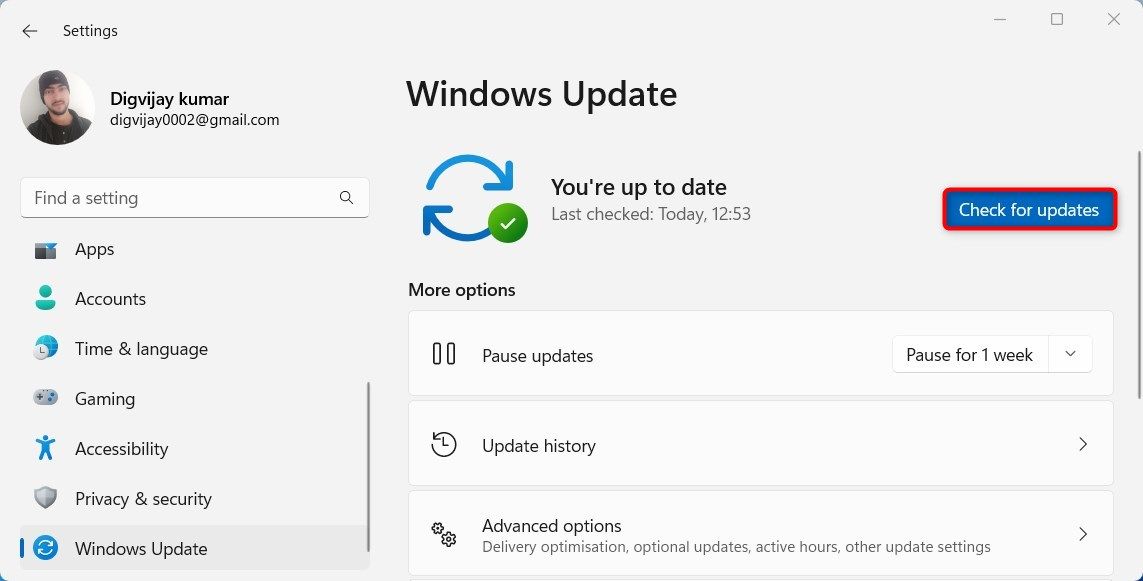
4. Check for a Windows Update
In some cases, outdated versions of Windows can cause Performance Monitor problems. To ensure your system is running the latest version of Windows, follow these steps:
PressWin + I on your keyboard to open System Settings. We also have an in-depth tutorial onaccessing the Settings menu .
ClickWindows Update in the left pane.
Then click theCheck for updates button.
If any available updates are found, Windows will download and install them automatically. After the updates have been installed, restart your computer and check if Performance Monitor is now working correctly.
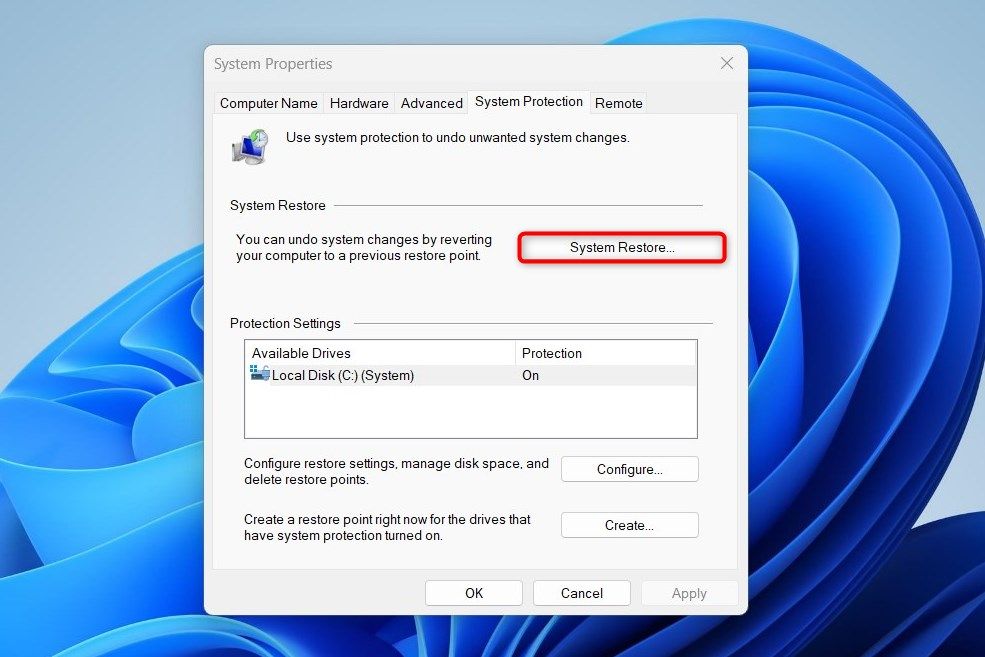
5. Perform a System Restore
In case you have run out of options, you may want to try a system restore. This way, your computer will be restored to the state it was in before the program stopped working.
To perform a system restore, follow these steps:
PressWin + Q on your keyboard.
TypeSystem Restore in the search bar and click onCreate a restore point .
In the System Properties window, click theSystem Restore button.
Choose a restore point, then clickNext .
Follow the on-screen instructions to perform a system restore.
Upon completion of the restoration process, make sure Performance Monitor is working properly.
Get Hassle Free Performance and Health Monitoring
Like any other program, Performance Monitor can have glitches and other issues that prevent it from working correctly. The steps in this article will help you fix these issues and get Performance Monitor up and running again.
]]>This Article Describes Improving Windows' Non-Responsive Performance ChartEnjoy Gameplay Without Extra Cables: Setup PS3 Controller on Windowshttps://win11-tips.techidaily.com/enjoy-gameplay-without-extra-cables-setup-ps3-controller-on-windows/2024-10-25T16:09:48.468Z2024-10-26T14:24:36.152ZEnjoy Gameplay Without Extra Cables: Setup PS3 Controller on Windows
Your PS3 is probably gathering dust by now, so why not put it to good use… or, at least, its controllers? Use them on your PC and give them a new life.
Although it was possible to use PS3 joypads on PCs in the past, the process was finicky, and their wireless functionality was wonky. That was until DsHidMini entered the scene. Here’s how you can use a PS3 DualShock controller on your PC, both through a USB connection and wirelessly through Bluetooth
Disclaimer: This post includes affiliate links
If you click on a link and make a purchase, I may receive a commission at no extra cost to you.
What Is DsHidMini?
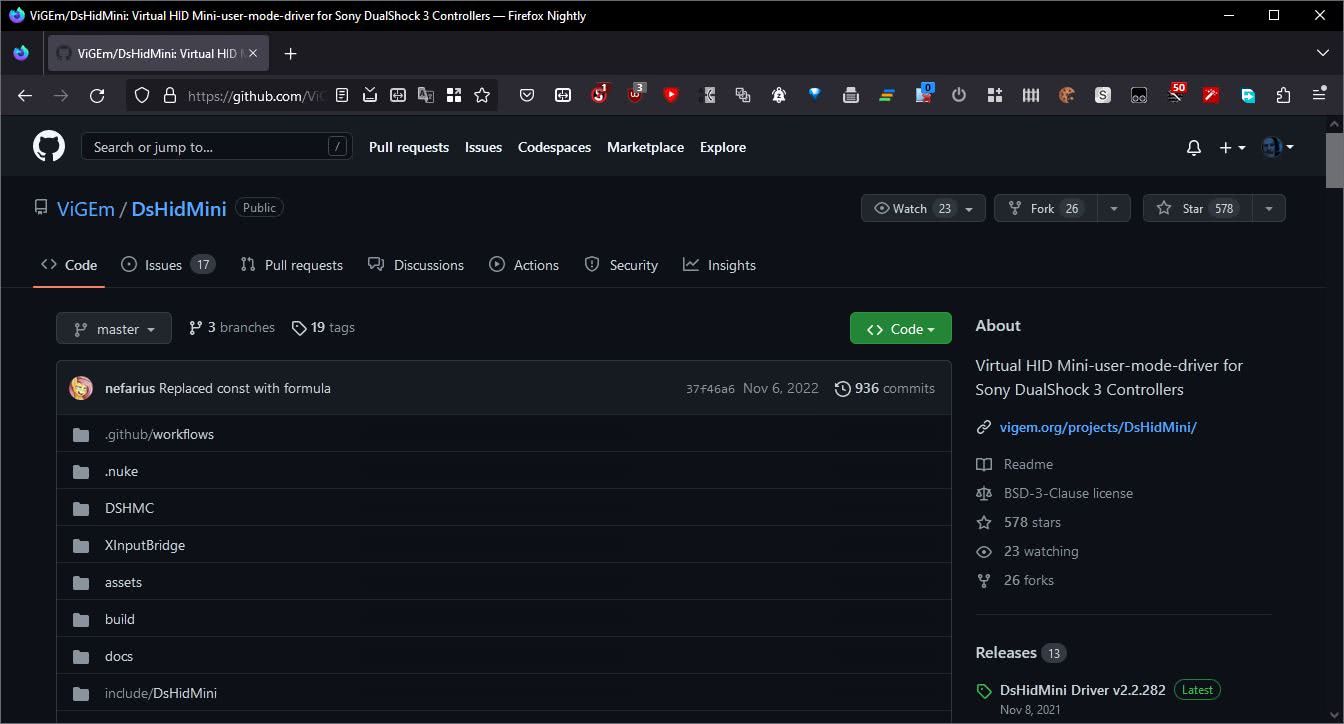
DsHidMini is an open-source solution for connecting and configuring many types of joypads to a PC. As such, if you have your old PS3 or PS4 DualShock controllers around, why not put them to use with this app?
DsHidMini enables your PC to recognize them and provides XInput emulation. With Xinput being the modern standard for joypads under Windows, you’ll be able to use your PlayStation controller with most modern games.
Getting the Necessary Software for Using Your PS3 Controller on a PC
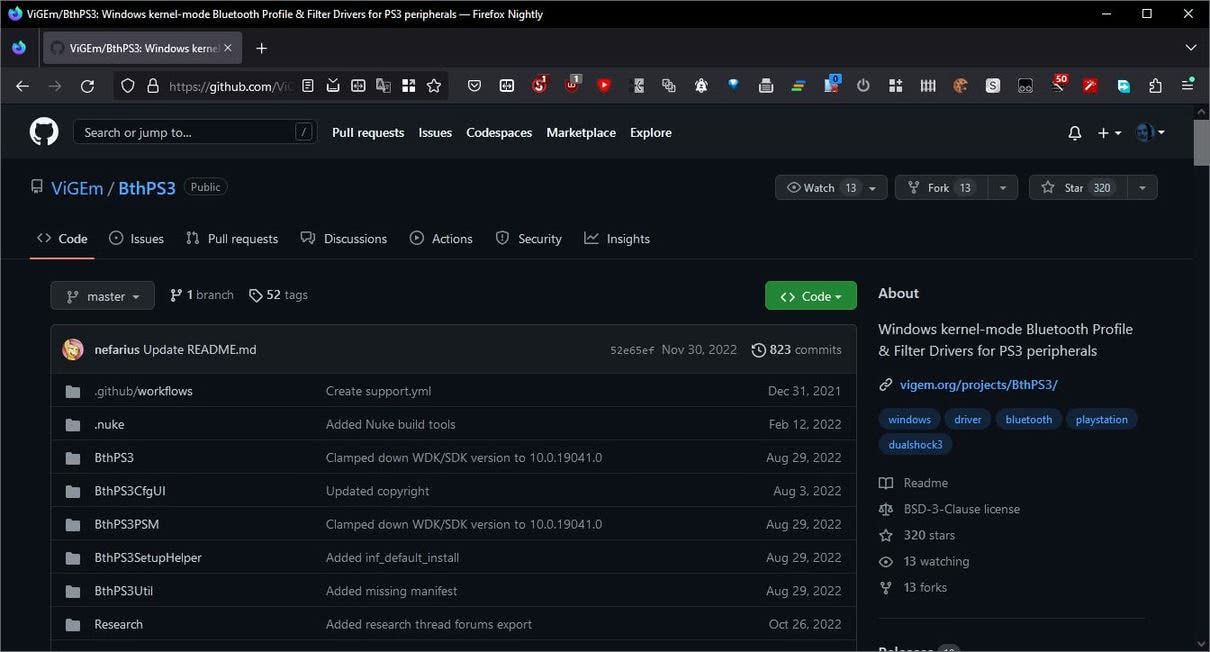
By combining two pieces of software, DsHidMini, and BthPS3, you can have your PC detect your DualShock controller effortlessly both when connected with a USB cable and wirelessly through Bluetooth.
DsHidMini suggests installing BthPS3 to have your DualShock controllers correctly detected and connected to your PC. This guide will follow that suggestion, especially since we want them to work wirelessly.
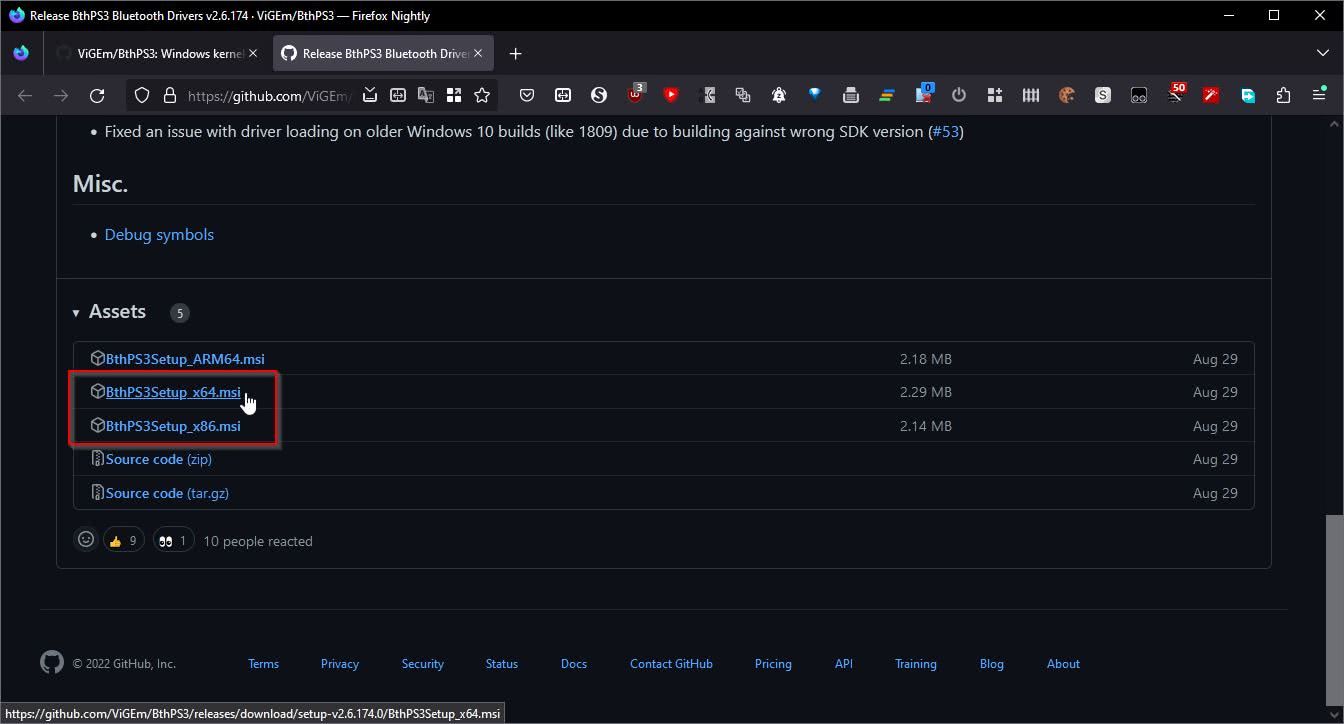
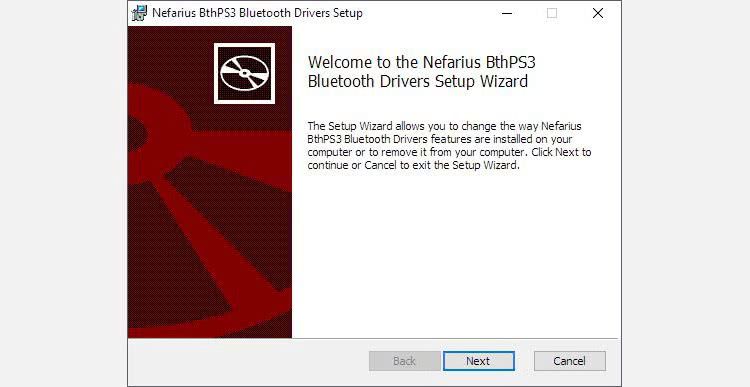
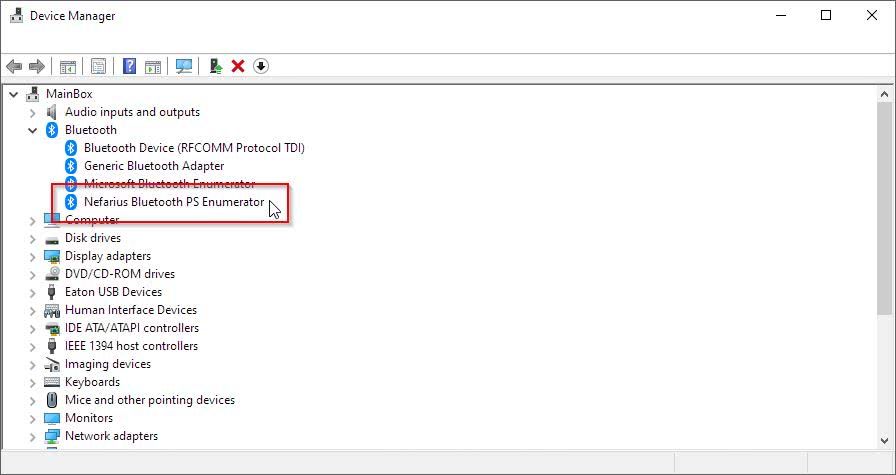
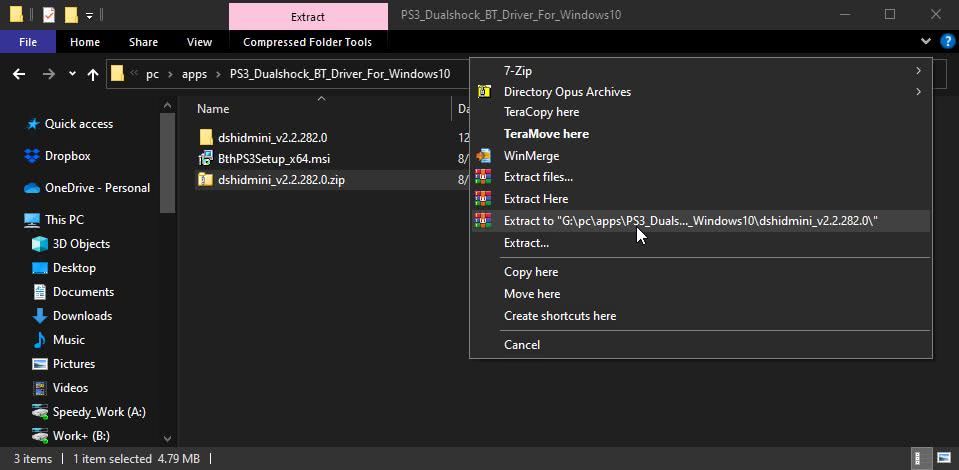
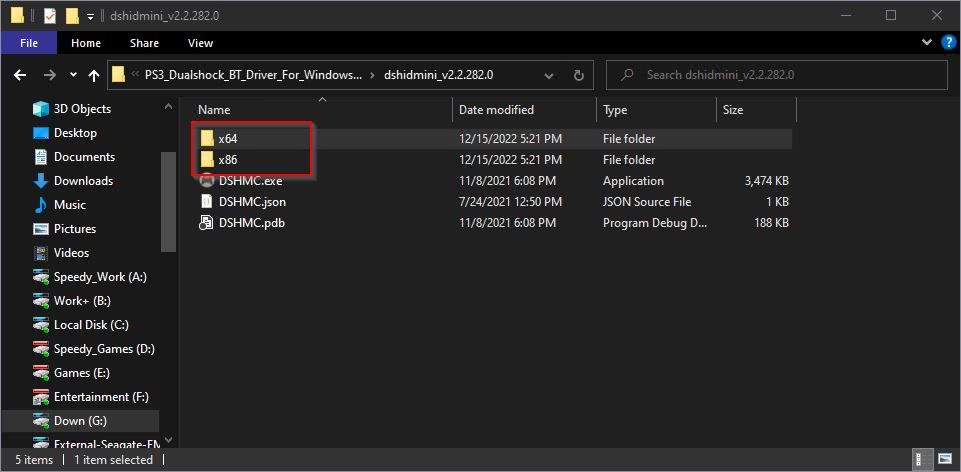
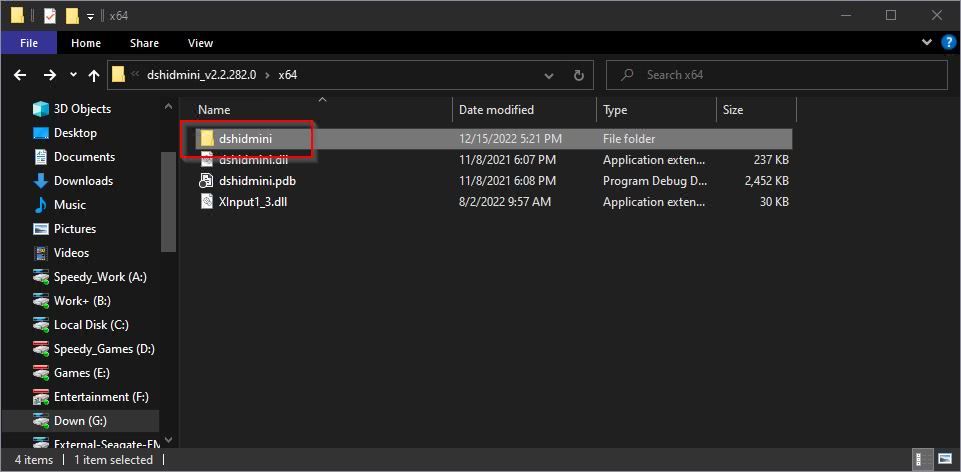
3. In both cases, you’ll find the downloadable files by clicking on the link underInstallation , then checking out the links underAssets . Most people should go for the x64 versions. If you’re still using an older 32-bit version of Windows, get the x86 files. 4. Click onBthPS3’s MSI file that you’ve downloaded to install the Bluetooth driver. “MSI” stands for Microsoft Software Installer. Unlike executable installers, MSI relies on the “official” installation libraries bundled with Windows. If you meet any problems during that step, check our guide onhow to fix issues with the Windows Installer package . 5. After BthPS3’s successful installation, you’ll see it as a new device under theBluetooth category inDevice Manager . The easiest way to access the Device Manager is by using theWindows Key +X shortcut and selecting it from the menu that shows up. 6. DsHidMini’s installation is a tad more complicated since it comes in a compressed archive. OpenWindows File Explorer , and pay a visit to the folder where you saved DsHidMini’s downloaded archive. All modern versions of Windows support the ZIP archive format, so you can right-click on the file and chooseExtract . However, we used WinRAR instead simply because we had it installed, and it’s somewhat faster. In both cases, the result is the same. 7. Look inside the extracted archive’s folder, and you’ll see two more folders:x64 andx86 . Enter the one matching your Windows architecture. As mentioned above, most people nowadays should go forx64 . 8. Inside that folder, you’ll find another subfolder nameddshidmini . Enter that one, too.
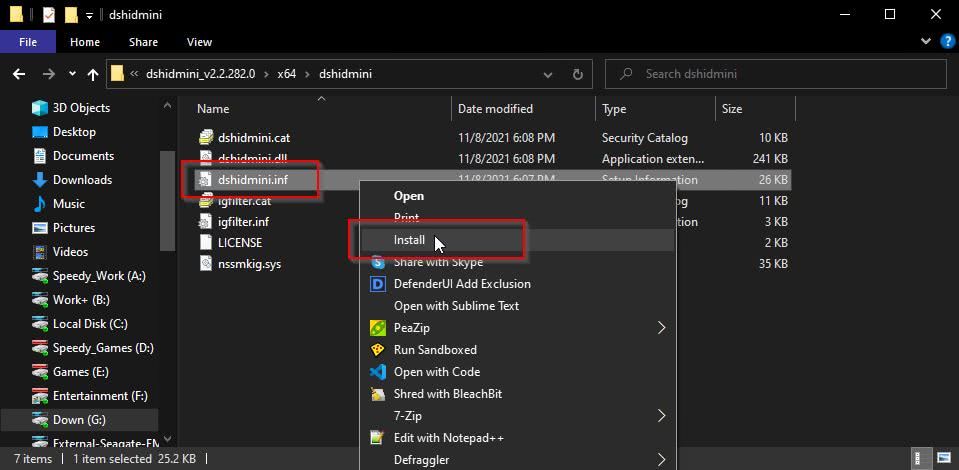
9. Right-click on thedshidmini.inf file, and chooseInstall from the menu that shows up. When that step completes, install theigfilter.inf the same way.
Theoretically, that’s everything you need for your DualShock to work with your PC. Practically, as is Windows’ tradition, it wouldn’t hurt to restart once to ensure the drivers are correctly installed, activated, and work as they should.
How to Pair and Configure Your PS3 DualShock
The next step is to “pair” your controller with your PC. However, that process is somewhat unconventional compared to how you usually connect Bluetooth devices to your PC.
Connect your DualShock joypad to your PC using a mini-USB cable. Your joypad should begin charging.
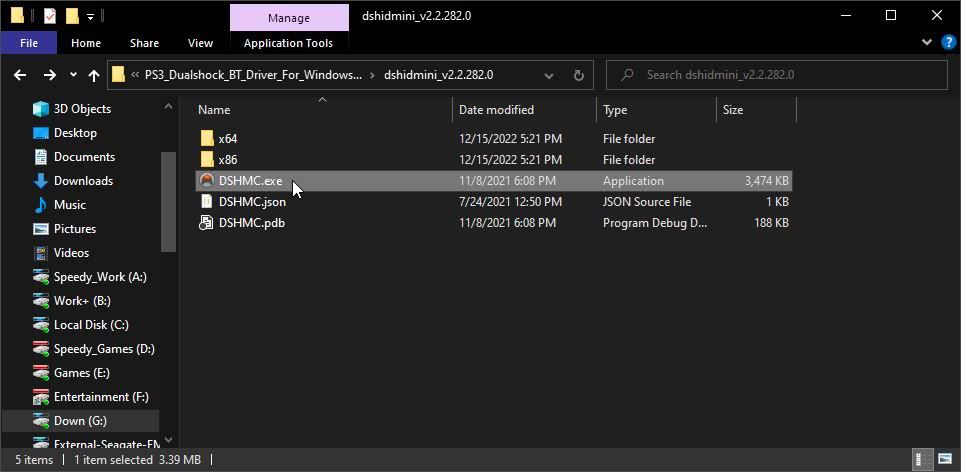
Pay a visit to the folder with DsHidMini’s extracted files. Double-click on theDSHMC.exe to run it.
You should see your “PlayStation controller” detected on the left side of the app’s window. Now, if you run Steam with its outstanding controller support, it should detect and configure your joypad for use in modern games. As for wireless? Unplug the cable, and your joypad should keep working as if nothing happened.
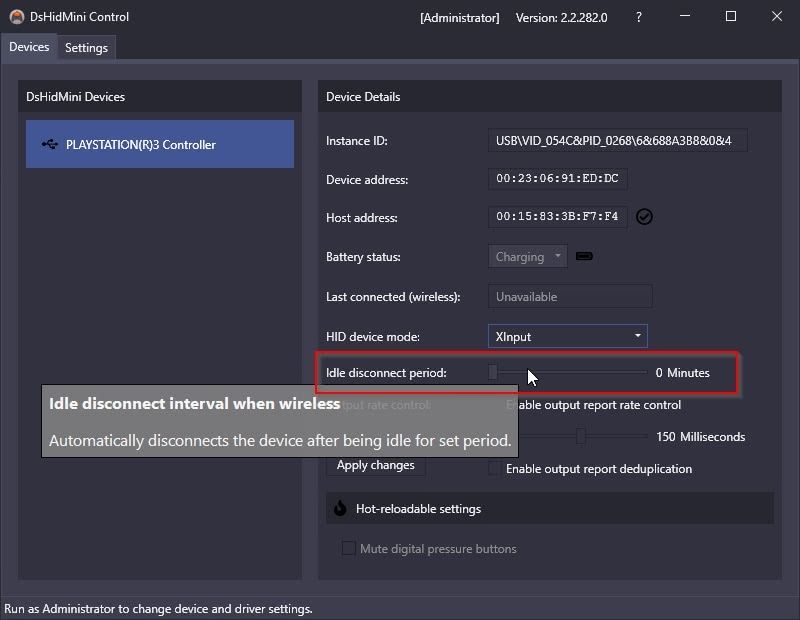
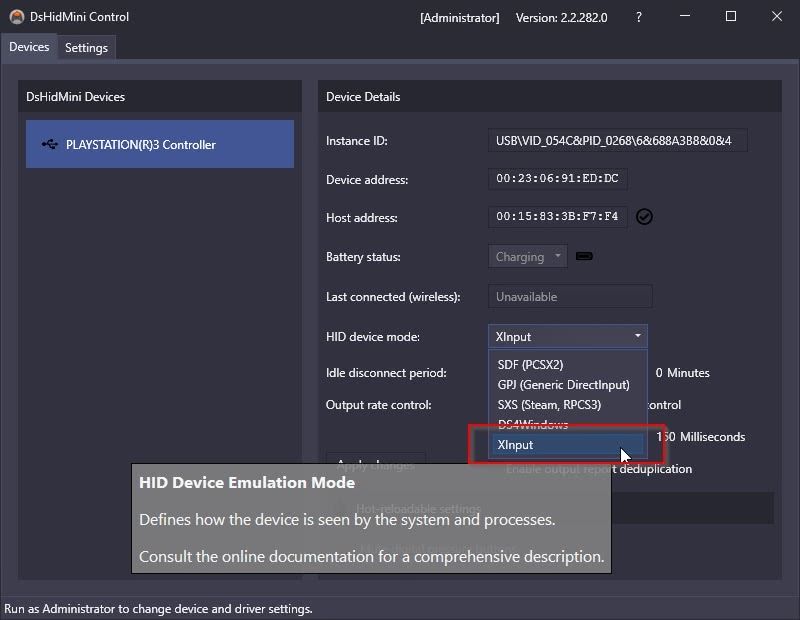
DsHidMini will have your controller recognized as anXInput device by default to maximize compatibility with modern software. But what if you want to use it on an older title that uses the olderDirectInput standard or to have emulators like PPSSPP, PCSX2, and RPCS3 recognize it as an actual PlayStation controller? Close DSHMC.exe, then right-click on it and re-run it, but this time chooseRun as Administrator . When its window shows up again, click on your controller on the left, and you’ll see more details about it on the right and some options you can tweak.
You can change the HID device mode fromXInput to another mode compatible with the software where you want to use your controller. You can also tweak itsIdle disconnect period or define after how much time of inactivity the controller should disconnect and turn off.
How to Remove Remnants of Old Drivers
If your joypad isn’t correctly detected, did you use another solution in the past to have it work under Windows, like Sony’s official driver or ScpToolkit? If yes, the problem might be a conflict between those and the DsHidMini and BthPS3 combo.
Removing the older drivers and software is somewhat complicated. Plus, the process varies based on the driver and software used. So, we won’t go over it in detail but offer a “generic guide” covering the basic steps for most cases.
Run theCommand Prompt orPowerShell with Administrative rights. Then, use the commands, in sequence, if you were using ScpToolkit:
These will stop and remove all active processes and services for PlayStation joypad-enabling software you might have used in the past.
Now, pressWin +X and chooseDevice Manager . Find and remove any mention of a “PlayStation controller” underHuman Interface Devices if you were using the official Sony drivers.
For ScpToolkit, look underlibusbK USB Devices instead, and right-click andUninstall any entry you see. Also, check for and, if found, uninstall the drivers for any “Bluetooth Dongle”, “DualShock controller”, or “PlayStation controller” underUniversal Serial Bus devices .
Then, downloadDriverStore Explorer from its GitHub page . Extract its archive and run the app. EnableForce Deletion on the right. Seek anylibusbK USB Devices , a standalonescpvbus.inf , orbluetoothhost.inf andds3controller.inf if using ScpToolkit.
Look forsixaxis.inf instead if using the official Sony driver. In both cases, place a checkmark next to any of those entries you’ll find, and then click onDelete Drivers on the right.
Afterward, exit the app, restart your PC, and let Windows re-detect any hardware and install the default drivers. Then, repeat the steps we covered above to install BthPS3 and DsHidMini from scratch.
How to Use Your PS3 DualShock in Games
Your controller should work now in most modern games that support Xbox joypads and for most joypad-enabled titles running under Steam.
When that’s not the case, run DSHMC.exe as an administrator and change the HID mode used by your joypad to the one supported by the game or app where you want to use it.
An easy way to find the HID mode to choose for a particular title is to check if there’s information about it atPCGamingWiki .
Using Classic PS3 Joypads on Your Modern-Day Games for Windows
Reusing your older joypads on your PC is the smartest choice. Apart from the fact you won’t have to pay a dime to do it, they’re great performers, tried and tested, and you’re already familiar with them.
Worst case scenario, you might have to buy a Bluetooth dongle for your PC, which would still come at a fraction of the cost of a brand-new controller.
]]>This Article Describes Enjoy Gameplay Without Extra Cables: Setup PS3 Controller on WindowsRestoring Lost Visual Function in Overwatch 2 on Windowshttps://win11-tips.techidaily.com/restoring-lost-visual-function-in-overwatch-2-on-windows/2024-10-25T16:08:09.456Z2024-10-26T14:18:11.525ZRestoring Lost Visual Function in Overwatch 2 on Windows
Have you encountered the “Your rendering device has been lost” error when playing Overwatch 2, which has taken you out of the active game session and caused the game to close? This is one of the most annoying errors encountered by Overwatch players, and it makes their gaming experience a complete disaster. But what causes it?
In this article, we will provide a brief explanation of the error message and its causes. We will also cover several solutions you can apply to solve the problem and enjoy playing the game again.
Disclaimer: This post includes affiliate links
If you click on a link and make a purchase, I may receive a commission at no extra cost to you.
An Overview of the “Your Rendering Device Has Been Lost” Error
The “Your rendering device has been lost” error occurs when your graphics card doesn’t respond appropriately, so you are taken back to your desktop following the game’s shutdown. It could result from overclocking the GPU, incompatible or overheating hardware, processes hogging resources, outdated graphics drivers, or simply a mismatch in your display settings.
To fix the “rendering device lost” error, ensure your hardware meets the minimum gaming requirement, no resource-hungry processes are hogging your resources, your GPU settings are not overclocked, your device has enough air circulation to cool down, the latest graphics drivers are running, and, most importantly, your game is updated.
In the following section, we will explain how to apply these fixes to prevent this error from occurring again.
1. Ensure Your Hardware Meets Overwatch 2’s System Requirements
First and foremost, you should ensure that your hardware meets the minimum system requirements for Overwatch 2. The minimum and recommended specifications for playing the game are explained onBattle.net . You should also check out theBattle.net list of supported video cards to see whether your card is compatible.
If your system doesn’t meet the specifications or the supported video card isn’t there, you should upgrade your hardware, and this problem will be solved. If your hardware is powerful and your specifications exceed what is needed to run the game, the problem lies elsewhere. If this is the case, begin applying the following fixes.
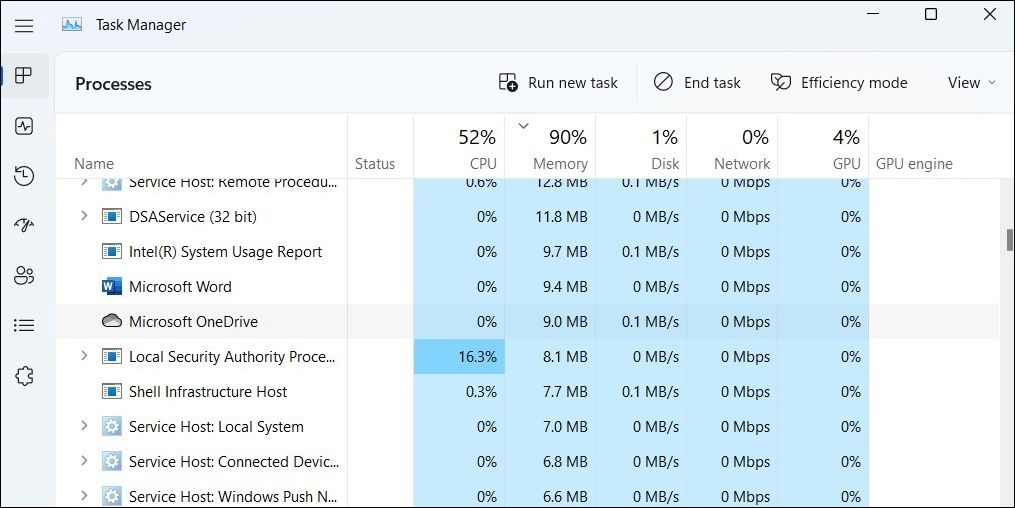
2. Close Resource-Hungry Processes
Overwatch 2 can only run smoothly if it has sufficient resources to process graphics. It won’t happen if your hardware has already been overloaded by other processes running concurrently with Overwatch 2. To let the game breathe comfortably, close any resource-hungry processes, you’re running alongside it.
Windows Task Manager is the best place to filter out such processes. To open Task Manager, pressCTRL + Shift + Esc . Once you’ve done that, go to theProcesses tab and filter out the processes that are overburdening your CPU and RAM the most. To end these processes, right-click on them and clickEnd task .
3. Reset Your GPU and CPU Settings
Have you recently modified your GPU and CPU settings from their normal to overclocking settings and begun experiencing this error? If so, there are two possible reasons for this:
You have overclocked the components improperly, causing a mismatch between the set frequency and voltage. Check out our guide to learnhow to overclock GPUs the right way .
With current overclocking settings, your PSU cannot provide enough power, or the heat generated is too much for your cooling system to handle.
Reset the GPU and CPU settings to their defaults and see if that fixes the issue. If it does, either run the hardware on default settings or install a better cooling system and get a PSU that can handle the power requirements.
4. Update Your Graphics Driver
Since improper graphics processing is the leading cause of the “rendering device lost” error, an outdated graphic driver may also be a contributing factor. You should therefore ensure that your device is running the most recent graphics drivers released by the manufacturer.
In our guide onupdating graphics drivers on Windows , we have explained the process of updating graphics drivers for most graphics cards. Thus, follow the relevant instructions in the article and make sure your graphics driver is up-to-date.
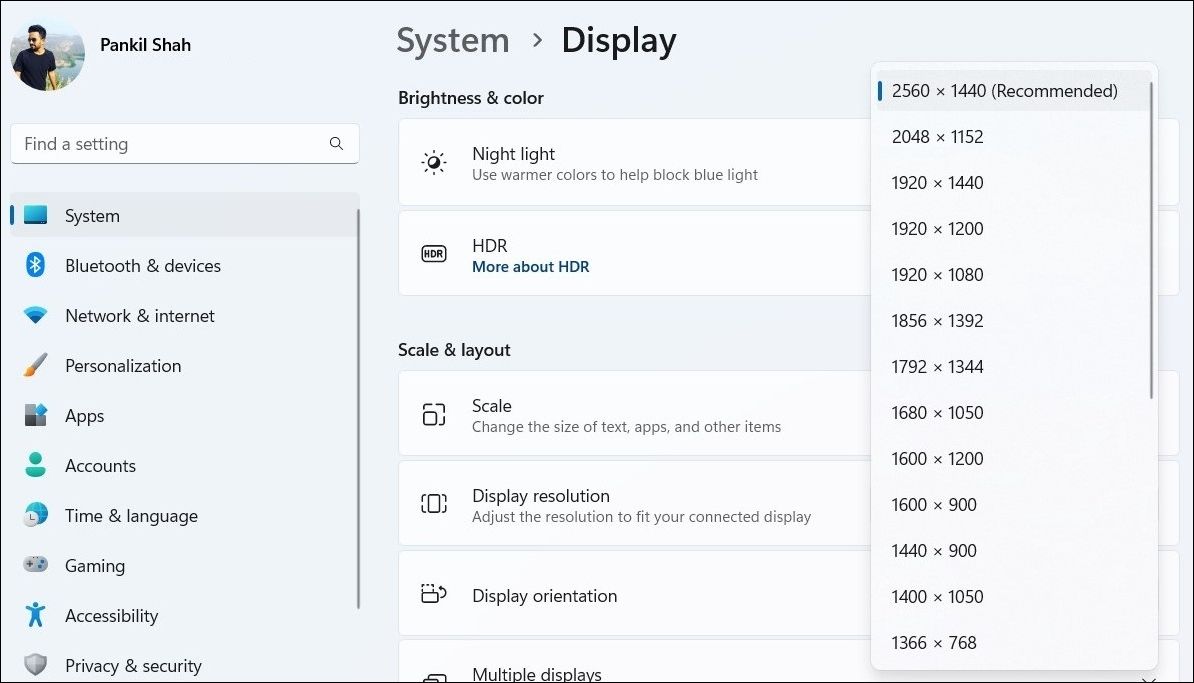
5. Change Display Settings
Have you changed your device’s display settings and then noticed Overwatch crashing? If so, you should revert the changes. Even if you haven’t changed your display settings in a while, follow these steps to ensure that they are correctly configured:
To open the Windows settings app, pressWin + I together.
In the left sidebar, click theSystem tab.
In the right pane, clickDisplay .
Set theScale percentage andDisplay resolution to the recommended value or modify them as needed.
5. After that, ensure theBrightness and color settings aren’t set too high.
Most GPU manufacturers allow you to change GPU scaling separately from dedicated software. So, if you or someone with whom you share your device has changed the scaling or resolution settings, this can also cause problems. Therefore, you should review your GPU settings to ensure that’s not the case.
Check whether lowering the resolution and scaling helps to resolve the error under discussion. If tweaking your display settings does not yield any results, keep applying the remaining fixes.
6. Ensure the SysMain Service Is Running
SysMain is a Windows service that maintains and improves the operating system’s performance. When turned off, you may experience system performance problems, which may result in errors when playing resource-intensive games. Follow these steps to ensure it’s running:
Search for**”Services”** in Windows Search and open theServices app.
Locate and double-click theSysMain service to open its properties.
If the service has been stopped, clickStart to restart it.
ClickOK after that.
Play the game again. If you encounter the same error, move on to the next fix.
7. Update or Reinstall Overwatch 2
If none of the fixes work and you encounter the same error in the middle of your gaming session, you should check whether a new update is available for the game. Update the game if it’s outdated, and everything will be fine. If the game is already updated, you should try reinstalling it as a last resort.
Problems with the game can ruin our day off from work or school. After you apply the fixes mentioned in the article, you should be able to fix the “Your rendering device has been lost” error. Furthermore, you should optimize your PC for gaming to avoid encountering similar performance-related problems in the future.
]]>This Article Describes Restoring Lost Visual Function in Overwatch 2 on Windows「MovaviのオンラインCR2処理 - すぐに使える無料JPEGへの変換サービス」https://win11-tips.techidaily.com/movavicr2-jpeg/2024-10-25T15:52:22.395Z2024-10-26T11:32:41.684Z[X + Y + Z < 21 \
The International Organization for Standardization
説明
M4Aは、国際標準化機構によって作成されたMPEG-4 Part 14規格に記載されています。MP4ファイルはオーディオとビデオを含むことができますが、M4Aはオーディオ専用に設計されています。このファイルタイプは、音楽、ポッドキャスト、オーディオブックの保存に使用できます。AppleのデバイスやプログラムはM4Aをネイティブでサポートしており、iTunesでは最も一般的なフォーマットです。Windowsでは、M4Aファイルを開いて再生するために、追加のコーデックパックをインストールする必要があるかもしれません。
]]><h2 id="X-Y-Z-21"><a href="#X-Y-Z-21" class="headerlink" title="[X + Y + Z < 21 \"></a>[X + Y + Z < 21 \</h2><p>当社はお客様に提供するサービスを向上するためComprehensive Beautiful AI Appraisal: Insights on Costs, Capabilities & Comparable Toolshttps://win11-tips.techidaily.com/comprehensive-beautiful-ai-appraisal-insights-on-costs-capabilities-and-comparable-tools/2024-10-25T15:51:39.400Z2024-10-26T09:10:03.165Z(v ) Is the Final Velocity (0 M/S)
Nous utilisons des cookies pour améliorer les services que nous vous proposons. En poursuivant votre navigation sur ce site, vous acceptez de les conserver conformément à notre Politique de confidentialité .
Si vous êtes un joueur, vous savez combien il est important que votre système fonctionne à pleine capacité. Même un décalage d’une milliseconde peut signifier “Game Over”. Cet article vous explique comment optimiser Windows 10 pour les jeux.
Conseil
Description
Régler les paramètres graphiques d’un jeu
Vérifiez les paramètres graphiques du jeu, puis consultez votre compteur de FPS.
Mettez à jour les pilotes de votre GPU
Vérifiez auprès du fabricant car Windows 10 ne le fait pas automatiquement.
Installer DirectX 12
Une application indispensable pour tout joueur.
Utiliser le mode de jeu Windows 10
Il est déjà intégré à Windows 10 et dédie des ressources système aux jeux.
Gérer les heures actives
Windows 10 installe les mises à jour en fonction de ces paramètres. Configurez-les pour que votre ordinateur ne se mette pas à jour pendant que vous jouez.
Ajustez les paramètres des effets visuels
Windows Exécute des graphiques en arrière-plan constamment. Modifiez vos paramètres pour vous concentrer sur le jeu.
Gérer les mises à jour automatiques de Steam
Même problème que pour les Windows 10 heures actives.
Désactiver les notifications
Allez dans vos “paramètres de notifications et d’actions” et désactivez les notifications.
Régler le panneau de contrôle NVIDIA
Modifiez les paramètres tels que “Ambient Occlusion” et “Anisotropic Filtering”.
Régler le centre de contrôle AMD/ATI
Activez les options “ Image Sharpening “ et “ Overclocking “ pour améliorer les performances.
Réduire la résolution dans un jeu
Vérifiez les paramètres du jeu et baissez-les d’un cran ou deux.
Désactiver l’accélération de la souris
Ce n’est pas un problème de performance du PC, mais cela rendra les mouvements de votre souris plus précis.
Utilisez une carte SSD
La mise à jour vers le SSD peut réduire considérablement les temps de chargement.
Mettez à niveau votre GPU/CPU
Veillez à vérifier la mémoire et la bande passante avant de faire un achat.
Mettez votre RAM à niveau
Le minimum de base est de 8 Go. Les titres plus récents nécessitent 12 Go. Mais vous aurez besoin de 16 à 32 Go pour rester au top.
Désactiver l’algorithme de Nagle
Aide à améliorer la latence de votre connexion.
Surcadencez votre carte graphique
Utilisez MSI Afterburner pour le faire, mais faites attention à la surchauffe.
Désactiver SysMain et Prefetch
Des processus faciles à désactiver qui vous aideront à accélérer votre système.
Utilisez une alimentation externe pour les ordinateurs portables
Faites cela pour éviter les fonctions d’économie d’énergie de votre ordinateur portable.
Utiliser un plan d’alimentation performant
Si vous ne cherchez pas à optimiser un ordinateur portable, utilisez ce paramètre pour une meilleure jouabilité.
Empêchez votre ordinateur portable de surchauffer
Veillez à ce que votre ordinateur portable soit bien ventilé. Essayez un bureau pour ordinateur portable !
Mettez à niveau le GPU et la RAM de votre ordinateur portable
Confiez l’installation à un technicien si vous n’avez pas l’expérience des ordinateurs portables.
Désactiver les services d’arrière-plan Windows
Désactivez les services d’arrière-plan pour accélérer votre ordinateur portable Windows.
Un facteur clé qui peut ralentir votre expérience de jeu est l’utilisation d’un enregistreur de qualité inférieure pendant le jeu. C’est pourquoi notre choix spécial pour optimiser votre PC pour les jeux sur Windows 10 est Gecata by Movavi. Ce programme peut enregistrer le gameplay en 4K et jusqu’à 120 FPS sans perte de performance. Il est facile à utiliser et est livré avec une version d’essai gratuite.
Qu’est-ce qu’un FPS faible et comment puis-je le vérifier ?
Si votre jeu commence à ralentir et que l’image est saccadée, surtout lorsqu’elle bouge, c’est que votre taux d’images par seconde (IPS) est faible. Cela se produit lorsque le matériel de votre ordinateur a du mal à faire fonctionner votre jeu ou fait des heures supplémentaires. S’il travaille trop, la vitesse du jeu ralentit.
La carte graphique travaille pour rendre les images fixes, ou frames, pendant que vous jouez à un jeu. Elle travaille en collaboration avec d’autres composants matériels tels que la RAM, le CPU et le GPU pour créer une expérience de jeu complète. En cas d’arrêt de l’un de ces composants, votre FPS commencera à baisser. La plupart des joueurs préfèrent un taux de 60 FPS en jouant, mais la plupart des jeux sont en fait très bien à 30 FPS.
Le PC surpasse les consoles à cet égard, car il est toujours possible d’accélérer le taux de FPS sur un PC avec des modifications, alors que modifier une console n’est pas possible. Les joueurs sur PC peuvent également augmenter la fréquence de rafraîchissement de leur écran, modifier d’autres paramètres système pour le jeu, et bien plus encore.
Cet article vous présente les réglages de performance pour les jeux que vous pouvez effectuer sur Windows 10 pour améliorer votre expérience de jeu.
Avant de commencer, il est toujours bon d’avoir un compteur de FPS dans le jeu, afin de pouvoir suivre vos progrès et tester les réglages qui fonctionnent. De nombreux jeux les ont préinstallés, mais si vous installez MSI Afterburner , vous ne serez jamais sans cet outil utile dans n’importe quel jeu.
Comment rendre Windows 10 plus rapide pour les jeux (corrections rapides)
Vous voulez savoir comment rendre Windows 10 plus rapide pour jouer avec une solution rapide ? Suivez ces conseils et recommencez à jouer !
Régler les paramètres graphiques d’un jeu
Chaque jeu possède des paramètres graphiques spécifiques qui peuvent vous aider à optimiser votre expérience de jeu. En voici trois que vous devriez vérifier dans le menu des paramètres du jeu avant de jouer.
Anti-crénelage : Lorsqu’un jeu utilise le crénelage, il corrige les petites lignes irrégulières et inégales autour de textures ou d’objets spécifiques. Pensez aux lignes floues que vous voyez lorsque l’herbe apparaît dans la plupart des jeux. Chaque jeu possède différents niveaux d’anticrénelage (SSAA, TAA, MSAA, etc.). - et vous pouvez généralement les modifier dans les paramètres du jeu pour obtenir de meilleures performances.
Flou de mouvement : Pour rendre les choses plus réalistes, les jeux intègrent des flous de mouvement afin d’émuler la vie réelle. Le désactiver peut souvent vous aider à économiser de la puissance graphique.
Synchronisation verticale : Parfois, lorsque vous vous déplacez rapidement, la carte graphique ne peut pas suivre et l’écran semble se déchirer en son milieu. La synchronisation verticale aide à résoudre ce problème mais ajoute un certain décalage. Une façon de corriger ce problème est d’utiliser le VSync adaptatif ou le Triple Buffering. Vous utiliserez davantage de puissance de la carte graphique, mais vous trouverez un juste milieu entre les déchirures et le décalage.
Mettez à jour les pilotes de votre GPU
Le GPU (Graphics Processing Unit) est crucial pour votre expérience de jeu et pour les performances de votre PC dans les jeux, mais vous devez maintenir les pilotes de votre GPU à jour pour en profiter. De plus, un pilote obsolète peut entraîner des bogues, des problèmes et des pannes du système. Nous vous recommandons donc de prendre ce problème au sérieux et de prendre soin de vos pilotes.
Bien que Windows 10 ne mette pas automatiquement à jour les pilotes de votre GPU, les fabricants créent souvent des logiciels spéciaux sous la forme de panneaux de contrôle GPU qui effectuent des vérifications régulières des mises à jour et vous avertissent si une nouvelle mise à jour est disponible. N’ignorez pas ces notifications, car le processus de mise à jour prend peu de temps et peut vous éviter bien des ennuis pendant le jeu.
Par exemple, selon le fabricant de votre GPU, vous pouvez télécharger soit Radeon Software Adrenaline, soit GeForce Experience. Ces deux programmes vérifient les mises à jour automatiques et proposent des options d’optimisation puissantes. De plus, GeForce Experience comprend un logiciel de capture et de streaming de jeux et fournit des pilotes spéciaux Game Ready, conçus par NVIDIA en collaboration avec les principales sociétés de développement de jeux.
Vous pouvez mettre à jour votre pilote directement à partir des propriétés Windows, mais le moyen le plus sûr d’obtenir le dernier pilote est d’aller directement sur le site Web du fabricant, de choisir votre modèle de GPU et de vérifier les mises à jour.
Si vous ne connaissez pas les spécifications de votre GPU, faites un clic droit sur le Bureau, choisissez Paramètres d’affichage, puis Paramètres d’affichage avancés et cliquez sur Propriétés de l’adaptateur d’affichage.
Voici quelques liens vers les mises à jour des pilotes des fabricants les plus populaires :
DirectX 12 est un outil indispensable pour quiconque souhaite jouer à des jeux sur Windows 10. Pour faire simple, DirectX est l’application que le jeu utilise pour communiquer avec votre ordinateur et lui dire quoi faire. DirectX 12 est une grande amélioration par rapport à son prédécesseur, DirectX 11, car il permet aux cartes graphiques de tirer des ressources de plus d’un cœur du processeur d’un PC, ce qui augmente les fréquences d’images, améliore les effets graphiques et réduit la consommation d’énergie. Des tests ont montré une différence de 85 à 300 % dans les performances de jeu entre la version 11 et la version 12.
Pour bénéficier des fonctionnalités de DirectX 12, le jeu doit avoir été développé avec cette version. La bonne nouvelle est que la liste de ces jeux s’allonge chaque jour, car de plus en plus de sociétés de jeux adoptent cette version.
Pour vérifier que vous disposez de la dernière version de DirectX, appuyez sur la touche Windows + R, tapez “dxdiag” et cliquez sur OK. L’outil de diagnostic DirectX s’ouvre.
Si vous n’avez pas DirectX 12, allez-y et installez-le ; le processus ne prendra que quelques minutes. Appuyez sur la touche Windows + I, choisissez Mise à jour et sécurité et cliquez sur Vérifier les mises à jour dans l’onglet Windows. Mise à jour. Attendez que l’installation se termine.
Utiliser le mode de jeu Windows 10
Voici un moyen simple et rapide d’optimiser Windows 10 pour les jeux en utilisant un outil intégré au système. Le mode Jeu, apparu dans les versions les plus récentes du système d’exploitation, est conçu pour améliorer l’expérience de jeu en consacrant davantage de ressources système aux jeux. Il empêche également d’autres programmes, tels que Windows Update, d’accaparer les ressources du système pendant que vous jouez.
Pour localiser les paramètres du mode jeu, appuyez sur la touche Windows + I, tapez “mode jeu” dans la boîte de recherche et cliquez sur Contrôler le mode jeu pour optimiser votre PC pour les jeux.
Dans le menu qui s’ouvre, cliquez sur Mode Jeu. Passez à On pour activer le Game Mode. Si votre PC prend en charge le Mode Jeu, le système optimisera les performances de votre PC pour les jeux.
Si vous ne trouvez pas ces paramètres, cela signifie que la dernière Windows Creators Update n’est pas installée sur votre PC.
Gérez vos heures actives
Oui, Windows 10 peut installer des mises à jour et redémarrer votre ordinateur en plein milieu de votre session de jeu sans même un simple “excusez-moi”. Ouch. Cela peut être décevant, c’est le moins que l’on puisse dire, surtout si vous êtes un joueur compétitif et que votre sortie non planifiée peut affecter vos coéquipiers ou votre classement.
Mais même en l’absence de tels redémarrages “en pleine face”, qui sont en fait assez rares, le téléchargement des mises à jour en arrière-plan limite vos vitesses de connexion et occupe la mémoire vive de votre PC.
Bien que votre première réaction puisse être de désactiver complètement les mises à jour automatiques, nous vous le déconseillons. La mise à jour agressive de Windows sans demander la permission est ainsi faite parce que dans les versions précédentes, les utilisateurs ne mettaient pas à jour de leur propre gré et leurs systèmes étaient donc régulièrement exposés aux cybermenaces. Rappelez-vous que les mises à jour automatiques de Windows ne sont pas là uniquement pour ruiner votre raid, mais aussi pour protéger votre système, le maintenir à jour et le faire fonctionner de manière optimale.
Ainsi, une autre solution plus “ douce “ et bien plus intelligente consiste à définir vos heures d’activité de manière appropriée. Vous pouvez spécifier vos horaires de jeu et de travail dans Windows et empêcher le système d’exploitation de télécharger des mises à jour pendant ces périodes. Windows utilisera alors vos heures non actives pour mettre à jour et redémarrer votre système.
Pour définir vos heures actives, appuyez sur la touche Windows + I, puis allez dans Mise à jour et sécurité et cliquez sur Modifier les heures actives. Vous pouvez alors définir jusqu’à 18 heures actives, en laissant un intervalle de 6 heures (il faut bien dormir parfois, non ?) pour que Windows installe vos mises à jour.
Si vous êtes un joueur de nuit ou si vos heures de sommeil varient considérablement, de sorte que vous ne pouvez pas définir une heure de repos spécifique, nous vous conseillons (en plus de changer vos habitudes de sommeil) de vous assurer que Windows vous rappelle chaque fois qu’il voudra redémarrer afin que, si cela se produit pendant que vous jouez, vous puissiez toujours le retarder.
Pour ce faire, retournez à Windows Update, cliquez sur Advanced options et assurez-vous que l’interrupteur sous We’ll show a reminder when we’re going to restart est activé.
Réglez les paramètres de vos effets visuels
Les interfaces utilisateur graphiques (IUG) de Windows 10 regorgent d’effets visuels fantaisistes. Néanmoins, ces jolis graphiques d’arrière-plan, dont la plupart sont activés par défaut, peuvent affecter la puissance de traitement disponible de votre PC lorsqu’un jeu est en cours d’exécution au premier plan. Ainsi, une façon d’optimiser Windows 10 pour les performances de jeu est de sacrifier certains, voire tous, ces paramètres.
Une fois encore, appuyez sur la touche Windows + I. Ensuite, tapez “performance” et sélectionnez Ajuster l’apparence et les performances de Windows. Dans la fenêtre qui s’ouvre, choisissez Ajuster pour une meilleure performance. Ensuite, allez dans l’onglet Avancé et vérifiez que le paramètre est appliqué aux programmes.
Si vous souhaitez conserver un minimum de graphismes pour que votre interface n’ait pas un aspect si terne, nous vous recommandons de garder au moins ces trois options de la liste cochées :
Afficher les vignettes au lieu des icônes.
Afficher le contenu de la fenêtre pendant le glissement.
Lisser les bords des polices d’écran.
Gérer les mises à jour automatiques de Steam
Le problème ici est le même qu’avec Windows Mises à jour. Steam met automatiquement à jour tous vos jeux, même ceux auxquels vous n’avez pas joué depuis longtemps. Les mises à jour en arrière-plan consomment la mémoire de votre PC et peuvent ralentir les processus de jeu.
Pour empêcher Steam de mettre à jour les jeux pendant que vous jouez, allez dans votre client Steam et trouvez les options de mise à jour dans Steam - Paramètres - Téléchargements. Décochez la case Autoriser les téléchargements pendant le jeu.
Par ailleurs, les jeux sur Steam sont mis à jour en permanence et il arrive souvent que de nouveaux bogues apparaissent dans les nouvelles mises à jour ou que certains éléments cessent de fonctionner.
Pour ramener la version d’un jeu à celle dont vous avez besoin, ouvrez Steam, faites un clic droit sur le jeu, choisissez Propriétés et allez dans l’onglet Bêta. Choisissez la version souhaitée dans le menu déroulant.
Désactiver les notifications
Les notifications au milieu d’un jeu consomment de la puissance CPU et peuvent nuire à votre champ de vision pendant le jeu. Suivez les étapes suivantes pour désactiver toutes les notifications avant de jouer :
Appuyez sur la touche Windows ou cliquez sur l’icône Windows en bas à gauche de votre écran.
Tapez “Notifications” dans la barre de recherche et sélectionnez Notifications et paramètres d’actions dans les résultats.
Lorsque la nouvelle fenêtre s’ouvre, mettez le commutateur à bascule situé à côté de l’option Obtenir des notifications d’applications et d’autres expéditeurs sur Désactivé. Vos notifications sont maintenant désactivées.
Vous pouvez également faire défiler la liste et désactiver les notifications par application.
Régler le panneau de contrôle NVIDIA
Si vous utilisez une carte graphique NVIDIA, il existe des paramètres spécifiques à la carte dans le panneau de configuration. Voici quelques-uns des meilleurs paramètres Windows 10 pour les cartes NVIDIA pour les jeux.
Occlusion ambiante : Activez-la et augmentez son niveau jusqu’à 16x.
Filtrage anisotropique : Passez sur Off.
DSR - Facteurs et lissage : Désactiver.
Mode faible latence : Activez-le.
Mode de gestion de l’énergie : Passez à Préférer les performances maximales.
Optimisation Threaded : Passez à Auto.
Régler le centre de contrôle AMD/ATI
Les cartes graphiques AMD ont également beaucoup de paramètres. Certains disent qu’elles rivalisent même avec leur concurrent NVIDIA. Modifiez ces paramètres pour optimiser les jeux de Windows 10.
Activez l’accentuation des images d’AMD en cliquant sur Paramètres, puis sur Graphiques pour trouver le paramètre. Vous pouvez l’activer pour des jeux individuels ou globalement.
Augmentez vos performances graphiques en utilisant l’overclocking. Pour ce faire, cliquez sur l’onglet Performance, puis sur Tuning, sélectionnez Automatique, et enfin GPU Overclocked.
Si vous utilisez une carte AMD, vous n’avez pas besoin de MSI Afterburner pour contrôler les performances. Il vous suffit d’appuyer sur Ctrl + Shift + O pour que vos statistiques apparaissent dans le jeu.
Réduire la résolution dans un jeu
Cette solution entre facilement dans la catégorie des “solutions rapides”. Parfois, votre système ne peut tout simplement pas gérer un jeu, et vous n’avez pas le temps de chercher des solutions à plus long terme. Allez dans les paramètres système du jeu et réduisez la résolution d’un niveau. Surveillez ensuite votre FPS jusqu’à ce que les choses s’améliorent.
Désactiver l’accélération de la souris
Celui-ci n’a rien à voir avec l’amélioration des performances de votre PC en matière de jeu, mais il s’agit plutôt d’un conseil pour vous permettre d’améliorer vos performances personnelles en matière de jeu. L’accélération de la souris est un paramètre qui fait bouger votre souris en se basant non seulement sur la détection des mouvements physiques mais aussi sur la vitesse. Cette option rend en fait les mouvements de votre souris moins précis, car elle ajoute un paramètre supplémentaire au mouvement que vous transmettez à la souris. Étant donné que la précision est cruciale pour la précision de la visée dans les jeux de tir à la première personne, si vous êtes un fan de Call of Duty, Counter-Strike ou Overwatch, vous devriez absolument désactiver cette option.
Pour ce faire, appuyez sur la touche Windows + I. Tapez “pointeur de la souris” dans la zone de recherche. Choisissez Modifier l’affichage ou la vitesse du pointeur de la souris. Dans la fenêtre qui s’ouvre, allez dans l’onglet Options du pointeur et décochez la case Améliorer la précision du pointeur.
Vous pouvez également modifier le curseur de la vitesse du pointeur pour créer la configuration qui vous convient le mieux.
Comment améliorer les performances de jeu sur Windows 10 (corrections avancées)
Vous ne savez toujours pas comment rendre Windows 10 plus rapide pour les jeux ? Utilisez ces correctifs avancés pour une solution à long terme.
Optez pour un SSD
Passer d’un disque dur à un disque SSD n’améliorera pas radicalement les performances de vos jeux, mais cela peut vous aider à réduire considérablement les temps de chargement. Il est vrai que les disques durs SSD peuvent être assez chers et il peut sembler que les temps de chargement ne sont pas une question si importante pour investir votre argent. Mais si ce n’est probablement pas la première chose à laquelle vous pensez lorsque vous accélérez votre ordinateur portable, ce n’est pas non plus la dernière. Les jeux d’aujourd’hui prennent de plus en plus d’espace disque, donc si vous voulez jouer aux derniers jeux, passer d’un disque dur à un disque SSD peut être un véritable gain de temps et vos temps de chargement de jeu peuvent passer de 30-40 secondes à 2-3, ce qui est assez significatif.
Quant à l’aspect financier, si un gros SSD pour votre système d’exploitation et vos jeux est trop cher pour vous, prenez un petit SSD pour votre système d’exploitation et gardez un gros disque dur pour les jeux.
Mettez à niveau votre GPU/CPU
Mettez à niveau votre GPU et votre CPU environ tous les quatre ans pour que tout fonctionne bien. Mais si vous êtes un joueur, vous devrez peut-être le faire plus tôt, car la technologie évolue beaucoup plus rapidement dans ce secteur.
Le choix de la première mise à niveau dépend des types de jeux auxquels vous jouez. Si vous n’avez pas besoin de graphismes extrêmes et jouez à des jeux plus rapides, le processeur est le meilleur choix. Mais si vous aimez les histoires numériques ou les jeux basés sur le monde avec beaucoup de personnages et d’arrière-plans non jouables, un GPU pourrait vous être plus utile.
Quoi qu’il en soit, assurez-vous que l’équilibre des performances entre les deux est délicat, car l’un ne fonctionne pas sans l’autre. Vérifiez la mémoire et la bande passante de toute mise à niveau potentielle.
Mettez votre RAM à niveau
La mise à niveau de votre RAM n’aura pas un effet aussi important que la mise à niveau du processeur ou du GPU. Mais elle peut donner à votre matériel le coup de pouce dont il a besoin pour augmenter votre fréquence d’images et améliorer votre expérience de jeu globale.
De nombreux jeux requièrent une mémoire vive de 8 Go, mais ce chiffre augmente régulièrement, car les titres les plus récents recommandent une mémoire vive de 12 Go.
Si vous voulez rester en tête de la courbe, 16 Go suffiront pour l’instant. Mais si vous voulez utiliser des services de streaming en arrière-plan comme Twitch, Discord et YouTube, vous devrez passer à 32 Go pour pouvoir tout faire fonctionner sans problème.
Désactiver l’algorithme de Nagle
En gros, l’algorithme de Nagle améliore l’efficacité des réseaux TCP/IP en créant des paquets de données, ce qui réduit le nombre de paquets à envoyer sur le réseau. Ce processus affecte votre connexion Internet, la rendant moins stable. La désactivation de cet algorithme sur votre PC peut contribuer à des problèmes de latence lorsque vous jouez à des jeux en ligne.
Ouvrez votre Windows Éditeur de registre en cliquant sur la touche Windows + Q, en tapant “regedit” et en cliquant sur le fichier regedit. Faites défiler le menu HKEY_LOCAL_MACHINE pour trouver le chemin suivant : “\SYSTEM\CurrentControlSet\Services\Tcpip\Parameters\Interface”. Cela vous mènera au menu qui comprend des dossiers avec de nombreux chiffres et lettres. Pour accéder au bon fichier, faites correspondre votre adresse IP à l’adresse DhcpIPAddress listée dans l’un de ces dossiers.
Pour trouver votre adresse IP, appuyez sur la touche Windows + X et suivez ces étapes : Panneau de configuration - Réseau et Internet - Centre Réseau et partage - Connexions - Détails - Adresse IPv4.
Vous pouvez maintenant retrouver le dossier avec la bonne adresse IP. Cliquez avec le bouton droit de la souris sur ce dossier et sélectionnez Nouveau - Valeur DWORD (32 bits). Vous devrez créer deux de ces valeurs : TcpAckFrequency et TCPNoDelay. Double-cliquez sur chacune d’elles et réglez leurs paramètres sur 1. L’algorithme de Nagle est maintenant désactivé.
Surcadencez votre carte graphique
Overclocker vos cartes graphiques signifie les pousser au-delà des spécifications affichées sur la boîte. De nombreuses cartes récentes disposent d’une fonction automatique permettant de le faire dans les paramètres de contrôle, mais il existe également des moyens de le faire manuellement. Veillez à bien connaître votre carte graphique, car si vous repoussez ses limites, elle risque de surchauffer.
Pour overclocker :
Vérifiez les paramètres standard ou de référence de votre carte.
Utilisez un programme comme MSI Afterburner pour augmenter l’horloge centrale de la carte. Faites-le par intervalles de 10 MHz et réinitialisez les benchmarks au fur et à mesure.
En option, vous pouvez également augmenter le voltage et l’horloge de la mémoire, mais surveillez de près la température de votre carte lorsque vous faites cela.
Jouez à un jeu et vérifiez les performances.
Désactiver SysMain et Prefetch
C’est l’un des services faciles à désactiver sur Windows 10. Ces programmes essaient de vous aider à accéder plus rapidement aux données, mais ils ajoutent finalement des opérations inutiles qui ralentissent les jeux. Voici comment les désactiver :
SysMain
Appuyez sur Win + R pour ouvrir l’invite Exécuter.
Tapez msc et appuyez sur Entrée.
Double-cliquez sur SysMain.
Sélectionnez Désactivé dans la liste déroulante.
Cliquez sur OK.
Préférez
Appuyez sur Win + R pour ouvrir l’invite d’exécution.
Tapez “regedit >” et appuyez sur Entrée.
Cliquez sur Oui.
Allez dans PrefetchParameters dans HKLM.
Double-cliquez sur la valeur REG_DWORD EnablePrefetcher.
Définissez la valeur sur 0.
Cliquez sur OK.
Comment accélérer l’exécution des jeux sur un ordinateur portable Windows 10
Vous voulez savoir comment améliorer les performances de jeu sur un ordinateur portable Windows 10 ? Ces conseils vous aideront à accélérer les choses !
Utiliser une alimentation externe
Windows 10 dispose de nombreuses fonctions d’économie d’énergie pour les ordinateurs portables afin de les maintenir en vie pendant de plus longues durées. Cela affectera considérablement l’expérience de jeu car votre RAM, vos cartes graphiques et votre CPU ne fonctionneront pas à pleine capacité. Pour remédier à ce problème, connectez votre ordinateur portable à son alimentation externe et assurez-vous que vos paramètres de contrôle permettent d’obtenir des performances optimales lorsqu’il est connecté.
Utiliser un plan d’alimentation performant
Pour modifier votre plan d’alimentation, cliquez sur la touche Windows + I, tapez “alimentation” dans la zone de recherche, choisissez Paramètres d’alimentation et de veille, puis Paramètres d’alimentation supplémentaires. Si vous ne voyez pas de plan d’alimentation haute performance dans la partie gauche de l’écran, cliquez sur Créer un plan d’alimentation et choisissez Haute performance.
Empêchez votre ordinateur portable de surchauffer
Les ordinateurs portables sont réputés pour leur surchauffe, car tous les composants sont serrés dans le châssis et l’air circule peu. En cas de surchauffe, le système ralentit et les performances de jeu aussi. Utilisez ces conseils de prévention :
Vérifiez et nettoyez toujours vos ventilateurs.
Pour la ventilation, essayez de surélever votre ordinateur portable ou utilisez un bureau conçu pour les ordinateurs portables.
Réglez les paramètres de vos ventilateurs pour qu’ils ne soient pas trop sollicités.
Si vous le pouvez, jouez sur votre ordinateur portable dans un environnement frais.
Mettez à niveau votre GPU et votre RAM
Nous avons déjà abordé ce sujet pour les PC, mais votre ordinateur portable peut également être équipé d’un processeur graphique et d’une mémoire vive. Suivez les mêmes protocoles, et si vous n’avez pas l’habitude de travailler avec des ordinateurs portables, il est préférable de confier l’installation à un technicien expérimenté.
Désactiver les services d’arrière-plan Windows
Les ordinateurs portables sont souvent équipés de nombreux services d’arrière-plan qui fonctionnent pour éviter la surchauffe et optimiser les performances avec des composants plus petits. Ces services peuvent facilement nuire aux performances de jeu s’ils ne sont pas désactivés. Voici les étapes à suivre :
Appuyez sur les touches Windows + R et utilisez l’invite Exécuter.
Tapez “msconfig” et cliquez sur OK.
Choisissez l’onglet Services.
Cochez la case Masquer tous les services Microsoft.
Sélectionnez Tout désactiver, puis cliquez sur Appliquer et OK.
Sélectionnez Redémarrer dans la boîte de dialogue qui s’ouvre.
Résumé
Nous espérons que cet article vous a donné quelques idées sur la façon de faire fonctionner les jeux plus rapidement sur Windows 10 et d’améliorer votre expérience de jeu. Voici quelques-uns des principaux conseils à utiliser pour optimiser votre système :
Modifiez les paramètres de vos jeux : Vous pouvez éventuellement modifier des éléments comme la résolution, le flou de mouvement et l’anticrénelage.
Mettez votre matériel à niveau : si votre RAM, votre GPU ou votre CPU ne sont pas à la hauteur, il est peut-être temps de les mettre à niveau pour les jeux modernes et une meilleure expérience de jeu.
Modifiez les paramètres de votre carte graphique : Les cartes graphiques modernes ont leurs propres paramètres que vous pouvez ajuster pour optimiser votre système pour les jeux. Vérifiez les paramètres de l’occlusion ambiante, du filtrage anisotropique et du DSR.
Gecata by Movavi
Logiciel d’enregistrement de jeux et de streaming gratuit et simple
L’article ci-dessus énumère une série de mesures que vous pouvez prendre pour optimiser votre ordinateur portable ou de bureau pour les jeux. Voici les principaux conseils :
Vérifiez vos paramètres graphiques dans le jeu.
Modifiez les paramètres de votre carte graphique
Mettez à niveau votre GPU et/ou votre CPU
Vérifiez les paramètres de performance de votre Windows.
Qu’est-ce qui ralentit mon ordinateur ?
Il y a une longue liste de choses qui pourraient ralentir votre ordinateur. Voici une liste de raisons que vous pouvez vérifier :
L’algorithme de Nagle est activé
Votre ordinateur exécute des mises à jour sur des heures non actives
Les pilotes du GPU ne sont pas à jour
Vous utilisez DirectX 11 et devez effectuer une mise à jour.
Le système fonctionne avec des paramètres de performance inférieurs pour économiser la batterie.
Comment faire fonctionner un ordinateur plus rapidement ?
Si vous voulez savoir comment rendre votre ordinateur plus rapide pour jouer, voici quelques conseils rapides :
Passez à une carte SSD
Désinstallez tous les programmes inutilisés
Effectuez un nettoyage du disque et une maintenance du système
Passez en revue votre programme de démarrage et désactivez ceux que vous n’utilisez pas.
Installez de la RAM supplémentaire
Windows 10 est-il meilleur pour les jeux ?
Lorsque l’on compare l’expérience de jeu des versions précédentes de Windows à Windows 10, l’amélioration des performances est extraordinaire. Si vous n’êtes pas sûr de vouloir faire une mise à jour, la décision est simple. Windows 10 offrira toujours une meilleure expérience.
Comment obtenir 60 fps dans un jeu ?
Atteindre 60 FPS dans un jeu n’est pas différent des conseils pour accélérer votre système en général, mais voici ce que vous pouvez faire :
Améliorez votre GPU et votre CPU
Mettez à niveau ou installez de la RAM supplémentaire
Passez Windows 10 en “mode jeu”.
Vérifiez les paramètres graphiques de votre jeu.
Installez les derniers pilotes pour votre carte graphique
Pourquoi ai-je des fps faibles sur mon PC haut de gamme ?
La baisse du nombre de FPS se produit lorsque votre ordinateur n’a pas la mémoire ou la puissance nécessaire pour faire tourner le jeu à pleine vitesse. Parmi les problèmes les plus courants à l’origine d’une baisse du nombre d’images par seconde, citons les pilotes de cartes graphiques obsolètes, les cartes graphiques de qualité inférieure, les vieux processeurs et le manque de mémoire vive.
Ce n’est pas parce que vous dépensez de l’argent pour un ordinateur qu’il est équipé du dernier cri. Le matériel est plus important que les autres caractéristiques de conception ou de logiciel. En outre, les jeux vidéo modernes placent toujours la barre plus haut en matière de capacité de performance, ce qui est donc relatif d’un jeu à l’autre.
Rejoignez-nous et obtenez des offres promo et des astuces !
1.5М+ utilisateurs déjà abonnés à notre newsletter
Votre adresse de messagerie
Je m’inscris
En vous inscrivant, vous acceptez de recevoir nos courriels de marketing et acceptez que Movavi utilise vos données personnelles conformément à notre Politique de confidentialité . Vous confirmez également que vous répondez aux critères d’âge minimum .
]]><h2 id="v-Is-the-Final-Velocity-0-M-S"><a href="#v-Is-the-Final-Velocity-0-M-S" class="headerlink" title="(v ) Is the Final Velocity (0 Momo Utilizar CapCut No Pc - Guia Passo a Passo Para Download E Usohttps://win11-tips.techidaily.com/como-utilizar-capcut-no-pc-guia-passo-a-passo-para-download-e-uso/2024-10-25T15:42:42.973Z2024-10-26T15:40:18.064ZTop 6 Recommended YouTube to WAV Converters for Easy Audio Downloads [Updated]
]]><h2 id="Top-6-Recommended-YouTube-to-WAV-Converters-for-Easy-Audio-Downloads-Updated"><a href="#Top-6-Recommended-YouTube-to-WAV-Converters-How to Fix the “A Disk Read Error Occurred” Error on Windowshttps://win11-tips.techidaily.com/how-to-fix-the-a-disk-read-error-occurred-error-on-windows/2024-10-25T15:38:28.733Z2024-10-26T13:42:21.073ZHow to Fix the “A Disk Read Error Occurred” Error on Windows
Is Windows showing the “A disk read error occurred”? Even if you follow Windows’ suggestion of pressingCtrl + Alt + Del to restart your computer, the error may not disappear. When this happens, there might be an overheating problem, improper port connections, or an outdated BIOS version, among other possible causes.
But how can you get rid of the disk read error?
Disclaimer: This post includes affiliate links
If you click on a link and make a purchase, I may receive a commission at no extra cost to you.
1. Let Your Computer Cool Down
As you may know, your computer’s hardware has optimal operating temperatures. But if your computer is overheating and its components are getting too hot, you’ll run into all sorts of errors, including “A disk read error occurred”. In this case, save any work in progress and turn off your computer for a couple of hours.
If it stops displaying the same error, check your cooling system and make sure your computer has enough airflow. Additionally, you should use acomputer temperature app to keep an eye on your hardware and avoid running into the same problem again.
2. Unplug Any External Storage Device
There’s a chance your computer is trying to boot up from one of the connected devices if there’s a change in the boot priority. In this case, the easiest way to get rid of the disk read error is to unplug any external device. Even a small-capacity USB flash stick can lead to disk read issues if the boot priority isn’t in the right order.
3. Check Hard Drive Connections
Another possible cause for this issue is a faulty connection between the hard drive and the motherboard. If you’re tech-savvy enough, you can check if your laptop’s motherboard hasn’t come loose within its compartment.
On a desktop computer, check the cable connecting your hard drive to the motherboard. Alternatively, you could try using a different port. In this case, you might have to update the boot sequence so it uses the new port.
Also, you may take advantage of the situation andclean your laptop as too much dust can affect the hard drive’s physical connection. If you don’t have the tools or the knowledge, it’s better to take your laptop to a professional service.
4. Run the CHKDSK Command
Whenever you encounter a disk-related issue on your Windows computer, you shouldrun the CHKDSK utility . CHKDSK will scan your hard drive and identify logical issues. This includes missing file metadata, inappropriate file types or sizes, corrupted files, and bad sectors.
5. Rearrange the Boot Sequence
Unplugging the external storage devices every time might be too inconvenient, especially if you save space by moving apps to external media. However, you can check your Windows boot sequence, to make sure your system is booting from the right source.
To do so,enter your computer’s BIOS and go to theBoot section. There, selectBoot Device Priority and set your hard drive as the first option.
6. Reset the BIOS Settings
Your BIOS might be running outdated or incorrect settings. Instead of going through individual BIOS settings, you should have BIOS revert to its default settings. To do so, enter BIOS during boot-up and go toLoad Setup Defaults orLoad Default Settings .
PressEnter and selectYes to confirm the action and reset BIOS to its factory settings.
7. Update BIOS
If resetting the BIOS to its default settings didn’t fix the issue, you should update it. An outdated BIOS version might cause communication issues between your hardware components.
Getting stuck in an error loop can be very annoying, and the “A disk read error occurred” makes no exception. Software or hardware issues can both cause this issue, so figuring out the exact cause might take a while.
]]>This Article Describes How to Fix the “A Disk Read Error Occurred” Error on Windowsオンラインで自由にMP4 to MP3変換!Movavi 使ってみる手軽版 -快適なフリーサービスhttps://win11-tips.techidaily.com/mp4-to-mp3movavi/2024-10-25T15:32:25.134Z2024-10-26T13:54:13.903Z(S ) Is the Distance Skidded (29 Meters)
Nous utilisons des cookies pour améliorer les services que nous vous proposons. En poursuivant votre navigation sur ce site, vous acceptez de les conserver conformément à notre Politique de confidentialité .
Si vous êtes un joueur, vous savez combien il est important que votre système fonctionne à pleine capacité. Même un décalage d’une milliseconde peut signifier “Game Over”. Cet article vous explique comment optimiser Windows 10 pour les jeux.
Conseil
Description
Régler les paramètres graphiques d’un jeu
Vérifiez les paramètres graphiques du jeu, puis consultez votre compteur de FPS.
Mettez à jour les pilotes de votre GPU
Vérifiez auprès du fabricant car Windows 10 ne le fait pas automatiquement.
Installer DirectX 12
Une application indispensable pour tout joueur.
Utiliser le mode de jeu Windows 10
Il est déjà intégré à Windows 10 et dédie des ressources système aux jeux.
Gérer les heures actives
Windows 10 installe les mises à jour en fonction de ces paramètres. Configurez-les pour que votre ordinateur ne se mette pas à jour pendant que vous jouez.
Ajustez les paramètres des effets visuels
Windows Exécute des graphiques en arrière-plan constamment. Modifiez vos paramètres pour vous concentrer sur le jeu.
Gérer les mises à jour automatiques de Steam
Même problème que pour les Windows 10 heures actives.
Désactiver les notifications
Allez dans vos “paramètres de notifications et d’actions” et désactivez les notifications.
Régler le panneau de contrôle NVIDIA
Modifiez les paramètres tels que “Ambient Occlusion” et “Anisotropic Filtering”.
Régler le centre de contrôle AMD/ATI
Activez les options “ Image Sharpening “ et “ Overclocking “ pour améliorer les performances.
Réduire la résolution dans un jeu
Vérifiez les paramètres du jeu et baissez-les d’un cran ou deux.
Désactiver l’accélération de la souris
Ce n’est pas un problème de performance du PC, mais cela rendra les mouvements de votre souris plus précis.
Utilisez une carte SSD
La mise à jour vers le SSD peut réduire considérablement les temps de chargement.
Mettez à niveau votre GPU/CPU
Veillez à vérifier la mémoire et la bande passante avant de faire un achat.
Mettez votre RAM à niveau
Le minimum de base est de 8 Go. Les titres plus récents nécessitent 12 Go. Mais vous aurez besoin de 16 à 32 Go pour rester au top.
Désactiver l’algorithme de Nagle
Aide à améliorer la latence de votre connexion.
Surcadencez votre carte graphique
Utilisez MSI Afterburner pour le faire, mais faites attention à la surchauffe.
Désactiver SysMain et Prefetch
Des processus faciles à désactiver qui vous aideront à accélérer votre système.
Utilisez une alimentation externe pour les ordinateurs portables
Faites cela pour éviter les fonctions d’économie d’énergie de votre ordinateur portable.
Utiliser un plan d’alimentation performant
Si vous ne cherchez pas à optimiser un ordinateur portable, utilisez ce paramètre pour une meilleure jouabilité.
Empêchez votre ordinateur portable de surchauffer
Veillez à ce que votre ordinateur portable soit bien ventilé. Essayez un bureau pour ordinateur portable !
Mettez à niveau le GPU et la RAM de votre ordinateur portable
Confiez l’installation à un technicien si vous n’avez pas l’expérience des ordinateurs portables.
Désactiver les services d’arrière-plan Windows
Désactivez les services d’arrière-plan pour accélérer votre ordinateur portable Windows.
Un facteur clé qui peut ralentir votre expérience de jeu est l’utilisation d’un enregistreur de qualité inférieure pendant le jeu. C’est pourquoi notre choix spécial pour optimiser votre PC pour les jeux sur Windows 10 est Gecata by Movavi. Ce programme peut enregistrer le gameplay en 4K et jusqu’à 120 FPS sans perte de performance. Il est facile à utiliser et est livré avec une version d’essai gratuite.
Qu’est-ce qu’un FPS faible et comment puis-je le vérifier ?
Si votre jeu commence à ralentir et que l’image est saccadée, surtout lorsqu’elle bouge, c’est que votre taux d’images par seconde (IPS) est faible. Cela se produit lorsque le matériel de votre ordinateur a du mal à faire fonctionner votre jeu ou fait des heures supplémentaires. S’il travaille trop, la vitesse du jeu ralentit.
La carte graphique travaille pour rendre les images fixes, ou frames, pendant que vous jouez à un jeu. Elle travaille en collaboration avec d’autres composants matériels tels que la RAM, le CPU et le GPU pour créer une expérience de jeu complète. En cas d’arrêt de l’un de ces composants, votre FPS commencera à baisser. La plupart des joueurs préfèrent un taux de 60 FPS en jouant, mais la plupart des jeux sont en fait très bien à 30 FPS.
Le PC surpasse les consoles à cet égard, car il est toujours possible d’accélérer le taux de FPS sur un PC avec des modifications, alors que modifier une console n’est pas possible. Les joueurs sur PC peuvent également augmenter la fréquence de rafraîchissement de leur écran, modifier d’autres paramètres système pour le jeu, et bien plus encore.
Cet article vous présente les réglages de performance pour les jeux que vous pouvez effectuer sur Windows 10 pour améliorer votre expérience de jeu.
Avant de commencer, il est toujours bon d’avoir un compteur de FPS dans le jeu, afin de pouvoir suivre vos progrès et tester les réglages qui fonctionnent. De nombreux jeux les ont préinstallés, mais si vous installez MSI Afterburner , vous ne serez jamais sans cet outil utile dans n’importe quel jeu.
Comment rendre Windows 10 plus rapide pour les jeux (corrections rapides)
Vous voulez savoir comment rendre Windows 10 plus rapide pour jouer avec une solution rapide ? Suivez ces conseils et recommencez à jouer !
Régler les paramètres graphiques d’un jeu
Chaque jeu possède des paramètres graphiques spécifiques qui peuvent vous aider à optimiser votre expérience de jeu. En voici trois que vous devriez vérifier dans le menu des paramètres du jeu avant de jouer.
Anti-crénelage : Lorsqu’un jeu utilise le crénelage, il corrige les petites lignes irrégulières et inégales autour de textures ou d’objets spécifiques. Pensez aux lignes floues que vous voyez lorsque l’herbe apparaît dans la plupart des jeux. Chaque jeu possède différents niveaux d’anticrénelage (SSAA, TAA, MSAA, etc.). - et vous pouvez généralement les modifier dans les paramètres du jeu pour obtenir de meilleures performances.
Flou de mouvement : Pour rendre les choses plus réalistes, les jeux intègrent des flous de mouvement afin d’émuler la vie réelle. Le désactiver peut souvent vous aider à économiser de la puissance graphique.
Synchronisation verticale : Parfois, lorsque vous vous déplacez rapidement, la carte graphique ne peut pas suivre et l’écran semble se déchirer en son milieu. La synchronisation verticale aide à résoudre ce problème mais ajoute un certain décalage. Une façon de corriger ce problème est d’utiliser le VSync adaptatif ou le Triple Buffering. Vous utiliserez davantage de puissance de la carte graphique, mais vous trouverez un juste milieu entre les déchirures et le décalage.
Mettez à jour les pilotes de votre GPU
Le GPU (Graphics Processing Unit) est crucial pour votre expérience de jeu et pour les performances de votre PC dans les jeux, mais vous devez maintenir les pilotes de votre GPU à jour pour en profiter. De plus, un pilote obsolète peut entraîner des bogues, des problèmes et des pannes du système. Nous vous recommandons donc de prendre ce problème au sérieux et de prendre soin de vos pilotes.
Bien que Windows 10 ne mette pas automatiquement à jour les pilotes de votre GPU, les fabricants créent souvent des logiciels spéciaux sous la forme de panneaux de contrôle GPU qui effectuent des vérifications régulières des mises à jour et vous avertissent si une nouvelle mise à jour est disponible. N’ignorez pas ces notifications, car le processus de mise à jour prend peu de temps et peut vous éviter bien des ennuis pendant le jeu.
Par exemple, selon le fabricant de votre GPU, vous pouvez télécharger soit Radeon Software Adrenaline, soit GeForce Experience. Ces deux programmes vérifient les mises à jour automatiques et proposent des options d’optimisation puissantes. De plus, GeForce Experience comprend un logiciel de capture et de streaming de jeux et fournit des pilotes spéciaux Game Ready, conçus par NVIDIA en collaboration avec les principales sociétés de développement de jeux.
Vous pouvez mettre à jour votre pilote directement à partir des propriétés Windows, mais le moyen le plus sûr d’obtenir le dernier pilote est d’aller directement sur le site Web du fabricant, de choisir votre modèle de GPU et de vérifier les mises à jour.
Si vous ne connaissez pas les spécifications de votre GPU, faites un clic droit sur le Bureau, choisissez Paramètres d’affichage, puis Paramètres d’affichage avancés et cliquez sur Propriétés de l’adaptateur d’affichage.
Voici quelques liens vers les mises à jour des pilotes des fabricants les plus populaires :
DirectX 12 est un outil indispensable pour quiconque souhaite jouer à des jeux sur Windows 10. Pour faire simple, DirectX est l’application que le jeu utilise pour communiquer avec votre ordinateur et lui dire quoi faire. DirectX 12 est une grande amélioration par rapport à son prédécesseur, DirectX 11, car il permet aux cartes graphiques de tirer des ressources de plus d’un cœur du processeur d’un PC, ce qui augmente les fréquences d’images, améliore les effets graphiques et réduit la consommation d’énergie. Des tests ont montré une différence de 85 à 300 % dans les performances de jeu entre la version 11 et la version 12.
Pour bénéficier des fonctionnalités de DirectX 12, le jeu doit avoir été développé avec cette version. La bonne nouvelle est que la liste de ces jeux s’allonge chaque jour, car de plus en plus de sociétés de jeux adoptent cette version.
Pour vérifier que vous disposez de la dernière version de DirectX, appuyez sur la touche Windows + R, tapez “dxdiag” et cliquez sur OK. L’outil de diagnostic DirectX s’ouvre.
Si vous n’avez pas DirectX 12, allez-y et installez-le ; le processus ne prendra que quelques minutes. Appuyez sur la touche Windows + I, choisissez Mise à jour et sécurité et cliquez sur Vérifier les mises à jour dans l’onglet Windows. Mise à jour. Attendez que l’installation se termine.
Utiliser le mode de jeu Windows 10
Voici un moyen simple et rapide d’optimiser Windows 10 pour les jeux en utilisant un outil intégré au système. Le mode Jeu, apparu dans les versions les plus récentes du système d’exploitation, est conçu pour améliorer l’expérience de jeu en consacrant davantage de ressources système aux jeux. Il empêche également d’autres programmes, tels que Windows Update, d’accaparer les ressources du système pendant que vous jouez.
Pour localiser les paramètres du mode jeu, appuyez sur la touche Windows + I, tapez “mode jeu” dans la boîte de recherche et cliquez sur Contrôler le mode jeu pour optimiser votre PC pour les jeux.
Dans le menu qui s’ouvre, cliquez sur Mode Jeu. Passez à On pour activer le Game Mode. Si votre PC prend en charge le Mode Jeu, le système optimisera les performances de votre PC pour les jeux.
Si vous ne trouvez pas ces paramètres, cela signifie que la dernière Windows Creators Update n’est pas installée sur votre PC.
Gérez vos heures actives
Oui, Windows 10 peut installer des mises à jour et redémarrer votre ordinateur en plein milieu de votre session de jeu sans même un simple “excusez-moi”. Ouch. Cela peut être décevant, c’est le moins que l’on puisse dire, surtout si vous êtes un joueur compétitif et que votre sortie non planifiée peut affecter vos coéquipiers ou votre classement.
Mais même en l’absence de tels redémarrages “en pleine face”, qui sont en fait assez rares, le téléchargement des mises à jour en arrière-plan limite vos vitesses de connexion et occupe la mémoire vive de votre PC.
Bien que votre première réaction puisse être de désactiver complètement les mises à jour automatiques, nous vous le déconseillons. La mise à jour agressive de Windows sans demander la permission est ainsi faite parce que dans les versions précédentes, les utilisateurs ne mettaient pas à jour de leur propre gré et leurs systèmes étaient donc régulièrement exposés aux cybermenaces. Rappelez-vous que les mises à jour automatiques de Windows ne sont pas là uniquement pour ruiner votre raid, mais aussi pour protéger votre système, le maintenir à jour et le faire fonctionner de manière optimale.
Ainsi, une autre solution plus “ douce “ et bien plus intelligente consiste à définir vos heures d’activité de manière appropriée. Vous pouvez spécifier vos horaires de jeu et de travail dans Windows et empêcher le système d’exploitation de télécharger des mises à jour pendant ces périodes. Windows utilisera alors vos heures non actives pour mettre à jour et redémarrer votre système.
Pour définir vos heures actives, appuyez sur la touche Windows + I, puis allez dans Mise à jour et sécurité et cliquez sur Modifier les heures actives. Vous pouvez alors définir jusqu’à 18 heures actives, en laissant un intervalle de 6 heures (il faut bien dormir parfois, non ?) pour que Windows installe vos mises à jour.
Si vous êtes un joueur de nuit ou si vos heures de sommeil varient considérablement, de sorte que vous ne pouvez pas définir une heure de repos spécifique, nous vous conseillons (en plus de changer vos habitudes de sommeil) de vous assurer que Windows vous rappelle chaque fois qu’il voudra redémarrer afin que, si cela se produit pendant que vous jouez, vous puissiez toujours le retarder.
Pour ce faire, retournez à Windows Update, cliquez sur Advanced options et assurez-vous que l’interrupteur sous We’ll show a reminder when we’re going to restart est activé.
Réglez les paramètres de vos effets visuels
Les interfaces utilisateur graphiques (IUG) de Windows 10 regorgent d’effets visuels fantaisistes. Néanmoins, ces jolis graphiques d’arrière-plan, dont la plupart sont activés par défaut, peuvent affecter la puissance de traitement disponible de votre PC lorsqu’un jeu est en cours d’exécution au premier plan. Ainsi, une façon d’optimiser Windows 10 pour les performances de jeu est de sacrifier certains, voire tous, ces paramètres.
Une fois encore, appuyez sur la touche Windows + I. Ensuite, tapez “performance” et sélectionnez Ajuster l’apparence et les performances de Windows. Dans la fenêtre qui s’ouvre, choisissez Ajuster pour une meilleure performance. Ensuite, allez dans l’onglet Avancé et vérifiez que le paramètre est appliqué aux programmes.
Si vous souhaitez conserver un minimum de graphismes pour que votre interface n’ait pas un aspect si terne, nous vous recommandons de garder au moins ces trois options de la liste cochées :
Afficher les vignettes au lieu des icônes.
Afficher le contenu de la fenêtre pendant le glissement.
Lisser les bords des polices d’écran.
Gérer les mises à jour automatiques de Steam
Le problème ici est le même qu’avec Windows Mises à jour. Steam met automatiquement à jour tous vos jeux, même ceux auxquels vous n’avez pas joué depuis longtemps. Les mises à jour en arrière-plan consomment la mémoire de votre PC et peuvent ralentir les processus de jeu.
Pour empêcher Steam de mettre à jour les jeux pendant que vous jouez, allez dans votre client Steam et trouvez les options de mise à jour dans Steam - Paramètres - Téléchargements. Décochez la case Autoriser les téléchargements pendant le jeu.
Par ailleurs, les jeux sur Steam sont mis à jour en permanence et il arrive souvent que de nouveaux bogues apparaissent dans les nouvelles mises à jour ou que certains éléments cessent de fonctionner.
Pour ramener la version d’un jeu à celle dont vous avez besoin, ouvrez Steam, faites un clic droit sur le jeu, choisissez Propriétés et allez dans l’onglet Bêta. Choisissez la version souhaitée dans le menu déroulant.
Désactiver les notifications
Les notifications au milieu d’un jeu consomment de la puissance CPU et peuvent nuire à votre champ de vision pendant le jeu. Suivez les étapes suivantes pour désactiver toutes les notifications avant de jouer :
Appuyez sur la touche Windows ou cliquez sur l’icône Windows en bas à gauche de votre écran.
Tapez “Notifications” dans la barre de recherche et sélectionnez Notifications et paramètres d’actions dans les résultats.
Lorsque la nouvelle fenêtre s’ouvre, mettez le commutateur à bascule situé à côté de l’option Obtenir des notifications d’applications et d’autres expéditeurs sur Désactivé. Vos notifications sont maintenant désactivées.
Vous pouvez également faire défiler la liste et désactiver les notifications par application.
Régler le panneau de contrôle NVIDIA
Si vous utilisez une carte graphique NVIDIA, il existe des paramètres spécifiques à la carte dans le panneau de configuration. Voici quelques-uns des meilleurs paramètres Windows 10 pour les cartes NVIDIA pour les jeux.
Occlusion ambiante : Activez-la et augmentez son niveau jusqu’à 16x.
Filtrage anisotropique : Passez sur Off.
DSR - Facteurs et lissage : Désactiver.
Mode faible latence : Activez-le.
Mode de gestion de l’énergie : Passez à Préférer les performances maximales.
Optimisation Threaded : Passez à Auto.
Régler le centre de contrôle AMD/ATI
Les cartes graphiques AMD ont également beaucoup de paramètres. Certains disent qu’elles rivalisent même avec leur concurrent NVIDIA. Modifiez ces paramètres pour optimiser les jeux de Windows 10.
Activez l’accentuation des images d’AMD en cliquant sur Paramètres, puis sur Graphiques pour trouver le paramètre. Vous pouvez l’activer pour des jeux individuels ou globalement.
Augmentez vos performances graphiques en utilisant l’overclocking. Pour ce faire, cliquez sur l’onglet Performance, puis sur Tuning, sélectionnez Automatique, et enfin GPU Overclocked.
Si vous utilisez une carte AMD, vous n’avez pas besoin de MSI Afterburner pour contrôler les performances. Il vous suffit d’appuyer sur Ctrl + Shift + O pour que vos statistiques apparaissent dans le jeu.
Réduire la résolution dans un jeu
Cette solution entre facilement dans la catégorie des “solutions rapides”. Parfois, votre système ne peut tout simplement pas gérer un jeu, et vous n’avez pas le temps de chercher des solutions à plus long terme. Allez dans les paramètres système du jeu et réduisez la résolution d’un niveau. Surveillez ensuite votre FPS jusqu’à ce que les choses s’améliorent.
Désactiver l’accélération de la souris
Celui-ci n’a rien à voir avec l’amélioration des performances de votre PC en matière de jeu, mais il s’agit plutôt d’un conseil pour vous permettre d’améliorer vos performances personnelles en matière de jeu. L’accélération de la souris est un paramètre qui fait bouger votre souris en se basant non seulement sur la détection des mouvements physiques mais aussi sur la vitesse. Cette option rend en fait les mouvements de votre souris moins précis, car elle ajoute un paramètre supplémentaire au mouvement que vous transmettez à la souris. Étant donné que la précision est cruciale pour la précision de la visée dans les jeux de tir à la première personne, si vous êtes un fan de Call of Duty, Counter-Strike ou Overwatch, vous devriez absolument désactiver cette option.
Pour ce faire, appuyez sur la touche Windows + I. Tapez “pointeur de la souris” dans la zone de recherche. Choisissez Modifier l’affichage ou la vitesse du pointeur de la souris. Dans la fenêtre qui s’ouvre, allez dans l’onglet Options du pointeur et décochez la case Améliorer la précision du pointeur.
Vous pouvez également modifier le curseur de la vitesse du pointeur pour créer la configuration qui vous convient le mieux.
Comment améliorer les performances de jeu sur Windows 10 (corrections avancées)
Vous ne savez toujours pas comment rendre Windows 10 plus rapide pour les jeux ? Utilisez ces correctifs avancés pour une solution à long terme.
Optez pour un SSD
Passer d’un disque dur à un disque SSD n’améliorera pas radicalement les performances de vos jeux, mais cela peut vous aider à réduire considérablement les temps de chargement. Il est vrai que les disques durs SSD peuvent être assez chers et il peut sembler que les temps de chargement ne sont pas une question si importante pour investir votre argent. Mais si ce n’est probablement pas la première chose à laquelle vous pensez lorsque vous accélérez votre ordinateur portable, ce n’est pas non plus la dernière. Les jeux d’aujourd’hui prennent de plus en plus d’espace disque, donc si vous voulez jouer aux derniers jeux, passer d’un disque dur à un disque SSD peut être un véritable gain de temps et vos temps de chargement de jeu peuvent passer de 30-40 secondes à 2-3, ce qui est assez significatif.
Quant à l’aspect financier, si un gros SSD pour votre système d’exploitation et vos jeux est trop cher pour vous, prenez un petit SSD pour votre système d’exploitation et gardez un gros disque dur pour les jeux.
Mettez à niveau votre GPU/CPU
Mettez à niveau votre GPU et votre CPU environ tous les quatre ans pour que tout fonctionne bien. Mais si vous êtes un joueur, vous devrez peut-être le faire plus tôt, car la technologie évolue beaucoup plus rapidement dans ce secteur.
Le choix de la première mise à niveau dépend des types de jeux auxquels vous jouez. Si vous n’avez pas besoin de graphismes extrêmes et jouez à des jeux plus rapides, le processeur est le meilleur choix. Mais si vous aimez les histoires numériques ou les jeux basés sur le monde avec beaucoup de personnages et d’arrière-plans non jouables, un GPU pourrait vous être plus utile.
Quoi qu’il en soit, assurez-vous que l’équilibre des performances entre les deux est délicat, car l’un ne fonctionne pas sans l’autre. Vérifiez la mémoire et la bande passante de toute mise à niveau potentielle.
Mettez votre RAM à niveau
La mise à niveau de votre RAM n’aura pas un effet aussi important que la mise à niveau du processeur ou du GPU. Mais elle peut donner à votre matériel le coup de pouce dont il a besoin pour augmenter votre fréquence d’images et améliorer votre expérience de jeu globale.
De nombreux jeux requièrent une mémoire vive de 8 Go, mais ce chiffre augmente régulièrement, car les titres les plus récents recommandent une mémoire vive de 12 Go.
Si vous voulez rester en tête de la courbe, 16 Go suffiront pour l’instant. Mais si vous voulez utiliser des services de streaming en arrière-plan comme Twitch, Discord et YouTube, vous devrez passer à 32 Go pour pouvoir tout faire fonctionner sans problème.
Désactiver l’algorithme de Nagle
En gros, l’algorithme de Nagle améliore l’efficacité des réseaux TCP/IP en créant des paquets de données, ce qui réduit le nombre de paquets à envoyer sur le réseau. Ce processus affecte votre connexion Internet, la rendant moins stable. La désactivation de cet algorithme sur votre PC peut contribuer à des problèmes de latence lorsque vous jouez à des jeux en ligne.
Ouvrez votre Windows Éditeur de registre en cliquant sur la touche Windows + Q, en tapant “regedit” et en cliquant sur le fichier regedit. Faites défiler le menu HKEY_LOCAL_MACHINE pour trouver le chemin suivant : “\SYSTEM\CurrentControlSet\Services\Tcpip\Parameters\Interface”. Cela vous mènera au menu qui comprend des dossiers avec de nombreux chiffres et lettres. Pour accéder au bon fichier, faites correspondre votre adresse IP à l’adresse DhcpIPAddress listée dans l’un de ces dossiers.
Pour trouver votre adresse IP, appuyez sur la touche Windows + X et suivez ces étapes : Panneau de configuration - Réseau et Internet - Centre Réseau et partage - Connexions - Détails - Adresse IPv4.
Vous pouvez maintenant retrouver le dossier avec la bonne adresse IP. Cliquez avec le bouton droit de la souris sur ce dossier et sélectionnez Nouveau - Valeur DWORD (32 bits). Vous devrez créer deux de ces valeurs : TcpAckFrequency et TCPNoDelay. Double-cliquez sur chacune d’elles et réglez leurs paramètres sur 1. L’algorithme de Nagle est maintenant désactivé.
Surcadencez votre carte graphique
Overclocker vos cartes graphiques signifie les pousser au-delà des spécifications affichées sur la boîte. De nombreuses cartes récentes disposent d’une fonction automatique permettant de le faire dans les paramètres de contrôle, mais il existe également des moyens de le faire manuellement. Veillez à bien connaître votre carte graphique, car si vous repoussez ses limites, elle risque de surchauffer.
Pour overclocker :
Vérifiez les paramètres standard ou de référence de votre carte.
Utilisez un programme comme MSI Afterburner pour augmenter l’horloge centrale de la carte. Faites-le par intervalles de 10 MHz et réinitialisez les benchmarks au fur et à mesure.
En option, vous pouvez également augmenter le voltage et l’horloge de la mémoire, mais surveillez de près la température de votre carte lorsque vous faites cela.
Jouez à un jeu et vérifiez les performances.
Désactiver SysMain et Prefetch
C’est l’un des services faciles à désactiver sur Windows 10. Ces programmes essaient de vous aider à accéder plus rapidement aux données, mais ils ajoutent finalement des opérations inutiles qui ralentissent les jeux. Voici comment les désactiver :
SysMain
Appuyez sur Win + R pour ouvrir l’invite Exécuter.
Tapez msc et appuyez sur Entrée.
Double-cliquez sur SysMain.
Sélectionnez Désactivé dans la liste déroulante.
Cliquez sur OK.
Préférez
Appuyez sur Win + R pour ouvrir l’invite d’exécution.
Tapez “regedit >” et appuyez sur Entrée.
Cliquez sur Oui.
Allez dans PrefetchParameters dans HKLM.
Double-cliquez sur la valeur REG_DWORD EnablePrefetcher.
Définissez la valeur sur 0.
Cliquez sur OK.
Comment accélérer l’exécution des jeux sur un ordinateur portable Windows 10
Vous voulez savoir comment améliorer les performances de jeu sur un ordinateur portable Windows 10 ? Ces conseils vous aideront à accélérer les choses !
Utiliser une alimentation externe
Windows 10 dispose de nombreuses fonctions d’économie d’énergie pour les ordinateurs portables afin de les maintenir en vie pendant de plus longues durées. Cela affectera considérablement l’expérience de jeu car votre RAM, vos cartes graphiques et votre CPU ne fonctionneront pas à pleine capacité. Pour remédier à ce problème, connectez votre ordinateur portable à son alimentation externe et assurez-vous que vos paramètres de contrôle permettent d’obtenir des performances optimales lorsqu’il est connecté.
Utiliser un plan d’alimentation performant
Pour modifier votre plan d’alimentation, cliquez sur la touche Windows + I, tapez “alimentation” dans la zone de recherche, choisissez Paramètres d’alimentation et de veille, puis Paramètres d’alimentation supplémentaires. Si vous ne voyez pas de plan d’alimentation haute performance dans la partie gauche de l’écran, cliquez sur Créer un plan d’alimentation et choisissez Haute performance.
Empêchez votre ordinateur portable de surchauffer
Les ordinateurs portables sont réputés pour leur surchauffe, car tous les composants sont serrés dans le châssis et l’air circule peu. En cas de surchauffe, le système ralentit et les performances de jeu aussi. Utilisez ces conseils de prévention :
Vérifiez et nettoyez toujours vos ventilateurs.
Pour la ventilation, essayez de surélever votre ordinateur portable ou utilisez un bureau conçu pour les ordinateurs portables.
Réglez les paramètres de vos ventilateurs pour qu’ils ne soient pas trop sollicités.
Si vous le pouvez, jouez sur votre ordinateur portable dans un environnement frais.
Mettez à niveau votre GPU et votre RAM
Nous avons déjà abordé ce sujet pour les PC, mais votre ordinateur portable peut également être équipé d’un processeur graphique et d’une mémoire vive. Suivez les mêmes protocoles, et si vous n’avez pas l’habitude de travailler avec des ordinateurs portables, il est préférable de confier l’installation à un technicien expérimenté.
Désactiver les services d’arrière-plan Windows
Les ordinateurs portables sont souvent équipés de nombreux services d’arrière-plan qui fonctionnent pour éviter la surchauffe et optimiser les performances avec des composants plus petits. Ces services peuvent facilement nuire aux performances de jeu s’ils ne sont pas désactivés. Voici les étapes à suivre :
Appuyez sur les touches Windows + R et utilisez l’invite Exécuter.
Tapez “msconfig” et cliquez sur OK.
Choisissez l’onglet Services.
Cochez la case Masquer tous les services Microsoft.
Sélectionnez Tout désactiver, puis cliquez sur Appliquer et OK.
Sélectionnez Redémarrer dans la boîte de dialogue qui s’ouvre.
Résumé
Nous espérons que cet article vous a donné quelques idées sur la façon de faire fonctionner les jeux plus rapidement sur Windows 10 et d’améliorer votre expérience de jeu. Voici quelques-uns des principaux conseils à utiliser pour optimiser votre système :
Modifiez les paramètres de vos jeux : Vous pouvez éventuellement modifier des éléments comme la résolution, le flou de mouvement et l’anticrénelage.
Mettez votre matériel à niveau : si votre RAM, votre GPU ou votre CPU ne sont pas à la hauteur, il est peut-être temps de les mettre à niveau pour les jeux modernes et une meilleure expérience de jeu.
Modifiez les paramètres de votre carte graphique : Les cartes graphiques modernes ont leurs propres paramètres que vous pouvez ajuster pour optimiser votre système pour les jeux. Vérifiez les paramètres de l’occlusion ambiante, du filtrage anisotropique et du DSR.
Gecata by Movavi
Logiciel d’enregistrement de jeux et de streaming gratuit et simple
L’article ci-dessus énumère une série de mesures que vous pouvez prendre pour optimiser votre ordinateur portable ou de bureau pour les jeux. Voici les principaux conseils :
Vérifiez vos paramètres graphiques dans le jeu.
Modifiez les paramètres de votre carte graphique
Mettez à niveau votre GPU et/ou votre CPU
Vérifiez les paramètres de performance de votre Windows.
Qu’est-ce qui ralentit mon ordinateur ?
Il y a une longue liste de choses qui pourraient ralentir votre ordinateur. Voici une liste de raisons que vous pouvez vérifier :
L’algorithme de Nagle est activé
Votre ordinateur exécute des mises à jour sur des heures non actives
Les pilotes du GPU ne sont pas à jour
Vous utilisez DirectX 11 et devez effectuer une mise à jour.
Le système fonctionne avec des paramètres de performance inférieurs pour économiser la batterie.
Comment faire fonctionner un ordinateur plus rapidement ?
Si vous voulez savoir comment rendre votre ordinateur plus rapide pour jouer, voici quelques conseils rapides :
Passez à une carte SSD
Désinstallez tous les programmes inutilisés
Effectuez un nettoyage du disque et une maintenance du système
Passez en revue votre programme de démarrage et désactivez ceux que vous n’utilisez pas.
Installez de la RAM supplémentaire
Windows 10 est-il meilleur pour les jeux ?
Lorsque l’on compare l’expérience de jeu des versions précédentes de Windows à Windows 10, l’amélioration des performances est extraordinaire. Si vous n’êtes pas sûr de vouloir faire une mise à jour, la décision est simple. Windows 10 offrira toujours une meilleure expérience.
Comment obtenir 60 fps dans un jeu ?
Atteindre 60 FPS dans un jeu n’est pas différent des conseils pour accélérer votre système en général, mais voici ce que vous pouvez faire :
Améliorez votre GPU et votre CPU
Mettez à niveau ou installez de la RAM supplémentaire
Passez Windows 10 en “mode jeu”.
Vérifiez les paramètres graphiques de votre jeu.
Installez les derniers pilotes pour votre carte graphique
Pourquoi ai-je des fps faibles sur mon PC haut de gamme ?
La baisse du nombre de FPS se produit lorsque votre ordinateur n’a pas la mémoire ou la puissance nécessaire pour faire tourner le jeu à pleine vitesse. Parmi les problèmes les plus courants à l’origine d’une baisse du nombre d’images par seconde, citons les pilotes de cartes graphiques obsolètes, les cartes graphiques de qualité inférieure, les vieux processeurs et le manque de mémoire vive.
Ce n’est pas parce que vous dépensez de l’argent pour un ordinateur qu’il est équipé du dernier cri. Le matériel est plus important que les autres caractéristiques de conception ou de logiciel. En outre, les jeux vidéo modernes placent toujours la barre plus haut en matière de capacité de performance, ce qui est donc relatif d’un jeu à l’autre.
Rejoignez-nous et obtenez des offres promo et des astuces !
1.5М+ utilisateurs déjà abonnés à notre newsletter
Votre adresse de messagerie
Je m’inscris
En vous inscrivant, vous acceptez de recevoir nos courriels de marketing et acceptez que Movavi utilise vos données personnelles conformément à notre Politique de confidentialité . Vous confirmez également que vous répondez aux critères d’âge minimum .
]]><h2 id="S-Is-the-Distance-Skidded-29-Meters"><a href="#S-Is-the-Distance-Skidded-29-Meters" class="headerlink" title="(S ) Is the Distance SUnveiling the Operating System's Hidden Settingshttps://win11-tips.techidaily.com/unveiling-the-operating-systems-hidden-settings/2024-10-25T15:26:30.269Z2024-10-26T09:05:29.242ZUnveiling the Operating System’s Hidden Settings
The system settings are one of the critical features of your PC. They help you customize your device, change the keyboard language, update Windows, configure privacy settings, and more.
But how do you access these settings?
In this article, we’ll take you through the different ways to open the Windows system settings.
Disclaimer: This post includes affiliate links
If you click on a link and make a purchase, I may receive a commission at no extra cost to you.
1. Use a Keyboard Shortcut
Windows is packed with tons of helpful keyboard shortcuts. But did you know that there’s a keyboard shortcut for accessing the Windows settings? To use this shortcut, simply press Win + I.
2. Use the Quick Access Menu
The Quick Access menu (also known as the Power User menu) offers one of the easiest ways for accessing the system settings. Let’s check out how this tool can be helpful:
Press Win + X to open the Quick Access Menu.
Select Settings from the on-screen options.
3. Use the Run Command Dialog Box
The Run command dialog box is an easy-to-use tool that you can use to access most of the apps on your PC. If you want to open the settings app with this tool, follow these steps:
Press Win + R to open the Run command dialog box.
Type ms-settings: and click OK or press Enter to open the settings window.
4. Use the Windows Search Bar
The Windows search bar is another incredible tool that can help you locate your built-in apps and list all the installed programs on your device . To search for the Windows system settings, follow these steps:
Click the Start Menu search bar or press Win + S.
Type Settings in the search box.
Select the Best match result.
5. Use the Windows Start Menu
Ever used the Windows Start menu before? It’s another reliable tool that can help you access most of the apps and tools on your Windows device.
So, let’s check out how to access the system settings using the Start menu:
Click the Start Menu icon or press the Windows key.
Select the PC Settings option or click the Settings icon.
6. Use the Command Prompt or PowerShell
If you’re a fan of the Command Prompt or PowerShell, then we’ve got some cool methods you should try.
To access the system settings via the Command Prompt, follow these steps:
Press Win + R to open the Run command dialog box.
Type CMD and press Ctrl + Shift + Enter to open an elevated Command Prompt.
Type ms-settings: and press Enter to open the Settings window.
Alternatively, here’s how you can access the system settings via PowerShell:
Press Win + R to open the Run command dialog box.
Type PowerShell and press Ctrl + Shift + Enter to open an elevated PowerShell window.
Type ms-settings: and press Enter to open the Settings window.
7. Use File Explorer’s Address Bar
File Explorer also offers a quick way to open the settings app. So, let’s check how this tool can be helpful:
Press Win + E to open File Explorer.
Type ms-settings: on File Explorer’s address bar and press Enter to access the system settings.
8. Use the Settings Widget on File Explorer
Did you know that File Explorer contains various widgets that help you access most of the tools on your PC? The good news is that one of those widgets helps you access the system settings.
So, let’s explore how you can access the system settings using the widgets on File Explorer:
Press Win + E to open File Explorer.
Click This PC on the left-hand side.
Click the Computer tab in the top-left corner.
Click the Settings option from the list of widgets that appear in the top part of the window.
9. Use the Action Center
The Windows Action Center gives you quick notifications about some of the tasks on your device. But this tool can also help you access the Windows settings.
So, let’s explore the steps you should follow to open the system settings with this tool:
Click the Action Center icon in the bottom-right corner of the taskbar. Alternatively, press Win + A.
Select the All settings option from the menu items to access the system settings.
10. Use the Task Manager
The Task Manager is used to monitor and manage running processes, system performance, and resource utilization on your Windows computer. Interestingly, you can use this tool to access various tools on your PC.
Here are the steps for accessing the system settings using the Task Manager:
Press Ctrl + Shift + Esc to open the Task Manager.
Click the File tab and select Run new task.
Type ms-settings: in the search box and then press Enter or click OK.
11. Use a System Settings Desktop Shortcut
Using a “System Settings” desktop shortcut is another easy way to access the system settings on your device. If you don’t have this desktop shortcut, here’s how you can create it:
Right-click on a blank space on the desktop and then select New > Shortcut.
Type ms-settings: in the location box.
Press the Next button to continue.
Type System Settings Shortcut in the “Name box” and then press the Finish button. You can now easily access the system settings by clicking your desktop shortcut.
And if you want to make your desktop shortcut easily accessible, simply pin it to the taskbar. To do that, right-click on your desktop shortcut and select Pin to taskbar.
12. Open the Settings Indirectly via the Desktop Context Menu
You can also access the system settings indirectly via the desktop’s context menu. Here are the steps you need to follow:
Press Win + D to navigate to the desktop.
Right-click on a blank space and select Display Settings. As expected, this will take you to the “Display Settings” window.
Click the Home button in the top-left corner to access all the system settings.
13. Open the Settings Indirectly via the Taskbar Context Menu
Before we wrap up, let’s take you through one last quick indirect method to try:
Right-click on a blank space on the taskbar and select Taskbar settings.
Click the Home button in the top-left corner. This will display a window containing all the system settings.
Accessing the Windows system settings is quite easy. But if you’re struggling to open the system settings, check out any of the methods we’ve covered.
Now, it’s worth noting that there are certain PC issues that you can’t tackle with the usual Windows settings. So, you might also want to take a step further and learn about the Windows Startup Settings (including tips on how to access these settings).
But how do you access these settings?
In this article, we’ll take you through the different ways to open the Windows system settings.
]]>This Article Describes Unveiling the Operating System's Hidden SettingsTeam Share Dilemma? Here's the Solution!https://win11-tips.techidaily.com/team-share-dilemma-heres-the-solution/2024-10-25T15:23:13.665Z2024-10-26T14:08:16.785ZTeam Share Dilemma? Here’s the Solution
The screen-sharing feature in Microsoft Teams can be useful when you need to present something during a video conference. Although the feature has been available for a while now, it is still not without its flaws.
Sometimes, when you try to share your screen in Microsoft Teams on Windows, you may get a black screen or an error message. If you encounter this problem, here are some tips that will help resolve the issue in no time.
Disclaimer: This post includes affiliate links
If you click on a link and make a purchase, I may receive a commission at no extra cost to you.
1. Start With Some Basic Fixes
It’s a good idea to start with some simple solutions before delving into more complex ones.
Close and Reopen the App: At times, temporary glitches with the Teams app can cause it to misbehave on your Windows computer. If it’s nothing major, simply closing the app and reopening it should help solve the problem.
Repair the App: Your Windows 10 or 11 computer includes a useful repair feature that can automatically identify and resolve minor issues with UWP apps . You can use this feature to repair the Microsoft Teams app and see if it solves your problem.
Update Display Drivers: Outdated or corrupted display drivers can also cause screen-sharing issues in Microsoft Teams. If that’s the case, updating the display drivers on your Windows PC should fix the issue.
Install Windows Updates: The screen sharing not working issue in Teams could be due to a bug within the current Windows build on your PC. Install any pending Windows updates and try to share the screen again.
2. Make Sure Everyone Is Allowed to Present Screen
A common reason why screen-sharing may not work in Microsoft Teams is if the administrator has not enabled the presentation permission for all users.
You will need to ask the admin to enable screen-sharing permission using these steps:
On the Microsoft Teams call screen, click the three-dot menu icon at the top.
Select Settings > Meeting options.
Under Who can present and select Everyone.
Click the Save button.
3. Rule Out Issues With Your Internet Connection
If you are unable to share the screen despite having the required permissions, there may be an issue with your internet connection. As features like screen sharing necessitate a fast internet connection, you’re likely to encounter problems if your internet connection is slow or unstable.
You can visit a website like Speedtest to test your internet connection and speed . If your internet appears to be slow, switch to a different network connection and try to share the screen again.
4. Close Background Apps and Programs
Even if you have a fast internet connection, you may experience problems if background apps and services on your PC are consuming a significant portion of your bandwidth. To avoid this, review the apps and programs running in the background and close the ones you don’t need.
Follow these steps to continue:
Press Ctrl + Shift + Esc to open the Task Manager.
In the Processes tab, go through the list to locate and select the apps and programs you aren’t using.
Click the End task option at the top to terminate them.
5. Try Lowering the Display Resolution
Another thing you can do is lower the display resolution while sharing the screen in Microsoft Teams. This should help reduce the amount of system resources and internet bandwidth Microsoft Teams requires for screen sharing, resulting in a smoother experience.
Follow these steps to change the screen resolution on Windows:
Press Win + I to open the Settings app.
Head to System > Display.
Click the drop-down menu next to Display resolution to select a lower resolution.
After lowering the screen resolution, try to share your screen again in Teams.
6. Clear Microsoft Teams App Cache
Microsoft Teams creates temporary files on your device to speed up loading times and enhance your overall experience. If you have been using the Teams app for a while, it may have accumulated a lot of cache data. While this data is intended to be helpful, it can end up interfering with the app’s performance if it becomes corrupted.
To fix this, you need to remove the existing cache files associated with the Teams app on your PC. Since this process doesn’t affect any of the essential app data, there’s no harm in trying it.
Follow these steps to continue:
Press Win + R to open the Run dialog.
Copy and paste the following path in the text box and click OK: %appdata%\Microsoft\teams
Press Ctrl + A to select all the files and folders inside the Teams folder.
Click the trash icon at the top to delete them.
Close File Explorer, restart the Teams app, and check if the issue is still there.
7. Update or Reinstall Microsoft Teams
Using an outdated version of the Teams app can lead to performance issues and cause certain features to stop working. Microsoft regularly releases updates for the Teams app to improve your experience and address known issues. Hence, it is always advisable to use the most recent version of the Teams app.
In the Teams app, click the menu icon at the top and select Settings.Switch to the About Teams tab and check if a newer version is available.
In case the issue remains, your best option is to uninstall the Teams app and install it again. To do so, press Win + S to access the search menu. Type Microsoft Teams in the search box and select the Uninstall option. Select Uninstall again to confirm.
Once removed, head over to Microsoft’s website to download and install Teams again.
8. Use Chrome or Edge While Sharing Screen in Teams for Web
Are you unable to share the screen while using Microsoft Teams in your browser? That could happen if you are using Teams in Firefox, Opera, or Brave.
Microsoft recommends using only Google Chrome or Microsoft Edge for using Teams on the web. Try switching to either of those browsers and see if you are able to share your screen after that.
Start Sharing Your Screen With Microsoft Teams
Fixing issues with Microsoft Teams’ screen-sharing feature can be as simple as granting the necessary permissions or as demanding as reinstalling the Teams app on your PC.
In any case, one of the above tips should help fix the issue for good.
Sometimes, when you try to share your screen in Microsoft Teams on Windows, you may get a black screen or an error message. If you encounter this problem, here are some tips that will help resolve the issue in no time.
]]>This Article Describes Team Share Dilemma? Here's the Solution!1. Free Online Converter: Transform WMA to MP3 with Movavihttps://win11-tips.techidaily.com/1-free-online-converter-transform-wma-to-mp3-with-movavi/2024-10-25T15:19:50.469Z2024-10-26T15:00:43.163Z[\Text{coefficient of Kinetic Friction} = \Frac{(v^2 - U^2)}{(2s \Cdot G)} \
Nous utilisons des cookies pour améliorer les services que nous vous proposons. En poursuivant votre navigation sur ce site, vous acceptez de les conserver conformément à notre Politique de confidentialité .
Si vous êtes un joueur, vous savez combien il est important que votre système fonctionne à pleine capacité. Même un décalage d’une milliseconde peut signifier “Game Over”. Cet article vous explique comment optimiser Windows 10 pour les jeux.
Conseil
Description
Régler les paramètres graphiques d’un jeu
Vérifiez les paramètres graphiques du jeu, puis consultez votre compteur de FPS.
Mettez à jour les pilotes de votre GPU
Vérifiez auprès du fabricant car Windows 10 ne le fait pas automatiquement.
Installer DirectX 12
Une application indispensable pour tout joueur.
Utiliser le mode de jeu Windows 10
Il est déjà intégré à Windows 10 et dédie des ressources système aux jeux.
Gérer les heures actives
Windows 10 installe les mises à jour en fonction de ces paramètres. Configurez-les pour que votre ordinateur ne se mette pas à jour pendant que vous jouez.
Ajustez les paramètres des effets visuels
Windows Exécute des graphiques en arrière-plan constamment. Modifiez vos paramètres pour vous concentrer sur le jeu.
Gérer les mises à jour automatiques de Steam
Même problème que pour les Windows 10 heures actives.
Désactiver les notifications
Allez dans vos “paramètres de notifications et d’actions” et désactivez les notifications.
Régler le panneau de contrôle NVIDIA
Modifiez les paramètres tels que “Ambient Occlusion” et “Anisotropic Filtering”.
Régler le centre de contrôle AMD/ATI
Activez les options “ Image Sharpening “ et “ Overclocking “ pour améliorer les performances.
Réduire la résolution dans un jeu
Vérifiez les paramètres du jeu et baissez-les d’un cran ou deux.
Désactiver l’accélération de la souris
Ce n’est pas un problème de performance du PC, mais cela rendra les mouvements de votre souris plus précis.
Utilisez une carte SSD
La mise à jour vers le SSD peut réduire considérablement les temps de chargement.
Mettez à niveau votre GPU/CPU
Veillez à vérifier la mémoire et la bande passante avant de faire un achat.
Mettez votre RAM à niveau
Le minimum de base est de 8 Go. Les titres plus récents nécessitent 12 Go. Mais vous aurez besoin de 16 à 32 Go pour rester au top.
Désactiver l’algorithme de Nagle
Aide à améliorer la latence de votre connexion.
Surcadencez votre carte graphique
Utilisez MSI Afterburner pour le faire, mais faites attention à la surchauffe.
Désactiver SysMain et Prefetch
Des processus faciles à désactiver qui vous aideront à accélérer votre système.
Utilisez une alimentation externe pour les ordinateurs portables
Faites cela pour éviter les fonctions d’économie d’énergie de votre ordinateur portable.
Utiliser un plan d’alimentation performant
Si vous ne cherchez pas à optimiser un ordinateur portable, utilisez ce paramètre pour une meilleure jouabilité.
Empêchez votre ordinateur portable de surchauffer
Veillez à ce que votre ordinateur portable soit bien ventilé. Essayez un bureau pour ordinateur portable !
Mettez à niveau le GPU et la RAM de votre ordinateur portable
Confiez l’installation à un technicien si vous n’avez pas l’expérience des ordinateurs portables.
Désactiver les services d’arrière-plan Windows
Désactivez les services d’arrière-plan pour accélérer votre ordinateur portable Windows.
Un facteur clé qui peut ralentir votre expérience de jeu est l’utilisation d’un enregistreur de qualité inférieure pendant le jeu. C’est pourquoi notre choix spécial pour optimiser votre PC pour les jeux sur Windows 10 est Gecata by Movavi. Ce programme peut enregistrer le gameplay en 4K et jusqu’à 120 FPS sans perte de performance. Il est facile à utiliser et est livré avec une version d’essai gratuite.
Qu’est-ce qu’un FPS faible et comment puis-je le vérifier ?
Si votre jeu commence à ralentir et que l’image est saccadée, surtout lorsqu’elle bouge, c’est que votre taux d’images par seconde (IPS) est faible. Cela se produit lorsque le matériel de votre ordinateur a du mal à faire fonctionner votre jeu ou fait des heures supplémentaires. S’il travaille trop, la vitesse du jeu ralentit.
La carte graphique travaille pour rendre les images fixes, ou frames, pendant que vous jouez à un jeu. Elle travaille en collaboration avec d’autres composants matériels tels que la RAM, le CPU et le GPU pour créer une expérience de jeu complète. En cas d’arrêt de l’un de ces composants, votre FPS commencera à baisser. La plupart des joueurs préfèrent un taux de 60 FPS en jouant, mais la plupart des jeux sont en fait très bien à 30 FPS.
Le PC surpasse les consoles à cet égard, car il est toujours possible d’accélérer le taux de FPS sur un PC avec des modifications, alors que modifier une console n’est pas possible. Les joueurs sur PC peuvent également augmenter la fréquence de rafraîchissement de leur écran, modifier d’autres paramètres système pour le jeu, et bien plus encore.
Cet article vous présente les réglages de performance pour les jeux que vous pouvez effectuer sur Windows 10 pour améliorer votre expérience de jeu.
Avant de commencer, il est toujours bon d’avoir un compteur de FPS dans le jeu, afin de pouvoir suivre vos progrès et tester les réglages qui fonctionnent. De nombreux jeux les ont préinstallés, mais si vous installez MSI Afterburner , vous ne serez jamais sans cet outil utile dans n’importe quel jeu.
Comment rendre Windows 10 plus rapide pour les jeux (corrections rapides)
Vous voulez savoir comment rendre Windows 10 plus rapide pour jouer avec une solution rapide ? Suivez ces conseils et recommencez à jouer !
Régler les paramètres graphiques d’un jeu
Chaque jeu possède des paramètres graphiques spécifiques qui peuvent vous aider à optimiser votre expérience de jeu. En voici trois que vous devriez vérifier dans le menu des paramètres du jeu avant de jouer.
Anti-crénelage : Lorsqu’un jeu utilise le crénelage, il corrige les petites lignes irrégulières et inégales autour de textures ou d’objets spécifiques. Pensez aux lignes floues que vous voyez lorsque l’herbe apparaît dans la plupart des jeux. Chaque jeu possède différents niveaux d’anticrénelage (SSAA, TAA, MSAA, etc.). - et vous pouvez généralement les modifier dans les paramètres du jeu pour obtenir de meilleures performances.
Flou de mouvement : Pour rendre les choses plus réalistes, les jeux intègrent des flous de mouvement afin d’émuler la vie réelle. Le désactiver peut souvent vous aider à économiser de la puissance graphique.
Synchronisation verticale : Parfois, lorsque vous vous déplacez rapidement, la carte graphique ne peut pas suivre et l’écran semble se déchirer en son milieu. La synchronisation verticale aide à résoudre ce problème mais ajoute un certain décalage. Une façon de corriger ce problème est d’utiliser le VSync adaptatif ou le Triple Buffering. Vous utiliserez davantage de puissance de la carte graphique, mais vous trouverez un juste milieu entre les déchirures et le décalage.
Mettez à jour les pilotes de votre GPU
Le GPU (Graphics Processing Unit) est crucial pour votre expérience de jeu et pour les performances de votre PC dans les jeux, mais vous devez maintenir les pilotes de votre GPU à jour pour en profiter. De plus, un pilote obsolète peut entraîner des bogues, des problèmes et des pannes du système. Nous vous recommandons donc de prendre ce problème au sérieux et de prendre soin de vos pilotes.
Bien que Windows 10 ne mette pas automatiquement à jour les pilotes de votre GPU, les fabricants créent souvent des logiciels spéciaux sous la forme de panneaux de contrôle GPU qui effectuent des vérifications régulières des mises à jour et vous avertissent si une nouvelle mise à jour est disponible. N’ignorez pas ces notifications, car le processus de mise à jour prend peu de temps et peut vous éviter bien des ennuis pendant le jeu.
Par exemple, selon le fabricant de votre GPU, vous pouvez télécharger soit Radeon Software Adrenaline, soit GeForce Experience. Ces deux programmes vérifient les mises à jour automatiques et proposent des options d’optimisation puissantes. De plus, GeForce Experience comprend un logiciel de capture et de streaming de jeux et fournit des pilotes spéciaux Game Ready, conçus par NVIDIA en collaboration avec les principales sociétés de développement de jeux.
Vous pouvez mettre à jour votre pilote directement à partir des propriétés Windows, mais le moyen le plus sûr d’obtenir le dernier pilote est d’aller directement sur le site Web du fabricant, de choisir votre modèle de GPU et de vérifier les mises à jour.
Si vous ne connaissez pas les spécifications de votre GPU, faites un clic droit sur le Bureau, choisissez Paramètres d’affichage, puis Paramètres d’affichage avancés et cliquez sur Propriétés de l’adaptateur d’affichage.
Voici quelques liens vers les mises à jour des pilotes des fabricants les plus populaires :
DirectX 12 est un outil indispensable pour quiconque souhaite jouer à des jeux sur Windows 10. Pour faire simple, DirectX est l’application que le jeu utilise pour communiquer avec votre ordinateur et lui dire quoi faire. DirectX 12 est une grande amélioration par rapport à son prédécesseur, DirectX 11, car il permet aux cartes graphiques de tirer des ressources de plus d’un cœur du processeur d’un PC, ce qui augmente les fréquences d’images, améliore les effets graphiques et réduit la consommation d’énergie. Des tests ont montré une différence de 85 à 300 % dans les performances de jeu entre la version 11 et la version 12.
Pour bénéficier des fonctionnalités de DirectX 12, le jeu doit avoir été développé avec cette version. La bonne nouvelle est que la liste de ces jeux s’allonge chaque jour, car de plus en plus de sociétés de jeux adoptent cette version.
Pour vérifier que vous disposez de la dernière version de DirectX, appuyez sur la touche Windows + R, tapez “dxdiag” et cliquez sur OK. L’outil de diagnostic DirectX s’ouvre.
Si vous n’avez pas DirectX 12, allez-y et installez-le ; le processus ne prendra que quelques minutes. Appuyez sur la touche Windows + I, choisissez Mise à jour et sécurité et cliquez sur Vérifier les mises à jour dans l’onglet Windows. Mise à jour. Attendez que l’installation se termine.
Utiliser le mode de jeu Windows 10
Voici un moyen simple et rapide d’optimiser Windows 10 pour les jeux en utilisant un outil intégré au système. Le mode Jeu, apparu dans les versions les plus récentes du système d’exploitation, est conçu pour améliorer l’expérience de jeu en consacrant davantage de ressources système aux jeux. Il empêche également d’autres programmes, tels que Windows Update, d’accaparer les ressources du système pendant que vous jouez.
Pour localiser les paramètres du mode jeu, appuyez sur la touche Windows + I, tapez “mode jeu” dans la boîte de recherche et cliquez sur Contrôler le mode jeu pour optimiser votre PC pour les jeux.
Dans le menu qui s’ouvre, cliquez sur Mode Jeu. Passez à On pour activer le Game Mode. Si votre PC prend en charge le Mode Jeu, le système optimisera les performances de votre PC pour les jeux.
Si vous ne trouvez pas ces paramètres, cela signifie que la dernière Windows Creators Update n’est pas installée sur votre PC.
Gérez vos heures actives
Oui, Windows 10 peut installer des mises à jour et redémarrer votre ordinateur en plein milieu de votre session de jeu sans même un simple “excusez-moi”. Ouch. Cela peut être décevant, c’est le moins que l’on puisse dire, surtout si vous êtes un joueur compétitif et que votre sortie non planifiée peut affecter vos coéquipiers ou votre classement.
Mais même en l’absence de tels redémarrages “en pleine face”, qui sont en fait assez rares, le téléchargement des mises à jour en arrière-plan limite vos vitesses de connexion et occupe la mémoire vive de votre PC.
Bien que votre première réaction puisse être de désactiver complètement les mises à jour automatiques, nous vous le déconseillons. La mise à jour agressive de Windows sans demander la permission est ainsi faite parce que dans les versions précédentes, les utilisateurs ne mettaient pas à jour de leur propre gré et leurs systèmes étaient donc régulièrement exposés aux cybermenaces. Rappelez-vous que les mises à jour automatiques de Windows ne sont pas là uniquement pour ruiner votre raid, mais aussi pour protéger votre système, le maintenir à jour et le faire fonctionner de manière optimale.
Ainsi, une autre solution plus “ douce “ et bien plus intelligente consiste à définir vos heures d’activité de manière appropriée. Vous pouvez spécifier vos horaires de jeu et de travail dans Windows et empêcher le système d’exploitation de télécharger des mises à jour pendant ces périodes. Windows utilisera alors vos heures non actives pour mettre à jour et redémarrer votre système.
Pour définir vos heures actives, appuyez sur la touche Windows + I, puis allez dans Mise à jour et sécurité et cliquez sur Modifier les heures actives. Vous pouvez alors définir jusqu’à 18 heures actives, en laissant un intervalle de 6 heures (il faut bien dormir parfois, non ?) pour que Windows installe vos mises à jour.
Si vous êtes un joueur de nuit ou si vos heures de sommeil varient considérablement, de sorte que vous ne pouvez pas définir une heure de repos spécifique, nous vous conseillons (en plus de changer vos habitudes de sommeil) de vous assurer que Windows vous rappelle chaque fois qu’il voudra redémarrer afin que, si cela se produit pendant que vous jouez, vous puissiez toujours le retarder.
Pour ce faire, retournez à Windows Update, cliquez sur Advanced options et assurez-vous que l’interrupteur sous We’ll show a reminder when we’re going to restart est activé.
Réglez les paramètres de vos effets visuels
Les interfaces utilisateur graphiques (IUG) de Windows 10 regorgent d’effets visuels fantaisistes. Néanmoins, ces jolis graphiques d’arrière-plan, dont la plupart sont activés par défaut, peuvent affecter la puissance de traitement disponible de votre PC lorsqu’un jeu est en cours d’exécution au premier plan. Ainsi, une façon d’optimiser Windows 10 pour les performances de jeu est de sacrifier certains, voire tous, ces paramètres.
Une fois encore, appuyez sur la touche Windows + I. Ensuite, tapez “performance” et sélectionnez Ajuster l’apparence et les performances de Windows. Dans la fenêtre qui s’ouvre, choisissez Ajuster pour une meilleure performance. Ensuite, allez dans l’onglet Avancé et vérifiez que le paramètre est appliqué aux programmes.
Si vous souhaitez conserver un minimum de graphismes pour que votre interface n’ait pas un aspect si terne, nous vous recommandons de garder au moins ces trois options de la liste cochées :
Afficher les vignettes au lieu des icônes.
Afficher le contenu de la fenêtre pendant le glissement.
Lisser les bords des polices d’écran.
Gérer les mises à jour automatiques de Steam
Le problème ici est le même qu’avec Windows Mises à jour. Steam met automatiquement à jour tous vos jeux, même ceux auxquels vous n’avez pas joué depuis longtemps. Les mises à jour en arrière-plan consomment la mémoire de votre PC et peuvent ralentir les processus de jeu.
Pour empêcher Steam de mettre à jour les jeux pendant que vous jouez, allez dans votre client Steam et trouvez les options de mise à jour dans Steam - Paramètres - Téléchargements. Décochez la case Autoriser les téléchargements pendant le jeu.
Par ailleurs, les jeux sur Steam sont mis à jour en permanence et il arrive souvent que de nouveaux bogues apparaissent dans les nouvelles mises à jour ou que certains éléments cessent de fonctionner.
Pour ramener la version d’un jeu à celle dont vous avez besoin, ouvrez Steam, faites un clic droit sur le jeu, choisissez Propriétés et allez dans l’onglet Bêta. Choisissez la version souhaitée dans le menu déroulant.
Désactiver les notifications
Les notifications au milieu d’un jeu consomment de la puissance CPU et peuvent nuire à votre champ de vision pendant le jeu. Suivez les étapes suivantes pour désactiver toutes les notifications avant de jouer :
Appuyez sur la touche Windows ou cliquez sur l’icône Windows en bas à gauche de votre écran.
Tapez “Notifications” dans la barre de recherche et sélectionnez Notifications et paramètres d’actions dans les résultats.
Lorsque la nouvelle fenêtre s’ouvre, mettez le commutateur à bascule situé à côté de l’option Obtenir des notifications d’applications et d’autres expéditeurs sur Désactivé. Vos notifications sont maintenant désactivées.
Vous pouvez également faire défiler la liste et désactiver les notifications par application.
Régler le panneau de contrôle NVIDIA
Si vous utilisez une carte graphique NVIDIA, il existe des paramètres spécifiques à la carte dans le panneau de configuration. Voici quelques-uns des meilleurs paramètres Windows 10 pour les cartes NVIDIA pour les jeux.
Occlusion ambiante : Activez-la et augmentez son niveau jusqu’à 16x.
Filtrage anisotropique : Passez sur Off.
DSR - Facteurs et lissage : Désactiver.
Mode faible latence : Activez-le.
Mode de gestion de l’énergie : Passez à Préférer les performances maximales.
Optimisation Threaded : Passez à Auto.
Régler le centre de contrôle AMD/ATI
Les cartes graphiques AMD ont également beaucoup de paramètres. Certains disent qu’elles rivalisent même avec leur concurrent NVIDIA. Modifiez ces paramètres pour optimiser les jeux de Windows 10.
Activez l’accentuation des images d’AMD en cliquant sur Paramètres, puis sur Graphiques pour trouver le paramètre. Vous pouvez l’activer pour des jeux individuels ou globalement.
Augmentez vos performances graphiques en utilisant l’overclocking. Pour ce faire, cliquez sur l’onglet Performance, puis sur Tuning, sélectionnez Automatique, et enfin GPU Overclocked.
Si vous utilisez une carte AMD, vous n’avez pas besoin de MSI Afterburner pour contrôler les performances. Il vous suffit d’appuyer sur Ctrl + Shift + O pour que vos statistiques apparaissent dans le jeu.
Réduire la résolution dans un jeu
Cette solution entre facilement dans la catégorie des “solutions rapides”. Parfois, votre système ne peut tout simplement pas gérer un jeu, et vous n’avez pas le temps de chercher des solutions à plus long terme. Allez dans les paramètres système du jeu et réduisez la résolution d’un niveau. Surveillez ensuite votre FPS jusqu’à ce que les choses s’améliorent.
Désactiver l’accélération de la souris
Celui-ci n’a rien à voir avec l’amélioration des performances de votre PC en matière de jeu, mais il s’agit plutôt d’un conseil pour vous permettre d’améliorer vos performances personnelles en matière de jeu. L’accélération de la souris est un paramètre qui fait bouger votre souris en se basant non seulement sur la détection des mouvements physiques mais aussi sur la vitesse. Cette option rend en fait les mouvements de votre souris moins précis, car elle ajoute un paramètre supplémentaire au mouvement que vous transmettez à la souris. Étant donné que la précision est cruciale pour la précision de la visée dans les jeux de tir à la première personne, si vous êtes un fan de Call of Duty, Counter-Strike ou Overwatch, vous devriez absolument désactiver cette option.
Pour ce faire, appuyez sur la touche Windows + I. Tapez “pointeur de la souris” dans la zone de recherche. Choisissez Modifier l’affichage ou la vitesse du pointeur de la souris. Dans la fenêtre qui s’ouvre, allez dans l’onglet Options du pointeur et décochez la case Améliorer la précision du pointeur.
Vous pouvez également modifier le curseur de la vitesse du pointeur pour créer la configuration qui vous convient le mieux.
Comment améliorer les performances de jeu sur Windows 10 (corrections avancées)
Vous ne savez toujours pas comment rendre Windows 10 plus rapide pour les jeux ? Utilisez ces correctifs avancés pour une solution à long terme.
Optez pour un SSD
Passer d’un disque dur à un disque SSD n’améliorera pas radicalement les performances de vos jeux, mais cela peut vous aider à réduire considérablement les temps de chargement. Il est vrai que les disques durs SSD peuvent être assez chers et il peut sembler que les temps de chargement ne sont pas une question si importante pour investir votre argent. Mais si ce n’est probablement pas la première chose à laquelle vous pensez lorsque vous accélérez votre ordinateur portable, ce n’est pas non plus la dernière. Les jeux d’aujourd’hui prennent de plus en plus d’espace disque, donc si vous voulez jouer aux derniers jeux, passer d’un disque dur à un disque SSD peut être un véritable gain de temps et vos temps de chargement de jeu peuvent passer de 30-40 secondes à 2-3, ce qui est assez significatif.
Quant à l’aspect financier, si un gros SSD pour votre système d’exploitation et vos jeux est trop cher pour vous, prenez un petit SSD pour votre système d’exploitation et gardez un gros disque dur pour les jeux.
Mettez à niveau votre GPU/CPU
Mettez à niveau votre GPU et votre CPU environ tous les quatre ans pour que tout fonctionne bien. Mais si vous êtes un joueur, vous devrez peut-être le faire plus tôt, car la technologie évolue beaucoup plus rapidement dans ce secteur.
Le choix de la première mise à niveau dépend des types de jeux auxquels vous jouez. Si vous n’avez pas besoin de graphismes extrêmes et jouez à des jeux plus rapides, le processeur est le meilleur choix. Mais si vous aimez les histoires numériques ou les jeux basés sur le monde avec beaucoup de personnages et d’arrière-plans non jouables, un GPU pourrait vous être plus utile.
Quoi qu’il en soit, assurez-vous que l’équilibre des performances entre les deux est délicat, car l’un ne fonctionne pas sans l’autre. Vérifiez la mémoire et la bande passante de toute mise à niveau potentielle.
Mettez votre RAM à niveau
La mise à niveau de votre RAM n’aura pas un effet aussi important que la mise à niveau du processeur ou du GPU. Mais elle peut donner à votre matériel le coup de pouce dont il a besoin pour augmenter votre fréquence d’images et améliorer votre expérience de jeu globale.
De nombreux jeux requièrent une mémoire vive de 8 Go, mais ce chiffre augmente régulièrement, car les titres les plus récents recommandent une mémoire vive de 12 Go.
Si vous voulez rester en tête de la courbe, 16 Go suffiront pour l’instant. Mais si vous voulez utiliser des services de streaming en arrière-plan comme Twitch, Discord et YouTube, vous devrez passer à 32 Go pour pouvoir tout faire fonctionner sans problème.
Désactiver l’algorithme de Nagle
En gros, l’algorithme de Nagle améliore l’efficacité des réseaux TCP/IP en créant des paquets de données, ce qui réduit le nombre de paquets à envoyer sur le réseau. Ce processus affecte votre connexion Internet, la rendant moins stable. La désactivation de cet algorithme sur votre PC peut contribuer à des problèmes de latence lorsque vous jouez à des jeux en ligne.
Ouvrez votre Windows Éditeur de registre en cliquant sur la touche Windows + Q, en tapant “regedit” et en cliquant sur le fichier regedit. Faites défiler le menu HKEY_LOCAL_MACHINE pour trouver le chemin suivant : “\SYSTEM\CurrentControlSet\Services\Tcpip\Parameters\Interface”. Cela vous mènera au menu qui comprend des dossiers avec de nombreux chiffres et lettres. Pour accéder au bon fichier, faites correspondre votre adresse IP à l’adresse DhcpIPAddress listée dans l’un de ces dossiers.
Pour trouver votre adresse IP, appuyez sur la touche Windows + X et suivez ces étapes : Panneau de configuration - Réseau et Internet - Centre Réseau et partage - Connexions - Détails - Adresse IPv4.
Vous pouvez maintenant retrouver le dossier avec la bonne adresse IP. Cliquez avec le bouton droit de la souris sur ce dossier et sélectionnez Nouveau - Valeur DWORD (32 bits). Vous devrez créer deux de ces valeurs : TcpAckFrequency et TCPNoDelay. Double-cliquez sur chacune d’elles et réglez leurs paramètres sur 1. L’algorithme de Nagle est maintenant désactivé.
Surcadencez votre carte graphique
Overclocker vos cartes graphiques signifie les pousser au-delà des spécifications affichées sur la boîte. De nombreuses cartes récentes disposent d’une fonction automatique permettant de le faire dans les paramètres de contrôle, mais il existe également des moyens de le faire manuellement. Veillez à bien connaître votre carte graphique, car si vous repoussez ses limites, elle risque de surchauffer.
Pour overclocker :
Vérifiez les paramètres standard ou de référence de votre carte.
Utilisez un programme comme MSI Afterburner pour augmenter l’horloge centrale de la carte. Faites-le par intervalles de 10 MHz et réinitialisez les benchmarks au fur et à mesure.
En option, vous pouvez également augmenter le voltage et l’horloge de la mémoire, mais surveillez de près la température de votre carte lorsque vous faites cela.
Jouez à un jeu et vérifiez les performances.
Désactiver SysMain et Prefetch
C’est l’un des services faciles à désactiver sur Windows 10. Ces programmes essaient de vous aider à accéder plus rapidement aux données, mais ils ajoutent finalement des opérations inutiles qui ralentissent les jeux. Voici comment les désactiver :
SysMain
Appuyez sur Win + R pour ouvrir l’invite Exécuter.
Tapez msc et appuyez sur Entrée.
Double-cliquez sur SysMain.
Sélectionnez Désactivé dans la liste déroulante.
Cliquez sur OK.
Préférez
Appuyez sur Win + R pour ouvrir l’invite d’exécution.
Tapez “regedit >” et appuyez sur Entrée.
Cliquez sur Oui.
Allez dans PrefetchParameters dans HKLM.
Double-cliquez sur la valeur REG_DWORD EnablePrefetcher.
Définissez la valeur sur 0.
Cliquez sur OK.
Comment accélérer l’exécution des jeux sur un ordinateur portable Windows 10
Vous voulez savoir comment améliorer les performances de jeu sur un ordinateur portable Windows 10 ? Ces conseils vous aideront à accélérer les choses !
Utiliser une alimentation externe
Windows 10 dispose de nombreuses fonctions d’économie d’énergie pour les ordinateurs portables afin de les maintenir en vie pendant de plus longues durées. Cela affectera considérablement l’expérience de jeu car votre RAM, vos cartes graphiques et votre CPU ne fonctionneront pas à pleine capacité. Pour remédier à ce problème, connectez votre ordinateur portable à son alimentation externe et assurez-vous que vos paramètres de contrôle permettent d’obtenir des performances optimales lorsqu’il est connecté.
Utiliser un plan d’alimentation performant
Pour modifier votre plan d’alimentation, cliquez sur la touche Windows + I, tapez “alimentation” dans la zone de recherche, choisissez Paramètres d’alimentation et de veille, puis Paramètres d’alimentation supplémentaires. Si vous ne voyez pas de plan d’alimentation haute performance dans la partie gauche de l’écran, cliquez sur Créer un plan d’alimentation et choisissez Haute performance.
Empêchez votre ordinateur portable de surchauffer
Les ordinateurs portables sont réputés pour leur surchauffe, car tous les composants sont serrés dans le châssis et l’air circule peu. En cas de surchauffe, le système ralentit et les performances de jeu aussi. Utilisez ces conseils de prévention :
Vérifiez et nettoyez toujours vos ventilateurs.
Pour la ventilation, essayez de surélever votre ordinateur portable ou utilisez un bureau conçu pour les ordinateurs portables.
Réglez les paramètres de vos ventilateurs pour qu’ils ne soient pas trop sollicités.
Si vous le pouvez, jouez sur votre ordinateur portable dans un environnement frais.
Nous avons déjà abordé ce sujet pour les PC, mais votre ordinateur portable peut également être équipé d’un processeur graphique et d’une mémoire vive. Suivez les mêmes protocoles, et si vous n’avez pas l’habitude de travailler avec des ordinateurs portables, il est préférable de confier l’installation à un technicien expérimenté.
Désactiver les services d’arrière-plan Windows
Les ordinateurs portables sont souvent équipés de nombreux services d’arrière-plan qui fonctionnent pour éviter la surchauffe et optimiser les performances avec des composants plus petits. Ces services peuvent facilement nuire aux performances de jeu s’ils ne sont pas désactivés. Voici les étapes à suivre :
Appuyez sur les touches Windows + R et utilisez l’invite Exécuter.
Tapez “msconfig” et cliquez sur OK.
Choisissez l’onglet Services.
Cochez la case Masquer tous les services Microsoft.
Sélectionnez Tout désactiver, puis cliquez sur Appliquer et OK.
Sélectionnez Redémarrer dans la boîte de dialogue qui s’ouvre.
Résumé
Nous espérons que cet article vous a donné quelques idées sur la façon de faire fonctionner les jeux plus rapidement sur Windows 10 et d’améliorer votre expérience de jeu. Voici quelques-uns des principaux conseils à utiliser pour optimiser votre système :
Modifiez les paramètres de vos jeux : Vous pouvez éventuellement modifier des éléments comme la résolution, le flou de mouvement et l’anticrénelage.
Mettez votre matériel à niveau : si votre RAM, votre GPU ou votre CPU ne sont pas à la hauteur, il est peut-être temps de les mettre à niveau pour les jeux modernes et une meilleure expérience de jeu.
Modifiez les paramètres de votre carte graphique : Les cartes graphiques modernes ont leurs propres paramètres que vous pouvez ajuster pour optimiser votre système pour les jeux. Vérifiez les paramètres de l’occlusion ambiante, du filtrage anisotropique et du DSR.
Gecata by Movavi
Logiciel d’enregistrement de jeux et de streaming gratuit et simple
L’article ci-dessus énumère une série de mesures que vous pouvez prendre pour optimiser votre ordinateur portable ou de bureau pour les jeux. Voici les principaux conseils :
Vérifiez vos paramètres graphiques dans le jeu.
Modifiez les paramètres de votre carte graphique
Mettez à niveau votre GPU et/ou votre CPU
Vérifiez les paramètres de performance de votre Windows.
Qu’est-ce qui ralentit mon ordinateur ?
Il y a une longue liste de choses qui pourraient ralentir votre ordinateur. Voici une liste de raisons que vous pouvez vérifier :
L’algorithme de Nagle est activé
Votre ordinateur exécute des mises à jour sur des heures non actives
Les pilotes du GPU ne sont pas à jour
Vous utilisez DirectX 11 et devez effectuer une mise à jour.
Le système fonctionne avec des paramètres de performance inférieurs pour économiser la batterie.
Comment faire fonctionner un ordinateur plus rapidement ?
Si vous voulez savoir comment rendre votre ordinateur plus rapide pour jouer, voici quelques conseils rapides :
Passez à une carte SSD
Désinstallez tous les programmes inutilisés
Effectuez un nettoyage du disque et une maintenance du système
Passez en revue votre programme de démarrage et désactivez ceux que vous n’utilisez pas.
Installez de la RAM supplémentaire
Windows 10 est-il meilleur pour les jeux ?
Lorsque l’on compare l’expérience de jeu des versions précédentes de Windows à Windows 10, l’amélioration des performances est extraordinaire. Si vous n’êtes pas sûr de vouloir faire une mise à jour, la décision est simple. Windows 10 offrira toujours une meilleure expérience.
Comment obtenir 60 fps dans un jeu ?
Atteindre 60 FPS dans un jeu n’est pas différent des conseils pour accélérer votre système en général, mais voici ce que vous pouvez faire :
Améliorez votre GPU et votre CPU
Mettez à niveau ou installez de la RAM supplémentaire
Passez Windows 10 en “mode jeu”.
Vérifiez les paramètres graphiques de votre jeu.
Installez les derniers pilotes pour votre carte graphique
Pourquoi ai-je des fps faibles sur mon PC haut de gamme ?
La baisse du nombre de FPS se produit lorsque votre ordinateur n’a pas la mémoire ou la puissance nécessaire pour faire tourner le jeu à pleine vitesse. Parmi les problèmes les plus courants à l’origine d’une baisse du nombre d’images par seconde, citons les pilotes de cartes graphiques obsolètes, les cartes graphiques de qualité inférieure, les vieux processeurs et le manque de mémoire vive.
Ce n’est pas parce que vous dépensez de l’argent pour un ordinateur qu’il est équipé du dernier cri. Le matériel est plus important que les autres caractéristiques de conception ou de logiciel. En outre, les jeux vidéo modernes placent toujours la barre plus haut en matière de capacité de performance, ce qui est donc relatif d’un jeu à l’autre.
Rejoignez-nous et obtenez des offres promo et des astuces !
1.5М+ utilisateurs déjà abonnés à notre newsletter
Votre adresse de messagerie
Je m’inscris
En vous inscrivant, vous acceptez de recevoir nos courriels de marketing et acceptez que Movavi utilise vos données personnelles conformément à notre Politique de confidentialité . Vous confirmez également que vous répondez aux critères d’âge minimum .
]]><h2 id="Text-coefficient-of-Kinetic-Friction-Frac-v-2-U-2-2s-Cdot-G"><a href="#Text-coefficient-of-Kinetic-Friction-Frac-v-2-U-2-2s-Cdot-G" Configuring the Perfect Windows Sandbox Experience in 11https://win11-tips.techidaily.com/configuring-the-perfect-windows-sandbox-experience-in-11/2024-10-25T15:17:59.436Z2024-10-26T14:33:39.325ZConfiguring the Perfect Windows Sandbox Experience in 11
Microsoft Windows 11 features multiple virtualization solutions out of the box. While Hyper-V is an excellent tool, Windows Sandbox is an easy alternative to Windows virtual machines. It lets you run untrusted apps in an isolated environment without the hassle of setting up a complete virtualization tool.
Unfortunately, Windows Sandbox is not available on the Home edition of the OS. If you are running the Pro, Enterprise, and Education edition, here is how to enable and set up Windows Sandbox in Windows 11.
Disclaimer: This post includes affiliate links
If you click on a link and make a purchase, I may receive a commission at no extra cost to you.
How to Set Up Windows Sandbox in Windows 11
Windows Sandbox is an optional feature, which means you’ll have to install it from the Optional features section. You canadd and remove optional features from the Windows Features dialog . Alternatively, you can use PowerShell or Command Prompt for a swift installation of Windows Sandbox.
While the setup process is easier, your computer must meet some system requirements. Windows 11 Pro, Education, or Enterprise running computers with virtualization support are Windows Sandbox compatible. In most cases,if your system can run Windows Hyper-V , it should also run Windows Sandbox.
1. Enable Windows Sandbox Using the Windows Features Dialog
You can install Windows Sandbox using the Windows Features dialog. This dialog houses most of the optional Windows features that are ready to be installed on your PC.
Follow these steps to install Windows Sandbox using the Windows Features dialog:
PressWin + R to openRun .
Typeappwiz.cpl and clickOK to openControl Panel.
In the left panel, click onTurn Windows features on or off.
In theTurn Windows features on or off dialog , scroll down and locateWindows Sandbox.
Check theWindows Sandbox option and clickOK .
Windows will search for the files and install the required dependencies to run Windows Sandbox scenarios. Once the changes are applied, close the Windows features dialog and restart your PC.
After the restart, pressWin + S to openWindows search.
Typesandbox and click onWindows Sandbox from the search result to launch the virtualization tool.
3. Install Windows Sandbox Using PowerShell
You can use the Enable WindowsOptionalFeature command in PowerShell to install Windows Sandbox in Windows. This method is useful if you find the sandbox option greyed out or unable to install it from the Windows Feature dialog.
To install Windows Sandbox using PowerShell:
PressWin + X to open theWinX menu.
Click onWindows Terminal (Admin) to open the Windows Terminal with administrative privilege. Since PowerShell is assigned as the default profile upon launch, you can execute your PowerShell cmdlets straight away in Windows Terminal.
In the Windows Terminal window, copy and paste the following command and press Enter: Enable-WindowsOptionalFeature -Online -FeatureName “Containers-DisposableClientVM” -All
If no error occurs, Windows will install the required files to enable Windows Sandbox.
Once done, pressY and hitEnter to restart your PC.
After the restart, you can launch Windows Sandbox from Windows Search.
3. Install Windows SandBox Using Command Prompt
Deployment Image Servicing and Management (DISM) is a command-line utility that facilitates the installation of optional features using the Command Prompt. To install Windows Sandbox, you will need to use the Enable-Feature command in Command Prompt. Here’s how to do it.
PressWin + R to openRun .
Typecmd in theRun dialog. Press and holdCtrl + Shift and clickOK to open Command Prompt as administrator.
In the Command Prompt, type the following command and pressEnter : dism /online /Enable-Feature /FeatureName: "Containers-DisposableClientVM" -All
Wait for the process to complete. Once done, pressY andEnter to restart your PC.
How to Use Windows Sandbox
Now that you have Windows Sandbox installed, you can start using it to test untrusted apps in isolation. To launch the app, pressWin + S to openWindows Search and typeWindows Sandbox. Click on the app from the search result to open it.
Upon its launch, Windows Sandbox looks like a lightweight version of your Windows machine. You can copy files from your host system or download them from the Internet using the built-in web browser. Any actions you perform in the sandbox will not affect your host system.
Once the testing is complete, close the Sandbox and clickOK to confirm the action. Unlike a VM, Sandbox will delete all the data (including apps and files) upon exit. So, you’ll get a clean, isolated environment running the same Windows OS build as your host machine each time.
Set Up and Use Windows Sandbox in Windows 11
Windows Sandbox provides an excellent way to test apps and files in an isolated environment without the hassle of setting up a virtual machine. While the virtual machines have distinct advantages, Sandbox is lighter, faster, and loads a fresh copy of Windows OS each time it’s run.
Windows 11 Home users, however, have missed out on this excellent feature. But if you must use a sandbox, consider using third-party alternatives such as Sandboxie Plus and SHADE Sandbox. These alternatives offer a similar set of functionalities with no complicated setup involved.