
Saving the Day with Win10/11's Recycle Bin Corruption Fixed
Saving the Day with Win10/11’s Recycle Bin Corruption Fixed
Key Takeaways
- Resetting the Recycle Bin using Command Prompt can effectively fix the “The Recycle Bin on C:\ is corrupted” error on Windows. Use the command “rd /s /q C:\$Recycle.bin” to delete all files and restore the Recycle Bin to default settings.
- If resetting the Recycle Bin doesn’t work, try running a CHKDSK scan to check and repair your drive for bad sectors and file system errors. Use the command “chkdsk /r e:” to scan the specified drive.
- Scan your computer for malware using Windows Defender, PowerShell, or a reliable third-party antivirus program. Eliminate any detected threats to rule out malware as the cause of the Recycle Bin corrupted error.
Is your Windows PC bugging you with a “The Recycle Bin on C:\ is corrupted. Do you want to empty the Recycle Bin for this drive” error message? Such errors can occur with any drive, including internal and external ones, effectively preventing you from accessing the drive.
Fortunately, it is possible to resolve this error message without formatting your drive and losing critical data. Here, we show you how to fix the Windows 10 or 11 error.
1. Reset Recycle Bin Using the Command Prompt
Resetting the Recycle Bin is one of the most effective ways to fix issues with it. Doing so allows Windows to empty the Recycle Bin and restore it to its default settings, resolving any issues.
Several users on a Microsoft Community post reported fixing the Recycle Bin corrupted error on Windows with this tip.
To reset the Recycle Bin on Windows:
- Press Win + X to open the Power User menu.
- Select Terminal (Admin) from the list.
- Select Yes when the User Account Control (UAC) prompt appears.
- Type the following command and press Enter.
rd /s /q C:\$Recycle.bin
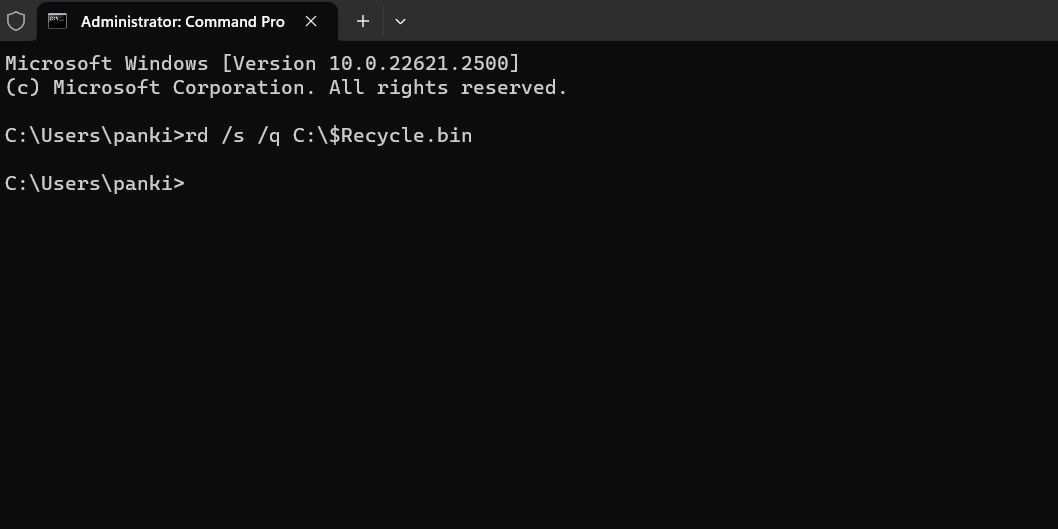
This command deletes all the files and folders in the Recycle Bin, including subdirectories, without prompting the user for confirmation. The two switches have the following functions:
/s - Recursively deletes all the files and folders in the Recycle Bin, including subdirectories.
/q - Stands for Quiet mode as it suppresses all confirmation prompts.
If you are getting the Recycle Bin corrupted error for a drive other than the C drive, replace the letter “C:” in the above command with the letter of the drive causing the error.
Once you run the above command, Windows will reset the Recycle Bin for the specified drive, and you should not see any more errors.
2. Run a CHKDSK Scan
If resetting the Recycle Bin proves ineffective, there may be an issue with the drive itself. You can try running a CHKDSK scan to check and repair your drive for bad sectors and file system errors.
For instance, if you see a “The Recycle Bin on E:\ is corrupted” error, you will need to scan the E: drive using these steps:
- Press Win + S to open the search menu.
- Type cmd in the text box and select Run as administrator.
- Select Yes when the User Account Control (UAC) prompt appears.
- Type the following command and press Enter.
chkdsk /r e:
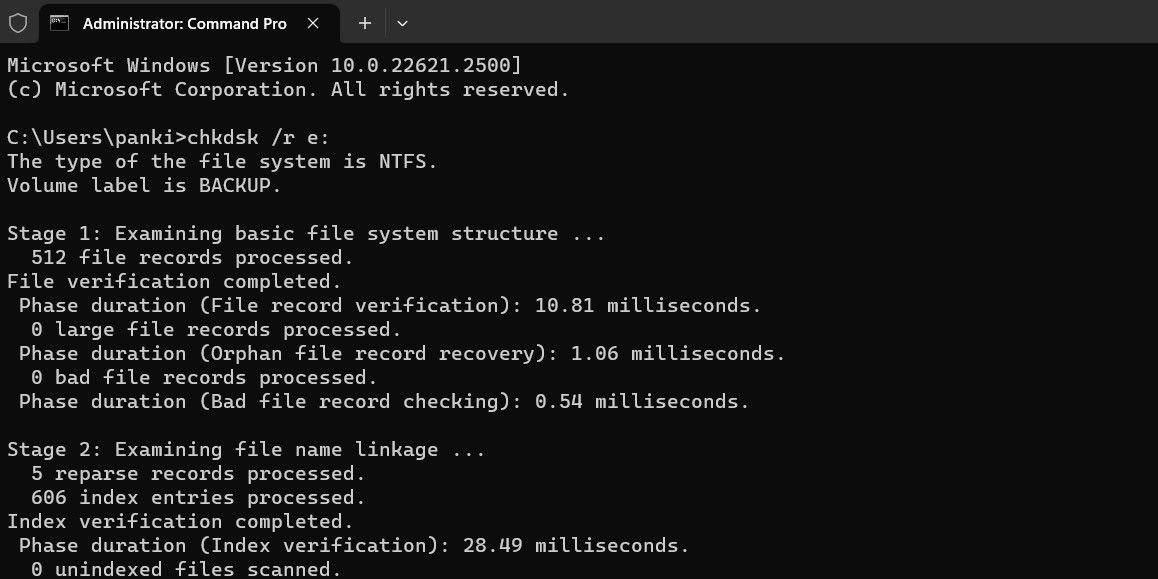
The r switch in a CHKDSK scan tells CHKDSK to locate bad sectors on the target disk and recover the readable information from the bad sectors. This can take some time as it scans and repairs the bad sectors on the drive.
Restart your PC after running the CHKDSK scan, then check if the error still occurs.
3. Run the SFC and DISM Scans
Problems with your PC’s system files can also give rise to such Recycle Bin errors. Thankfully, Windows includes helpful tools called SFC (System File Checker) and DISM (Deployment Image Servicing and Management) scans, which can automatically detect and repair any corrupted system files.
For more information, check our guide on repairing corrupt Windows files with Windows’ built-in tools and follow the steps outlined.
4. Scan for Malware
If you continue to see the Recycle Bin corrupted error, there is a chance that your PC is infected with malware. To rule out this possibility, you can use the built-in Windows Defender or PowerShell to scan your computer for malware . You can also use a reliable third-party antivirus program for this.
If the scan detects anything suspicious, take the recommended steps to eliminate the threat.
5. Perform a System Restore
Recent changes made to your system may have led to the Recycle Bin corrupted error on your Windows 10 or 11 PC. If the error message has only started appearing recently, you can consider using system restore to revert Windows to its earlier state when it worked fine.
Once you restore Windows to its previous state, the errors shouldn’t persist.
Get Rid of Annoying Recycle Bin Corrupted Errors
Recycle Bin errors can be vexing but are usually easy to fix. In most cases, resetting the Recycle Bin should resolve the corrupted error. If not, you may need to try the abovementioned solutions to fix the underlying problem.
Is your Windows PC bugging you with a “The Recycle Bin on C:\ is corrupted. Do you want to empty the Recycle Bin for this drive” error message? Such errors can occur with any drive, including internal and external ones, effectively preventing you from accessing the drive.
Fortunately, it is possible to resolve this error message without formatting your drive and losing critical data. Here, we show you how to fix the Windows 10 or 11 error.
1. Reset Recycle Bin Using the Command Prompt
Resetting the Recycle Bin is one of the most effective ways to fix issues with it. Doing so allows Windows to empty the Recycle Bin and restore it to its default settings, resolving any issues.
Several users on a Microsoft Community post reported fixing the Recycle Bin corrupted error on Windows with this tip.
To reset the Recycle Bin on Windows:
- Press Win + X to open the Power User menu.
- Select Terminal (Admin) from the list.
- Select Yes when the User Account Control (UAC) prompt appears.
- Type the following command and press Enter.
rd /s /q C:\$Recycle.bin
This command deletes all the files and folders in the Recycle Bin, including subdirectories, without prompting the user for confirmation. The two switches have the following functions:
/s - Recursively deletes all the files and folders in the Recycle Bin, including subdirectories.
/q - Stands for Quiet mode as it suppresses all confirmation prompts.
If you are getting the Recycle Bin corrupted error for a drive other than the C drive, replace the letter “C:” in the above command with the letter of the drive causing the error.
Once you run the above command, Windows will reset the Recycle Bin for the specified drive, and you should not see any more errors.
2. Run a CHKDSK Scan
If resetting the Recycle Bin proves ineffective, there may be an issue with the drive itself. You can try running a CHKDSK scan to check and repair your drive for bad sectors and file system errors.
For instance, if you see a “The Recycle Bin on E:\ is corrupted” error, you will need to scan the E: drive using these steps:
- Press Win + S to open the search menu.
- Type cmd in the text box and select Run as administrator.
- Select Yes when the User Account Control (UAC) prompt appears.
- Type the following command and press Enter.
chkdsk /r e:
The r switch in a CHKDSK scan tells CHKDSK to locate bad sectors on the target disk and recover the readable information from the bad sectors. This can take some time as it scans and repairs the bad sectors on the drive.
Restart your PC after running the CHKDSK scan, then check if the error still occurs.
3. Run the SFC and DISM Scans
Problems with your PC’s system files can also give rise to such Recycle Bin errors. Thankfully, Windows includes helpful tools called SFC (System File Checker) and DISM (Deployment Image Servicing and Management) scans, which can automatically detect and repair any corrupted system files.
For more information, check our guide on repairing corrupt Windows files with Windows’ built-in tools and follow the steps outlined.
4. Scan for Malware
If you continue to see the Recycle Bin corrupted error, there is a chance that your PC is infected with malware. To rule out this possibility, you can use the built-in Windows Defender or PowerShell to scan your computer for malware . You can also use a reliable third-party antivirus program for this.
If the scan detects anything suspicious, take the recommended steps to eliminate the threat.
5. Perform a System Restore
Recent changes made to your system may have led to the Recycle Bin corrupted error on your Windows 10 or 11 PC. If the error message has only started appearing recently, you can consider using system restore to revert Windows to its earlier state when it worked fine.
Once you restore Windows to its previous state, the errors shouldn’t persist.
Get Rid of Annoying Recycle Bin Corrupted Errors
Recycle Bin errors can be vexing but are usually easy to fix. In most cases, resetting the Recycle Bin should resolve the corrupted error. If not, you may need to try the abovementioned solutions to fix the underlying problem.
Also read:
- [New] In 2024, Unveiling the Secrets to Verified Instagram Images
- [Updated] How to Zoom Photos and Videos on Snapchat
- [Updated] Virtual Vs. Augmented Unraveling AR, MR & VR Distinctions for 2024
- 最佳圖片加上文字編輯器:創意書寫照片的方法 202Amino Acids and Proteins, so They Do Not Need to Consume Them Directly. Instead, Ruminants Rely on the Microbial Fermentation in Their Gut to Convert Non-Protein Nitrogen Sources Into Protein.
- Act Fast - Here’s Why You Can't Wait Any Longer for iOS 15.3!
- Addressing Dual Users' MS Error on Windows OS
- Addressing Error 0X800700E1 on Modern Windows
- Get the Latest Camera Driver Software for All Windows Versions Including 11, 10, 8, and 7
- How to Unpair and Reconnect Devices Effortlessly on Win 11
- In 2024, Apple ID Unlock On Apple iPhone 14 Pro Max? How to Fix it?
- In 2024, Apple iPhone 8 Plus Screen Mirroring You Must Know | Dr.fone
- In 2024, Catch or Beat Sleeping Snorlax on Pokemon Go For Motorola G54 5G | Dr.fone
- Mastering Screen Quiet: Disable Win11 Folders
- Navigating Through Troubled Waters in Windows Mail App with 0X800713F
- Protect Your PC: Identifying the 7 Most Suspicious Windows Processes
- Transformative Power for Photo Renewal with Windows
- Winning Back Access: Decoding Password Demand
- Title: Saving the Day with Win10/11's Recycle Bin Corruption Fixed
- Author: Richard
- Created at : 2025-01-28 22:37:12
- Updated at : 2025-02-02 23:02:42
- Link: https://win11-tips.techidaily.com/1719276426207-saving-the-day-with-win1011s-recycle-bin-corruption-fixed/
- License: This work is licensed under CC BY-NC-SA 4.0.