Calibrate Display Colors: Go to 'Settings' > 'System' > 'Display' And Use the Built-In Calibration Tool for Accurate Color Representation.
Calibrate Display Colors: Go to ‘Settings’ > ‘System’ > ‘Display’ And Use the Built-In Calibration Tool for Accurate Color Representation
Both an exceptionally bright monitor and a dim display can strain your eyes. So, if you’re having this issue, you should change your screen’s settings. However, there are times when you’re unable to adjust the brightness on your Windows PC.
There are several reasons for this: corrupt system files, outdated display drivers, insufficient battery level, misconfigured power settings, and more. So, if you want relief for your strained eyes, here are a few fixes you can apply to resolve the issue and adjust your display’s brightness again.
1. Use a Different Method to Adjust the Brightness Level
First, you should use a different method to adjust your display’s brightness from what you usually use. That way, you can check if the issue is specific to that adjustment setting or if it affects your entire system. For instance, if you can’t change the brightness using your keyboard fn key but can change it with Windows settings, the key could just be disabled or broken.
If you’re unfamiliar, you can check out the other ways to adjust your Windows PC’s screen brightness . If these other methods work, your usual method for changing the brightness might be an issue. If so, you should check out how to fix them. We have guides for repairing the Windows brightness fn key and restoring the brightness slider in Windows 11 to help you.
In most cases, you cannot change external monitor brightness from Windows settings—you must manually adjust this setting. If the external monitor’s brightness setting is unresponsive, check your monitor’s manual to find the brightness buttons’ location and how you can adjust it.

2. Reboot Your Device
If none of the methods for changing your display’s brightness work, reboot your device once. Doing so will ensure that a temporary problem with your operating system isn’t preventing you from changing the brightness. If rebooting your device does not make a difference, apply the remaining fixes.

3. Update, Restart, or Reinstall the Drivers
If restarting your computer didn’t fix the issue, you should check for driver updates. This lets you determine whether corrupt or malfunctioning graphics drivers cause the problem. Follow these steps to update the relevant drivers:
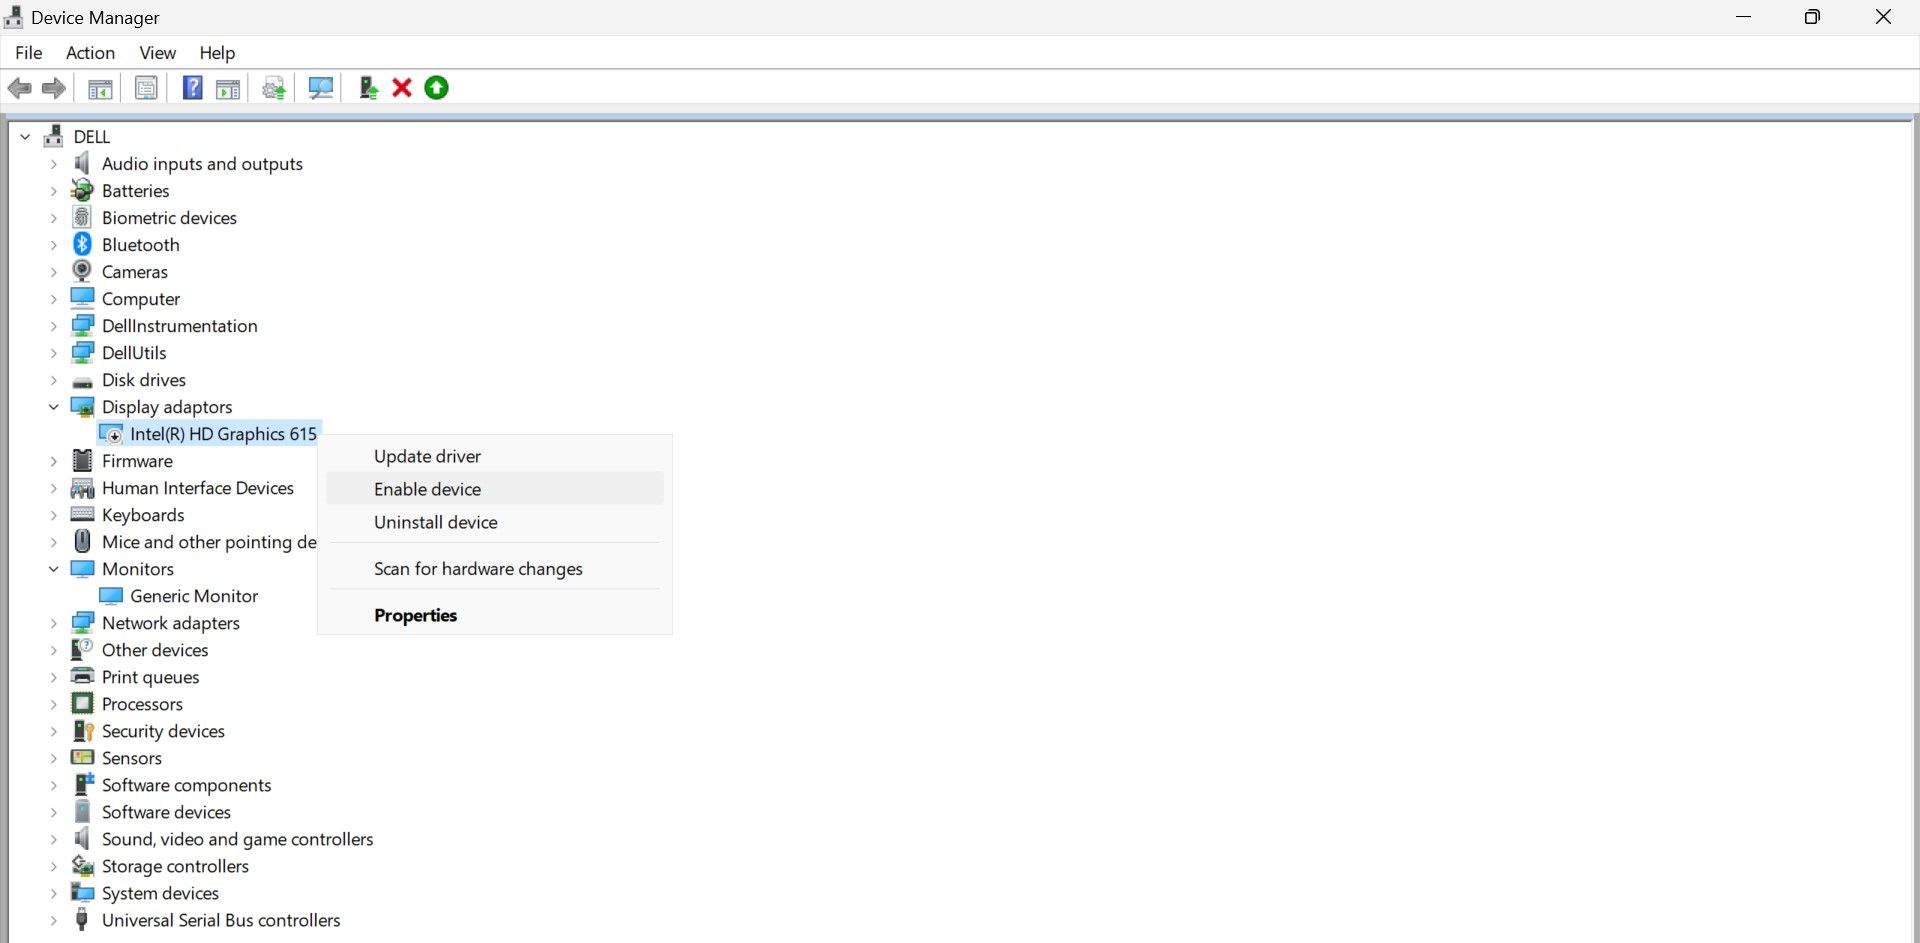
- Right-click the WindowsStart button and selectDevice Manager .
- Expand theMonitors category, right-click on the drivers listed there, and chooseUpdate driver .

- After that, expand theDisplay adapters category, right-click on the drivers listed there, and clickUpdate driver .
PCDJ DEX 3 for Windows & MAC is the total entertainment DJ software solution, offering audio, video, and karaoke mixing ability. Automatic beat-sync, smart looping, 4 decks, DJ MIDI controller support, Karaoke Streaming and much more.
DEX 3 meets the demands of today’s versatile DJ, without compromise!
DEX 3 (Audio, Video and Karaoke Mixing Software for Windows/MAC | 3 Activations and Free Updates)


 PCDJ DEX 3 for Windows & MAC is the total entertainment DJ software solution, offering audio, video, and karaoke mixing ability. Automatic beat-sync, smart looping, 4 decks, DJ MIDI controller support, Karaoke Streaming and much more.
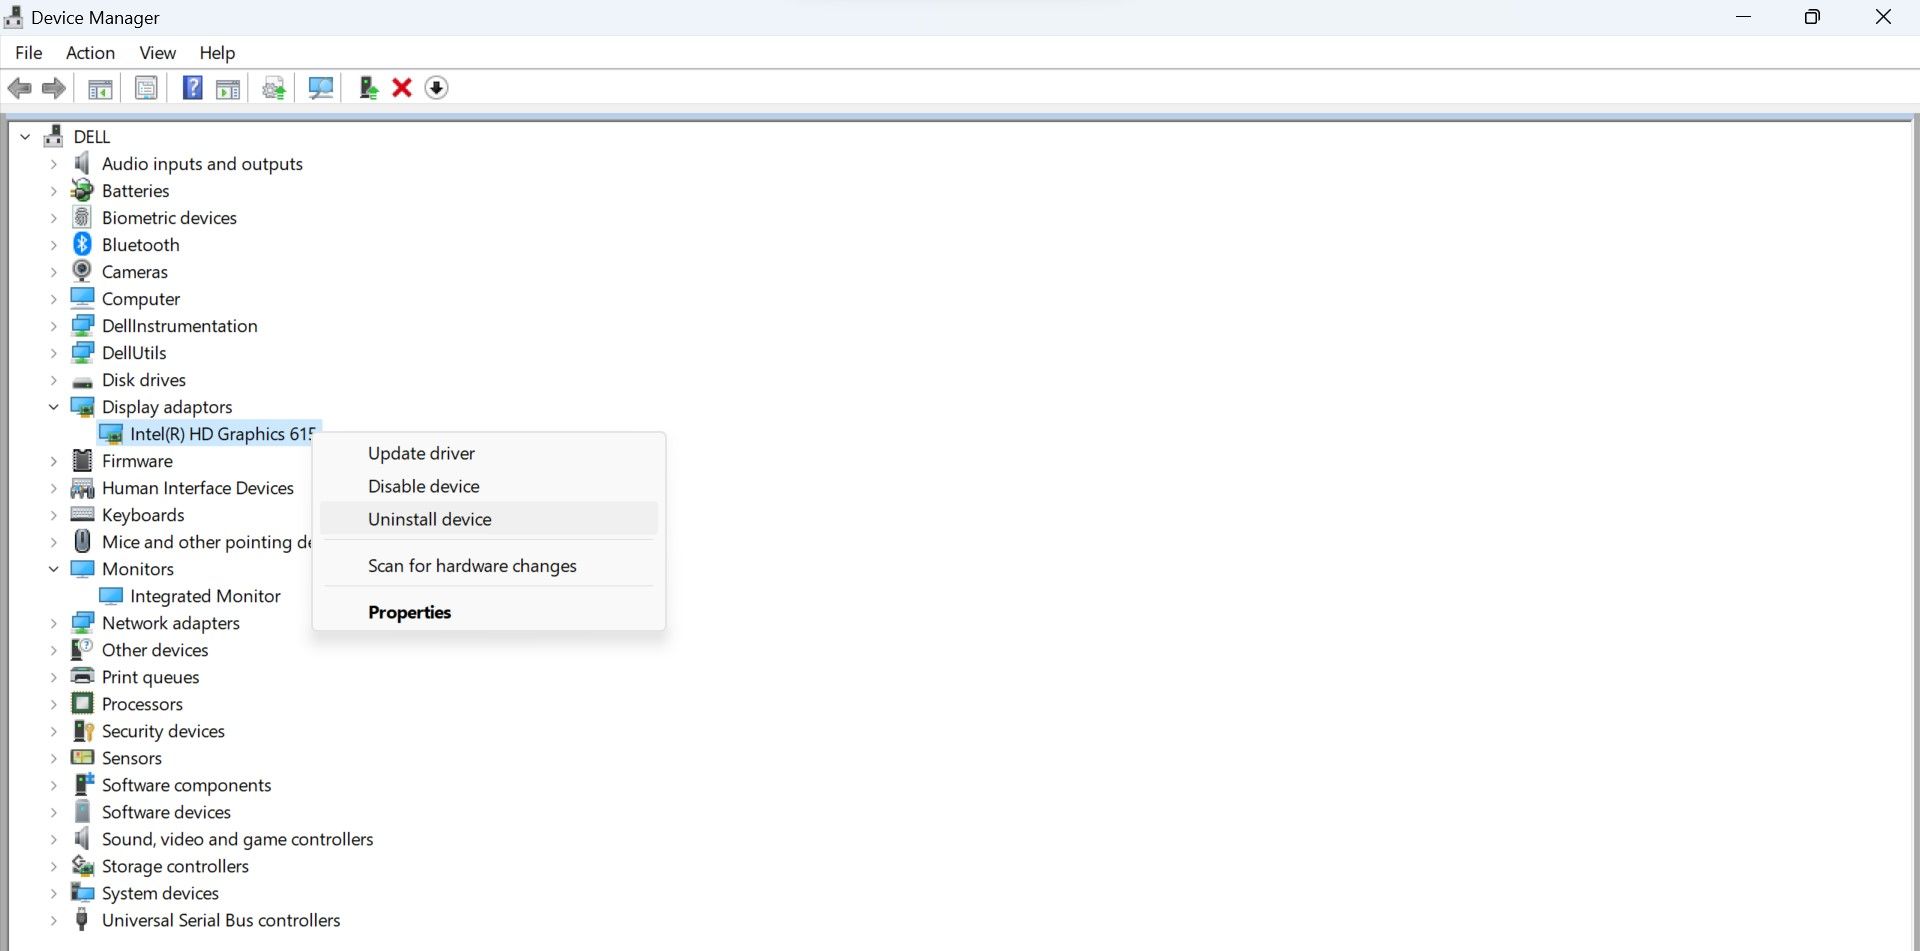
If updating the drivers does not resolve the issue, right-click on both drivers individually and selectDisable device . To enable them again, right-click on each and selectEnable device .

In case that doesn’t work either, you should uninstall both drivers. To do that, right-click on both drivers individually and selectDelete device . After that, reboot your device again, and Windows will reinstall them.
4. Recharge Your Device
Is your device running low on battery power? If that is the case, Windows may not allow you to change the brightness. The operating system does this to help save energy and will enable you to stretch your remaining battery even longer. Because of this, your computer will reduce its brightness significantly and might not even let you turn it up manually.
Likewise, turning on battery-saving mode could also interfere with the brightness adjustment. If you set your laptop to conserve as much battery as possible, it might minimize its display’s brightness to help save power.
If your battery is low, you should recharge your computer. Once your battery reaches a healthy level, you can adjust the brightness as usual. Or if you experienced the problem when you turned on battery-saving mode, you should turn it off or change its settings to allow you to change your monitor’s brightness.
5. Repair Corrupted System Files
Corrupt system files can impede many Windows features from working correctly and cause your device’s brightness to freeze. So, you should rule out this possibility. Fortunately, Windows has a built-in tool—the System File Checker—to fix corrupt system files.
So,run the SFC to repair corrupt system files . Hopefully, after the scan, you can adjust your display’s brightness again.
6. Change Your Display Settings
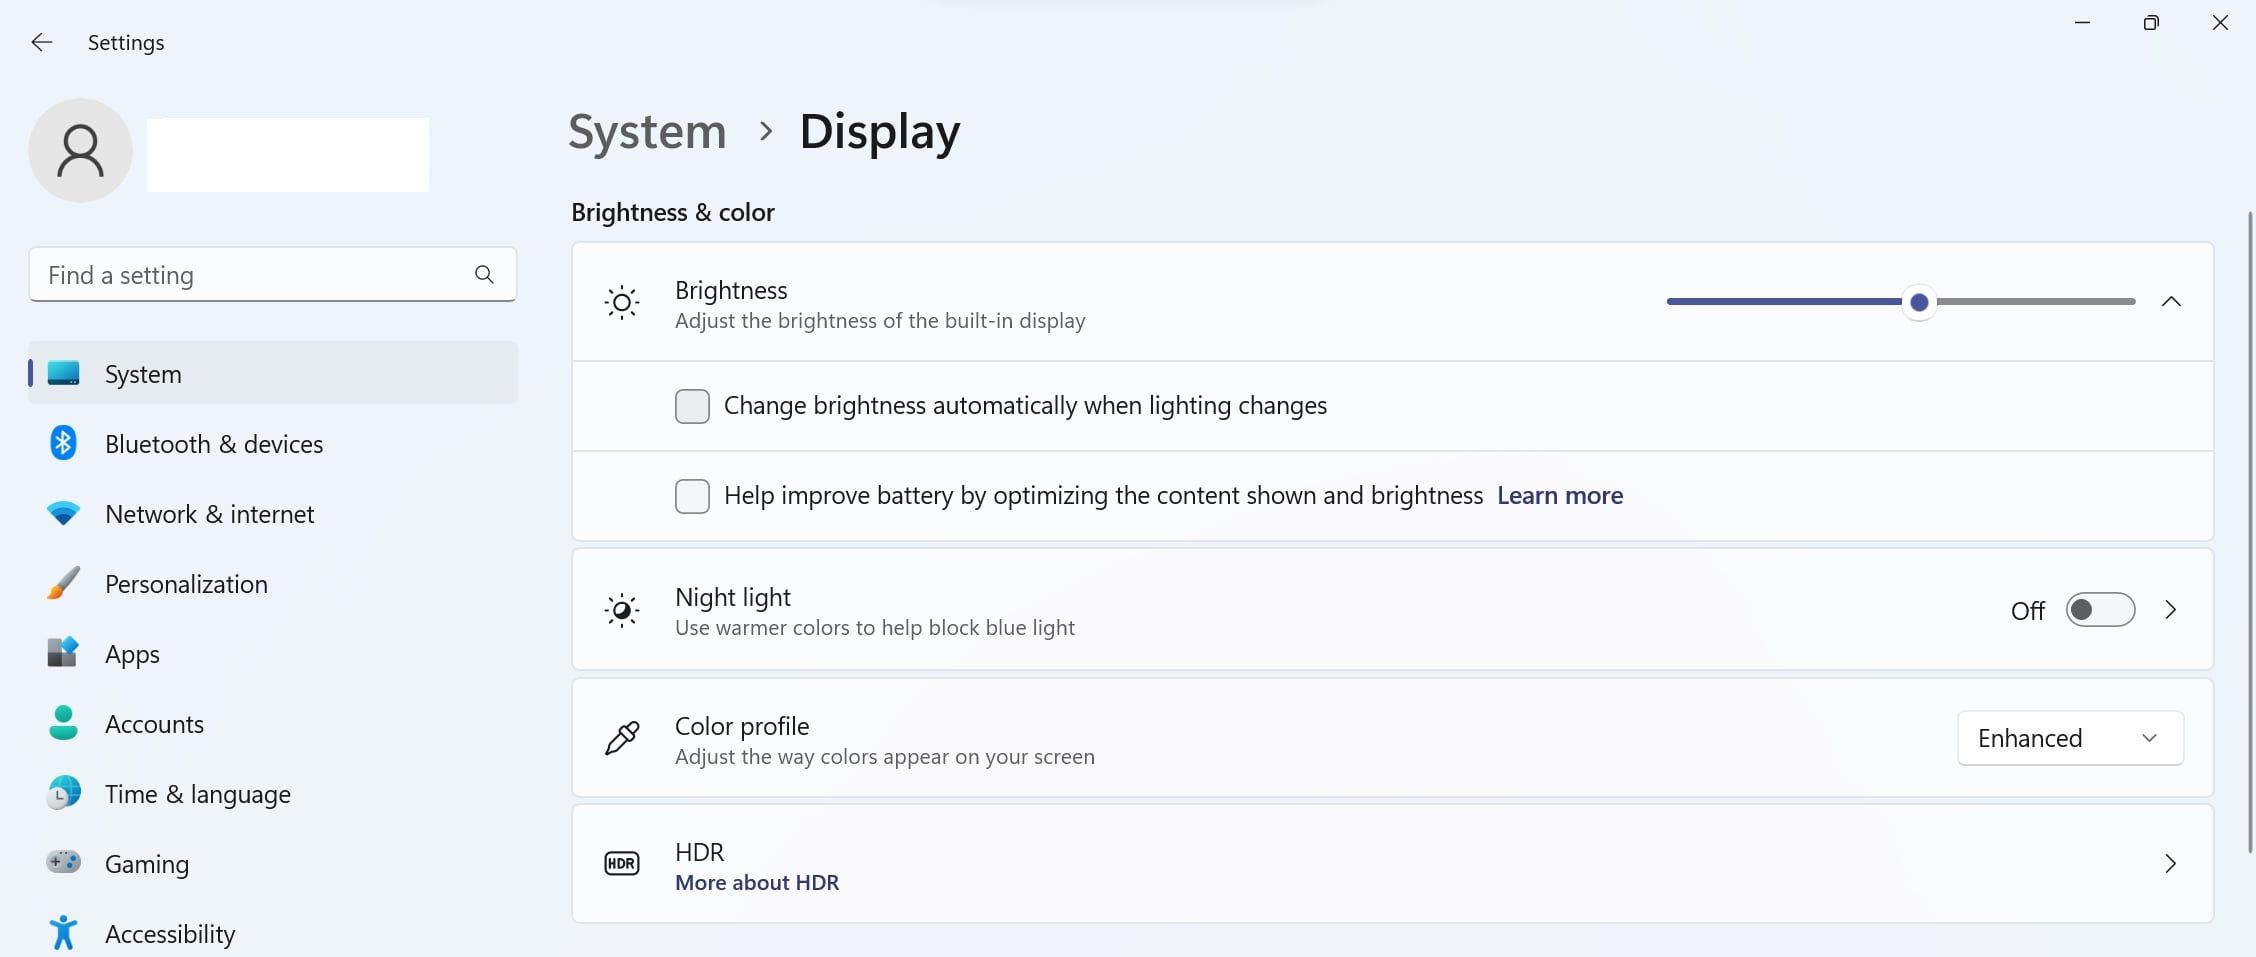
Windows allows users to set the brightness to change automatically as the lightning condition changes. Likewise, you can customize its Night Light settings, Select a Color Profile for compatible monitors, and manage other settings to enhance your display’s appearance. While these settings are helpful, they often impede brightness adjustment.
So, make the following changes in the Display settings to regain control of your brightness settings:
- Right-click on the WindowsStart button and go to theSettings app.
- Go toSystem > Display .
- Expand theBrightness menu and uncheck the boxes besideChange brightness automatically when lighting changes and Help improve battery by optimizing the content shown and brightness .
- After that, turn off the toggle next toNight light if it is turned on.

7. Install Pending Windows Updates
If you don’t update Windows, you can run into unforeseen issues. If you have done that in a while, you could eventually encounter problems, like the inability to adjust your screen’s brightness.
You should check for and install Windows 11 updates to ensure that’s not the case.

8. Perform a System Restore
If your PC is fully updated and you still can’t adjust its brightness, your next step is performing a system restore. While this fix is what some would call the “nuclear option” as it reverts customizations you’ve made since the last restore point, it will undo any changes to the system that have caused the brightness issue you’re experiencing.
That’s why you should create a restore point on Windows 11 every time you make a significant change, like installing a new app.
Take the Strain Off Your Eyes
Extreme brightness levels and super dim screens will give you eyestrain. Hopefully, you have solved the issue with the above fixes and can adjust the screen again to fit your need.
But if you’re still having occasional trouble adjusting your monitor’s brightness or are looking for a way to balance the brightness of multiple displays, you should check out the best brightness control apps on Windows to help you.
- Title: Calibrate Display Colors: Go to 'Settings' > 'System' > 'Display' And Use the Built-In Calibration Tool for Accurate Color Representation.
- Author: Richard
- Created at : 2024-08-16 01:36:12
- Updated at : 2024-08-17 01:36:12
- Link: https://win11-tips.techidaily.com/1719328086208-calibrate-display-colors-go-to-settings-)-system-)-display-and-use-the-built-in-calibration-tool-for-accurate-color-representation/
- License: This work is licensed under CC BY-NC-SA 4.0.