
A Deep Dive Into Enabling iMessage on Non-iOS Devices
A Deep Dive Into Enabling iMessage on Non-iOS Devices
Key Takeaways
- For your iPhone and Windows computer to communicate, you will need to connect them over Bluetooth.
- To sync contacts and messages to your Windows PC, you’ll need to install the Link to Windows app on your iPhone.
- Use the Phone Link app on Windows to send and receive iMessages.
Looking at your iPhone to check your messages can be distracting when you’re working. Apple’s excellent cross-device support means that you can easily send and receive messages on a Mac without breaking your flow. But did you know that it’s as simple if you have a Windows PC, too?
How to Use Phone Link to Get iMessages on Windows
If you’re running the latest version of Windows, the Microsoft Phone Link app should already be installed on your device. If not, you may have to update Windows on your computer first. You’ll use this app to sync contacts and messages from your iPhone.
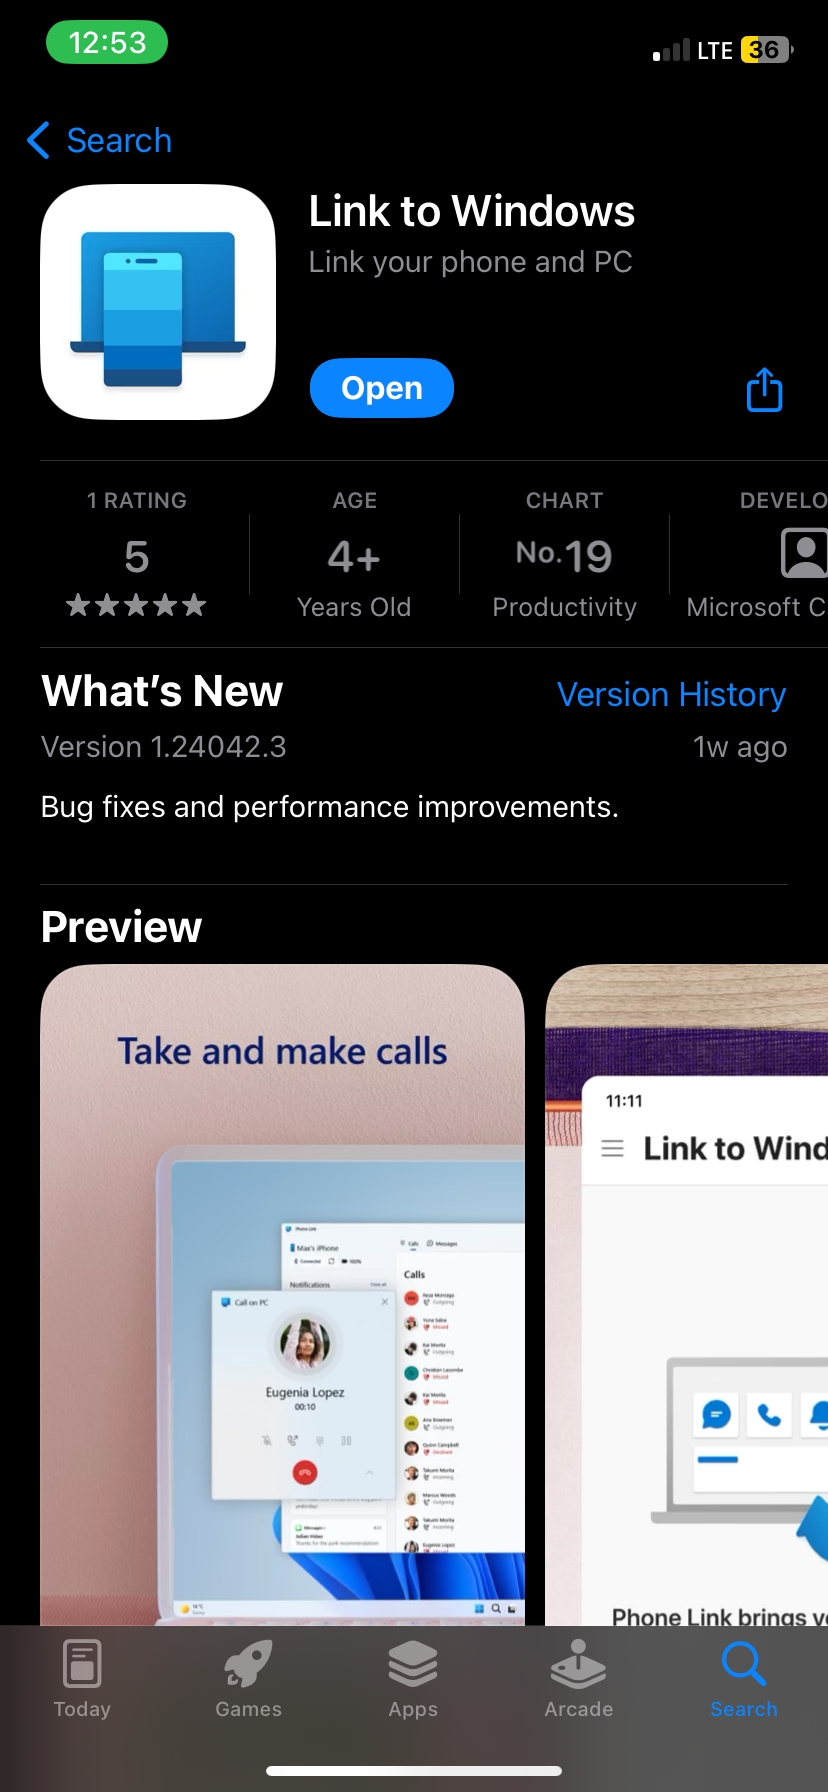
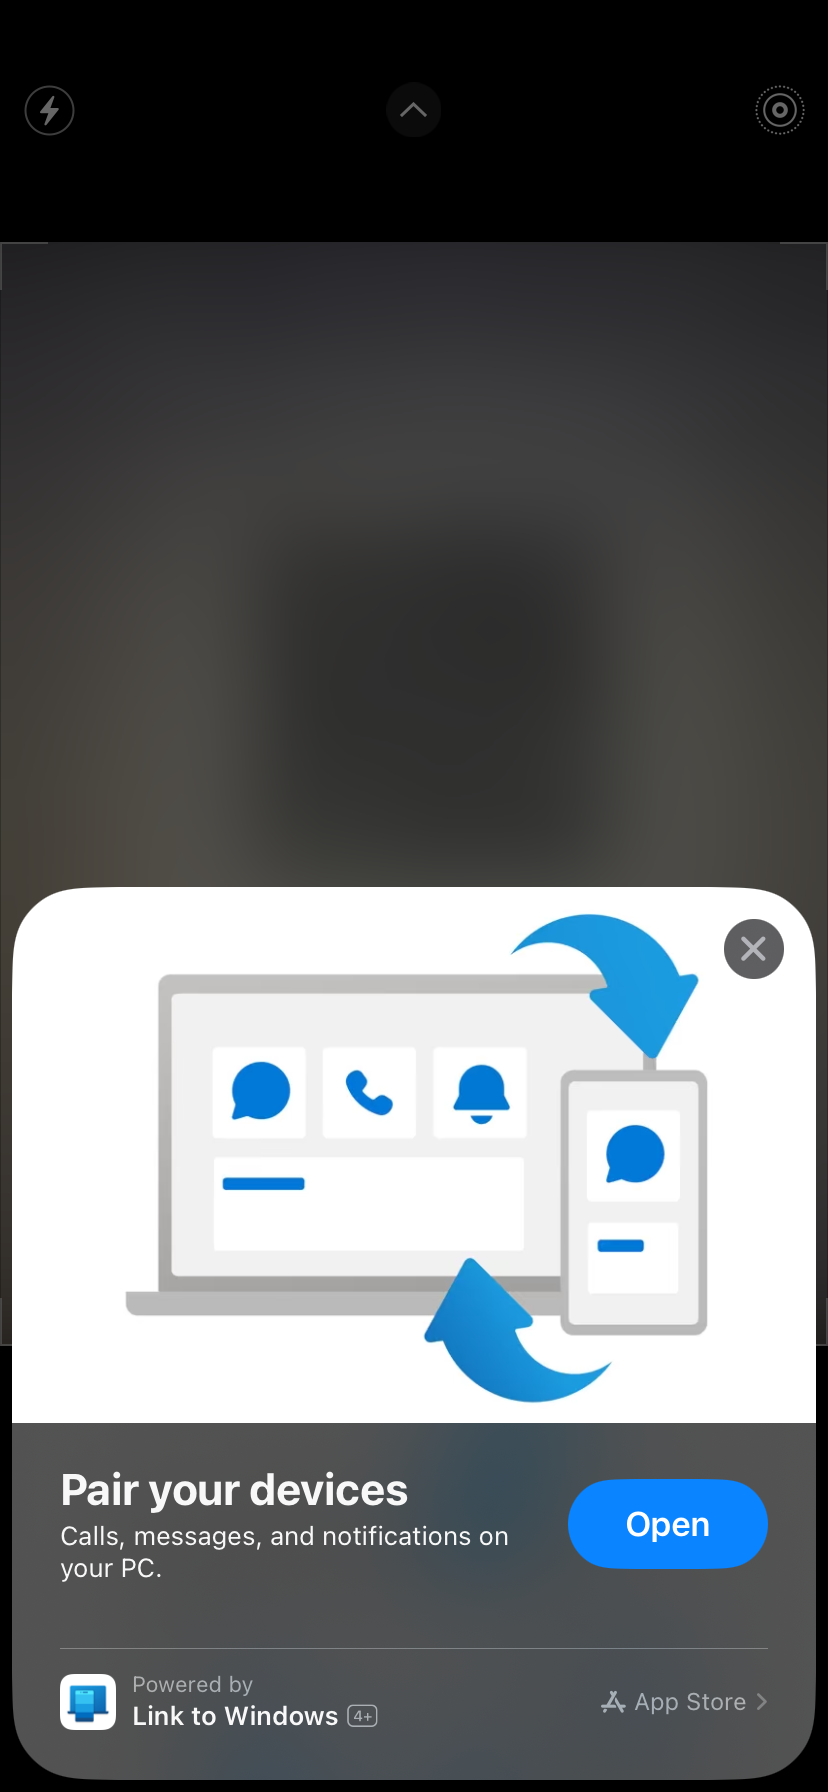
Download the Link to Windows App on Your iPhone
You’ll need to download a Microsoft app called Link to Windows on your iPhone from the App Store . TapOpen to launch the app to get started.

Close
Before continuing on the app,connect your iPhone to the Windows PC via Bluetooth since this is how Link to Windows will communicate with Phone Link.
Connect Your iPhone to Phone Link on Windows
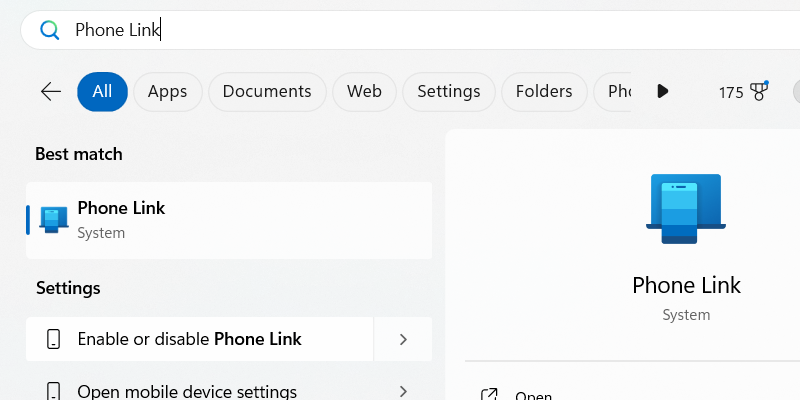
On the PC, click theSearch bar and type “phone link.” Click thePhone Link app that appears in the results to launch it. Remember, if you don’t see the app, you may need to update Windows to the latest version available.
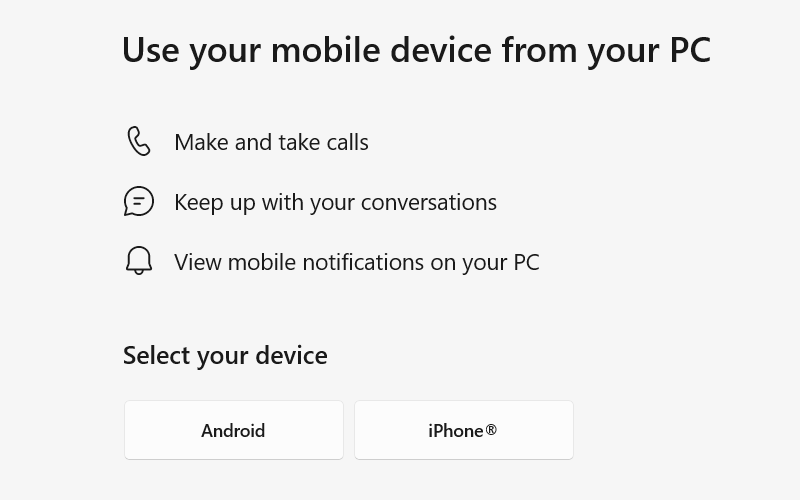
After launching Phone Link, choose the mobile device you want to connect to by clickingiPhone .
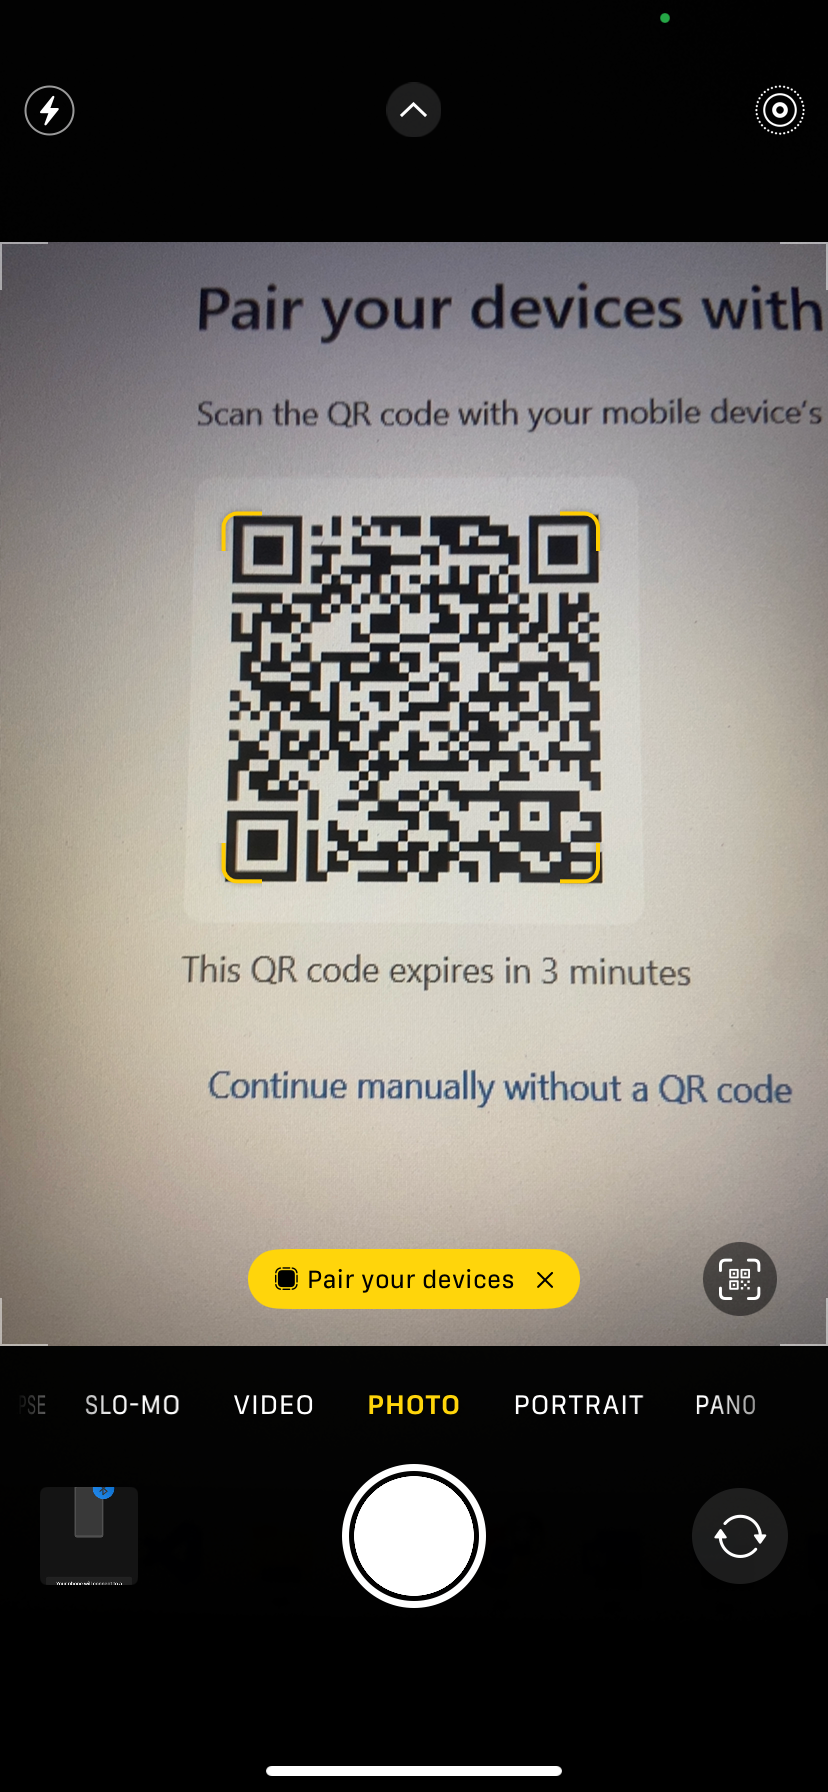
The app will display a QR code that you can scan using the Camera app on your iPhone. TapPair Your Devices when it appears on your iPhone—it will pop up below the QR code. Then, tapOpen on the prompt that appears.
Close
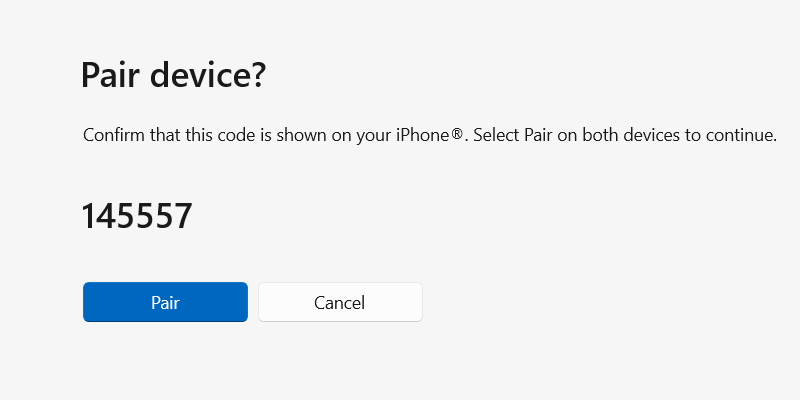
On the next screen, tapContinue . Ensure the code you see matches the one on your computer screen, and tapPair .
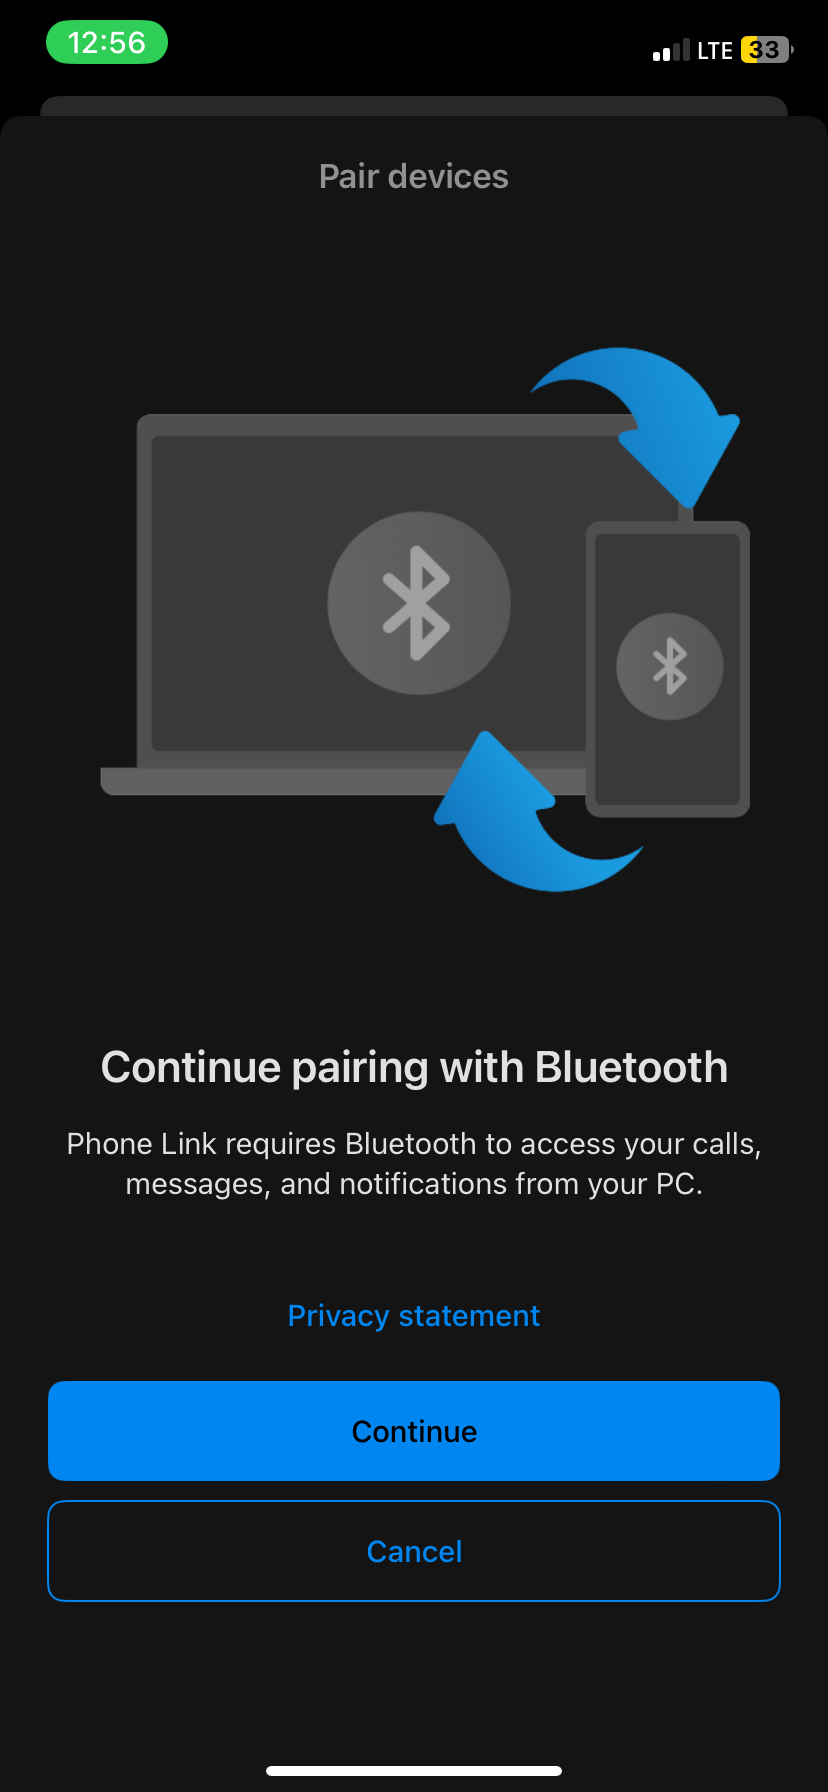
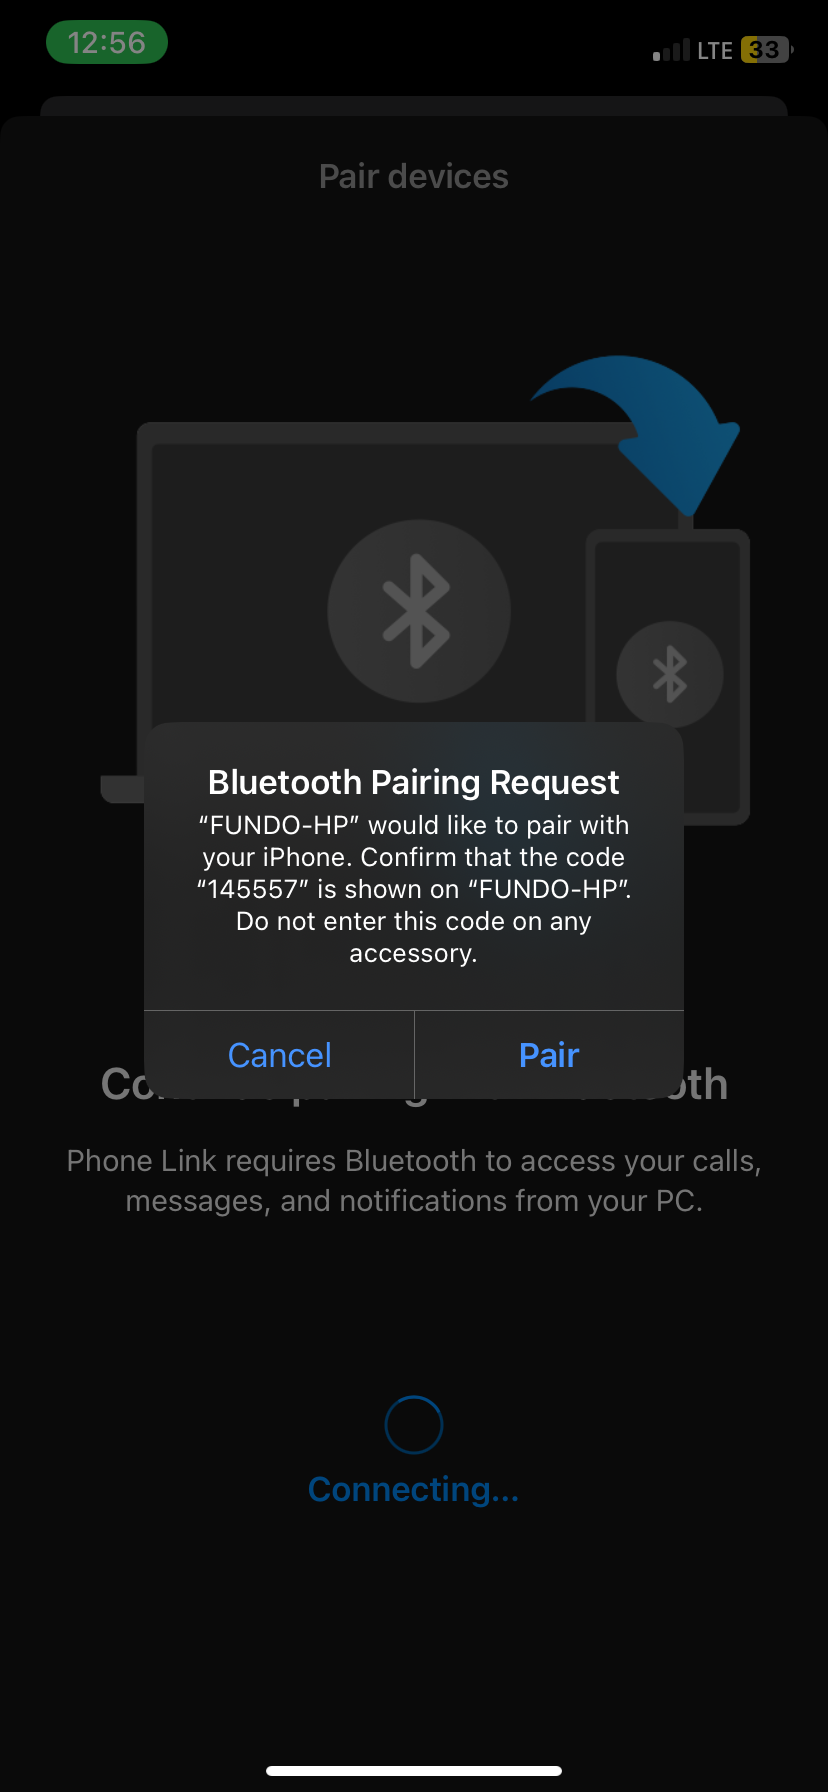
Close
Now, go to the Phone Link app on Windows and clickPair .
On your iPhone, tapDone . You’re almost done setting up iMessage for your PC; there’s just one more step.
Sync Contacts and Messages from Your iPhone
The final step is to sync your iPhone’s contacts and messages with the Phone Link app on Windows.
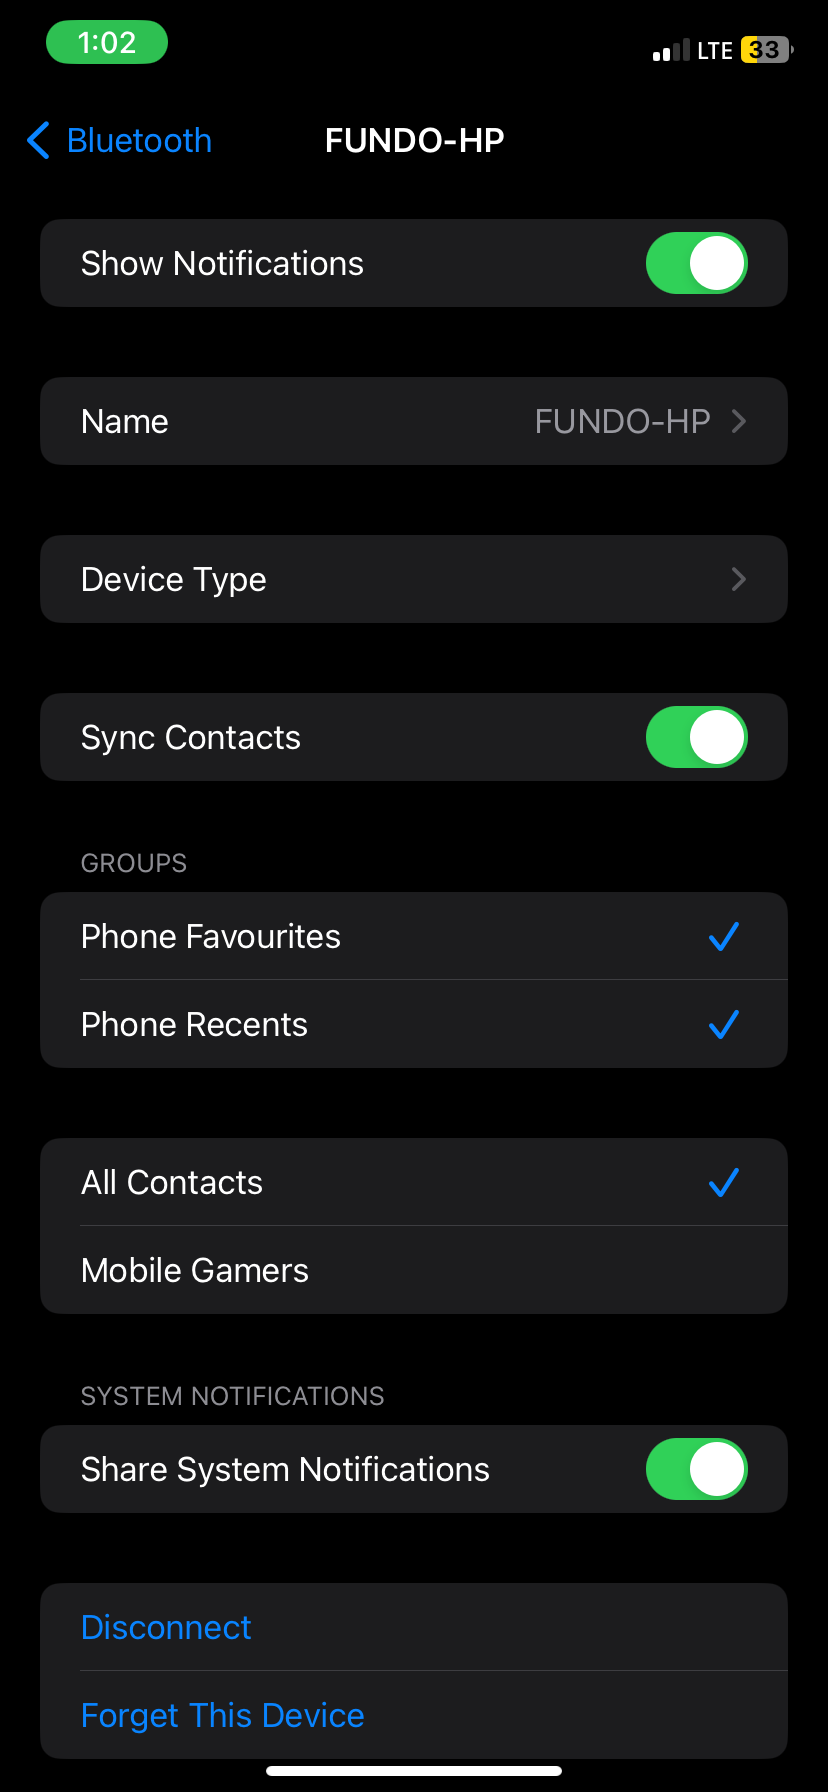
Go toSettings > Bluetooth on your phone and tap thei icon next to your PC’s name. Toggle onShare System Notifications ,Show Notification , andSync Contacts .

Close
ClickContinue in the Phone link app on Windows to sync contacts and messages from your iPhone.
And you’re done! The good news is that the setup is a one-time process. Your phone and Windows PC should now automatically connect as long as Bluetooth is enabled and the two devices are within range.
View and Write Messages in the Phone Link App
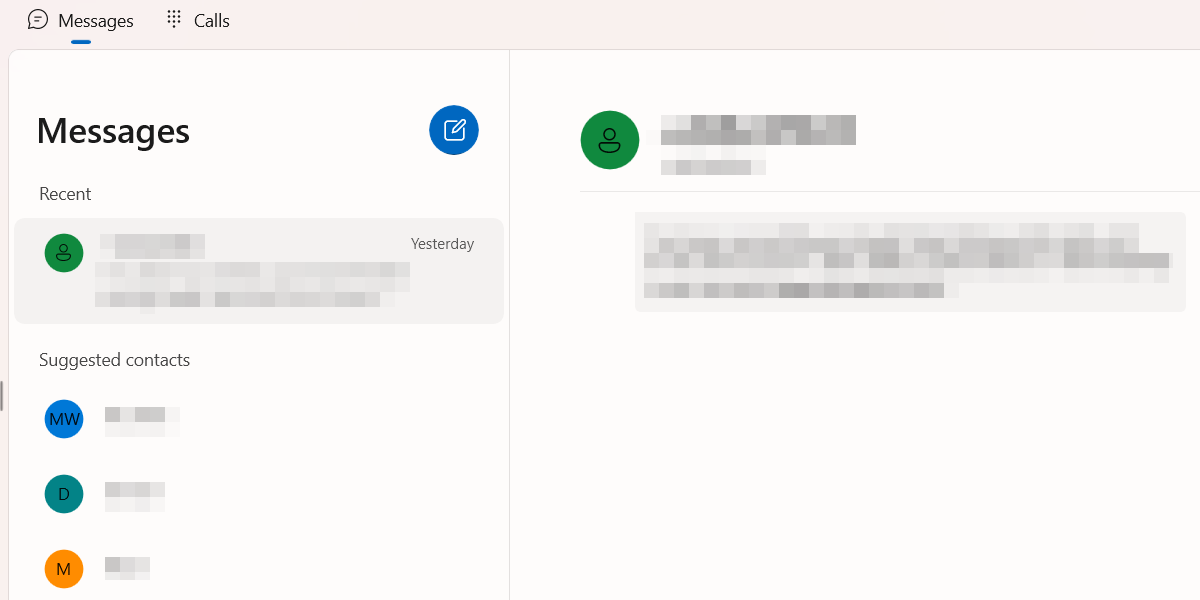
You can see any messages you receive on your iPhone in the Phone Link app by opening theMessages tab at the top. Click on the sender’s name to see the ongoing conversation in a chat window on the right.
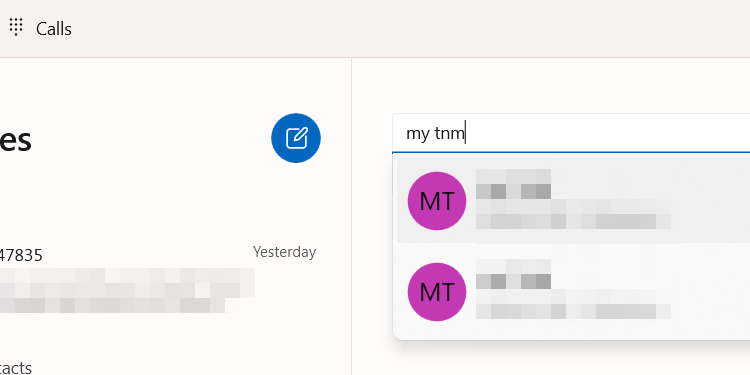
ClickNew Message —the blue pencil icon button—to send a message to a contact who doesn’t have an existing thread. Start typing the person’s name in the text box that appears and select it from the search results.
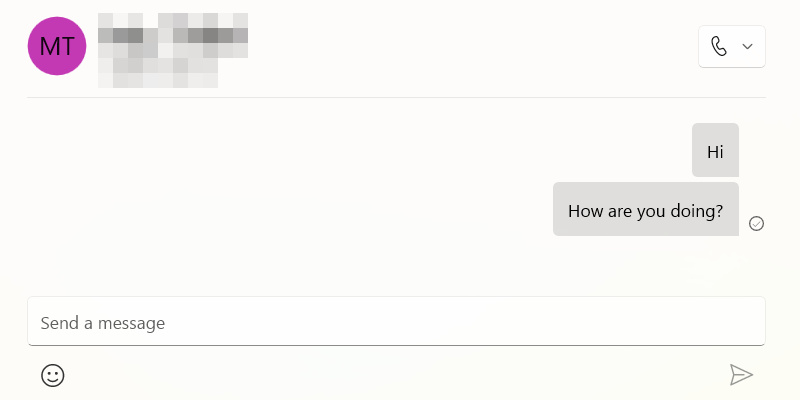
Type your message in the chat box at the bottom and press Enter or clickSend .
As long as you have notifications enabled on the Phone Link app, you will get an alert when the other person responds.
An Alternative Method to Use iMessage on Windows
If you don’t want to use the Phone Link, there is an alternate, albeit more complicated, way to interact with iMessage on your Windows PC. This method involves using the Remote Desktop extension for Chrome, which you can download from the Chrome Web Store . However, you will also need a Mac and Windows computer and install the extension on both devices.
Launch Messages on your Mac and share the screen with the Windows PC using the Remote Desktop extension. You can then interact with iMessage on the PC through the shared screen.
If your messages aren’t going through or the Remote Desktop extension isn’t working, first check whether the Windows PC is connected to the Internet and ensure you have a stable network connection . Of course, if you aren’t able to send someone a message, whether on a PC or your iPhone, the person may have blocked you on iMessage .
Also read:
- [New] Essential 9 Puzzle & Adventure Titles for Unplugged Android Gaming for 2024
- [New] In 2024, The Complete Handbook to Excellent YouTube Audio Production
- [New] Unlock Exclusive YouTube Visuals – Top 5 Tools Reviewed for 2024
- [Updated] Perfect Your Phone's Chat Signal How to Download & Personalize WhatsApp Ringtone
- [Updated] Rewind on Request Swift iPhone Video Flip
- 2024 Approved Step-by-Step Guide to LUT Mastery
- Dive Deep: Configuring a Triplet of Tiles in Windows 11 UI
- Expert Tips and Tricks for Efficiently Inserting Comments Into PDF Files
- In 2024, How to Unlock a Network Locked Motorola Moto G14 Phone?
- In 2024, Latest way to get Shiny Meltan Box in Pokémon Go Mystery Box On Apple iPhone 11 | Dr.fone
- In 2024, Why does the pokemon go battle league not available On Itel P40+ | Dr.fone
- Mastering Memos: Best Tablet Apps for Windows
- Navigating Windows Storage Estimation Using PowerShell
- Practicality Meets Elegance with the New Asus S15 OLED
- Reveal the Hidden, Conceal for Clarity in Windows 11
- Revisiting User Permissions for Regular Windows Users
- Steps to Remedy Windows 11'S AFC Camera Bug
- Streamlining Faulty Drives in Windows
- Turning Off SmartScreen Protection in Win11 & 11
- Title: A Deep Dive Into Enabling iMessage on Non-iOS Devices
- Author: Richard
- Created at : 2025-02-10 19:39:05
- Updated at : 2025-02-15 22:39:26
- Link: https://win11-tips.techidaily.com/a-deep-dive-into-enabling-imessage-on-non-ios-devices/
- License: This work is licensed under CC BY-NC-SA 4.0.