Addressing Disrupted Microphone Input in Valorant (Windows)

Addressing Disrupted Microphone Input in Valorant (Windows)
Is voice chat not working in Valorant? If so, there could be several reasons causing this issue. You might have selected the wrong microphone in Valorant settings, muted it, misconfigured other voice chat settings, and more. As such, it can be hard to pinpoint what, exactly, is causing microphone problems.
If you want to make voice chat work again and communicate with your friends, here are the fixes you should try.
1. Preliminary Checks and Fixes
Apply the following preliminary checks and fixes before moving on to the main fixes:
- Firstly, unplug your microphone from your device and reconnect it; this should resolve any temporary problems.
- Disconnect all audio input devices other than the one you intend to use,
- Restart your computer to rule out temporary glitches with the operating system.
- Update your audio drives to ensure that outdated drivers aren’t disrupting your microphone’s operation.
- Whitelist Valorant from Windows Defender firewall (see how to whitelist apps in the firewall ) and turn off third-party antivirus software. This will ensure your security suites do not restrict Valorant’s voice chat capability.
If none of the above preliminary checks and fixes resolve the issue, move on to the main troubleshooting steps.
2. Ensure Your Microphone Isn’t Faulty
Next, make sure your microphone isn’t faulty. You can try other games or voice recording apps and see if they can detect your voice.
If the microphone doesn’t detect voice in other apps also, connect it to a different device. If you do not hear anything from the other device either, your microphone could be faulty. In that case, get it inspected or get a replacement.
However, if the microphone works fine on your other device and other apps on your primary device, it isn’t faulty. In that case, continue applying the remaining fixes.
3. Ensure the Correct Microphone Is Selected in Valorant and That It Isn’t Muted
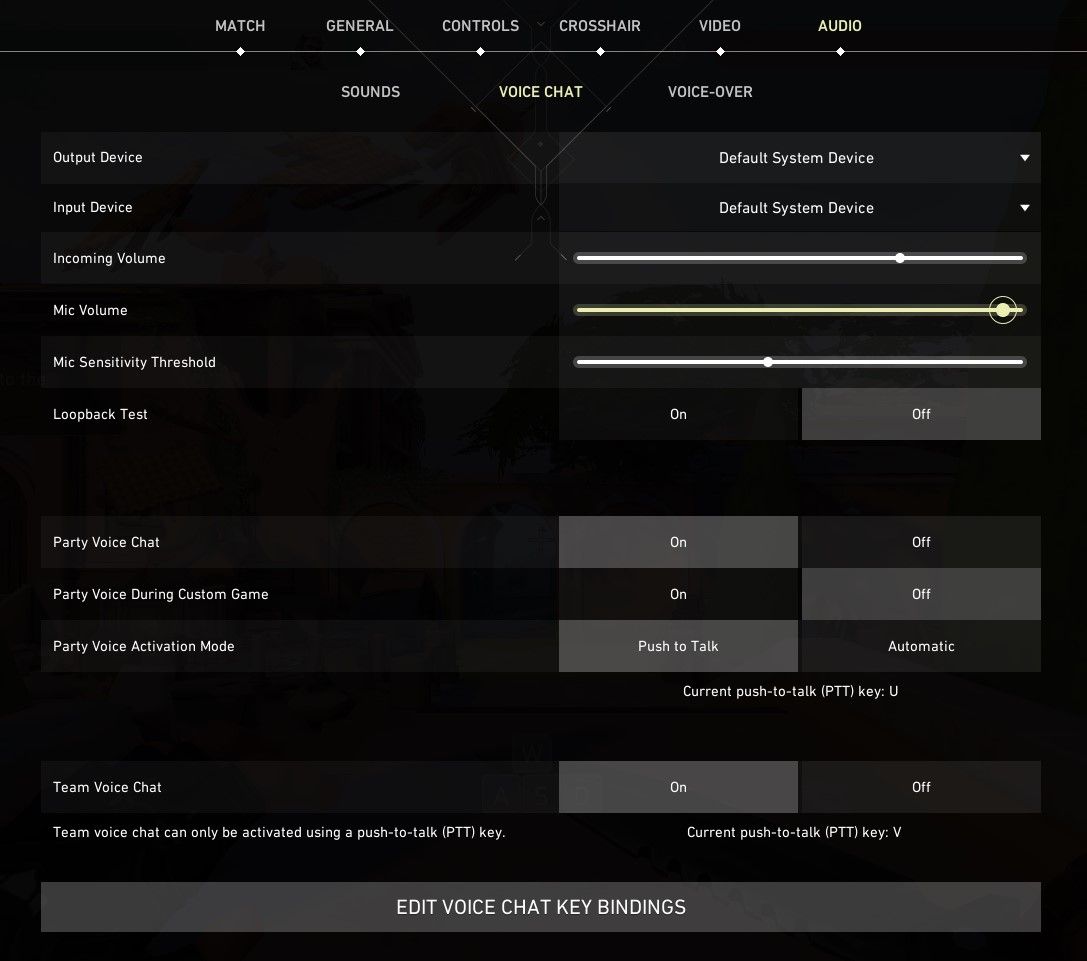
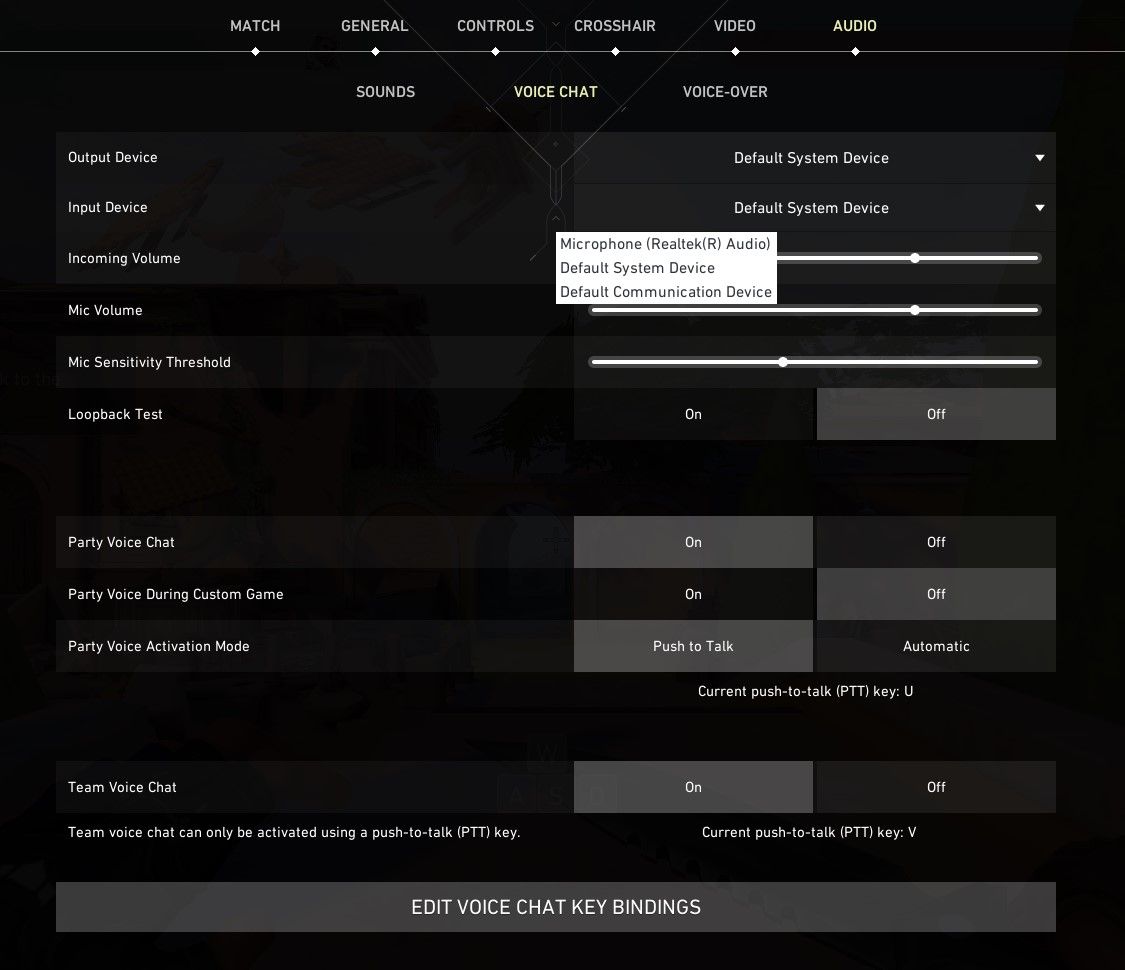
First, ensure your desired microphone is selected in Valorant settings and it’s not muted in the game. Check that by following these steps:
- Launch Valorant.
- Press the Escape key to open Settings.
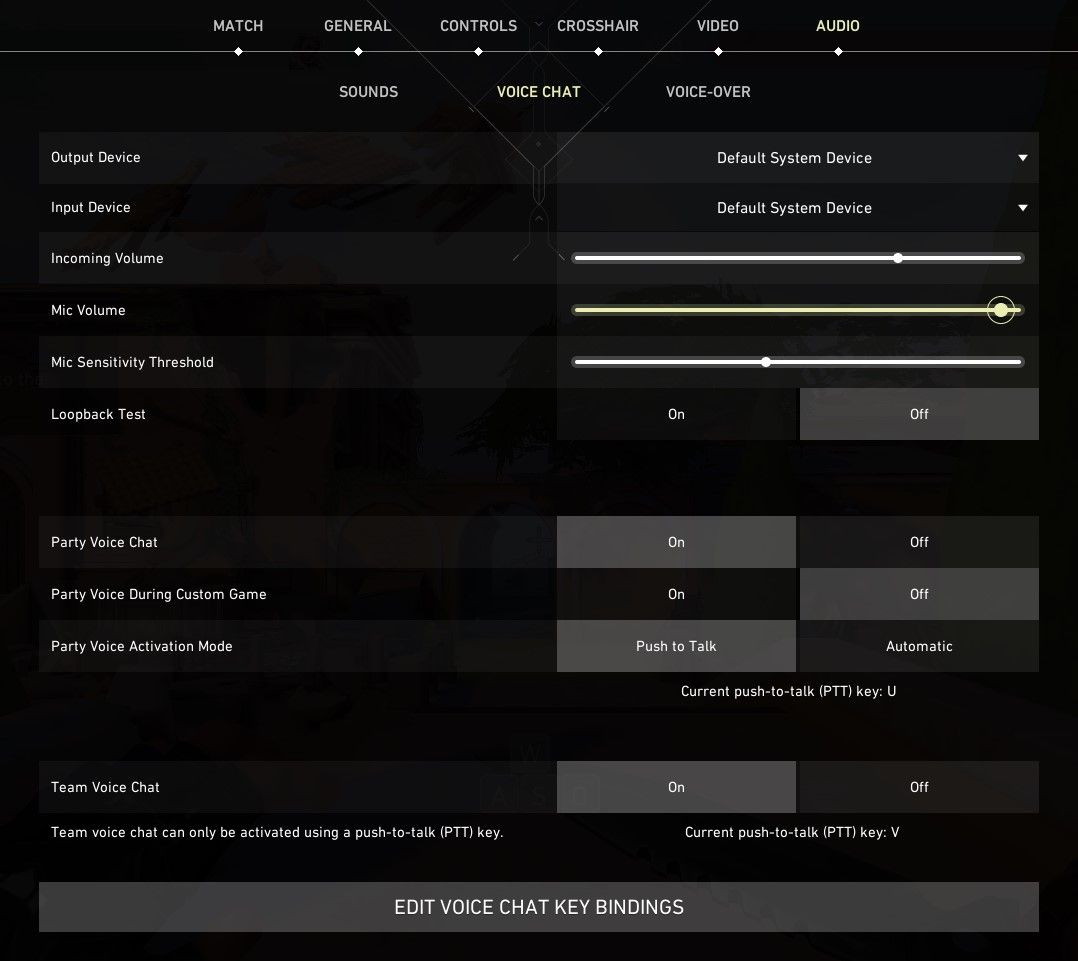
- At the top, click the Audio tab and then the Voice Chat tab.
- Here, select the primary microphone you’re using right now in the Input Device field.

- Make sure that the Mic Volume isn’t too low as well. If it is, move the slider to the extreme right**.**
 /a>
/a>

If you can’t hear other gamers’ voice chat, ensure the proper audio output device is selected and its incoming volume isn’t too low.
4. Ensure the Correct Microphone Is Selected in Windows and That It Isn’t Muted
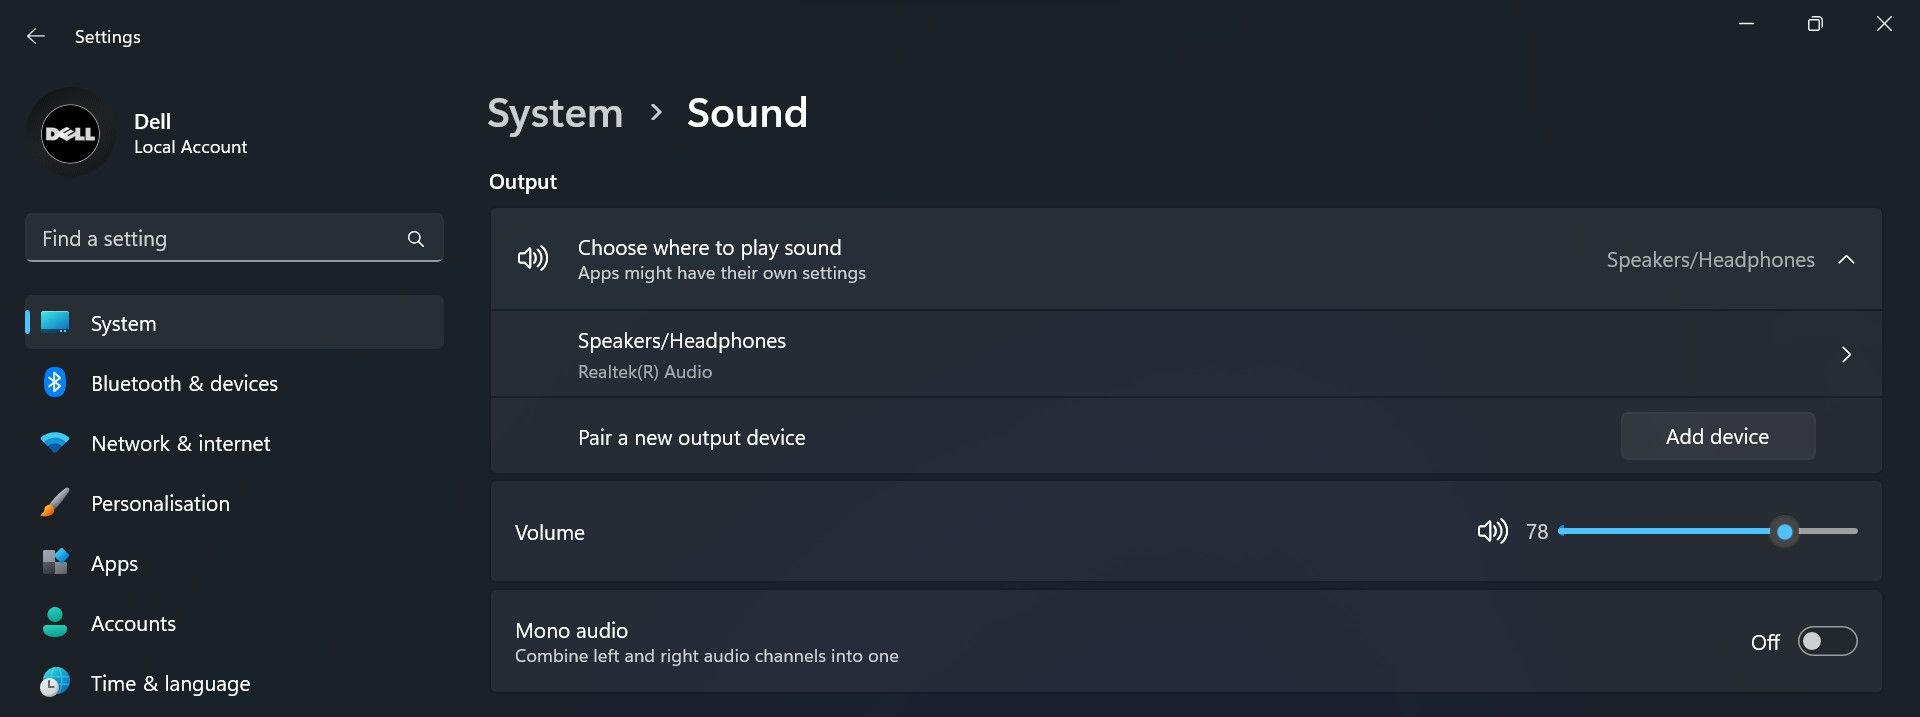
If you have the correct microphone selected in Valorant settings and it isn’t muted, ensure it’s properly configured and unmuted in the Windows settings also. Follow these steps to confirm:
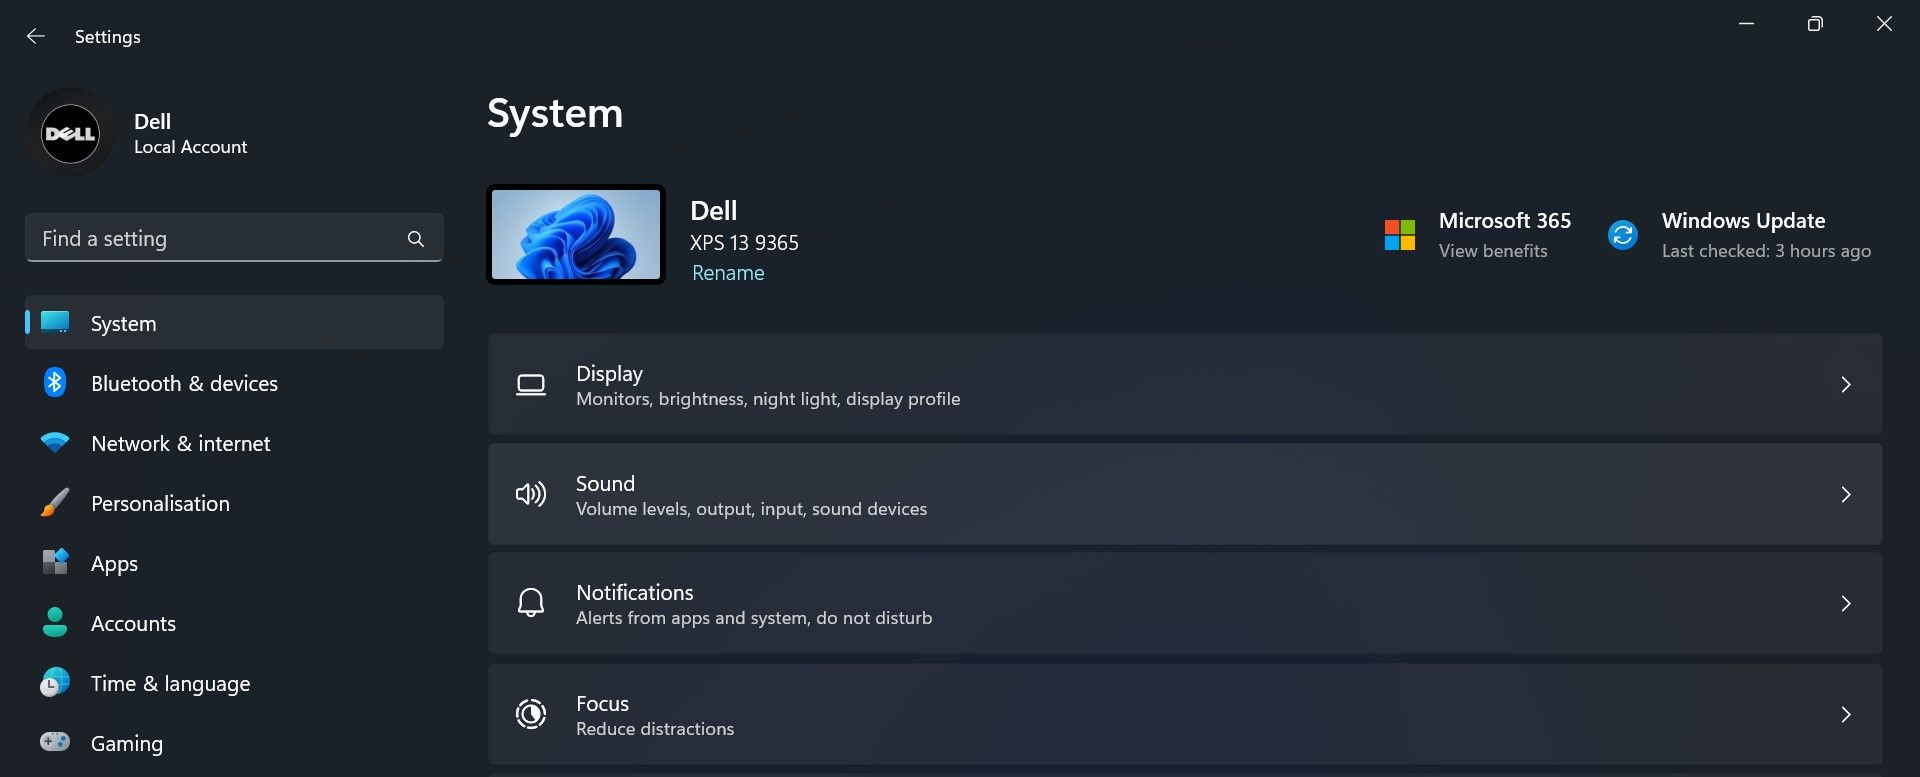
- Open the Windows Settings app.
- Navigate to System > Sound.

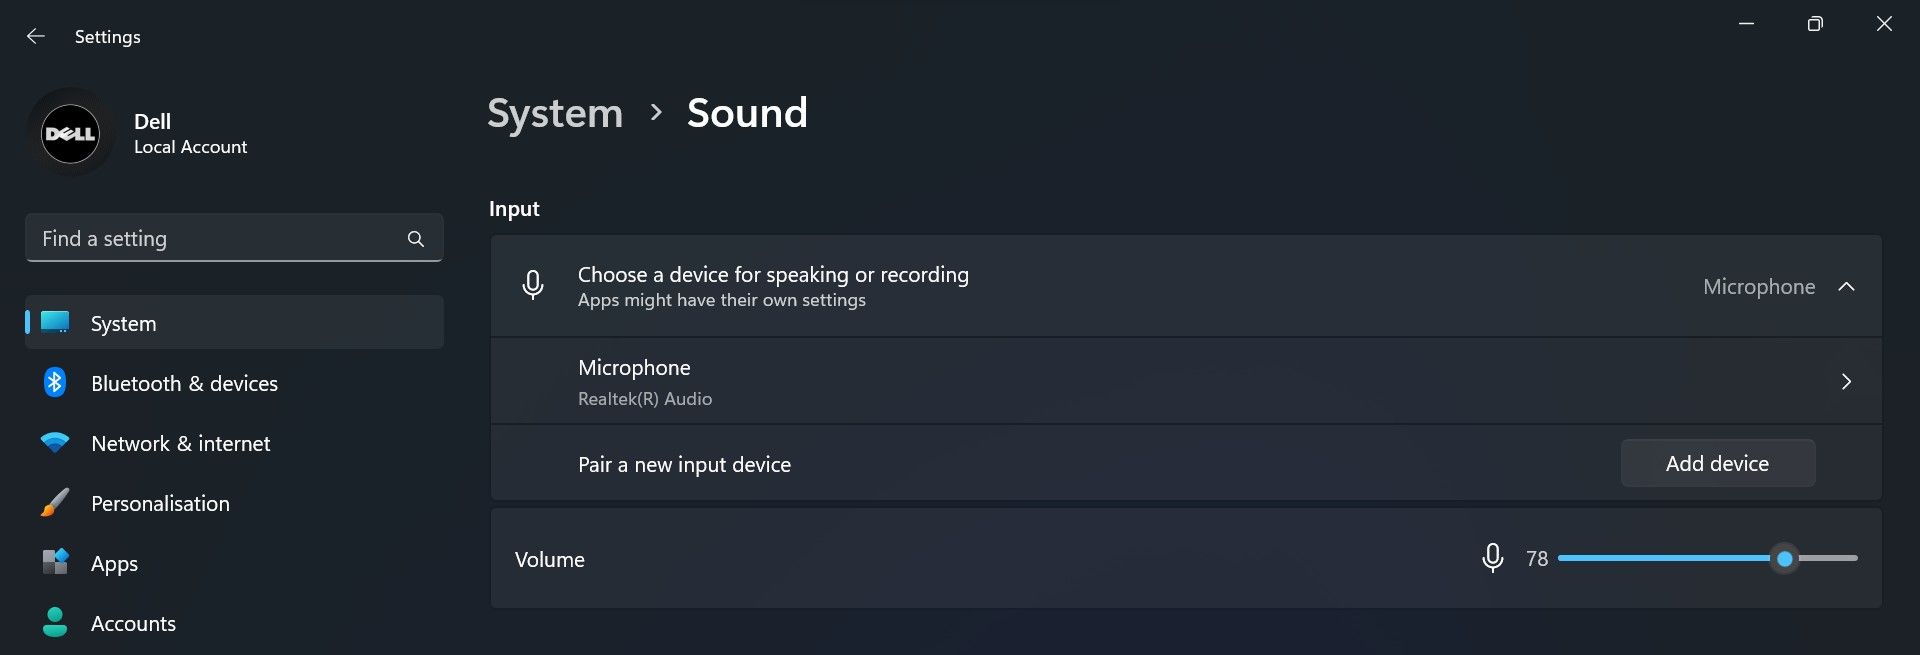
- Under Input settings, select the microphone you wish to use.
- Choose your desired microphone and make sure the Input Volume isn’t too low.

If you’re not hearing from your friends, return to Sound settings and select the correct audio output device. Then, click on your primary speaker device to ensure its volume isn’t too low.
5. Make Your Primary Microphone and Headphone the Default Devices
If the voice chat does not work after selecting your preferred microphone and speaker, set your preferred audio input and output devices as defaults. To do that, follow these steps:
- Open Settings.
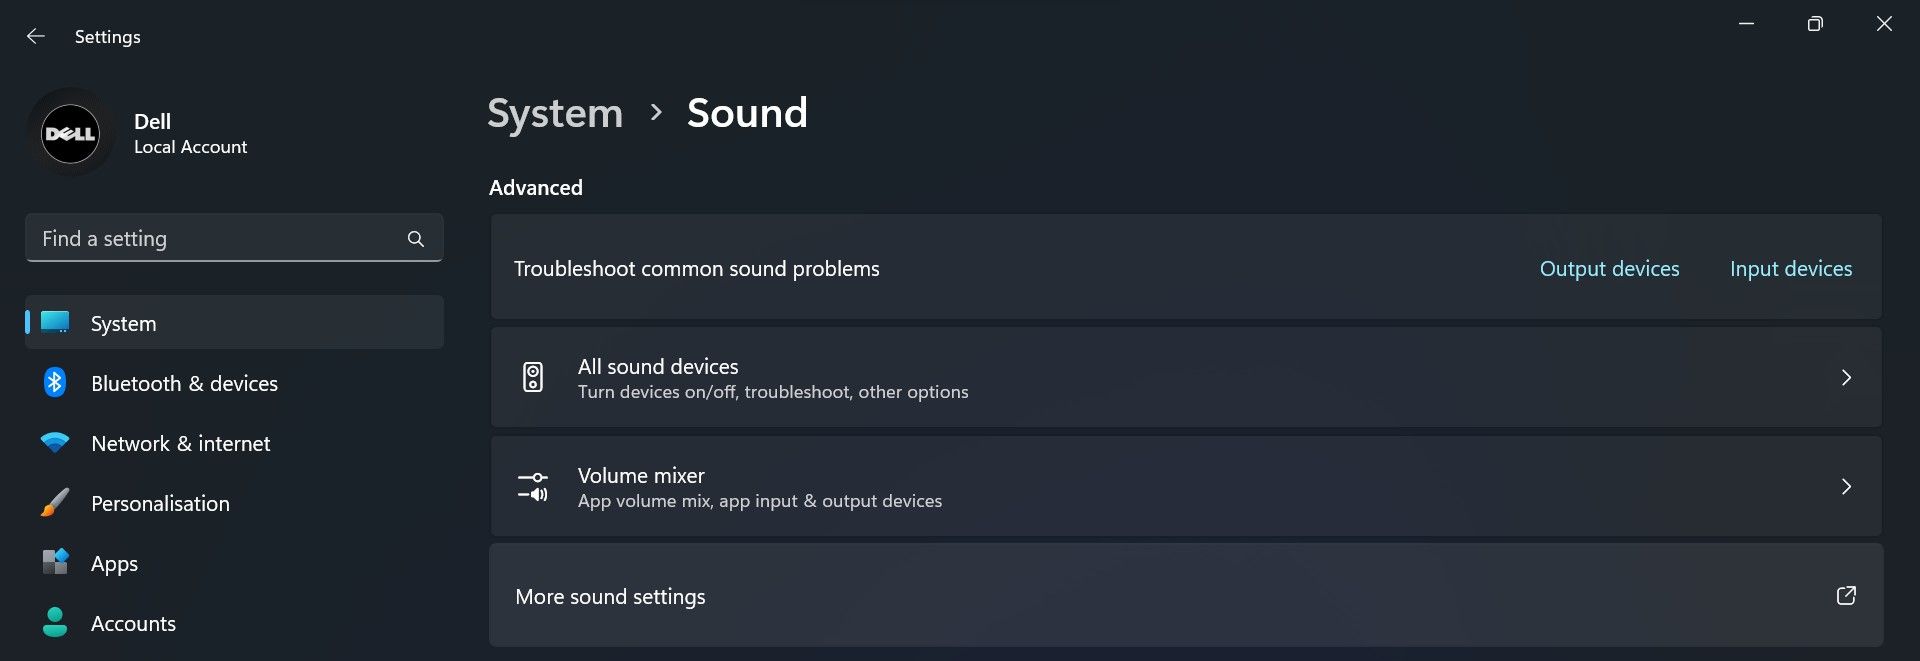
- Navigate to System > Sound and click More sound settings.


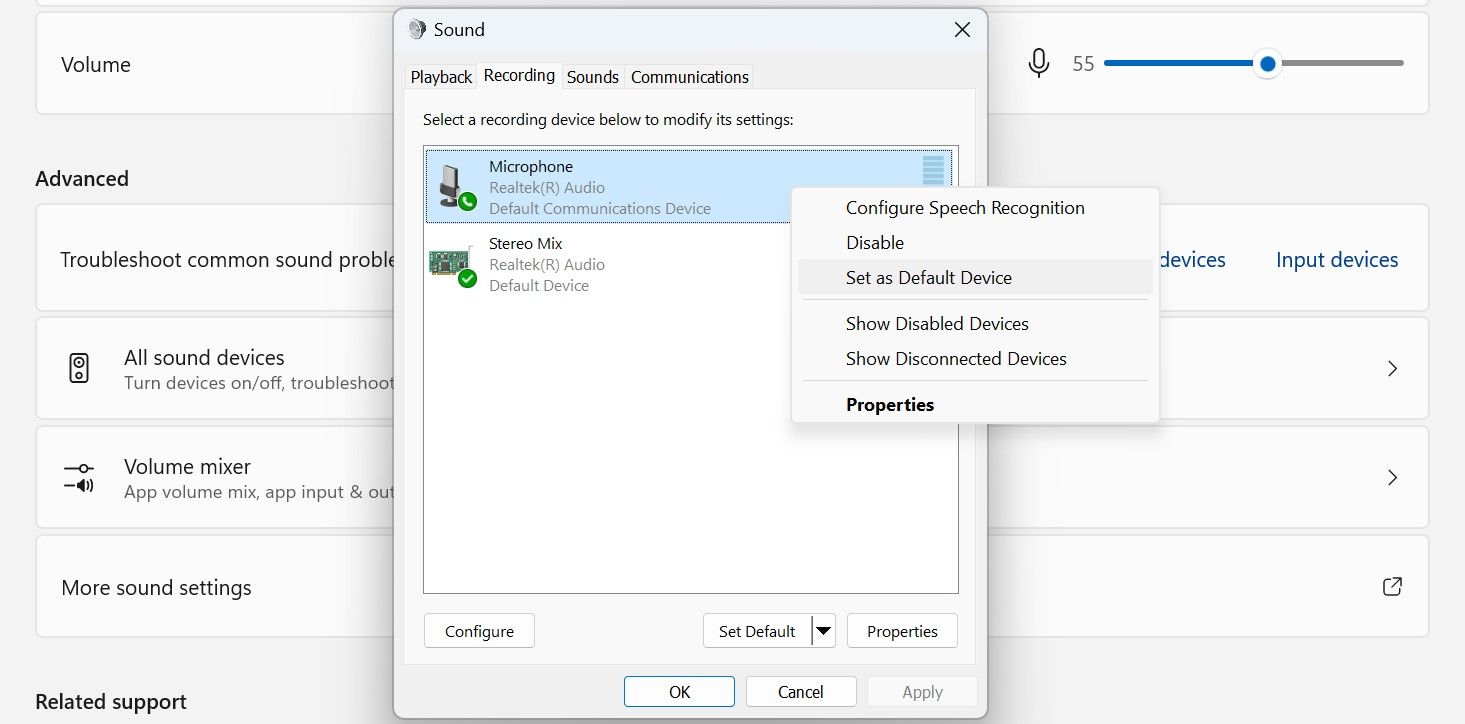
- Navigate to the Recording tab, right-click on your desired device, and select Set as Default Device.

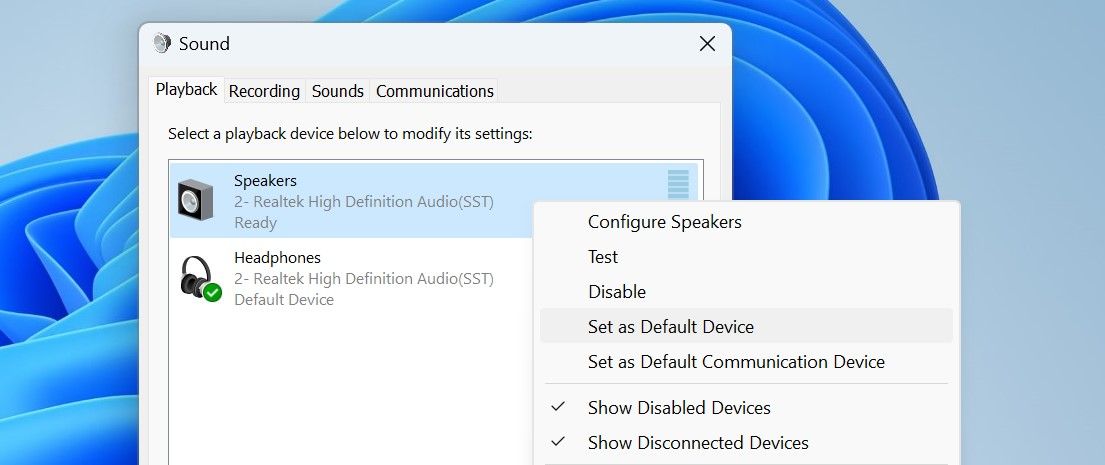
- Afterward, go to the Playback device, right-click on your desired audio output device, and select Set as Default Device.

6. Check Valorant’s Microphone Permissions
The Windows operating system allows users to restrict any app from accessing the microphone. This setting is handy when you don’t want your microphone to get unmuted in the middle of a meeting or gameplay when you don’t want it to.
Therefore, ensure you haven’t mistakenly restricted Valorant from using the microphone or disabled microphone access for all apps. Follow these steps to check that:
- Open the Settings app.
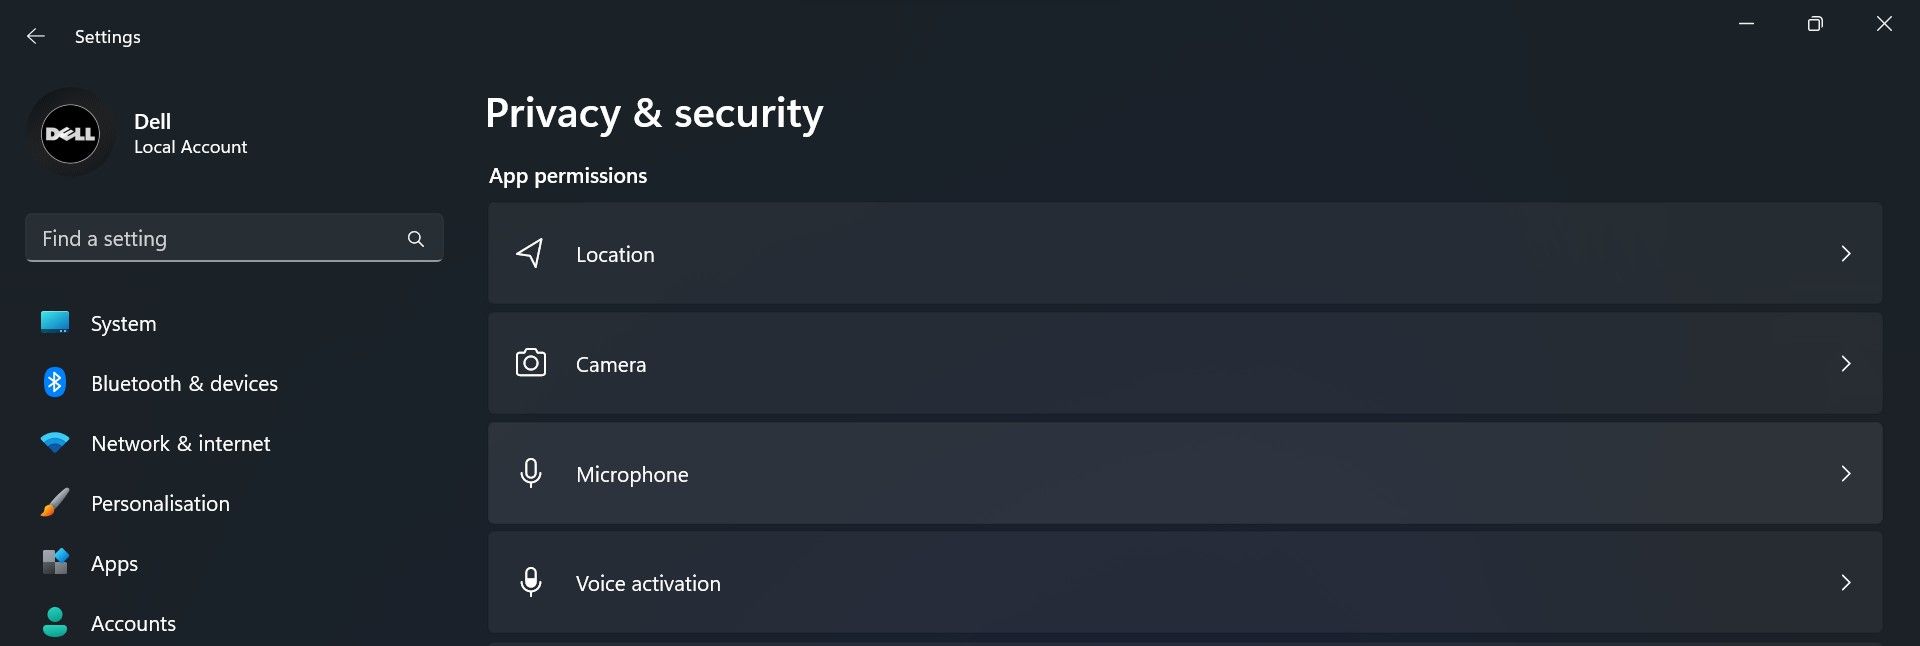
- Go to the Privacy and security tab in the left sidebar.
- Navigate to the App permissions settings and click on Microphone.

- Make sure the toggle next to Microphone access is turned on.
- After that, find Valorant in the list of apps and turn on the toggle next to it.
7. Turn Off Apps’ Exclusive Control Over Your Microphone and Speaker
Windows has a handy feature that allows audio apps to take exclusive control of the drivers of hardware devices, preventing other applications from using them. Despite being useful, this permission has been linked to the issue under discussion. You should turn off this feature to rule out this possibility.
To turn off exclusive control of the microphone, navigate to Settings > System > Sound and click on More sound settings. Afterward, go to the Recording tab, right-click on your desired microphone, and select Properties.
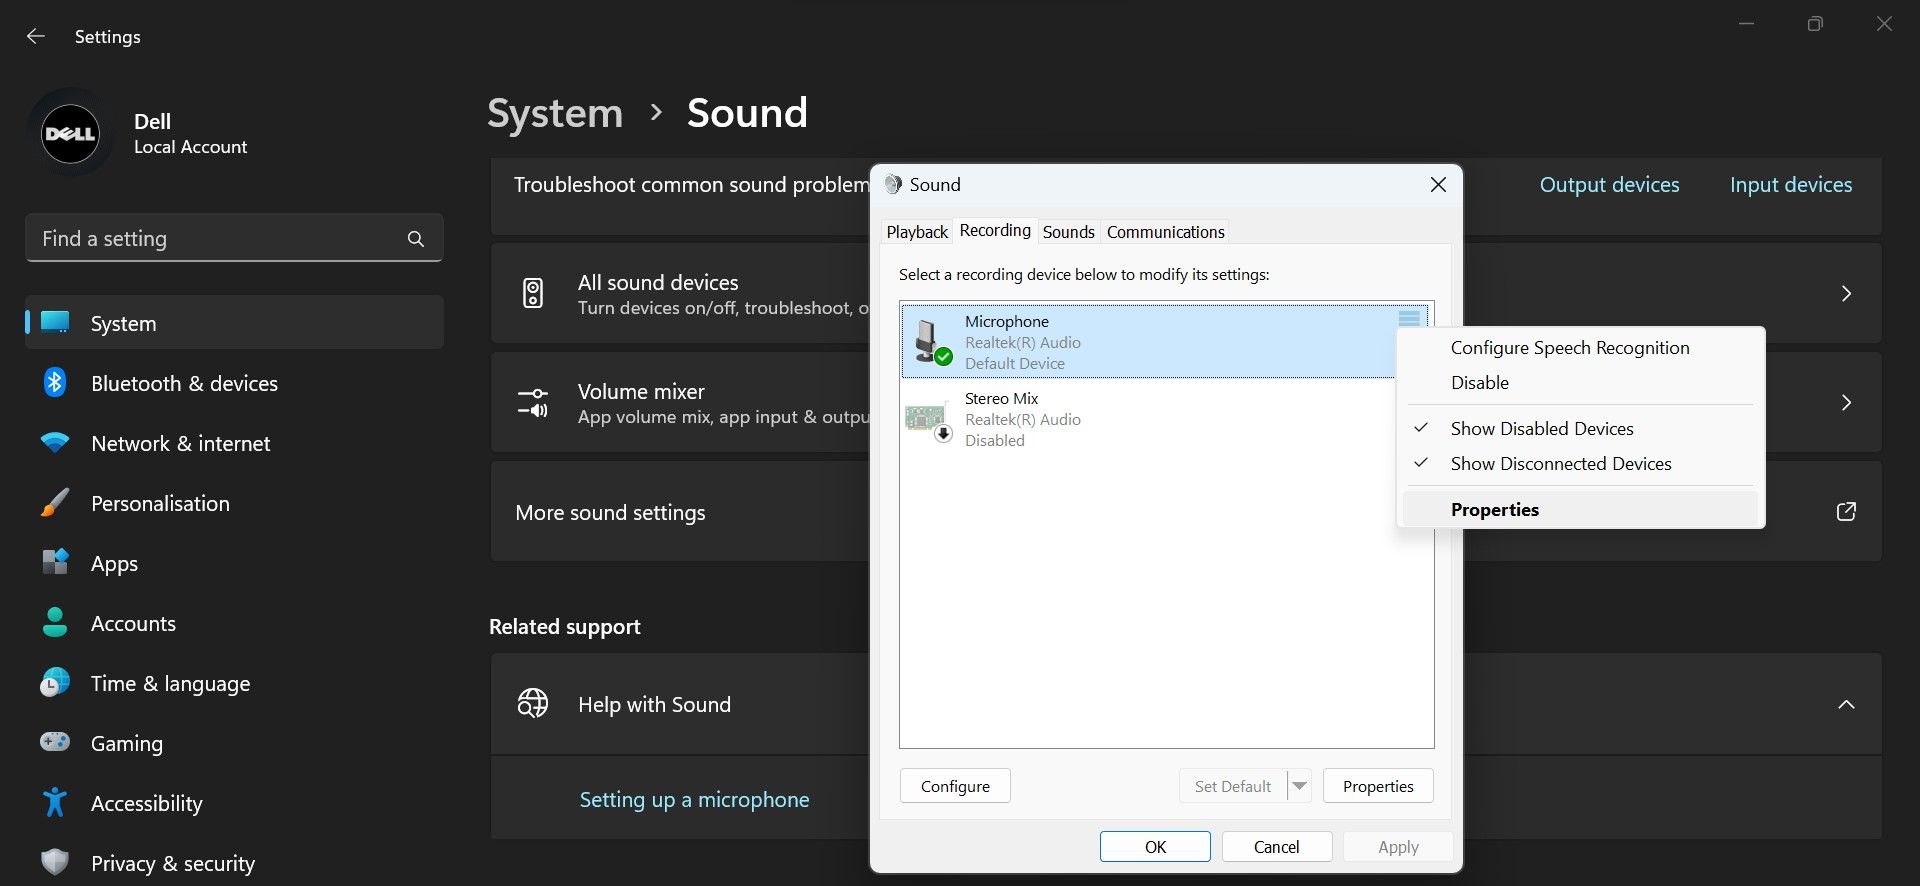
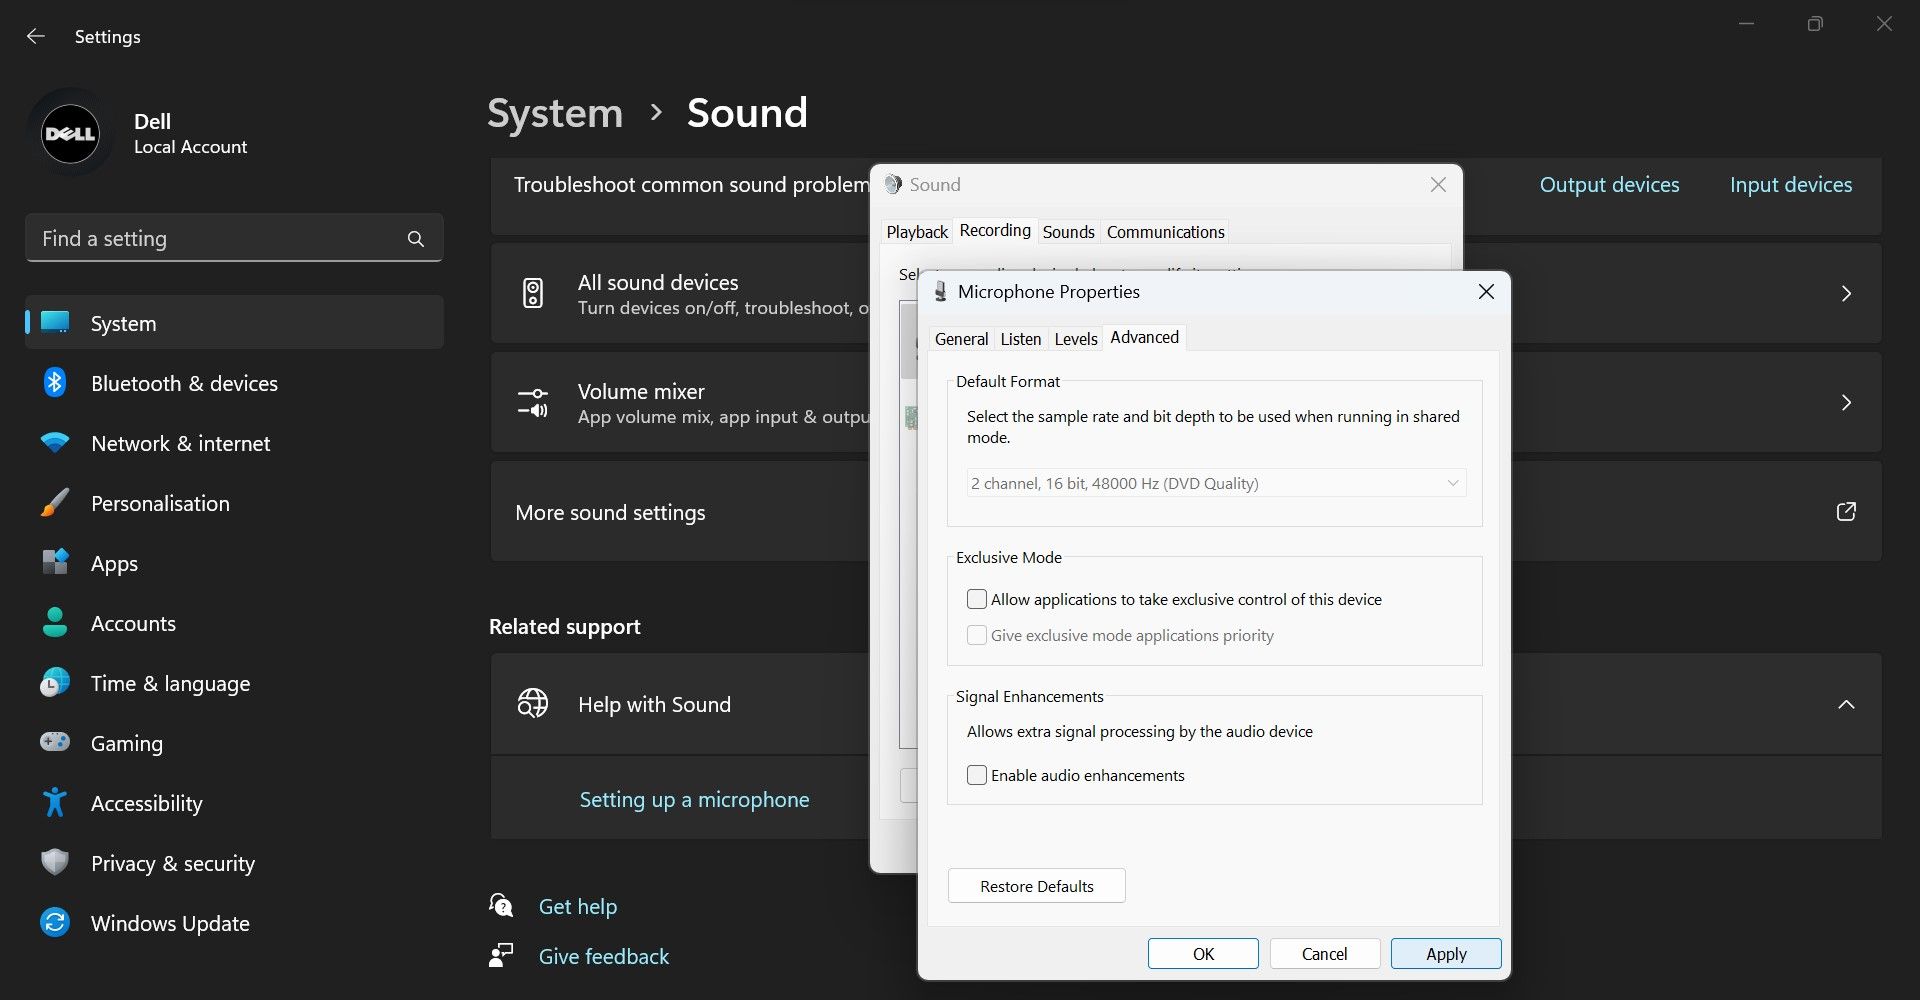
Then, go to the Advanced tab and uncheck the box beside Allow applications to take exclusive control of this device. Also, uncheck the box beside Enable audio enhancements.
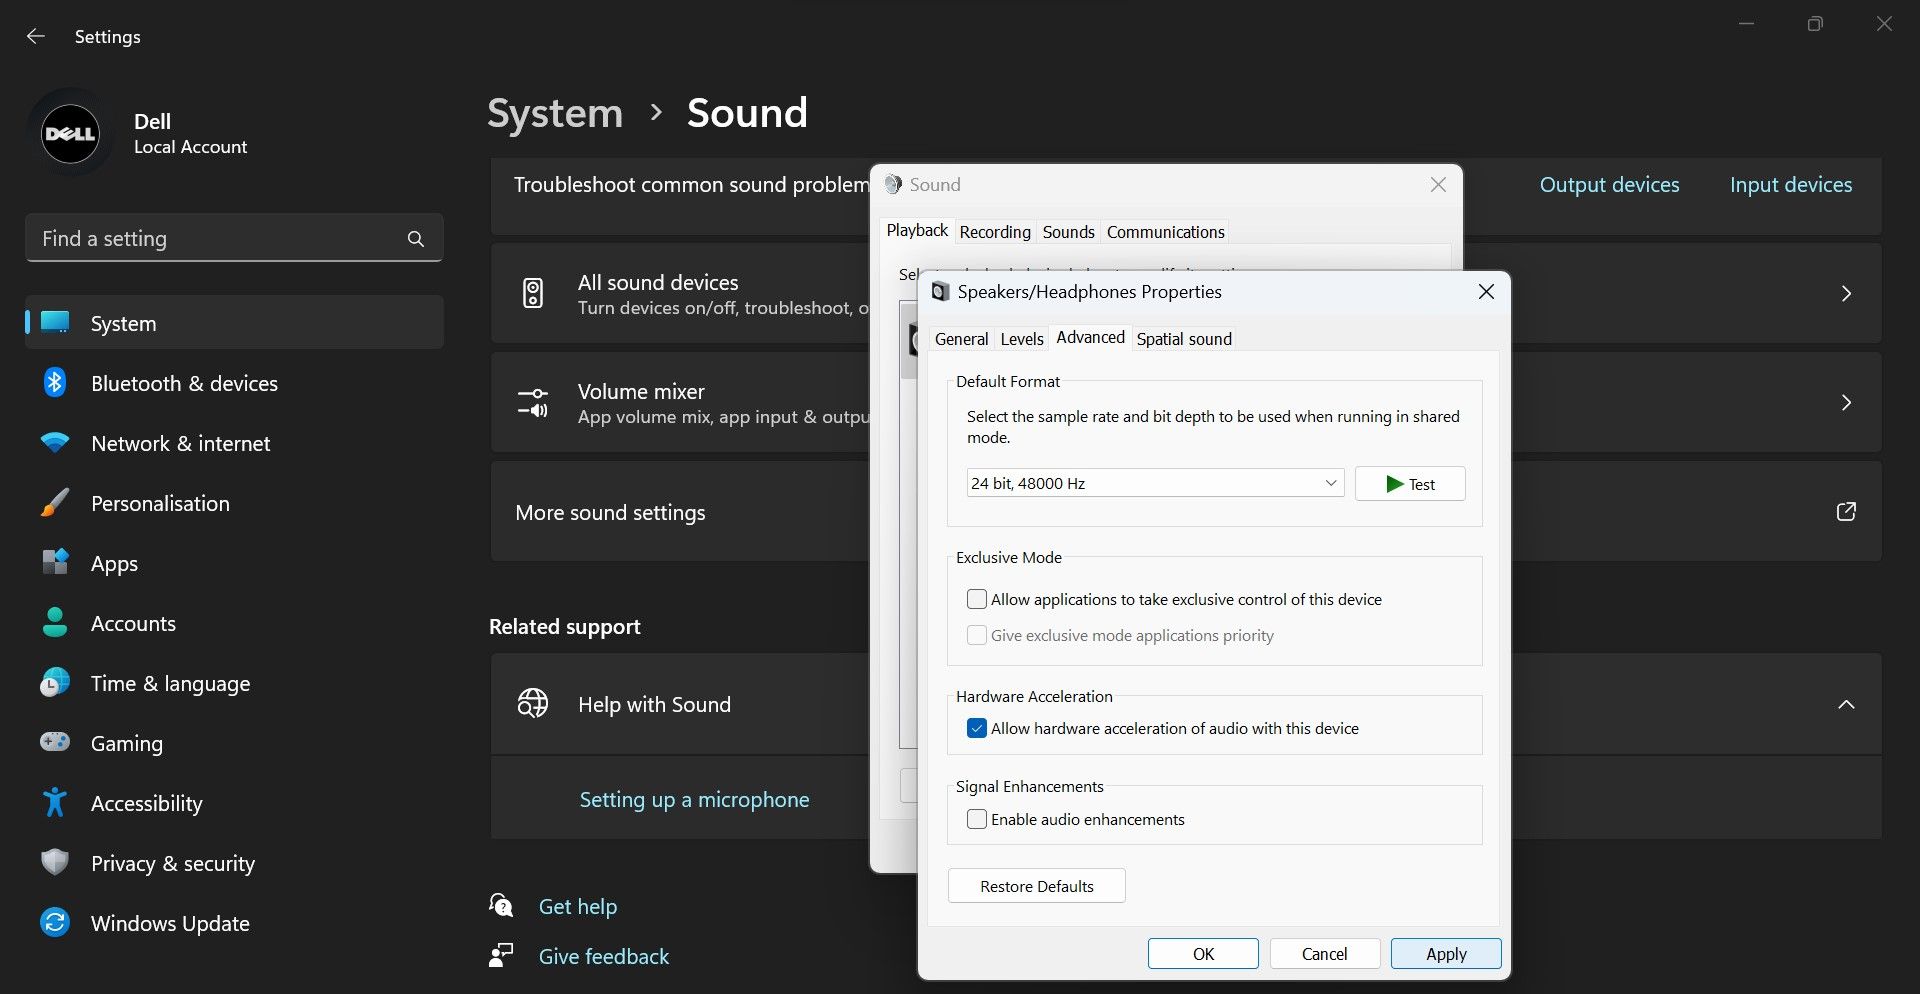
Afterward, go to the Playback tab, right-click your primary audio output device, and select Properties. Then, go to the Advanced tab, uncheck the exclusive control box, and turn off audio enhancements.
8. Change the Voice Activation Mode
By default, Valorant’s voice activation mode is set to automatic, so it transmits any voice it detects. Valorant offers another voice activation mode, Push to Talk, that allows users to press a specific key to begin a voice chat. This means that the microphone detects voice only when this button is pressed.
Changing the voice activation mode to Push to Talk has also been reported to resolve the voice chat issue in Valorant. Therefore, follow the steps below to make this change in Valorant:
- Launch Valorant.
- Press the Escape key to open Settings.
- Navigate to the Audio tab at the top and go to the Voice Chat tab.
- Select the Push to Talk option next to Party Voice Activation Mode.

Make Voice Communication Super Smooth on Valorant
Using the voice chat feature in Valorant makes communication easier. Hopefully, you now know what causes the voice chat feature to stop working in Valorant and how to restore voice communication. If voice chat remains unresponsive despite applying all the fixes, reinstall Valorant.
If you want to make voice chat work again and communicate with your friends, here are the fixes you should try.
- Title: Addressing Disrupted Microphone Input in Valorant (Windows)
- Author: Richard
- Created at : 2024-07-29 08:08:31
- Updated at : 2024-07-30 08:08:31
- Link: https://win11-tips.techidaily.com/addressing-disrupted-microphone-input-in-valorant-windows/
- License: This work is licensed under CC BY-NC-SA 4.0.

 /a>
/a>
