Bypassing the Window's Time-Limited Lock

Bypassing the Window’s Time-Limited Lock
If your Windows PC is protected by a password, the computer will auto-lock whenever you restart it or put it into Sleep mode. While this auto-locking behavior is a security measure, it can be annoying on occasion.
Fortunately, you can keep Windows from automatically locking itself. Here’s how.
Why Is Windows 10 Automatically Locking Itself?
Windows automatically locks itself for one simple reason: to protect your privacy.
Imagine a scenario where you have to leave your computer unattended for an extended period. If there is no auto-lock on Windows, anyone can use your PC for any reason without any repercussions.
By locking itself automatically once your PC goes into sleep mode, Windows ensures that your data stays private and nobody except you has access to your computer.
How to Stop Windows From Automatically Locking Itself
You can stop Windows from automatically locking itself by:
- Disabling Windows sign-in.
- Disabling sleep mode and screen saver.
- Editing theWindows Registry to disable auto-locking.
Now that we know how to do it, let’s dive into the steps.
Disabling Windows Sign-In
Outright disabling Windows’ sign-in requirement is the most serious step that you can take to disable auto-locking on Windows. To disable the sign-in requirement:
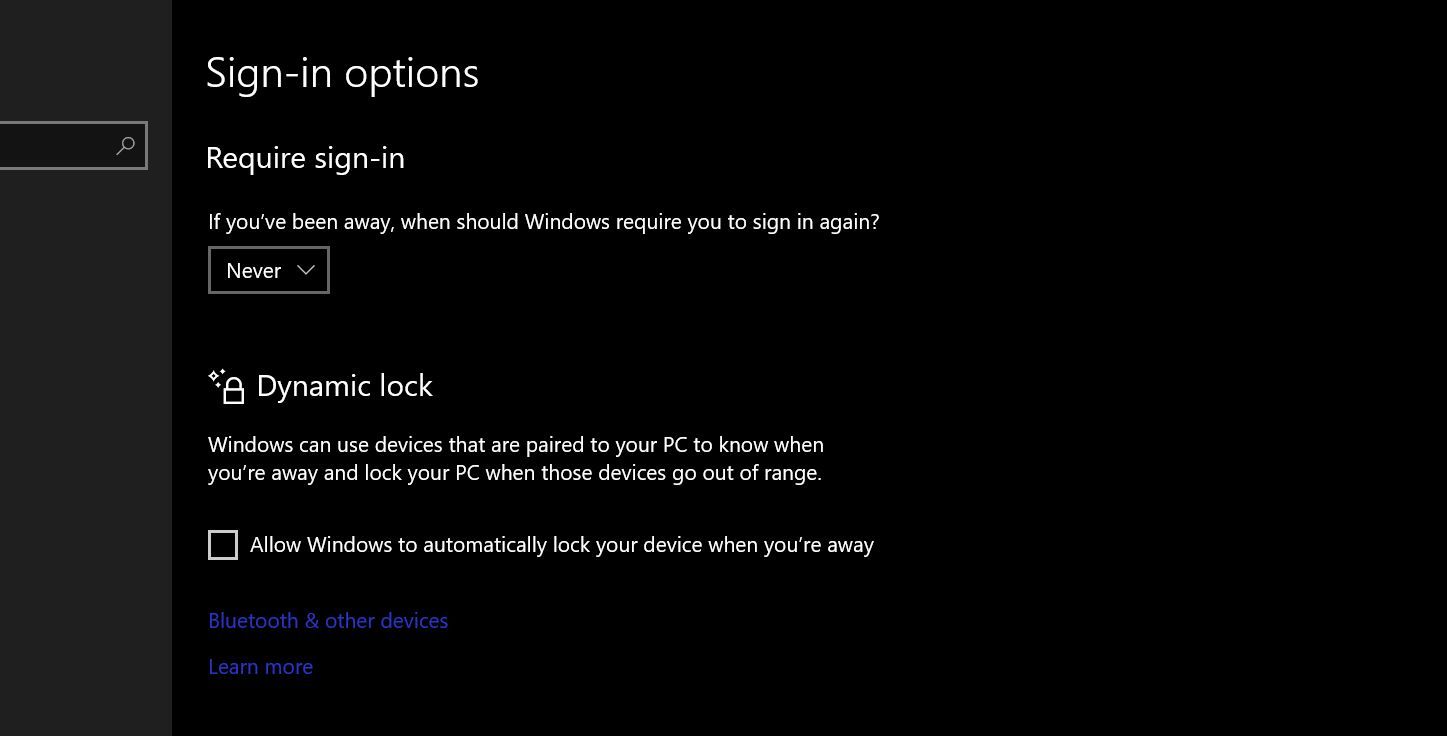
- Hit the Windows keys, type “sign in”, and chooseSign-in options .
- In theRequire sign-in section, selectNever from the dropdown menu.
- While you are in Sign-in options, make sure to disable Dynamic lock by unchecking the option in theDynamic lock section.
Dynamic lock automatically locks your PC if a Bluetooth-connected device, for instance, your smartphone, goes out of range. So, disabling this option will ensure that your PC doesn’t lock up when you walk away from it.
Disabling Sleep Mode and Screen Saver
Next, because Windows automatically locks itself when in sleep mode, you can effectively disable auto-locking by keeping your computer from entering sleep mode. To do this:
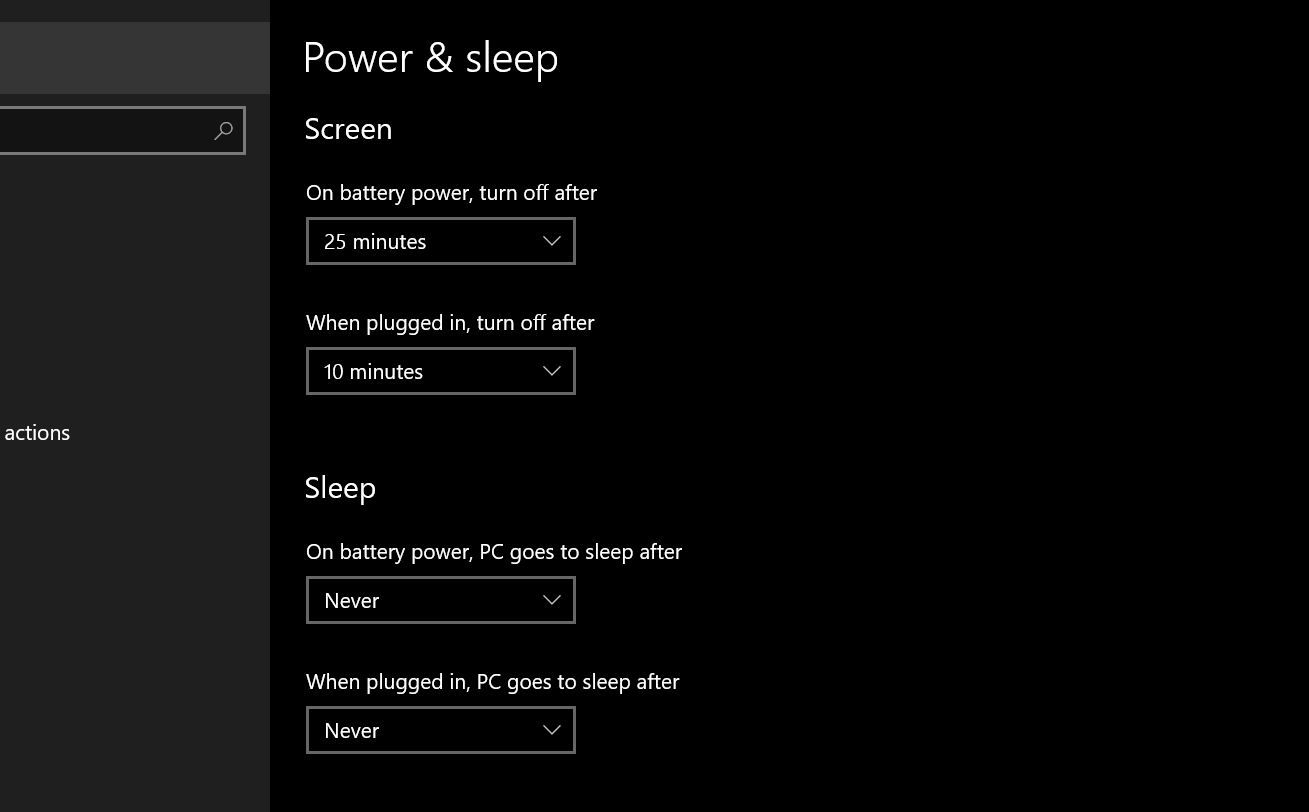
- Hit the Windows key, type “power and sleep”, and choosePower & sleep settings .
- In the Power & sleep section, set disable mode by choosingNever from both dropdowns underSleep .
If you’ve set a screen saver active on your PC, we also recommend turning it off, as it can, sometimes, cause Windows to automatically lock itself. To disable the screen saver:
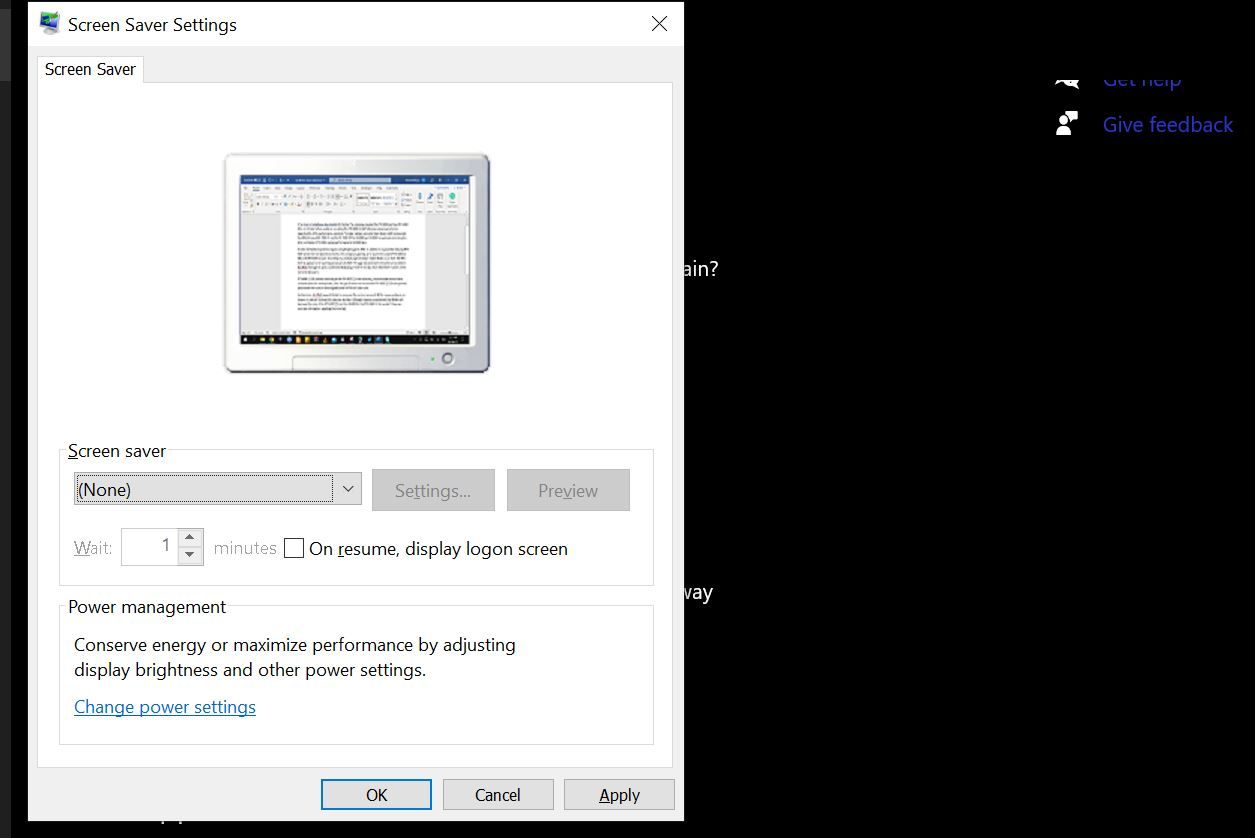
- Hit the Windows key again, type “screen saver”, and clickTurn screen saver on or off to openScreen Saver Settings .
- In the Screen Saver Settings, setScreen saver toNone and uncheckOn resume, display the logon screen .
Editing Windows Registry to Disable Auto-Locking
Finally, you can also edit Windows Registry to stop Windows from automatically locking itself. Before we show you how to do this, make sure you understand that editing Windows Registry can make your system unstable requiring you to restart or evenperform a fresh Windows install for your PC to work properly again.
So, edit Windows Registry only when nothing else works.
- Hit the Windows keys, type “registry”, right-click onRegistry Editor , and selectRun as administrator .
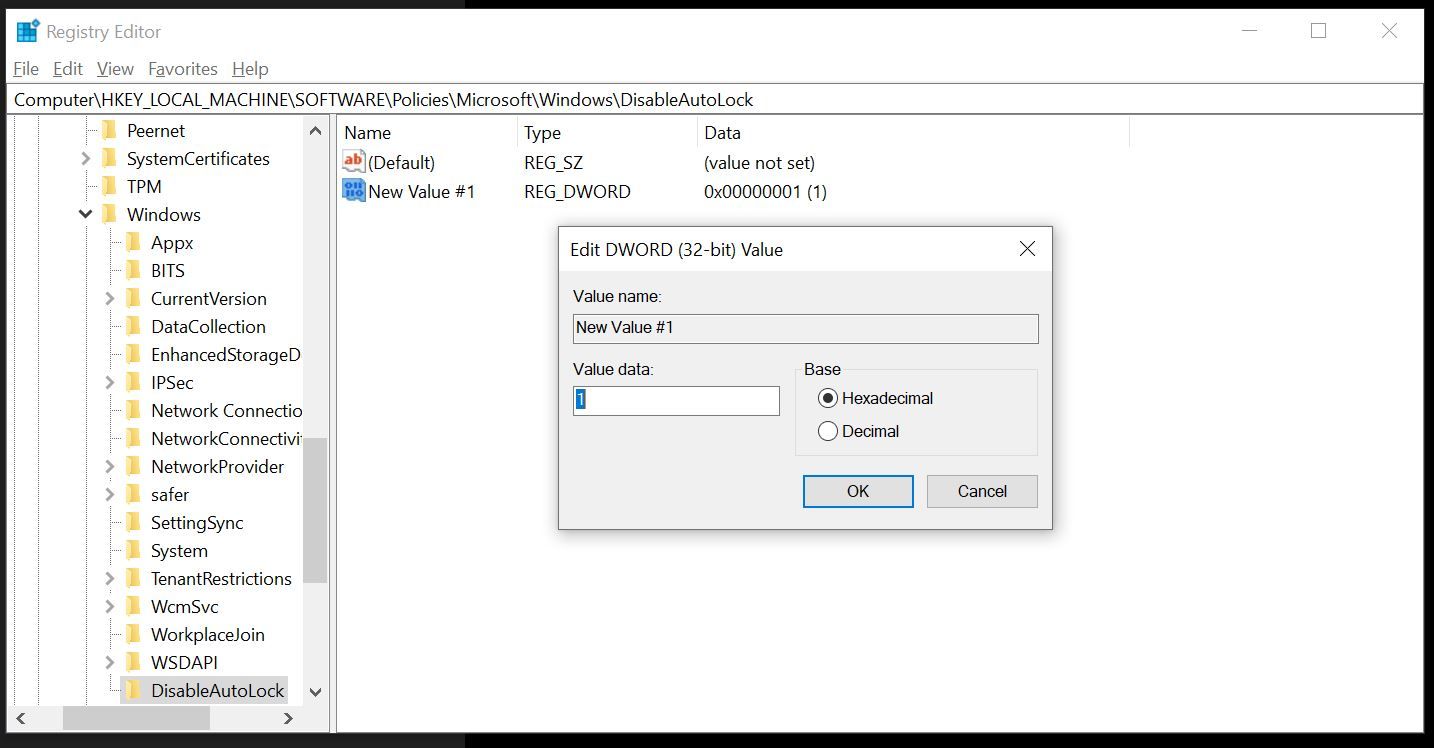
- In Registry Editor, navigate toHKEY_LOCAL_MACHINE >Software >Policies >Microsoft .
- Next, right-click onWindows , selectNew , and chooseKey to define a new key/create a new folder in Windows Registry. Name the new folder something like “Disable autoLock”.
- Now, right-click on the folder you just created, place the mouse cursor overNew , and selectDWORD (32-bit) Value . Change the name of this new element to “NoLockScreen”.
- OpenNoLockScreen and set the Value data to 1. Press ok to finish the process.
Finally, restart your computer to see if a lock screen appears.
Use Windows Hello to Make Windows’ Auto-Locking Bearable
If your PC or notebook has facial recognition or a fingerprint reader, you can set up Windows Hello to make sign-ins a breeze.
On supported computers, Windows Hello can instantly recognize your face/fingerprint to log you in, taking the hassle out of typing a password in case of Windows auto-locking itself.
Also read:
- [New] 2024 Approved Tips How to Quickly Enjoy Instagram Videos
- [New] 2024 Approved Top-Ranked 4K Screen Recorders Summarized
- [New] In 2024, Master Fast Sharing YouTube Playlists Made Simple
- Discovering Hidden Patterns in Data Usage Through Windows' DiskUsage Command
- Enhancing User Experience: Reactivating Silent Notifications
- Essential Non-Windows Apps For Modern Computing
- How PGSharp Save You from Ban While Spoofing Pokemon Go On Oppo K11 5G? | Dr.fone
- How to Stream Apple Music on Your Windows PC: A Guide with Lyric Display
- Mastering Desktop Art: Windows 10/11 Tutorials
- Mastering Windows: Fix Loaded LOL Screens
- Personalizing Windows' Inbuilt PDF Renderer
- Refund Policy Explained: Understanding Movavi's Terms of Return
- Sidestep Mobility Center, Stay In Full Screen
- Solutions for Dealing with Immutable Energy States in Windows 11
- Tips to Unblock Overloaded GPT Windows Errors
- Top 5 Google Pixel 7a Bypass FRP Tools for PC That Actually Work
- What Are MMO Games, and How Have They Changed?
- Title: Bypassing the Window's Time-Limited Lock
- Author: Richard
- Created at : 2025-01-12 16:41:04
- Updated at : 2025-01-18 16:44:37
- Link: https://win11-tips.techidaily.com/bypassing-the-windows-time-limited-lock/
- License: This work is licensed under CC BY-NC-SA 4.0.


