Configure Win11's Registry Editor with Ease

Configure Win11’s Registry Editor with Ease
Although the Registry Editor on Windows makes it easy for administrators to access critical settings and configurations, making incorrect changes to registry files can cause the system to become unstable and compromise its security. This is a common concern among Windows users who share their computers with others.
Fortunately, it’s possible to disable (or enable) Registry Editor access on your Windows 11 PC. Let’s see how.
Disclaimer: This post includes affiliate links
If you click on a link and make a purchase, I may receive a commission at no extra cost to you.
1. How to Disable or Enable Registry Editor Access via the Group Policy Editor
The most straightforward way to block access to the Registry Editor on Windows is via the Group Policy Editor. However, it’s important to note that this tool is only available on Windows Pro, Education, and Enterprise editions. If you happen to be using Windows Home, refer to our guide on how to access the Group Policy Editor on Windows Home before proceeding.
- Press Win + R to open the Run dialog box.
- Type gpedit.msc in the box and press Enter.
- In the Local Group Policy Editor window, use the left pane to navigate to User Configuration > Administrative Templates > System.
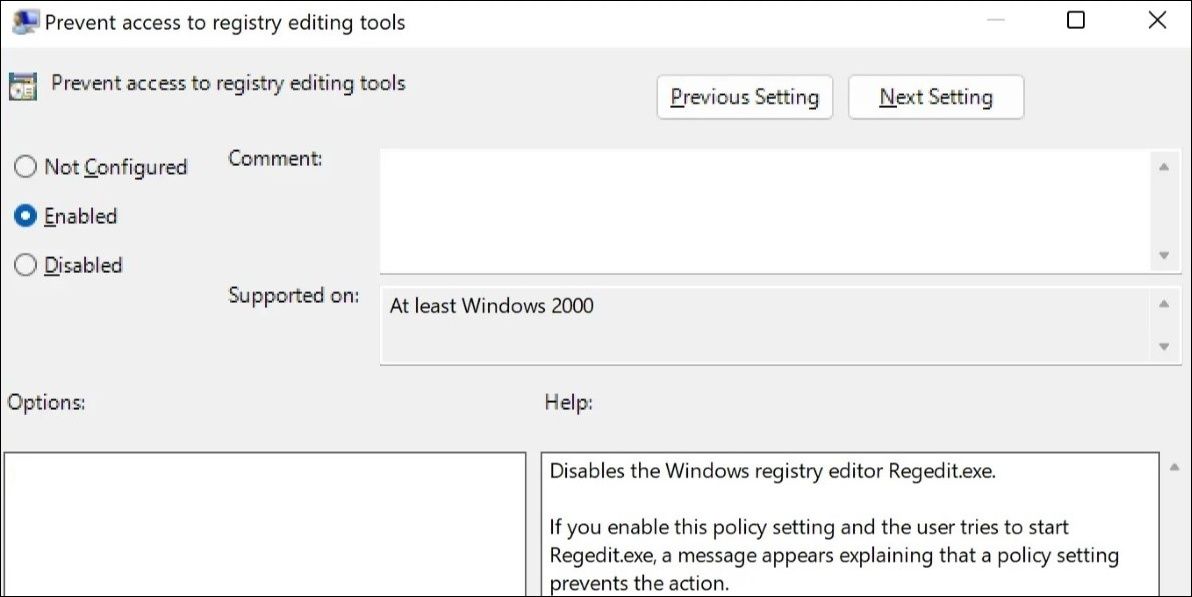
- Double-click the Prevent access to registry editing tools policy in the right pane.
- Select the Enabled option.
- Click Apply followed by OK.

Following this, users will see the “Registry editing has been disabled by your administrator” message when they attempt to access the Registry Editor. If you want to re-enable Registry Editor later, repeat the above steps and set the Prevent access to registry editing tools policy to Not configured or Disabled.
2. How to Disable or Enable Registry Editor Access via the Registry Editor
Another way to restrict the Registry Editor access on Windows involves using the Registry Editor itself. Here are the steps you can follow.
- Click the search icon on the taskbar to access the search menu.
- Type regedit in the box and press Enter.
- Select Yes when the User Account Control (UAC) prompt appears.
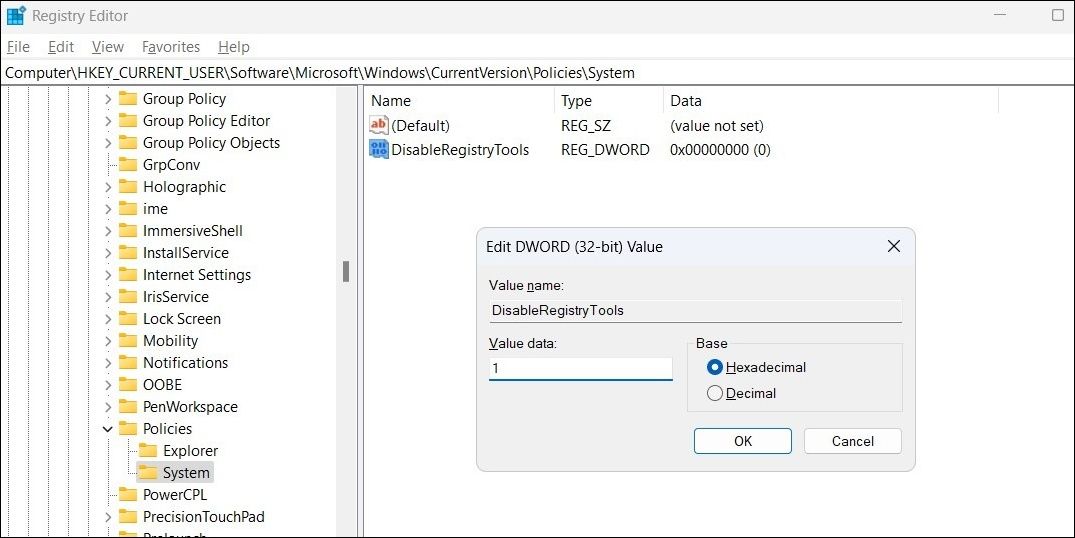
- In the Registry Editor window, use the left pane to navigate to HKEY_CURRENT_USER > SOFTWARE > Microsoft > Windows > CurrentVersion > Policies.
- Right-click on the Policies key and select New > Key. Name it System.
- Right-click on the System key and select New > DWORD (32-bit) Value. Name it DisableRegistryTools.
- Double-click the newly created DWORD, type 1 in the Value data field, and hit OK.

Once you complete the above steps, the Registry Editor will be disabled on your PC.
Although you cannot access the Registry Editor to reverse the above changes, it’s still possible to re-enable Registry Editor access. For that, you will have to create and run a REG file . Here’s how you can go about it.
- Press Win + S to open the search menu.
- Type notepad in the search box and press Enter.
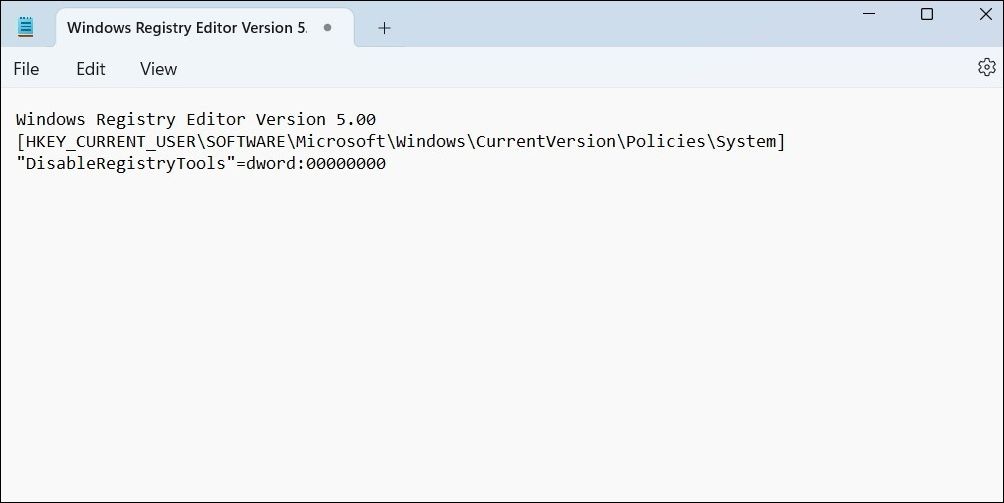
- In the notepad window, paste the following command.
Windows Registry Editor Version 5.00 [HKEY_CURRENT_USER\SOFTWARE\Microsoft\Windows\CurrentVersion\Policies\System] "DisableRegistryTools"=dword:00000000
- Click the File menu and select Save as.
- Select Desktop in the Save as dialog box.
- Enter a suitable name followed by “.reg” and hit Save. For instance, you could name the file ReEnableRegistry.reg or something similar.
- Use one of the many ways to open the Command Prompt with admin rights .
- Type the following command in the console and hit Enter. Make sure you replace the [username] in the following command with your actual username.
cd C:\Users\[username]\Desktop - Paste the following command, replace FileName with the actual name of the REG file, and press Enter.
regedit.exe /s FileName.reg
Once you run the above command, the Registry Editor will become accessible again.
Allowing or Disallowing Registry Editor Access on Windows
Blocking access to the Registry Editor is an effective way to protect your system from registry mishaps. Nonetheless, if you opt to re-enable access to the Registry Editor on your PC, make sure to exercise caution to avoid messing up the Windows Registry.
Fortunately, it’s possible to disable (or enable) Registry Editor access on your Windows 11 PC. Let’s see how.
Also read:
- [New] In-Depth Training on Google's Advanced Speech to Text Feature
- [New] Proven Tactics Increasing Your Instagram Video Traffic
- 2024 Approved 3 Ways to Record Switch Gameplay
- 2024 Approved Next-Gen Escapades Upcoming Best PlayStation VR Games to Try
- Augment Windows Management with a Disk Space Analysis Tool
- Cure for Unresponsive Wired Gaming Accessories
- Discover the Top 6 Computer Utilization Monitors on PCs
- In 2024, How to Bypass Google FRP Lock from Samsung Galaxy A15 5G Devices
- Mastering WIN10/11 Recycle Bin Repair Strategies
- Navigating Through Limited Access Install Troubleshooting on Win 11/10
- Planning to Use a Pokemon Go Joystick on Xiaomi Redmi A2? | Dr.fone
- Step-by-Step Tutorial: Successfully Starting Minecraft After Winodws Glitches
- The Future of Windows Interface: WinBubble's 8 Innovations
- Ways to Wipe Old Windows Protection Markers From Microsoft's Record
- What to Expect From the Next Apple Ring? Inside Look at Potential Costs, Launch Dates & Innovative Features
- Title: Configure Win11's Registry Editor with Ease
- Author: Richard
- Created at : 2024-12-02 20:41:38
- Updated at : 2024-12-06 17:18:09
- Link: https://win11-tips.techidaily.com/configure-win11s-registry-editor-with-ease/
- License: This work is licensed under CC BY-NC-SA 4.0.


