
Configuring Win11 DNS Server Settings Quick Guide
Configuring Win11 DNS Server Settings Quick Guide
Clearing the DNS cache and restarting the DNS cache services are the first troubleshooting tips that anyone should try when diagnosing Windows network issues. But when you open the Service utility to stop or restart the service, all the options are grayed out in the context menu.
But how do you configure the service if nothing works? Well, that’s where the trusty old method of registry tweaking comes in handy. We will elaborate on the process to disable and configure the DNS Client service as per your liking.
Disclaimer: This post includes affiliate links
If you click on a link and make a purchase, I may receive a commission at no extra cost to you.
How to Disable the DNS Client Service Using the Registry Editor
Even if you try to use the Command Prompt and run the command to stop the service, it responds with a “the requested pause, continue, or stop is not valid for this service.” message. So, you need to edit the registry settings of the DNS Client service to disable it.
However, fiddling with Windows Registry is a risky endeavor, and you shouldcreate a registry backup as well as aSystem Restore point . That way, you can always revert to the last known good system configuration.
Repeat the following steps to disable the DNS client service:
PressWin + R toopen the Run command box . Type “regedit” and pressCtrl + Shift + Enter to open the Registry Editor with administrator privileges.
Navigate to the address bar in the Registry Editor windows and paste the following path:
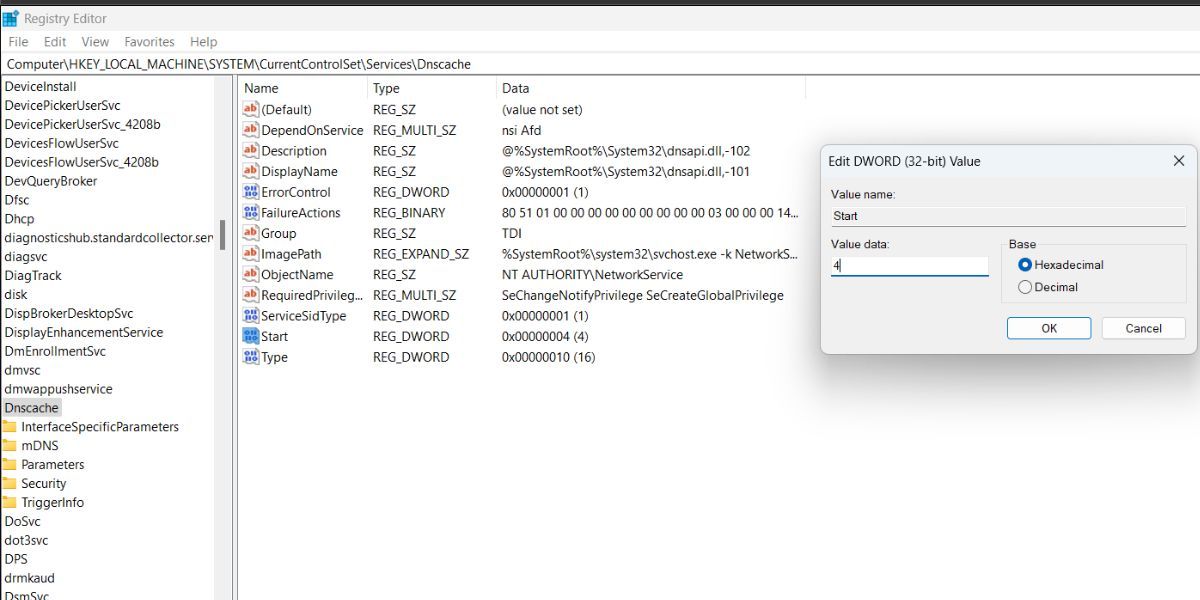
HKEY_LOCAL_MACHINE\SYSTEM\CurrentControlSet\services\DnscacheIn the Dnscache key, locate theStart DWORD value and double-click on it to edit its properties.
Change theValue Data to4 and keep the base asHexadecimal . Click on theOK button.

Close the Registry editor.
PressWin + S and typeservices.msc . Click on theRun as administrator option.
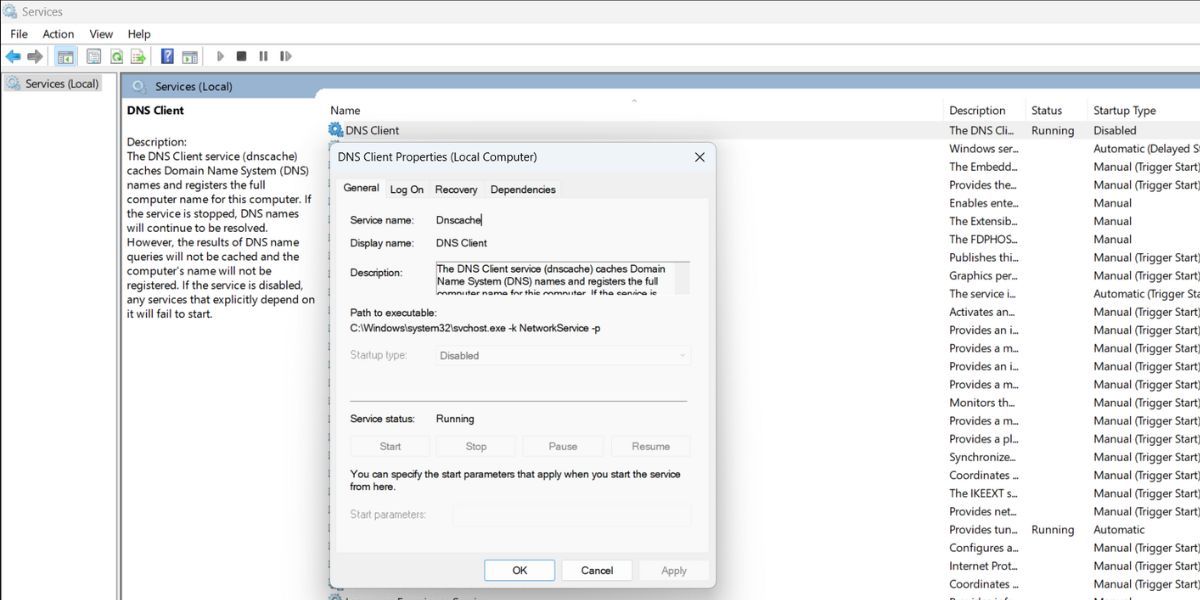
Locate the DNS Client service. You will see that the service is still running but the Startup Type field shows Disabled.
Close the Services utility and restart your system to apply the changes.
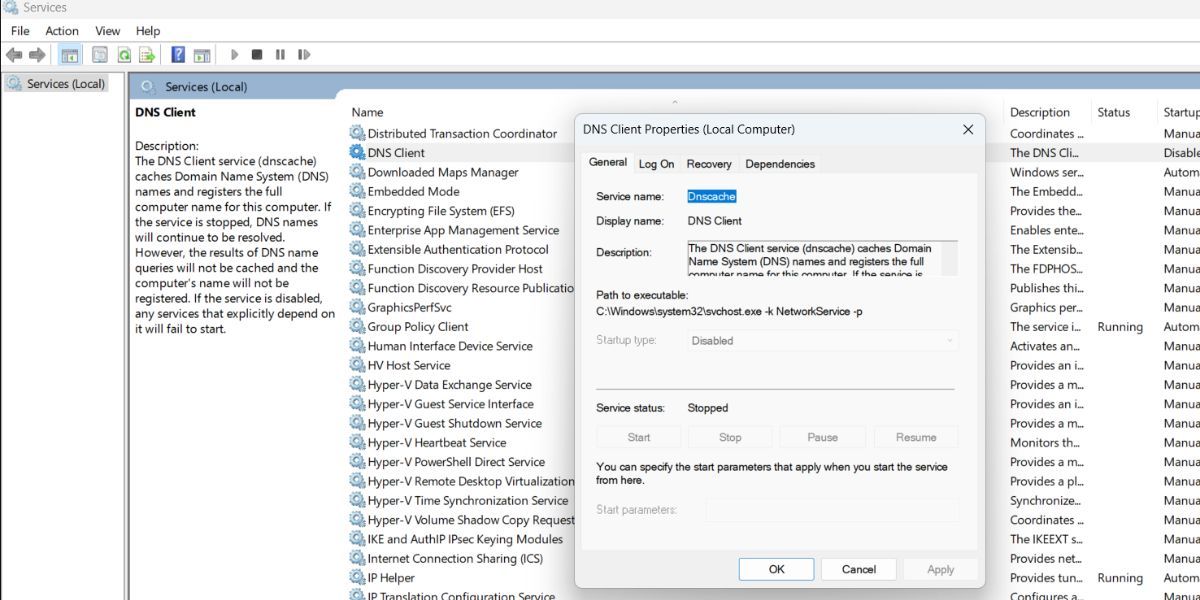
Relaunch the Services panel and find the DNS Client service. It will have a blank status and Startup Type as disabled.
Now, DNS Client Service won’t start until you manually tweak its registry key again.
Is It Possible to Configure the DNS Client Service Without the Registry Editor?
Unfortunately, no. As we described above, you will have to manually change the registry value of the Start DWORD every time you want to stop the DNS Client service on your system.
Even if you set the service to Manual mode, it will still not display anything in the context menu when you right-click on it. So, it is evident that Microsoft doesn’t want anyone tinkering with the DNS Client service in any condition.
If you are curious about how to change the Startup Type of the DNS Client service using Registry Editor, here are the following Data Values and what they do:
Hexadecimal Value Data (2) - DNS Client service is set to run automatically at startup.
Hexadecimal Value Data (3) - DNS Client service is set to Manual mode but will automatically run at startup.
Hexadecimal Value Data (4) - DNS Client service is set to Disabled mode and won’t run until you change the value.
Open the Registry Editor with administrator privileges and navigate to the DNS Client service path as described in the previous section. Now, you can change theValue Data of theStart DWORD value to any of the numbers described above.
How to Quickly Disable the DNS Client Service Using Command Prompt
It is possible to disable the DNS Client Service using Command Prompt as well. All you need to do is run the command to change the Startup Type of the service to “Disabled”. Here’s how to do it:
- PressWin + R to open the Run command box. Type “cmd” and press theCtrl + Shift + Enter keys tostart the Command Prompt with administrator privileges .
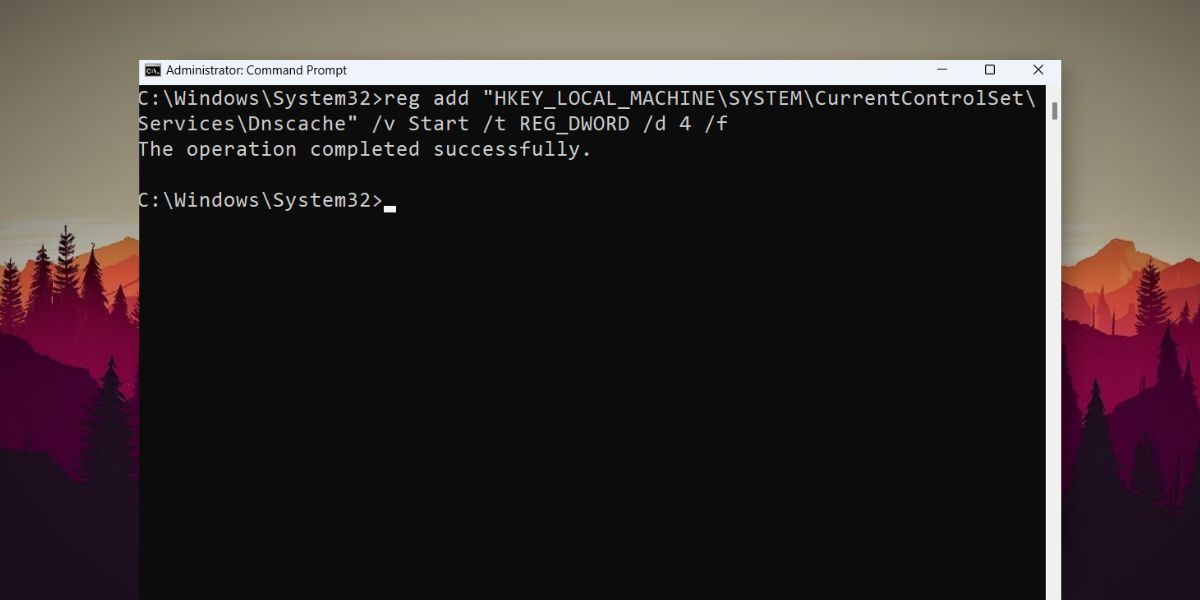
- Now, type the following command and press theEnter key to execute it:
reg add "HKEY_LOCAL_MACHINE\SYSTEM\CurrentControlSet\Services\Dnscache" /v Start /t REG_DWORD /d 4 /f - After you see the “The operation completed successfully.” message, type “exit” and pressEnter to close the Command Prompt window.
- Restart your system for the changes to take effect. DNS Client Service will remain disabled on your system.
Tweak Your DNS Client Service Easily
Microsoft makes it very difficult to disable the DNS Client service on Windows 10 and 11. But you can use the registry hack to disable the service whenever the need arises. Or if you want to disable the service quickly, use the Command Prompt method.
Also read:
- [New] In 2024, A Comprehensive Guide to HP Laptop's Screen Recording Features
- [Updated] Are Earnings Linked to Assessing Merchandise?
- [Updated] In 2024, Getting Acquainted with Discord's Innovations
- [Updated] Maintaining YouTube-Like Video Quality on Twitter for 2024
- Elevate Your Digital Workspace with Uplifting Pixels: Premium Solitude Themes From YL Software's Portfolio
- Exploring Developer's Playground: Windows 11'S Enhanced Dev Drive
- Issues playing MKV video on Xiaomi Civi 3 Disney 100th Anniversary Edition
- Pioneering Portable CD Devices of the Year 2024
- Realigning Windows PAudio with Audacity Software
- Restoring Previous Windows Backup Standards
- Secrets of the Lost Mode of Prayer | Free Book
- Strategies for Tackling the Absent Gpedit.msc in Windows
- The Popularity of Subpar Rear-Projection Televisions: A Look Back at Our Misguided Longing
- Title: Configuring Win11 DNS Server Settings Quick Guide
- Author: Richard
- Created at : 2025-02-26 23:06:47
- Updated at : 2025-03-04 17:44:37
- Link: https://win11-tips.techidaily.com/configuring-win11-dns-server-settings-quick-guide/
- License: This work is licensed under CC BY-NC-SA 4.0.