
Crafting a Modern Interface in Retro Machines - Guide to Windows 11, To Go & Rufus
Crafting a Modern Interface in Retro Machines - Guide to Windows 11, To Go & Rufus
Windows 11 system requirements specify that it needs UEFI, Secure Boot and TPM. Many old computers are powerful enough to run Windows 11. Yet, they cannot install the OS because of these requirements. Windows 11 refuses to install and displays the message “this PC can’t run Windows 11”.
There is a way to bypass these requirements and install Windows 11 on any powerful computer, even if it is old. The process is quite simple as well.
What Are Windows 11’s System Requirements?
Unlike earlier versions, Windows 11 is rigid with its minimum system requirements. It not only asks for a fast processor but also insists on the processor being a certain generation or higher. The supported processors include newer models from AMD, Intel, and Qualcomm.
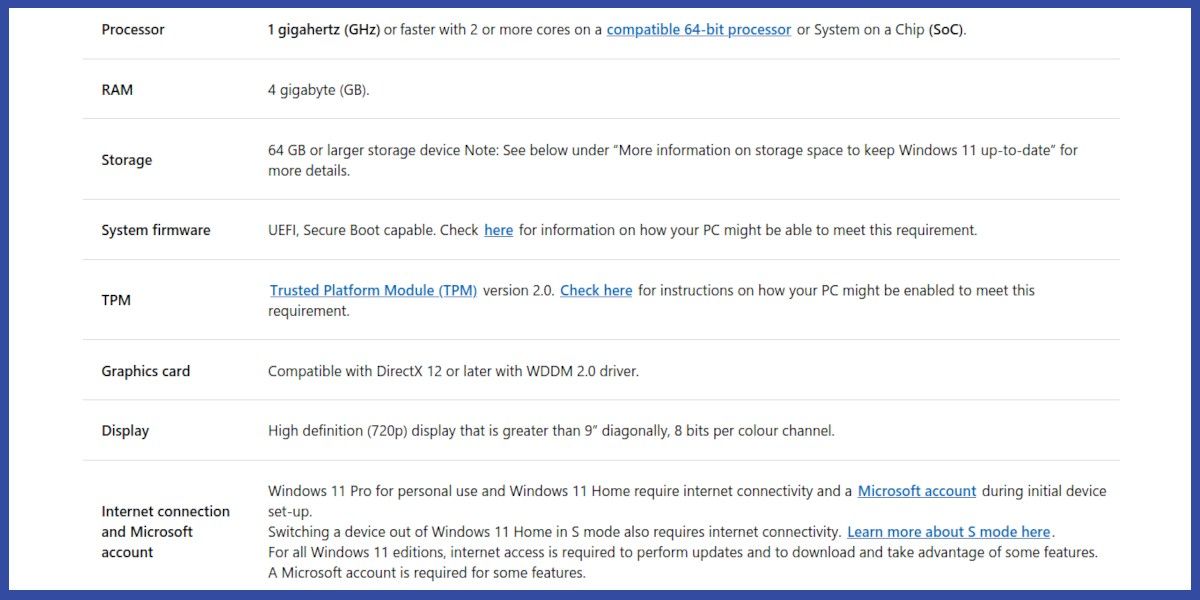
You can check if your PC meets these requirements using the PC Health Check app . But, if any of the requirements are not fulfilled, Windows will say that the system does not meet the requirements.

Windows 11 compatibility check is not only a warning, but will also result in refusal to install the OS. Windows 10 will retire on October 14, 2025 , after which it will not get any updates. As such, your PC won’t get any new features or security fixes unless you install Windows 11 on it.
However, you can give your computer a new lease of life by creating a Windows To Go bootable disk. With that, you can bypass all these requirements:
- A compatible processor,
- A UEFI BIOS,
- Secure Boot compatibility,
- TPM (Trusted Platform Module),
- and a Microsoft account for the initial device setup.
The Hardware You Need to Create a Windows 11 To Go Drive
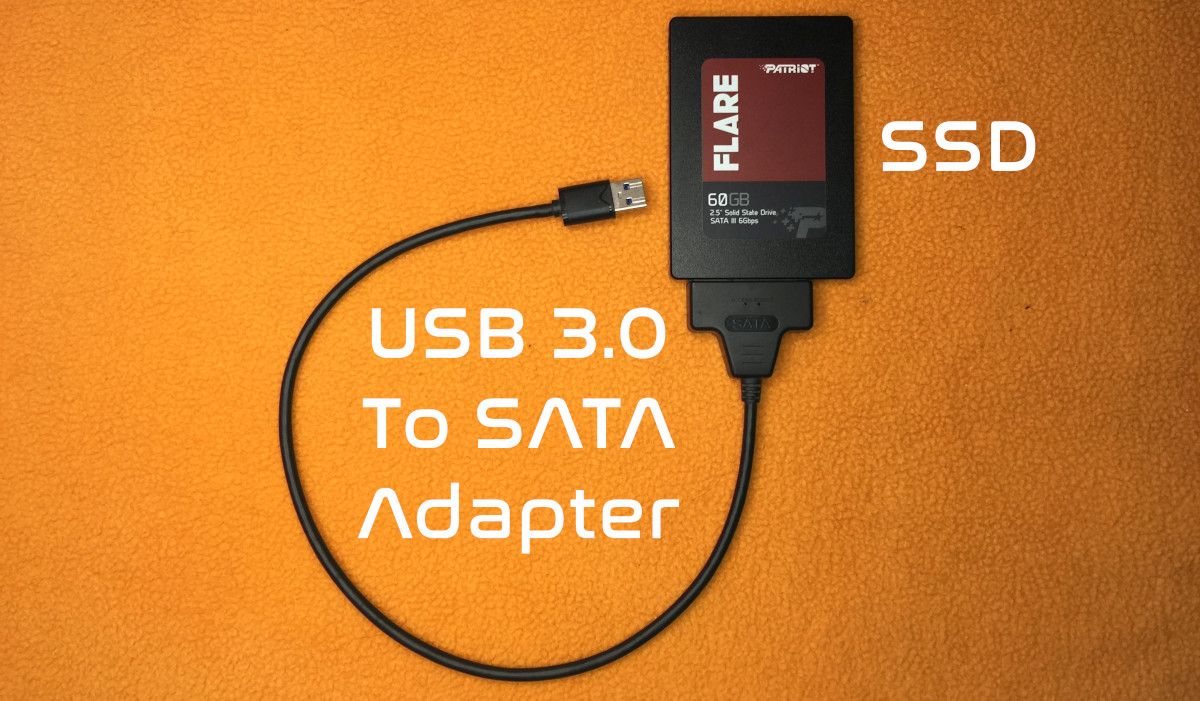
Portable versions of Windows run over the USB interface. You need a USB 3.0 to SATA adapter and an SSD. One end of the adapter will connect to the USB 3.0 on your computer, and the SSD will be at the other end. Quite simple.
And yes, you can install Windows To Go on a USB flash drive. It will also work with a USB 2.0 and a hard disk as well. But, these slower devices and interfaces are not recommended. We will get to this later.
How to Create a Windows To Go Drive Using Rufus
Rufus is a free open-source tool to create bootable USB drives, which you can use to install operating systems. Rufus can also create Windows To Go portable drives. So, to start, download Rufus from the official website .
You will also need an image of Windows 11. It is available as a free download at Microsoft . You are not required to register to download the media. Activation after installation is optional as well.
On the download page, scroll down to the section titled Download Windows 11 Disk Image (ISO) for x64 devices. Then, select Windows 11 (multi edition ISO for x64 devices) from the drop-down box.
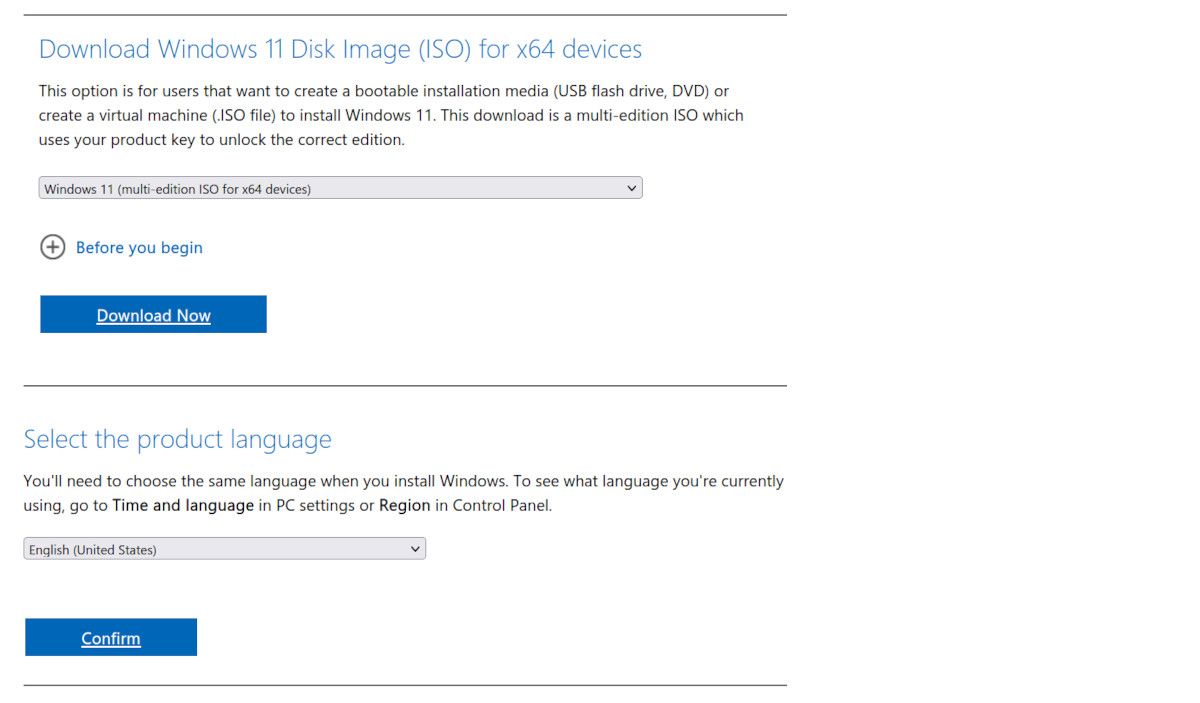

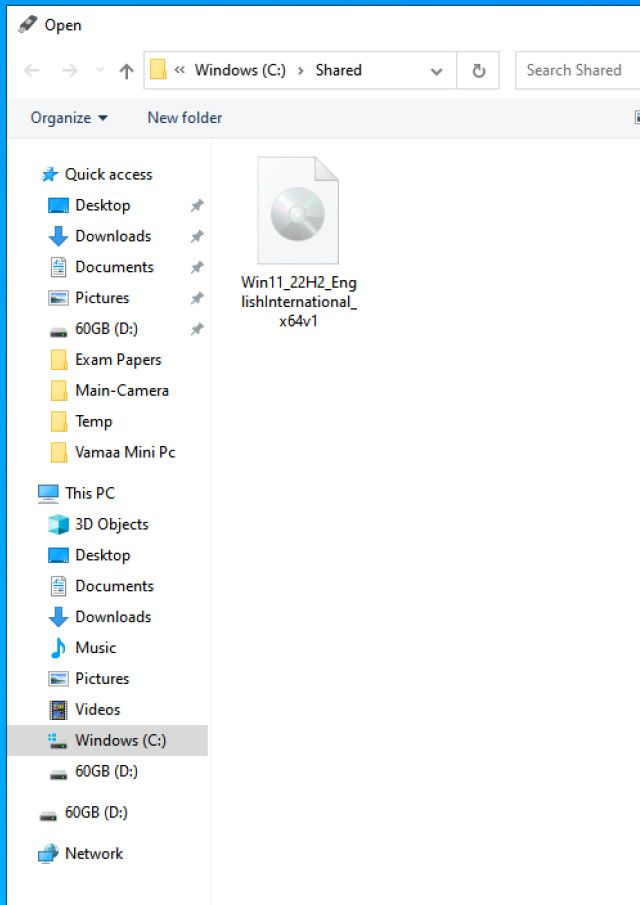
Scroll down to Select the product language and click Confirm to download. The download is in excess of 5GB. Once downloaded, connect your USB SSD and run Rufus.
 Any DRM Removal for Win:Remove DRM from Adobe, Kindle, Sony eReader, Kobo, etc, read your ebooks anywhere.
How to Use Rufus
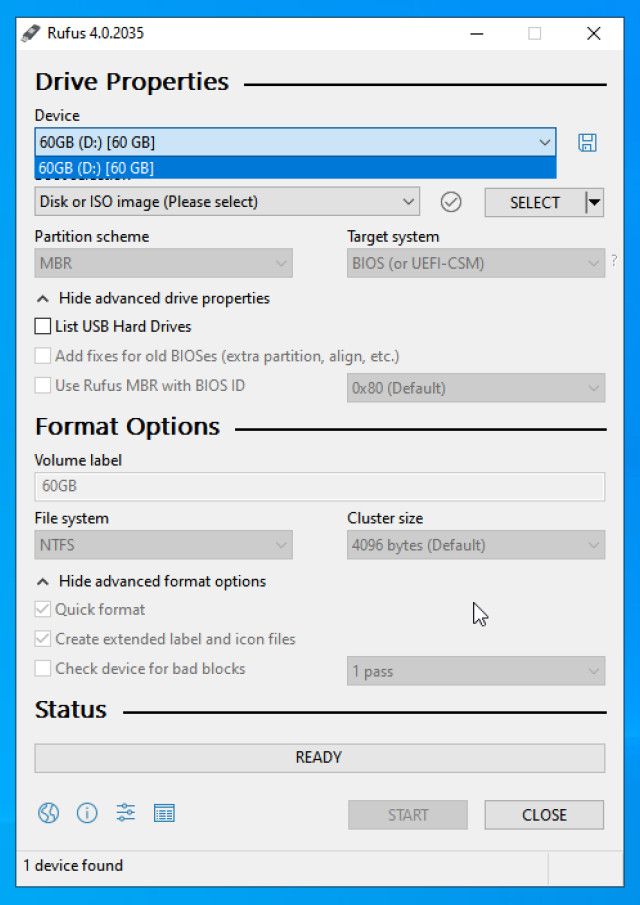
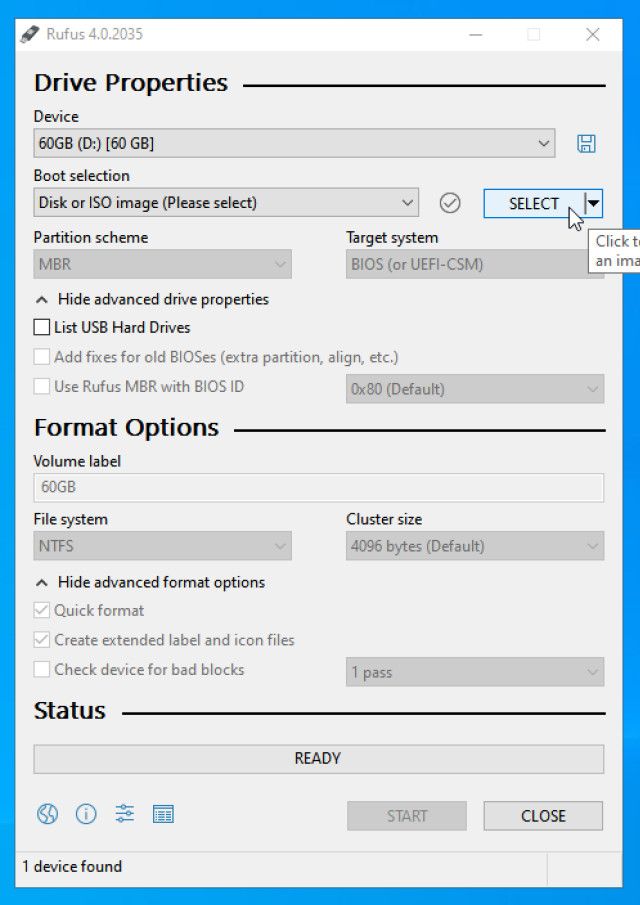
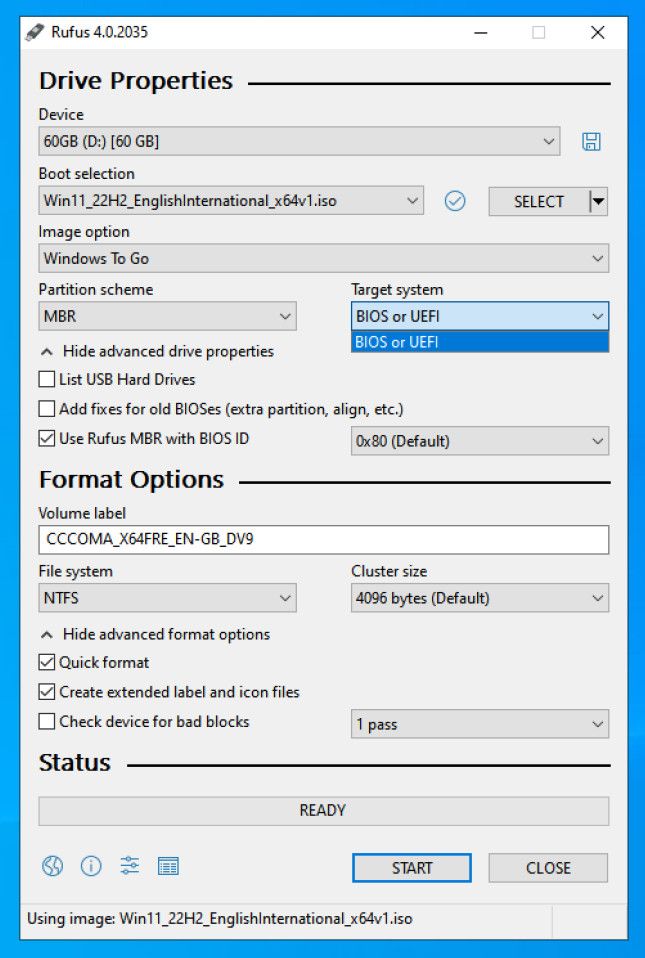
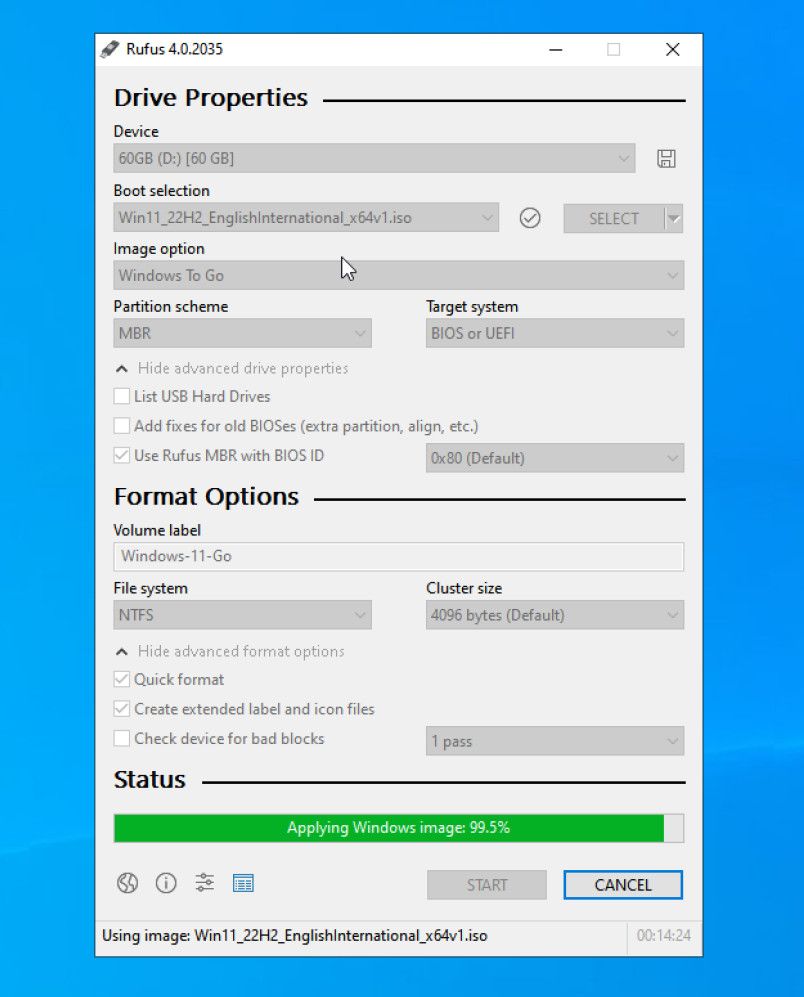
Once Rufus is started, it’s time to set up your drive. Select your USB SSD in the Device dropdown box. If the USB drive does not show up, expand Advanced drive properties and check List USB Hard Drives. For Boot selection, since you have already downloaded the image, click SELECT and choose the Windows 11 ISO.
Close
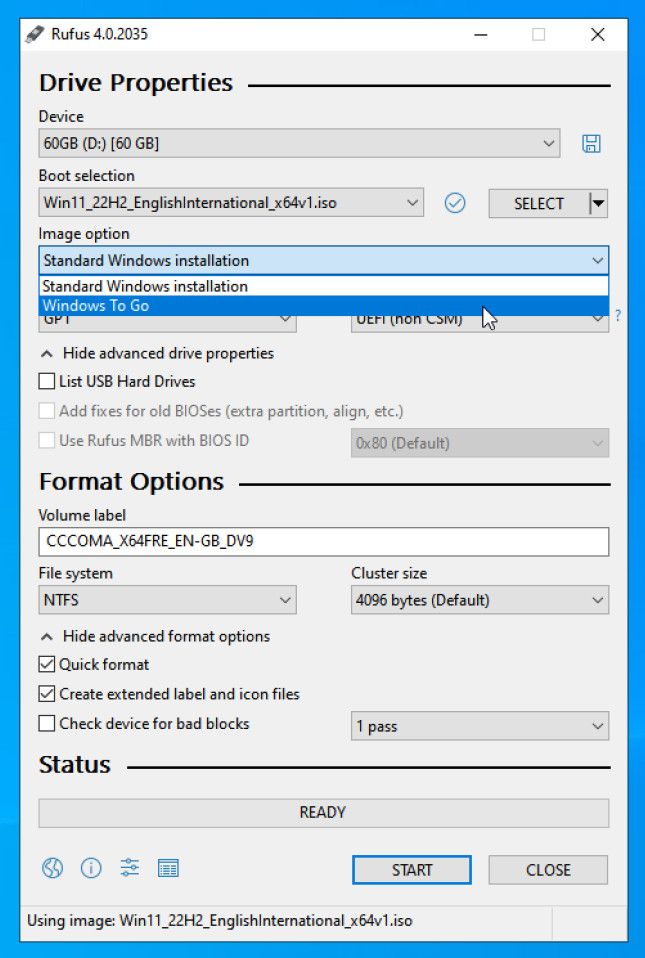
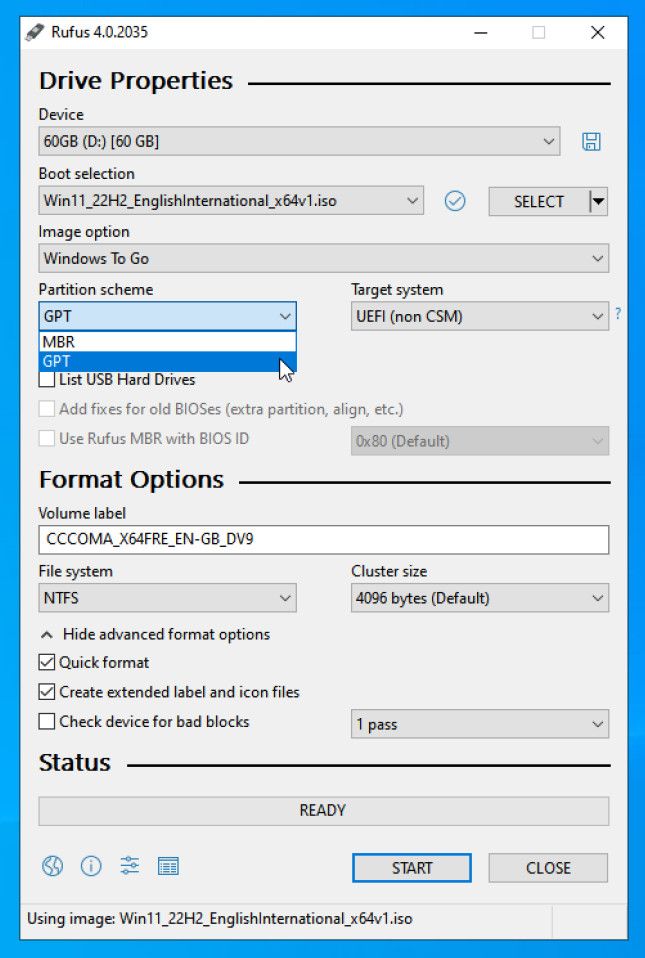
For the Image Option select Windows To Go. This will create a portable installation of Windows 11 that you can use across multiple computers. In the Partition scheme, select GPT if your drive is above 2TB, or select MBR if below 2TB. If your computer does not have UEFI, you need to stick to MBR only. If you don’t know the difference between the two, check out MBR vs. GPT: which should you use?
GPT will work with UEFI only which is different from CSM BIOS. The combination to choose depends upon what your computer has. You should decide it based on the findings during the PC Heath Check.
Close
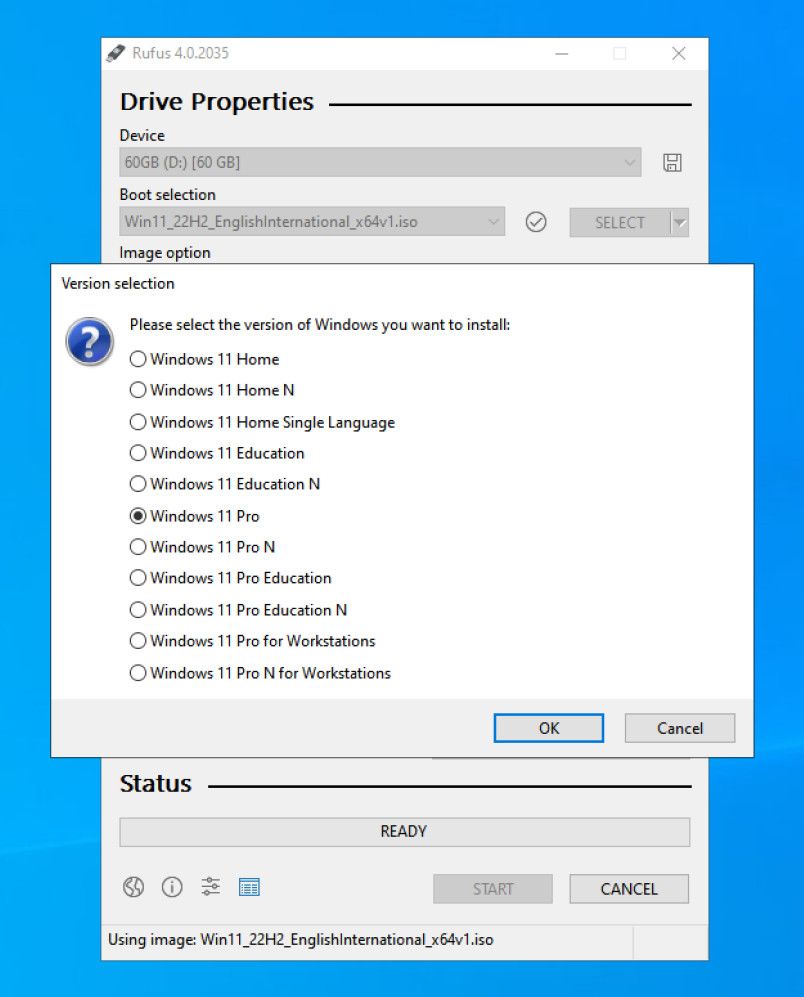
You can leave the rest of the options to their default and click Start. Rufus will then ask you to choose the version of Windows 11. Since you have downloaded the full version, all versions are available for installation. Choose the one that suits your needs.
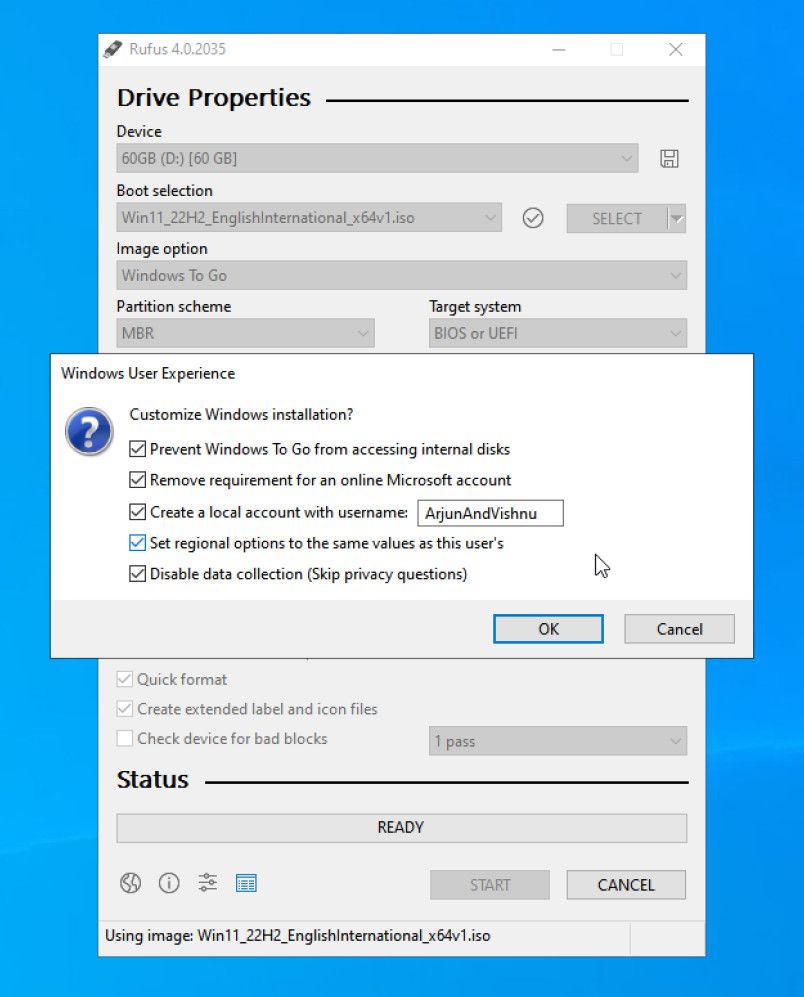
Rufus will present you with more options to customize your installation. Here is the best way to set up Rufus, as it sorts out a lot of issues:
- Select Prevent Windows To Go from accessing internal disks. This will prevent portable media from disturbing the OS on the host machine.
- Select Remove requirement for an online Microsoft account if you don’t like to create one for privacy. This is no longer an option in standard Windows 11 installation, as it requires a Microsoft account.
- Did you not add a Microsoft account? You need a local account then, Create a local account with username as you like.
- Leave the other two options checked as well, this will save time during installation.
 Simple and intuitive video editing
Close
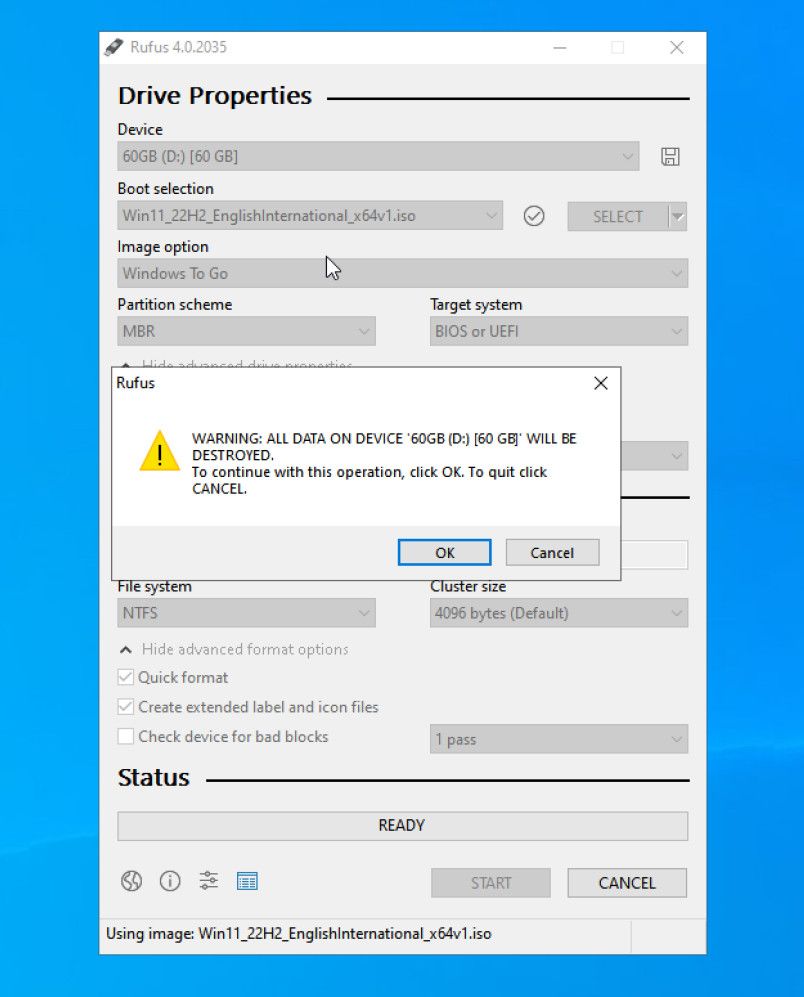
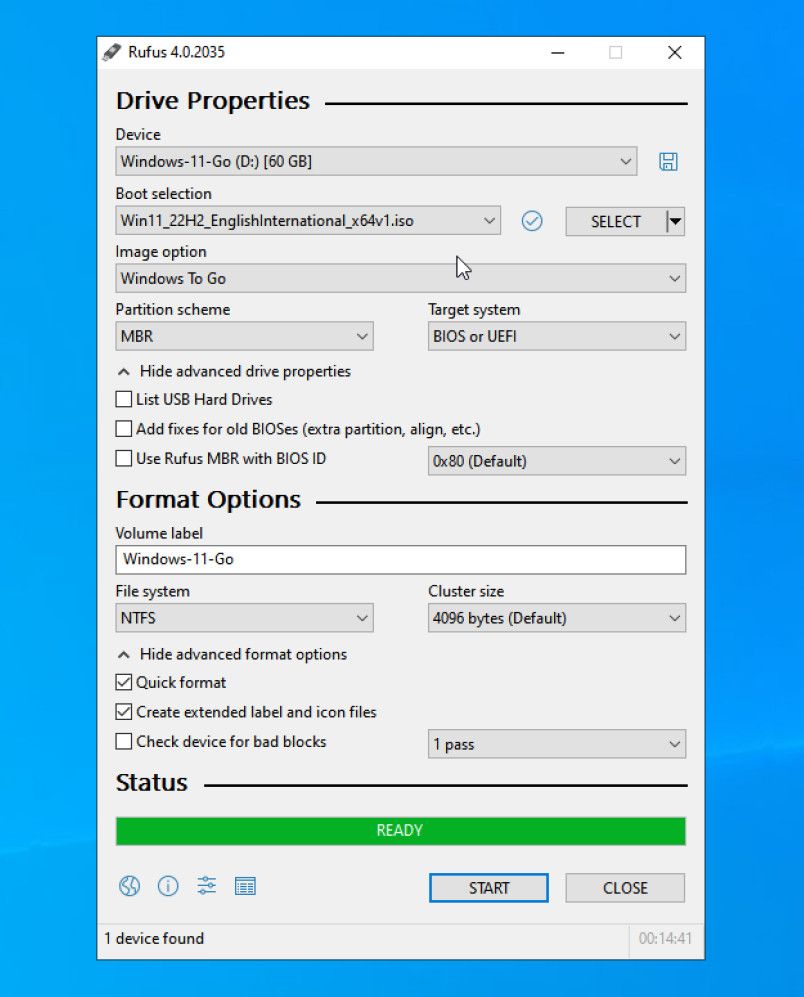
Once you’re ready to go, click Start. Rufus will clear the data on the portable drive, write Windows 11 files, and make the drive bootable. This will usually take around 10 minutes.
Close
When done, close Rufus. If you are going to use Windows To Go on the same computer, reboot it. If you want to use it on another computer, eject the USB device and connect it to the target computer.
How to Set Up Windows 11 to Boot
Enter the UEFI or BIOS menu , it is usually the DEL key on desktops and F2 key on laptops. The screens vary between different computers, adapt these instructions as needed. Go to the Boot tab and set the USB drive as the first boot device. Save and Exit (usually F10).
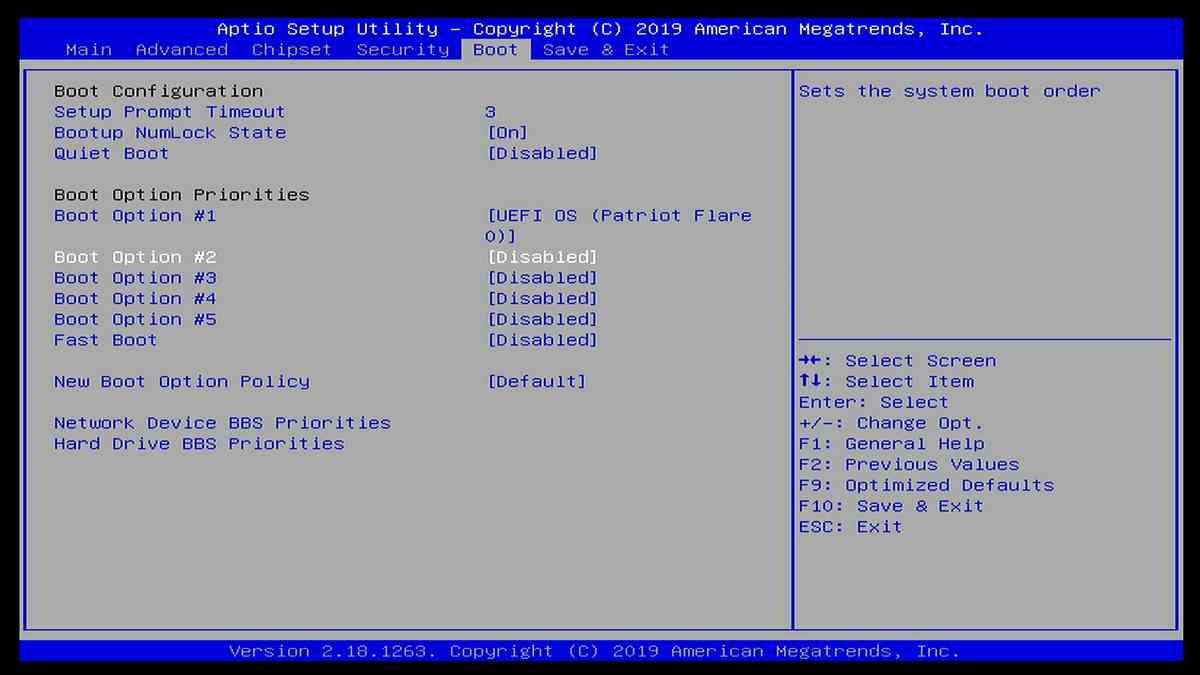
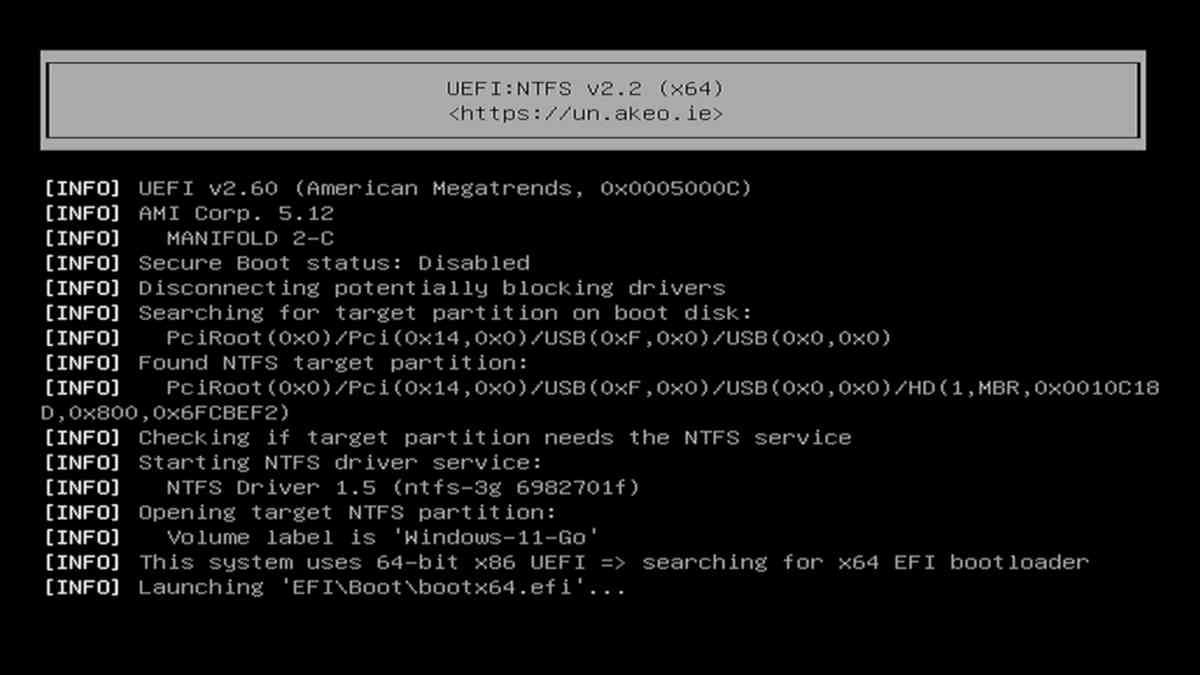
Your computer will boot into Windows To Go. The screen shows that the computer’s Secure Boot is off, it does not have the TPM either.
 PCDJ Karaoki is the complete professional karaoke software designed for KJs and karaoke venues. Karaoki includes an advanced automatic singer rotation list with singer history, key control, news ticker, next singers screen, a song book exporter and printer, a jukebox background music player and many other features designed so you can host karaoke shows faster and easier!
Windows will take a few minutes to set up everything. Since you have already set the regional options and privacy options, the installation will not ask any more questions.

Once done, you have Windows 11, completely functional on a computer that does not meet the minimum system requirements. It will still run A-OK!
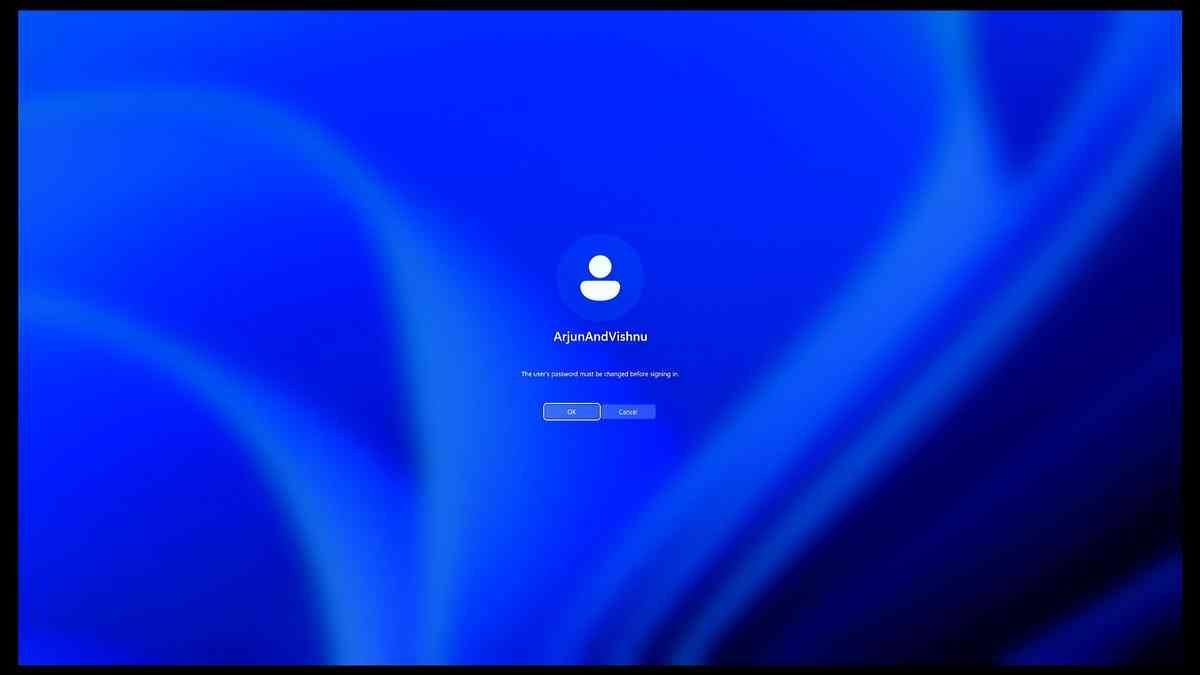
It will also update, as a normal installation would do. There is still one thing you need to do. You did not set the password when you created the username in Rufus. This is important for security.
To set the password, open Settings > search for Change your password > click Password and change it.
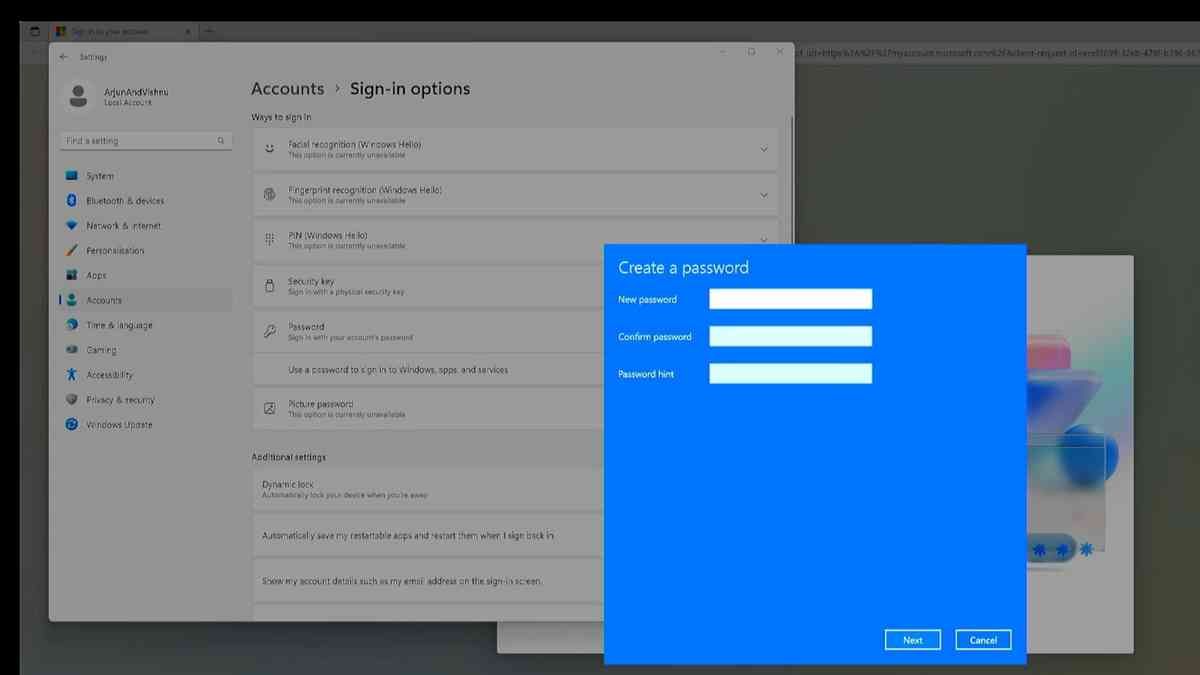

If you didn’t do that, Windows 11 will compel you to do it at the next reboot anyway.

How to Use the Right Hardware for Windows To Go
Windows 11 on a USB drive will work well, exactly as it would on an internal drive, provided the disk speeds are up to the mark. As such, it’s a good idea to ensure you’re using the right ports and drives to ensure the quickest experience possible.
SSDs Are Always a Better Choice
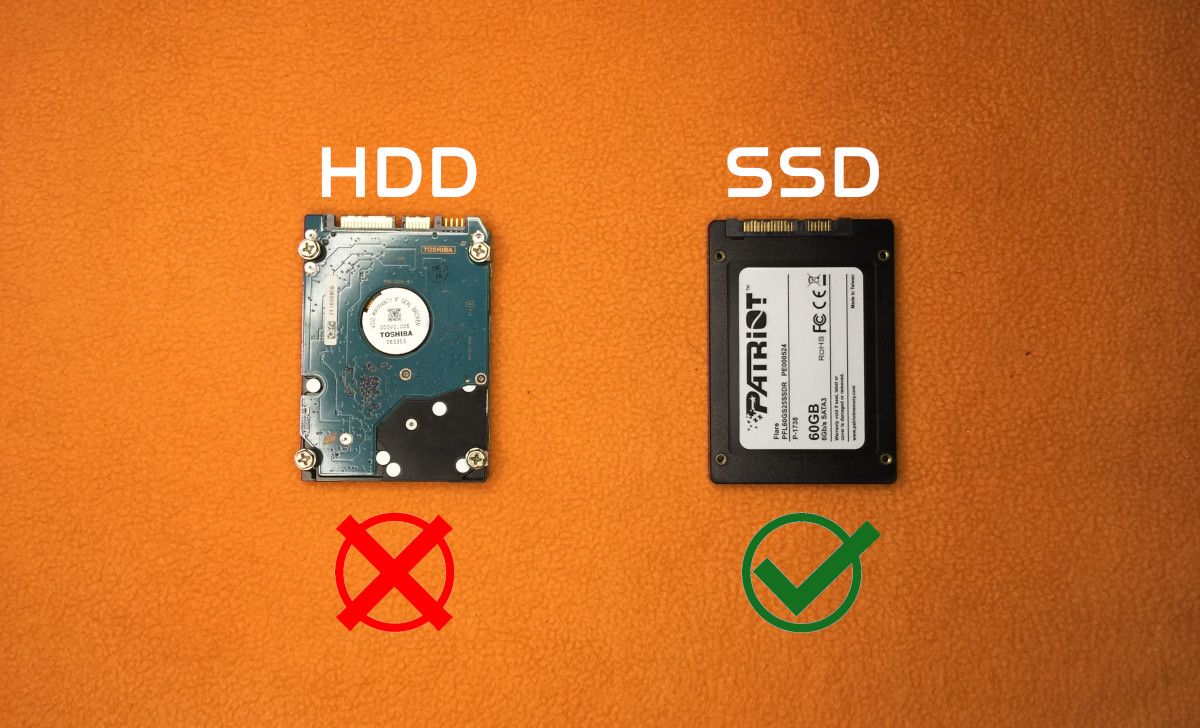
Solid state drives (SSD) have no moving parts in them. This makes them very fast compared to hard disks (HDD) which use spinning disks.
Operating systems use plenty of small files, and SSDs shine at the read/write speed of these files. Hard disks, in contrast, need more time to seek the files. This is shown via the access time of each drive; SSDs take 1ms, and hard disks take 20ms. As such, you should always choose an SSD to store your operating system if you can.
USB 3.0 Is 10 Times Faster Than 2.0
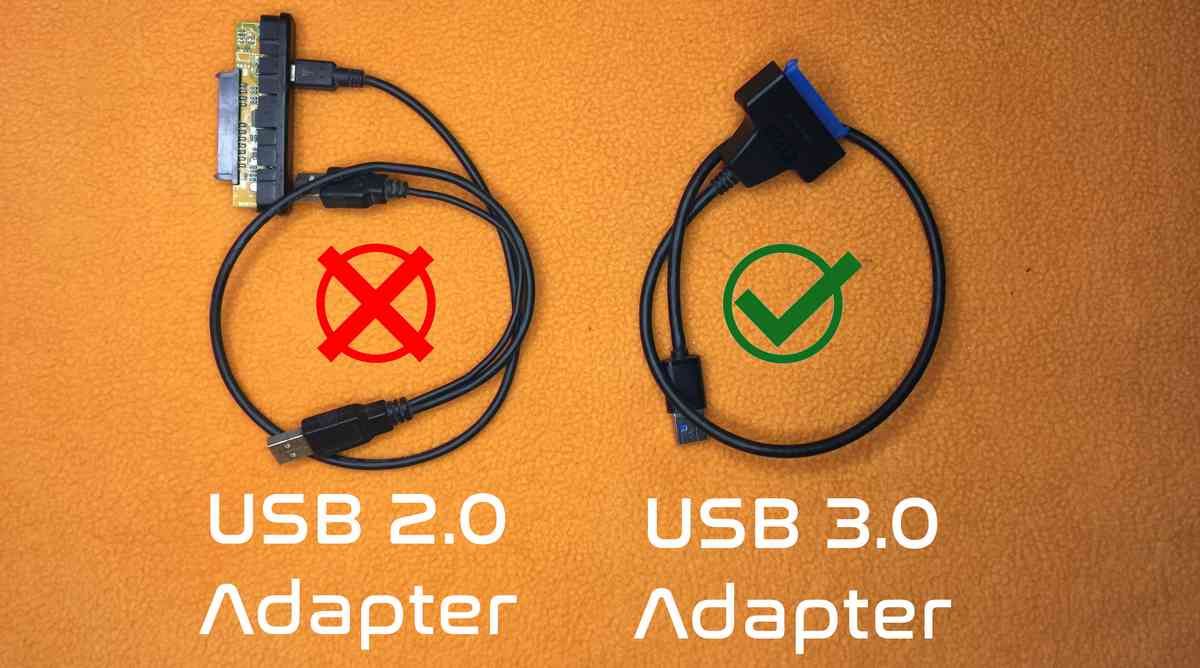
USB 3.0 read/writes at 5Gbps compared to USB 2.0 which can do only 480Mbps. So, you should use a USB 3.0 to SATA adapter.
Use the USB 3.0 Port on Your Computer

 Power Tools add-on for Google Sheets, 12-month subscription
Identify the 3.0 port on your computer. It is usually blue. You can also use USB-C ports which usually are USB 3.0 or above.
Important Things to Know About Windows 11 To Go
Before you use Windows 11 To Go, keep in mind these important things:
- Drives with Windows To Go will not boot as internal disks. If you remove the SSD from the USB to SATA adapter and connect it to an internal SATA port, the PC will not boot from it.
- The disk is portable across different computers—if they have the same configuration. For example, if one computer has NVIDIA graphics with an already installed driver, the same disk will not boot on other hardware. In such case, you need to boot in safe mode and reset the drivers.
- Bypassing the system requirements is not a good idea overall. Some of the features in Windows 11 provide additional security for your computer. You may need those if the computer is at risk of cyberattacks. However, this may be a good last resort if you’re worried about Windows 10’s loss of support.
Extend Your PC’s Life With Windows 11 To Go
Some say that aging hardware kills a computer. But that’s not the usual case. Chromebooks in perfect condition are getting discarded because of the lack of software updates. The same will happen with the PCs that are running Windows 10, the ones that are incompatible with Windows 11. Bypassing the system requirements can give your computer a new lease of life.
There is a way to bypass these requirements and install Windows 11 on any powerful computer, even if it is old. The process is quite simple as well.
- Title: Crafting a Modern Interface in Retro Machines - Guide to Windows 11, To Go & Rufus
- Author: Richard
- Created at : 2024-08-16 01:50:38
- Updated at : 2024-08-17 01:50:38
- Link: https://win11-tips.techidaily.com/crafting-a-modern-interface-in-retro-machines-guide-to-windows-11-to-go-and-rufus/
- License: This work is licensed under CC BY-NC-SA 4.0.