Creating a Quick & Easy Context Menu Alert for Auto-Check System Updates

Creating a Quick & Easy Context Menu Alert for Auto-Check System Updates
Microsoft regularly releases patch updates for both Windows 10 and 11 every month. These patch updates typically address security vulnerabilities and fix Windows bugs and issues. Although those updates are usually automatically installed, sometimes your PC will miss the memo. And sometimes, the update itself is an optional download.
To ensure your Windows 11/10 PC has all the patch updates available for it, it’s a good idea to check for new ones via Settings. The Windows Update tab includes a Check for updates button. You can add a shortcut for that tab to the desktop’s context menu with the method below.
Disclaimer: This post includes affiliate links
If you click on a link and make a purchase, I may receive a commission at no extra cost to you.
Add a Check for Updates Shortcut to the Context Menu
Windows 11 doesn’t include any built-in options for adding shortcuts to the desktop’s right-click context menu. However, you can still add a Check for Updates shortcut for the Windows Update tab to that menu by manually editing the registry . Once done, you can open the Windows Update tab directly from the desktop’s context menu.
To add that context menu shortcut, edit the registry as follows:
Right-click the Start button and select the Run shortcut to launch that accessory.
Open the Registry Editor by typing regedit in the Open box and clicking OK.
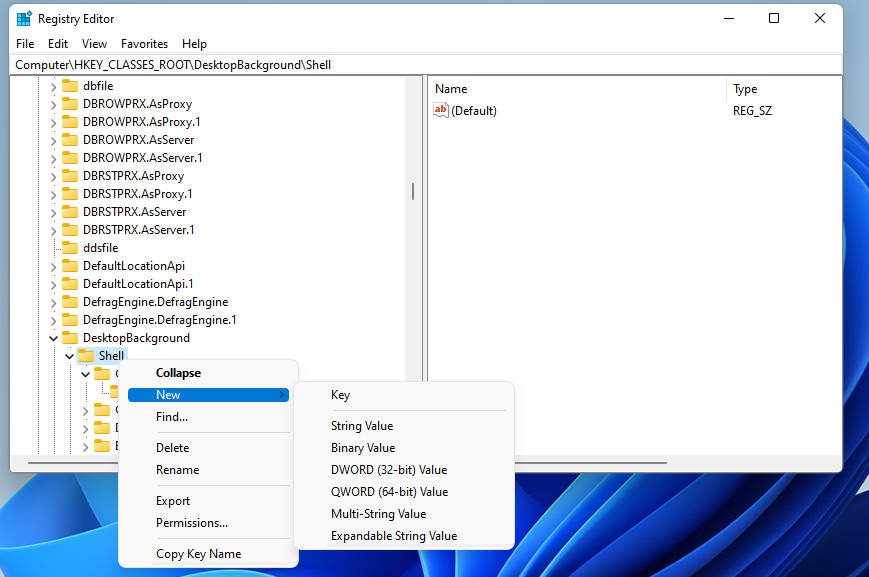
Then navigate to the Computer > HKEY_CLASSES_ROOT > DesktopBackground > Shell registry key.
Right-click the Shell key to select the New submenu option.
Select the Key option.

Type Check for Updates to be the new key’s name.
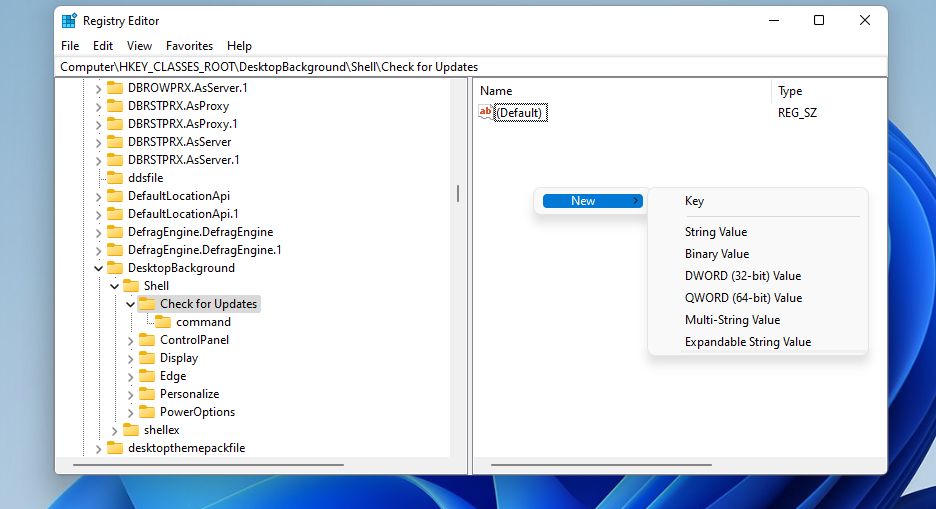
Right-click the Check for Updates key and select New on the context menu.
Click the Key option again.
Now input command for the new key’s name.
Select the Check for Updates key, and then right-click a space on the right side of the Registry Editor to select New > String Value.

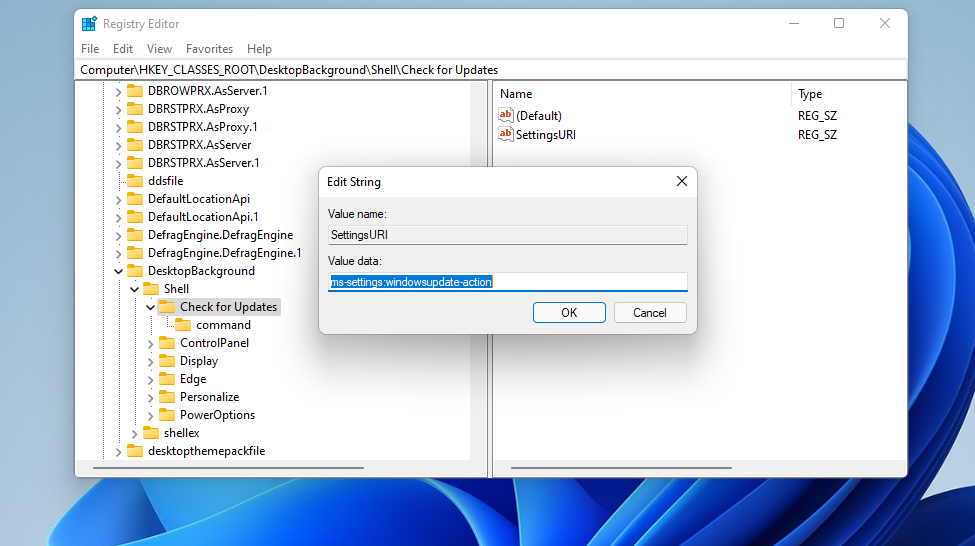
Type SettingsURI to be the new string’s name.
Double-click SettingsURI to open an Edit String window.
Type ms-settings:windowsupdate-action within the Value data box, and click OK.

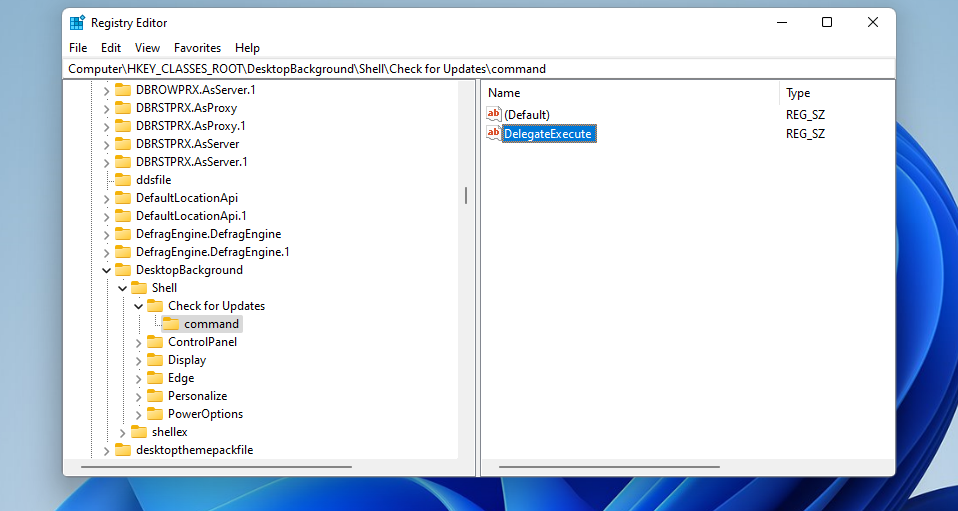
Right-click the command key and select the New > String Value options.
Enter the string title DelegateExecute, and press the Return key.

Double-click the DelegateExecute string to bring up its Value data box.
Type {556FF0D6-A1EE-49E5-9FA4-90AE116AD744} in the Value data text box, and press the OK button.
Close the Registry Editor’s window.
Now right-click an area of your Windows 11 desktop and select Show more options to bring up the classic context menu. If you’ve edited the registry correctly, that menu will include a Check for Updates option. Select that option to open Settings’ Windows Update tab. Then you can click the Check for updates button on that tab.
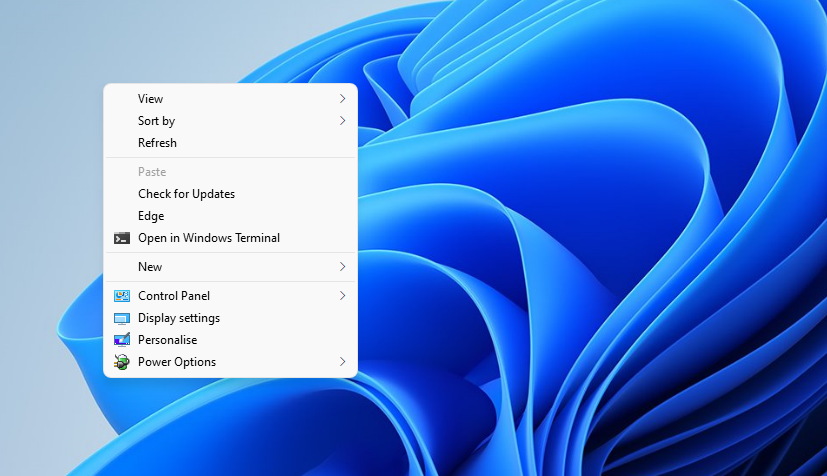
Alternatively, press the Shift + F10 hotkey to bring up the classic context menu without right-clicking the desktop. That keyboard shortcut opens the classic context menu at the top left of the desktop. Then you can select Check for Updates from there to bring up the tab shown below.
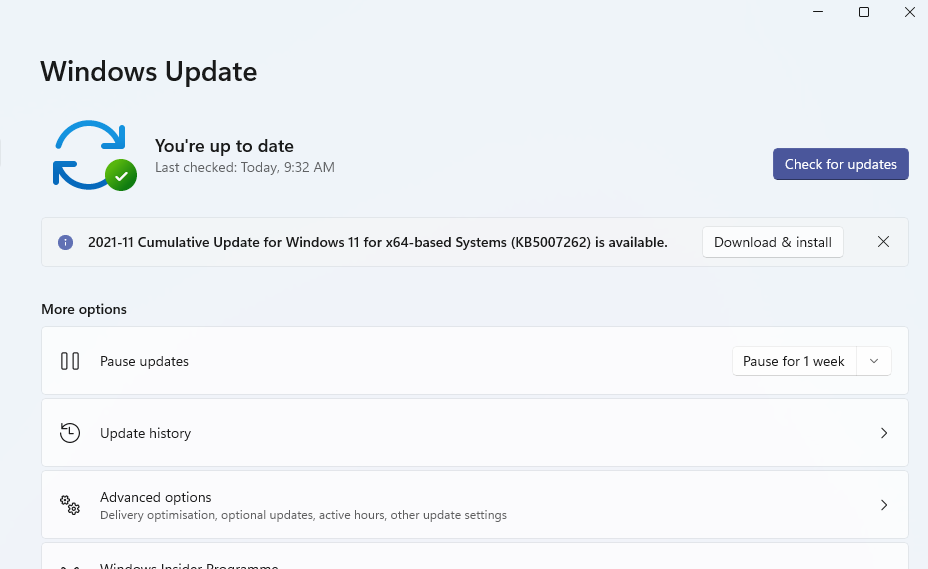
This registry trick works much the same on Windows 10. The only difference is that you won’t need to select Show more options. As Windows 10’s desktop context menu is the classic one, it doesn’t include Show more options. You can select Check for Updates on its primary context menu.
If you ever want to remove the Check for Updates shortcut from the context menu, open the Shell key in the Registry Editor again. Then right-click the Check for Updates key to select Delete.
Add a Windows Update Submenu to the Context Menu With Winaero Tweaker
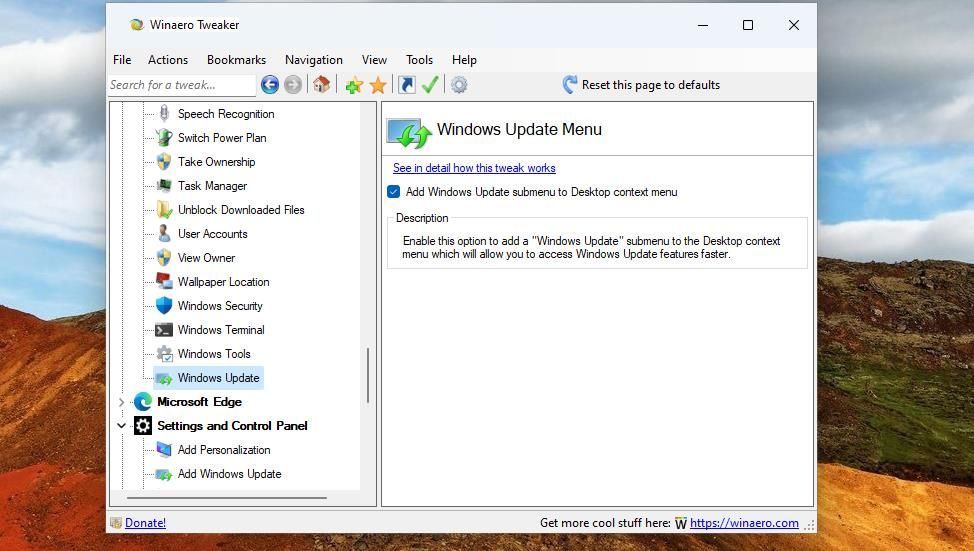
Winaero Tweaker is a freely available customization software for Windows with which you can customize the context menu in many ways. That software has an option you can select to add a Windows Update submenu to the context menu, which includes a Check for updates shortcut. This is how you can add a Check for updates shortcut to the desktop’s right-click menu with Winaero Tweaker:
- Go to this Winaero Tweaker webpage in your browsing software.
- Next, click the Click here to download file link.
- Install and run the Winaero Tweaker software with the downloaded setup file. This Winaero Tweaker customization guide includes full installation instructions for that software.
- Double-click the Context menu category within Winaero Tweaker’s left sidebar.
- Click on the Windows Update setting.

- Select the Add Windows Update submenu to Desktop context menu option.
Now look at the new Windows Update submenu on the desktop’s context menu. Press Shift + F10 to view the classic context menu. Move the cursor over the Windows Update submenu to view its options. There you can select a Check for updates option to bring up the Check for updates button.
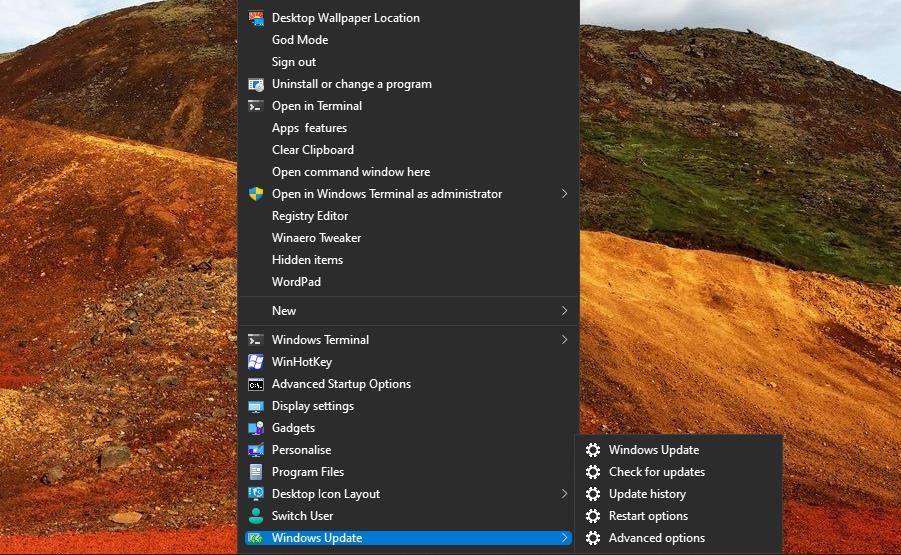
The Windows Update submenu also has four other shortcuts to update settings. Click Update history to view the installed update list. Or select Advanced options to bring up the additional settings for updates. The Restart options shortcut opens the settings for scheduling update times.
Winaero Tweaker also has a customization option for adding a Windows Update shortcut to the Control panel. To access that option, click Settings and Control Panel > Add Windows Update in Winaero Tweaker’s sidebar. Click the Add Windows Update to Control Panel\System and Security checkbox to select that option.
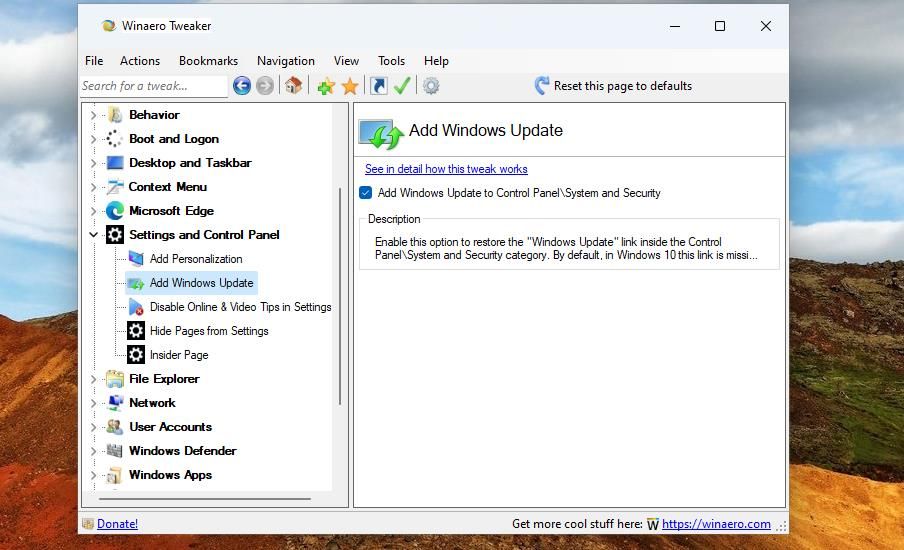
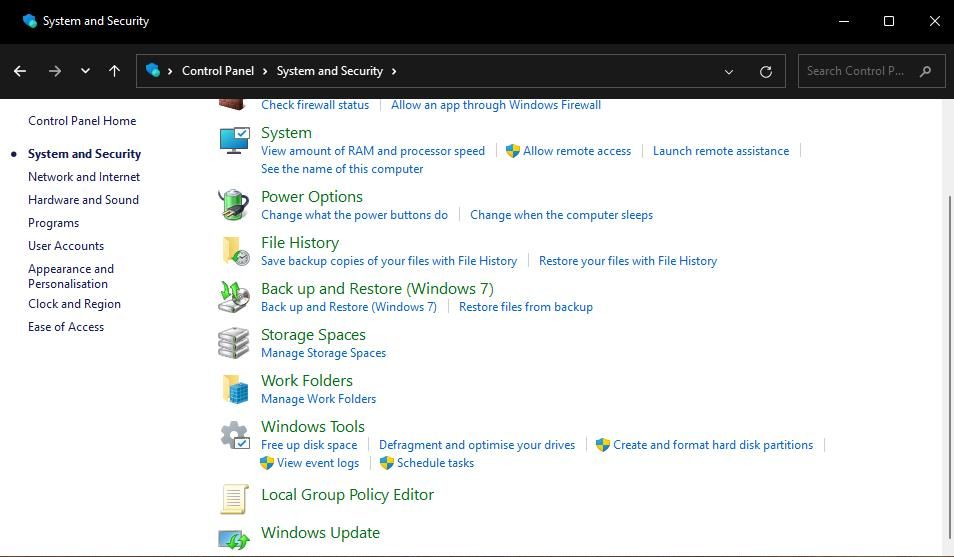
Then you’ll see a Windows Update shortcut within the Control Panel. Open the Control Panel and click the System and Security category. Clicking the Windows Update shortcut there will open the Settings tab with the Check for updates button.
Keep an Eye Out For New Windows Updates
So, now you can select a handy Check for Updates shortcut on your desktop’s context menu. That shortcut will save you from having to manually open Settings and its Windows Update tab whenever you need to check for updates. Instead, you can simply click the Check for Updates context menu option to open the update tab directly from the desktop.
Select that shortcut to keep an eye out for new updates regularly. When optional updates are available, you’ll see them listed on the tab with Download and install options. Clicking Check for updates will automatically download and install available updates.
To ensure your Windows 11/10 PC has all the patch updates available for it, it’s a good idea to check for new ones via Settings. The Windows Update tab includes a Check for updates button. You can add a shortcut for that tab to the desktop’s context menu with the method below.
Also read:
- [New] 2024 Approved Streamlining YouTube Videos for Facebook Circulation
- [Updated] Immediate GIF-to-Video Conversion, Top 5 Free Websites
- Approaches to Addressing Critical App Issues
- Break The Ice & Converse Professionally in English
- Configure Touch Input in Windows: Enable/Disable Steps
- Fix Crashing File Explorer on Windows 11 Now
- In 2024, 3 Solutions to Find Your Realme C33 2023 Current Location of a Mobile Number | Dr.fone
- In 2024, How can I get more stardust in pokemon go On Vivo S17t? | Dr.fone
- New 2024 Approved From Basic to Brilliant Adding FCP X Effects in 3 Easy Steps
- Resolving Error Code 30015-26 in M365 for Windows Computers
- The Path to Reinstating Default Windows Backups
- Top 10 Best AI Chatbots: Excellent Alternates to ChatGPT
- Troubleshoot Missing 5GHz Network on Windows 11: Top 7 Solutions
- Ultimate Guide to Free PPTP VPN For Beginners On Infinix Hot 40i | Dr.fone
- Windows 11 Folder Customization - Adding Move/Copy Context Functionality
- Title: Creating a Quick & Easy Context Menu Alert for Auto-Check System Updates
- Author: Richard
- Created at : 2024-10-03 01:30:01
- Updated at : 2024-10-09 02:38:51
- Link: https://win11-tips.techidaily.com/creating-a-quick-and-easy-context-menu-alert-for-auto-check-system-updates/
- License: This work is licensed under CC BY-NC-SA 4.0.
