Decoding and Correcting Windows Restore Error 0X80042306

Decoding and Correcting Windows Restore Error 0X80042306
The error code 0x80042306 occurs when attempting to create a restore point in Windows. It prevents the creation of new restore points in the system and typically occurs when your system does not have sufficient free space, there is a problem with the Volume Shadow Copy service (VSS), or a background process is conflicting with the restore utility.
Below, we talk about the different troubleshooting methods you can try to fix the system restore error 0x80042306 in Windows. We recommend booting into the administrator account before you proceed.
Disclaimer: This post includes affiliate links
If you click on a link and make a purchase, I may receive a commission at no extra cost to you.
1. Make Sure You Have Sufficient Space
Restore points require free space on the disk they are stored. This amount of space required by a restore point typically depends on on the size and complexity of your system configuration.
If you do not have sufficient space on the disk, the restore utility is likely to return a 0x80042306 error. This is why, we recommend getting started by making sure that enough free space for the System Restore to function correctly. You can delete unnecessary items to increase the space manually, oruse the Disk Cleanup utility that is offered by Microsoft by default.
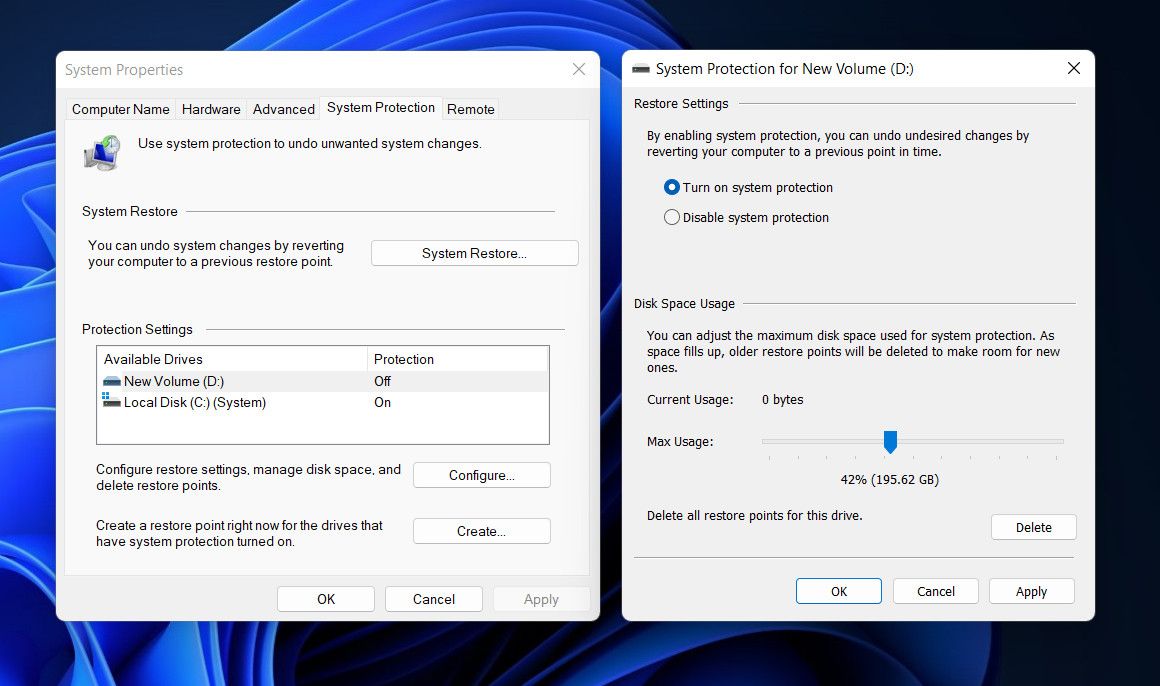
Alternatively, you can also increase the amount of disk space allocated for System Restore in the System Protection settings. Here is how you can do that:
- Type “Create a restore point” in the Windows search utility and clickOpen .
- In the following dialog, head over to theSystem Protection tab.
- Click on theConfigure button and use the Max usage to slider to adjust the disk percentage according to your preference.

- ClickApply >OK to save the changes.
Once the changes are made, check if you can now create a restore point without any issues.
2. Restart the Volume Shadow Copy Service
You might also be facing the problem if the Volume Shadow Copy service is disabled or simply not functioning properly.
This service allows the creation of backup copies for files and volumes in Windows. It is used to by the restore utility to create snapshots of the items that are being backed up and if it fails to work due to any reason, you might encounter the problem at hand.
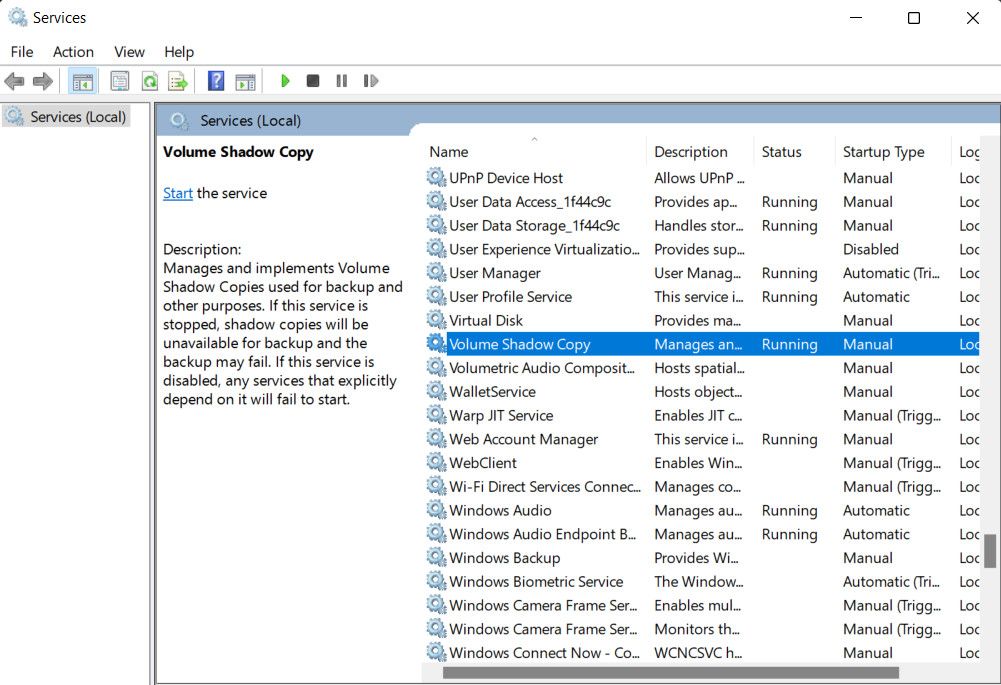
To ensure this service is working properly, you can restart it using the Services utility. Follow the steps below to proceed:
- Press theWin +R keys together to open Run.
- Type “services.msc” in Run and clickEnter .
- In the services window, scroll down to locate theVolume Shadow Copy service and right-click on it.

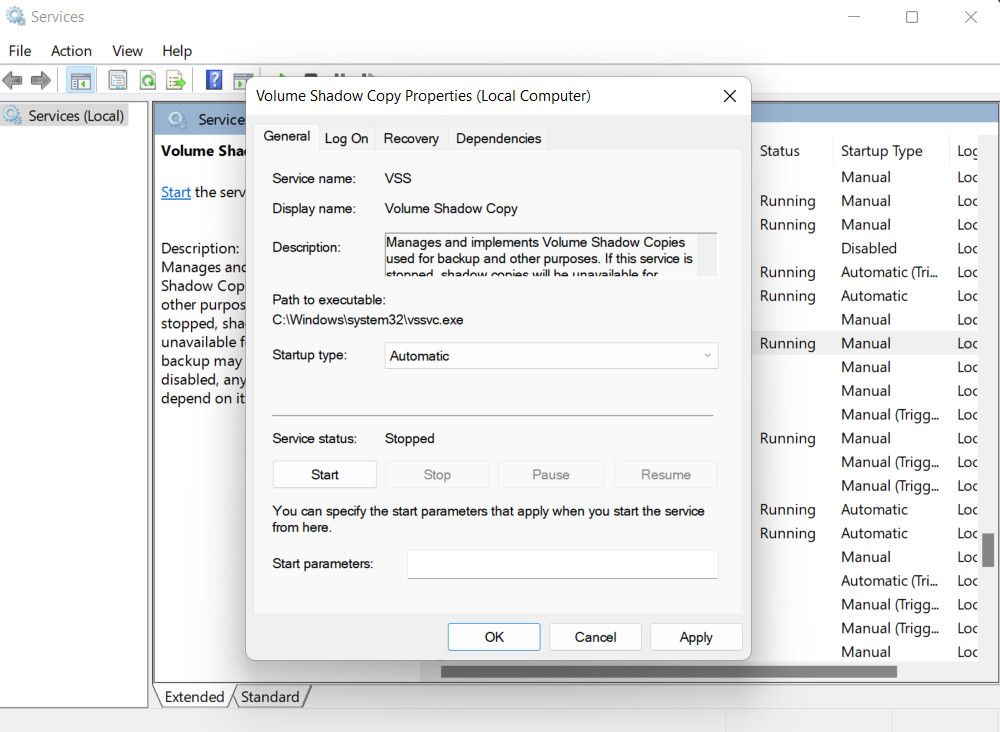
- ChooseProperties from the context menu.
- Now, click on theStop button, wait for a few seconds, and hitStart again.
- Make sure the Startup type is set toAutomatic .

- Finally, clickApply >OK to save the changes.
Do the same for the Windows Backup service and check if the issue is resolved.
3. Re-Register VSS Components
If restarting the Volume Shadow Copy service did not work, then you can also try re-registering the VSS components via Command Prompt.
Here is how to proceed:
- Press theWin +R keys together to open Run.
- Type “cmd” in Run and press theCtrl +Shift +Enter keys together to open Command Prompt as an administrator.
- ClickYes in the User Account Control prompt.
- Now, execute the following commands one by one:
`cd /d %windir%\system32net stop vssnet stop swprvregsvr32 /s ole32.dllregsvr32 /s oleaut32.dllregsvr32 /s vss_ps.dllvssvc /registerregsvr32 /s /i
swprv.dllregsvr32 /s /i eventcls.dllregsvr32 /s es.dllregsvr32 /s stdprov.dllregsvr32 /s vssui.dllregsvr32 /s msxml.dllregsvr32 /s
msxml3.dllregsvr32 /s msxml4.dllvssvc /registernet start swprvnet start vss`
5. Once you have re-registered VSS components, close Command Prompt and try creating a restore point again.
If an issue within the VSS components was causing the problem, restarting the components should fix it.
4. Create a Restore Point in Safe Mode
In some cases, a conflicting background process can also prevent the System Restore utility from creating a restore point successfully. The best way to ensure there are no applications or programs in the background interrupting the functionality of System Restore, try creating a restore point in Safe Mode.
This mode launches Windows with a minimal set of drivers and services, which can help isolate the issue and prevent any conflicts that may be occurring in normal mode.
Here is how you can boot in Safe Mode:
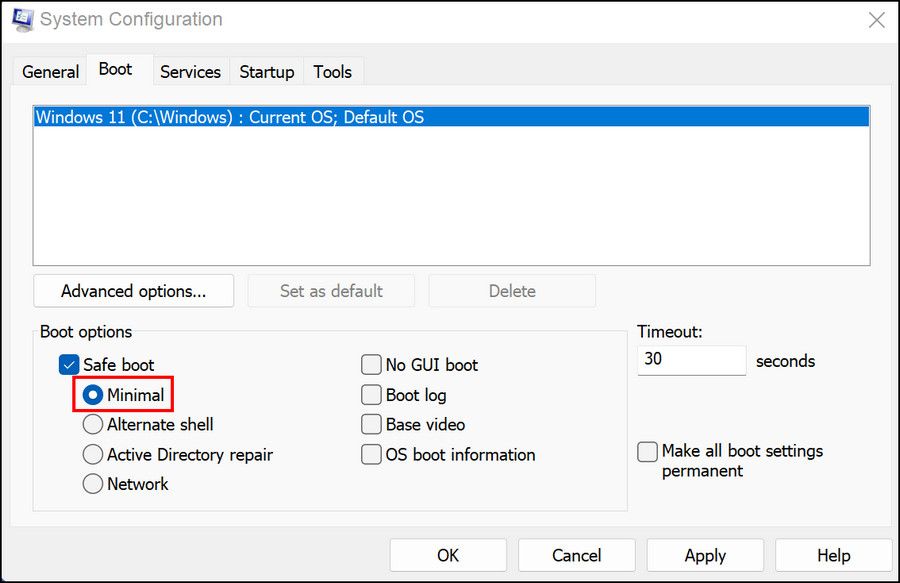
- Type “System Configuration” in Windows search and clickOpen .
- Head over to theBoot tab and under Boot Options, checkmark the Safe Boot option.
- ChooseMinimal and click onApply >OK to save the changes.

You can now restart your computer and upon reboot, you should enter the Safe Mode automatically. Try recreating a restore point and check if the problem is resolved.
5. Scan the System For Corruption Errors
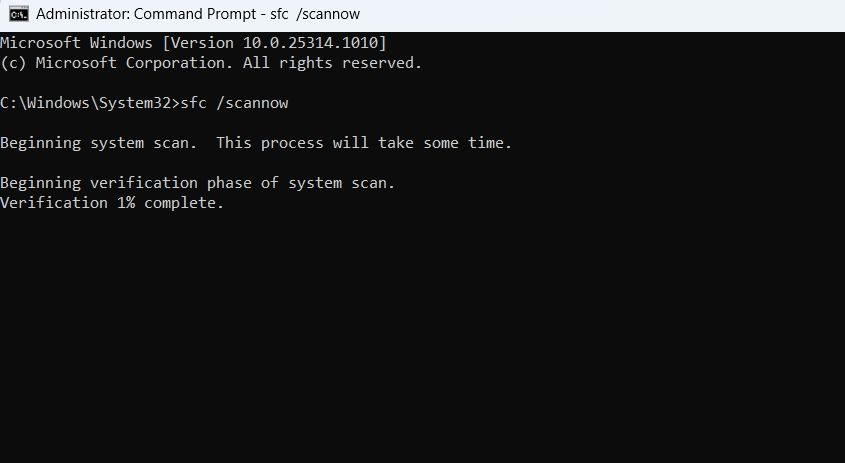
The System Restore utility itself might be dealing with a corruption error, which is preventing it from functioning properly.
To fix any corrupt system files, we suggest using the System File Checker (SFC) and Deployment Image Servicing and Management (DISM) tools. SFC works by scanning the protected system files for underlying problems. If an issue is discovered, it will replace the faulty file with its healthier cached counterpart.
DISM, on the other hand, works by repairing corrupt system images. We have a guide onhow to use SFC and DISM in Windows which you can refer to, to perform the steps correctly.
System Restore Back On Track
The System Restore utility in Windows is a powerful tool that can save you from losing important data in case of unexpected system issues. That said, it can be annoying if you cannot create a restore point easily, especially when you are trying to do it before performing a critical action.
By following the methods outlined in this guideline, you can diagnose the error and take necessary steps to resolve it. We recommend making sure all the relevant services stay enabled, and your system is up-to-date to avoid any such issues in the future.
Also read:
- [New] Vimeo to MP4 Conversion Made Simple for 2024
- [Updated] Premier Strategies in Sport Broadcasting Technology
- Crafting Romance: ChatGPT's Role in Dating
- Effortlessly Ripen Access Rights on Windows Files
- Guided Navigation: Changing Settings on Windows Systems
- How to Fix Life360 Shows Wrong Location On Xiaomi 13T? | Dr.fone
- How To Revive Your Bricked Poco X5 in Minutes | Dr.fone
- In 2024, How to Unlock Honor Magic 5 Pro Pattern Lock if Forgotten? 6 Ways
- In 2024, Life360 Circle Everything You Need to Know On Vivo S17e | Dr.fone
- Mastering Printer Control in Modern Windows OS
- Quick Tips and Fixes for When Call of Duty: Warzone Won’t Launch Correctly
- Securing Windows: Autoupdate + AMD GPU Driver Change
- Streamlined Approach to RAM Tuning W11
- Top 5 Competitors to Procreate on Your Windows Device
- Will iSpoofer update On OnePlus Nord CE 3 Lite 5G | Dr.fone
- Win11 Configuration: Three Easy Steps for Users
- Title: Decoding and Correcting Windows Restore Error 0X80042306
- Author: Richard
- Created at : 2024-11-05 14:16:30
- Updated at : 2024-11-06 22:26:06
- Link: https://win11-tips.techidaily.com/decoding-and-correcting-windows-restore-error-0x80042306/
- License: This work is licensed under CC BY-NC-SA 4.0.
