
Effective Techniques for Assigning Row Numbers in MS Excel: A Step-by-Step Guide

Effective Techniques for Assigning Row Numbers in MS Excel: A Step-by-Step Guide
Quick Links
Microsoft Excel provides row headers starting with number 1. But if you have data that you want to number beginning below the first row, these row headers aren’t much help. We’ll show you how to add your own row numbers.
You may want to number rows for an easy way to collaborate and make sure you’re talking about the same data. Or, maybe you want to use a specific sequential series for reference numbers throughout your sheet. You can add numbers like this in Excel using the fill handle or a function. Let’s walk through the options.
Number Rows Using the Fill Handle
By using the fill handle , you can create a series of numbers or letters by dragging through cells. The key to using this method is the pattern you begin with and copy.
For example, if you simply want to start numbering with 1 and go in order, you would enter “1” in the first cell and “2” in the cell below it. This establishes a pattern.
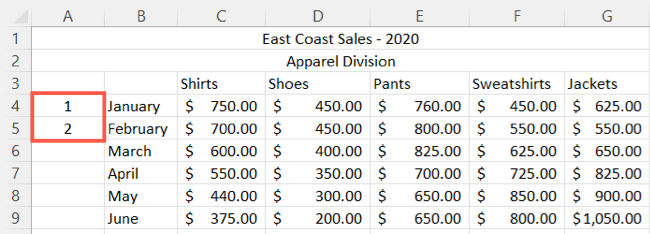
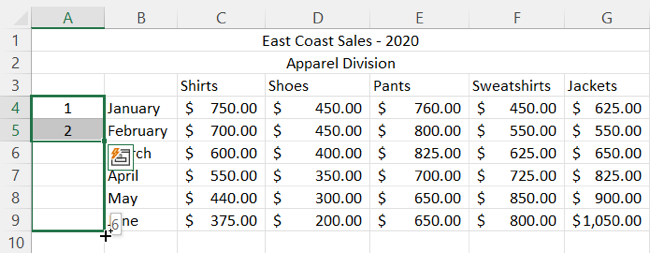
Then, select both cells and drag the fill handle to the subsequent rows. You’ll see a preview as you drag showing the numbers that will populate.
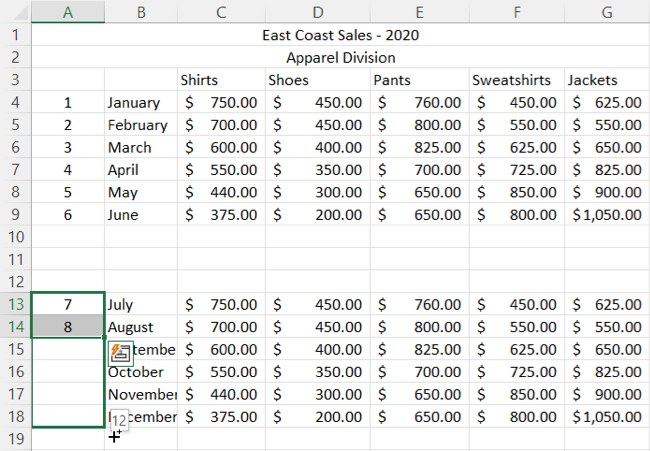
If you have a break in your data and want to continue the numbering after the break, you can do so with the next pattern in the series.
For instance, you may have rows numbered 1 through 6, a break of three rows, and then want to pick up the numbering with 7 for the rest.
Enter “7” in the cell you want to number and “8” in the cell below. Then select both cells and use the fill handle to drag once again. Excel is smart enough to know your pattern and comply.
Number Rows Using the ROW Function
Another way to number rows is using the ROW function. With it, you can also use the fill handle to drag the formula you enter to the remaining rows.
Select the cell where you want to start numbering. If you want to start with the number 1, you would use the A1 cell reference and enter:
=ROW(A1)
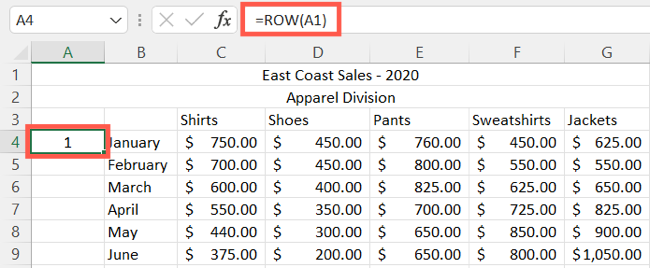
You can then drag the formula to the cells in the rows below. Now if you have a break in your data, like in the example above, you can continue your numbering after the break with this same function.
Go to the cell where you want to pick up the numbering and enter the function with the corresponding cell reference for the number you need. So, if you want to start with number 5, you’d use A5 or if you want to start with number 10, you’d use A10.
For our example, we want to continue with the number 7, so we would enter:
=ROW(A7)

And again, you can then drag the formula to the remaining cells using the fill handle.
Use a Custom Number Series
As mentioned, you can use these methods for numbering rows, but also for reference numbers. Maybe you have product orders, customers, or something similar that you want assign numbers to. For instance, you might want to start numbering as 0001, 0002, and 0003 or 00-001, 00-002, and 00-003.
With the ROW function, you can include the TEXT function to designate the numbering format for the series you want.
As an example, we want to start numbering with 0001. Here is the formula to enter:
=TEXT(ROW(A1),”0000”)
With this formula in the cell, the result would be 0001. The A1 reference assigns a number 1 and the 0000 is the format.
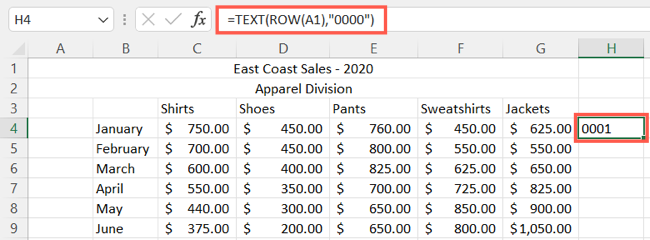
And like the other methods listed here, you can use that convenient fill handle to copy the formula to the cells in the subsequent rows.

To continue numbering after a break, just use the corresponding cell reference as described earlier.
If you’re not fond of the way that Excel uses letters as column headers, did you know that you can change the cell reference style ? Have a look!
Also read:
- [New] 2024 Approved Mastering Mobile and Professional Camera Capture for Impressive IGTV
- [Updated] In 2024, Capture Gameplay Prowess on Android Screens
- Dealing with Erroneous Value Not Found Messages on WinOS
- Discovering 2023'S Best Stories on the Worldwide Web
- Enhancing uTorrent Speed: Overcoming Connectivity Issues in Windows
- How to Change Your Vivo X Fold 2 Location on life360 Without Anyone Knowing? | Dr.fone
- How to Revive Stuck Windows Hibernate Mode
- How to Spy on Text Messages from Computer & Infinix Note 30 5G | Dr.fone
- In 2024, How to Find iSpoofer Pro Activation Key On Infinix Smart 8 Plus? | Dr.fone
- In 2024, How To Unlock Any Realme C33 2023 Phone Password Using Emergency Call
- Personalizing Thumbnail Heights for Images
- Revamp Your Old Videos: Master MadVR Techniques
- Steps to Correct Projector Unresponsive Error
- Steps to Deactivate License Will Soon End” Warning on Win10/W11
- Tiny & Portable: How Much Smaller Is This Apple Vision Pro Case Compared to Original Apple?
- Troubleshooting Non-Functional DVD Drives on Your MacPro, iMac or MacAir - Easy Fixes!
- Unlocking Value in Exercise Gadgets - A Comprehensive Review of the Cost-Effective Fitbit Versa Lite
- Unravel the Mysteries of Your Windows 10 Activity Archive
- WinKey Woes: Resolving Blank Display on Backlit Pads
- Title: Effective Techniques for Assigning Row Numbers in MS Excel: A Step-by-Step Guide
- Author: Richard
- Created at : 2024-11-29 16:34:55
- Updated at : 2024-12-06 22:45:45
- Link: https://win11-tips.techidaily.com/effective-techniques-for-assigning-row-numbers-in-ms-excel-a-step-by-step-guide/
- License: This work is licensed under CC BY-NC-SA 4.0.