
Essential Guide to Updating Username on Windows 11
Essential Guide to Updating Username on Windows 11
Have you got tired of using the same username for a long time? Were you assigned a random username when you created your account, but now you want to add a personal touch? If you want to change your username for any reason, Windows lets you do it easily. In fact, there are numerous ways to go about this. We have listed some of the simplest ones below.
 Video Converter Factory Pro
Before We Get Started…
Keep in mind that the first four methods discussed below can only be used to change the username of a local user account. If you use them to change the username of a Microsoft account, the change will be reversed the next time you restart your device.
So, if you want to change your Microsoft account username, we recommend directly using the last method—changing your username from Microsoft’s website. However, if you want to change the username of a local user account, you can use one of the first four methods mentioned below.
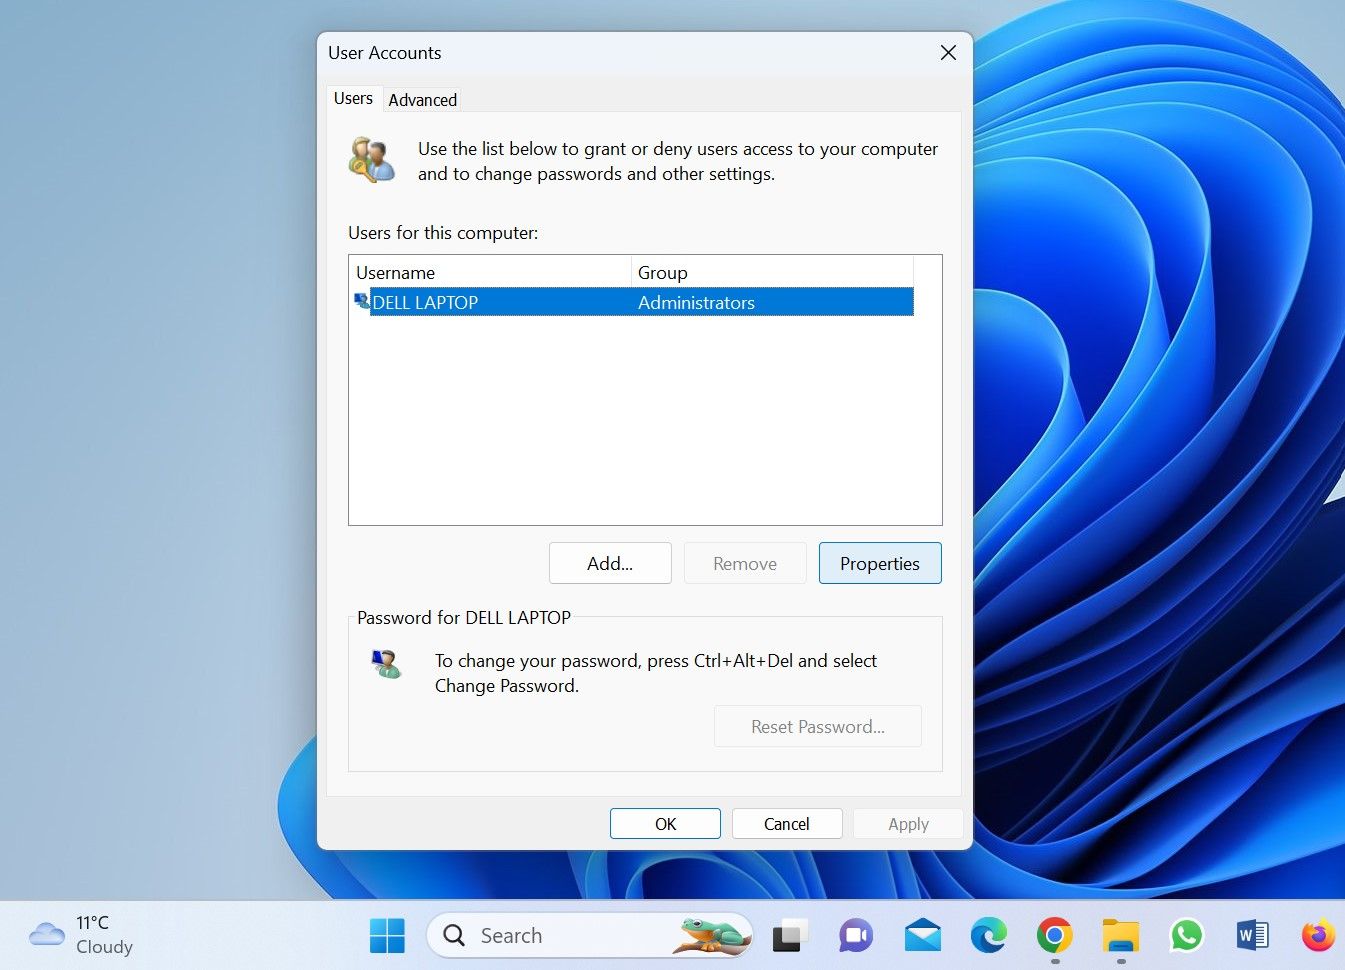
1. How to Change Your Username Using the Control Panel
The Control Panel serves as the central hub in the Windows operating system. From changing the operating system’s appearance to configuring the connected hardware, the Control Panel allows users to tailor the entire OS. Among other customizations, users can change their usernames and manage their user accounts effectively.
To change your username using the Control Panel, follow these steps:
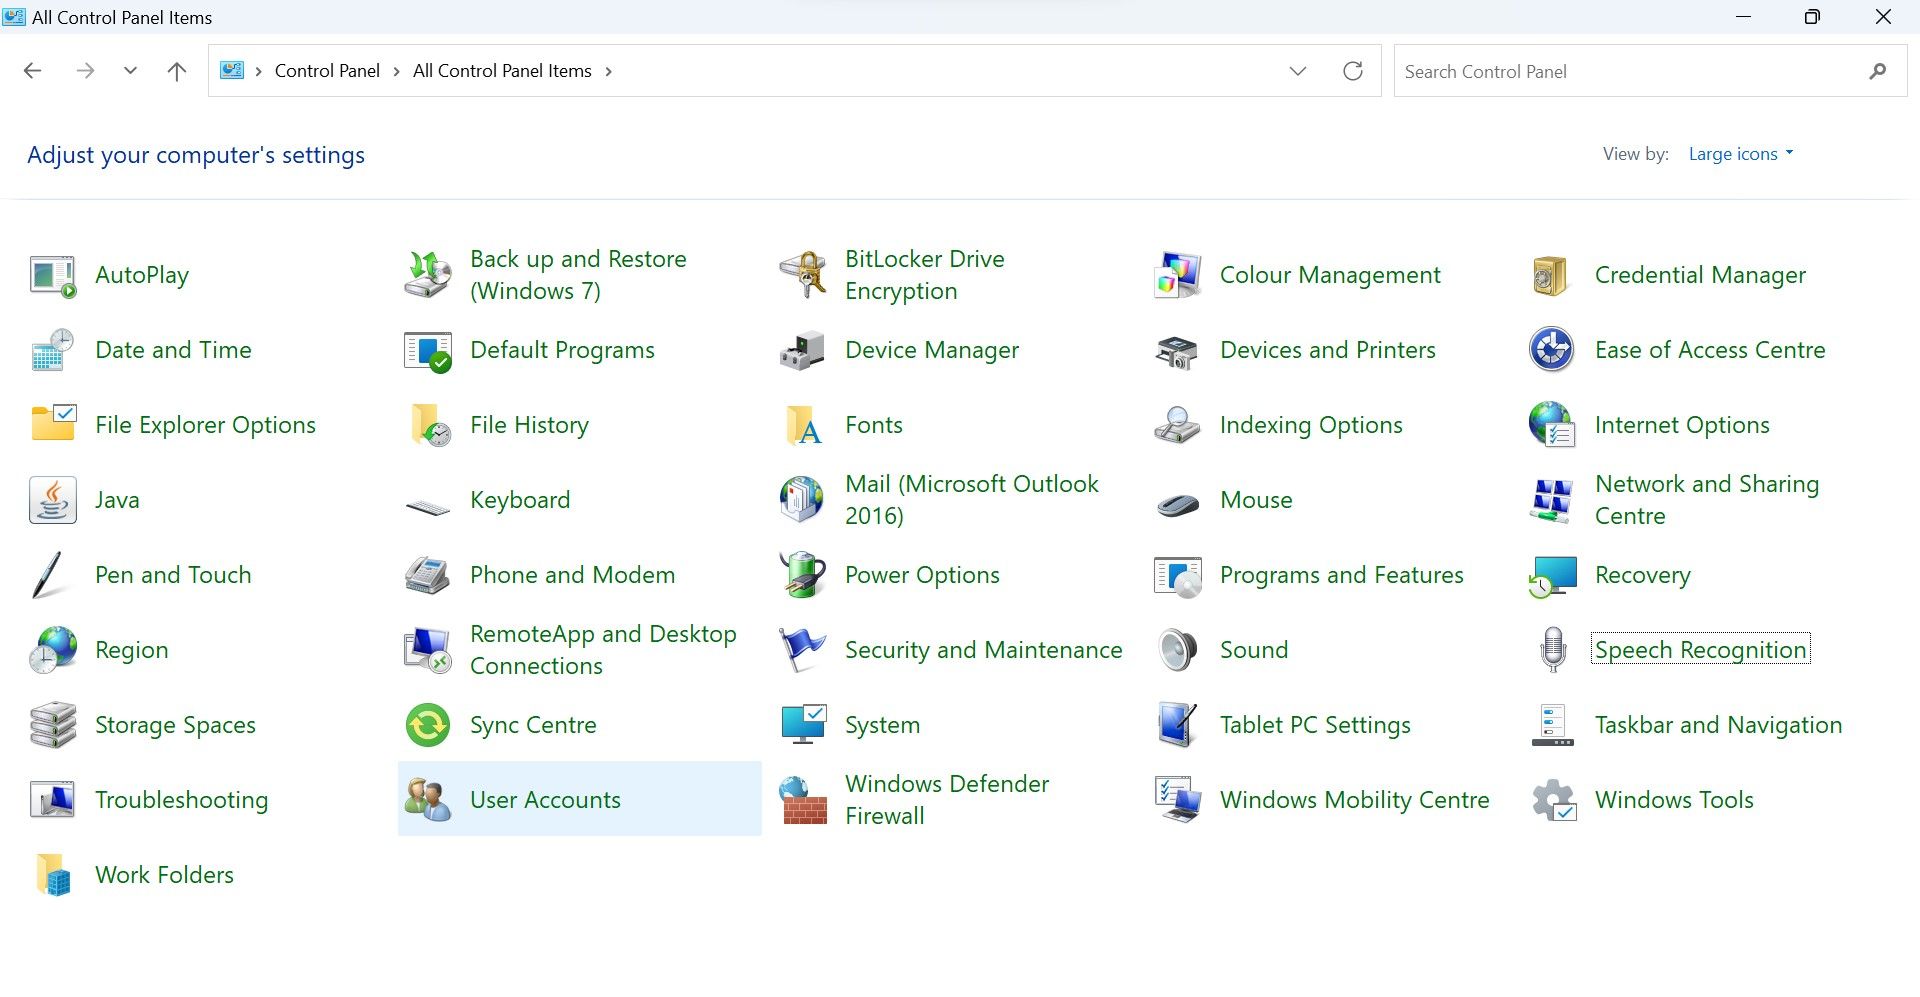
- Type**”Control Panel”** in Windows Search and open theControl Panel app. (Check out other ways to access the Control Panel )
- SelectLarge icons from theView by dropdown menu if it isn’t already selected.
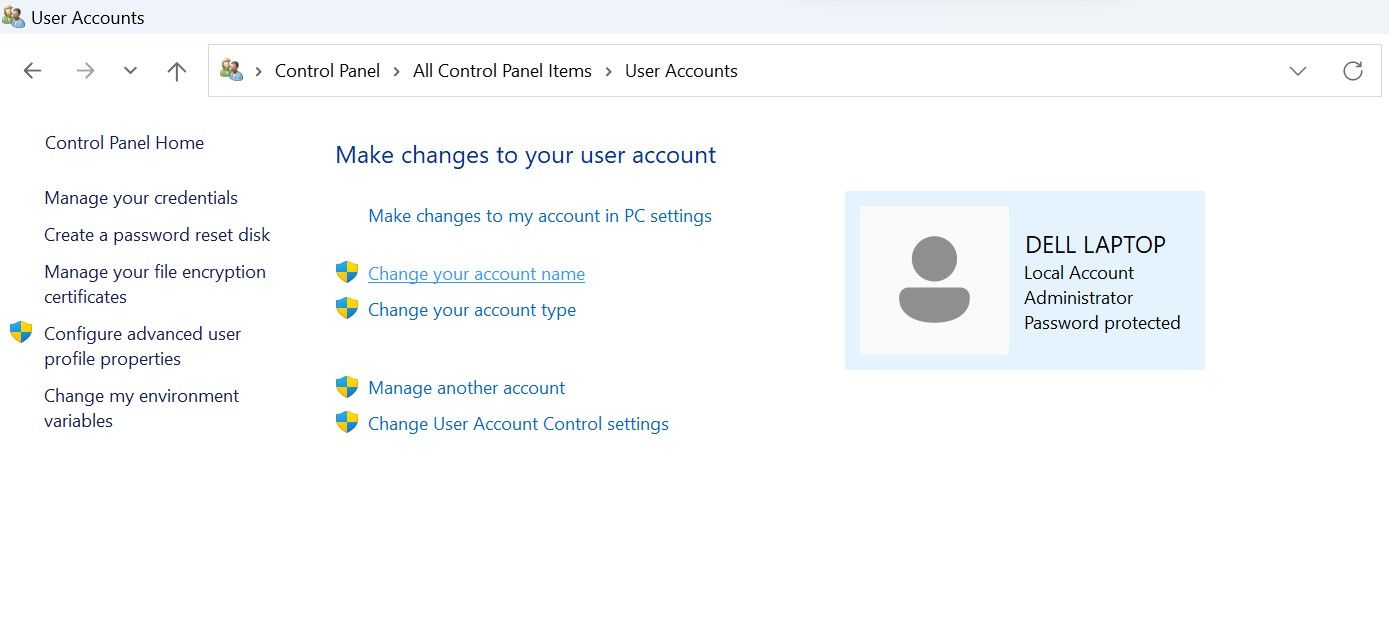
- Go toUser Accounts .

- Click onChange your account name .
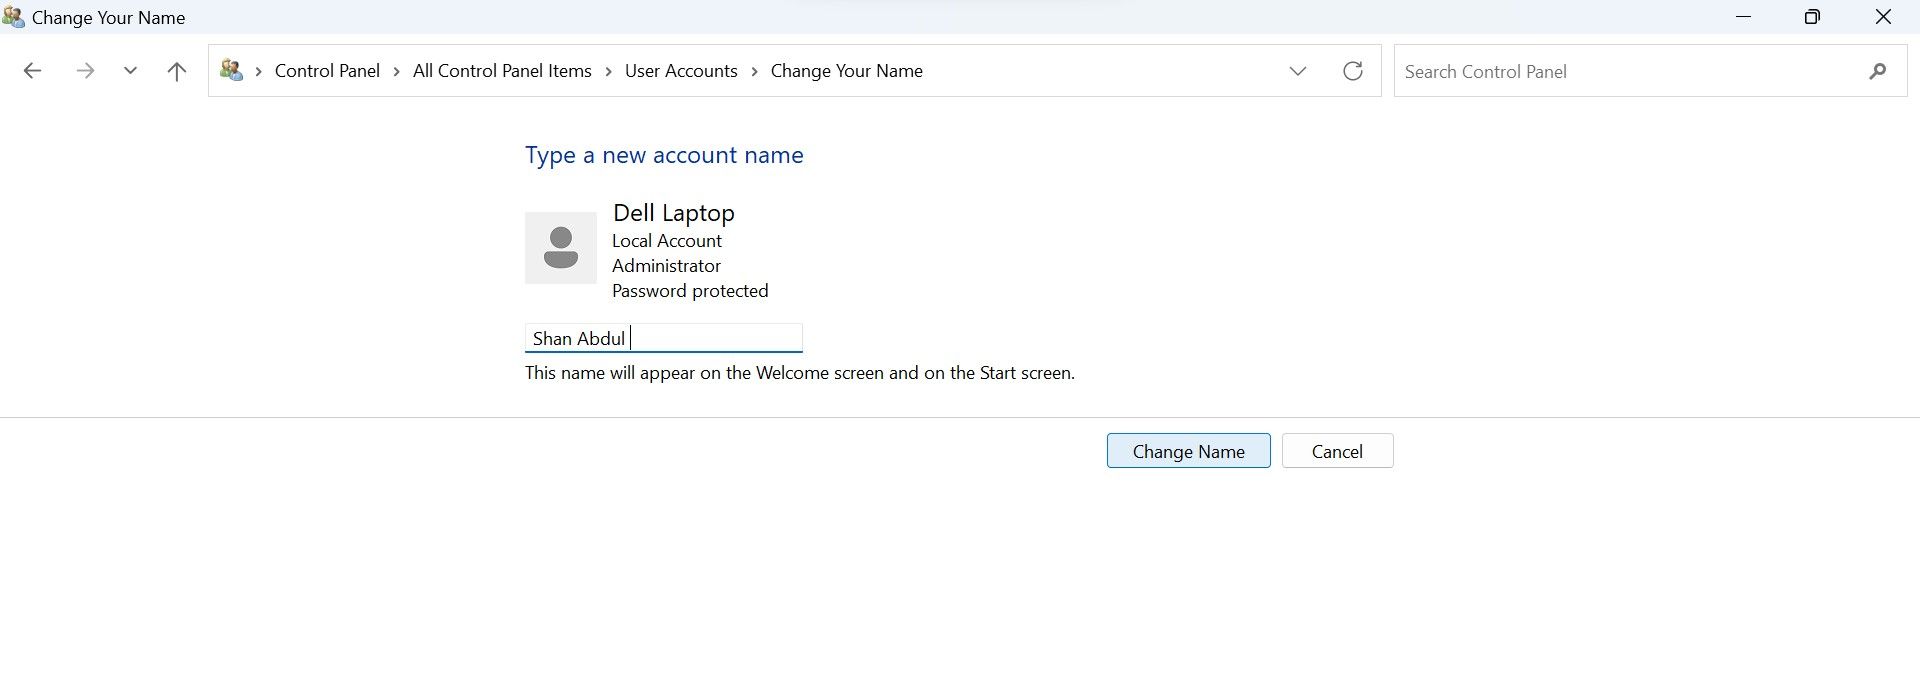
- ClickYes in theUser Account Control (UAC) window.
- In theNew account name field, type your new username.
- After that, click onChange Name .
- For this change to take effect, you need to sign out of your account and sign back in.
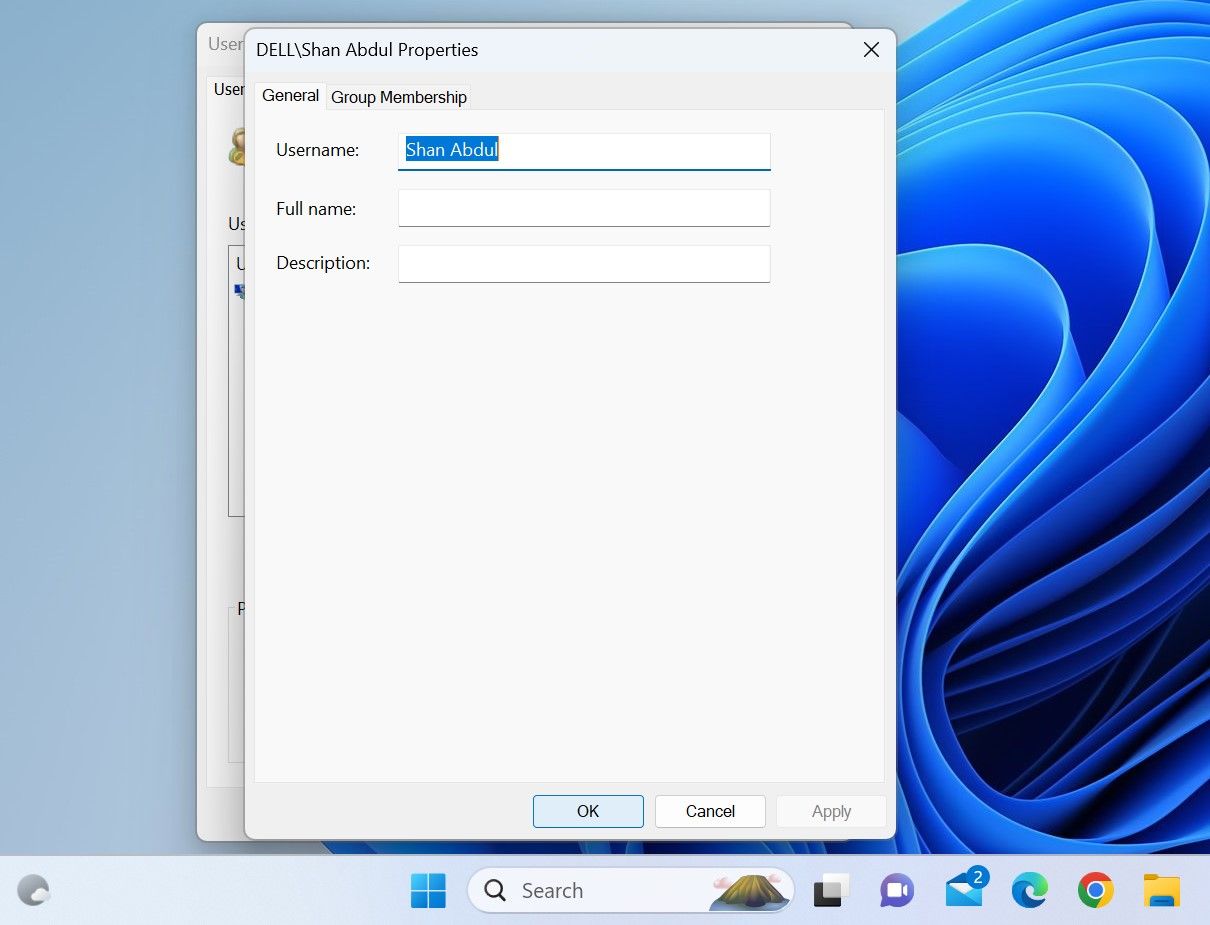
2. How to Change Your Username Using the Run Command
Using the Run command, Windows users can access any location on a computer whose path is known. It eliminates the need to navigate through numerous folders to reach our destination.
Using this utility, we can access the User Accounts settings via a simple command, “netplwiz,” which allows us to access the dedicated account management panel. From there, you can easily change your username.
To change your username using the Run command, follow these steps:
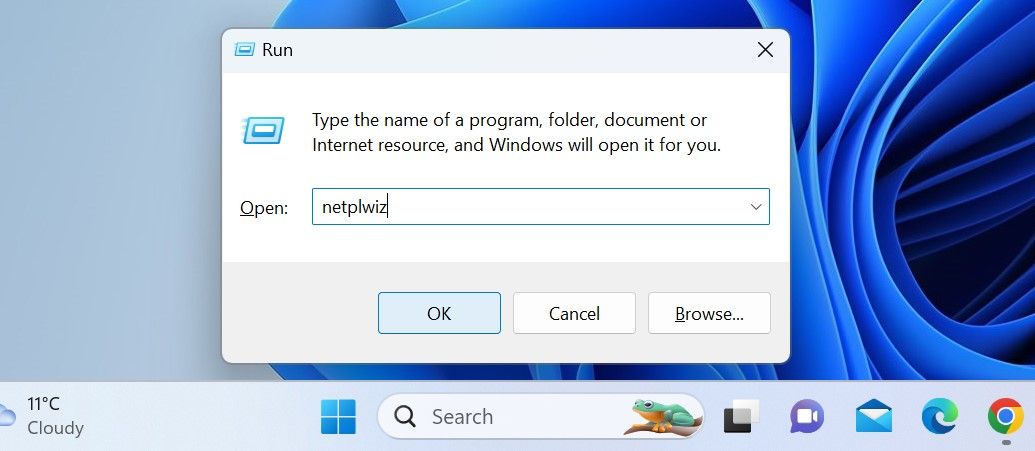
- PressWin + R to launch theRun command .
- Enter**”netplwiz”** in theRun command field and pressEnter .
- ClickYes in theUser Account Control (UAC) window.
- In theUser Accounts window, select the user account for which the username needs to be changed.
- Click onProperties .
- In theGeneral tab, you’ll see your existing username. Rename it to your liking after removing it.
- Once the new username has been added, click theApply button andOK .
- Then, log out of your account, and you’ll be greeted with your new username on the sign-in screen when you sign in.
3. How to Change Your Username From Local User and Group Management Tool
If the “netplwiz” command does not work or gives an error when accessing the user account manager, you can use the local user and group management tool to change the username. This is the easiest way to modify your Windows username, as it allows you to simply rename your username directly—like you rename any folder.
Here’s how to change the username through the local user and group management tool:
- PressWin + R to open the Run command.
- Type**”lusrmgr.msc”** and pressEnter .
OtsAV Radio Webcaster
- Click**”Yes”** in theUser Account Control (UAC) window.
- Select theUsers tab in the left sidebar.
- Find your account in the right pane.
- Right-click the username and clickRename .
Epubor Audible Converter for Mac: Download and convert Audible AAXC/AA/AAX to MP3 with 100% original quality preserved.
- Enter the new username you want to use.
 OtsAV Radio Webcaster
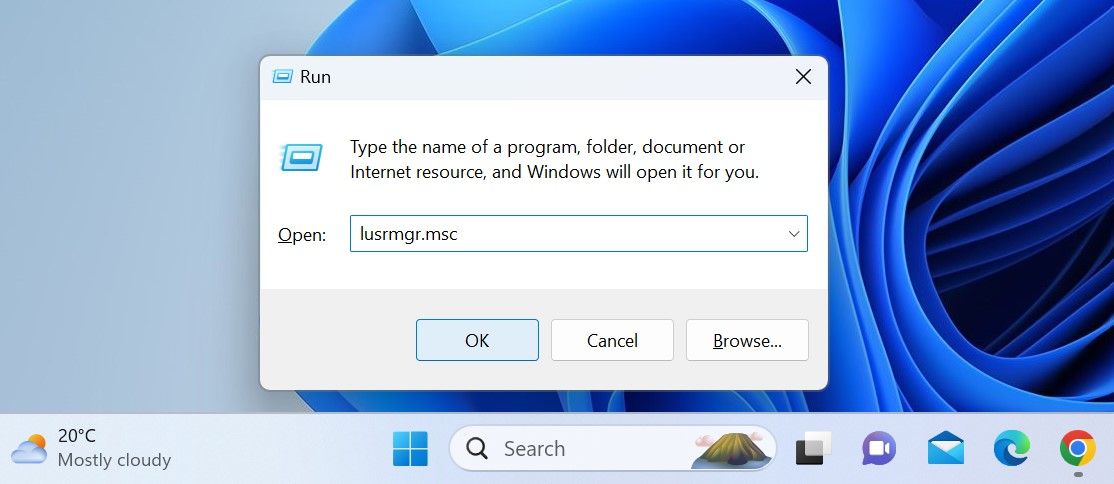
 Epubor Audible Converter for Mac: Download and convert Audible AAXC/AA/AAX to MP3 with 100% original quality preserved.
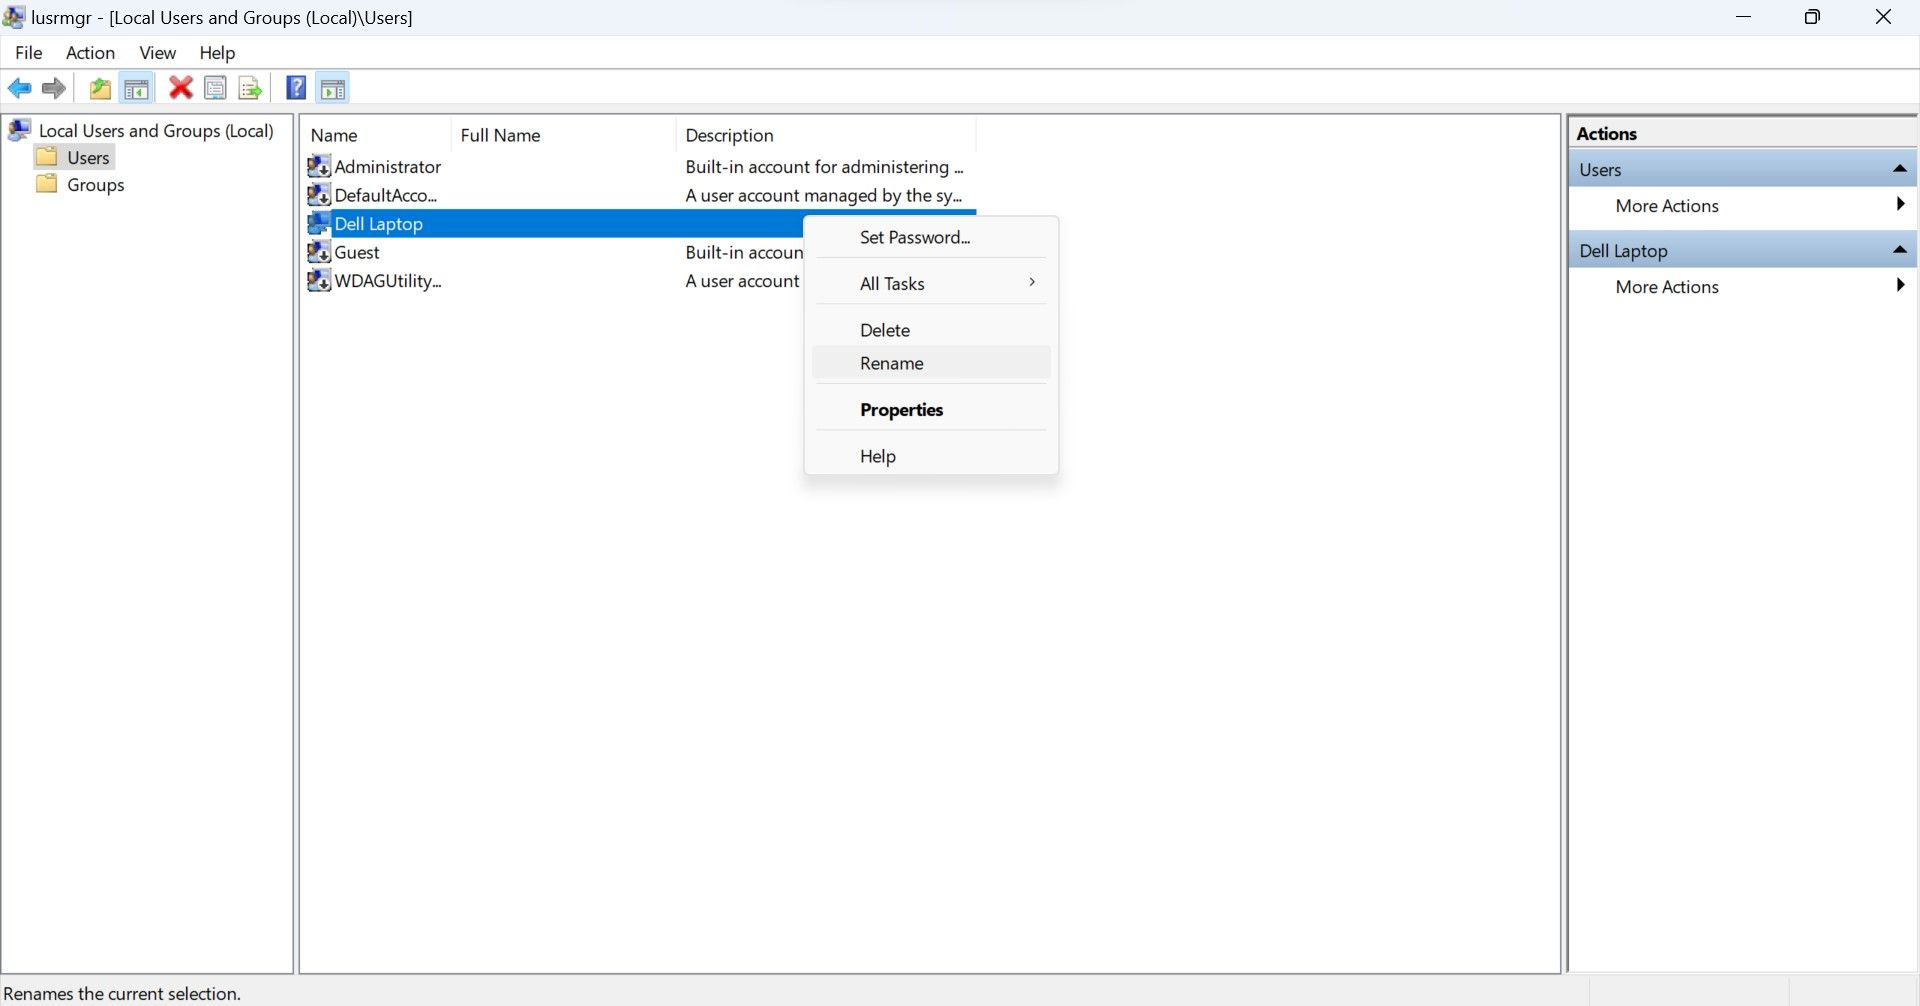
Afterward, close the local user and group management tool, sign out of your account once, and you’ll see your new username on the sign-in screen.

4. How to Change Your Username Using Windows PowerShell
Windows Powershell , an object-oriented automation engine, was designed primarily for IT administrators to automate tasks. Still, its simplicity and ease of use make it worthwhile for laypeople without programming experience.
Using its built-in cmdlets or writing custom scripts, you can make any changes to your Windows device that you usually make via GUI-based applications and settings. You can also change your username using it.
To change your username using the Windows PowerShell, follow these steps:
- Type**”Windows PowerShell”** in Windows Search and open the Windows PowerShell app.
- Type the following command and press Enter to find your current username:
Get-LocalUser - Add the following command after entering your current username and the one you want to switch to:
Rename-LocalUser -Name “Enter your current username” -NewName “Enter the new username” - HitEnter after adding the above command.
ZoneAlarm Extreme Security NextGen
- Then, log back into your account after logging out.
 ZoneAlarm Extreme Security NextGen
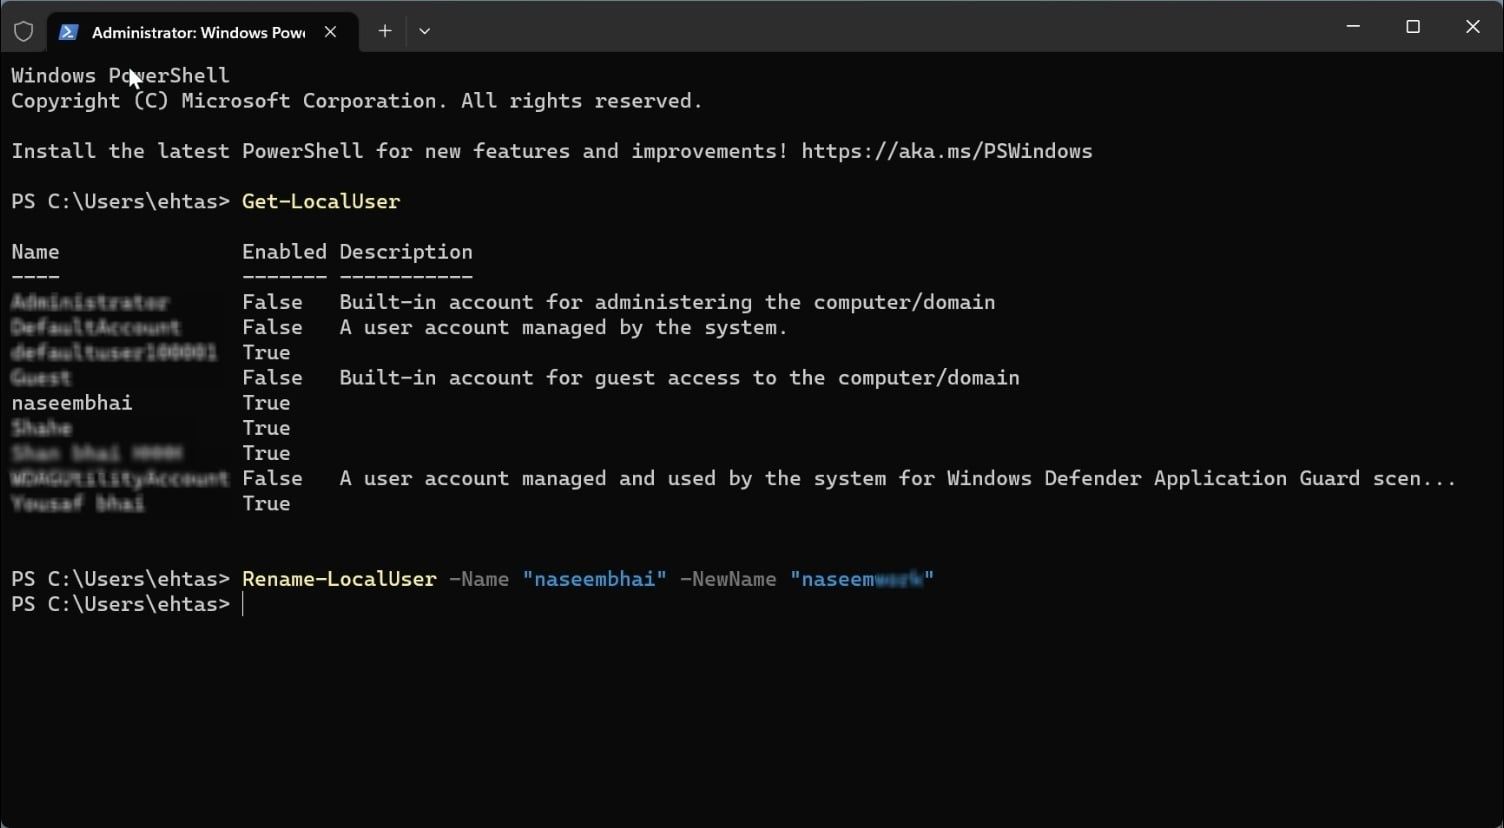
5. How to Change Your Profile Username From the Microsoft Website
If you use a Microsoft account on your computer, change your username on the Microsoft website. To update your profile username on the Microsoft website, follow these steps:
- Go to your account page on the Microsoft website .
- Log in to your account if you haven’t already.
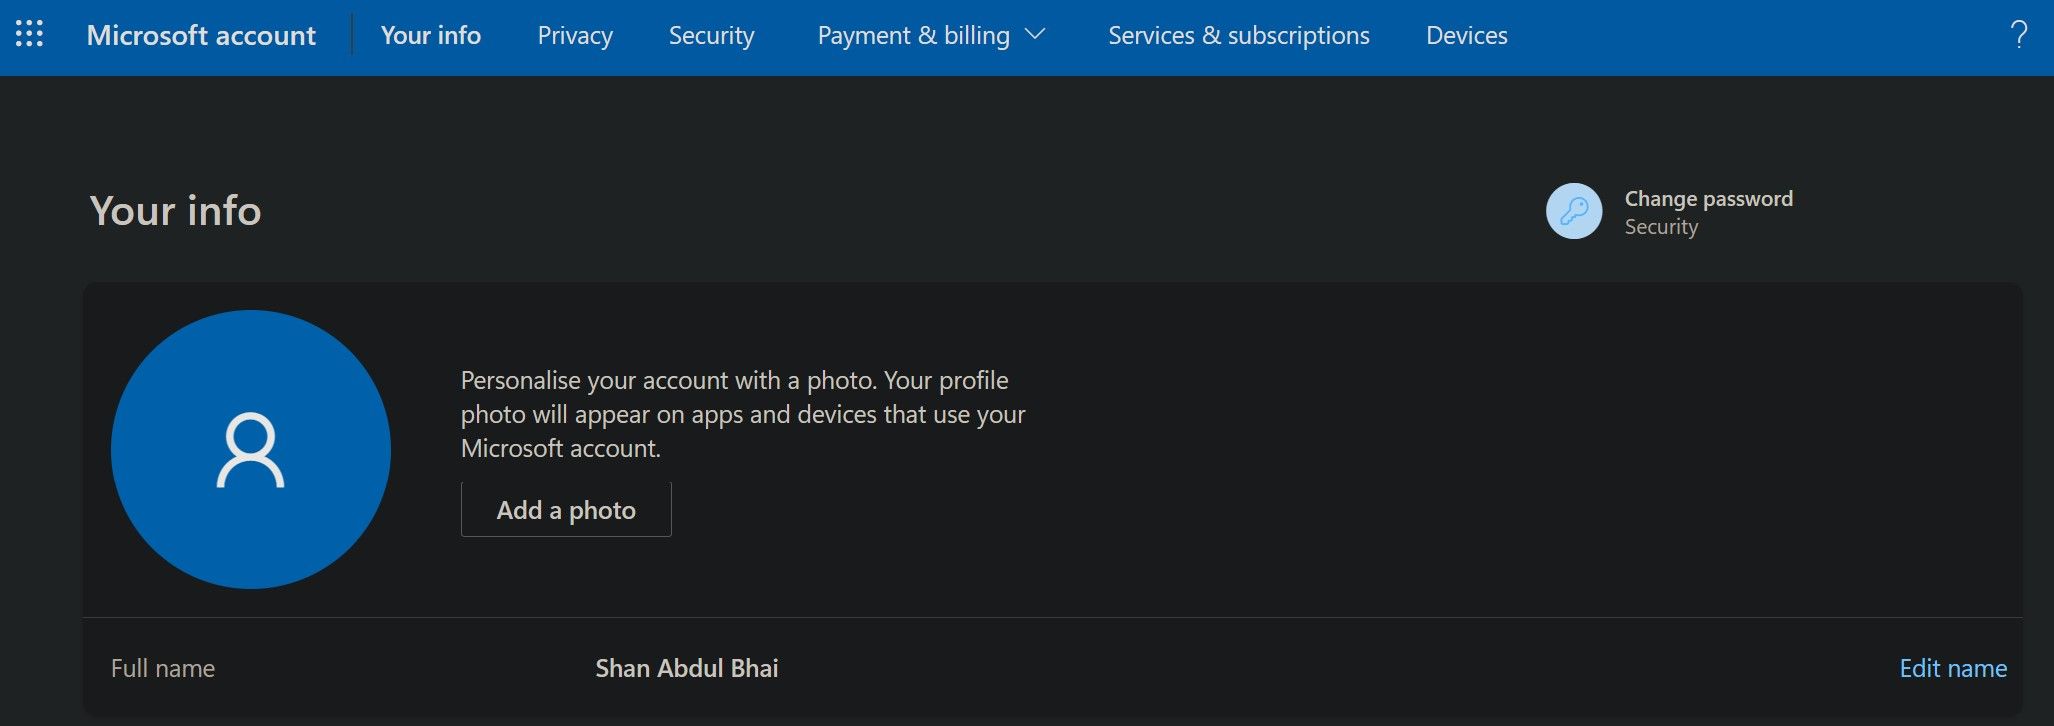
- Navigate to theYour info menu after logging in.
- Click theEdit name button.
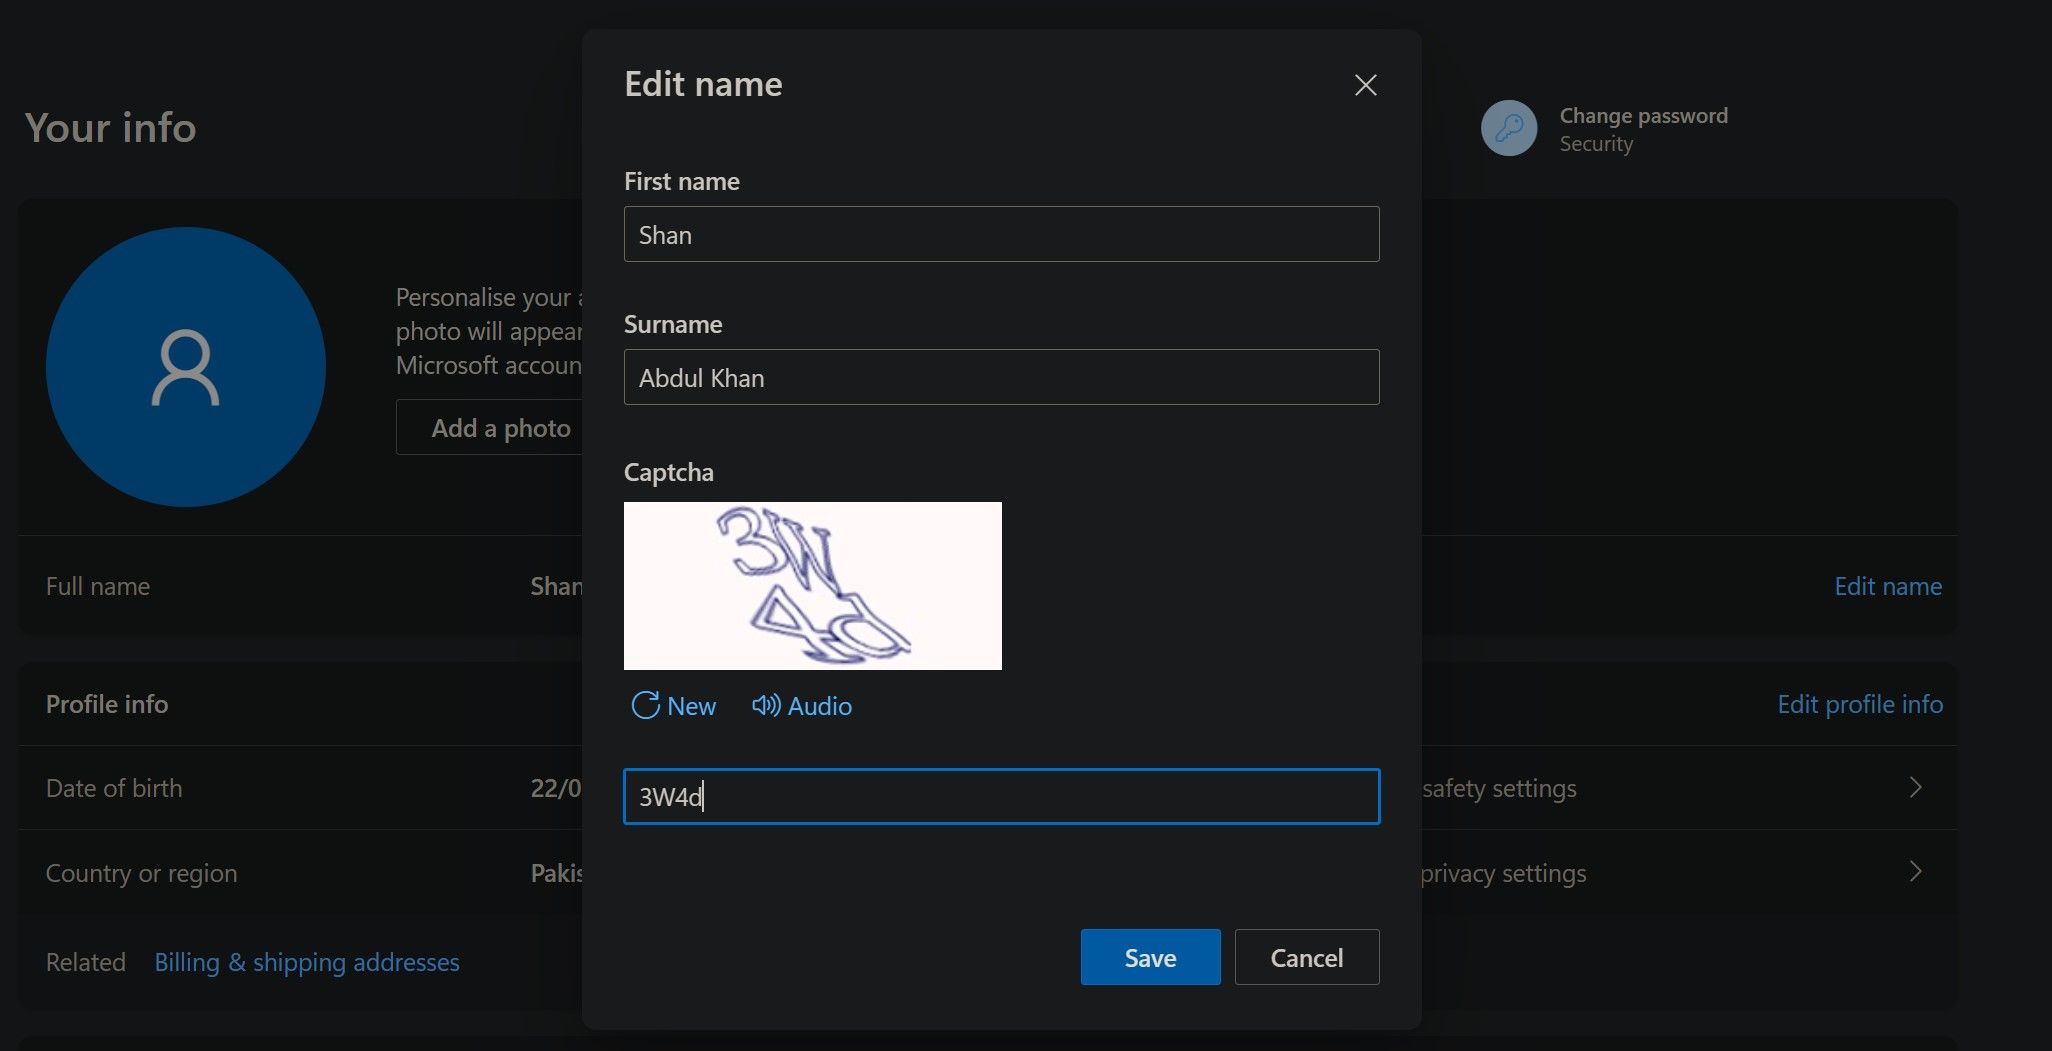
- Remove your current username and add the one you wish to switch to.
- After that, clickSave .
Changing the username associated with your Microsoft account may not take effect immediately. Sometimes, you may not see the new username after signing out from your account once, as we do in the other methods. To prevent that from happening, we recommend restarting your device instead of just signing out.
Change Your Username With Ease
Your username doesn’t have to remain the same for the rest of your life. If you decide to change it, you can use the first four methods listed above to change the current username (of your local user account) to the one you prefer. Regardless of which way you opt, ensure you sign out of your account once. Only then will this change take effect.
You will need to change the username associated with your Microsoft account from the Microsoft website. Also, remember that changing your username does not automatically change the user profile folder name. Therefore, you’ll have to change it separately.
- Title: Essential Guide to Updating Username on Windows 11
- Author: Richard
- Created at : 2024-07-29 08:08:47
- Updated at : 2024-07-30 08:08:47
- Link: https://win11-tips.techidaily.com/essential-guide-to-updating-username-on-windows-11/
- License: This work is licensed under CC BY-NC-SA 4.0.