Fixing Disabled Outlook Notification Settings in Windows

Fixing Disabled Outlook Notification Settings in Windows
Microsoft Outlook, like any other email client, keeps you up to date with your most recent emails by sending you timely notification alerts. However, if these Outlook notifications stop working, you may miss important emails and alerts.
Fortunately, there are several ways to fix this problem. So, let’s get started and discover the various ways for fixing Outlook’s notifications on Windows.
Disclaimer: This post includes affiliate links
If you click on a link and make a purchase, I may receive a commission at no extra cost to you.
1. Disable Offline Mode in Outlook
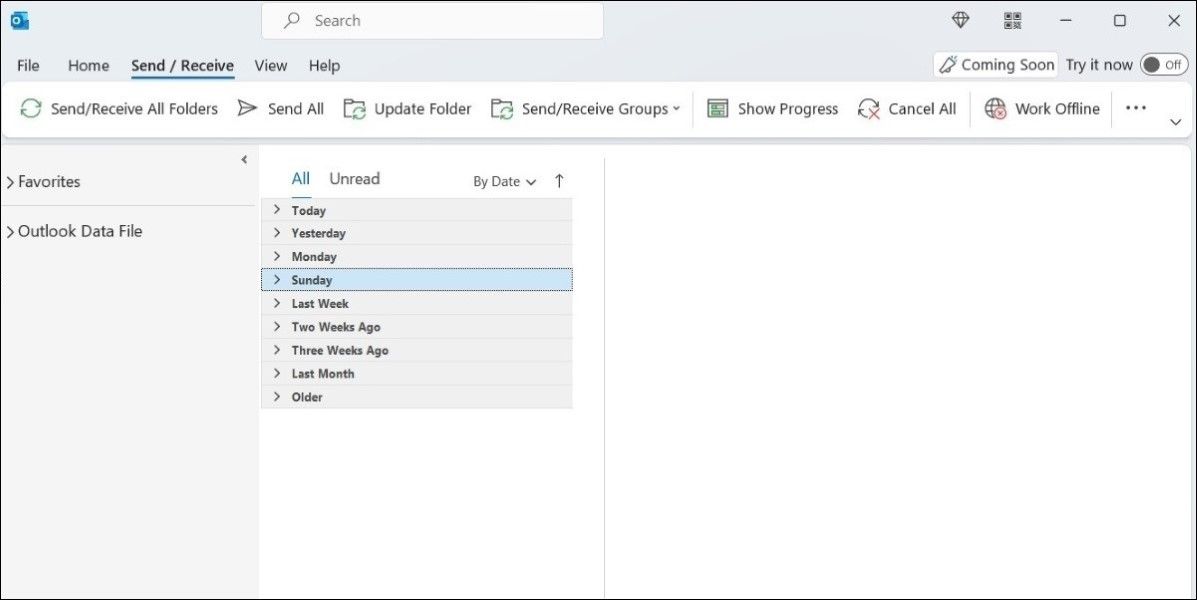
First, you should get the most obvious fix out of the way. If you have inadvertently enabled the Work Offline feature, Outlook will stop receiving any new emails from the servers. It’s one of the first few things you should check for ifOutlook isn’t receiving any emails or showing notifications.
You can fix this by disabling offline mode in Outlook:
- Open Outlook and switch to theSend / Receive tab.
- Click the option that saysWork Offline to disable it.
2. Check Outlook’s In-App Notification Settings
If Outlook fails to send notifications even when it is online, you should check Outlook’s in-app notification settings to make sure email alerts aren’t disabled.
Follow these steps to check Outlook’s notification settings:
- Open Outlook and click theFile menu.
- SelectOptions from the left pane.
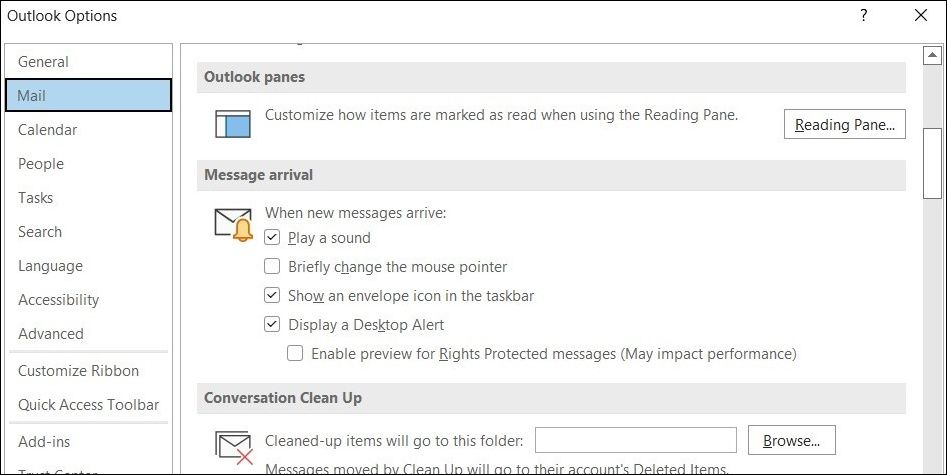
- In theOutlook Options window, selectMail from the left sidebar.
- Under theMessage arrival section, enable desktop and sound alerts by checking the corresponding boxes. Then, hitOK to save changes.

Once you complete the above steps, you should start receiving Outlook notifications on Windows.
3. Enable Outlook Notifications in the Windows Settings
Windows allows you tomanage notification preferences on a per-app basis. If you’ve previously disabled notifications for the Outlook app, here’s what you can do to re-enable them.
- PressWin + I to open theSettings app.
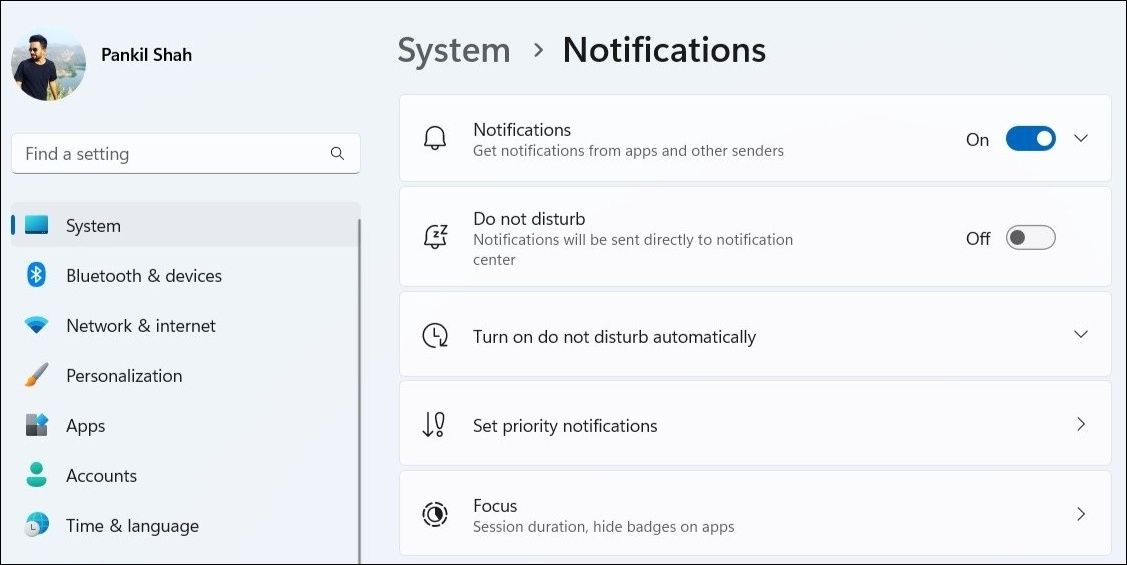
- In theSystem tab, selectNotifications . Make sure notifications are enabled on your PC.
- Scroll down to theNotifications from apps and other senders section and selectOutlook .
- EnableNotifications toggle for Outlook. Then, check the boxes that readShow notification banners andShow notifications in notification center .

Optionally, you can also enable sound alerts for Outlook notifications from the same menu.
4. Turn Off Do Not Disturb
Do Not Disturb is a useful feature in Windows that allows you to work in a distraction-free environment. When enabled, this feature silences notifications for all apps unless specified otherwise. To avoid any confusion, it’s best to disable Do Not Disturb in Windows.
- Open theSettings app.
- Navigate toSystem > Notifications .
- Turn off the toggle next toDo not distrub .

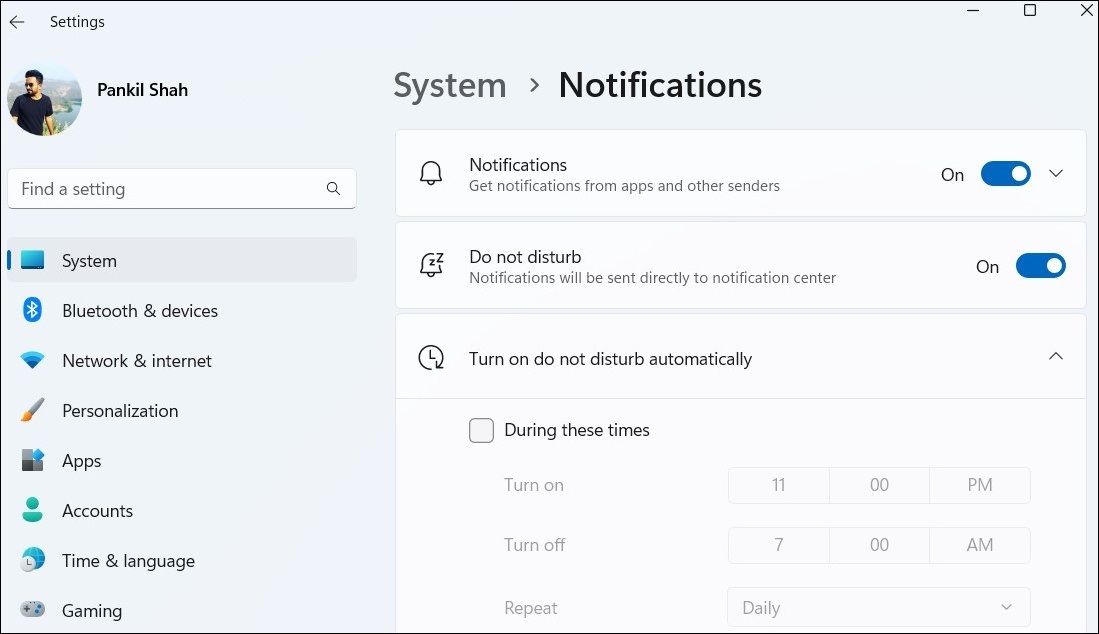
Further, make sure Do Not Disturb isn’t configured to turn on automatically at specific times.
5. Turn Off Battery Saver
Another reason Outlook may fail to send you notifications is if the battery saver is enabled on your laptop. If it is, apps like Outlook will fail to sync data in the background, and you may not receive notifications from Outlook unless you open the app. To avoid this, you must disable the battery saver mode on Windows by following the steps below.
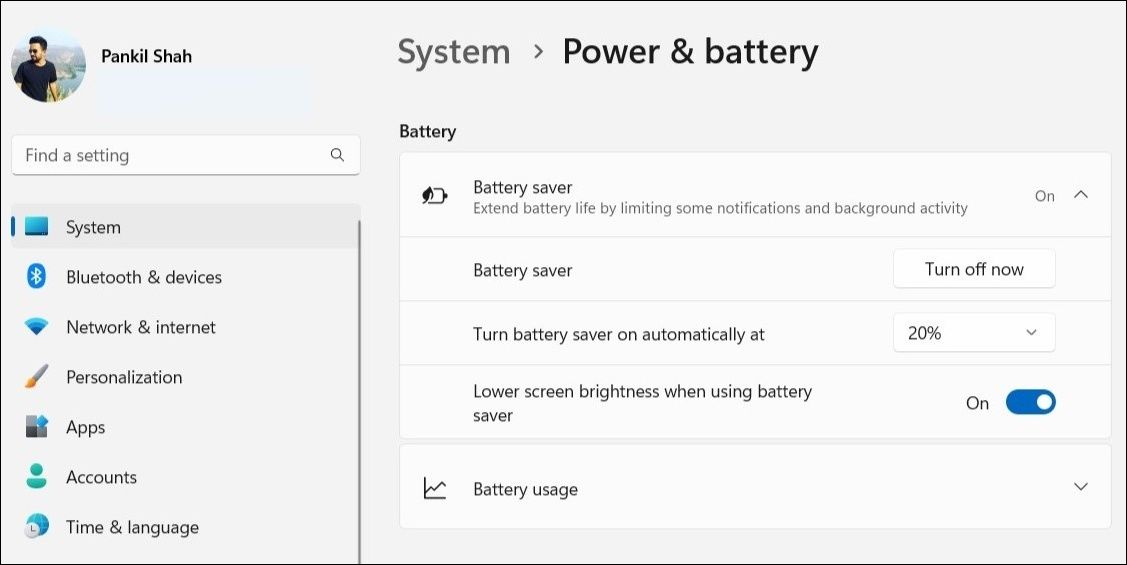
- Open the Settings app and head toSystem > Power & battery .
- Click onBattery saver to expand it.
- Click theTurn off now button.

6. Check Outlook’s Rules
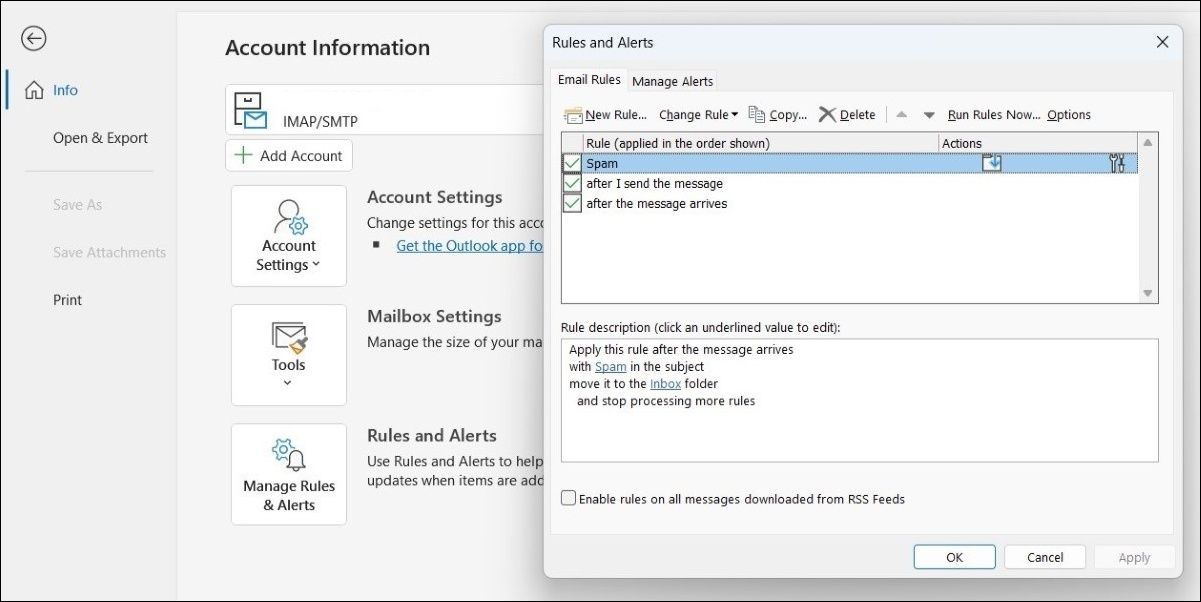
The rules in Outlook allow you to specify how different types of emails should be handled. If you have previously set any notification rules in the Outlook app, this may cause them to not show. If unsure, you can go through Outlook’s rules to disable any rules related to notifications.
Here’s how you can access Outlook’s rules:
- Open the Outlook app and click theFile menu in the top left.
- In theInfo tab, select theManage Rules & Alerts option.
- UnderEmail Rules , you’ll see all the rules that you’ve created for your emails. Find and disable any rule that may be interfering with Outlook notifications. Then, hitApply followed byOK .

7. Clear the Outlook Cache
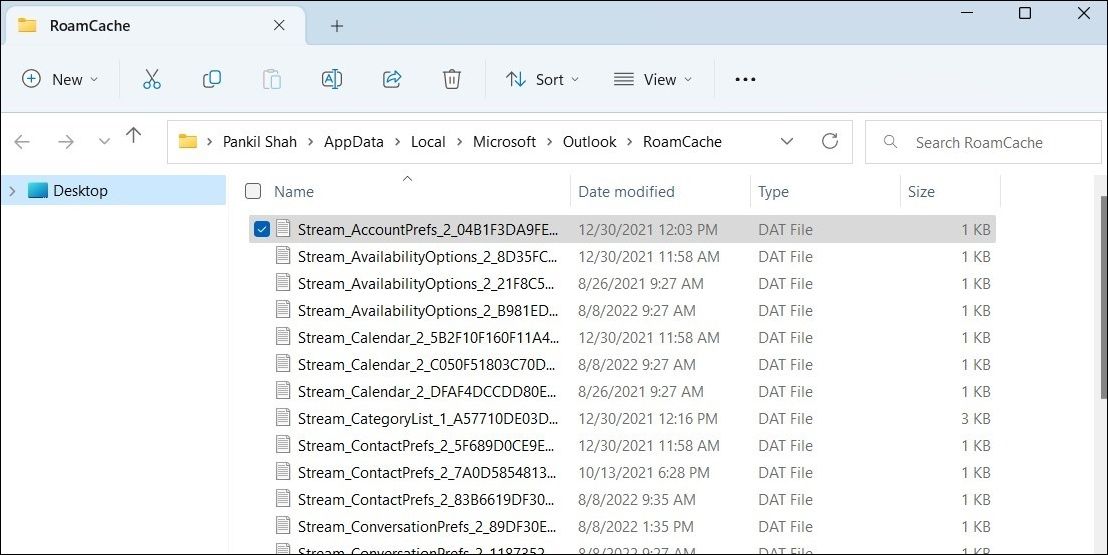
Outlook, like most apps, saves cache files on your computer to improve performance and reduce loading times. However, once this cache gets old or corrupted, it hurts more than it helps. Thankfully, you can get rid of the Outlook cache data fairly easily.
Follow these steps to delete Outlook’s cache data on Windows:
- Press theWin + R keys to open the Run dialog.
- Type**%localappdata%\Microsoft\Outlook** in the Open field and pressEnter .
- In theRoamCache folder that appears,select all the files and click the trash icon at the top to delete them.

Restart Outlook after this and check if the notifications are working now.
8. Update the Outlook App
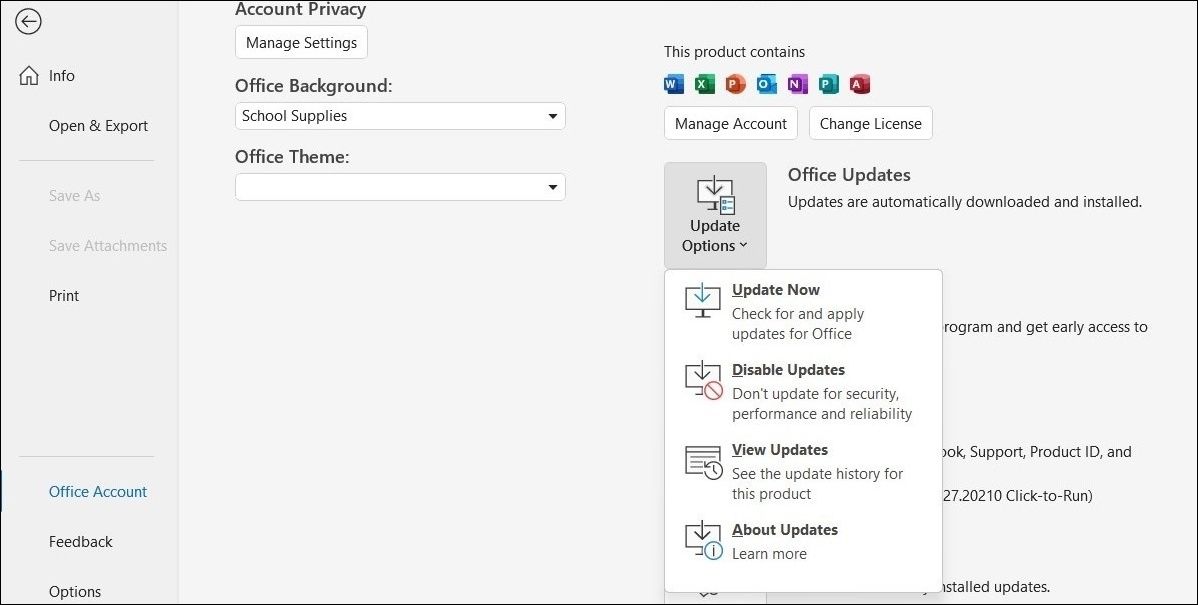
Using an outdated version of the Outlook app can result in a variety of problems, including the one discussed here. You can try updating the Outlook app to the most recent version to see if that helps. Here’s how you can go about it.
- Open Outlook on your PC and head over toFile > Office Account .
- In the pane on the right, selectUpdate Options > Update Now .

Wait for Outlook to find and install the latest updates on your computer. Once updated, check if the notifications are working now.
9. Repair Your Email Account
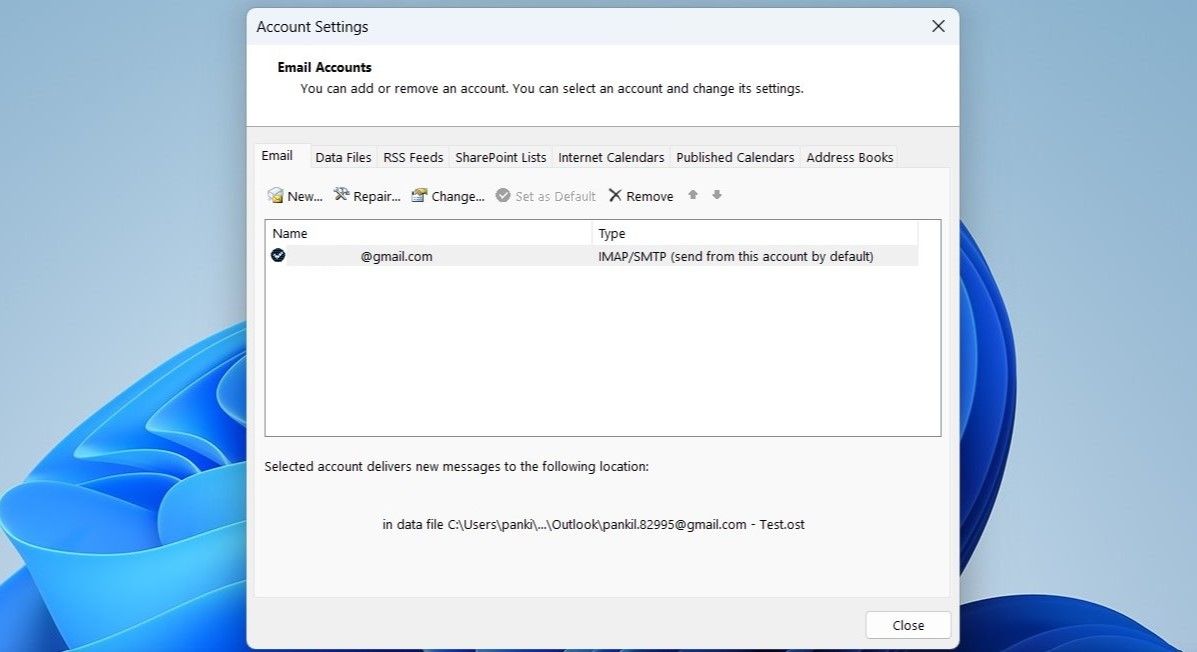
If Outlook is failing to display notifications only for a specific email account, you can try repairing it. Here are the steps for the same.
- Open the Outlook app and click onFile .
- SelectInfo from the left sidebar.
- Click theAccount Settings drop-down menu and selectAccount Settings .
- Select the problematic account and click theRepair option.
- ClickRepair to confirm.

10. Repair the Microsoft Office Suite
Microsoft Office comes with a handy repair tool that can prove useful when Office apps fail to work correctly. You can repair the Microsoft Office suite in case the above solutions don’t help. Here’s what you’ll need to do.
- OpenControl Panel using the search menu.
- Go toPrograms and Features .
- Locate and select Microsoft Office on the list. Then, click theChange button at the top.
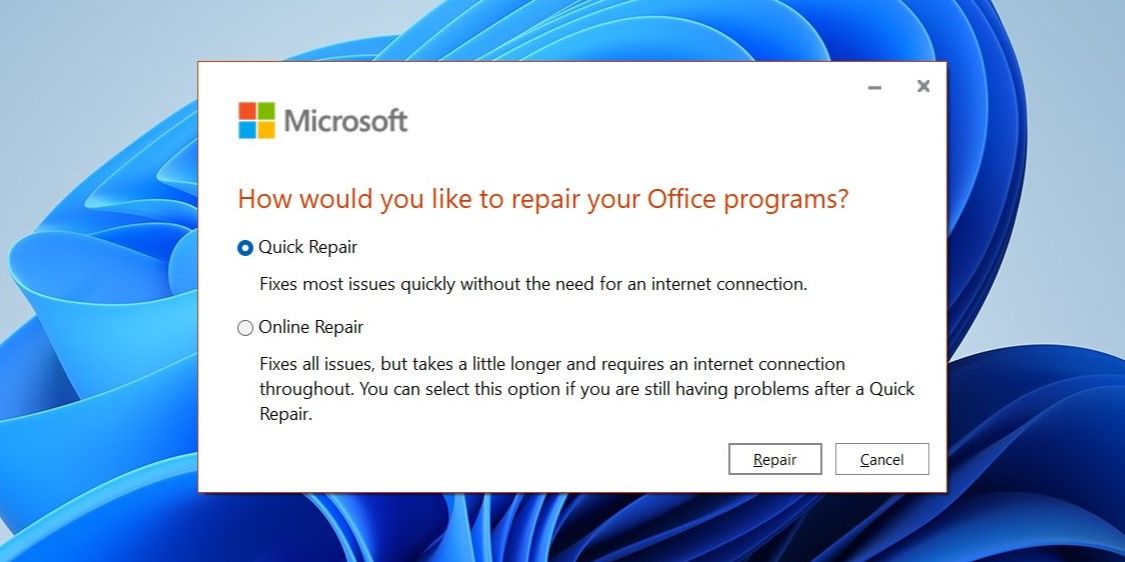
- SelectQuick Repair and then clickRepair .

Wait for the process to finish and check if notifications are working. If the problem persists, repeat the above steps to perform anOnline Repair . As the name implies, the process does necessitate an active internet connection. So, make sure your PC is connected to the internet.
Never Miss an Outlook Notification Again
Being a Microsoft product, you’d expect Outlook to work flawlessly on Windows. However, that may not always be the case. Hopefully, going through the above fixes has helped you fix Outlook’s notification issue on Windows and things are back to normal.
However, if nothing works, you can consider switching to Microsoft’s Mail app for Windows.
Also read:
- [Updated] 2024 Approved MorphVOX Mastery Complete Technique Collection
- [Updated] 2024 Approved Solo Stardom in the Podcast Universe
- [Updated] In 2024, Syncing Speed and Quality in LunaPic Edits
- A Quick Guide to OnePlus Nord N30 SE FRP Bypass Instantly
- Comprehensive Breakdown: Understanding Windows' ODBC System
- Customizing Main Panel of Windows 11 Task Manager
- Ease of Access: Disabling Security Interrogation for Windows 11 Admin
- Easy steps to recover deleted call history from Lava Yuva 2
- In 2024, Inside Look Polaroid's Bold Move Into Action Camera Tech
- In 2024, Outdoor Gadgets for Making Road-Trip Videos
- Mac Users, Get Ready to Marvel at Stellar’s Phoenix Image Fixer
- Mending Window 11'S Help Service Disruption
- Preventing Vanished Recorded Run Events
- Step by Step to Resolve Failing Windows Discord Updates
- Strategies to Correct Token Misreference Errors on Win10/Win11
- The Value Proposition of Windows 11'S Interactive Elements
- Understanding Slug Lines An Essential Guide for 2024
- Title: Fixing Disabled Outlook Notification Settings in Windows
- Author: Richard
- Created at : 2024-10-27 19:53:28
- Updated at : 2024-11-01 16:36:03
- Link: https://win11-tips.techidaily.com/fixing-disabled-outlook-notification-settings-in-windows/
- License: This work is licensed under CC BY-NC-SA 4.0.
