
How to Change Display Orientation in Windows
How to Change Display Orientation in Windows
While the default landscape orientation on your Windows computer is suitable for most tasks, there can be times when you need to change it. Whether it’s for work, creative endeavors, or simply personal preference, rotating the display on your Windows computer is quick and easy.
Here, we share three methods for changing the display orientation on your Windows computer.
Disclaimer: This post includes affiliate links
If you click on a link and make a purchase, I may receive a commission at no extra cost to you.
1. Change Windows Display Orientation via the Settings App
The Display section in the Windows Settings app makes it easy for you to modify things like screen brightness , color, layout, scale, and more. Additionally, it also offers the option to change the display orientation on your Windows 10 or 11 computer.
Use the following steps:
- Press Win + I or use one of the many ways to open the Settings app .
- Head over to System > Display.
- Click the drop-down menu next to Display orientation to select from the available options: Landscape, Portrait, Landscape (flipped), and Portrait (flipped).
- Click the Keep changes button to confirm.

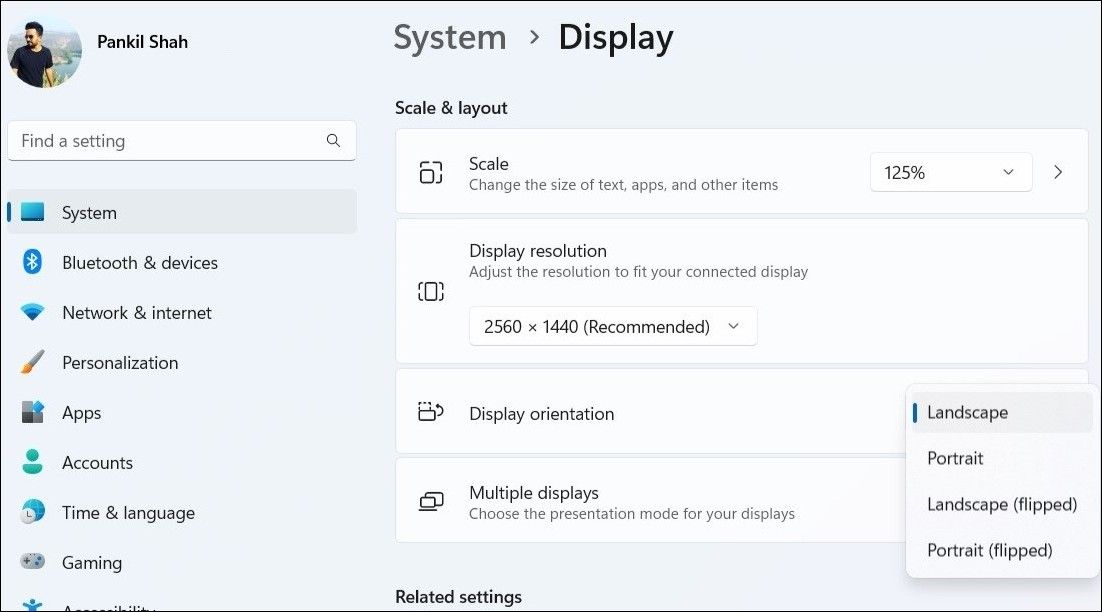
Once you have completed the above steps, Windows will rotate your screen 90 degrees, 180 degrees, or 270 degrees, depending on the option you select.
2. Change Windows Display Orientation via the Graphics Control Panel
Apart from the system settings, you can also use the built-in graphics control panel to change the display orientation on Windows. However, the exact steps for doing so will depend on the type of graphics card installed on your PC .
Here’s how you can rotate your screen using the Intel Graphics Command Center and the NVIDIA Control Panel.
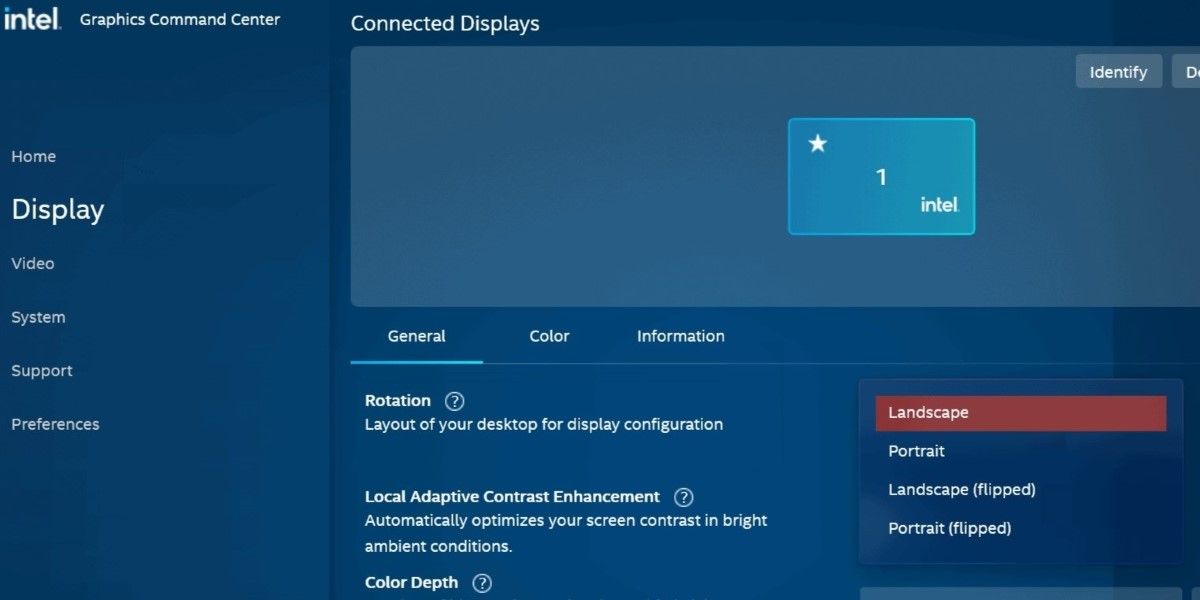
Change the Display Orientation Using the Intel Graphics Command Center
- Click the magnifying icon on the taskbar or use the Win + S keyboard shortcut to open the search menu.
- Type Intel Graphics Command Center in the box and press Enter.
- Select the Display tab from the left pane.
- Under the General tab, click the drop-down menu next to Rotation to select your preferred display orientation.
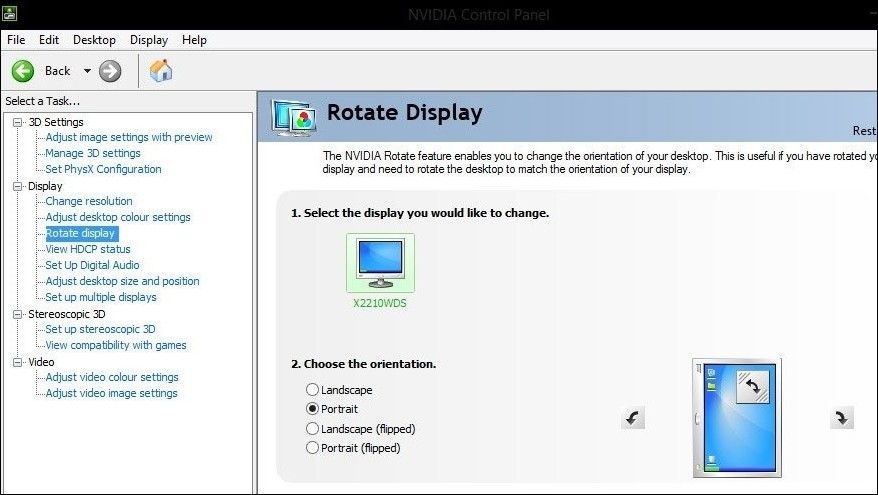
Change the Display Orientation Using the NVIDIA Control Panel
- Open the NVIDIA Control Panel using the search menu.
- Double-click the Display menu in the left pane to expand it.
- Click the Rotate display option.
- Select your preferred orientation in the right pane.
- Click the Apply button to save the changes.
3. Change Windows Display Orientation With Keyboard Shortcuts
Another quick way to rotate your Windows computer’s screen is to use keyboard shortcuts. This method can be especially useful if you frequently need to switch between different display orientations.
Here are the keyboard shortcuts you can use to rotate your computer screen.
- Ctrl + Alt + Right arrow: Rotates your screen clockwise by 90 degrees (portrait-flipped).
- Ctrl + Alt + Left arrow: Rotates your screen counterclockwise by 90 degrees (portrait).
- Ctrl + Alt + Down arrow: Rotates your screen 180 degrees (landscape-flipped).
- Ctrl + Alt + Up arrow: Resets your screen to its original orientation (landscape).
It’s important to note that the above keyboard shortcuts may not work on all Windows computers. If they do not work on your PC, you can use the Settings app or the built-in Graphics Control Panel to make the necessary adjustments.
Changing the Display Orientation on Windows Is Easy
Knowing how to change the display orientation on Windows can be helpful if you have a laptop with a rotatable screen or an external monitor that allows rotation.
Whether you choose to use a keyboard shortcut or the Windows Settings app, the process of rotating your screen is relatively easy so you can go back and forth quickly without having to keep digging into the Settings menu. Just remember that changing the display orientation also affects the cursor, so you’ll have to adjust your mouse movement accordingly.
Here, we share three methods for changing the display orientation on your Windows computer.
Also read:
- [Updated] Ultimate Selection of iPhone XGIF Apps
- 「高品質な映像制作へ変わろう:プロフェッショナルな動画編集者が使う明るさ最適化方法」
- 2024 Approved Fast Windows File Check-Up Tips and Tricks
- 2024 Approved How to Clear Your Default Podcast Listings on Spotify
- 6 Best Linkedin Video Downloaders to Save Videos From LinkedIn for 2024
- Closing the Voids in Folder Navigation View
- Eradicating Erratic Movement of PC Cursor
- Everyday AI: Deciding Between Claude or ChatGPT for Your Needs
- Five Essential Steps for Firewall Customization
- Full Guide How To Fix Connection Is Not Private on Xiaomi Redmi 13C 5G | Dr.fone
- Launching Professional Instagram Starting an Enterprise Account
- Overcoming OpenGL Issue 3: Fix for Windows NVidia GPUs
- RAM Detective: Decoding Types in Windows Operating System
- Recover Lost Configurations: Navigating the Hidden Menus
- Tackle Chrome’s Stubborn Files Not Syncing in Windows OS
- Unveiling Excellence - Brookstone's Top Frame
- Uptime Assurance for PCs: Top 5 Verification Techniques in Windows 11
- Vapor 3 Showdown Shade 4 Advances for 2024
- What Does Hardware Reserved Memory Mean in Windows?
- Title: How to Change Display Orientation in Windows
- Author: Richard
- Created at : 2024-12-18 08:45:27
- Updated at : 2024-12-21 20:13:49
- Link: https://win11-tips.techidaily.com/how-to-change-display-orientation-in-windows/
- License: This work is licensed under CC BY-NC-SA 4.0.