How to Change Lockout Duration After Failed Logon Attempts in Windows 10 and 11

How to Change Lockout Duration After Failed Logon Attempts in Windows 10 and 11
Windows has a policy setting that can lock someone out from signing in if they enter the wrong local account password too many times. The user is not allowed to sign in for a set number of minutes after being locked out, but you can change this lockout duration.
Here’s how to change how long someone using a specific Windows machine is locked out if they enter the wrong login credentials a certain number of times. You must be signed in as an administrator to change this policy.
Disclaimer: This post includes affiliate links
If you click on a link and make a purchase, I may receive a commission at no extra cost to you.
How to Change the Duration a User Is Locked Out of Their Account via Local Security Policy
This method will work as long as the system is running the Pro, Enterprise, or Education edition of Windows 10 or 11.
- Press Windows key + R to open the Run dialogue.
- Type “secpol.msc” into the text field and hit Enter.

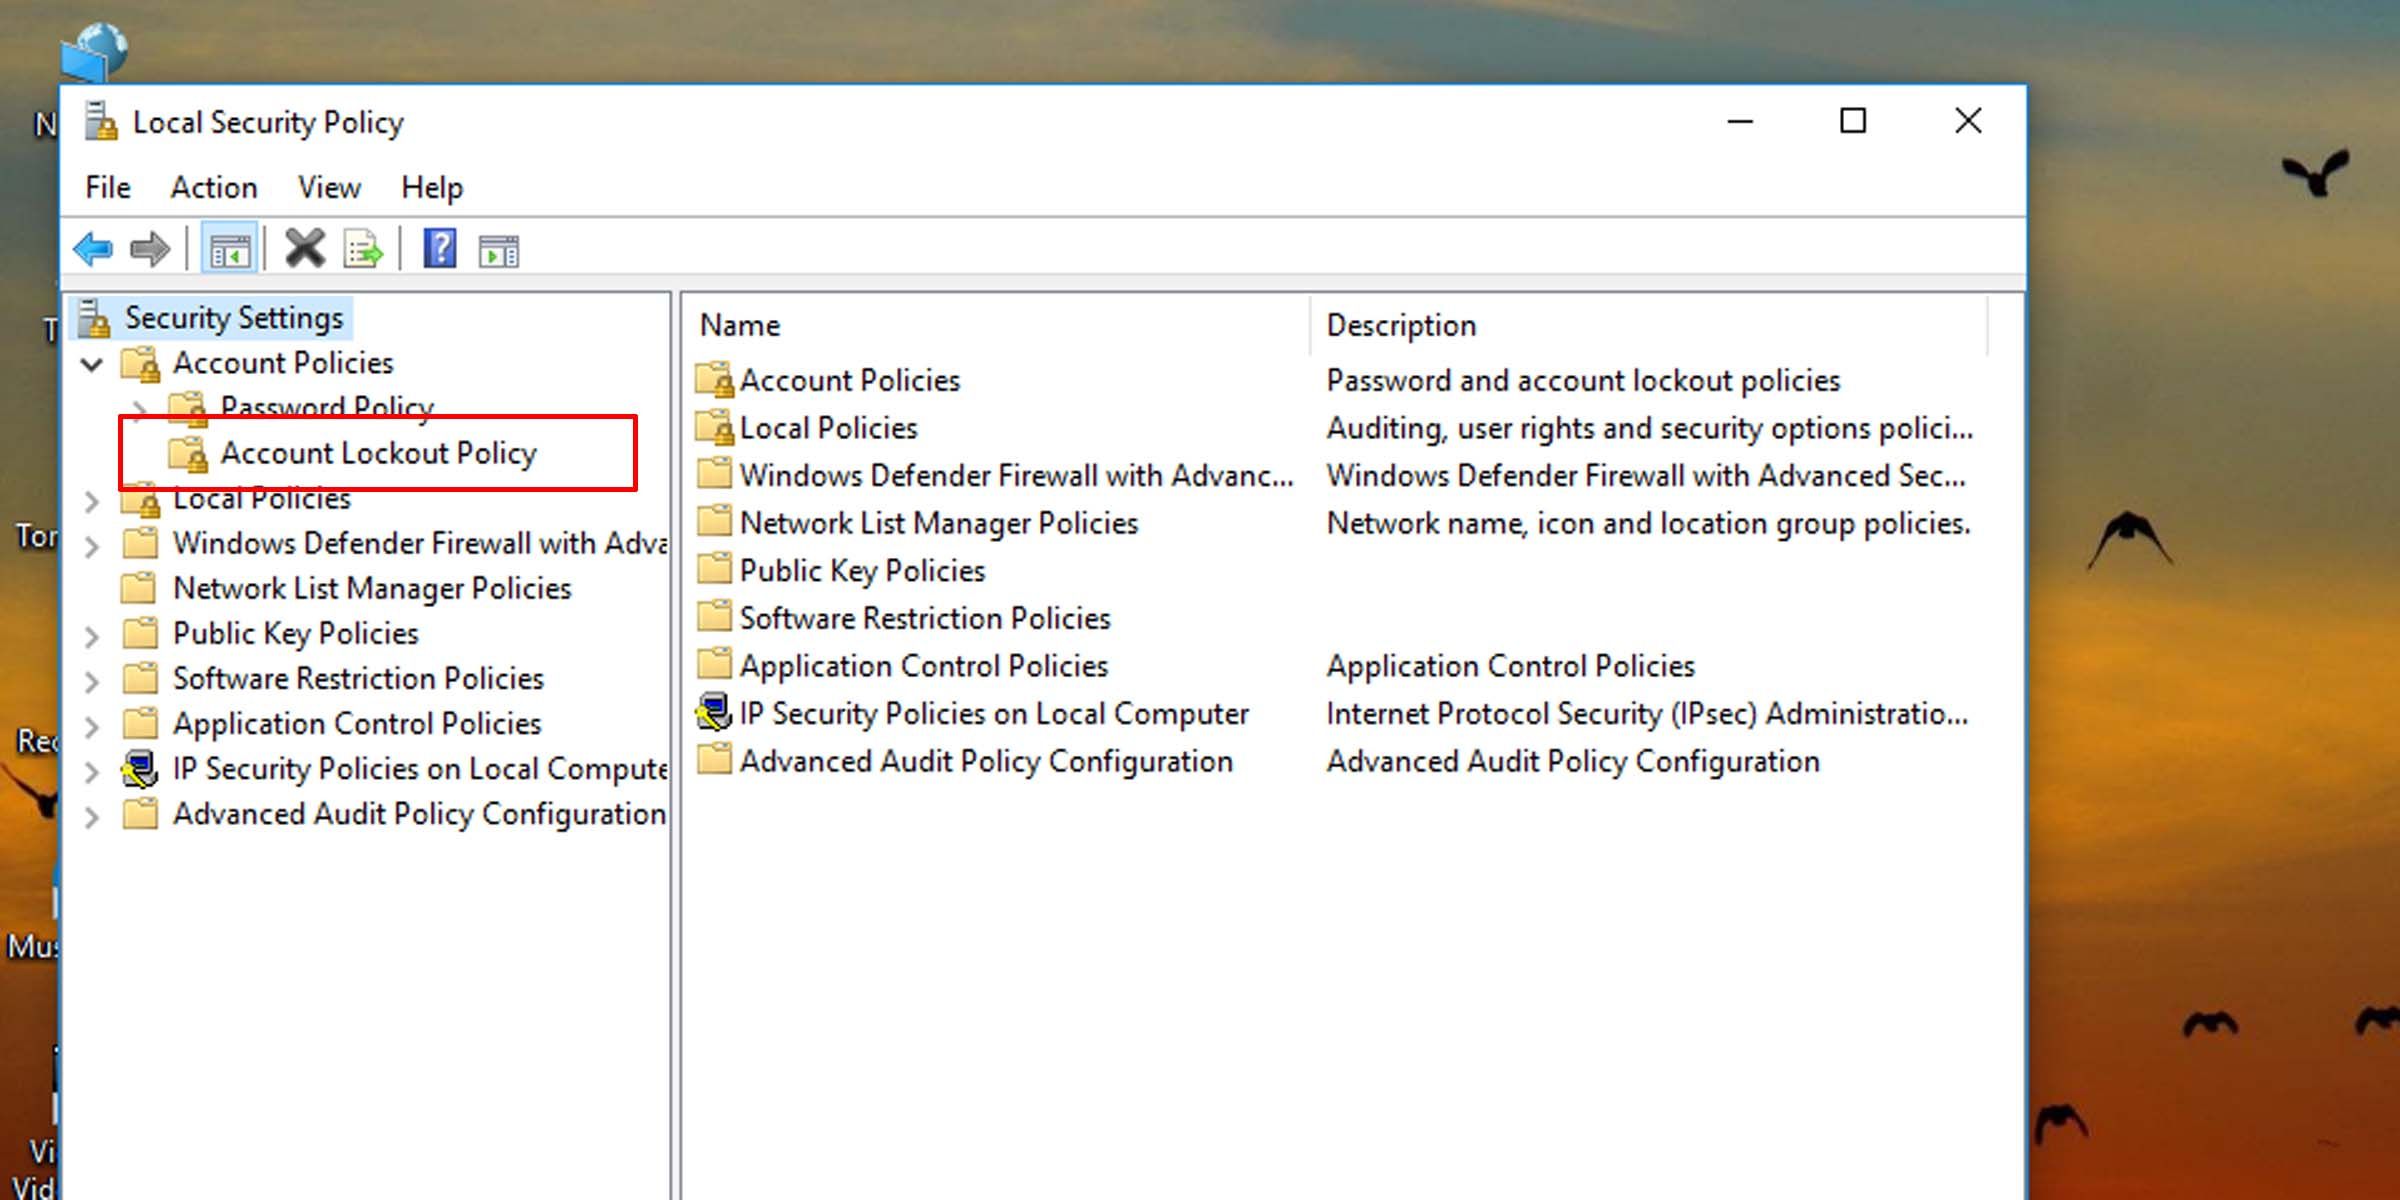
- On the left pane, click on the Account Lockout Policy folder under Account Policies.

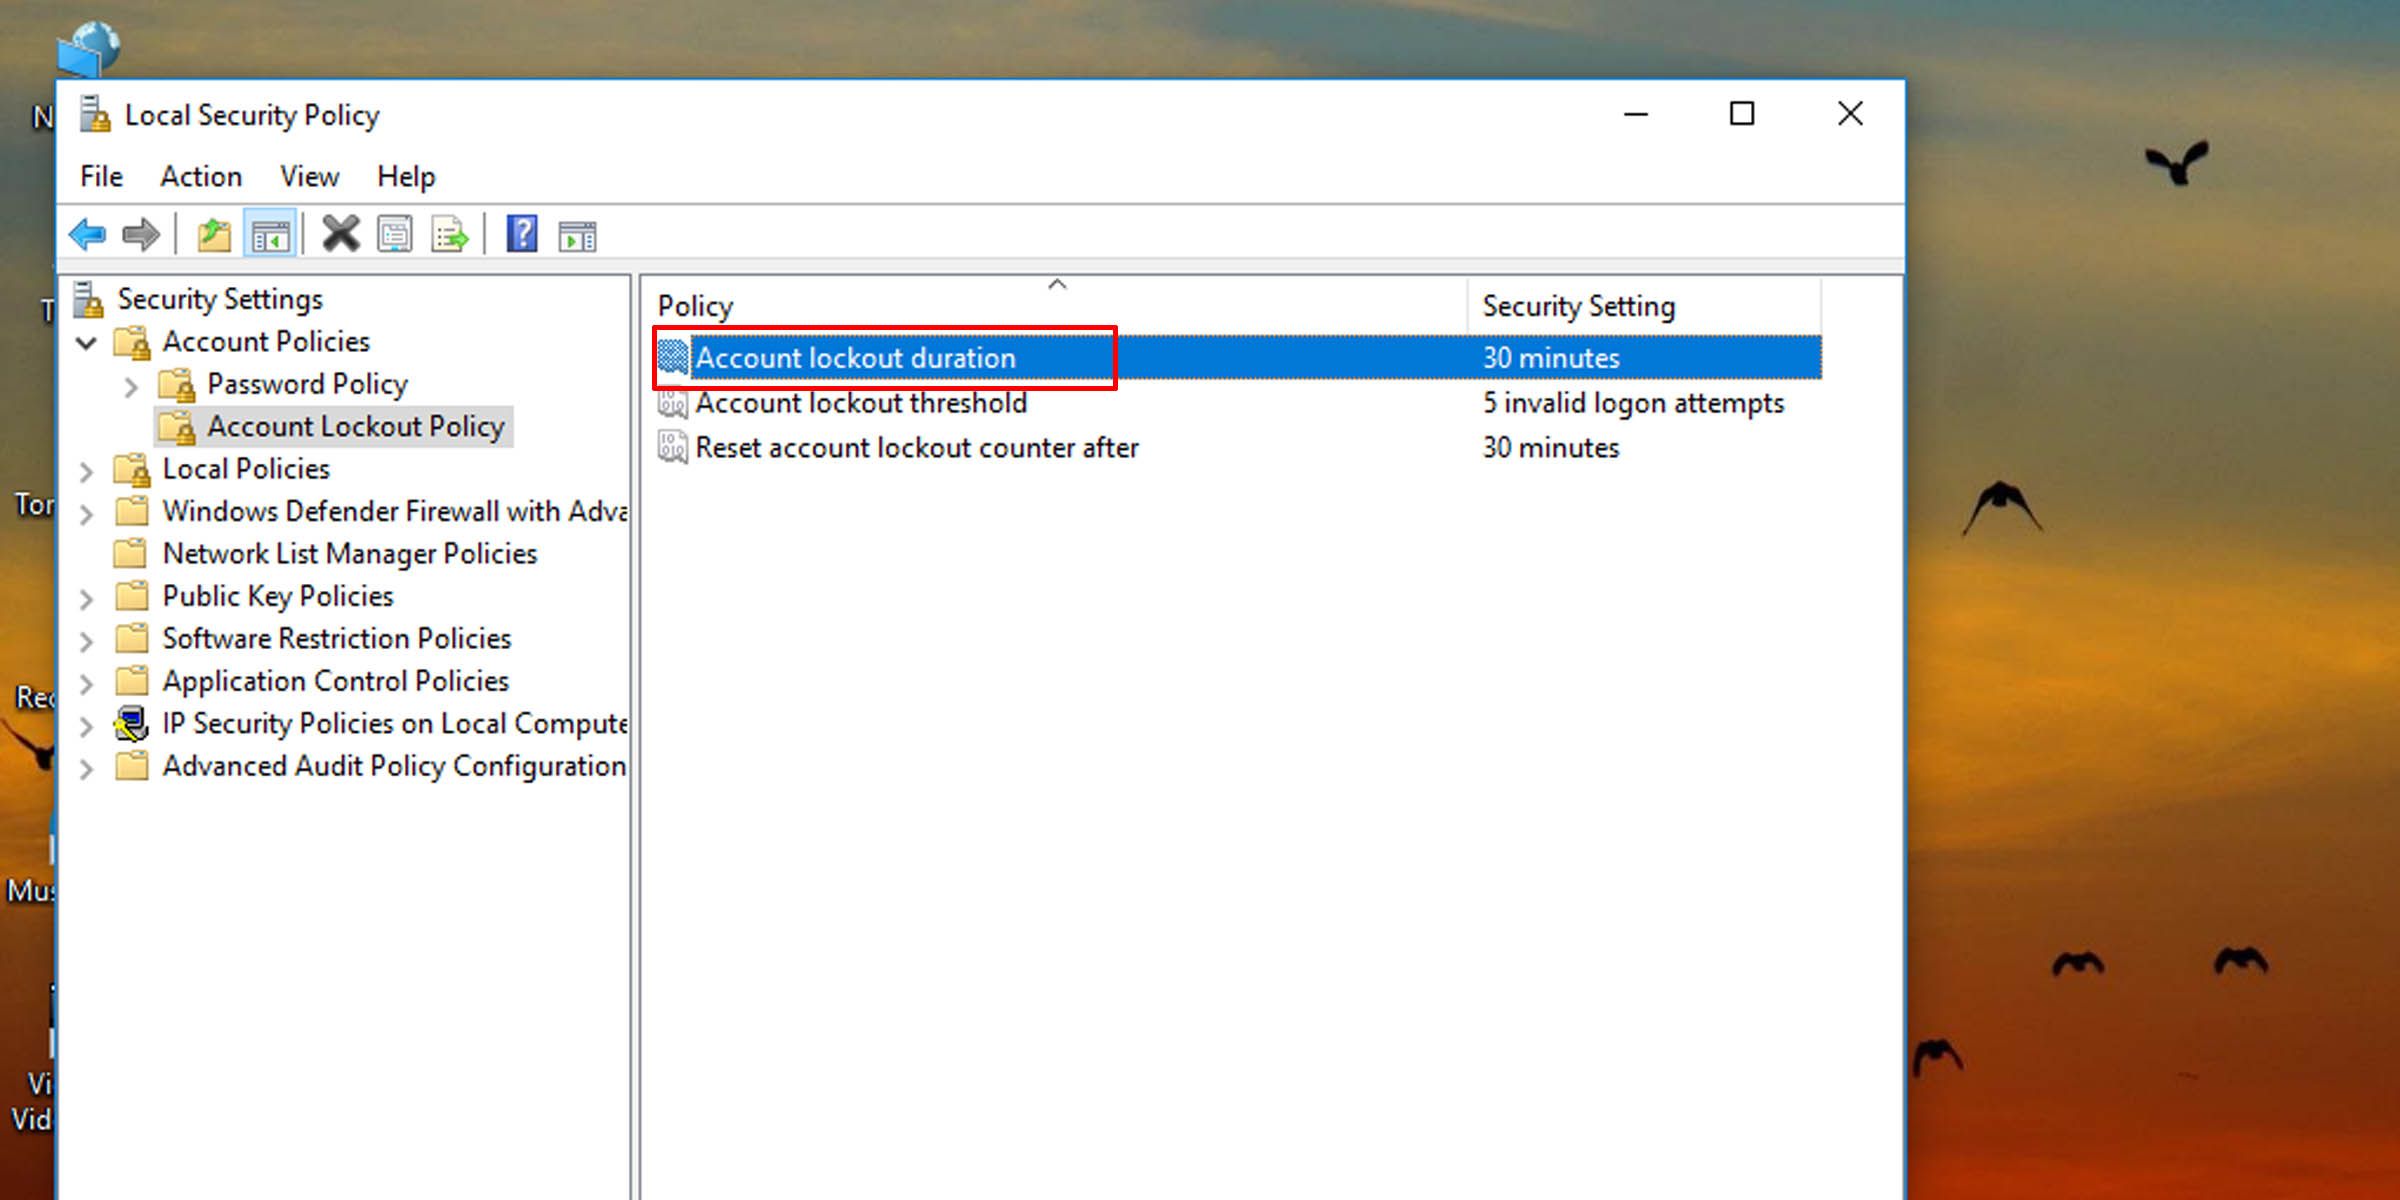
- On the right pane, double-click on Account lockout duration.

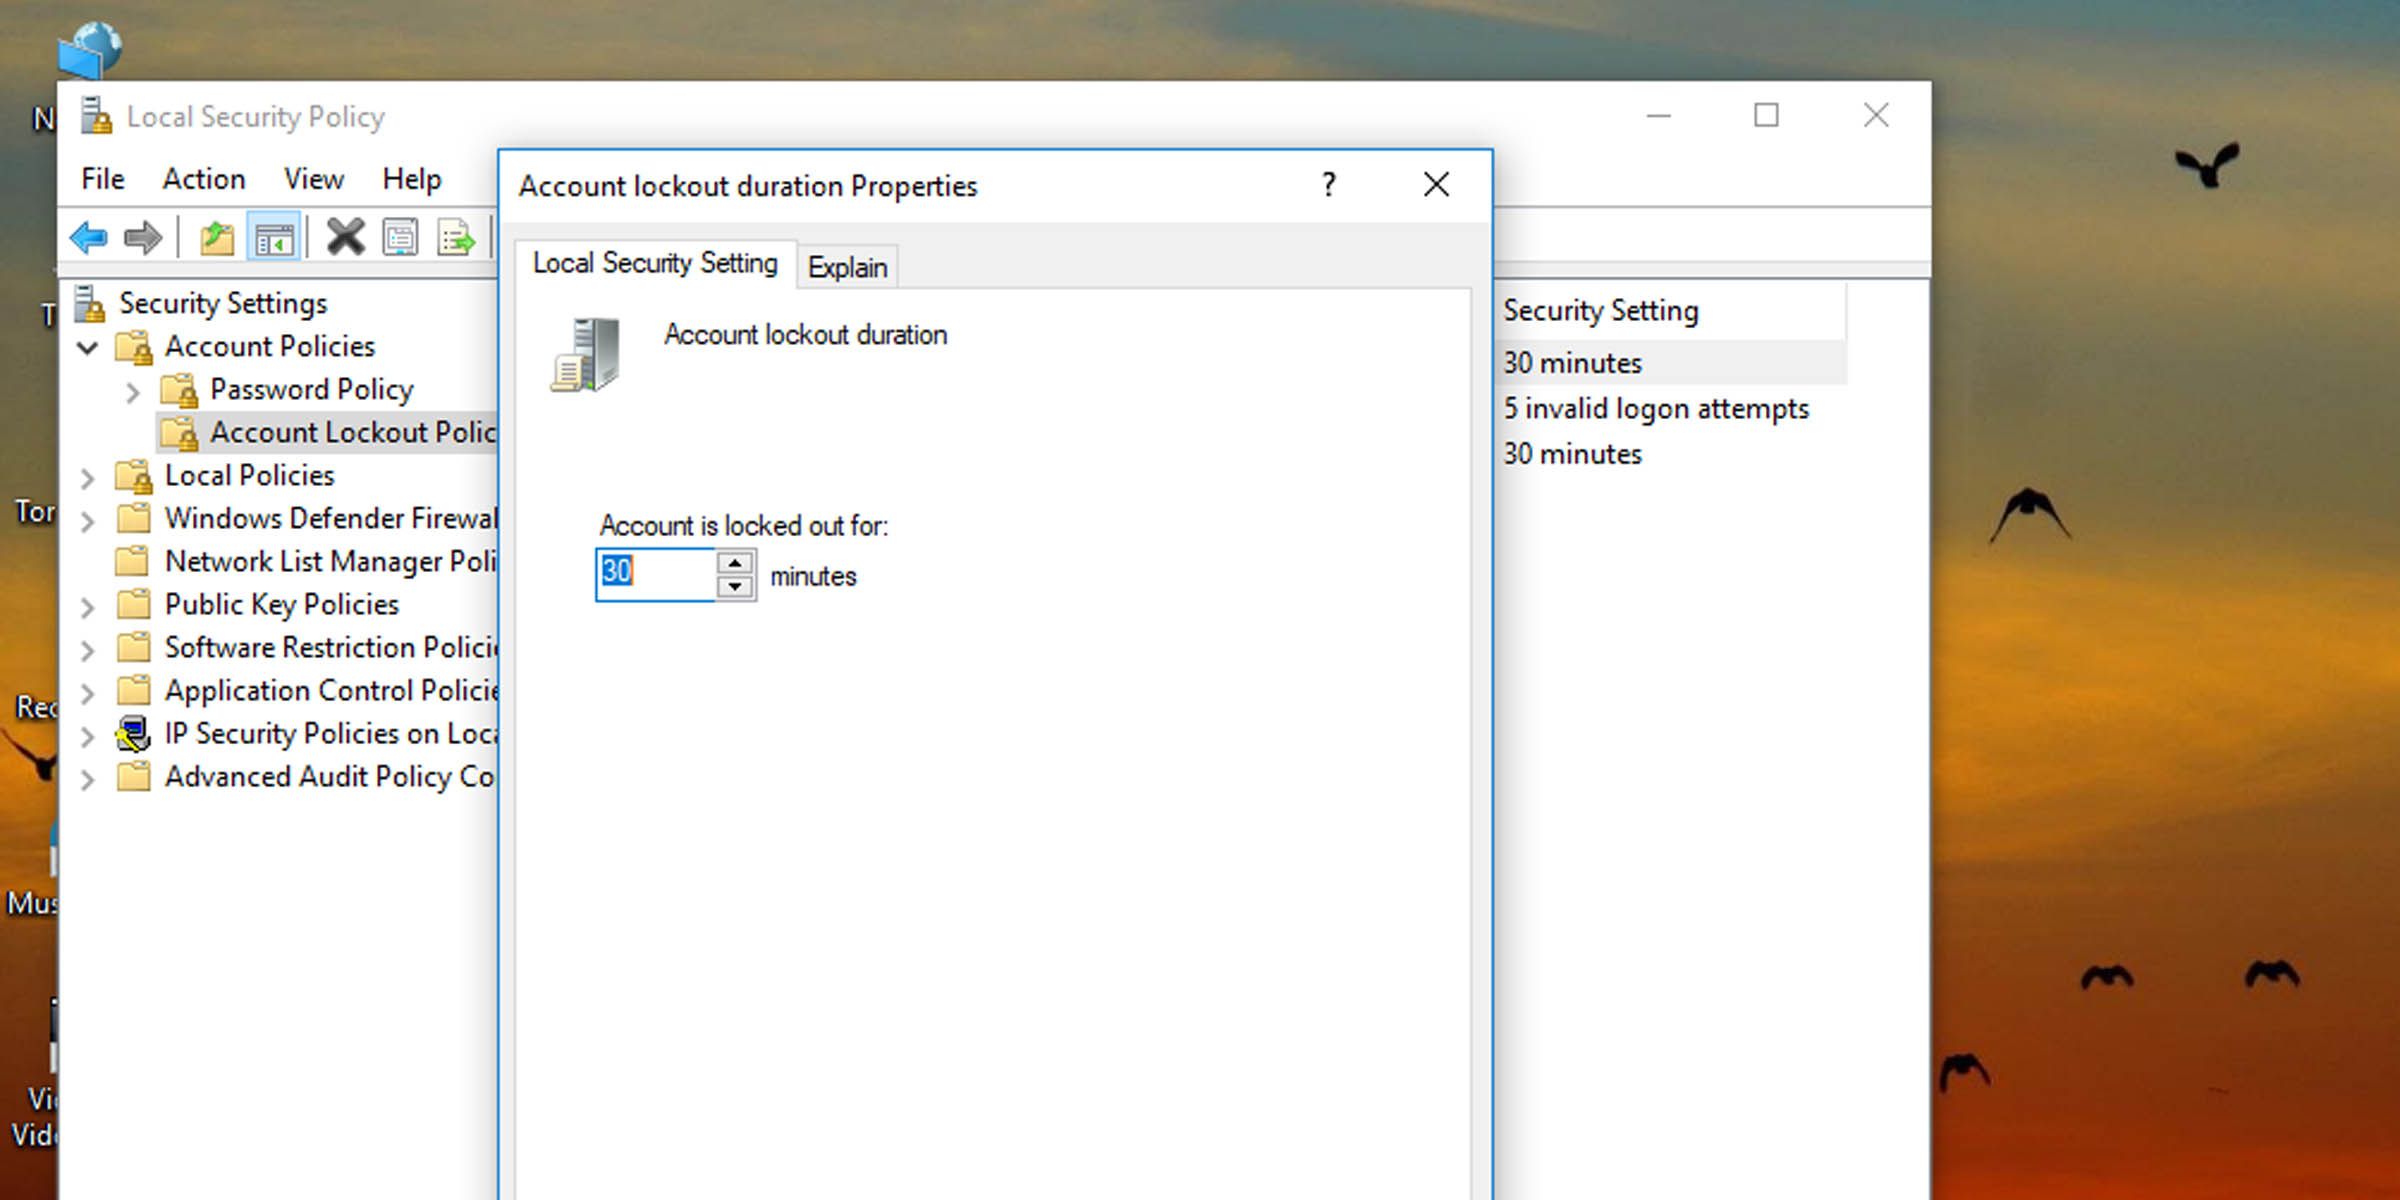
- Type in a number between zero and 99,999, and hit OK. This will set how long (in minutes) the system will need before it accepts another login attempt.

How to Change the Account Lockout Duration in Windows via the Command Prompt
If the system isn’t running the Pro, Enterprise, or Education edition of Windows 10 or 11, you’ll need to use the command prompt to change how long a user must wait before signing in again after failed login attempts.
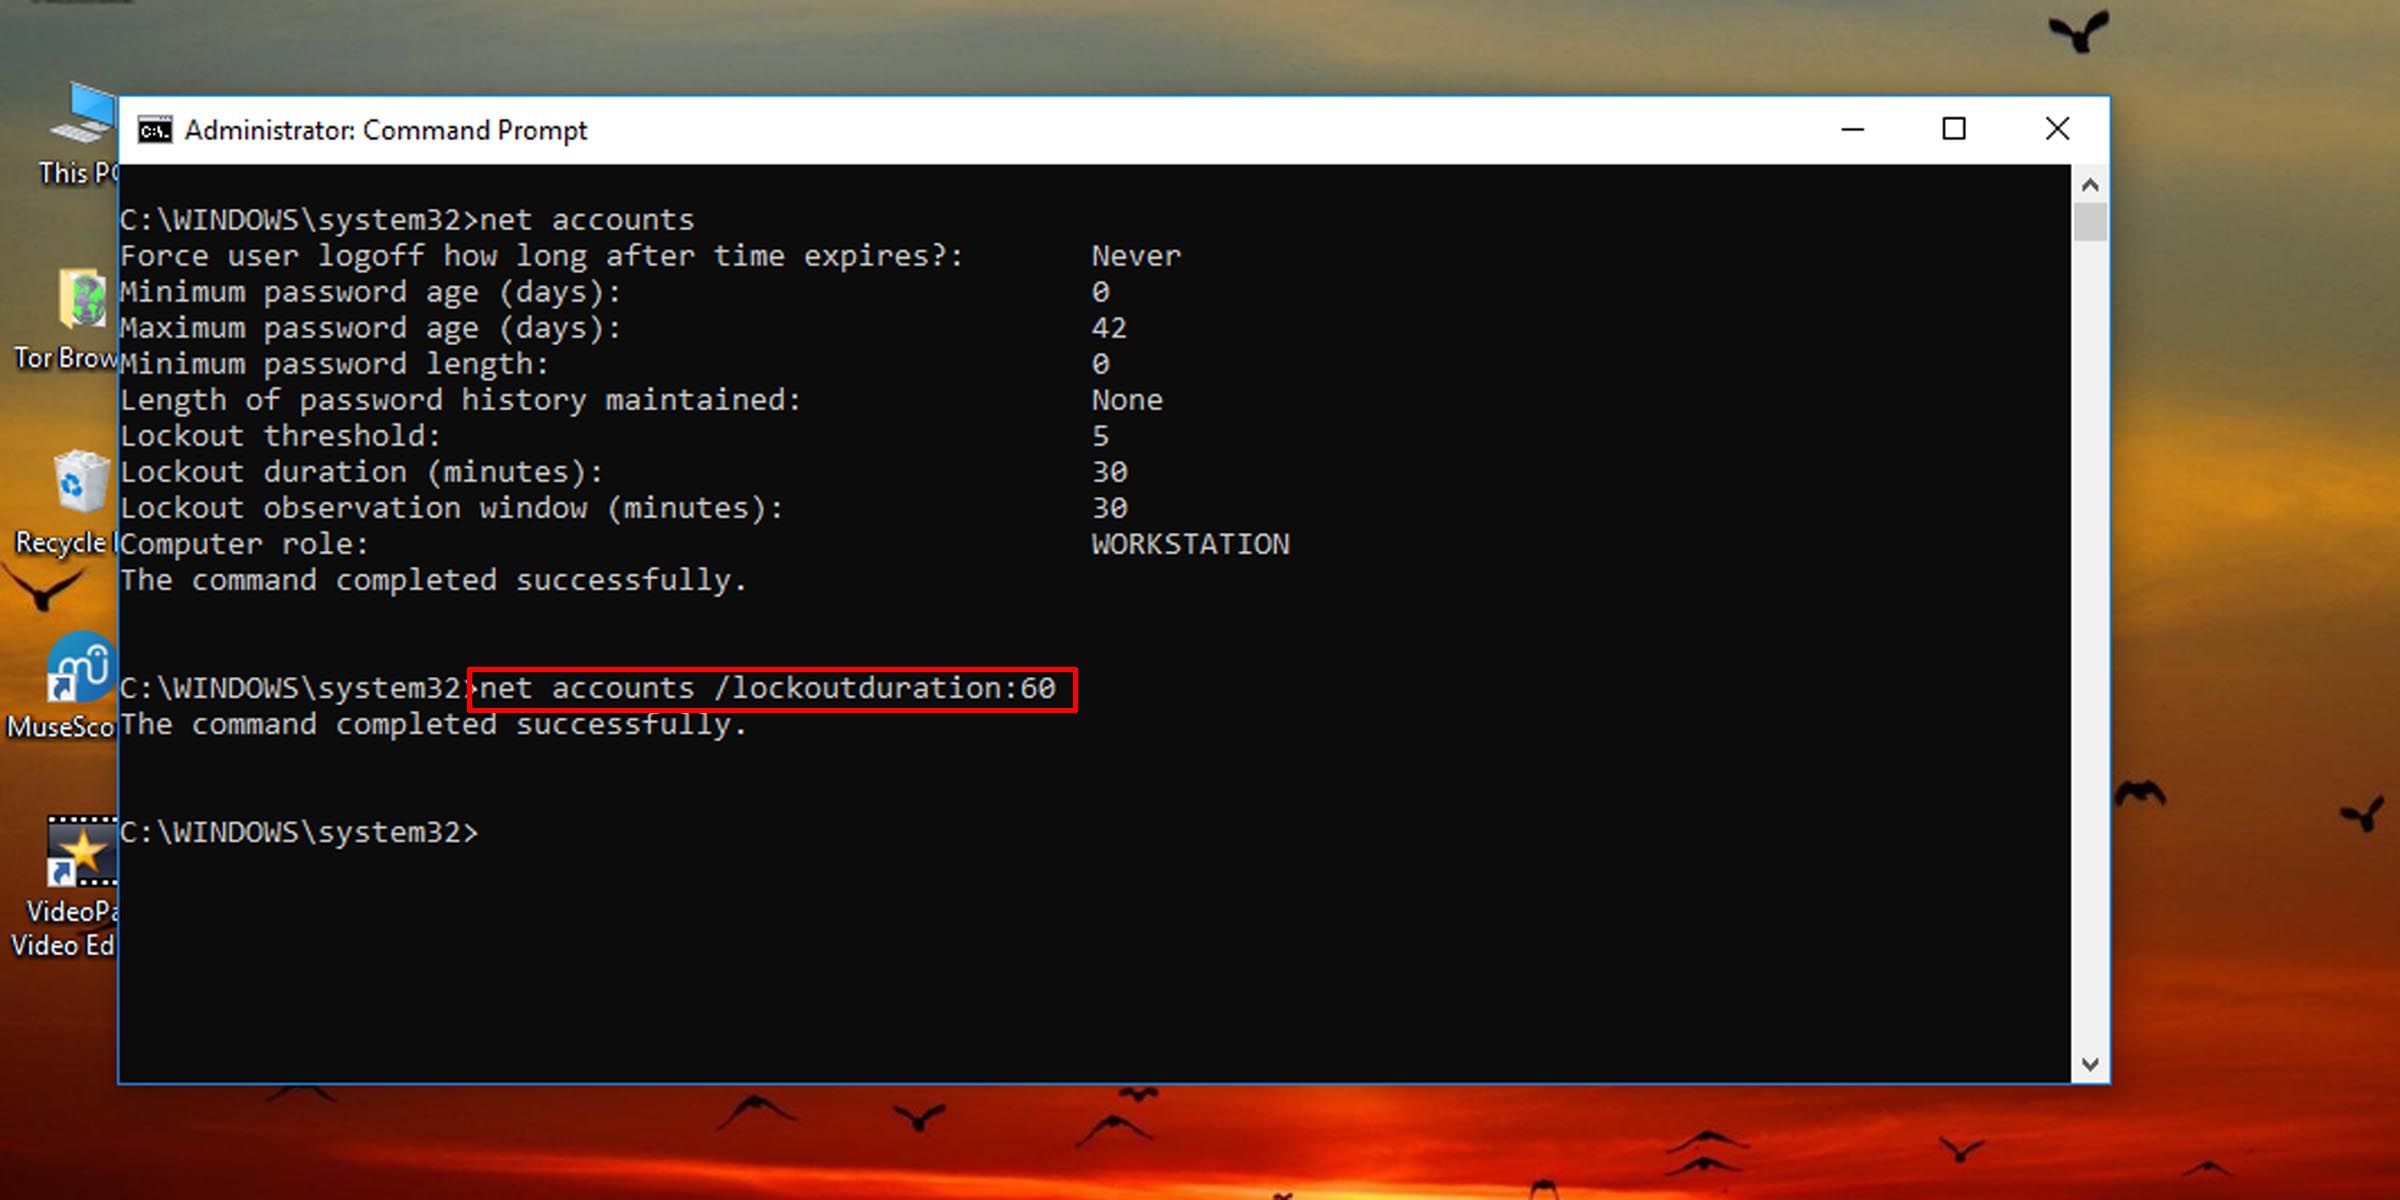
- Open Command Prompt as Administrator . You can also perform this task with Windows PowerShell if you prefer.
- Type the following command into the console and hit Enter:
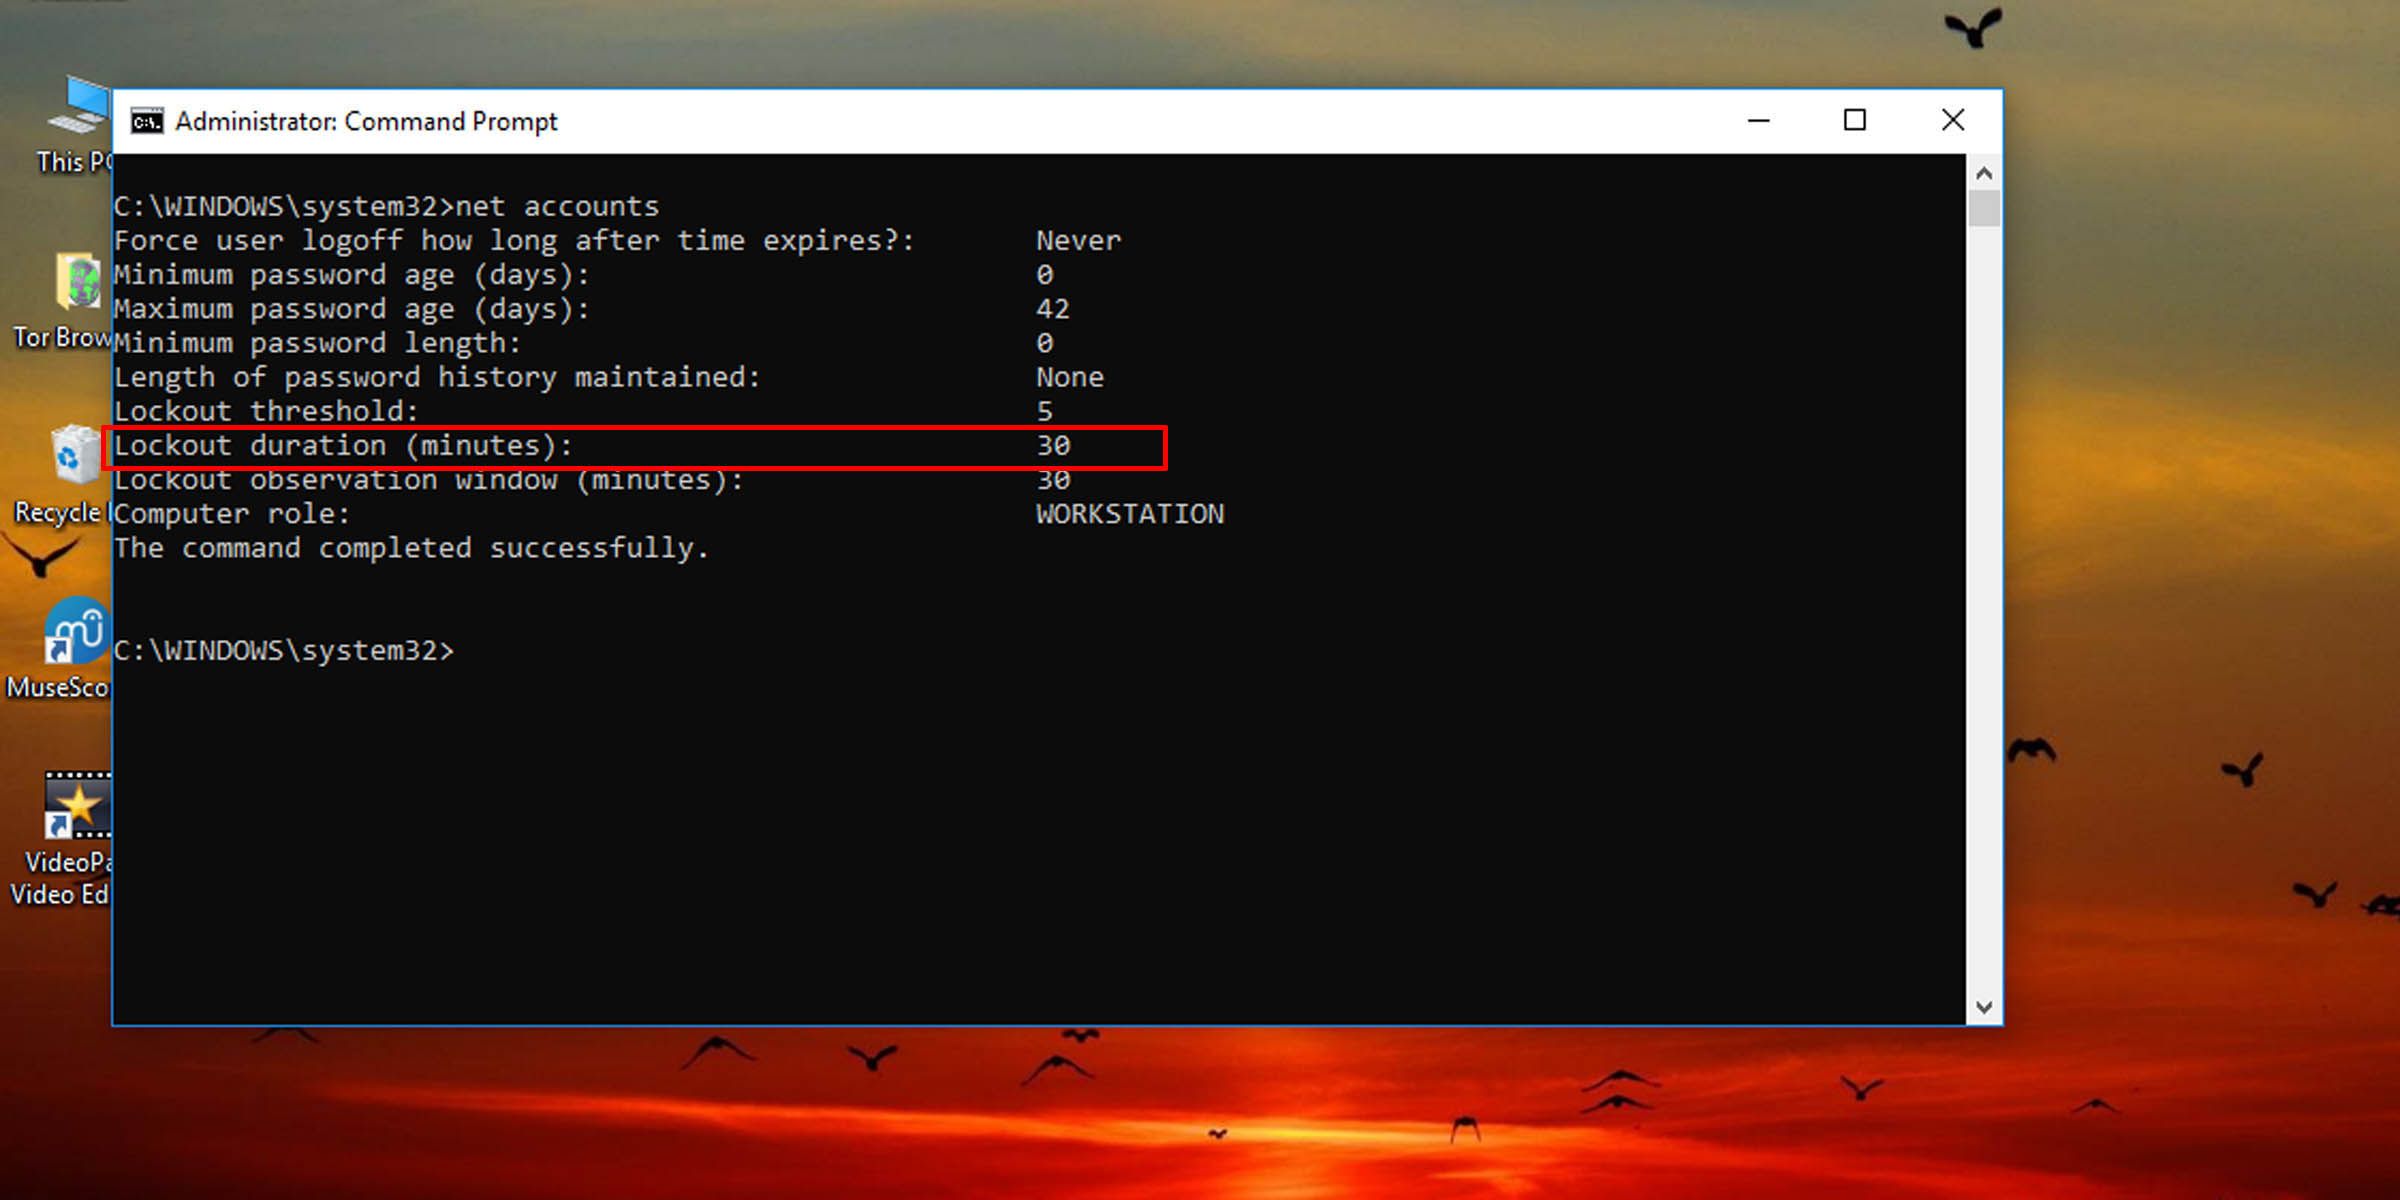
net accounts
- This will pull up information, among other things, about how long this account lockout duration is currently set.
- To change account lockout duration on Windows 10 and 11, type the following command into the console and hit Enter. Replace the number “60” in the command with any other number from zero to 99,999 to set how many minutes a user will have to wait before being allowed to try and log in again.
net accounts /lockoutduration:60
Setting this value to zero means the locked-out user will not be able to sign in unless an administrator intervenes and unlocks it. Also, the account lock-out duration must be greater than or equal to the time for the system to automatically reset the number of failed login attempts .
If you don’t ever want users to be locked out of their local accounts, you must change the number of failed login attempts a user is allowed.
Find the Balance Between Security and Convenience
Setting account lockout duration too high will cause inconvenience, but if you set it to zero, an administrator will have to be contacted each time a user locks themselves out. Find a balance between security and convenience when it comes to changing how long a user is locked out after a set number of failed login attempts.
Here’s how to change how long someone using a specific Windows machine is locked out if they enter the wrong login credentials a certain number of times. You must be signed in as an administrator to change this policy.
Also read:
- [New] 2024 Approved X-Audio Studio Pro for Computer Users
- [New] Master Multitask Media with Ease Expertly Using Netflix’s Picture-In-Picture Feature
- [Updated] Capturing More with Less - LG's 360 Camera Redefined & Reviewed for 2024
- [Updated] In 2024, Ensuring Smooth Transition Livestreaming Old Videos on FB
- Addressing the Challenge of svchost.exe (NETsvcs): Strategies to Curtail Its Significant Impact on Internet Usage
- Gmail Not Working on Samsung Galaxy F14 5G 7 Common Problems & Fixes | Dr.fone
- How to Hide/Fake Snapchat Location on Your OnePlus 12R | Dr.fone
- In 2024, The Most Useful Tips for Pokemon Go Ultra League On Honor 90 Pro | Dr.fone
- Local Groups, Local Power: Admin Techniques for Win11/10 Homes
- Overcoming GeForce Experience Error X0001 in Windows OS
- Quick Access Methods for Windows Control Panel
- Quick-Fix Guide to Fast League of Legends Downloading: Say Goodbye to Delays
- Strategies for Printer Availability on Windows 11
- Streamlining Tech Usage: Leveraging Windows Widgets
- Troubleshooting Hogwarts Game's RAM Overflow Issue
- Title: How to Change Lockout Duration After Failed Logon Attempts in Windows 10 and 11
- Author: Richard
- Created at : 2024-10-23 16:18:54
- Updated at : 2024-10-26 16:18:10
- Link: https://win11-tips.techidaily.com/how-to-change-lockout-duration-after-failed-logon-attempts-in-windows-10-and-11/
- License: This work is licensed under CC BY-NC-SA 4.0.

