How to Fix a Grayed-Out Secure Boot in the BIOS on Windows
How to Fix a Grayed-Out Secure Boot in the BIOS on Windows
You need a secure boot-compatible computer to install Windows 11. But there are other reasons to enable secure boot when available. It is a safety standard that prevents malicious codes from running on your PC during boot.
But what if secure boot option is grayed out in BIOS? This can happen due to incorrect changes to your BIOS settings. You can load the default boot configuration to restore secure boot on Windows. Here is how to troubleshoot and fix the secure boot grayed-out problem in the BIOS.
1. Set Admin Password in BIOS
You can set an administrator password in BIOS security to prevent unauthorized access to the setup utility. On some computers, you may need to enable an administrator password to enable secure boot.
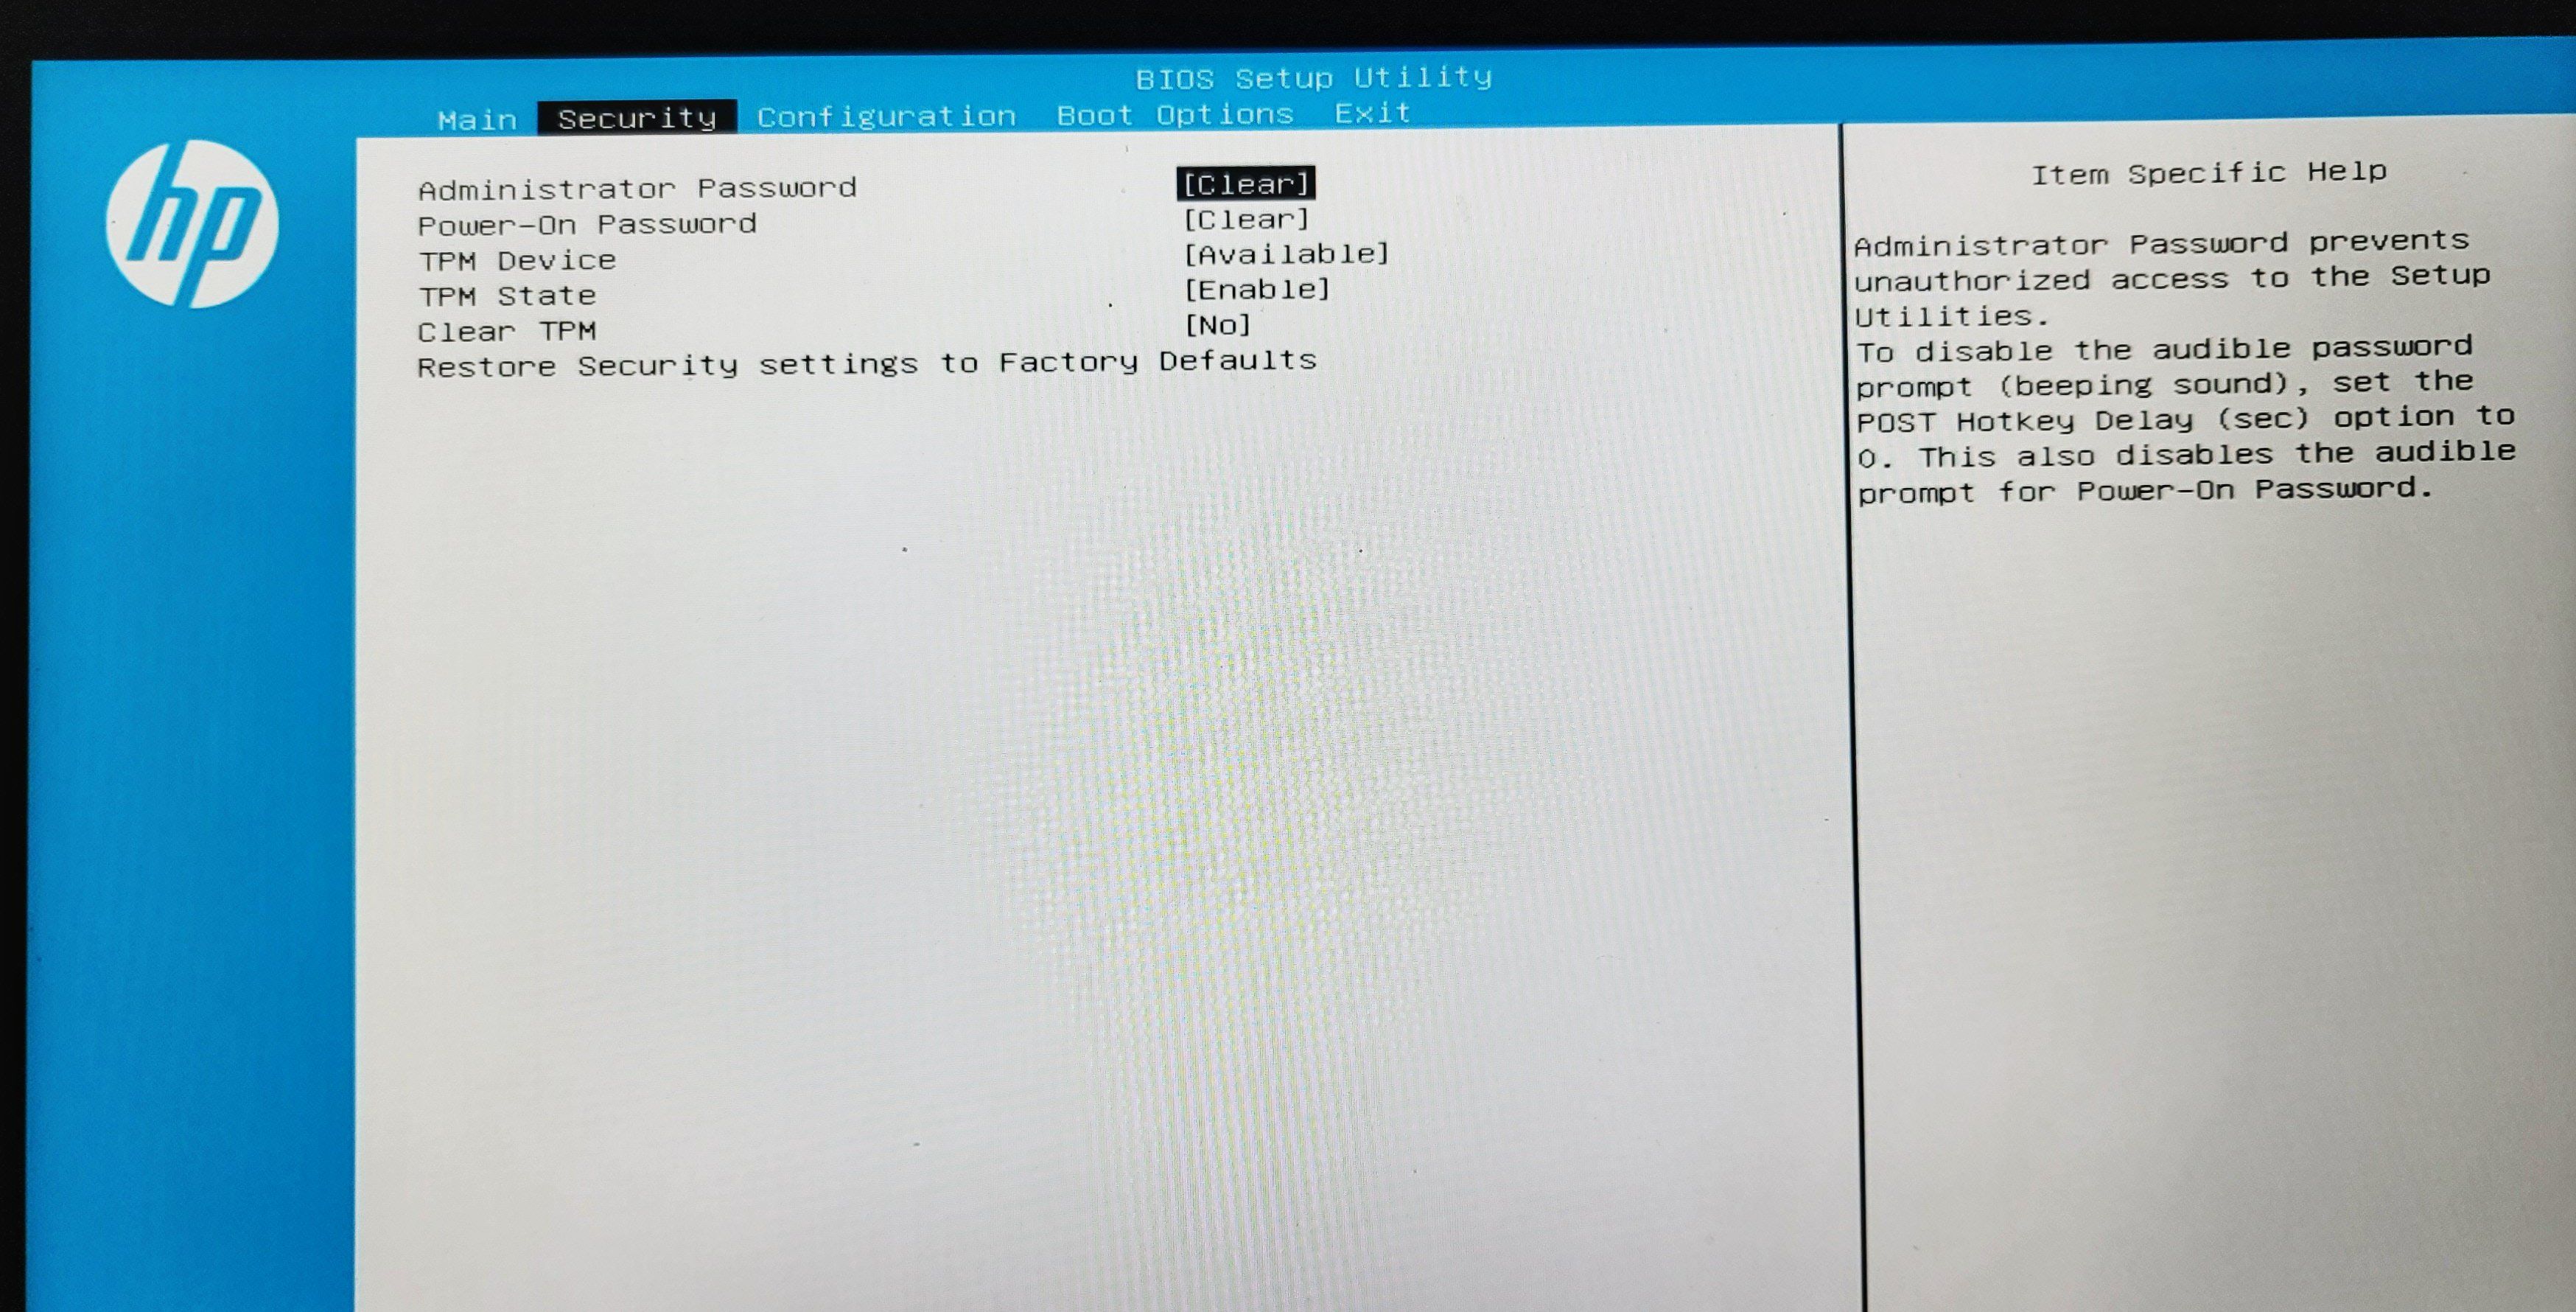
To set an administrator password, you need to access the BIOS Security tab. The following steps are for an HP Pavilion laptop. Refer to your manufacturer’s manual for other OEM devices.
To set an administrator password in BIOS:
- Shut down your PC.
- Press thePower to restart and then start pressing theF10 key to enter BIOS Setup Utility. Other manufacturers like Dell, Asus, and Lenovo use F2 to access the BIOS utility.
- In the BIOS Setup Utility, use the right and left arrow keys to open theSecurity tab.

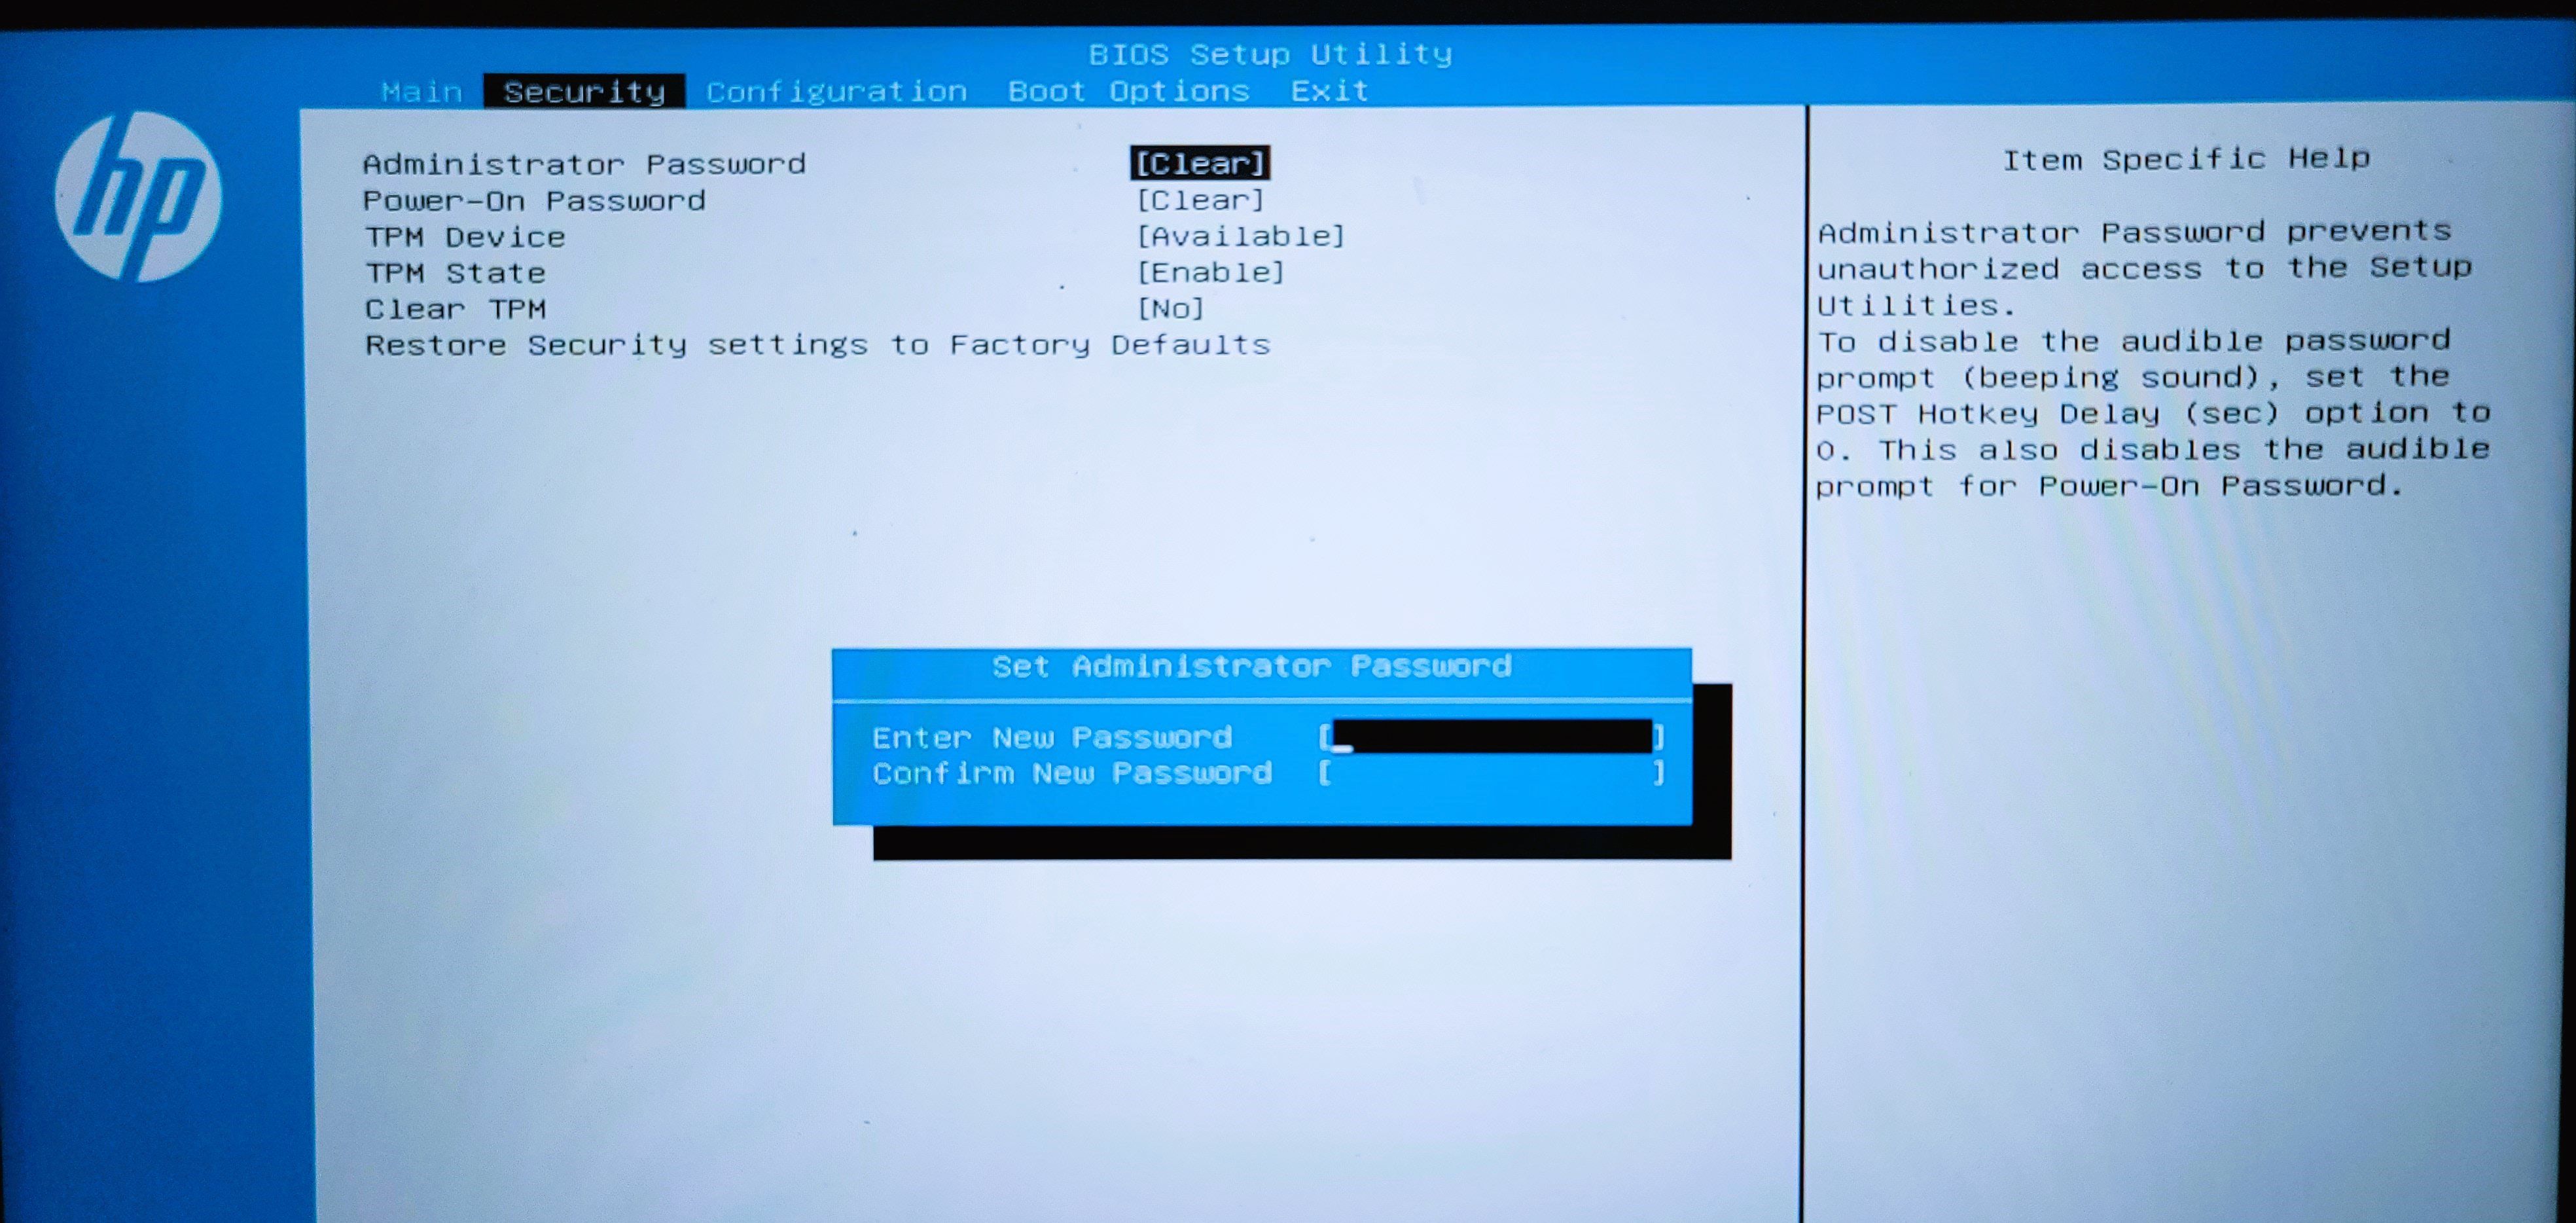
- Next, selectAdministrator Password and pressEnter . On other computers, you may see theSet Supervisor Password option instead.
- Here, type your new administrator password and then repeat the password in theConfirm New Password field.
- PressEnter to save the password.
- Next, pressF10 to save the changes and exitBIOS .
- Boot intoBIOS again, andSecure Boot should be available for use.
You can remove the administrator password after enabling Secure Boot. To do this, open theSecurity tab in BIOS and selectAdministrator Password . Next, enter your administrator password, but leave theEnter New Password andConfirm New Password fields blank. PressEnter again to save the changes.
2. Disable Fast Boot in BIOS
Fast Boot is a UEFI/BIOS feature. When enabled, it skips the check for a USB device, such as a bootable drive to speed up the boot process. However, the same can also prevent you from enabling secure boot in BIOS.
To fix the issue, boot into the BIOS Setup Utility and disable Fast Boot. This feature may not be available on all computers. If not available, skip to the next solution.
Note that the fast boot feature is different from Fast Startup. Fast Boot is a BIOS feature, whereas Fast Startup is a Windows feature to speed up the boot process .
To disable fast boot in BIOS:
- Boot intoBIOS
- Use the right and left arrow keys to open theAdvanced tab.
- Next, selectBoot Options and pressEnter .
- SelectFast Boot and set it toDisabled .
- PressEnter to save the changes.
- PressF10 to save the changes and exit.
- After the computer restarts, boot into BIOS to see if you can access Secure Boot.
Power Tools add-on for Google Sheets, 12-month subscription
3. Restore the BIOS Security Settings to Factory Defaults
You can restore BIOS security settings to factory defaults to enable secure boot. If you have made major changes to the BIOS security settings, a reset will remove the custom configuration and restore the factory default security settings. Most BIOS utilities allow you to perform a restore in the BIOS Security tab.
To restore BIOS Security settings to factory defaults:
- Boot into BIOS.
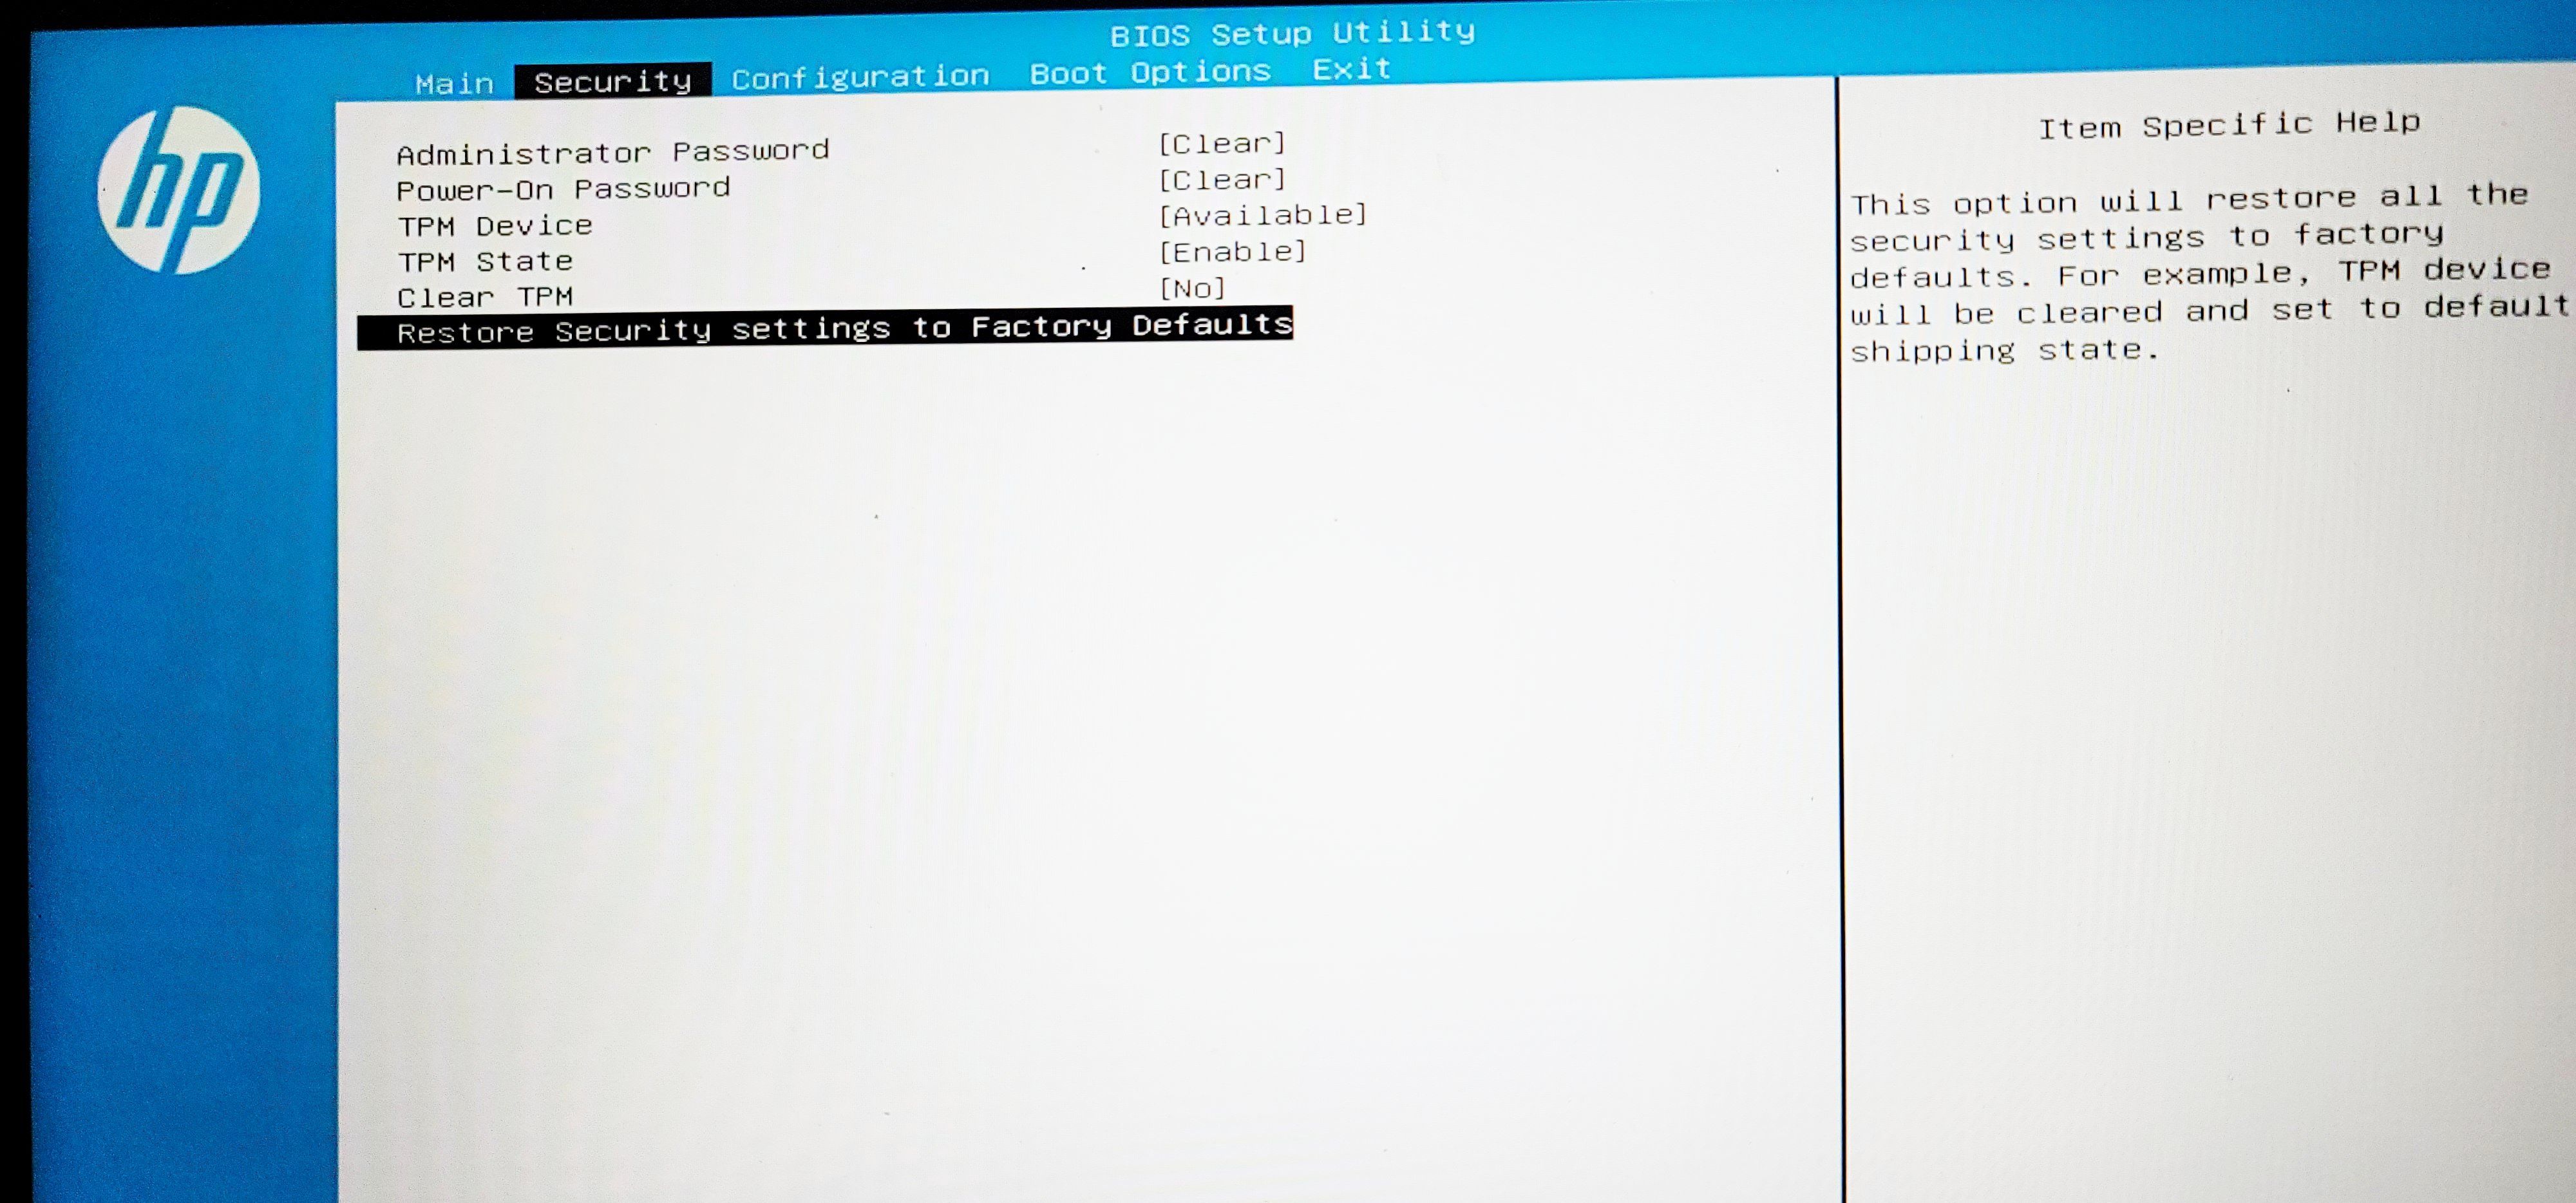
- Open theSecurity tab using the arrow keys.
- Use the down arrow keys and selectRestore Security settings to factory defaults .
- Read the description in theSecurity Feature Reset Request dialog. Here you’ll need to enter a pass code to complete the reset request.
- So, enter the shownpass code and pressEnter .
- PressF10 to save the changes and exitBIOS .
- Boot into BIOS again and check if the greyed-out secure boot problem is resolved.

4. Update BIOS
 Easy GIF Animator is a powerful animated GIF editor and the top tool for creating animated pictures, banners, buttons and GIF videos. You get extensive animation editing features, animation effects, unmatched image quality and optimization for the web. No other GIF animation software matches our features and ease of use, that’s why Easy GIF Animator is so popular.
If the issue persists, your problem may be due to outdated BIOS firmware. While you don’t need to update your system BIOS as frequently, the newer version tends to bring bug fixes, performance improvements, and newer hardware support.
A BIOS update is recommended if your motherboard or laptop manufacturer recommends it. Any updates will be available via the laptop or motherboard manufacturer’s websites.
Prepare Your Computer for a BIOS Update
Before you update your BIOS, you’ll need to suspend BitLocker protection . You may also need to temporarily turn off Windows Security protection and third-party antivirus.
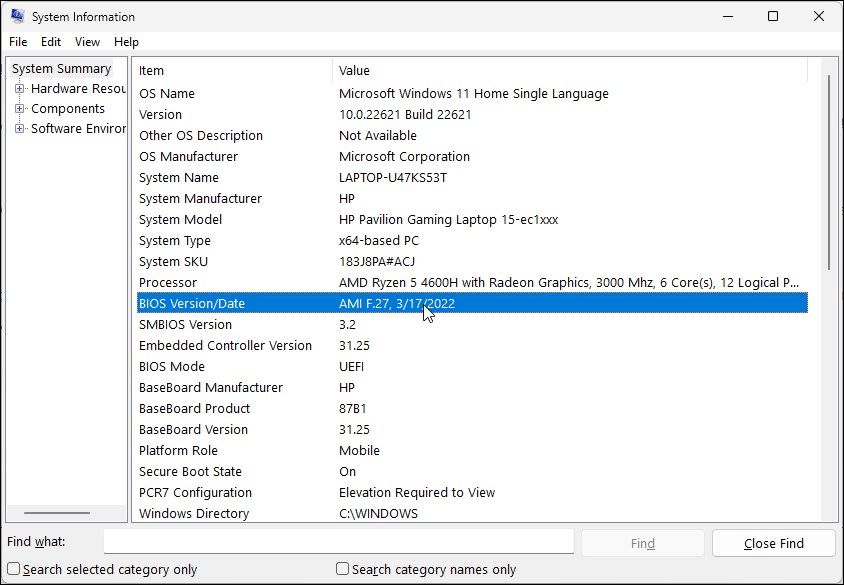
Next, check your current BIOS version. You don’t want to install an older version of BIOS on your computer. So, press theWin key, typesystem information , and open the System Information app from the search results. In the System Information dialog, locate and check theBIOS Version/Date entry. Note down the BIOS version, for example,AMI F.27, 3/17/2022 .
Unlike other driver and software feature updates, updating your BIOS can be tricky. You can update BIOS from within BIOS, where the BIOS Setup Utility can check your laptop manufacturer’s website for BIOS updates. This option, however, is not available for all computers.
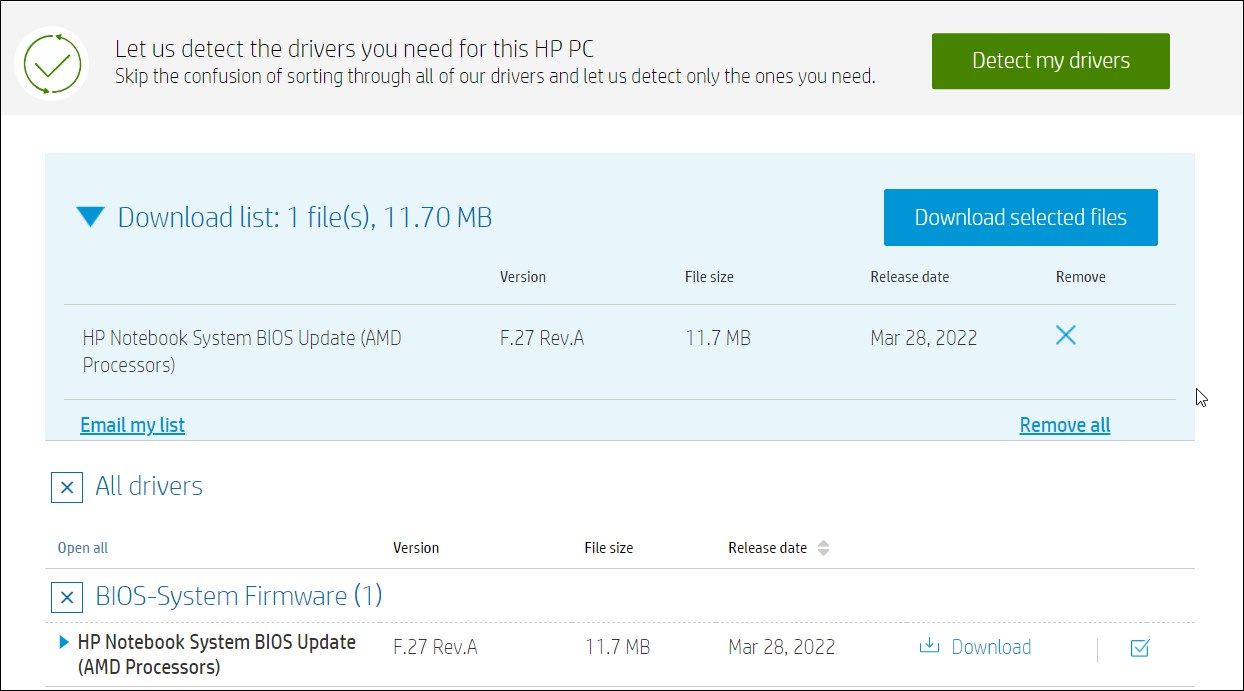
Alternatively, you can also manually install BIOS from within Windows. For example, on an HP computer, go to the HP Drivers page . Select your device manually or let the website detect the device for you.
Next, check for the pending drivers and BIOS updates. If detected, download the HP Notebook System BIOS Update (Intel / AMD Processors). Make sure to compare the version with the version installed on your PC. If same or older, you don’t need to update your BIOS.
To update BIOS, run the firmware file and follow the on-screen instructions. Your computer will restart into the BIOS Update utility. SelectApply Update Now and wait for the update to finish installing. Once done, boot into BIOS and check if the Secure Boot option is available. Make sure to enable your antivirus and BitLocker protection again.
 ZoneAlarm Pro Antivirus + Firewall NextGen
5. Load the BIOS Defaults Settings
You can restore your BIOS to its factory default settings to fix issues occurring due to corrupt BIOS configuration. While loading the default settings will not affect your data, we recommend you back up any and all the important data on your computer before proceeding with a BIOS reset.
To load BIOS defaults settings:
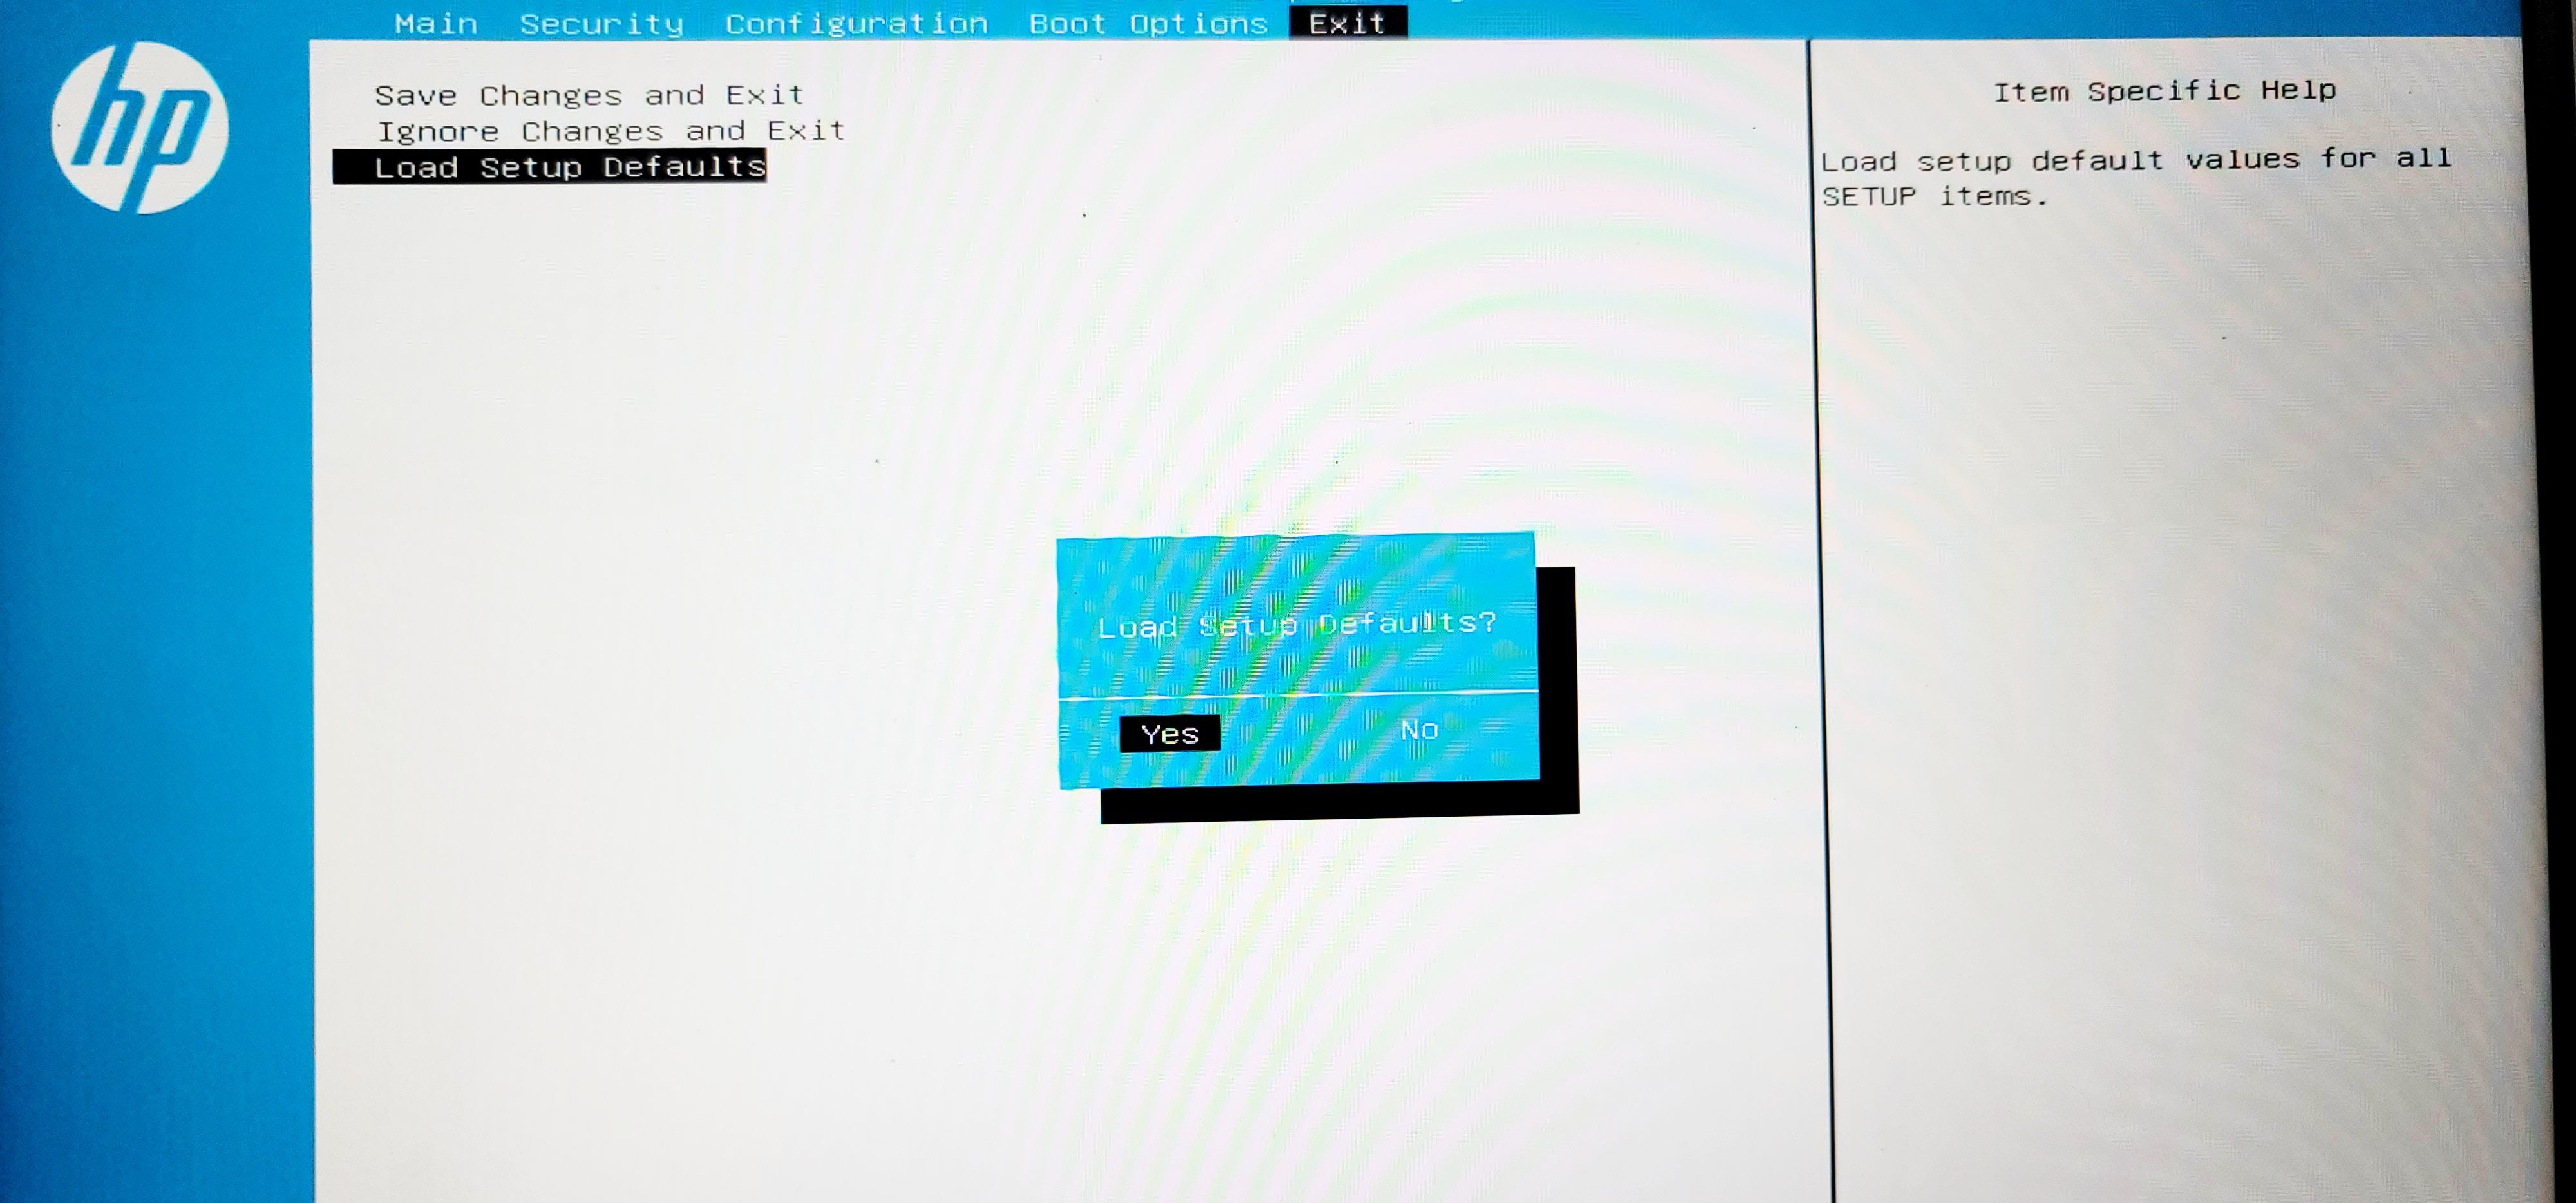
- Boot intoBIOS and open theExit tab.
- Next, select theLoad Setup Defaults option and pressEnter .
- SelectYes and pressEnter . This will load setup default values for all SETUP items.
- SelectSave Changes andExit .
- Boot intoBIOS again and check if the secure boot option is restored.
Fixing the Grayed Out Secure Boot Option in BIOS
Secure Boot in BIOS is greyed out if the administrator password is not set. In other instances, incorrect BIOS security settings and outdated BIOS can cause the issue. As a last resort, try to restore BIOS settings to factory defaults to restore Secure Boot in BIOS.
- Title: How to Fix a Grayed-Out Secure Boot in the BIOS on Windows
- Author: Richard
- Created at : 2024-08-16 02:27:42
- Updated at : 2024-08-17 02:27:42
- Link: https://win11-tips.techidaily.com/how-to-fix-a-grayed-out-secure-boot-in-the-bios-on-windows/
- License: This work is licensed under CC BY-NC-SA 4.0.