How to Fix a Persistent 0X800f0831 Error in Windows 10 and 11

How to Fix a Persistent 0X800f0831 Error in Windows 10 and 11
The 0x800f0831 error occurs when the users try to install the pending system updates on their Windows computers. Like other update errors, it is frustrating and can lead to inconvenience.
In this guide, we will take a detailed look at the causes of this problem and discuss several solutions that can help you fix the issue once and for all.
Disclaimer: This post includes affiliate links
If you click on a link and make a purchase, I may receive a commission at no extra cost to you.
What Causes the Update Error 0x800f0831 in Windows?
There can be several reasons why you cannot install the latest updates on the system due to the 0x800f0831 error code. This issue typically occurs when the update you attempt to install requires a manifest file of an older update package.
When you install an update package on Windows, it comes with a manifest file that contains the update components and other relevant settings. In some cases, the update package you are trying to install requires the manifest file of an older package, but that update is not present in the system. This results in issues like the one at hand.

Other than this, it can also be caused by one or more of the following:
- Corruption errors within the system: Your system might be corrupted or infected by malware, preventing the update services from working properly.
- Update services are disabled: The services required to install updates on your system might be disabled or corrupt, affecting their functionality and causing the update error.
- VPN interference: The VPN you are using might be blocking the protocols used by Windows Update to download and install the latest updates. The same problem can also be caused due to a third-party security program installed on the system.
Having identified the possible causes of the problem, let’s examine the troubleshooting techniques that can help you resolve the problem at hand permanently.
1. Install the Missing Update
As we mentioned, this issue occurs when an older update with the required manifest file is missing from the system. It could be that the update was never installed or was accidentally removed.
In most cases, it occurs when the KB4512489 update is missing from Windows. You can manually install this update using the Microsoft Update catalog to fix the problem.
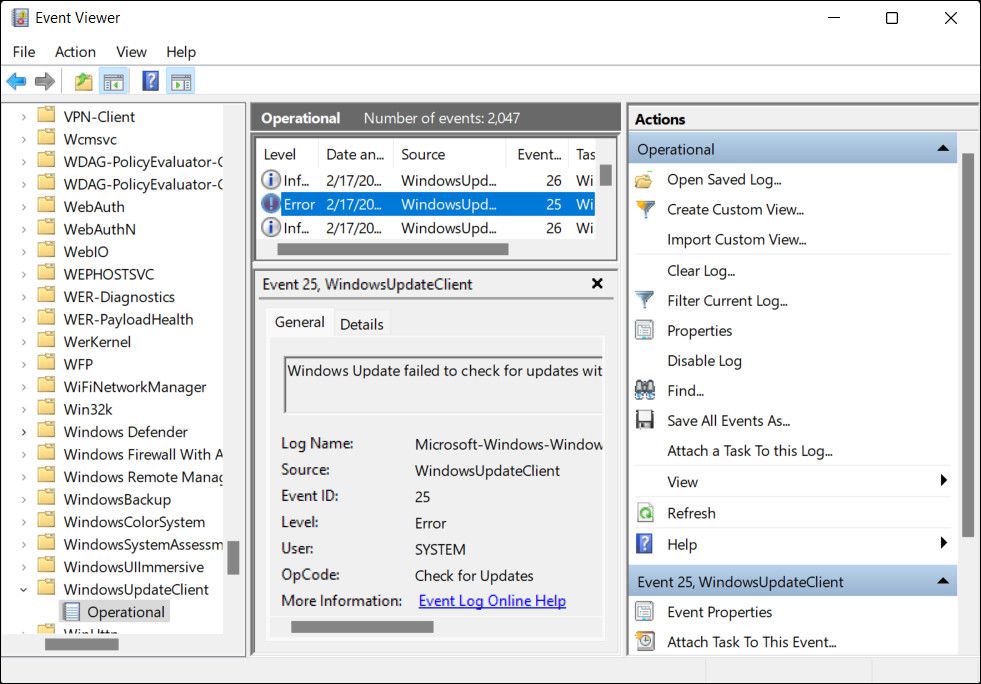
We recommend using the Windows Event Viewer to confirm the KB number of the update that is causing the problem. For this, you can open the Event Viewer and navigate to the following location:
Applications and Service Logs\Microsoft\Windows\WindowsUpdateClient\Operational
Here, look for the error and click on it. In the description area of the General tab, you should be able to view which missing update is causing the problem. Once you find that, use the Microsoft Update Catalog to search for this update. Take your time to download it.

After downloading the update, navigate to the download location and right-click on the .inf file. Choose Install and wait for the process to complete successfully. You should be able to install the update triggering the 0x800f0831 error once the missing update is launched in the system.
2. Eliminate Corruption Errors
You might also face the problem if the system is infected with a corruption error or malware.
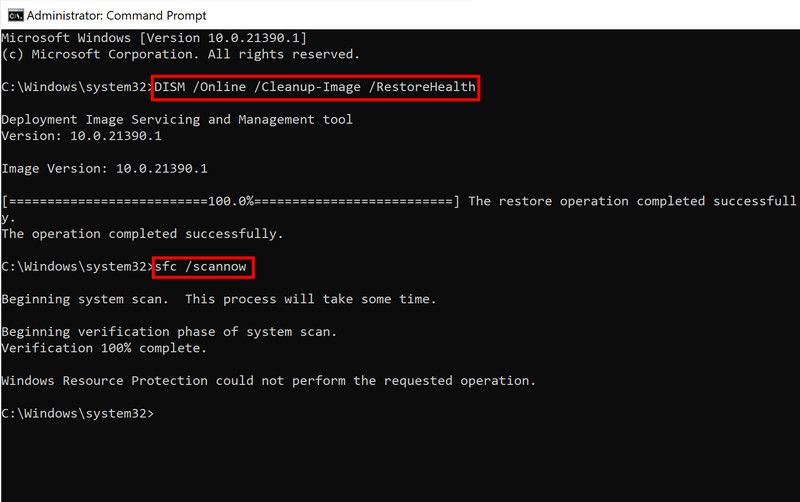
You can repair corrupt Windows files with Window’s built-in tools like SFC and DISM scan. Both these utilities are built into Windows by default and can be accessed using the Command Prompt.

Here’s how you can do both steps:
- Run the Windows Command Prompt as an Administrator
- Type the following command and press enter:
sfc /scannow - After the process completes, type the next command and press enter:
DISM /Online /Cleanup-Image /RestoreHealth
Once the process completes, try running Windows Update again and see if this fixes the problem.
The System File Checker scans the critical operating system files for underlying issues. If a problem is discovered, the tool with replace the file with its functional cached counterpart. DISM, on the other hand, can repair system images to fix problems. It is typically considered more powerful than SFC and is used to fix issues the System File Checker cannot resolve.
But if your computer is infected with malware, you should try one of the best malware removal tools to clean up your PC.
3. Repair the Component Store
Some of the update components required for an app or system update to install can be missing or might have gotten corrupt, which is preventing you from installing the desired update.
If this scenario is applicable, you can fix the problem by resetting the Windows update components using the Command Prompt. While you are at it, we also recommend restarting the critical update services in the Services utility of Windows. Restarting these services will eliminate any temporary bugs or glitches within them, fixing the issue in the process.

Here are some services that we recommend restarting:
- Windows Update
- Background Intelligent Transfer Service (BITS)
- Cryptographic Services
Here’s how you can do so:
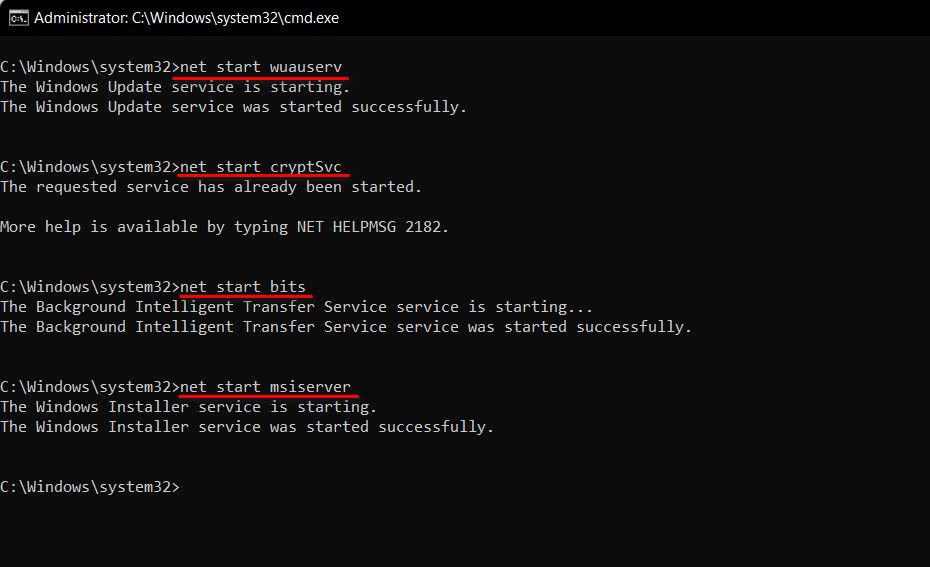
- Run the Windows Command Prompt as an Administrator.
- Type the following commands and press Enter individually:
- net start wuauserv
- net start cryptSvc
- net start bits
- net start msiserver
Once they restarted, close the Services window and check if the problem is resolved.
4. Disable Your VPN and Other Third-Party Security Software

Using a VPN on your computer might block the protocols and ports Windows requires to download and install update packages.
We recommend disconnecting the VPN and trying to install the update to check if this is the case. If it works, then it implies that the VPN was the culprit; in this case, you can switch to a better alternative to avoid this issue.
We also recommend disabling your antivirus program before you attempt to install updates on the system. Like the VPN, third-party security programs can also interfere with the legitimate system process and cause issues like the one at hand. They might also block the updates altogether due to a false alarm.
Install the Targeted Updates Easily
Installing important system and app updates should be simple, but unfortunately, that is not always the case. Hopefully, the methods listed above will help you fix the update error 0x800f0831 once and for all.
If you still struggle to resolve the problem, consider resetting the system to its default state or performing a clean install. However, remember that these are time-consuming methods and should be only used as a last resort. Alternatively, you can report the issue to Microsoft and wait for them to release an official fix for the problem.
Also read:
- [New] Pro Tips to Perfect Minecraft Pixelation
- [Updated] Dynamic Public Speaker Review V8
- 2024 Approved Crafting Your Ultimate Style Haul Video
- 2024 Approved Shaky Video Tamer for Handheld Cams
- 5 Hotkey Hits: Unlock Maximum Auto Click Potential
- A Streamlined Guide to Resolving Roblox Error Code 262
- A Symphony of Sounds: Taming IRQ Noise
- Adding Directories to W11's Right-Click Menu Steps
- Addressing Invalid Update File Signatures on WinOSes
- Altering FN Key Functions: Windows 11 Edition
- Avoid Epic Game Launcher Stubbornness On W11 Computers
- Boost Your System: Mastering Windows 11 Efficiency
- Bridging Minds Online The Ultimate Guide to Facebook Video Screensharing for 2024
- Download and Install Insignia Drivers on Windows: Effortless & Time-Saving Method
- Host Free Windows-Based GPT Clones Using GPT4All.
- Resolving the Missing Comctl32.dll File: A Step-by-Step Guide
- Step-by-Step Tutorial: Dealing with Missing or Corrupt Mscorwks.dll Files
- Top 10 Fixes for Phone Keep Disconnecting from Wi-Fi On Vivo T2 Pro 5G | Dr.fone
- Transforma Tu Archivo .TS en .MP4 Gratuito Y Perfecto: El Método Más Eficaz Para La Conversión Online
- Title: How to Fix a Persistent 0X800f0831 Error in Windows 10 and 11
- Author: Richard
- Created at : 2024-11-29 20:11:35
- Updated at : 2024-12-06 16:17:33
- Link: https://win11-tips.techidaily.com/how-to-fix-a-persistent-0x800f0831-error-in-windows-10-and-11/
- License: This work is licensed under CC BY-NC-SA 4.0.