How to Handle Error Code: 0X80 Point-to-Point Link Failure on Windows

How to Handle Error Code: 0X80 Point-to-Point Link Failure on Windows
The network error 0x800704b3 occurs when you attempt to connect to the internet or a network resource. This code is also associated with a message that states “The network path was either typed incorrectly, does not exist, or the network provider is not currently available. Please try retyping the path or contact your network administrator.”
Below, we discuss the different solutions that you can try to fix this problem for good.
1. Run the Network Troubleshooter
If you encounter a network error, the first thing you should try is running the network troubleshooter. It’s a handy tool built into Windows that can quickly scan your network settings, detect common network issues, and even apply automatic fixes.
In case the troubleshooter can’t resolve the problem automatically, it may offer suggestions for manual fixes that you can try out.
Here is how to proceed:
- Press the Win + I keys together to open the Settings app.
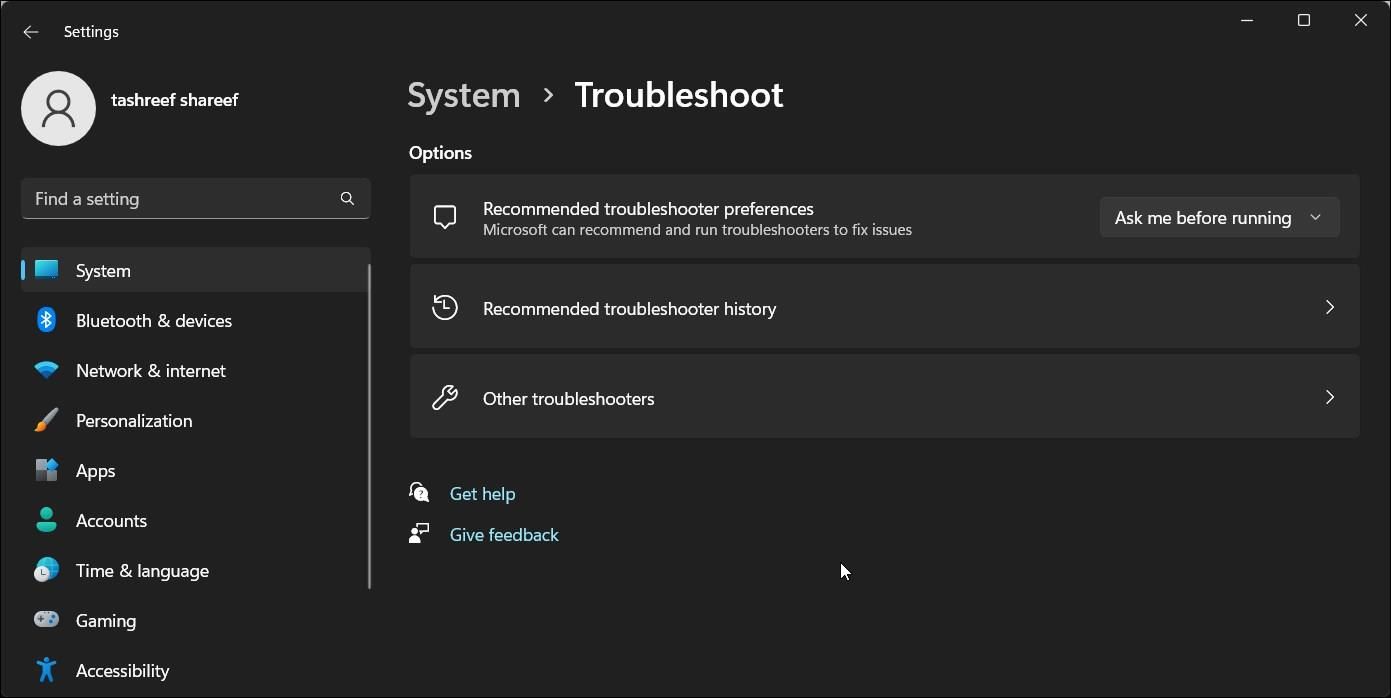
- Choose System > Troubleshoot.
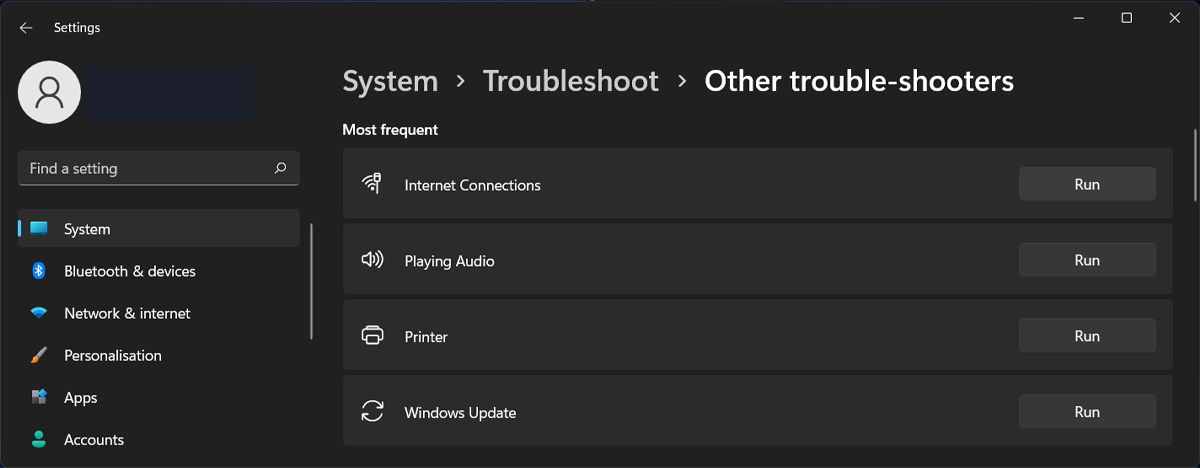
- Click on Other troubleshooters.

- In the following window, look for the Network troubleshooter and click on the Run button for it. The troubleshooter will now start scanning the system for potential errors. If it finds anything, it will notify you.

- Once the scan completes, check the results. If the troubleshooter has suggested fixes, click on Apply this fix.
- Otherwise, choose Close the troubleshooter and move to the next method below.
2. Enable the Related Services
There are a few vital Windows services that play a crucial role in ensuring proper network connectivity. These services are responsible for establishing and maintaining network connections. However, if any of these services become corrupt or malfunction, it can lead to the network error you are experiencing.
Here is how you can ensure the required services are running:
- Press the Win + R keys together to open Run.
- Type “services.msc” in Run and click Enter.
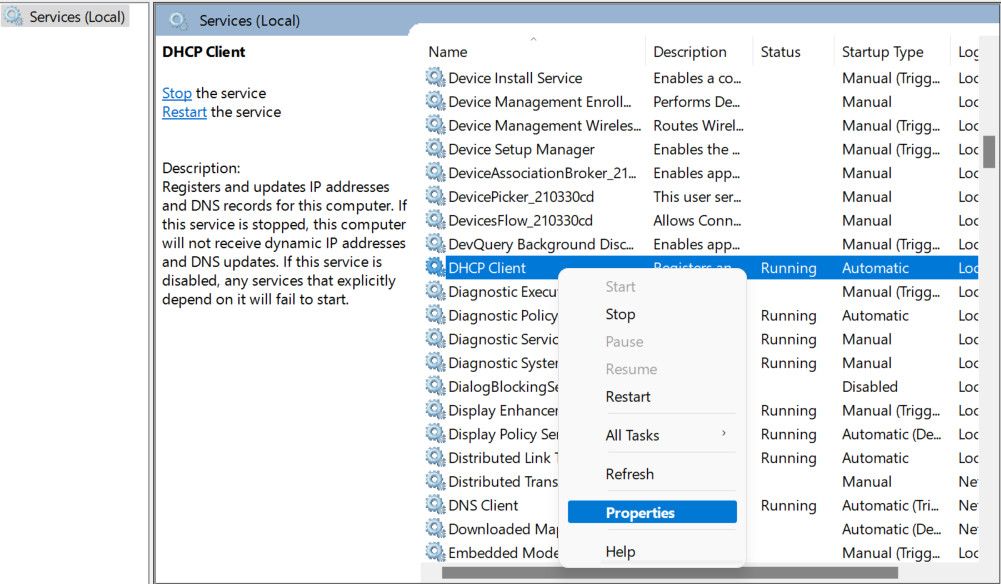
- In the following window, locate the DHCP Client service and right-click on it.
- Choose Properties from the context menu.

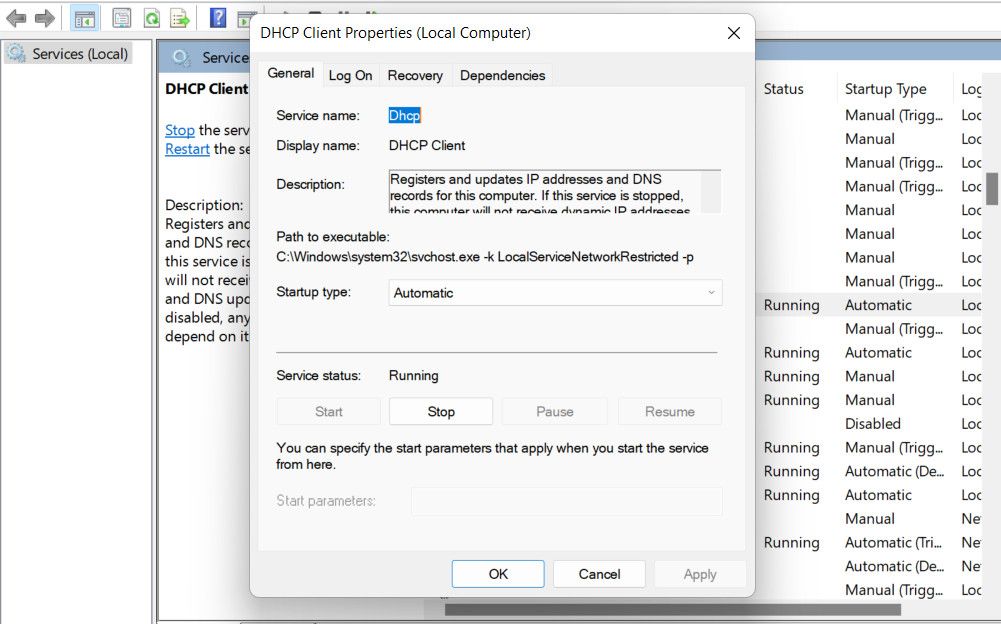
- Click on the Start button for it if the service was not running already. If it was, click Stop, wait for a few seconds, and click Start again.
- Ensure the Startup type is set to Automatic.

- Click Apply > OK to save the changes.
Perform the same steps for these services:
- DNS Client
- Network Connections
- Network List Service
- Network Location Awareness
- TCP/IP NetBIOS Helper
- WLAN AutoConfig (if using Wi-Fi)
Once all the services are running, close the Services window and check if the problem has been resolved. While you are at it, you can also try to update your network drivers as in some cases, outdated or corrupt drivers can prevent the system from establishing successful connections, leading to issues like the one at hand.
3. Disable and Re-enable Network Adapter
You can also try to reset your network connection to fix the problem. This will resolve temporary glitches or conflicts that might be causing the network error.
Follow these steps to proceed:
- Right-click on the network icon in the corner of the taskbar. It typically is in the form of a computer monitor or a Wi-Fi signal indicator.
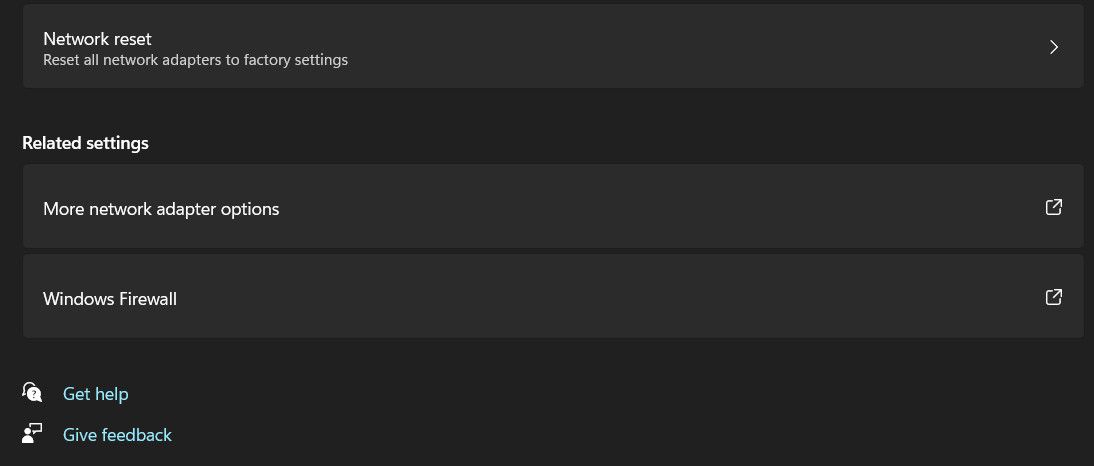
- Choose Open Network & Internet settings from the context menu. This will launch the Network & Internet settings window.
- Navigate to Advanced network settings > More network adapter options.

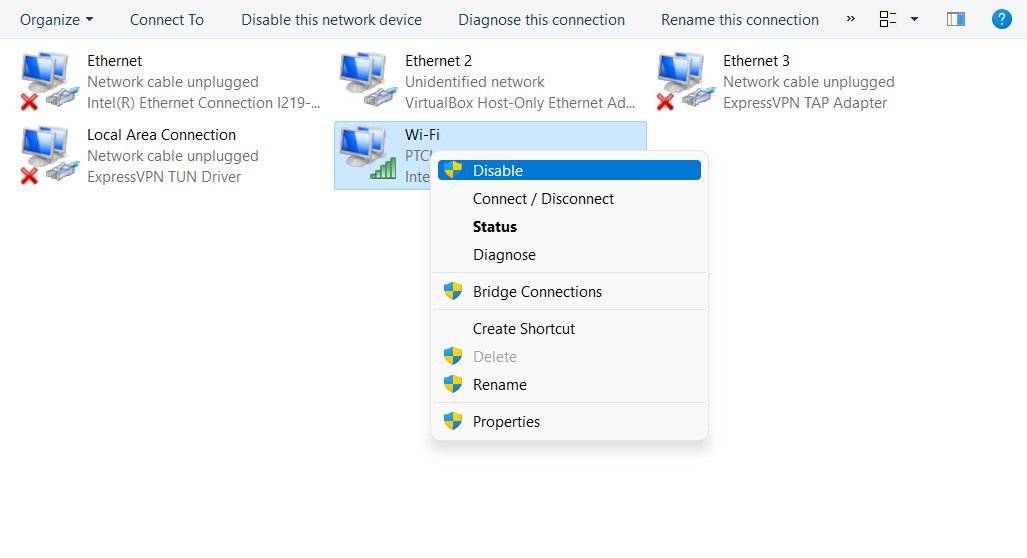
- You should now see a list of available network adapters. Right-click on the one you are currently using and choose Disable from the context menu.

- Wait for a few before right-clicking on it again and choosing Enable.
- Once done, close the Settings window and try to perform the action that was initially triggering the error.
If the problem was being caused by issues with the adapter, this should fix them.
4. Disable SMB 1.0 Protocol
The SMB (Server Message Block) protocol allows file and printer sharing between the different devices on a network. The SMB 1.0 is an older version of the protocol and can lead to different issues due to some known vulnerabilities as well as incompatibility.
Disabling it can help you prevent any potential conflicts or compatibility issues that might be arising from this protocol and leading to the error.
Follow these steps to proceed:
- Press the Win + S keys together to open the Search utility.
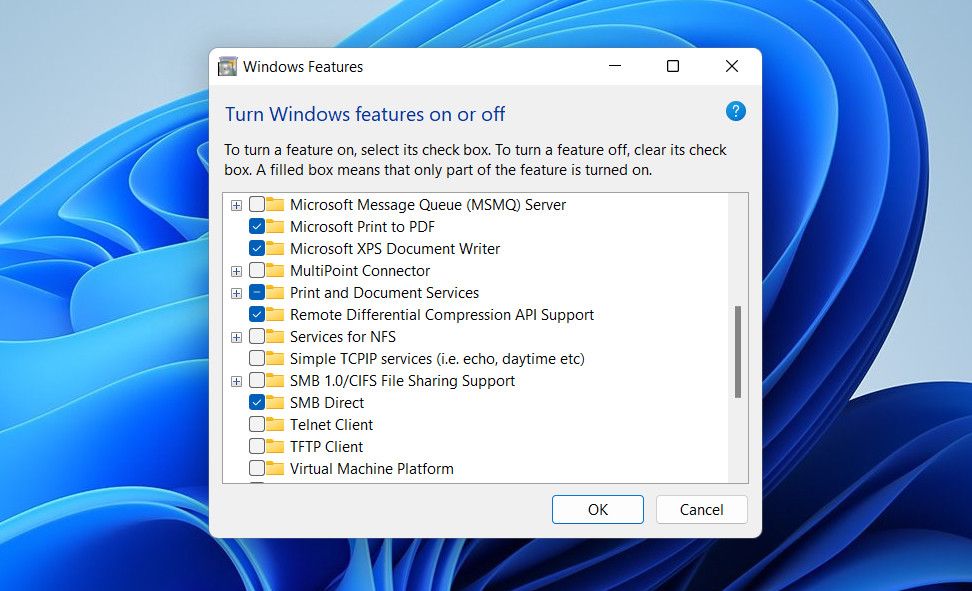
- Type Windows Features and click on Open for “Turn Windows features on and off”.
- In the following dialog, locate SMB 1.0 and uncheck the box associated with it.
- If a confirmation prompt pops up, click Yes.

- Click OK to save the changes and restart your computer. Upon reboot, check if the issue is resolved.
5. Reset TCP/IP Stack
The TCP/IP stack is a set of protocols that enable and allow network communication on your computer. There are times when the TCP/IP settings can become corrupt or are simply misconfigured, which leads to issues like the one at hand.
To fix problems with the TCP/IP stack, you can reset it. This will revert it to its default, error-free state, hopefully resolving the network issue in the process.
Here is how you can do it:
- Open Run by pressing Win + R keys together.
- Type “cmd” in Run and press the Ctrl + Shift + Enter keys together to open Command Prompt as administrator.
- Click Yes in the User Account Control prompt.
- In Command Prompt, type the following command and click Enter to execute it. This will reset Winsock Catalog.
netsh winsock reset - Now, execute this command to reset the TCP/IP stack.
netsh int ip reset - Finally, restart your computer to apply the changes.
If the error persists, you can try repairing the system files and Windows image using the SFC and DISM utilities. Our comprehensive guide on using the built-in Windows troubleshooting tools discusses this in detail.
Network Errors Resolved
Network errors can be frustrating, especially if you need to access the internet urgently. Hopefully, the fixes we have listed above will help you fix the error at hand once and for all. If it reappears, you can contact the official Microsoft support team with the essential information and report the issue to them.
Below, we discuss the different solutions that you can try to fix this problem for good.
Also read:
- [Updated] Overlay Wizardry on Your Windows Desktop
- [Updated] Unclouded Vision Leading Online Tools for Crisp Imagery
- 2024 Approved Your Visual Impact Journey Begins with Our 50 FREE Banners!
- 網路移動中的無限 AIFF至MP3 轉換 - 使用 Movavi 進行 MP3 音頻優化
- Convert MP3 to WAV Files Free - Lossless Audio Conversion with Movavi
- Cutting-Edge Teamblend Skills for Smoothed Conferencing Borders for 2024
- Gratis Konvertereen Van WMV Naar WAV: Professioneel Onlinetool Von Movavi
- How to Reset a Locked HTC U23 Pro Phone
- Movavi OFFLINE GRATIS: Scambia Il Tuo Video in PDF O HTML Con Il Convertitore Di File Online Gratuito
- Next-Level Information Retrieval via Perplexity AI
- Possible solutions to restore deleted contacts from Poco C55.
- The Top 5 Android Apps That Use Fingerprint Sensor to Lock Your Apps On OnePlus 11R
- Top 15 Innovadoras Técnicas Para Crear Collage De Fotografías Con Eficacia - Guía De Movavi
- Understanding EPS Format & Steps for File Compatibility in Design Software
- オンラインで利用可能な無料MOVWMVファイル変換サービス - Movavi
- Title: How to Handle Error Code: 0X80 Point-to-Point Link Failure on Windows
- Author: Richard
- Created at : 2025-03-03 19:12:16
- Updated at : 2025-03-04 22:28:14
- Link: https://win11-tips.techidaily.com/how-to-handle-error-code-0x80-point-to-point-link-failure-on-windows/
- License: This work is licensed under CC BY-NC-SA 4.0.
