How to Turn Your Voice to Text in Real Time With Whisper Desktop

How to Turn Your Voice to Text in Real Time With Whisper Desktop
The very same people behind ChatGPT have created another AI-based tool you can use today to boost your productivity. We’re referring to Whisper, a voice-to-text solution that eclipsed all similar solutions that came before it.
You can use Whisper in your programs or the command line. And yet, that defeats its very purpose: typing without a keyboard. If you need to type to use it, why use it to avoid typing? Thankfully, you can now use Whisper through a desktop GUI. Even better, it can also transcribe your voice almost in real time. Let’s see how you can type with your voice using Whisper Desktop.
What Is OpenAI’s Whisper?
OpenAI’s Whisper is an Automatic Speech Recognition system (ASR for short) or, to put it simply, is a solution for converting spoken language into text.
However, unlike older dictation and transcription systems, Whisper is an AI solution trained on over 680,000 hours of speech in various languages. Whisper offers unparalleled accuracy and, quite impressively, not only is it multilingual, but it can also translate between languages.
More importantly, it’s free and available as open source. Thanks to that, many developers have forked its code into their own projects or created apps that rely on it, like Whisper Desktop.
If you’d prefer the “vanilla” version of Whisper and the versatility of the terminal instead of clunky GUIs, check our article on how to turn your voice into text with OpenAI’s Whisper for Windows .
Are Whisper and Whisper Desktop the Same?
Despite its official-sounding name, Whisper Desktop is a third-party GUI for Whisper, made for everyone who’d prefer to click buttons instead of typing commands.
Whisper Desktop is a standalone solution that doesn’t rely on an existing Whisper installation. As a bonus, it uses an alternative, optimized version of Whisper, so it should perform better than the standalone version.
You’re on the other end of the spectrum, and instead of seeking an easier way to use Whisper than the terminal you’re seeking ways to implement it in your own solutions? Rejoice, for OpenAI has opened access to ChatGPT and Whisper APIs .
Download & Install Whisper Desktop
Although Whisper Desktop is easier to use than the standalone Whisper, its installation is more convoluted than repeatedly clicking Next in a wizard.
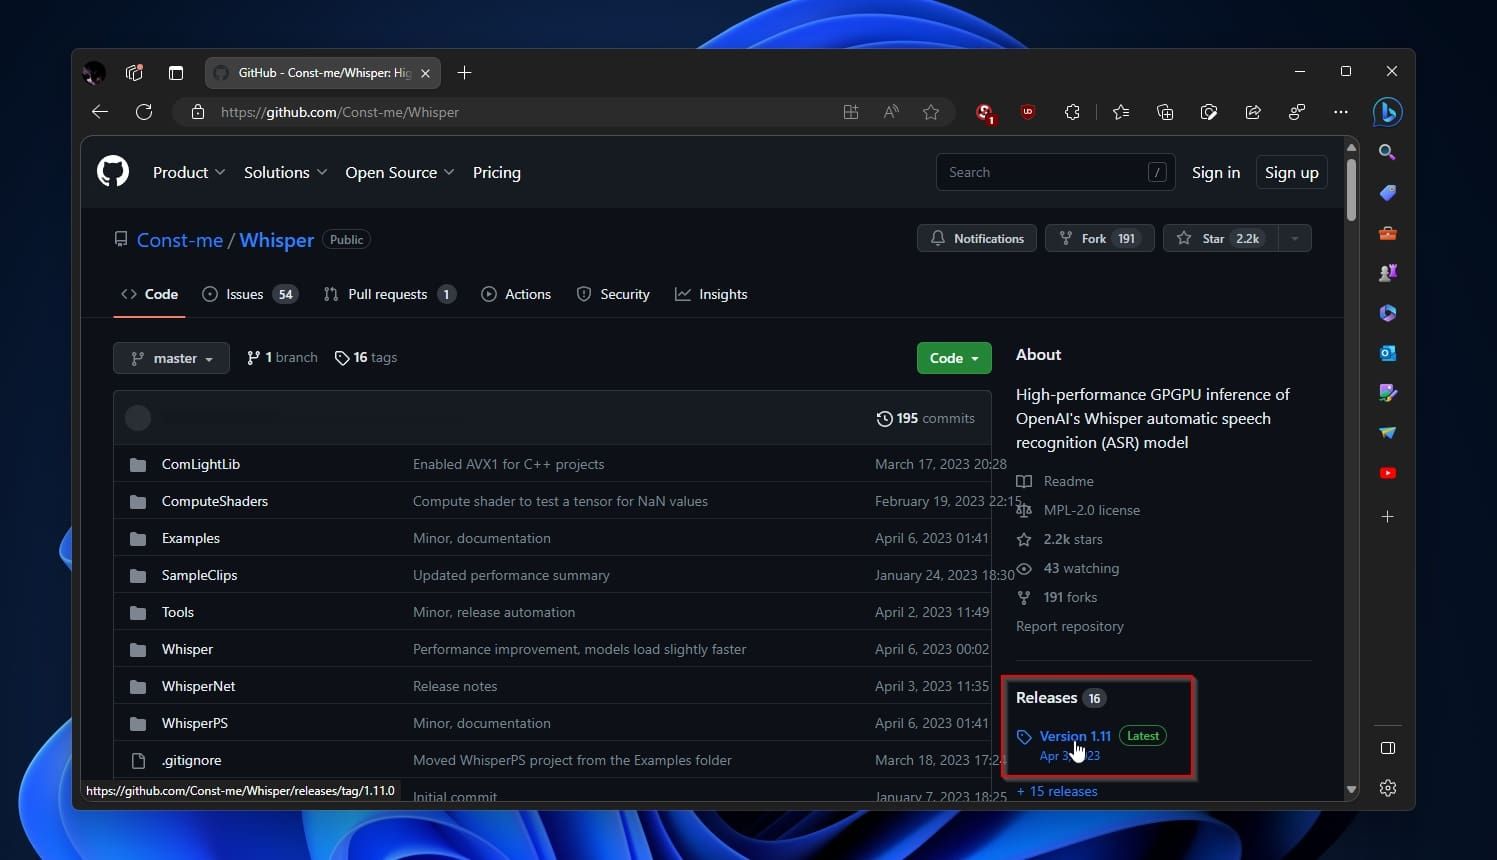
- Visit Whisper Desktop’s official Github page . Look on the right, and click on the latest version under Releases.

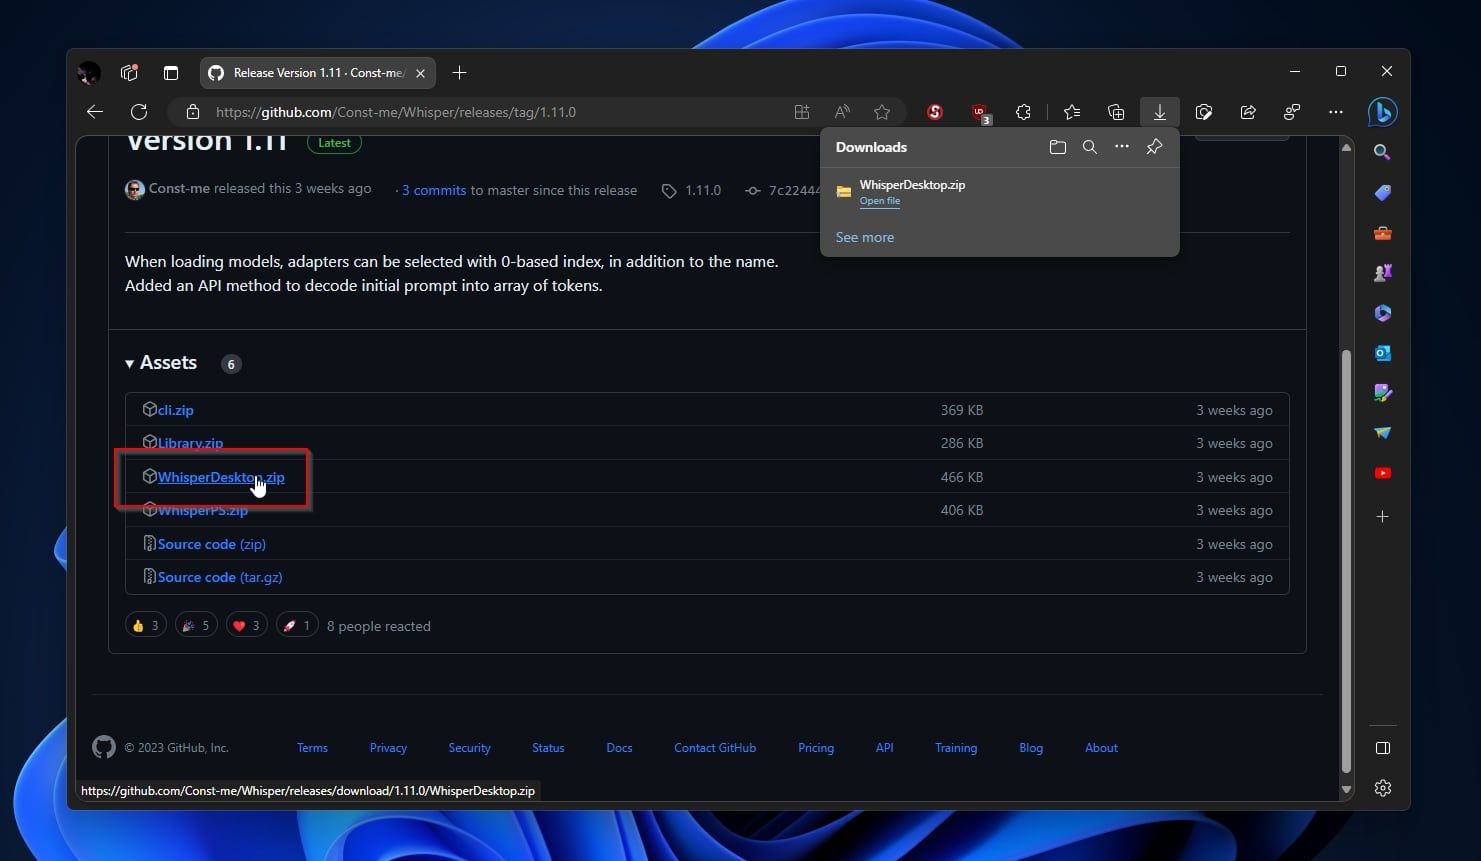
- Under Assets, click WhisperDesktop.zip and download it to your PC.

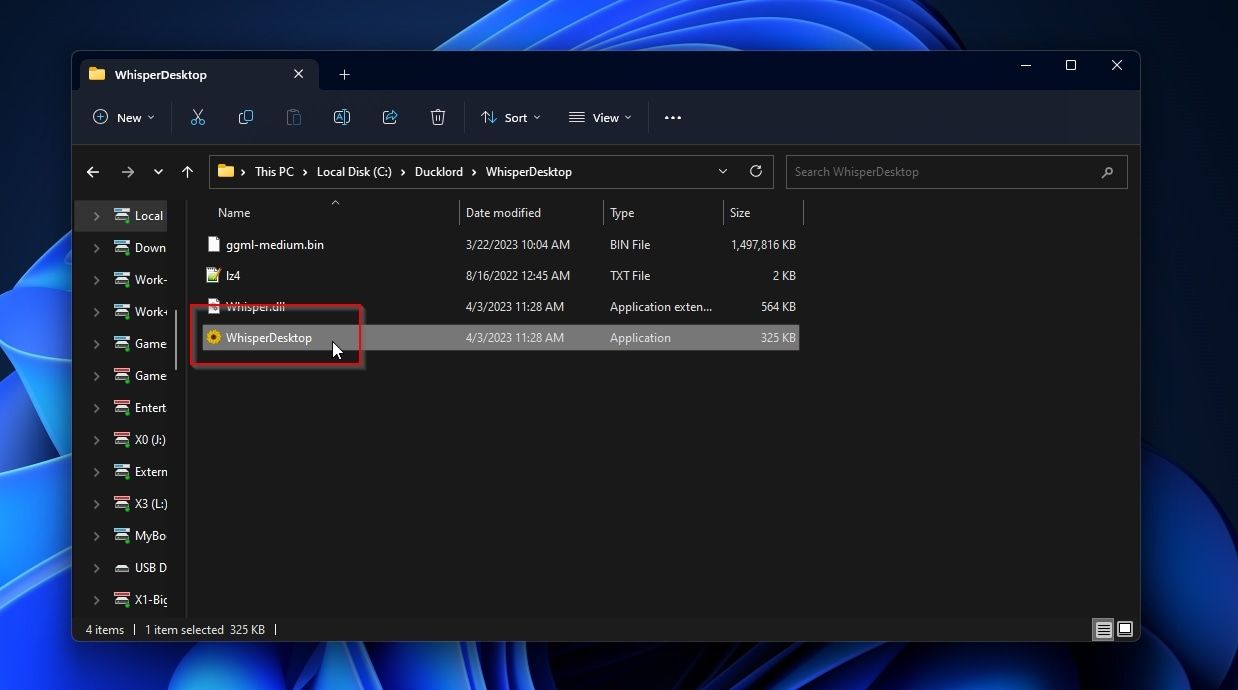
- Extract the downloaded archive to a folder and use your file manager to visit it. Inside you will find the Whisper Desktop application. Double-click on it to run it.

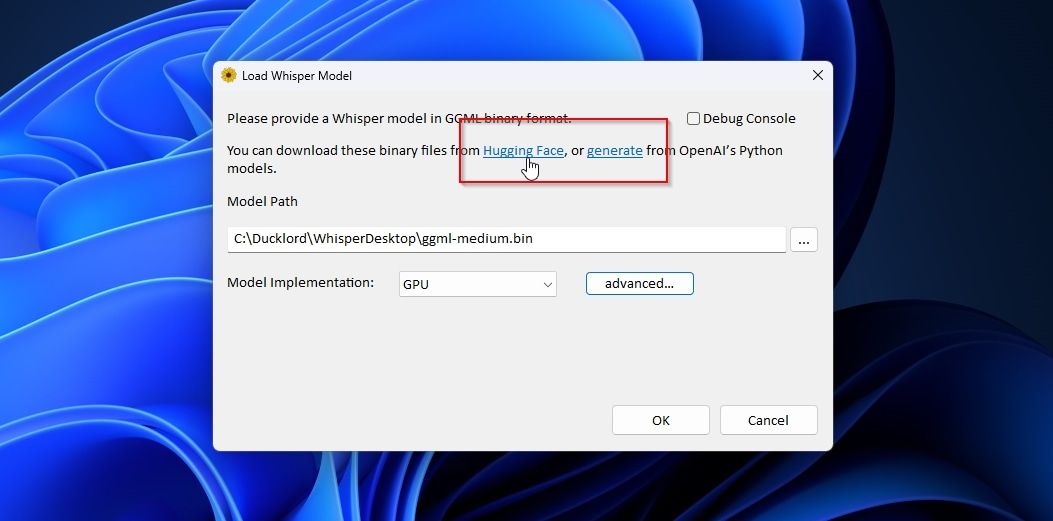
- You also need a Whisper language model in GCML binary format. Whisper Desktop will provide you with two links for acquiring one. Skip the second link for generating your own model since it’s a more complicated process. Click on Hugging Face to open that page in your default browser, from where you can download a ready-to-use file.

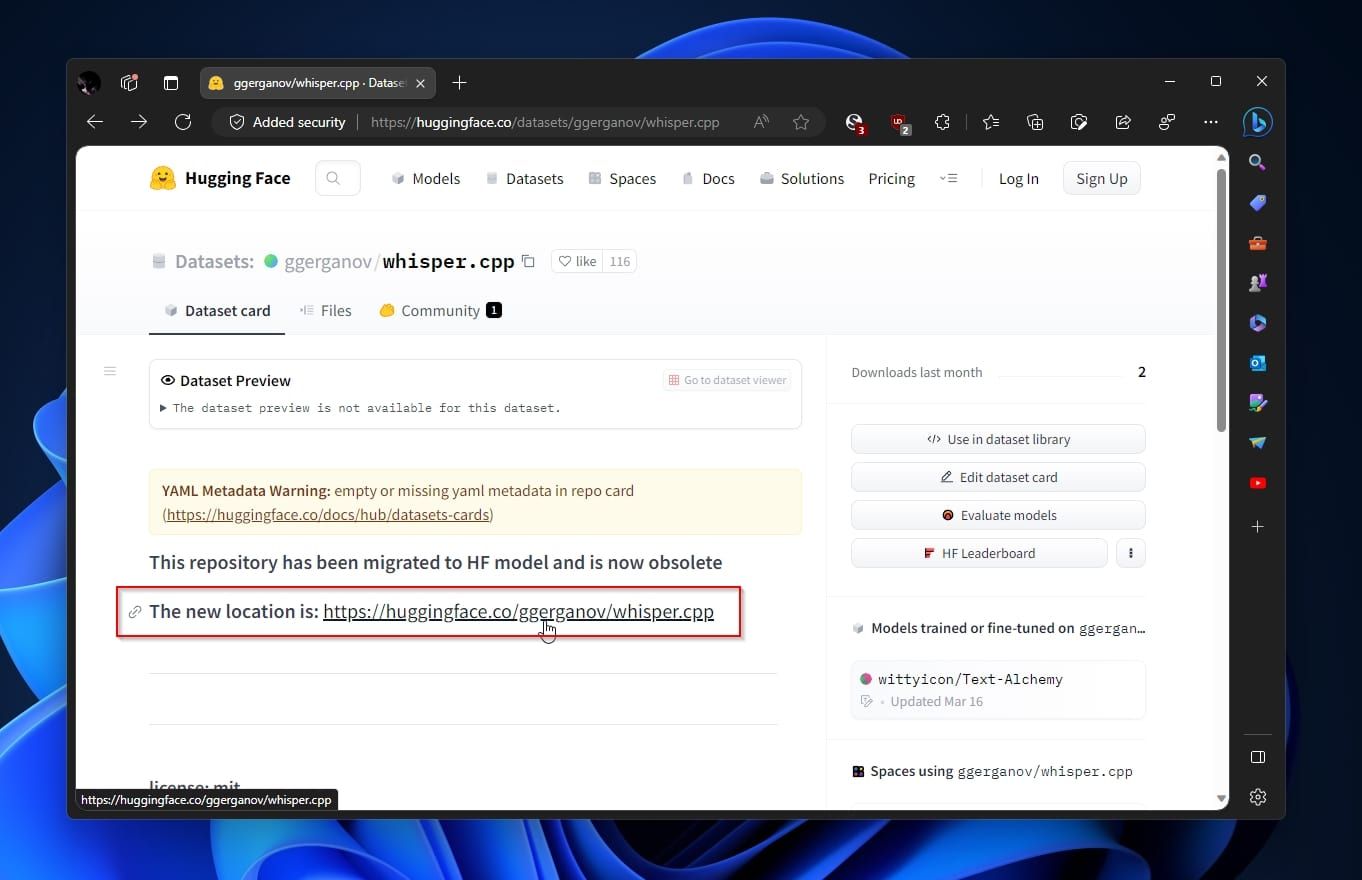
- The version of Whisper Desktop we used while writing this article provided a link to an obsolete repository at Hugging Face. If you meet the same problem, notice a link to a new location. Click on it to visit the new repository.

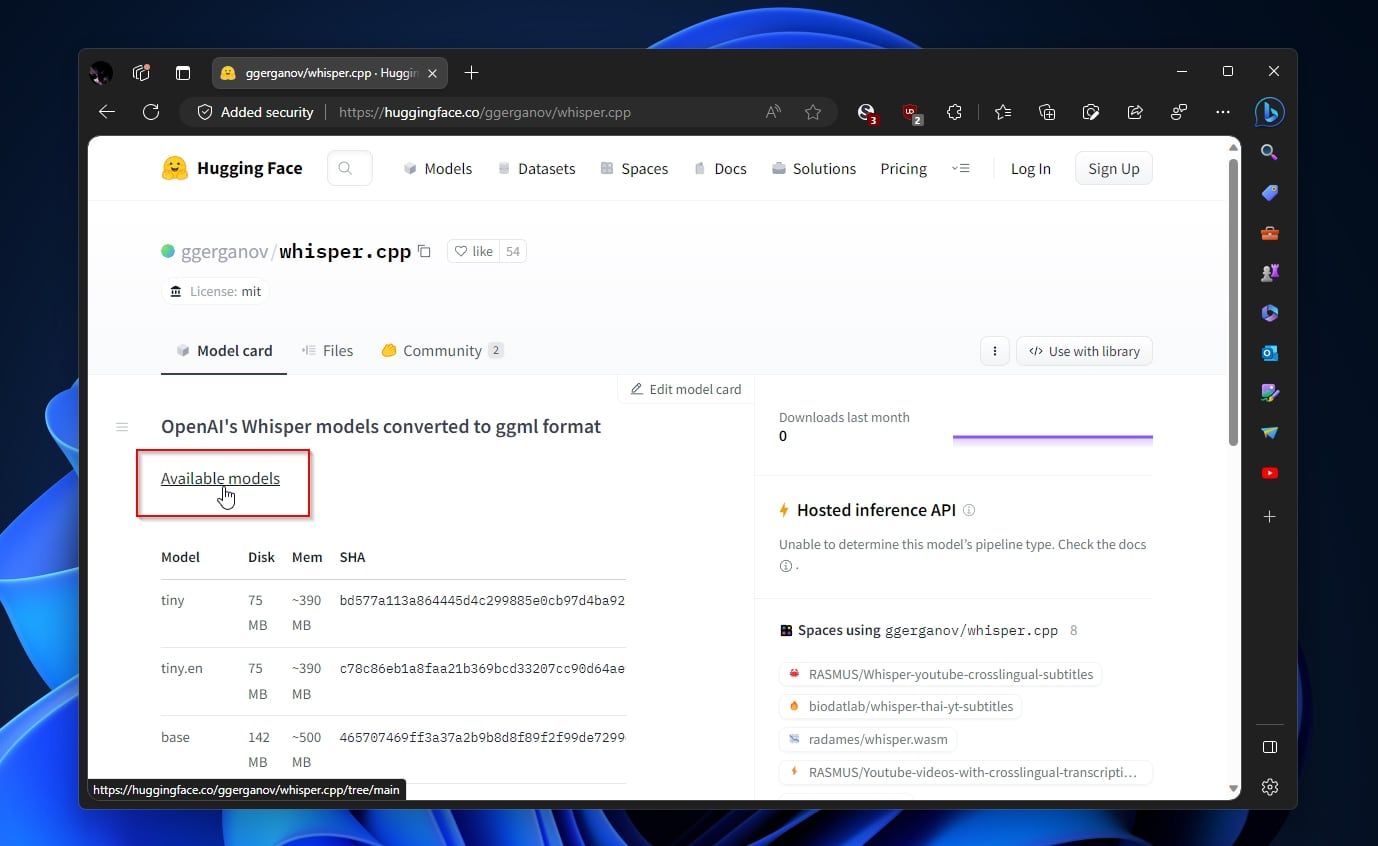
- Click on the link that will take you to the available models.

 Jutoh Plus - Jutoh is an ebook creator for Epub, Kindle and more. It’s fast, runs on Windows, Mac, and Linux, comes with a cover design editor, and allows book variations to be created with alternate text, style sheets and cover designs. Jutoh Plus adds scripting so you can automate ebook import and creation operations. It also allows customisation of ebook HTML via templates and source code documents; and you can create Windows CHM and wxWidgets HTB help files.
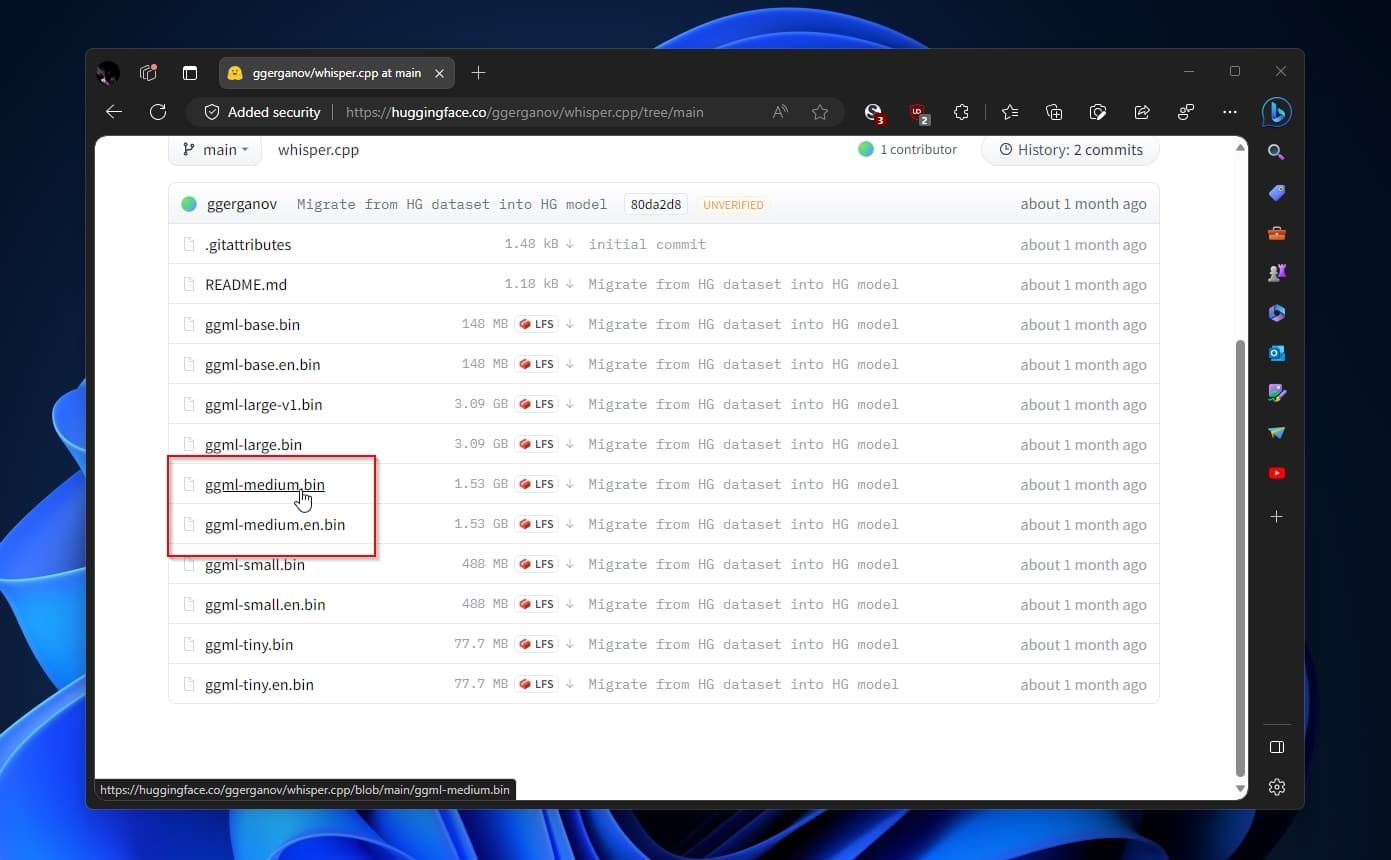
 - From that list, click on either the ggml-medium.bin or ggml-medium.en.bin, depending on if you want multilingual or English-only support in Whisper.

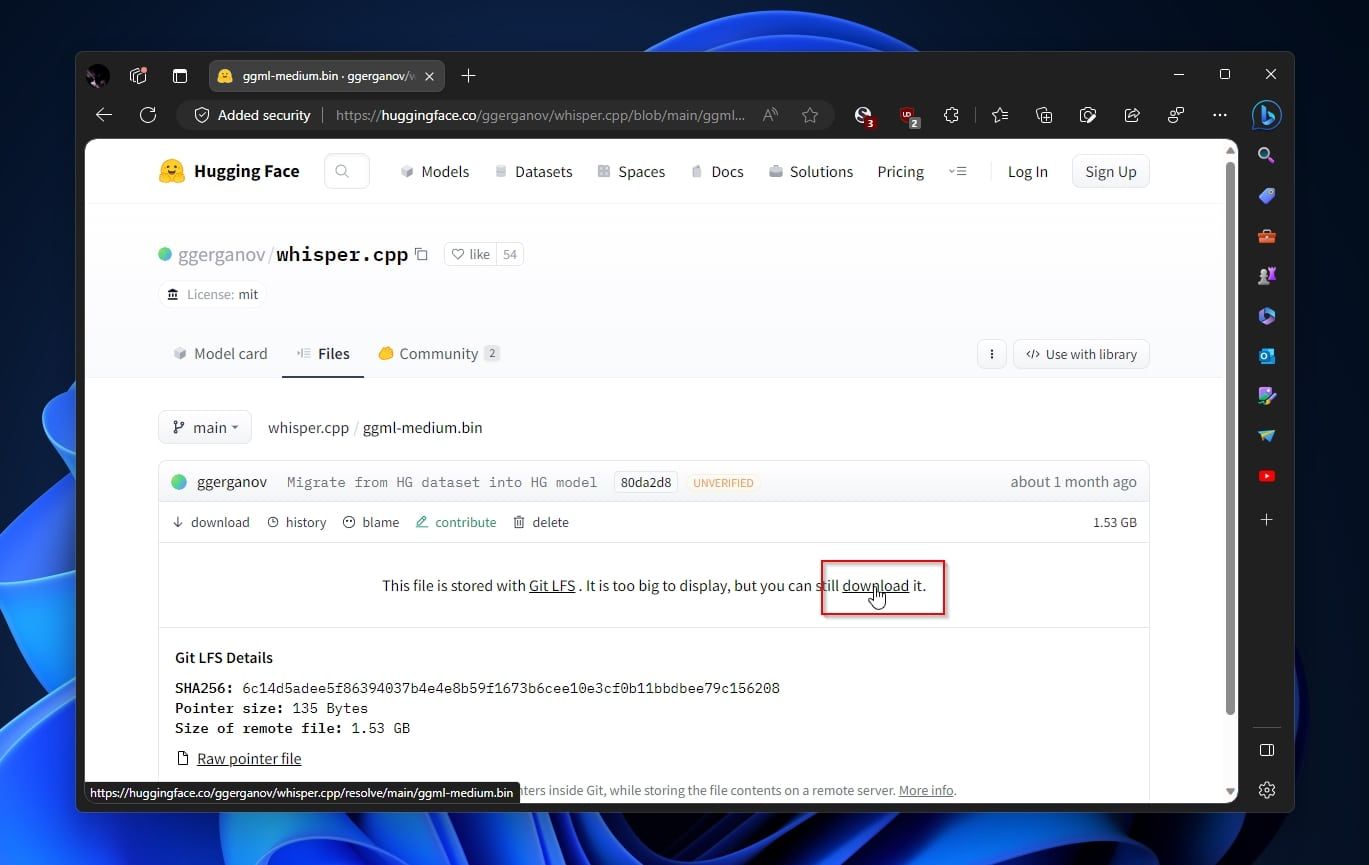
- Finally, you should have reached your destination. Notice the line stating that this file is stored with Git LFS and is too big to display, but you can still download it. Click on download to do precisely that.

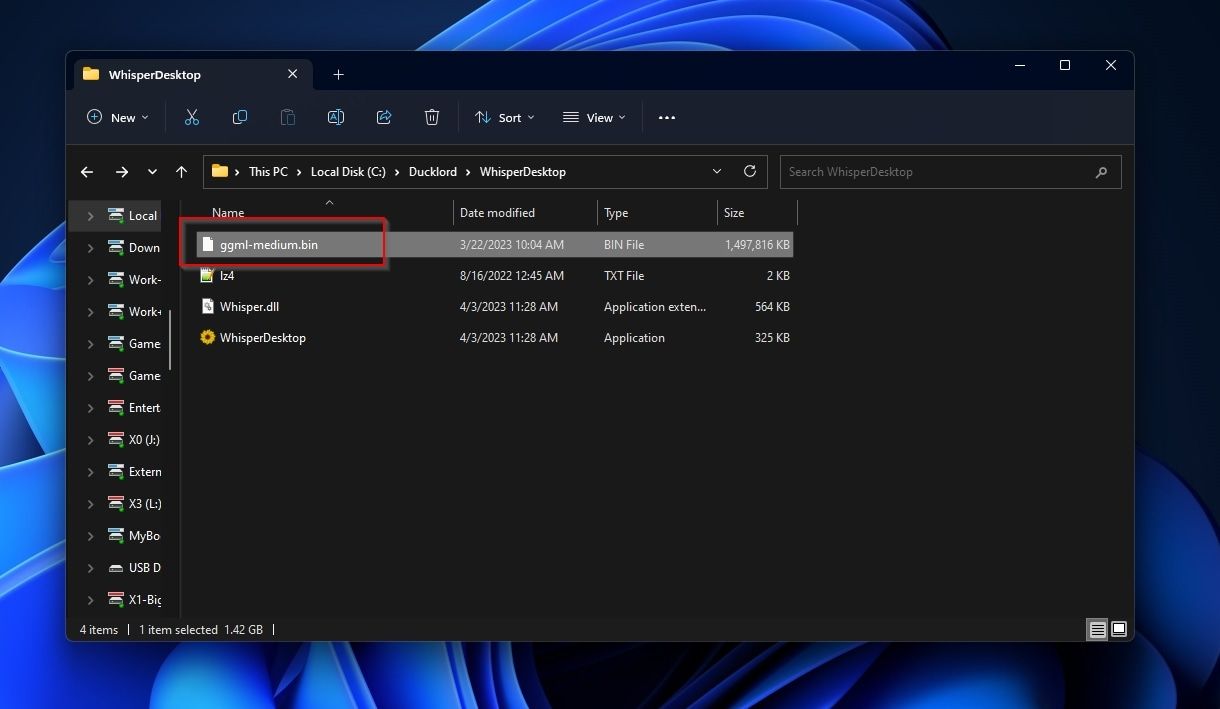
- When the file completes downloading, use your favorite file manager (File Explorer will do) to move the downloaded language model file into the same folder as Whisper Desktop.

Transcribing With Whisper Desktop
Transcribing with Whisper Desktop is easy, but you may still need one or two clicks to use the app.
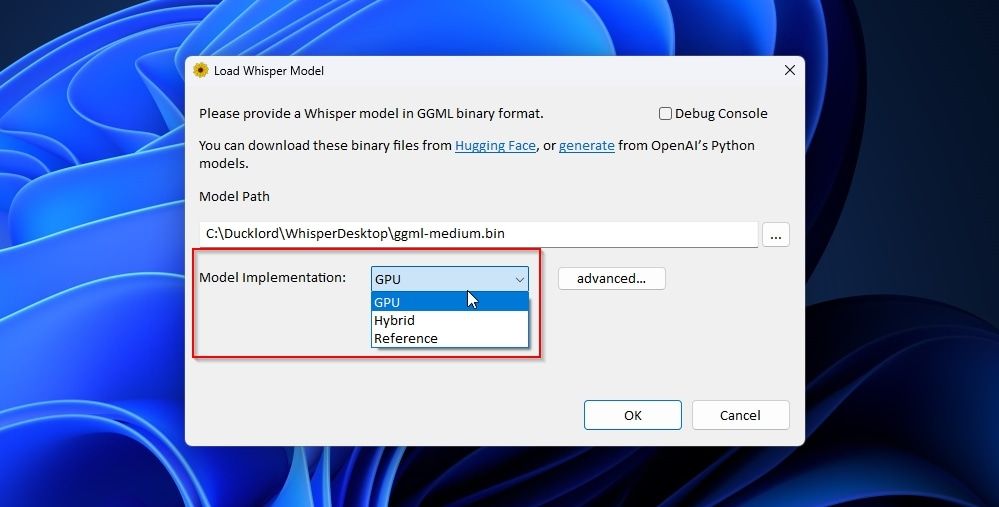
Rerun Whisper Desktop. Does it (still) miss the correct path to your downloaded language model? Click on the button with the three dots on the right of the field and manually select the file you downloaded from Hugging Face.
From this spot, you can also use the drop-down menu next to Model Implementation to choose if you want to run Whisper on your GPU (GPU), on both the CPU and GPU (Hybrid), or only on the CPU (Reference).
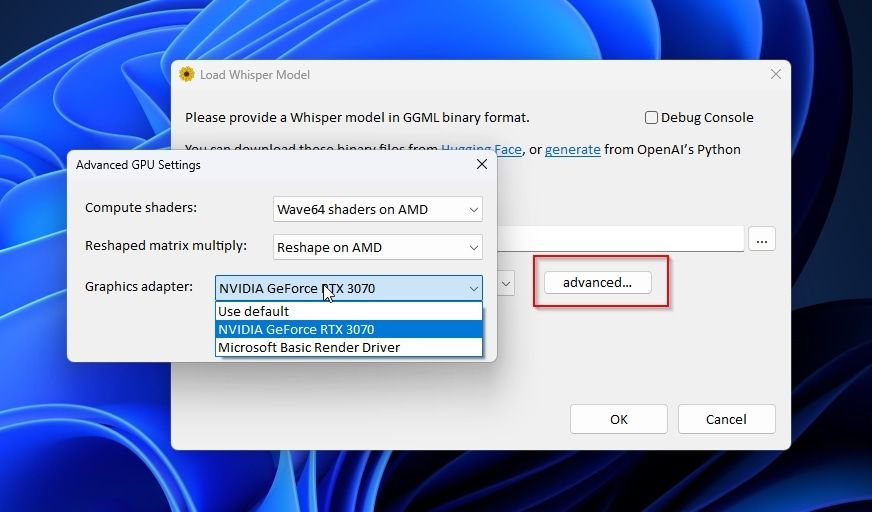
The Advanced button leads to more options that affect how Whisper will run on your hardware. However, since the button clearly states they are advanced, we suggest you only tweak them if you are troubleshooting or know what you are doing. Setting the wrong options values here can impose a performance penalty or render the app unusable.
Click on OK to move to the app’s main interface.
If you already have a recording of your voice you want to turn into written text, click on Transcribe File and select it. Still, we will use Whisper Desktop for live transcription for this article.
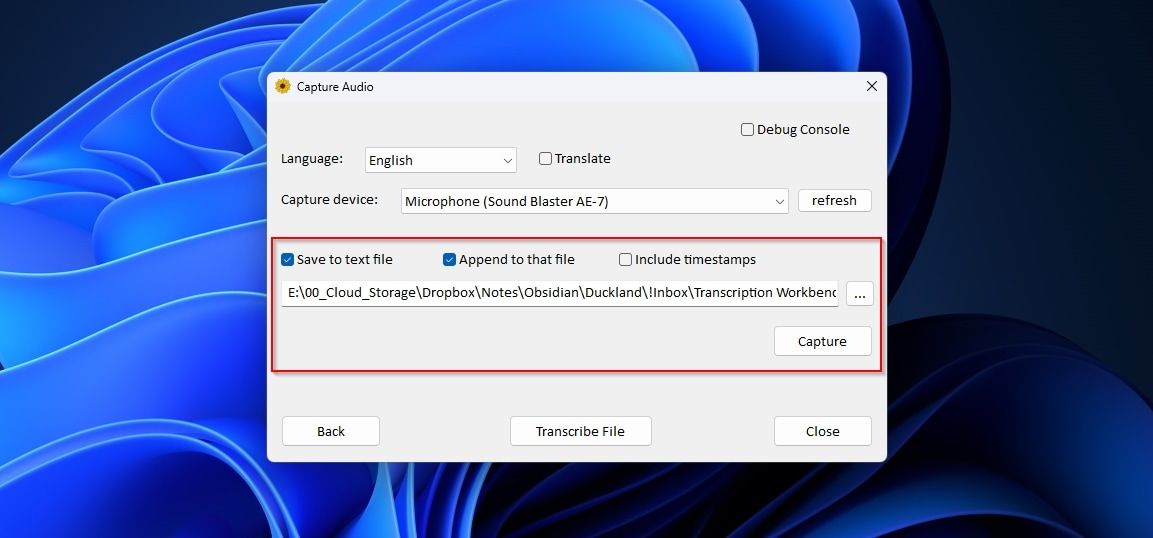
The options offered are straightforward. You can select the language Whisper will use, choose if you want to translate between languages and enable the app’s Debug Console.
Most English-speaking users can safely skip those options and only ensure the correct audio input is selected from the pull-down menu next to Capture Device.
Make sure Save to text file and Append to that file are enabled to have Whisper Desktop save its output to a file without overwriting its content. Use the button with the three dots on the right of the file’s path field to define said text file.
 Software Update Pro - Check and update software installed on your computer.
Click on Capture to begin transcribing your speech to text.
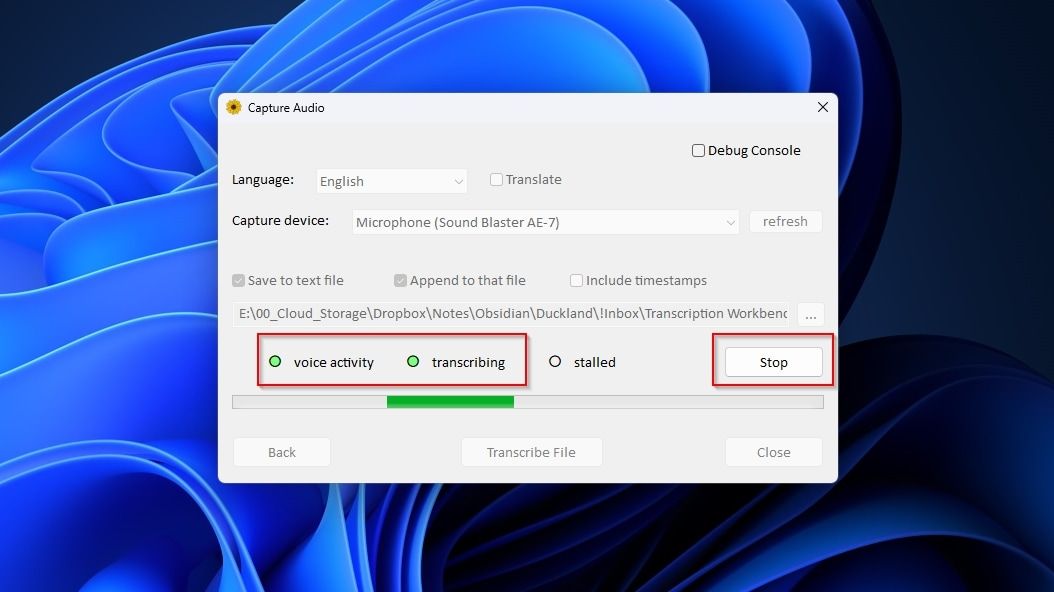
Whisper Desktop will show you three indicators for when it detects voice activity, when it’s actively transcribing, and when the process is stalled.
You can keep talking for as long as you like, and you should occasionally see the two first indicators flashing while the app turns your voice into text. Click Stop when done.
The text file you selected should open in your default text editor, containing in written form everything you said until you clicked Stop.
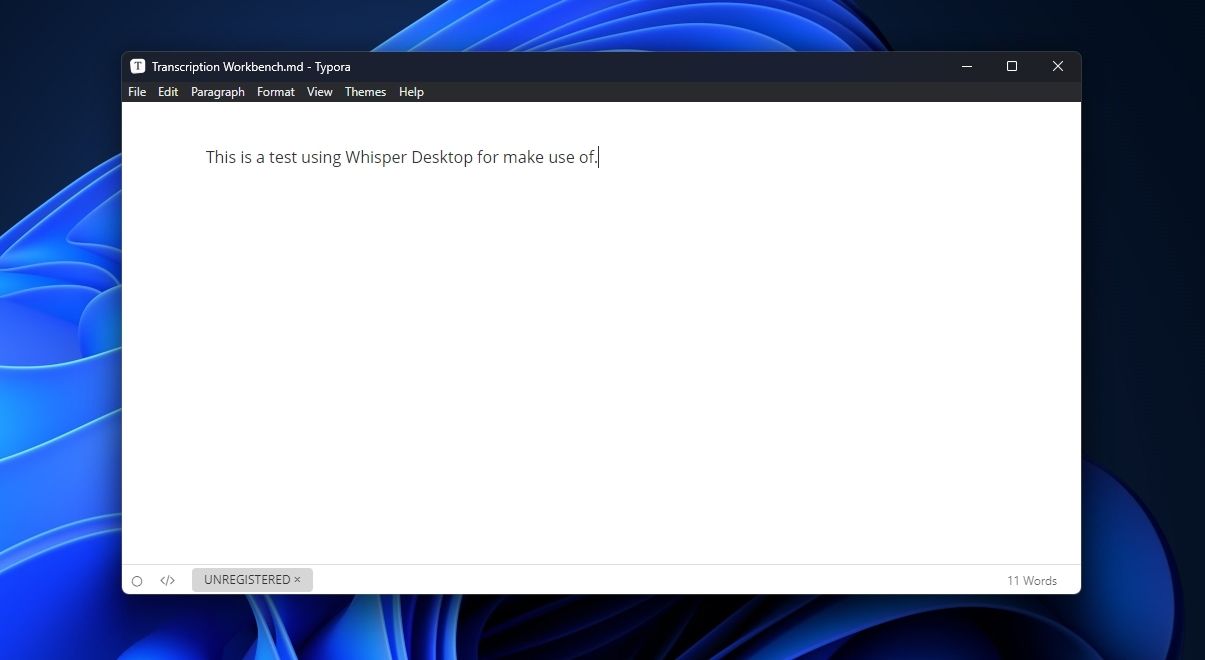
We should note that you can also do the opposite of what we saw here: convert any text to speech. This way you can listen to anything as if it were a podcast instead of tiring your eyes squinting at screens. For more info on that, check our article on some of the best free online tools to download text-to-speech as MP3 audio .
Whisper Desktop Voice-Typing Tips
Although Whisper Desktop can be a lifesaver, enabling you to write with your voice much quicker than you could type, it’s far from perfect.
During our testing, we found that it may occasionally stutter, skip some words, fail to transcribe until you manually stop and restart the process, or get stuck in a loop and keep re-transcribing the same phrase repeatedly.
We believe those are temporary glitches that will be fixed since the standalone Whisper doesn’t exhibit the same issues.
Apart from those minor bumps, turning your voice to text should be effortless with Whisper Desktop. Still, during our tests, we found that it can perform even better if…
- Instead of uttering only two or three words and then pausing, Whisper can understand you better if you go on longer. Try to at least give it an entire sentence at a time.
- For the same reason, avoid repeatedly starting and stopping the transcription process.
- Whenever you realize you made a mistake, ignore it and keep going. Loading and unloading the language model seems to be the most time-consuming part of the process with the current state of Whisper and our available hardware. So, it’s quicker to keep talking and then edit out your mistakes afterward.
- As with the standalone version of Whisper, it’s best to use the optimal language model for your available hardware. You can use up to the medium model if your GPU has 8GB of VRAM. For less VRAM, go for the smaller models. Only choose the slightly more accurate but also much more demanding large model if you use a GPU with 16GB of VRAM or more.
- Remember that the larger the language model, the slower the transcription process. Don’t go for a model larger than needed. You’ll probably find Whisper Desktop can already “understand you” most of the time with the medium or smaller models, with only one or two errors per paragraph.
Are You Still Typing? Use Your Voice With Whisper
Despite requiring some time to set up, as you will see when you try it, Whisper Desktop performs much better than most alternatives, with much higher accuracy and better speed.
After you start using it to type with your voice, your keyboard may look like a relic from ancient times long gone.
You can use Whisper in your programs or the command line. And yet, that defeats its very purpose: typing without a keyboard. If you need to type to use it, why use it to avoid typing? Thankfully, you can now use Whisper through a desktop GUI. Even better, it can also transcribe your voice almost in real time. Let’s see how you can type with your voice using Whisper Desktop.
- Title: How to Turn Your Voice to Text in Real Time With Whisper Desktop
- Author: Richard
- Created at : 2024-08-16 02:28:35
- Updated at : 2024-08-17 02:28:35
- Link: https://win11-tips.techidaily.com/how-to-turn-your-voice-to-text-in-real-time-with-whisper-desktop/
- License: This work is licensed under CC BY-NC-SA 4.0.
 Jutoh Plus - Jutoh is an ebook creator for Epub, Kindle and more. It’s fast, runs on Windows, Mac, and Linux, comes with a cover design editor, and allows book variations to be created with alternate text, style sheets and cover designs. Jutoh Plus adds scripting so you can automate ebook import and creation operations. It also allows customisation of ebook HTML via templates and source code documents; and you can create Windows CHM and wxWidgets HTB help files.