
Keep Devices Awake: Disabling USB Hibernate in Win 11
Keep Devices Awake: Disabling USB Hibernate in Win 11
Windows’ USB selective suspend feature puts USB devices in a low-power state when not in use. While this can enhance battery life, it may cause problems with peripherals that require constant power.
If you encounter issues with USB devices on your Windows 11 computer, consider disabling the USB selective suspend feature. Here’s how to do so on Windows 11.
Why You Might Want to Disable USB Selective Suspend
Windows has various features to prolong your laptop’s battery life , one of which is USB selective suspend. While this feature is great, below are a few situations where you should disable it:
- If Windows fails to recognize a USB device, try turning off USB selective suspend and check if it makes any difference.
- USB selective suspend sometimes adds a small amount of latency, especially in gaming peripherals. So, you can turn it off to get immediate and responsive input from your gaming device.
- USB selective suspend might occasionally conflict with other power management settings, potentially leading to computer instability. If you’ve been experiencing power-related problems, disabling USB selective suspend could help.
Now that you know the reason, let’s check out different ways to disable USB selective suspend on Windows 11.
1. Using the Device Manager
The Device Manager on Windows is the go-to place to manage USB devices connected to your system. You can use it to update outdated drivers , uninstall devices, and much more. It can also help you turn off the USB selective suspend feature.
Follow these steps to disable USB selective suspend via the Device Manager:
- Press the Win + X hotkey and choose Device Manager from the context menu.
- Double-click on the Universal Serial Bus controllers node.
 NeoDownloader - Fast and fully automatic image/video/music downloader.
 - Right-click on any Generic USB Hub or USB Root Hub drivers and choose Properties.
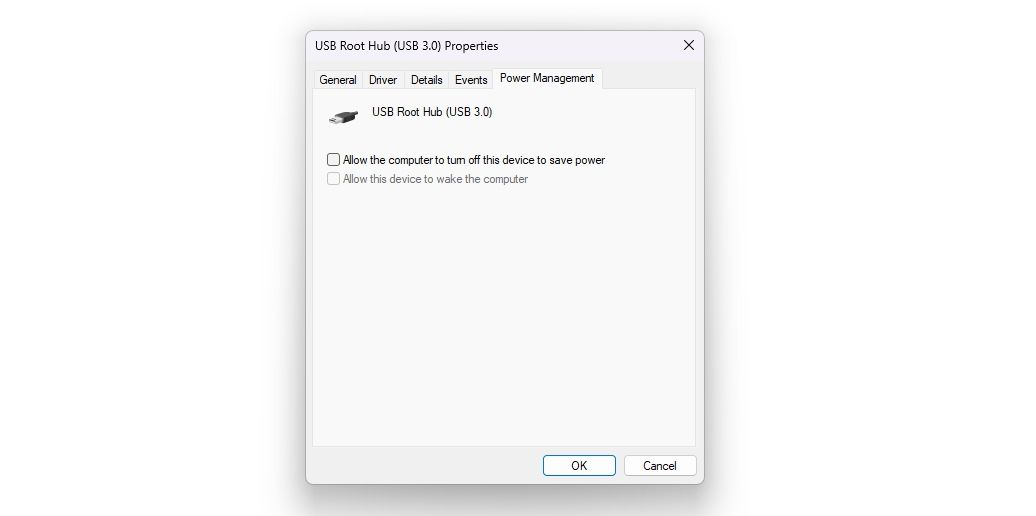
- Switch to the Power Management tab and uncheck the Allow the computer to turn off this device to save power option. Then, click OK to save the changes.

 NeoDownloader - Fast and fully automatic image/video/music downloader.
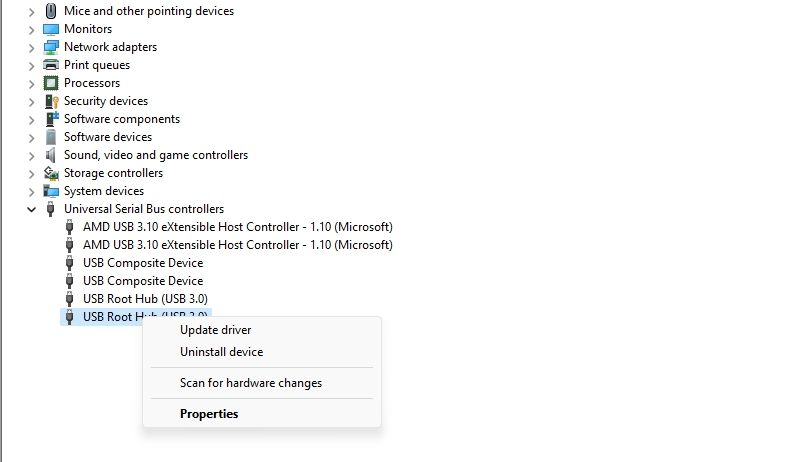
Now, repeat the above steps for all the USB drivers for which you want to disable USB selective suspend.

2. Using the Control Panel
The Control Panel serves as the central hub of a Windows operating system, allowing users to perform a wide range of tasks. From simple actions like changing your desktop wallpaper to more complex operations like managing user accounts, you can do it all by accessing the Control Panel.
Follow these steps to disable USB selective suspend via the Control Panel:
- Press the Win key to open the Start Menu, type Control Panel in the search bar, and press Enter.
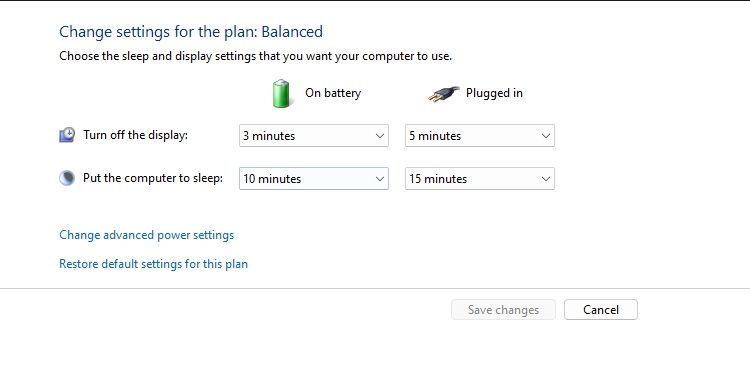
- Navigate to System and Security > Power Options > Change plan settings.
- Click the Change advanced power settings option.
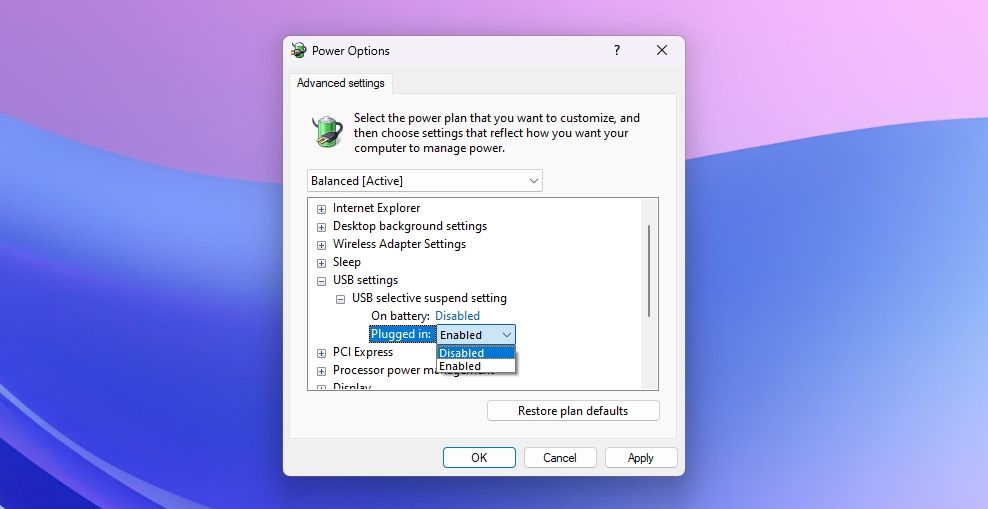
- Double-click on the USB settings option and then expand USB selective suspend setting.
- Choose Disabled for both the On battery and Plugged in options.
- Click Apply > OK to save the changes.


The USB selective suspend feature is now disabled. Let’s look at one more way to do so.
3. Using Command Prompt
Follow these steps to disable USB selective suspend via the Command Prompt:
- Open the Start Menu, type Command Prompt in the search bar, and choose Run as administrator from the right pane.
- Type the following command in the elevated Command Prompt window and press Enter.
powercfg /SETACVALUEINDEX SCHEME_CURRENT 2a737441-1930-4402-8d77-b2bebba308a3 48e6b7a6-50f5-4782-a5d4-53bb8f07e226 0

And you’re done! The USB selective suspend feature is now disabled on your Windows computer. If you wish, you can easily turn it back on using the same navigation as shown above.
USB Selective Suspend Is Good, but Not Perfect
We’ve taken a look at how and when to disable USB selective suspend. As mentioned earlier, it can occasionally lead to system instability, introduce latency, or even cause your computer to fail to recognize the USB device. Therefore, disabling it might be preferable when power efficiency isn’t a top priority for your system.
However, if disabling USB selective suspend doesn’t resolve the issue, there are various other troubleshooting steps you can take when Windows fails to recognize a USB device.
If you encounter issues with USB devices on your Windows 11 computer, consider disabling the USB selective suspend feature. Here’s how to do so on Windows 11.
- Title: Keep Devices Awake: Disabling USB Hibernate in Win 11
- Author: Richard
- Created at : 2024-08-16 02:12:16
- Updated at : 2024-08-17 02:12:16
- Link: https://win11-tips.techidaily.com/keep-devices-awake-disabling-usb-hibernate-in-win-11/
- License: This work is licensed under CC BY-NC-SA 4.0.