Master Manual Time Adjustment in Windows Systems

Master Manual Time Adjustment in Windows Systems
Did you ever experience being in a different time zone while working on your Windows computer? You’ve checked Windows time settings and noticed that it’s not set to your current location. Suddenly, you realize that the time zone is greyed out, and you can’t configure it automatically. What do you do next? There are several scenarios where Windows cannot automatically set the time zone, and here’s how to fix them.
1. Restart Your PC
The first step when troubleshooting any Windows-related issue is to restart the computer. It seems obvious, but it often solves the problem. Rebooting flushes out cached data that could cause time zone problems. It also resets various temporary services that may prevent Windows from automatically setting the time zone.
To restart your computer, save all your work and close any running applications. After that, open the Start menu and click Restart. Once your computer restarts, check if that fixes the issue.
2. Turn on Location Services in the Settings
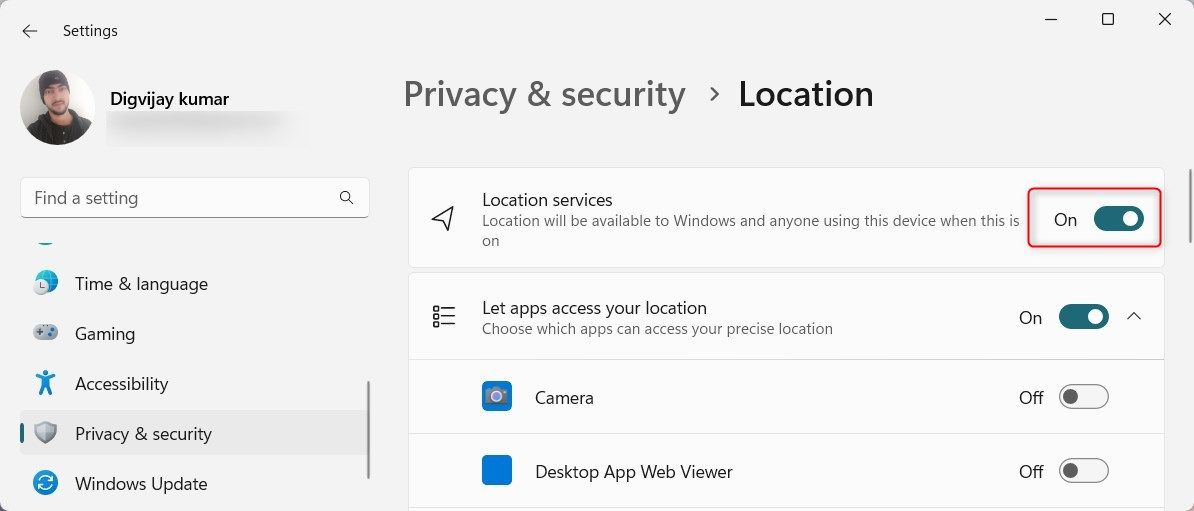
If restarting your computer didn’t fix the issue, check if location services are enabled. Location services allow Windows to automatically detect the time zone and set it accordingly.
To verify location services, follow these steps:
- Press Win + I to open the Settings window.
- From the left navigation panel, click Privacy & security.
- Under the App permissions section, select Location.
- Make sure the Location services option is enabled. If it’s not, switch the toggle to turn it on.

Now restart your computer and check if Windows can set the time zone automatically.
3. Set the Windows Time Service to Automatic
If the location services are already enabled, but Windows still can’t detect the time zone, the problem may be related to the Windows Time Service. This background service keeps your system clock synchronized with time servers.
Windows won’t detect the time zone if the service is not running. To fix this issue, set Windows Time Service to Automatic.
Here’s how to do that:
- Press Win + R on your keyboard to open the Run window.
- Type services.msc in the text box and press Enter.
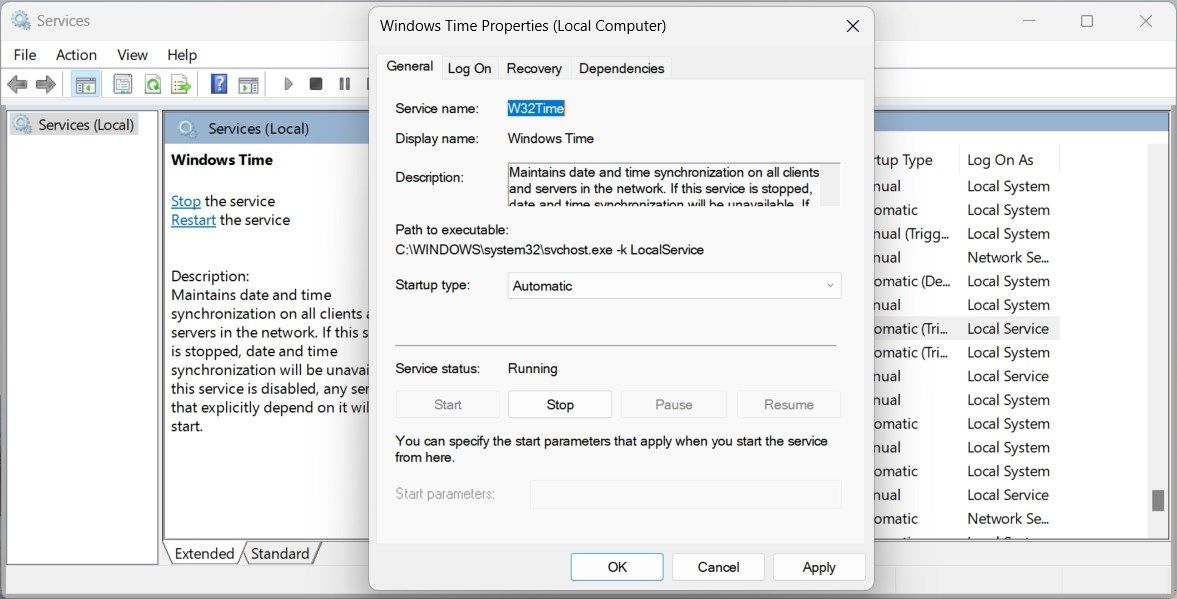
- Scroll down in the Services window and locate the Windows Time service.
- Right-click the service and select Properties.
- In the Properties window, set the Startup type to Automatic.

- Now check the Service status. If it reads Stopped, click the Start button to start the service.
- Click Apply and OK to save the changes.
Once you’ve done this, restart your PC and check the time zone settings.
4. Tweak the Registry Editor
If Windows still fails to detect the time zone or the “Set time zone automatically” option is still grayed out, you may need to tweak your registry. This is a more technical solution and requires registry knowledge. If you’re not good at registry editing, skip this step or ask a professional for help.
Follow these steps to make the changes:
Modifying the registry incorrectly may cause serious problems. Before making any changes, back up your Windows registry .
- Press Win + S on your keyboard to open the Windows Search.
- Type regedit in the search bar and press Enter.
- If the UAC window pops up, click Yes to grant administrative privileges.
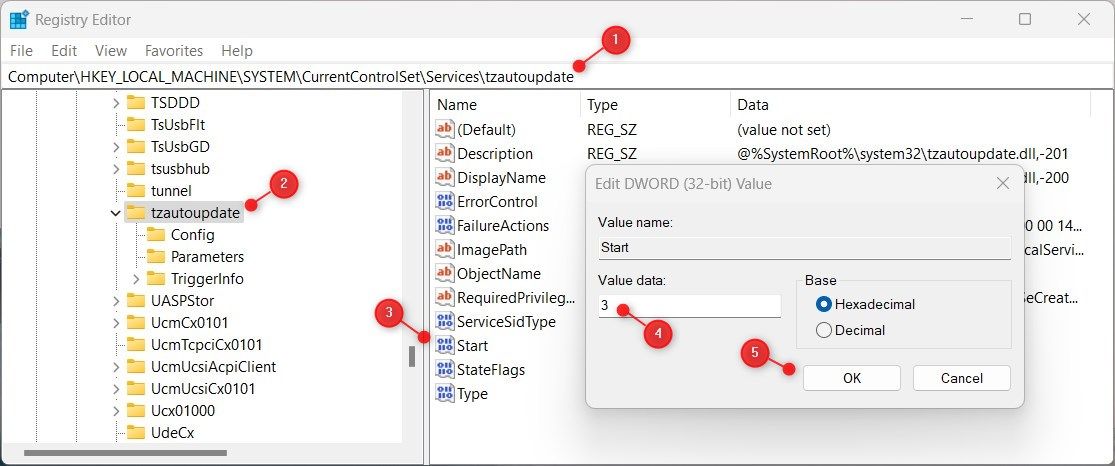
- In the Registry Editor window, navigate to the following directory.
HKEY_LOCAL_MACHINE\SYSTEM\CurrentControlSet\Services\tzautoupdate - In the right pane, double-click the Start (DWORD) value.

- When the Edit DWORD Value window pops up, set the Value data to 3 and click OK.
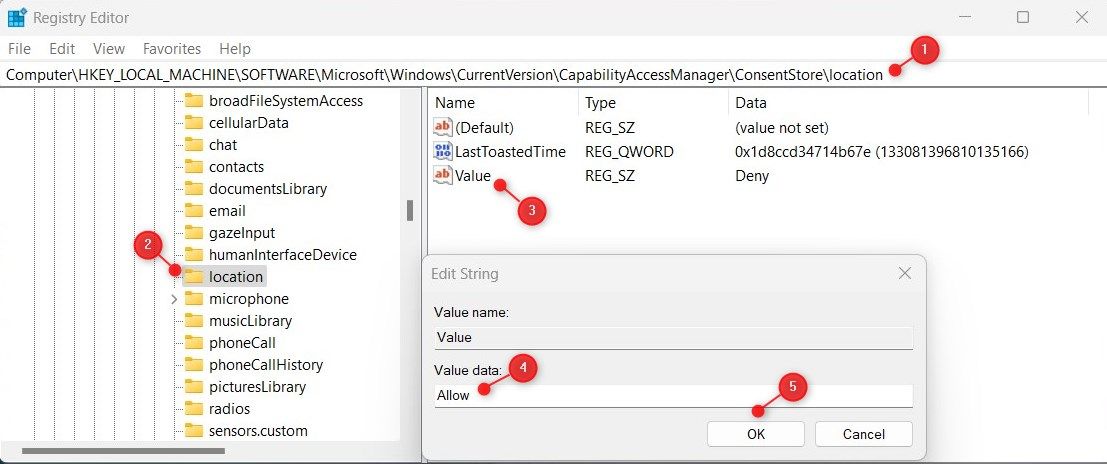
- After doing this, you must change the location setting. To do this, navigate to the following key:
HKEY_LOCAL_MACHINE\SOFTWARE\Microsoft\Windows\CurrentVersion\CapabilityAccessManager\ConsentStore\location
You can also copy and paste the path into the Registry Editor address bar. Now press Enter and this directs you to the Location key. - Move to the right pane and double-click the Value (REG_SZ) value.

- In the Edit String window, type Allow in the Value data field and click OK.
After that, close the Registry Editor and restart your PC. Windows should detect the time zone automatically and set it correctly.
5. Use the Group Policy Editor
If you’re comfortable with registry editing, use the Group Policy Editor instead. However, the tool is only compatible with Windows Pro and Enterprise editions. If you’re not a Pro user, activate the Group Policy for Windows Home , then follow these steps:
- Right-click on Start and select Run.
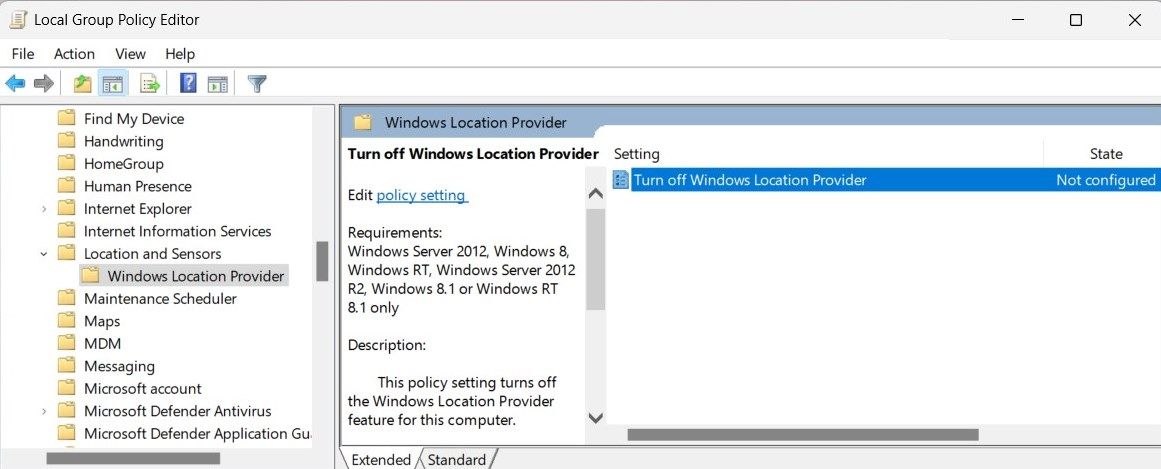
- Type gpedit.msc in the text field and click OK. The Local Group Policy Editor window will open.
- On the left navigation panel, browse to the following path:
Computer Configuration > Administrative Templates > Windows Components > Location and Sensors > Windows Location Provider - Go to the right pane and double-click on Turn off Windows Location Provider.

- In the pop-up window, check the Not Configured option.
- Click Apply and OK to save the changes.
Now close the Group Policy Editor and restart your PC. After restarts check if your Windows detects the time zone automatically.
6. Reset the Windows Time Service
This problem may also occur if the Windows Time Service or time synchronization settings become corrupted. In that case, reset the service to its default settings and see if that helps. Here’s how to do it:
- Click on Start and type cmd in the search box.
- Press Ctrl + Shift + Enter on your keyboard simultaneously. This opens the Command Prompt in administrator mode.
- If the pop-up window appears, click Yes to grant permission.
- In the Command Prompt window, type net stop w32time and press Enter. Running this command will stop the Windows Time Service.
- Now, type w32tm /unregister in the Command Prompt window and hit Enter. This unregisters the service.
- Next, type w32tm /register and press Enter. This will re-register the Windows Time Service.
- After that, type net start w32time to restart the Windows Time Service.
Once done, close the Command Prompt and restart your computer to check if it solves the problem.
7. Try Some Generic Windows Fixes
There are also generic fixes you can try:
- Run the System File Checker tool:running System File Checker scans for corrupted system files and replaces them if necessary.
- Perform a Clean Boot: If that didn’t work, try a Windows clean boot . This determines if third-party applications interfere with Windows Time Service.
- Update Windows: Finally, update Windows to the latest version to ensure you have all the latest fixes and security patches.
Windows Can Now Automatically Set the Time Zone
We hope the article helped you resolve timing issues on your Windows computer. It may occur due to missing or corrupted system files or incorrect time zone settings. Make sure to try these solutions and perform a System Restore if the problem persists.
Also read:
- Detailed Tips for Adequate Lighting in YouTube Video Production for 2024
- Easy steps to recover deleted pictures from Honor 90 Pro.
- Effective Tips for Draining Water Out of Your iPhone Audio Ports
- Essential History Series YouTube Recommendations for Learners for 2024
- From iPhone's Calendar to Windows Desktop: A Step Guide
- How I Transferred Messages from Realme 12 Pro 5G to iPhone 12/XS (Max) in Seconds | Dr.fone
- In 2024, A Detailed VPNa Fake GPS Location Free Review On Oppo A1 5G | Dr.fone
- Latest and Best Windows-Compatible Bluetooth Adapter Drivers – Free Downloads Available Now!
- Navigate Save Issues Efficiently: 6 Proven Techniques WIN11
- Optimize Task Management: Proficient Use of the MSPCM Bar, Windows 11
- Proactive Automation: Leveraging Task Scheduler
- Quickly Remove Google FRP Lock on Honor Play 8T
- Resolving the binkw32.dll Not Found Issue: A Step-by-Step Guide
- Seven Reasons to Hold Onto What You Have: Continue Using Windows 10
- Triumphant PC Restarts: Windows Factory Fresh Edition
- Title: Master Manual Time Adjustment in Windows Systems
- Author: Richard
- Created at : 2024-12-24 18:32:45
- Updated at : 2024-12-27 22:01:39
- Link: https://win11-tips.techidaily.com/master-manual-time-adjustment-in-windows-systems/
- License: This work is licensed under CC BY-NC-SA 4.0.
