
Master Your Windows NetTools With These Steps

Master Your Windows NetTools With These Steps
Need to manage the network connections on your Windows device? If so, the Windows Network Connections tool can help. This tool displays all your wired and wireless connections in one place, making it easy to identify and troubleshoot various connection issues on your device.
In this article, we’ll show you the various ways to open the Windows Network Connections tool. From there, we’ll explore how you can check your network connection status on Windows.
Disclaimer: This post includes affiliate links
If you click on a link and make a purchase, I may receive a commission at no extra cost to you.
1. Use the Start Menu Search Bar
An easy way to open the Network Connections tool is via the Start menu.
Here are the steps you need to follow:
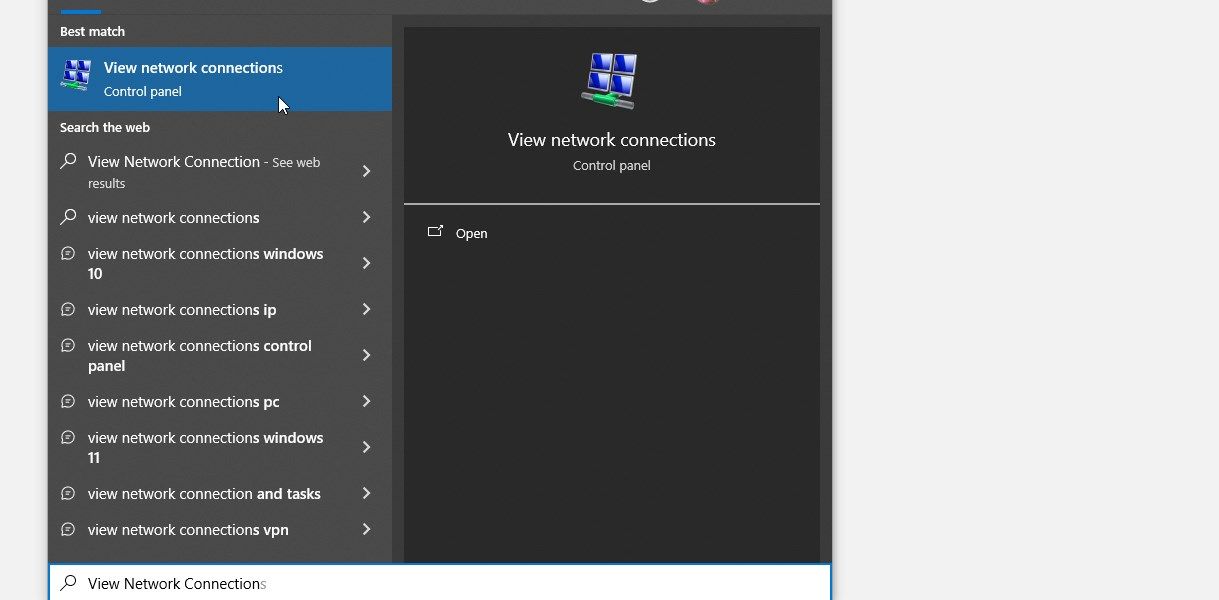
- Click the Start Menu search bar or press Win + S.
- Type View Network Connections in the search bar and select the Best match.
2. Use the Run Command Dialog Box
The Run command dialog box also offers an easy way to open the Network Connections tool. To use this tool, follow these steps:
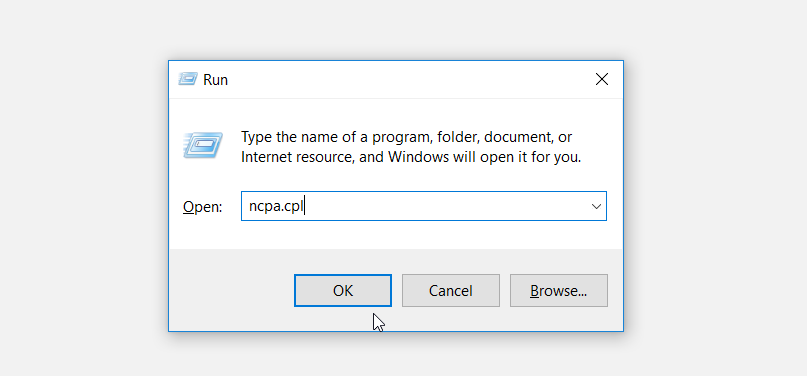
- Press Win + R to open the Run command dialog box.
- Type ncpa.cpl and press Enter to open the Network Connections tool.
3. Use the Quick Access Menu
The Quick Access menu helps you easily access the Network Connections tool and other features like the Device Manager and more. As such, it’s a great tool to have on hand if you want to access one of Windows’ many diagnostics tools
Here’s how you can use the Quick Access menu to open the Network Connections tool:
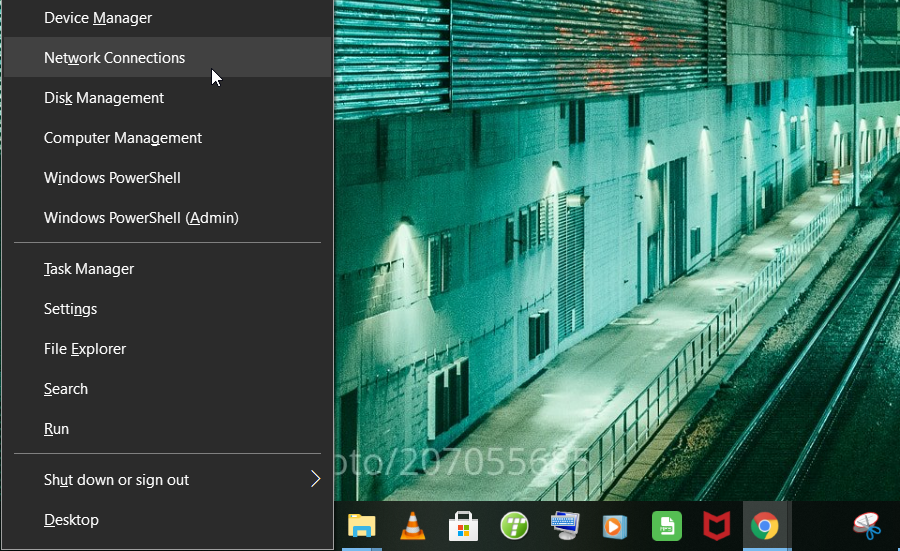
- Press Win + X or right-click on the Windows icon to open the Quick Access menu.
- Select Network Connections from the menu items.
4. Use File Explorer’s Address Bar
File Explorer’s address bar is an incredible tool that can help you access tons of Windows apps . Here’s how you can use it to open the Network Connections tool:
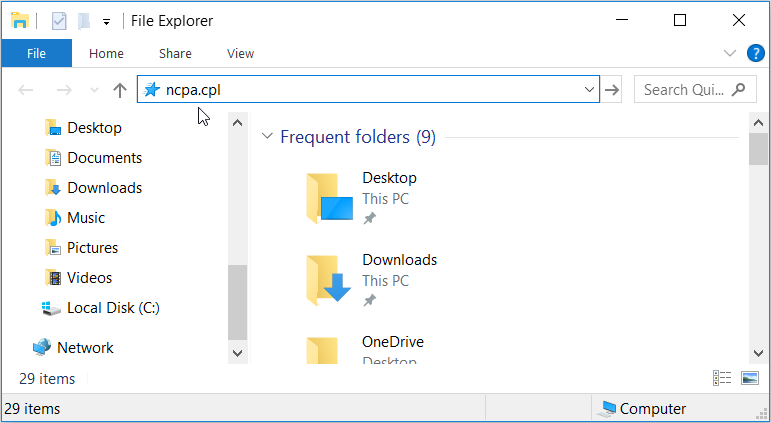
- Press Win + E to open File Explorer.
- Type ncpa.cpl in the address bar and press Enter to open the Network Connections tool.
5. Use the Wi-Fi Icon or System Settings
The Wi-Fi icon on your taskbar comes in handy when you want to configure network-related issues . But that’s not all—you can also use that icon to open the Network Connections tool. Here’s how:
- Right-click on the Wi-Fi icon on the taskbar and select Open Network & Internet settings.
- Finally, click Change adapter options to open the Network Connections tool.
![]()
Alternatively, open the Network Connections tool via the system settings through these steps:
- Press Win + I to open the system settings.
- Click Network & Internet from the menu options.
- In the next window, select Status on the left-hand side pane.
- Click Change adapter options to open the Network Connections tool.
6. Use the Command Prompt or PowerShell

The Command Prompt and PowerShell make it easy for you to troubleshoot a faulty Windows PC . Interestingly, these tools can also help you access a lot of the software programs on your device.
Here’s how to use the Command Prompt to open the Network Connections tool:
- Press Win + R to open the Run command dialog box.
- Type CMD and press Ctrl + Shift + Enter to open an elevated Command Prompt.
- Type ncpa.cpl and press Enter to open the Network Connections tool.
Now, here’s how PowerShell can help you access the Network Connections tool:
- Press Win + R to open the Run command dialog box.
- Type Powershell and press Ctrl + Shift + Enter to open an elevated PowerShell window.
- Type ncpa.cpl and press Enter to open the Network Connections tool.
7. Use the Control Panel
The Control Panel is a reliable tool that helps with troubleshooting Windows system-related issues. This tool can also help you easily access most of the software programs on your Windows device.
Here’s how to use the Control Panel to open the Network Connections tool:
- Type Control Panel in the Start menu search bar and select the Best match.
- Click the View by drop-down menu and select Small icons.
- Select the Network and Sharing Center from the menu options.
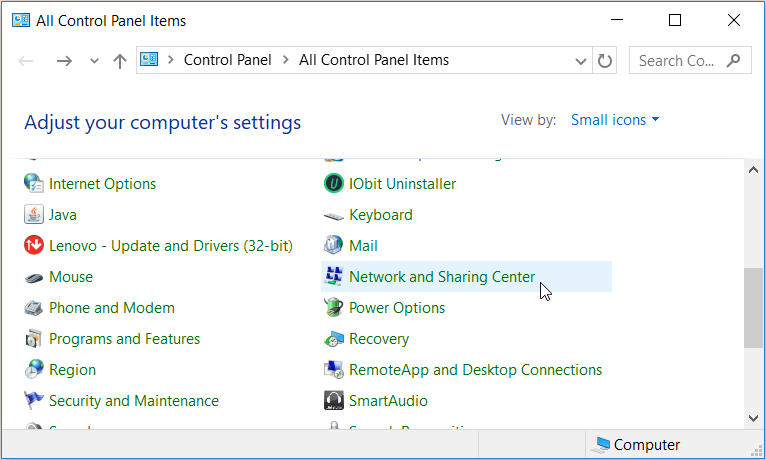
In the next window, click Change adapter settings to open the Network Connections tool.
8. Use the Task Manager
You can always rely on the Task Manager when you want to analyze system processes and monitor device performance. The Task Manager also helps you terminate active software programs with ease. But did you know that this tool can also help you access various Windows software programs?
Here’s how to use the Task Manager to open the Network Connections tool:
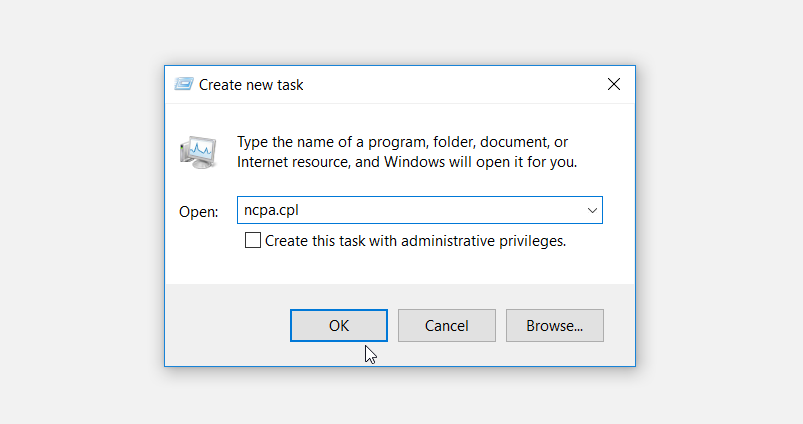
- Press Ctrl + Shift + Esc to open the Task Manager.
- Click the File tab in the top-left corner and select Run new task.
- Type ncpa.cpl in the search box and click OK to open the Network Connections tool.
9. Use the Executable File in the System32 Directory
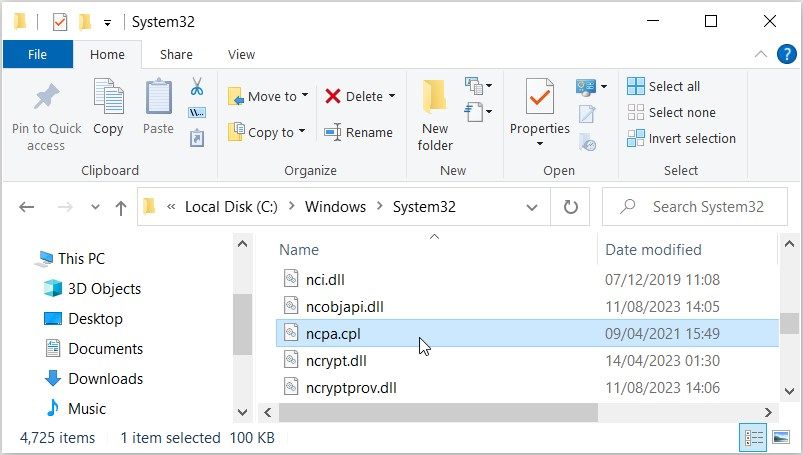
Now, let’s explore how to open the Network Connections tool using the relevant executable (.exe) file. This particular file is hiding somewhere in the System32 folder, so we’ll show you how to locate it:
- Press Win + E to open File Explorer.
- Select This PC on the left-hand side.
- Click Local Disk (C:) on the right-hand side.
- Navigate to Windows > System32.
- Scroll down and select ncpa.cpl option to open the Network Connections tool.
10. Create a Network Connections Desktop Shortcut
Desktop shortcuts make it easy for you to access the apps on your Windows device. So, let’s take a look at how to create a Desktop shortcut for the Network Connections tool:
- Press Win + D to access the Desktop.
- Right-click on a blank space on the Desktop and navigate to New > Shortcut.
- Type ncpa.cpl in the location box and click Next to continue.
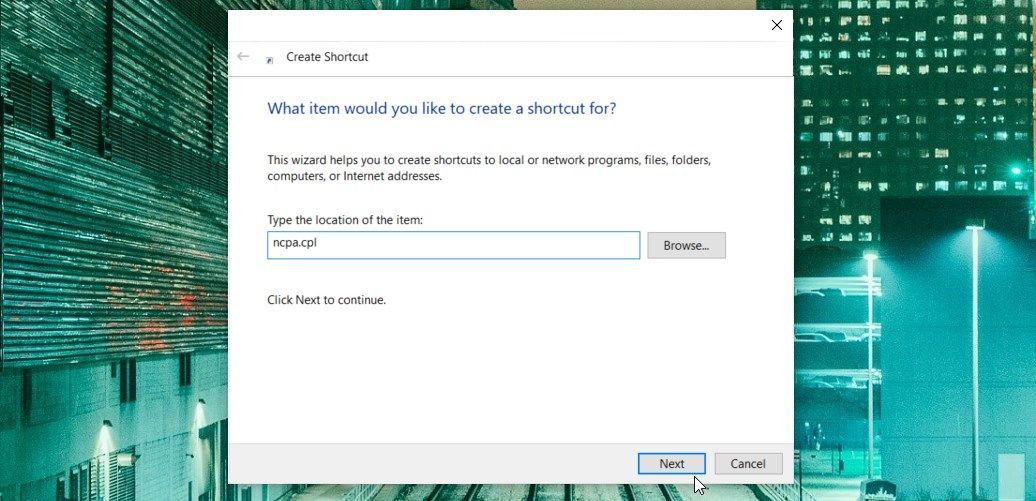
From there, type Network Connections Tool in the name field and click Finish. Now, you can easily access the Network Connections tool using the desktop shortcut you’ve just created.
That’s it! You’re now able to easily access the Windows Network Connections tool. So, let’s now explore tips on how to check the network connection status on your Windows device.
How to Check Your Network Connection Status on Windows
There are some good reasons why you’d want to open the Network Connection tool. For instance, you can use it to troubleshoot network issues, enable/disable IPv6 (Internet Protocol version 6), and more.
But if you’re mainly interested in checking your network connection status, here’s a quick way to do it via the Command Prompt:
- Press Win + R to open the Run command dialog box.
- Type CMD and press Ctrl + Shift + Enter to open an elevated Command Prompt.
In the Command Prompt window, type any of the following commands and then press Enter. Each command should help you understand something about your current network connections.
- netstat -a: This command displays all the current active connections, the internet protocol type, IP addresses, port numbers, and the state of the connection.
- netstat -b: This command shows the executable files that create each connection or listening port.
- netstat -e: This command displays ethernet statistics.
- netstat -n: This command displays IP addresses and port numbers in numerical form.
- netstat -q: This command displays all connections, listening ports, and bound non-listening TCP ports.
- netstat -y: This command displays the TCP connection template for all connections.
If you want to find out more about other network connection commands, here’s what you can do:
- Open the Command Prompt as per the previous steps.
- Type netstat /? and press Enter to display information about all netstat commands.
Tackle Connection Problems With the Network Connections Tool
There are times when you’d need to troubleshoot connection problems or enable/disable IPv6 (Internet Protocol version 6). In such cases, the Windows Network Connections tool can help you out. And if you want to easily access this tool, apply any of the methods we’ve covered.
So, can the Network Connections tool help you resolve disconnecting Wi-Fi issues on your Windows device? Not really! But there are tons of other solutions you can check out, such as resetting the Wi-Fi Auto-Config service.
Need to manage the network connections on your Windows device? If so, the Windows Network Connections tool can help. This tool displays all your wired and wireless connections in one place, making it easy to identify and troubleshoot various connection issues on your device.
In this article, we’ll show you the various ways to open the Windows Network Connections tool. From there, we’ll explore how you can check your network connection status on Windows.
Also read:
- [New] Comedic Counterpoints Funny Song Flips for 2024
- [Updated] In 2024, Essential Links for Acquiring YouTube Preview Templates Online
- [Updated] Peering Into YouTube Interactive Threads
- Essential Precautionary Measures on Windows 11 Upgrade
- Guide to Restoring iTunes Operation in Windows Environment
- How to Circumvent 'Permission Blocked' Error in WinSys
- In 2024, Unlocking the Power of Smart Lock A Beginners Guide for Sony Xperia 10 V Users
- Make Your IG Stories Inclusive: A Comprehensive Tutorial on Implementing Captions
- Master the Art of Secure Files with PowerToys
- Maximize Your iPhone Experience with iOS 16: Unlocking the Potential of the Enhanced Lock Screen - Tech Insights
- Maximizing Efficiency with Llama 2 - A Comprehensive Guide
- Modifying Internet Preferences on Win11
- Navigating Through The Fatal JavaScript Error in Windows 11'S Discord
- Prime Choices Purchasing Your Dreams in YouTube Ringtones
- Win11's D3DX9_39 Error: Fix Guide Here
- Title: Master Your Windows NetTools With These Steps
- Author: Richard
- Created at : 2024-12-15 05:25:58
- Updated at : 2024-12-21 19:30:27
- Link: https://win11-tips.techidaily.com/master-your-windows-nettools-with-these-steps/
- License: This work is licensed under CC BY-NC-SA 4.0.