Mastering Column Addition: Solutions for Excel Windows Problems

Mastering Column Addition: Solutions for Excel Windows Problems
When working on an Excel workbook, you may need to insert cells to accommodate new data or modify your existing spreadsheet. However, this seemingly uncomplicated task can sometimes leave you frustrated if Excel does not allow you to insert new cells.
If you are facing a similar problem, don’t fret. This guide will walk you through some effective solutions that should fix the problem in no time.
Disclaimer: This post includes affiliate links
If you click on a link and make a purchase, I may receive a commission at no extra cost to you.
1. Disable Cell Protection
A common reason why you may not be able to insert new rows or columns in an Excel sheet is if the existing cells are protected. In that case, you won’t be able to make any changes unless you disable the cell protection feature using these steps:
- Press Ctrl + A to select all the cells within your Excel sheet.
- Under the Home tab, click the Format button and select Format cells from the resulting menu.
- Switch to the Protection tab and uncheck the box that reads Locked.
- Click OK to apply the changes.

After disabling the cell protection feature, try to insert new cells again.
2. Unfreeze the Panes
Microsoft Excel lets you freeze specific parts of your sheet so that they remain visible even as you scroll through the sheet. However, this feature can sometimes cause problems and prevent you from adding new cells.
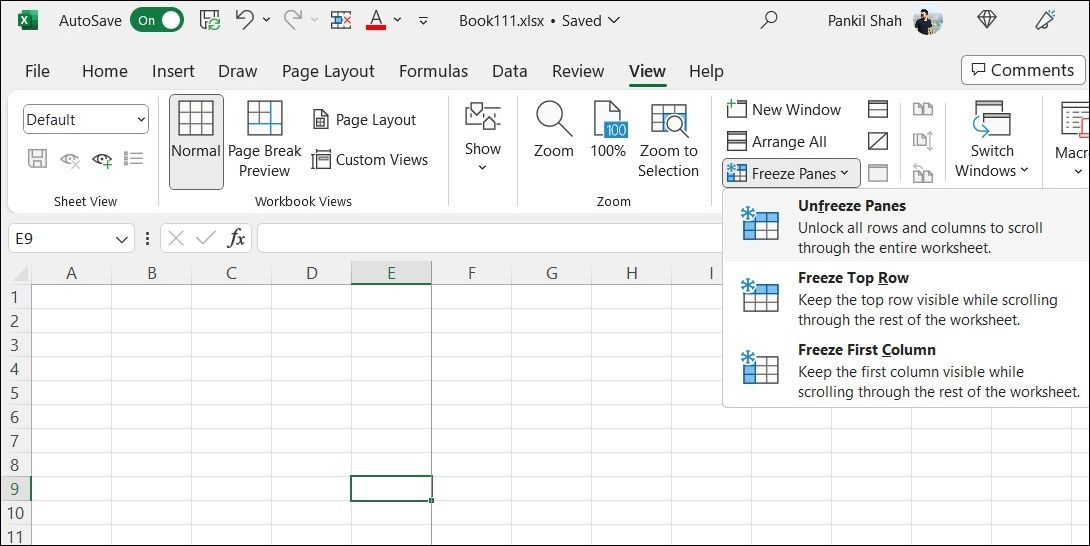
You can try unfreezing panes in your worksheet to see if that helps. Here are the steps for the same.
- Open your Excel worksheet.
- Click the View tab at the top.
- Click the Freeze Panes option.
- Select Unfreeze Panes from the resulting menu.

Once you unfreeze the panes, Excel should let you insert new cells.
3. Unmerge the Cells
Excel might not allow you to insert cells if you are trying to add them into cells that have been merged. To resolve this, you will need to unmerge the cells in your Excel worksheet .
Excel will unmerge all the selected cells and you should be able to add new cells after that.
4. Delete Entries From the Last Row and Column
Another reason why you might not be able to insert new cells in an Excel sheet is if the last column or row of your sheet contains data. If that’s the case, you may encounter the “Microsoft Excel can’t insert new cells because it would push non-empty cells off the end of the worksheet” error.
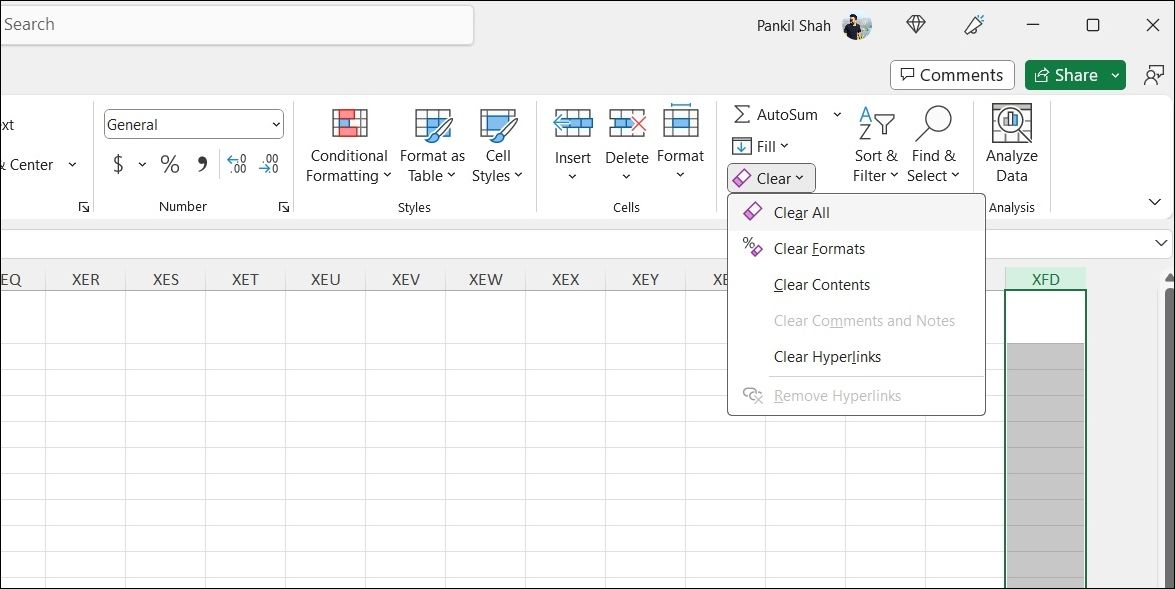
Select any cell in the first row of your Excel sheet and then press the Ctrl + Right arrow key to quickly navigate to the last column of your sheet. Now click the column header to select the entire column. In the Home tab, select Editing > Clear > Clear All.
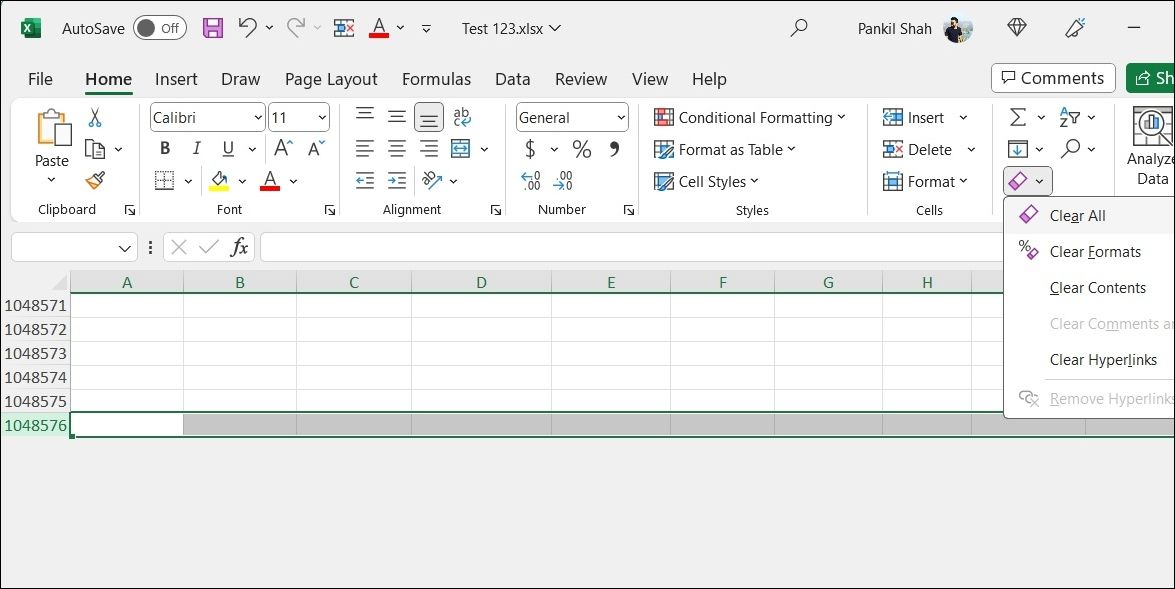
To clear entries from the last row, select any cell in the first column and press the Ctrl + Down arrow key to quickly navigate to the last row of your sheet. Click the row number to select the entire last row. Then, switch to the Home tab and select Editing > Clear > Clear All.
5. Repair the Corrupted Excel Workbook
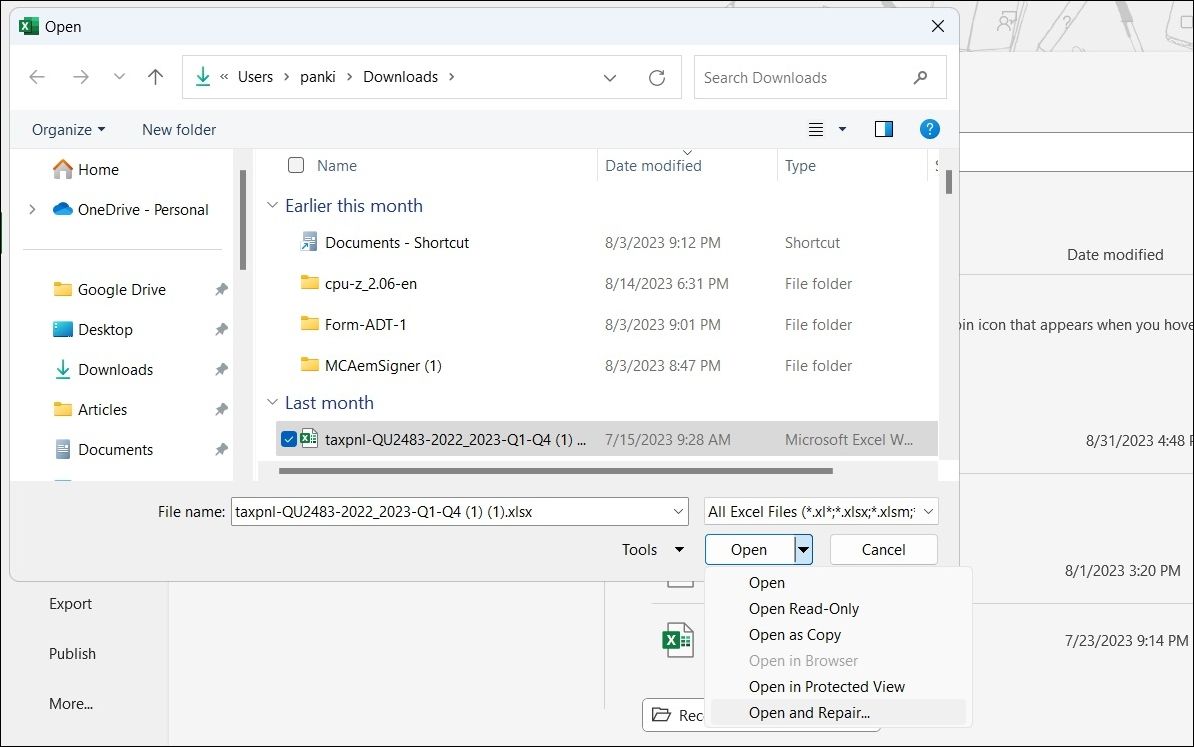
If you still can’t add new cells, it’s likely that your Excel workbook has become corrupted for some reason . Fortunately, Excel includes an option to repair corrupted or damaged files. Here’s how you can use it to repair a problematic Excel workbook.
- Open Excel and head to File > Open.
- Click the Browse option in the right pane.
- In the Open dialog box, locate the corrupted file and select it.
- Click the arrow beside the Open button and select Open and Repair.

Wait for Excel to fix any issues with your worksheet and then open it. After that, check if the issue is still there.
6. Copy Your Data to a New Workbook
If repairing your Excel workbook proves ineffective, your next best option is to copy your data to a new sheet. To do this, follow these steps:
- Open your Excel workbook and select the data you want to copy.
- Press Ctrl + C to copy the selected data.
- Press Ctrl + N to open a new Excel workbook.
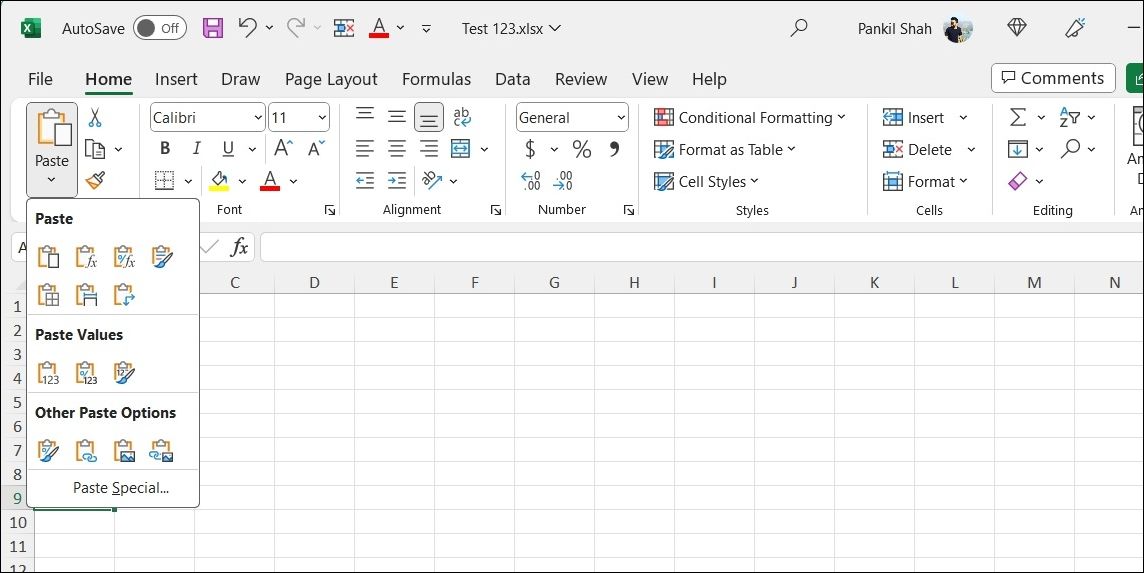
- In the Home tab, click the Paste button and select your preferred option from the resulting menu.

After completing the above steps, you should be able to insert new rows and columns without any errors.
7. Update Microsoft Excel
Have you disabled automatic updates for Office apps on Windows ? If so, you may be using an outdated version of Excel, which can sometimes cause problems. Try updating Microsoft Excel manually on your PC and see if that fixes the problem.
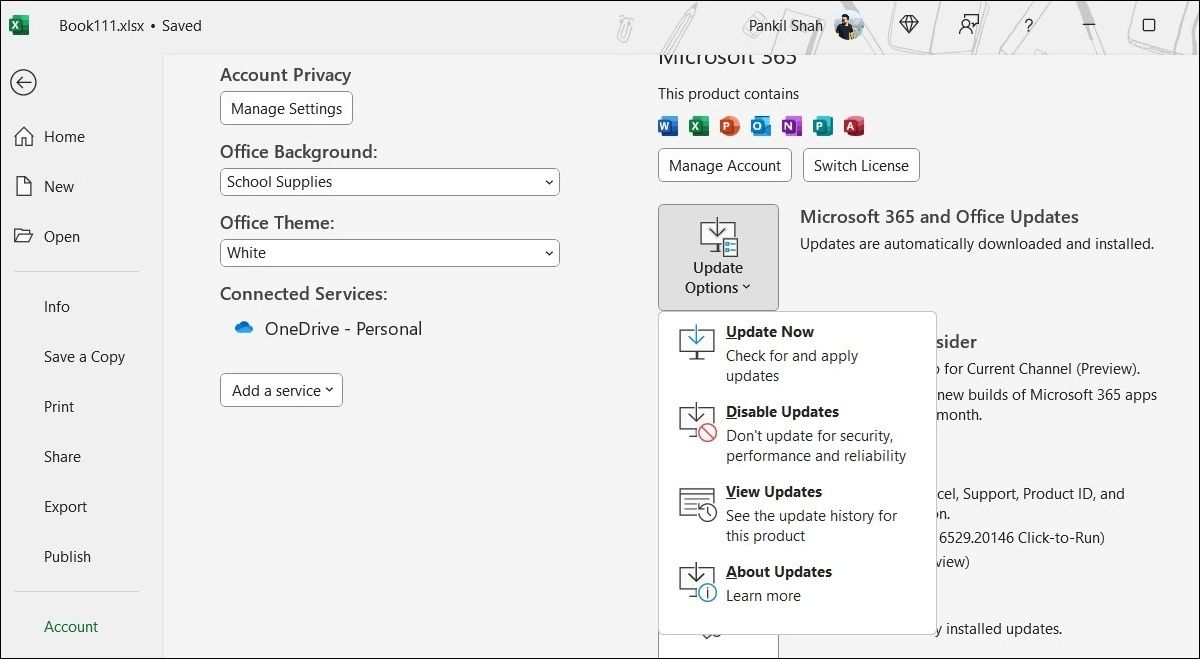
To update Microsoft Excel on Windows:
- Open Microsoft Excel and click the File menu in the top left corner.
- Select Account from the left sidebar.
- Click Update Options > Update Now.

Wait for Microsoft Office to update Excel along with other Office apps and check if that fixes the problem.
8. Run the Office Repair Tool
If none of the above solutions help, you can consider running the Office Repair tool as a last resort. Here’s how to run it.
- Press Win + R to open the Run dialog box.
- Type control in the text box and press Enter to open the Control Panel .
- Use the drop-down menu in the top right corner to change the view type to Large icons.
- Click on Programs and Features.
- Locate and select the Microsoft Office suite on the list.
- Click the Change option at the top.
- Select the Quick Repair option and hit the Repair button.

Wait for the tool to repair your Office apps and then check if you can insert cells in Excel. If you still get errors, repeat the above steps and select the Online Repair option. This will allow the tool to perform a thorough repair operation and download any missing files from the internet.
Insert Cells in Your Excel Spreadsheet Without Errors
It is annoying when Microsoft prevents you from performing basic tasks such as inserting cells. Hopefully, one of the suggestions above has resolved your issue and you are now able to insert cells in your Excel workbook.
If you are facing a similar problem, don’t fret. This guide will walk you through some effective solutions that should fix the problem in no time.
Also read:
- [New] 2024 Approved Screen Snip Pro The Essential Guide to Win OS
- [New] Expeditious Approaches to Slide Storage
- [Updated] Mastering the Art of Obtaining Facebook’s Prestigious Blue Badge for 2024
- Effortless Projection without PIN in WIndows 11
- Eliminate Default USB Suspend Using Windows 11 Features
- Fix Freeze Frames in Windows-Based League of Legends
- Global Content Makers' Conference for 2024
- Improve Display Clarity with GPU Reset in Windows 11
- Master the Art of Clearing Vacant Directories on Windows
- Revolutionize Your Interior Design with These 4 Essential Paint Calculator Apps
- Simplify Multitasking with Picture in Picture Feature (iOS) for 2024
- Soundtrack Your YouTube Videos 7 Free Audio Selections
- Title: Mastering Column Addition: Solutions for Excel Windows Problems
- Author: Richard
- Created at : 2024-10-03 05:45:20
- Updated at : 2024-10-08 19:45:57
- Link: https://win11-tips.techidaily.com/mastering-column-addition-solutions-for-excel-windows-problems/
- License: This work is licensed under CC BY-NC-SA 4.0.

