
Navigating the Change: Easily Altering NAT Settings in Win11/10
Navigating the Change: Easily Altering NAT Settings in Win11/10
Key Takeaways
- Changing the NAT type from strict to open can improve network connectivity and reduce network-related issues when playing multiplayer games online.
- You can change your NAT type on Windows by enabling Discovery Mode, UPnP, or port forwarding.
- Port forwarding provides greater control over open ports and enhances security compared to UPnP, but it requires knowing the specific TCP and UDP ports used by your game.
You may want to change your NAT type from strict to open when playing multiplayer games online. A strict or moderate NAT type may cause network problems when joining a game party, like abrupt disconnections, lags, and making it difficult to host matches.
You can change the NAT type on Windows to ease restrictions, resulting in a faster and more reliable network connection. But you must balance your needs with potential security risks when changing the NAT.
What Is NAT, and What Are the NAT Types?
Network Address Translation (NAT) is a feature in routers (and firewalls) that translates the private IPv4 address from devices in your home and office to the public IPv4 address assigned to your router by the ISP and vice versa. NAT helps address the limited number of public IPv4 addresses available worldwide.
A NAT type describes the status of your network connection. The three NAT types are Strict, Moderate, and Open.
- NAT Type Strict: It is the most secure of the NAT types but also the most restrictive one. Users with a Strict NAT type can join games hosted by a system with an Open NAT type. However, the connection is dropped if a system with a Moderate NAT type joins the same game.
- NAT Type Moderate: It is moderately secure and opens a few ports. Systems with a Moderate NAT type can join other systems using the Moderate or Open NAT type.
- NAT Type Open: Choose Open NAT if you want to host matches. It has no restrictions and facilitates data transfer between all devices without restrictions, irrespective of their NAT type or firewall configuration.
Your default NAT type depends on your router configuration. If you experience network-related issues, changing your NAT type from Strict or Moderate to Open can help. However, be wary of potential security risks associated with changing your NAT type to Open.
How to Set a Static Private IP Address
Whether you want to change the NAT type using the UPnP method or port forwarding, you’ll need a static IP address to make it work. Since most routers assign a dynamic IP address, you must manually configure a static IP for your Windows device.
If you already have a static IP address assigned to your device, skip to the following steps to change the NAT type. If not, follow the below steps to set a static IP address on your Windows computer :
Press Win + R to open Run.
Type cmd and click OK to open Command Prompt.
In Command Prompt, type the following command to view your network information:
ipconfigFor this guide, we’ll set up a static IP for the Ethernet adapter. So, scroll down to the Ethernet adapter section and note down the IPv4 Address, Subnet Mask, and Default Gateway.

Parental Control Software
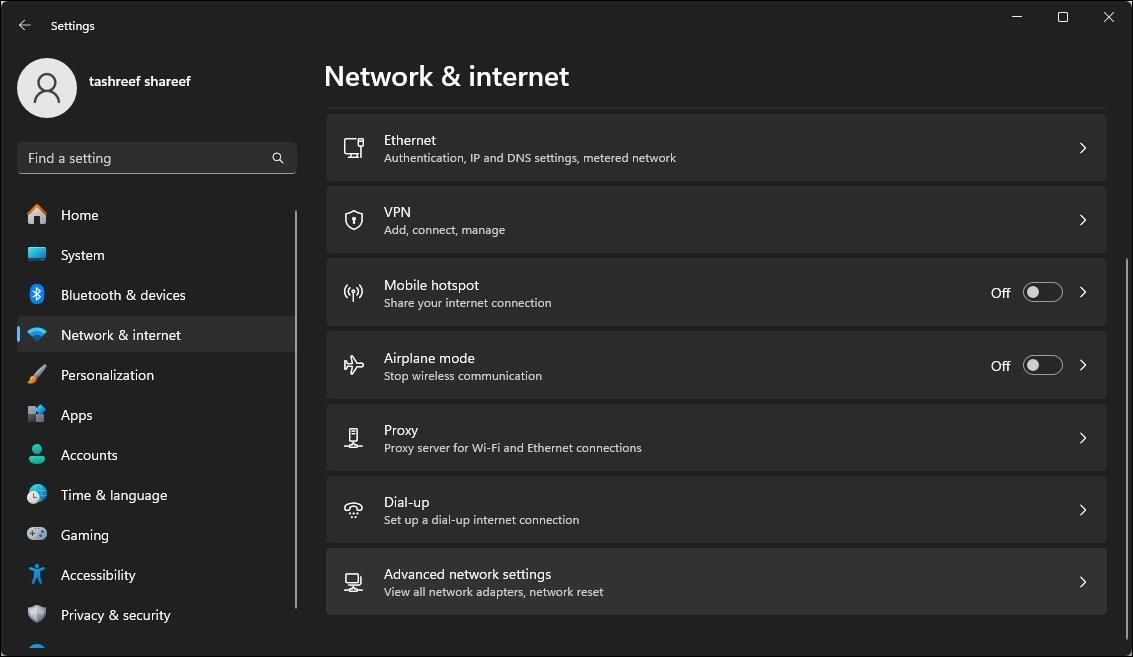
Next, press Win + I to open Settings.
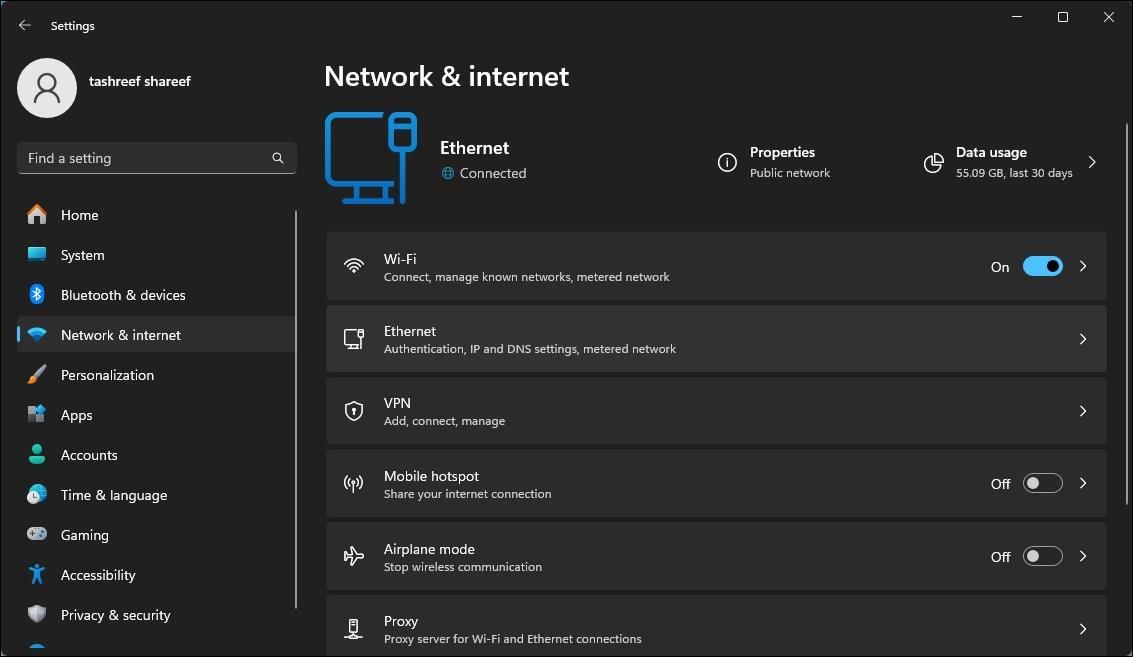
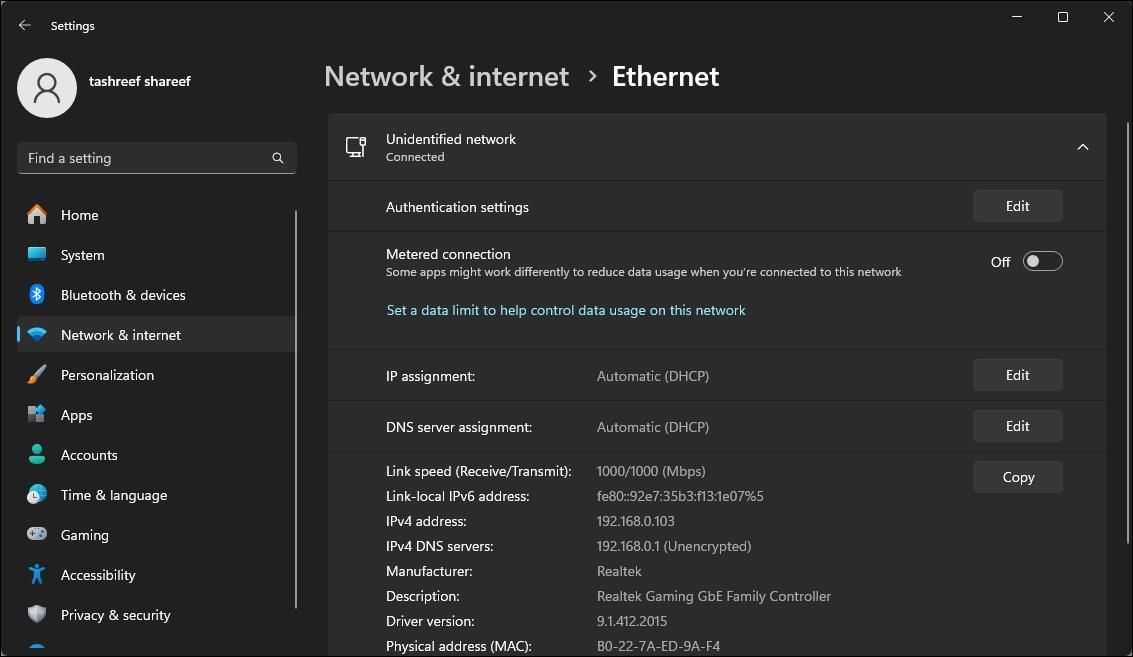
Go to Network & internet, and click on Ethernet to open the Ethernet adapter properties.
Click the Edit button beside IP assignment.
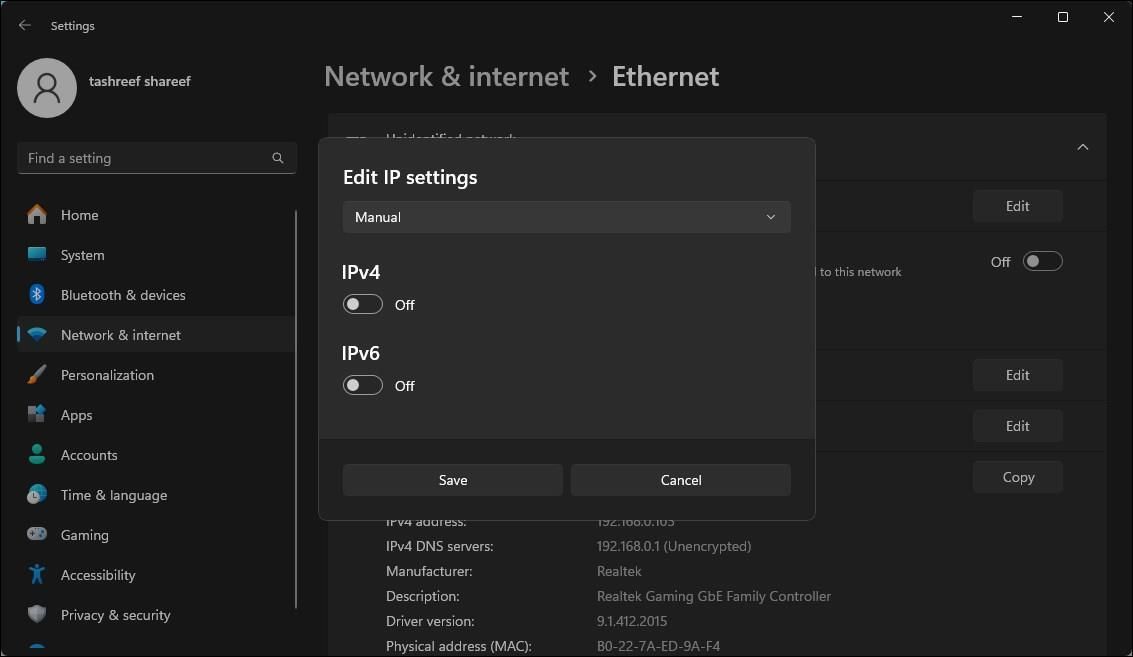
Select the Automatic (DCHP) drop-down and choose Manual.
Toggle the switch to enable IPv4.
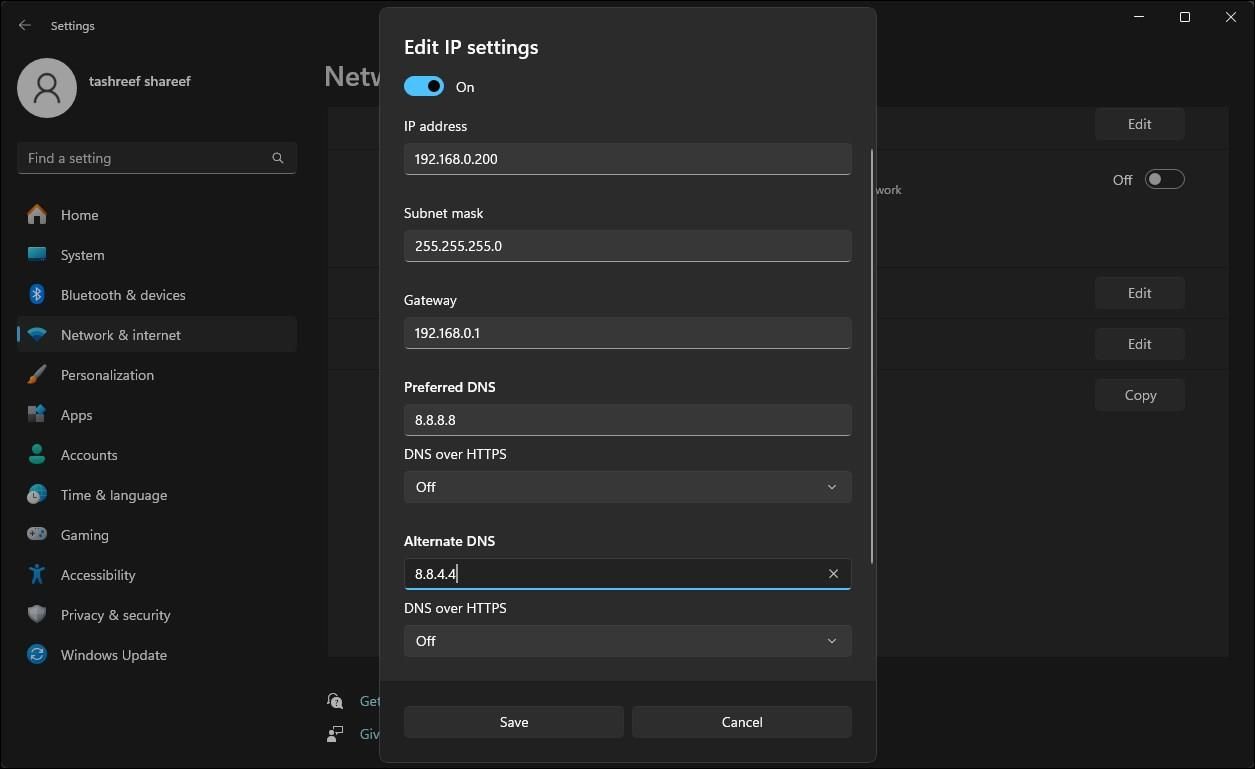
Enter the IP address by ensuring the first three octets of your IP address match the IPv4 address obtained using the ipconfig command—for example, type 192.168.0.200. As you can see, we have kept the first three octets of the IP address (192.168.0) but changed the fourth octet to 200 from 101.
Enter the Subnet mask, and Default gateway address for the Ethernet adapter obtained using the ipconfig command.
In the Preferred DNS field, enter 8.8.8.8;for Alternate DNS, enter 8.8.4.4. This is a public DNS server offered by Google.
Leave other settings as default and click Save to set up your static IP address for the device.

Once you have a static IP, you can follow the steps below to change the NAT type on your Windows computer.
1. Turn On Discovery Mode on Windows
Network Discovery is a built-in Windows feature to help you allow other computers on the network to detect your computer. You can turn On or Off the Network Discovery mode on Windows 10 from the Settings apps. Here’s how to do it on Windows 11:
- Press Win + I to open Settings.
- Open the Network & internet tab in the left pane.
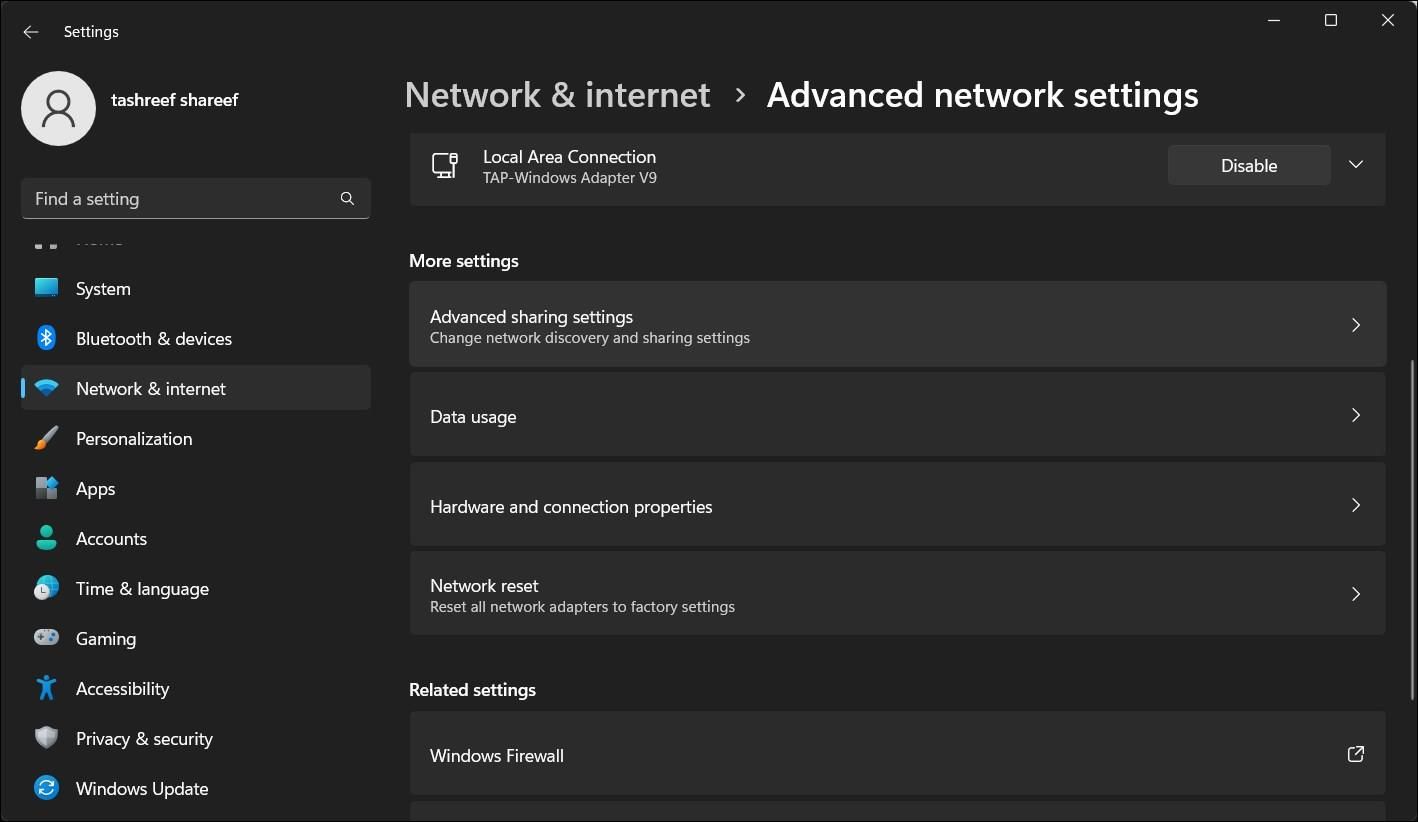
- Click on Advanced network settings.
- Scroll down and click Advanced sharing settings under the More settings section.
- Toggle the switch for Network Discovery to turn it on for public networks.
2. Enable UPnP On Your Router

You can change your NAT type to Open by enabling Universal Plug and Play (UPnP) in your router settings. This is the easiest way to change the NAT type, provided you can access your router configuration page. However, there are security concerns with the UPnP method , which hackers may exploit.
Note that the following steps apply to a TP-Link router. The process to enable UPnP may differ for routers from other manufacturers. Check your router’s user manual or manufacturer knowledge base online for instructions.
Follow these steps to enable UPnP:
- Log in to your router’s web-based utility. To do this, type the default gateway address (for example (http://192.168.0.1 ) in the search bar and press Enter. If not, here’s how to find your router’s IP address .
- On the router dashboard, open the Advanced tab.
- Click to expand NAT Forwarding in the left pane.
- Open the UPnP tab under NAT Forwarding.
- Toggle the switch to enable UPnP.
You can now close your router’s web-based utility and check for any improvements in your network connectivity.
3. Change NAT Type Using Port Forwarding
Alternatively, you can use the safer port forwarding method to change your NAT type for a specific game title or application. While the process is a little complicated compared to UPnP, port forwarding gives greater control over open ports and their usage with enhanced security.
To create a new port forwarding entry, you’ll need to know the TCP or UDP ports used for your specific game. For example, Call of Duty: Black Ops Cold War uses the following ports:
TCP: 3074, 27014-27050 UDP: 3074-3079
To find your game’s UDP and TCP ports, perform a web search with your game title for port forwarding. Often, the game developers include port information for the game on their website.

Alternatively, go to portforward , select your game, and then your router name and model using the given options. On the following page, scroll down to locate the specific ports for your game. Port Forward keeps a database of ports for games on multiple platforms and for different router makers.
To change NAT type using Power Forwarding:
- Log in to your router’s web app. In this instance, we’ll use TP-Link’s web-based utility.
- Open the Advanced tab.
- In the left pane, click to expand NAT Forwarding.
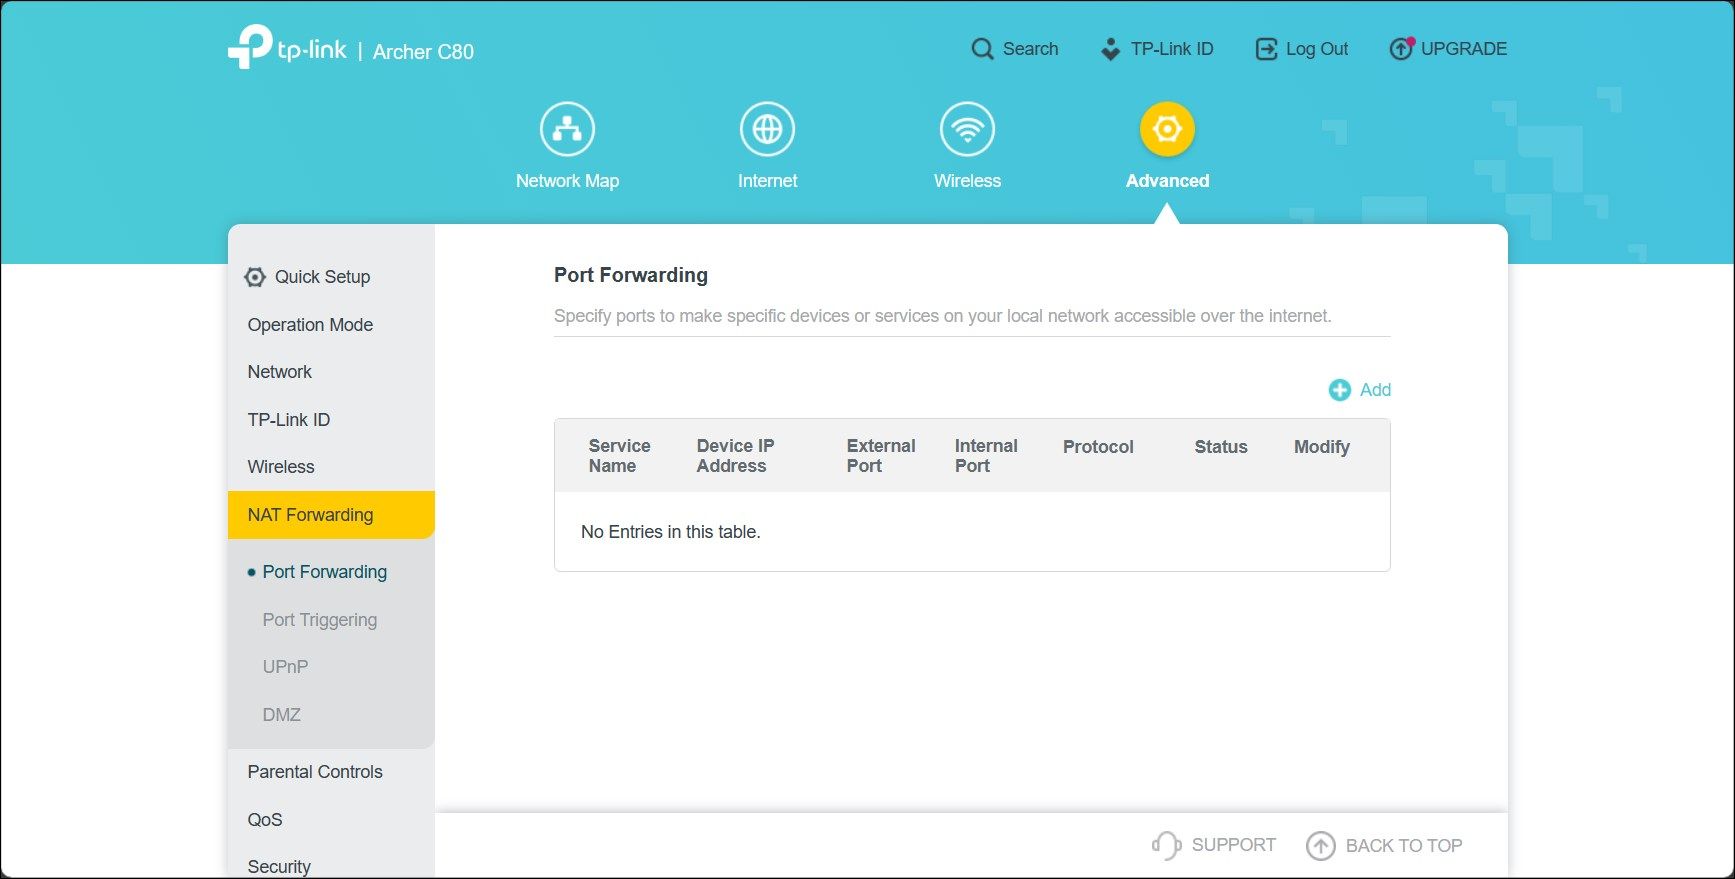
- Open the Port Forwarding tab.
- Click the + Add icon in the top right corner to create a new port forwarding entry.
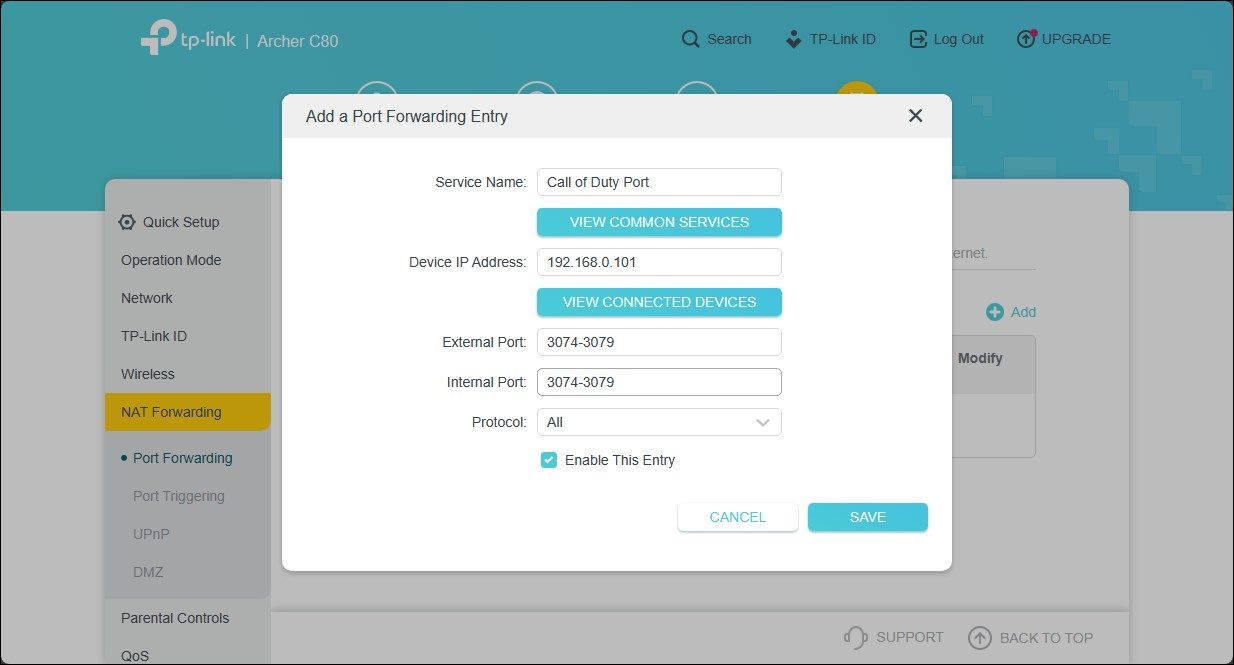
- In the Add a Port Forwarding Entry dialog, type a name for Service Name. Make sure to add a name to make it easy to identify this port forwarding entry for future reference.
- In Device IP Address, type your computer’s static IP address for Ethernet or Wi-Fi.
- Type your game’s port number in the External and Internet Port fields. You can use a UDP or TCP port, but use the same port in both the External Port and Internal Port fields.
- Set the Protocol field to All.
- Once done, click Save to save the port forwarding entry.


The entry will be saved in the Port Forwarding table. You can enable or disable the entry using the Status toggle switch.
Apart from port forwarding, you can also change the NAT type by modifying your router’s configuration file. However, some router manufacturers, including TP-Link, encrypt the configuration file, making it extremely difficult to make necessary modifications.

Changing NAT Type on Windows to Fix Network Issues
Changing the NAT type may be necessary to troubleshoot network-related issues. You can enable UPnP or turn on Network Discovery to ease network restrictions. However, we recommend port forwarding to reduce network restrictions without compromising network security.
You may want to change your NAT type from strict to open when playing multiplayer games online. A strict or moderate NAT type may cause network problems when joining a game party, like abrupt disconnections, lags, and making it difficult to host matches.
You can change the NAT type on Windows to ease restrictions, resulting in a faster and more reliable network connection. But you must balance your needs with potential security risks when changing the NAT.
What Is NAT, and What Are the NAT Types?
Network Address Translation (NAT) is a feature in routers (and firewalls) that translates the private IPv4 address from devices in your home and office to the public IPv4 address assigned to your router by the ISP and vice versa. NAT helps address the limited number of public IPv4 addresses available worldwide.
A NAT type describes the status of your network connection. The three NAT types are Strict, Moderate, and Open.
- NAT Type Strict: It is the most secure of the NAT types but also the most restrictive one. Users with a Strict NAT type can join games hosted by a system with an Open NAT type. However, the connection is dropped if a system with a Moderate NAT type joins the same game.
- NAT Type Moderate: It is moderately secure and opens a few ports. Systems with a Moderate NAT type can join other systems using the Moderate or Open NAT type.
- NAT Type Open: Choose Open NAT if you want to host matches. It has no restrictions and facilitates data transfer between all devices without restrictions, irrespective of their NAT type or firewall configuration.
Your default NAT type depends on your router configuration. If you experience network-related issues, changing your NAT type from Strict or Moderate to Open can help. However, be wary of potential security risks associated with changing your NAT type to Open.
How to Set a Static Private IP Address
Whether you want to change the NAT type using the UPnP method or port forwarding, you’ll need a static IP address to make it work. Since most routers assign a dynamic IP address, you must manually configure a static IP for your Windows device.
If you already have a static IP address assigned to your device, skip to the following steps to change the NAT type. If not, follow the below steps to set a static IP address on your Windows computer :
Press Win + R to open Run.
Type cmd and click OK to open Command Prompt.
In Command Prompt, type the following command to view your network information:
ipconfigFor this guide, we’ll set up a static IP for the Ethernet adapter. So, scroll down to the Ethernet adapter section and note down the IPv4 Address, Subnet Mask, and Default Gateway.
Next, press Win + I to open Settings.
Go to Network & internet, and click on Ethernet to open the Ethernet adapter properties.
Click the Edit button beside IP assignment.
Select the Automatic (DCHP) drop-down and choose Manual.
Toggle the switch to enable IPv4.
Enter the IP address by ensuring the first three octets of your IP address match the IPv4 address obtained using the ipconfig command—for example, type 192.168.0.200. As you can see, we have kept the first three octets of the IP address (192.168.0) but changed the fourth octet to 200 from 101.
Enter the Subnet mask, and Default gateway address for the Ethernet adapter obtained using the ipconfig command.
In the Preferred DNS field, enter 8.8.8.8;for Alternate DNS, enter 8.8.4.4. This is a public DNS server offered by Google.
Leave other settings as default and click Save to set up your static IP address for the device.
 EmEditor Professional (Lifetime License, non-store app)
 Greeting Card Builder
Once you have a static IP, you can follow the steps below to change the NAT type on your Windows computer.
1. Turn On Discovery Mode on Windows
Network Discovery is a built-in Windows feature to help you allow other computers on the network to detect your computer. You can turn On or Off the Network Discovery mode on Windows 10 from the Settings apps. Here’s how to do it on Windows 11:
- Press Win + I to open Settings.
- Open the Network & internet tab in the left pane.
- Click on Advanced network settings.
- Scroll down and click Advanced sharing settings under the More settings section.
- Toggle the switch for Network Discovery to turn it on for public networks.


2. Enable UPnP On Your Router
You can change your NAT type to Open by enabling Universal Plug and Play (UPnP) in your router settings. This is the easiest way to change the NAT type, provided you can access your router configuration page. However, there are security concerns with the UPnP method , which hackers may exploit.
Note that the following steps apply to a TP-Link router. The process to enable UPnP may differ for routers from other manufacturers. Check your router’s user manual or manufacturer knowledge base online for instructions.
Follow these steps to enable UPnP:
- Log in to your router’s web-based utility. To do this, type the default gateway address (for example (http://192.168.0.1 ) in the search bar and press Enter. If not, here’s how to find your router’s IP address .
- On the router dashboard, open the Advanced tab.
- Click to expand NAT Forwarding in the left pane.
- Open the UPnP tab under NAT Forwarding.
- Toggle the switch to enable UPnP.
You can now close your router’s web-based utility and check for any improvements in your network connectivity.
3. Change NAT Type Using Port Forwarding
Alternatively, you can use the safer port forwarding method to change your NAT type for a specific game title or application. While the process is a little complicated compared to UPnP, port forwarding gives greater control over open ports and their usage with enhanced security.
To create a new port forwarding entry, you’ll need to know the TCP or UDP ports used for your specific game. For example, Call of Duty: Black Ops Cold War uses the following ports:
TCP: 3074, 27014-27050 UDP: 3074-3079
To find your game’s UDP and TCP ports, perform a web search with your game title for port forwarding. Often, the game developers include port information for the game on their website.
Alternatively, go to portforward , select your game, and then your router name and model using the given options. On the following page, scroll down to locate the specific ports for your game. Port Forward keeps a database of ports for games on multiple platforms and for different router makers.
To change NAT type using Power Forwarding:
- Log in to your router’s web app. In this instance, we’ll use TP-Link’s web-based utility.
- Open the Advanced tab.
- In the left pane, click to expand NAT Forwarding.
- Open the Port Forwarding tab.
- Click the + Add icon in the top right corner to create a new port forwarding entry.
- In the Add a Port Forwarding Entry dialog, type a name for Service Name. Make sure to add a name to make it easy to identify this port forwarding entry for future reference.
- In Device IP Address, type your computer’s static IP address for Ethernet or Wi-Fi.
- Type your game’s port number in the External and Internet Port fields. You can use a UDP or TCP port, but use the same port in both the External Port and Internal Port fields.
- Set the Protocol field to All.
- Once done, click Save to save the port forwarding entry.
The entry will be saved in the Port Forwarding table. You can enable or disable the entry using the Status toggle switch.
Apart from port forwarding, you can also change the NAT type by modifying your router’s configuration file. However, some router manufacturers, including TP-Link, encrypt the configuration file, making it extremely difficult to make necessary modifications.
Changing NAT Type on Windows to Fix Network Issues
Changing the NAT type may be necessary to troubleshoot network-related issues. You can enable UPnP or turn on Network Discovery to ease network restrictions. However, we recommend port forwarding to reduce network restrictions without compromising network security.
You may want to change your NAT type from strict to open when playing multiplayer games online. A strict or moderate NAT type may cause network problems when joining a game party, like abrupt disconnections, lags, and making it difficult to host matches.
You can change the NAT type on Windows to ease restrictions, resulting in a faster and more reliable network connection. But you must balance your needs with potential security risks when changing the NAT.
What Is NAT, and What Are the NAT Types?
Network Address Translation (NAT) is a feature in routers (and firewalls) that translates the private IPv4 address from devices in your home and office to the public IPv4 address assigned to your router by the ISP and vice versa. NAT helps address the limited number of public IPv4 addresses available worldwide.
A NAT type describes the status of your network connection. The three NAT types are Strict, Moderate, and Open.
- NAT Type Strict: It is the most secure of the NAT types but also the most restrictive one. Users with a Strict NAT type can join games hosted by a system with an Open NAT type. However, the connection is dropped if a system with a Moderate NAT type joins the same game.
- NAT Type Moderate: It is moderately secure and opens a few ports. Systems with a Moderate NAT type can join other systems using the Moderate or Open NAT type.
- NAT Type Open: Choose Open NAT if you want to host matches. It has no restrictions and facilitates data transfer between all devices without restrictions, irrespective of their NAT type or firewall configuration.
Your default NAT type depends on your router configuration. If you experience network-related issues, changing your NAT type from Strict or Moderate to Open can help. However, be wary of potential security risks associated with changing your NAT type to Open.
Power Tools add-on for Google Sheets, 12-month subscription
How to Set a Static Private IP Address
Whether you want to change the NAT type using the UPnP method or port forwarding, you’ll need a static IP address to make it work. Since most routers assign a dynamic IP address, you must manually configure a static IP for your Windows device.
If you already have a static IP address assigned to your device, skip to the following steps to change the NAT type. If not, follow the below steps to set a static IP address on your Windows computer :
Press Win + R to open Run.
Type cmd and click OK to open Command Prompt.
In Command Prompt, type the following command to view your network information:
ipconfigFor this guide, we’ll set up a static IP for the Ethernet adapter. So, scroll down to the Ethernet adapter section and note down the IPv4 Address, Subnet Mask, and Default Gateway.
WPS Office Premium ( File Recovery, Photo Scanning, Convert PDF)–YearlyNext, press Win + I to open Settings.
Go to Network & internet, and click on Ethernet to open the Ethernet adapter properties.
Click the Edit button beside IP assignment.
Select the Automatic (DCHP) drop-down and choose Manual.
Toggle the switch to enable IPv4.
Enter the IP address by ensuring the first three octets of your IP address match the IPv4 address obtained using the ipconfig command—for example, type 192.168.0.200. As you can see, we have kept the first three octets of the IP address (192.168.0) but changed the fourth octet to 200 from 101.
Enter the Subnet mask, and Default gateway address for the Ethernet adapter obtained using the ipconfig command.
In the Preferred DNS field, enter 8.8.8.8;for Alternate DNS, enter 8.8.4.4. This is a public DNS server offered by Google.
Leave other settings as default and click Save to set up your static IP address for the device.


Once you have a static IP, you can follow the steps below to change the NAT type on your Windows computer.
1. Turn On Discovery Mode on Windows
Network Discovery is a built-in Windows feature to help you allow other computers on the network to detect your computer. You can turn On or Off the Network Discovery mode on Windows 10 from the Settings apps. Here’s how to do it on Windows 11:
- Press Win + I to open Settings.
- Open the Network & internet tab in the left pane.
- Click on Advanced network settings.
Advanced Find and Replace for Google Sheets, Lifetime subscription
- Scroll down and click Advanced sharing settings under the More settings section.
- Toggle the switch for Network Discovery to turn it on for public networks.

2. Enable UPnP On Your Router
You can change your NAT type to Open by enabling Universal Plug and Play (UPnP) in your router settings. This is the easiest way to change the NAT type, provided you can access your router configuration page. However, there are security concerns with the UPnP method , which hackers may exploit.
Note that the following steps apply to a TP-Link router. The process to enable UPnP may differ for routers from other manufacturers. Check your router’s user manual or manufacturer knowledge base online for instructions.
Follow these steps to enable UPnP:
- Log in to your router’s web-based utility. To do this, type the default gateway address (for example (http://192.168.0.1 ) in the search bar and press Enter. If not, here’s how to find your router’s IP address .
- On the router dashboard, open the Advanced tab.
- Click to expand NAT Forwarding in the left pane.
- Open the UPnP tab under NAT Forwarding.
- Toggle the switch to enable UPnP.
You can now close your router’s web-based utility and check for any improvements in your network connectivity.
3. Change NAT Type Using Port Forwarding
Alternatively, you can use the safer port forwarding method to change your NAT type for a specific game title or application. While the process is a little complicated compared to UPnP, port forwarding gives greater control over open ports and their usage with enhanced security.
To create a new port forwarding entry, you’ll need to know the TCP or UDP ports used for your specific game. For example, Call of Duty: Black Ops Cold War uses the following ports:
TCP: 3074, 27014-27050 UDP: 3074-3079
To find your game’s UDP and TCP ports, perform a web search with your game title for port forwarding. Often, the game developers include port information for the game on their website.
 SwifDoo PDF Perpetual (2-PC) Free upgrade. No monthly fees ever.
Alternatively, go to portforward , select your game, and then your router name and model using the given options. On the following page, scroll down to locate the specific ports for your game. Port Forward keeps a database of ports for games on multiple platforms and for different router makers.
To change NAT type using Power Forwarding:
- Log in to your router’s web app. In this instance, we’ll use TP-Link’s web-based utility.
- Open the Advanced tab.
- In the left pane, click to expand NAT Forwarding.
Allavsoft Batch Download Online Videos, Music Offline to MP4, MP3, MOV, etc format
- Open the Port Forwarding tab.
- Click the + Add icon in the top right corner to create a new port forwarding entry.
- In the Add a Port Forwarding Entry dialog, type a name for Service Name. Make sure to add a name to make it easy to identify this port forwarding entry for future reference.
- In Device IP Address, type your computer’s static IP address for Ethernet or Wi-Fi.
- Type your game’s port number in the External and Internet Port fields. You can use a UDP or TCP port, but use the same port in both the External Port and Internal Port fields.
- Set the Protocol field to All.
- Once done, click Save to save the port forwarding entry.
 Allavsoft Batch Download Online Videos, Music Offline to MP4, MP3, MOV, etc format
The entry will be saved in the Port Forwarding table. You can enable or disable the entry using the Status toggle switch.
Apart from port forwarding, you can also change the NAT type by modifying your router’s configuration file. However, some router manufacturers, including TP-Link, encrypt the configuration file, making it extremely difficult to make necessary modifications.
## Changing NAT Type on Windows to Fix Network IssuesChanging the NAT type may be necessary to troubleshoot network-related issues. You can enable UPnP or turn on Network Discovery to ease network restrictions. However, we recommend port forwarding to reduce network restrictions without compromising network security.
You may want to change your NAT type from strict to open when playing multiplayer games online. A strict or moderate NAT type may cause network problems when joining a game party, like abrupt disconnections, lags, and making it difficult to host matches.
You can change the NAT type on Windows to ease restrictions, resulting in a faster and more reliable network connection. But you must balance your needs with potential security risks when changing the NAT.
What Is NAT, and What Are the NAT Types?
Network Address Translation (NAT) is a feature in routers (and firewalls) that translates the private IPv4 address from devices in your home and office to the public IPv4 address assigned to your router by the ISP and vice versa. NAT helps address the limited number of public IPv4 addresses available worldwide.
A NAT type describes the status of your network connection. The three NAT types are Strict, Moderate, and Open.
- NAT Type Strict: It is the most secure of the NAT types but also the most restrictive one. Users with a Strict NAT type can join games hosted by a system with an Open NAT type. However, the connection is dropped if a system with a Moderate NAT type joins the same game.
- NAT Type Moderate: It is moderately secure and opens a few ports. Systems with a Moderate NAT type can join other systems using the Moderate or Open NAT type.
- NAT Type Open: Choose Open NAT if you want to host matches. It has no restrictions and facilitates data transfer between all devices without restrictions, irrespective of their NAT type or firewall configuration.
Your default NAT type depends on your router configuration. If you experience network-related issues, changing your NAT type from Strict or Moderate to Open can help. However, be wary of potential security risks associated with changing your NAT type to Open.
How to Set a Static Private IP Address
Whether you want to change the NAT type using the UPnP method or port forwarding, you’ll need a static IP address to make it work. Since most routers assign a dynamic IP address, you must manually configure a static IP for your Windows device.
If you already have a static IP address assigned to your device, skip to the following steps to change the NAT type. If not, follow the below steps to set a static IP address on your Windows computer :
Press Win + R to open Run.
Type cmd and click OK to open Command Prompt.
In Command Prompt, type the following command to view your network information:
ipconfigFor this guide, we’ll set up a static IP for the Ethernet adapter. So, scroll down to the Ethernet adapter section and note down the IPv4 Address, Subnet Mask, and Default Gateway.
Next, press Win + I to open Settings.
Go to Network & internet, and click on Ethernet to open the Ethernet adapter properties.
Click the Edit button beside IP assignment.
Select the Automatic (DCHP) drop-down and choose Manual.
Toggle the switch to enable IPv4.
Enter the IP address by ensuring the first three octets of your IP address match the IPv4 address obtained using the ipconfig command—for example, type 192.168.0.200. As you can see, we have kept the first three octets of the IP address (192.168.0) but changed the fourth octet to 200 from 101.
Enter the Subnet mask, and Default gateway address for the Ethernet adapter obtained using the ipconfig command.
In the Preferred DNS field, enter 8.8.8.8;for Alternate DNS, enter 8.8.4.4. This is a public DNS server offered by Google.
Leave other settings as default and click Save to set up your static IP address for the device.


Once you have a static IP, you can follow the steps below to change the NAT type on your Windows computer.
1. Turn On Discovery Mode on Windows
Network Discovery is a built-in Windows feature to help you allow other computers on the network to detect your computer. You can turn On or Off the Network Discovery mode on Windows 10 from the Settings apps. Here’s how to do it on Windows 11:
- Press Win + I to open Settings.
- Open the Network & internet tab in the left pane.
- Click on Advanced network settings.
- Scroll down and click Advanced sharing settings under the More settings section.
- Toggle the switch for Network Discovery to turn it on for public networks.
2. Enable UPnP On Your Router
You can change your NAT type to Open by enabling Universal Plug and Play (UPnP) in your router settings. This is the easiest way to change the NAT type, provided you can access your router configuration page. However, there are security concerns with the UPnP method , which hackers may exploit.
Note that the following steps apply to a TP-Link router. The process to enable UPnP may differ for routers from other manufacturers. Check your router’s user manual or manufacturer knowledge base online for instructions.
Follow these steps to enable UPnP:
- Log in to your router’s web-based utility. To do this, type the default gateway address (for example (http://192.168.0.1 ) in the search bar and press Enter. If not, here’s how to find your router’s IP address .
- On the router dashboard, open the Advanced tab.
- Click to expand NAT Forwarding in the left pane.
- Open the UPnP tab under NAT Forwarding.
- Toggle the switch to enable UPnP.
You can now close your router’s web-based utility and check for any improvements in your network connectivity.
3. Change NAT Type Using Port Forwarding
Alternatively, you can use the safer port forwarding method to change your NAT type for a specific game title or application. While the process is a little complicated compared to UPnP, port forwarding gives greater control over open ports and their usage with enhanced security.
To create a new port forwarding entry, you’ll need to know the TCP or UDP ports used for your specific game. For example, Call of Duty: Black Ops Cold War uses the following ports:
TCP: 3074, 27014-27050 UDP: 3074-3079
To find your game’s UDP and TCP ports, perform a web search with your game title for port forwarding. Often, the game developers include port information for the game on their website.
Alternatively, go to portforward , select your game, and then your router name and model using the given options. On the following page, scroll down to locate the specific ports for your game. Port Forward keeps a database of ports for games on multiple platforms and for different router makers.
To change NAT type using Power Forwarding:
- Log in to your router’s web app. In this instance, we’ll use TP-Link’s web-based utility.
- Open the Advanced tab.
- In the left pane, click to expand NAT Forwarding.
- Open the Port Forwarding tab.
- Click the + Add icon in the top right corner to create a new port forwarding entry.
- In the Add a Port Forwarding Entry dialog, type a name for Service Name. Make sure to add a name to make it easy to identify this port forwarding entry for future reference.
WonderFox DVD Ripper Pro
- In Device IP Address, type your computer’s static IP address for Ethernet or Wi-Fi.
- Type your game’s port number in the External and Internet Port fields. You can use a UDP or TCP port, but use the same port in both the External Port and Internal Port fields.
- Set the Protocol field to All.
- Once done, click Save to save the port forwarding entry.
 WonderFox DVD Ripper Pro
The entry will be saved in the Port Forwarding table. You can enable or disable the entry using the Status toggle switch.
Apart from port forwarding, you can also change the NAT type by modifying your router’s configuration file. However, some router manufacturers, including TP-Link, encrypt the configuration file, making it extremely difficult to make necessary modifications.

Changing NAT Type on Windows to Fix Network Issues
Changing the NAT type may be necessary to troubleshoot network-related issues. You can enable UPnP or turn on Network Discovery to ease network restrictions. However, we recommend port forwarding to reduce network restrictions without compromising network security.
- Title: Navigating the Change: Easily Altering NAT Settings in Win11/10
- Author: Richard
- Created at : 2024-08-16 01:29:33
- Updated at : 2024-08-17 01:29:33
- Link: https://win11-tips.techidaily.com/navigating-the-change-easily-altering-nat-settings-in-win1110/
- License: This work is licensed under CC BY-NC-SA 4.0.