
Navigating the Maze: Acquire User SIDs in Windows 11
Navigating the Maze: Acquire User SIDs in Windows 11
The Security Identifier (SID) is a unique number tied to a user account on a Windows PC. It comes in handy while finding and identifying a user on Windows, and no two SIDs can be identical.
The most common means to find a SID on Windows is using the “whoami”command. But there are several other ways to view the SID of one or all users on your Windows PC. Let’s discuss them in detail.
Disclaimer: This post includes affiliate links
If you click on a link and make a purchase, I may receive a commission at no extra cost to you.
1. Using the Command Prompt
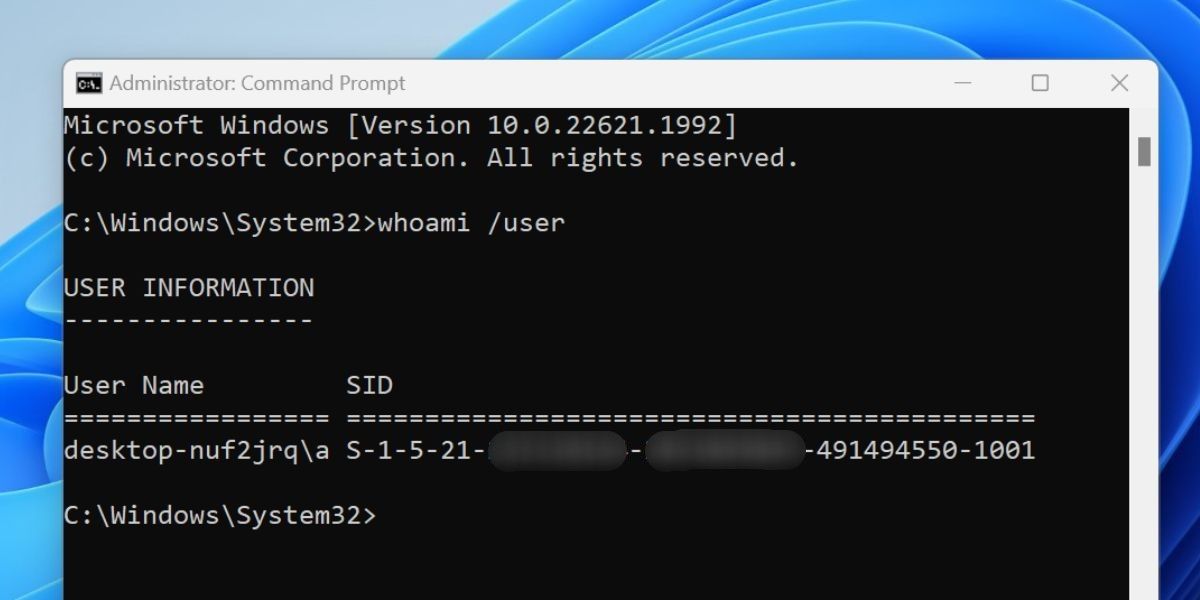
The simplest way to check the SID of the currently logged-in user on your PC is by using the whoami command. It will display the SID with the help of the “user” argument with the command. The only drawback is that it cannot display more than one user’s SID.
Here’s how to do it:
- Press Win + R to launch the Run dialog box . Type cmd in the text box and press the Ctrl + Shift + Enter keys to open Command Prompt.
- The User Account Control window will pop up. Click on the Yes button to open the app with admin rights if prompted.
- Now, type the following command to view the SID of the currently logged-in user account:
whoami /user
- You will see the currently logged-in user’s name and the corresponding SID. You can directly select and copy the text from the Command Prompt window. But if you want to export the details to a text file for future use, you can do so by entering the following command:
whoami /user > C:\SID.txt - The above command will create a text file named SID in the C drive. You can open it with Notepad or any other text editor app.
- Close the Command Prompt window.
2. Using WMIC
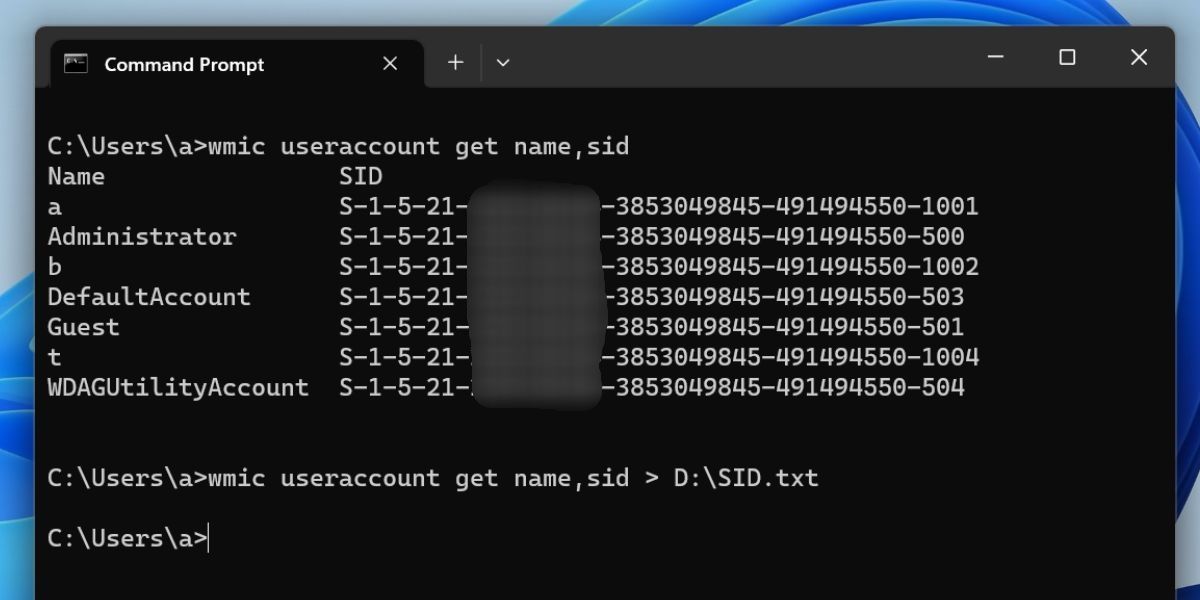
You can easily view the SID of all the users or a single user on your PC using the WMIC command-line tool. You don’t need to open an elevated Command Prompt window for using WMIC to view the SIDs.
Repeat the following steps to do so:
- Right-click on the Start button to open the Power User menu. Click on the Terminal option.
- Type the following command and press the Enter key to execute it:
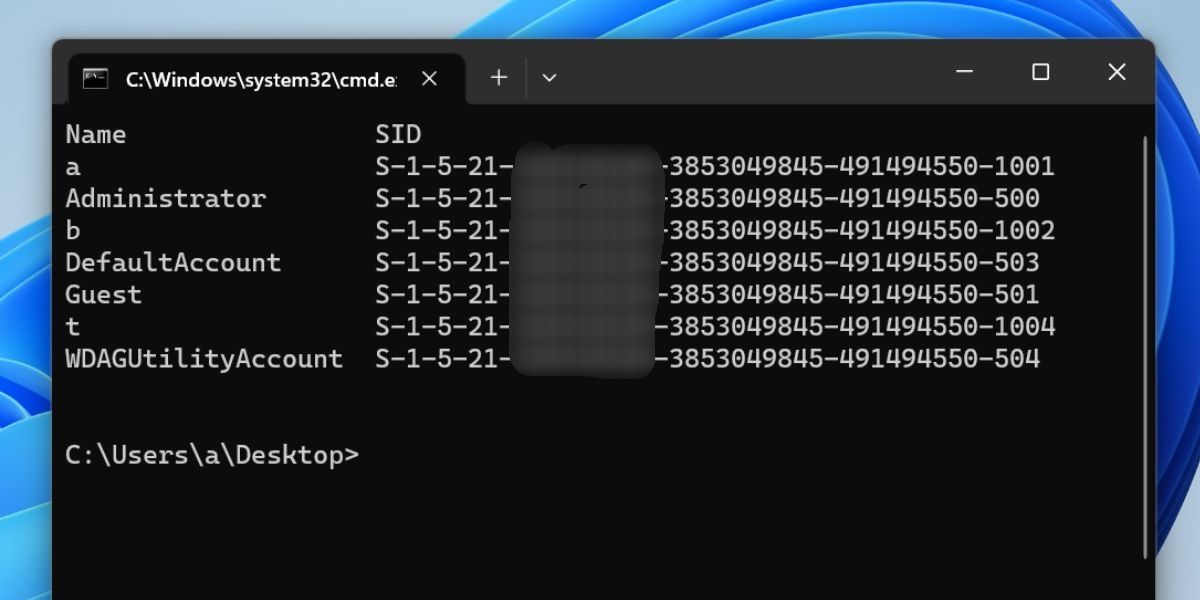
wmic useraccount get name,sid - The above command will display the user name and the corresponding SID of all the user accounts. In our instance, it shows three local accounts (a,b, and t), and the administrator, guest, default account, and WDAGUtility account.
- You can export all this data into a text file on the D drive by executing the following command:
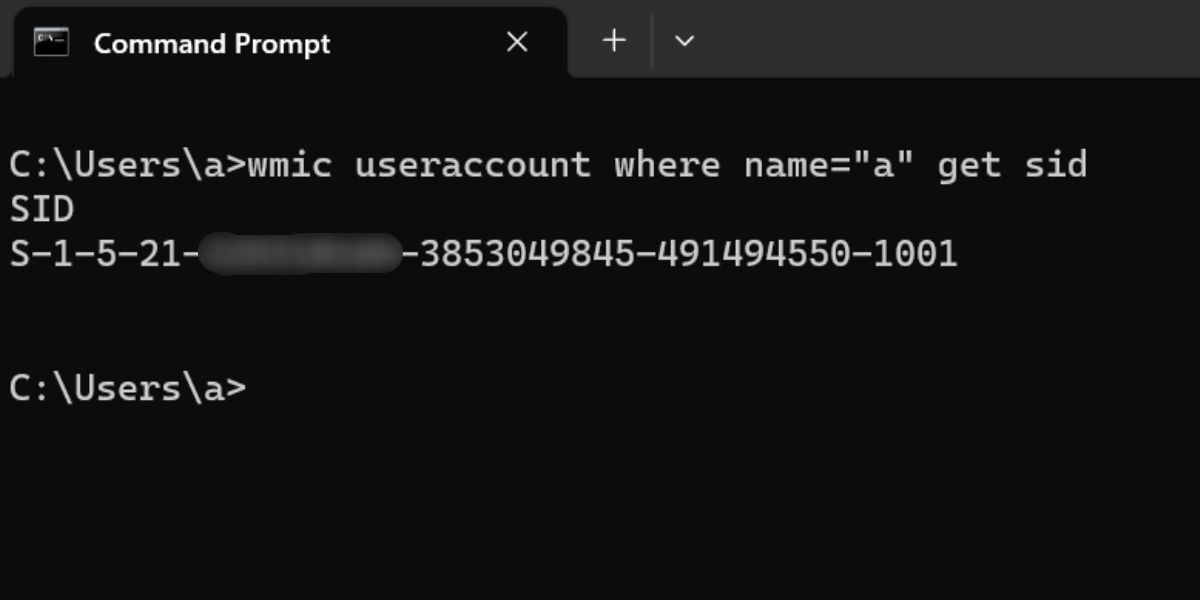
wmic useraccount get name,sid > D:\SID.txt - If you want to get the details of a specific user account on your PC, the syntax of the command is:
wmic useraccount where name=”USER” get sid - Replace the USER part of the command with an actual username. In our case, the command becomes:
wmic useraccount where name=”a” get sid - Close the Command Prompt window.
3. Using a PowerShell Cmdlet
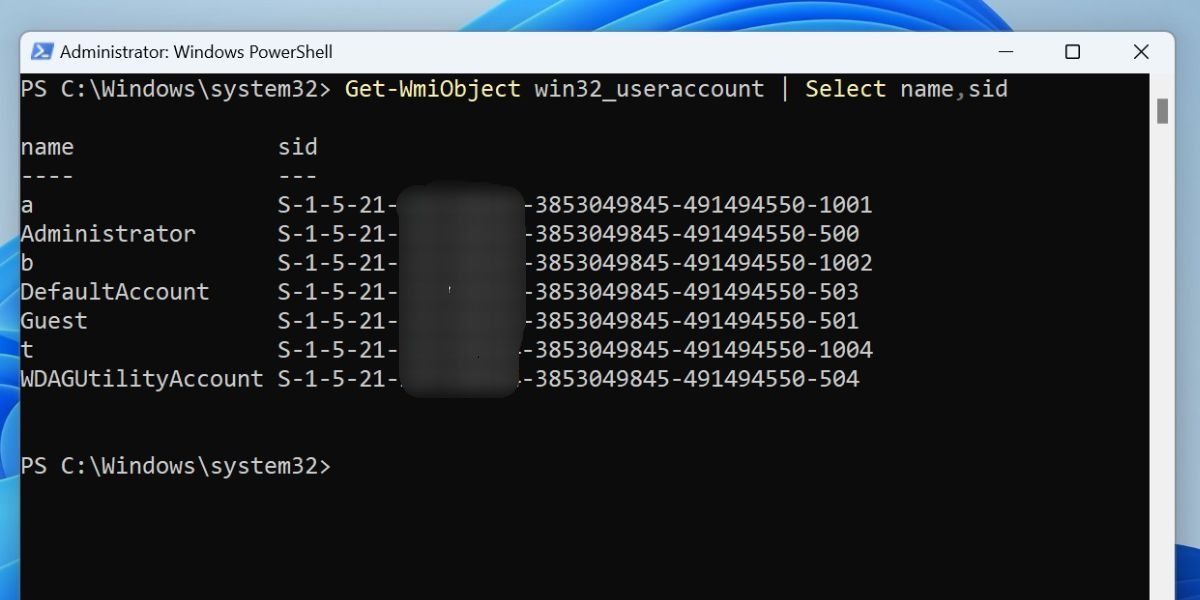
PowerShell offers the Get-WmiObject cmdlet using which you can view the SID of all the user accounts on a Windows PC. Like the WMIC method, you can view the SIDs of all users with a single command.
Repeat the following steps to do so:
- Press Win + R to launch the Run dialog box. Type powershell in the text box and press the Ctrl + Shift + Enter keys to open PowerShell.
- The User Account Control window will pop up. Click on the Yes button to open the app with admin rights if prompted.
- Type the following command and press the Enter key:
Get-WmiObject win32_useraccount | Select name,sid - The above command will display all the user accounts and their respective SIDs. To export the results in a text file, execute the following command:
Get-WmiObject win32_useraccount | Select name,sid > C:\SID.txt - The command will save the file in the C drive. Visit the location using File Explorer and open the file in a text editor app.
- Close the PowerShell window.
4. Using the Registry Editor
If the Command Prompt or PowerShell isn’t working on your PC , you can use the Registry Editor to view all the SIDs on your PC. This method isn’t as convenient as viewing the complete SID list in the terminal or in a text file. You will have to do some manual digging to find the SIDs and their user name.
Here’s how to do it:
- Press Win + R to launch the Run dialog box. Type regedit in the text box and press the Ctrl + Shift + Enter keys simultaneously.
- The User Account Control window will pop up. Click on the Yes button.
- Go to the address bar at the top, paste the following path, and press the Enter key:
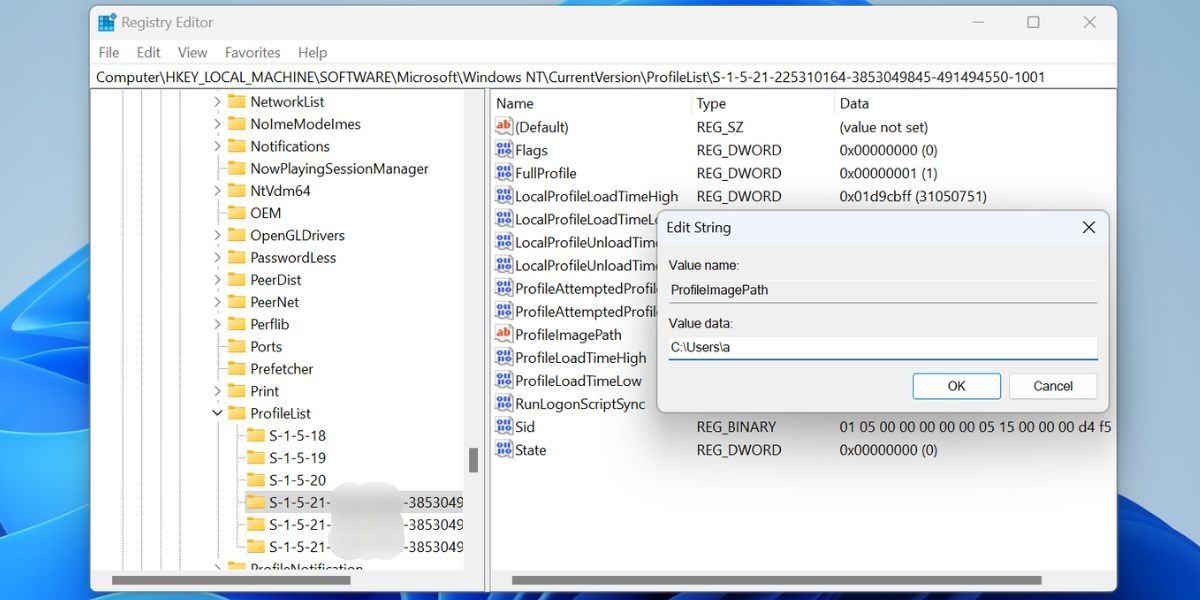
HKEY_LOCAL_MACHINE\SOFTWARE\Microsoft\Windows NT\CurrentVersion\ProfileList - Click on any SID subkey to select it and go to the right pane.
- Now, find the ProfileImagePath value and double-click on it to open the Edit window. You will see the user name of the SID in the Value Data field.
- Similarly, you can check the other SID keys and open their ProfileImagePath value to find their corresponding user name.
- Close the Registry Editor app afterward.
5. Using a Batch File
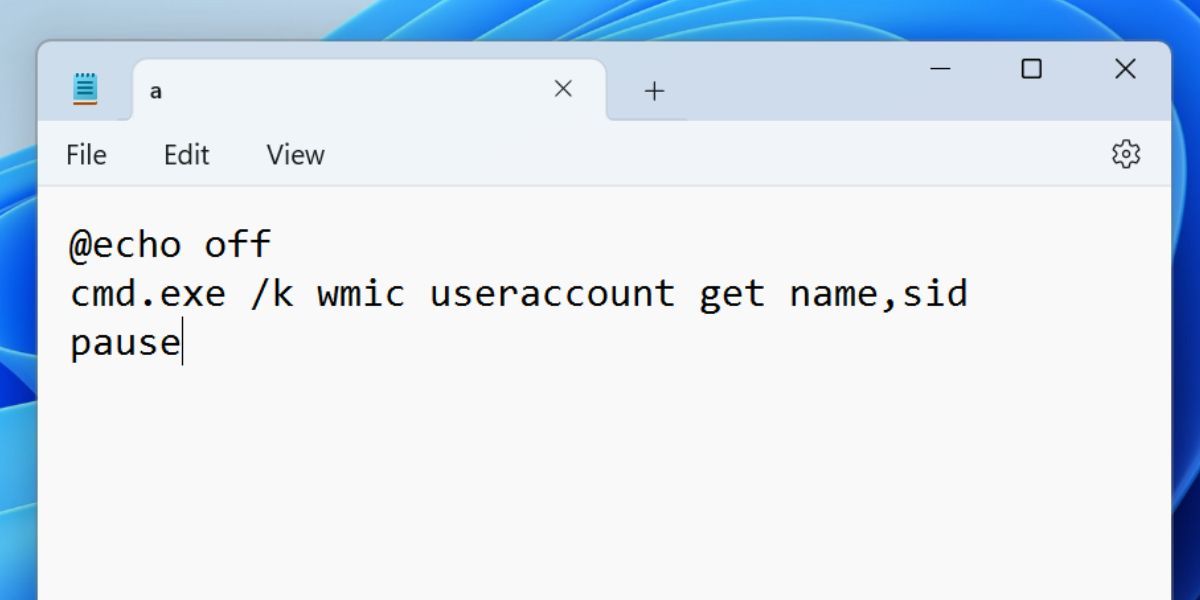
If you find the Terminal route cumbersome, you can create a batch file to display the SID of all the users at once. Repeat the following steps to create a batch file:
- Press Win + D to switch to the Desktop.
- Right-click on an empty space on the desktop and click on the New > Text Document option.
- A new text file will appear on the desktop. Double-click on the file to open it in a Notepad window.
- Now, paste the following code snippet into the Notepad file:
@echo off cmd.exe /k wmic useraccount get name,sid pause - Press Ctrl + Shift + S to open the Save as window. Keep the file name as SID.bat and the Save as Type field as All Files.
- Navigate to the folder location where you saved the batch file. Double-click on it to run it.
- A Terminal window will launch and display all the users on your PC and their respective SIDs.
Check SIDs in a Jiffy
These were the methods to check the SID of a user or all the users on your Windows PC. Use the first method if you only want to see the currently logged-in user’s SID.
The rest of the methods will display the SID of one or all the users on your PC. Lastly, create a batch file to display the SIDs of all users whenever you need it.
The most common means to find a SID on Windows is using the “whoami”command. But there are several other ways to view the SID of one or all users on your Windows PC. Let’s discuss them in detail.
Also read:
- [New] 2024 Approved Android Freedom Selecting Prime Video Editing Tools
- [New] In 2024, Channel Control Center Creator Studio Essentials
- [New] In 2024, Huawei's Built-In Recorder Screen Capture for Mate and P Series
- [New] In 2024, Transform Ordinary to Outstanding Creating Captivating Square Videos on FB
- [Updated] In 2024, Maximize Impact Sharing YouTube Videos on Social Media (FB)
- Accessing Printers Under Edge Guard on Windows 11
- Advanced File Management Techniques: Dragging Tabs in Windows 11
- Artistry Made Easy: Top 7 Windows 11 Drawing Apps Reviewed
- Auditory Capture Made Simple with Microsoft's Win 11
- Banish the Deadly JS Error in Discord: A Quick Guide for Win 11 Users
- In 2024, Top 10 Best Spy Watches For your Vivo V29e | Dr.fone
- Lifewire's Guide to 15 Self-Paced Online Free AI Courses
- Top Humor Image Tinkerer
- Title: Navigating the Maze: Acquire User SIDs in Windows 11
- Author: Richard
- Created at : 2024-09-30 23:35:31
- Updated at : 2024-10-03 16:04:04
- Link: https://win11-tips.techidaily.com/navigating-the-maze-acquire-user-sids-in-windows-11/
- License: This work is licensed under CC BY-NC-SA 4.0.