Overcoming Frozen PC Lock Screen Wait Time Issue

Overcoming Frozen PC Lock Screen Wait Time Issue
Have you ever left your computer unattended for a while, only to return and find that it was still unlocked? Several users have reported problems getting their Windows computers to lock automatically after a certain period of inactivity.
To help out, we have listed some useful tips that should get the lock screen timeout to work on your Windows 10 or 11 PC.
1. Check Screen Timeout Settings
Before we get to any advanced troubleshooting tips, it’s a good idea to double-check the screen timeout settings on Windows. Here are the steps for the same.
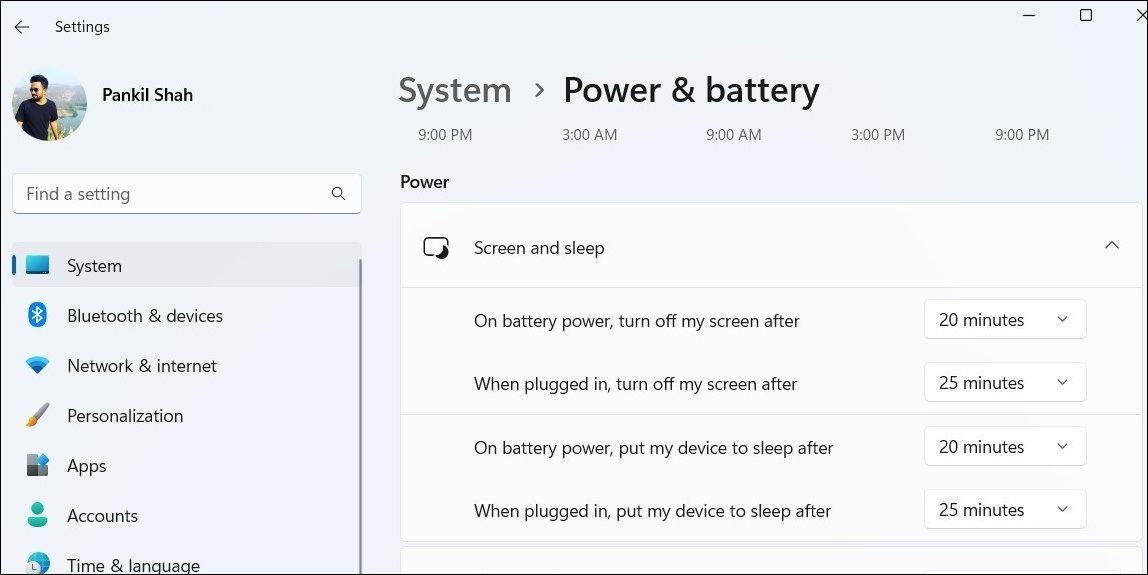
- Press Win + I to open the Settings app.
- Navigate to System > Power & battery.
- Click on Screen and sleep to expand it.
- Click the drop-down menus next to On battery power, turn off my screen after and When plugged in, turn off my screen after to select your preferred timeout.

After setting your preferred timeout, observe if Windows locks your PC after the specified period.
2. Configure Screen Saver Settings
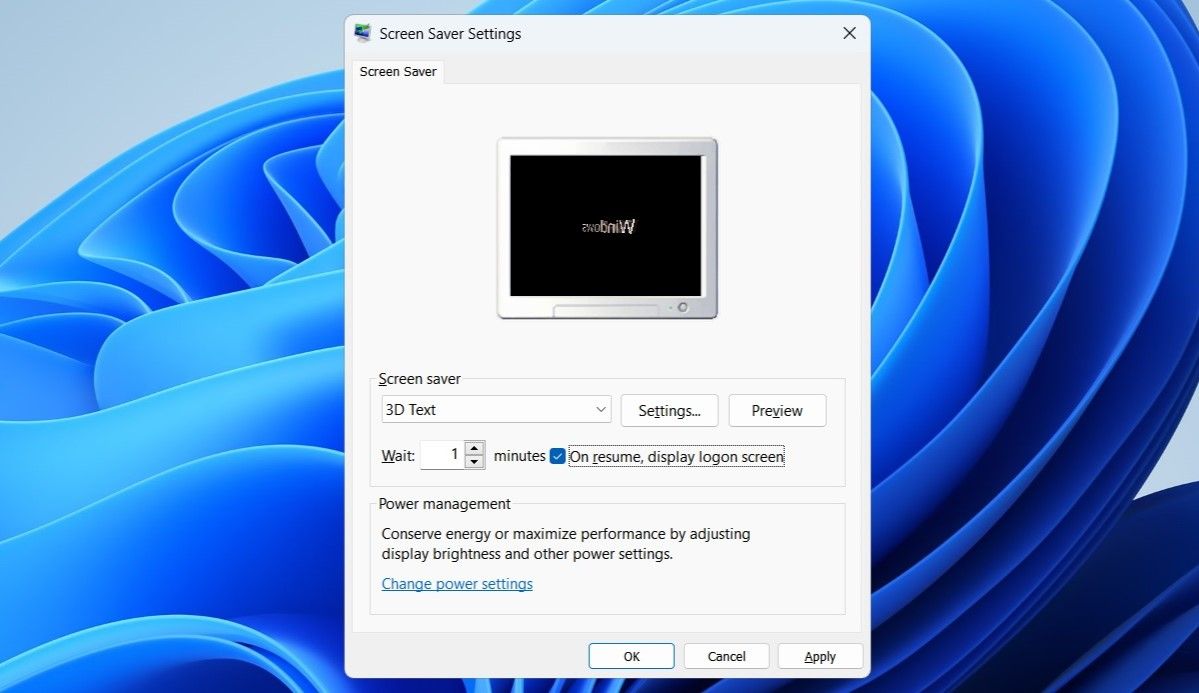
Incorrectly configured screen saver settings on Windows can also be the cause of this issue. Here’s how you can configure Windows to display the lock screen after you resume from a screensaver.
- Press Win + S to open the search menu.
- Type change screen saver in the box and select the first result that appears.
- In the Screen Saver Settings window, set the preferred wait time.
- Tick the On resume, display logon screen checkbox.
- Hit Apply followed by OK.

Once you complete the above steps, Windows should lock your system once the screen saver activates.
3. Check Screen Saver Settings in the Local Group Policy
If the issue remains even after you configure the screen saver settings, you will need to check the policies related to the screen saver and make sure they are configured correctly.
As you may be aware, the Local Group Policy Editor is only available on Windows Pro, Enterprise, and Education editions. However, if you are using the Home edition, you can use a workaround to access the Local Group Policy Editor on Windows Home .
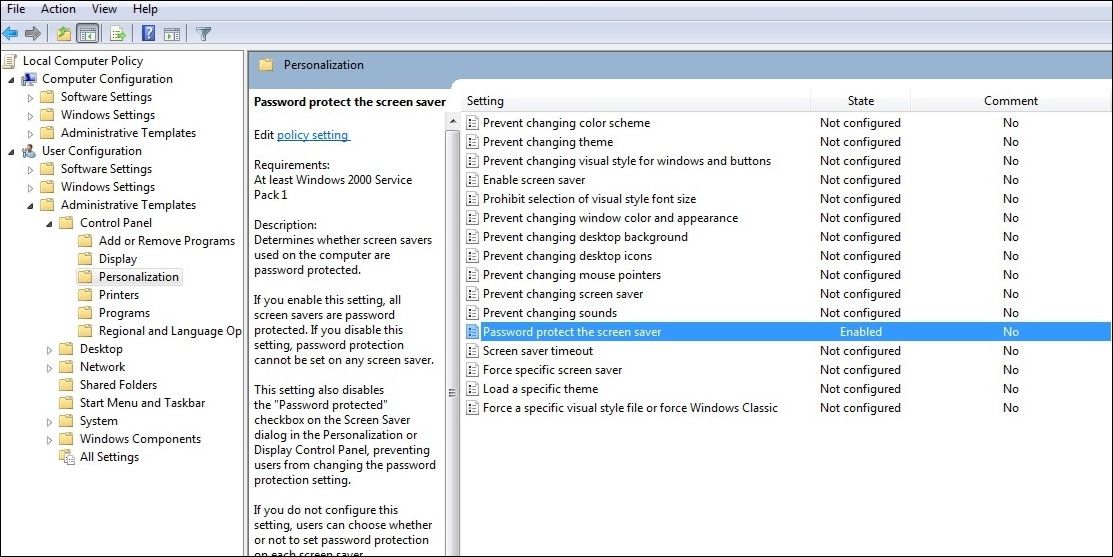
To modify group policies related to screen saver, use these steps:
- Press Win + R to open the Run dialog box.
- Type gpedit.msc in the box and press Enter.
- Select Yes when the User Account Control (UAC) prompt appears.
- Use the left pane to navigate to User Configuration > Administrative Templates > Control Panel > Personalization.
- Double-click the Enable Screen Saver policy on your right.
- Select the Enabled option.
- Hit Apply and then click OK.
- Similarly, enable the Password protect the screen saver policy as well.

Restart your PC after applying the above changes and check if the issue is still there.
4. Other Generic Fixes to Try
If the above solutions do not work, you can try some generic Windows fixes to get the lock screen timeout working on Windows.
- Disconnect External Devices: It is possible that an external device connected to your system is keeping Windows awake. To test this, disconnect all external devices and see if the problem persists.
- Reset Your Power Plan: Issues with the power plan settings could also cause such problems. To fix this, you can try resetting the power plan to default on Windows .
- Install Windows Updates: It’s possible that the lock screen timeout problem is occurring due to a bug within the Windows build your PC is running. If that’s the case, installing Windows updates should help.
- Try a Clean Boot:Performing a clean boot on Windows can help you determine whether a third-party program or service is causing issues with the lock screen timeout. Once you find the problematic program, consider removing it from your system to avoid such issues in the future.
- Perform a System Restore: If the issue has only started occurring recently, you can perform a system restore on Windows to undo recent changes and fix the problem.
Get the Lock Screen Timeout Working Again on Windows
When the lock screen timeout fails to work as expected, it can potentially put your Windows computer at risk. Hopefully, one or more of the above tips have helped you solve the problem and you are at peace.
To help out, we have listed some useful tips that should get the lock screen timeout to work on your Windows 10 or 11 PC.
Also read:
- 1. Don't Purchase These 4 Apple Devices Yet: A ZDNet Insight
- 2024 Approved Inspirational Article Leaderboard Maker
- 2024 Approved Sun Salutations & Beyond – YouTube's Premier Yoga Pages
- 信頼性高く、持続可能な方法でウェブ上のVMバックアップを行う - 専門家から学ぶ
- Beyond Silence: The Rise of 'Quiet Firing' In Modern Workplaces - Why It Has Companies Concerned
- Directing Wakeable Assets on Windows During Rest
- Efficient Techniques: Merging Both Adjacent & Non-Adjacent Windows Partitions
- Home Cinematic Wonders Fastest Tips & Tricks
- How to Fix the “Package Could Not Be Registered” Photos Error in Windows 10 & 11
- How To Mend 'Audio Output Not Found' Issue
- In 2024, 2 Ways to Monitor Google Pixel 8 Activity | Dr.fone
- Is Your Pen Tablet Not Working on Windows? Here’s How to Fix It
- Reconstructing Disappeared ChatGPT Exchanges
- Setting Up a Memorable Social Media Presence with Covers
- Unlocking Task Management on Win11 with a Quick Search Bar
- Unveiling the Secrets of Updater Error #0xCA00A009
- Windows Woes? 9 Essential Fixes for Ineffectual Keystrokes and Keycombinations
- Title: Overcoming Frozen PC Lock Screen Wait Time Issue
- Author: Richard
- Created at : 2024-12-01 21:44:24
- Updated at : 2024-12-07 02:07:04
- Link: https://win11-tips.techidaily.com/overcoming-frozen-pc-lock-screen-wait-time-issue/
- License: This work is licensed under CC BY-NC-SA 4.0.


