Overcoming Inactive Automation Rules for Emails on PC

Overcoming Inactive Automation Rules for Emails on PC
By setting up Outlook rules, you can configure the app to handle your inbox efficiently. This allows you to save time and automate actions that would otherwise require manual effort. But what if these Outlook rules stop working on your Windows computer?
To help out, we have compiled a list of useful solutions that should get Outlook rules to work again.
Disclaimer: This post includes affiliate links
If you click on a link and make a purchase, I may receive a commission at no extra cost to you.
1. Make Sure Outlook Rules Are Enabled
To start, you need to ensure that you haven’t inadvertently disabled any Outlook rules. To do so, use these steps:
- Open the Outlook app and click the File menu in the top left corner.
- In the Info tab, click the Manage Rules & Alerts button.
- Under the Email Rules tab, make sure the boxes next to your rules are checked.

2. Rename Outlook Rules
Using lengthy names for your Outlook rules can cause them to become larger in size, leading to unexpected issues with their functionality. To address this, try assigning shorter names to your Outlook rules and see if that gets things moving again.
To rename Outlook rules, use these steps:
- In the Outlook app, click the File menu in the top left corner.
- In the Info tab, click the Manage Rules & Alerts button.
- Under the Email Rules tab, select the rule you want to rename.
- Click Change Rule and select Rename Rule.
- Type in a shorter name for the rule and hit OK.
- Click Apply to save the changes.

3. Delete Unwanted Outlook Rules
Apart from renaming rules, you can also consider deleting rules that you no longer need to prevent conflicts or unexpected behavior. Here’s how.
- In the Outlook app, navigate to File > Info > Manage Rules & Alerts.
- Hold down the Ctrl key and select the rules you no longer need.
- Click the Delete option at the top.
- Select Yes when prompted.

4. Reset the Outlook SRS File
Microsoft Outlook stores essential account configuration in an SRS (Send and Receive Settings) file on your PC. If this file somehow becomes corrupted, Outlook rules won’t work. To fix this, you can force Outlook to recreate the SRS file by renaming the old file. Here’s how.
- Press Win + R to open the Run dialog box.
- Type %appdata%\Microsoft\Outlook in the Open field and press Enter.
- In the File Explorer window that opens, locate and select Outlook.srs file.
- Press F2 on your keyboard and rename the file to Outlook.srs.old.

Restart Outlook after completing the above steps and check if your rules work as expected.
5. Disable the Stop Processing More Rules Option
By adjusting the settings in the Outlook app, you can instruct it to halt the processing of additional rules once a specific rule has run. However, this can lead to Outlook ignoring all subsequent rules, giving a false impression that your rules are not functioning correctly. To avoid this, you need to disable the “stop processing more rules” option by following the steps below.
- In Outlook, head over to File > Info > Manage Rules & Alerts.
- Select your rule from the list.
- Click the Change Rule option and select Edit Rule Settings from the list.

- Clear the stop processing more rules checkbox.
- Click Finish and then Apply.
6. Configure Outlook Rules to Run on All Devices
Another reason why your Outlook rules may not work is if you have configured them to run on a specific device only. Here’s how you can change that.
- In Outlook, head over to File > Info > Manage Rules & Alerts.
- Double-click the problematic rule.
- Under Select conditions, uncheck the on this computer only box.
- Hit Finish followed by Apply.

7. Activate Cached Exchange Mode
When you enable the Cached Exchange Mode, Outlook retains a copy of your mailbox within the Outlook data file. This can help the app implement your rules without any issues.
To enable Cached Exchange Mode in Outlook:
- Open Outlook and click the File menu.
- In the Info tab, click Account Settings, and select Account Settings.
- Under the Email tab, select your account and click Change.
- Click More Settings and select Advanced.
- Tick the Use Cached Exchange Mode checkbox.
- Hit Apply followed by OK.
8. Run the Outlook Inbox Repair Tool
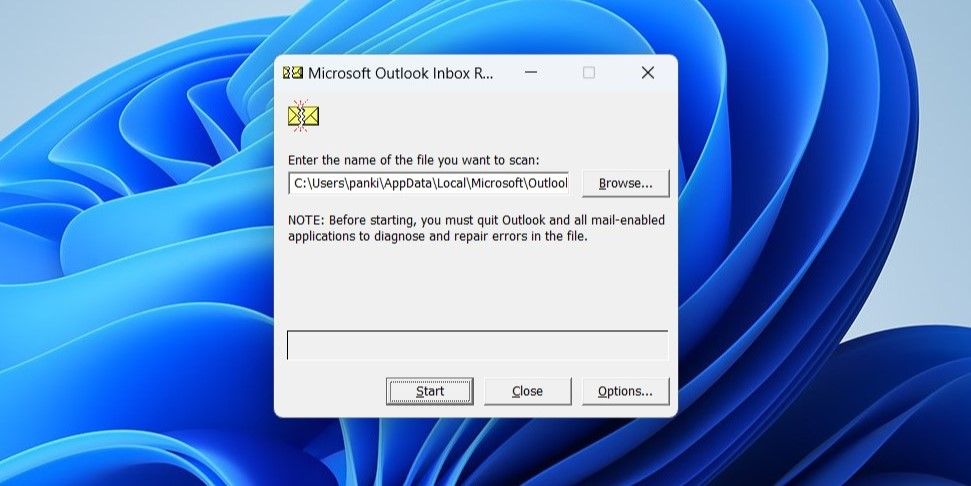
When you use Microsoft Outlook on your Windows PC, it generates OST and PST files to store your account data locally. If these data files become inaccessible for some reason, your Outlook rules may stop working. Fortunately, Outlook includes an inbox repair tool that can help you repair Outlook data files with ease . Here’s how to run it.
- Right-click the Outlook shortcut and select Properties.
- Under the Shortcut tab, click the Open File Location button.
- Double-click on SCANPST.EXE to run it.
- In the Microsoft Outlook Inbox Repair Tool window, click the Browse button and then navigate to the following directory:
C:\Users\*username*\AppData\Local\Microsoft\Outlook
Make sure you replace *username* in the above path with your own username. - Select the profile you want to repair and then click Start.

Restart Outlook after this and check if the issue is still there.
9. Update the Outlook App
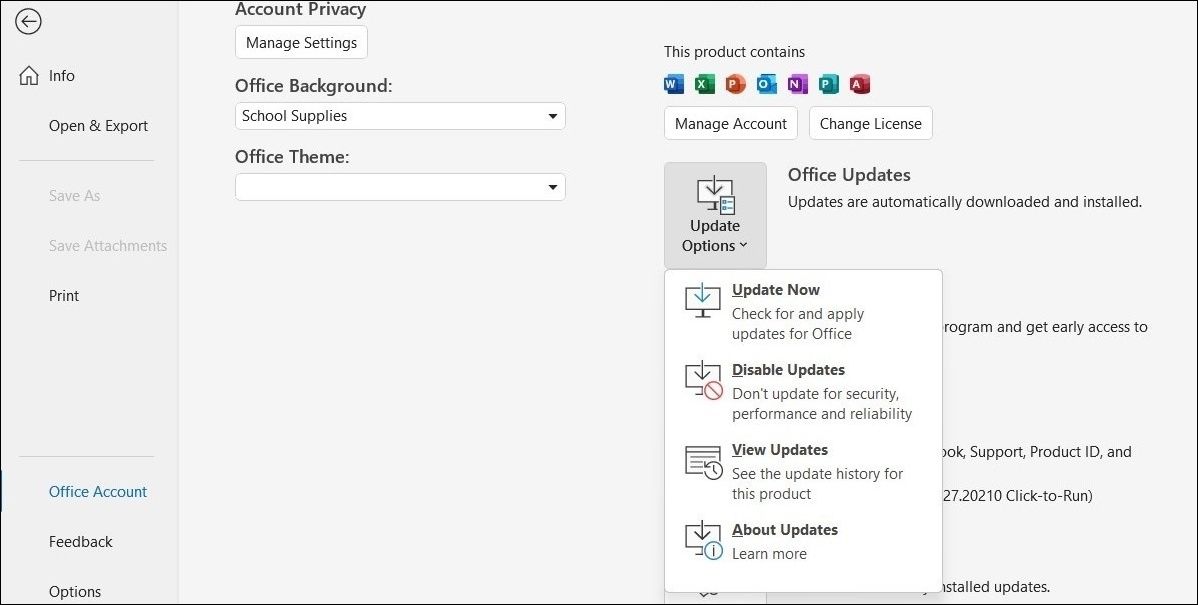
Using an outdated version of Outlook can also lead to such issues. If you have disabled automatic updates for Office apps , use these steps to update the Outlook app.
- Open Outlook and select the File menu in the top-left corner.
- Choose the Office Account tab from the left column.
- Click Update Options > Update Now.

Wait for Microsoft Office to check for new updates and install them. Following that, Outlook rules should start working.
10. Reset All the Rules
Lastly, if none of the above tips help, you can consider deleting all the Outlook rules and then setting them up again. Doing so will help fix any issues caused by improper configuration or corrupt data.
To delete all the Outlook rules at once, open the Run dialog box . Type Outlook.exe /cleanrules in the text box and press Enter.

Once Outlook deletes all the rules, head to Manage Rules & Alerts and set them up again.
Manage Your Emails Efficiently With Outlook Rules
Without Outlook rules, organizing your inbox can be quite challenging, especially if you receive a lot of emails throughout the day. Hopefully, one or more of the above tips have proven useful, and Outlook rules are now working as before.
To help out, we have compiled a list of useful solutions that should get Outlook rules to work again.
Also read:
- [New] Discovering the Finest FREE SRT Translation Tools for 2024
- [New] In 2024, How To Choose Video Recording Between 30 Vs. 60 FPS?
- Bring Back Saved Audio Configurations: WinVolume Hacks
- Chrome Compatibility with Windows 11 Explained
- Comparing iPhones: Should You Upgrade to the iPhone 16 Pro From the iPhone Amoled?
- Crafting Your YouTube Content for Specific Crowds for 2024
- Curing Won't Start Spotify on Windows 10/11 Platforms
- Download Your ASUS DVD Hardware Drivers Today!
- Essential Strategies for Winning with the Windows 11 Bar
- Guide Expert: Comment Réaliser Et Partager Votre Premier Montage Vidéo en Quelques Étapes Simples
- Reversing the Malfunction of Windows Delete Operation
- Top 15 Augmented Reality Games Like Pokémon GO To Play On Poco X5 Pro | Dr.fone
- Triggering Printer Functionality Within Edge Guard
- Title: Overcoming Inactive Automation Rules for Emails on PC
- Author: Richard
- Created at : 2024-12-01 16:05:40
- Updated at : 2024-12-07 00:32:42
- Link: https://win11-tips.techidaily.com/overcoming-inactive-automation-rules-for-emails-on-pc/
- License: This work is licensed under CC BY-NC-SA 4.0.


