Personalize Your CMD Window: Set as Default

Personalize Your CMD Window: Set as Default
If you find the default terminal emulator on your Windows PC—Windows Console Host—to be too basic and lacking in features, there are a few good alternatives. These alternative apps, like Windows Terminal, offer several advanced features like tabs, profiles, the ability to open multiple windows, and more.
Setting a terminal as the default app for Command Prompt and PowerShell is fairly straightforward. Here are some methods you can use to make the switch.
1. How to Change the Default Terminal App via Windows Terminal’s Settings
The most straightforward way to change the default command-line interface on your Windows computer is by using Windows Terminal’s settings menu. Here are the steps you can follow.
- Press Win + S to open the search menu.
- Type Terminal in the search box and press Enter (see how to open the Windows Terminal for more methods).
- Click the down-arrow icon at the top and select Settings from the resulting menu.
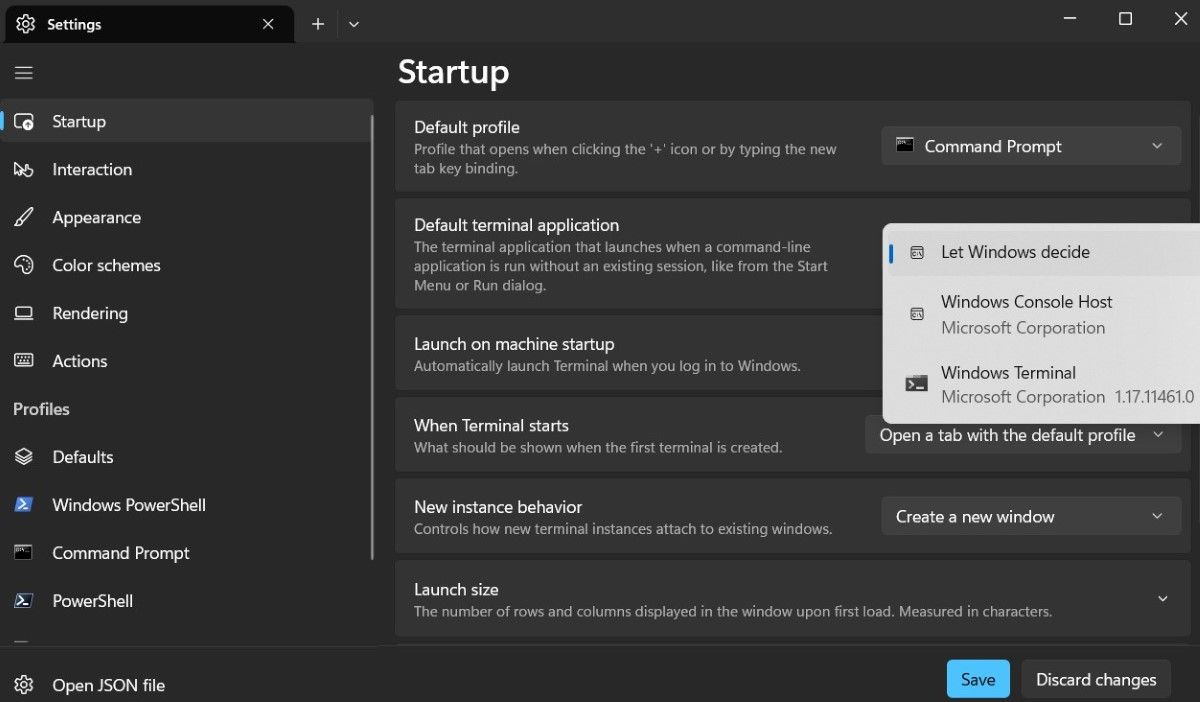
- Use the drop-down menu next to Default terminal application to select your chosen terminal from the list.
- Optionally, you can set the Default profile that opens when you launch the Terminal app.
- Click the Save button at the bottom.

If you want to undo the above changes later, simply repeat the above steps and select Windows console host or Let Windows decide in the Default terminal application drop-down menu.
Alternatively, you can also reset the Terminal app on your PC. If you are interested in doing that, check our guide on how to reset the Windows Terminal settings to their defaults in Windows .
2. How to Change the Default Terminal App Using Windows Console Host Properties
Another way to change the default terminal app on your Windows 10 or 11 PC is via the Windows Console Host properties. Here are the steps for the same.
- Click the magnifying icon on the taskbar to access the search menu.
- Type in command prompt or powershell in the search box and select the first result that appears.
- Right-click on the title bar of the Command Prompt or PowerShell window and select Properties.
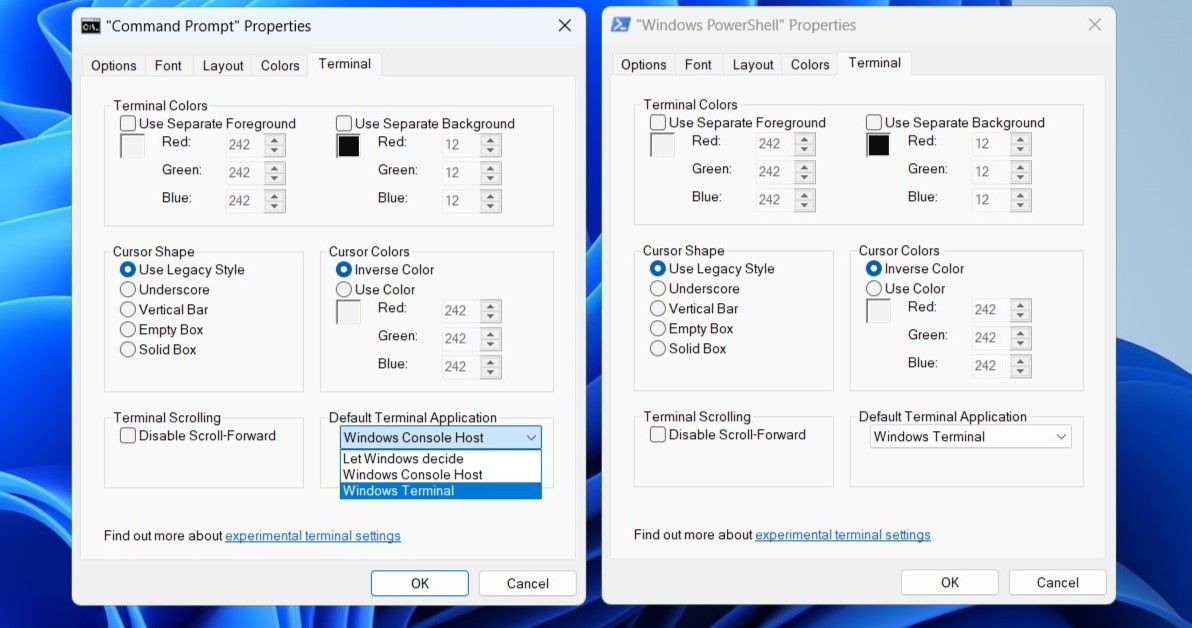
- In the “Command Prompt” Properties or “Windows PowerShell” Properties window that appears, switch to the Terminal tab.
- Click the drop-down menu under Default Terminal Application to select your favorite terminal app, or Let Windows decide to revert the option to its default.
- Click the OK button to save your changes.

3. How to Change the Default Terminal App From Windows Settings
The Settings app makes it easy to set or change the default apps on your Windows computer . Here’s how you can use it to set your chosen terminal as the default app for Command Prompt and PowerShell.
- Open the Start menu and click the gear-shaped icon or use the Win + I keyboard shortcut to launch the Settings app.
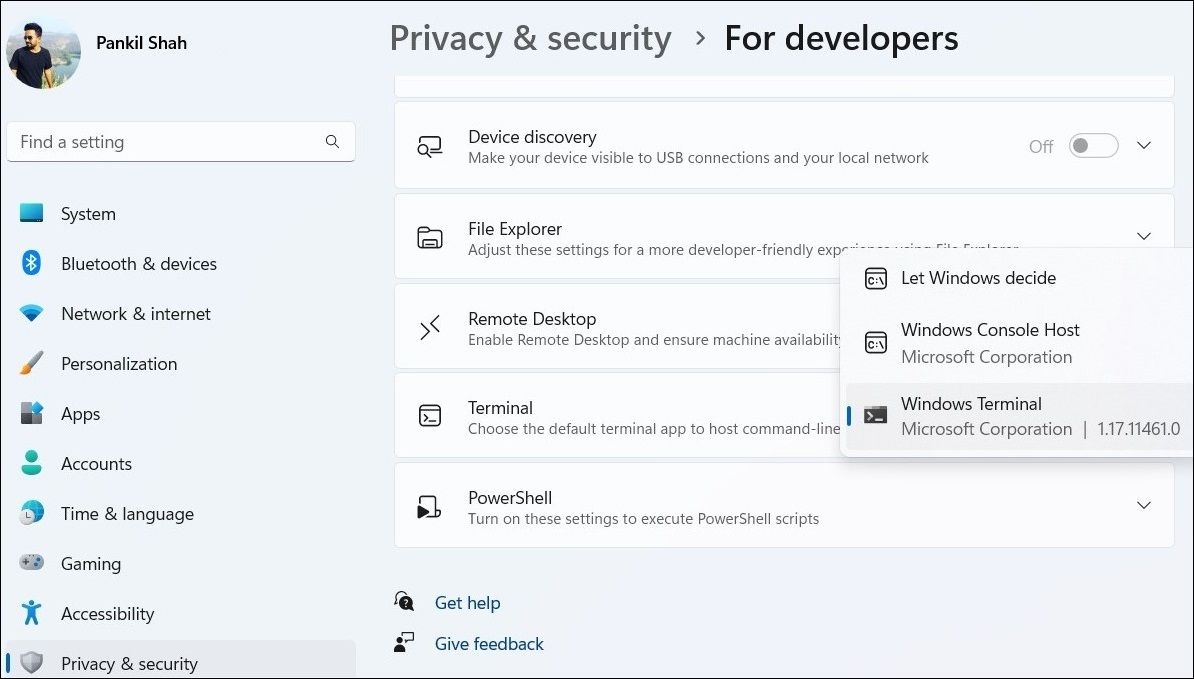
- Select the Privacy & security tab from the left pane.
- Under the Security section, click the For developers option.
- Use the drop-down menu next to Terminal to select your chosen terminal app, or choose Let Windows decide to undo any changes you’ve made previously.

Once you complete the above steps, both Command Prompt and PowerShell will launch in the chosen app.
Changing the Default Terminal App Is Easy
If you frequently use command-line tools, it makes sense to switch to a better terminal app. As we just saw, the process is not too difficult as long as you follow the steps mentioned above.
If you have set Windows Terminal as your default terminal app for Command Prompt and PowerShell, now is a good time to learn some Windows Terminal tips, tricks, and shortcuts to improve your experience.
Setting a terminal as the default app for Command Prompt and PowerShell is fairly straightforward. Here are some methods you can use to make the switch.
Also read:
- [New] In 2024, Scholarly Streams 10 Best Ed Tutorials YT
- [Updated] In 2024, Edible Expeditions Popular Foods From Every Country
- Accelerate Efficiency: 5 Best Apps to Create Animated Clock Screen Savers on PCs
- Canon Cameras' Vividness with Free & Paid LUT Sets
- Converting H.2n Codec to MP4: A Guide Through 5 Different Strategies
- Essential Tips for Rectifying OBS Studio Server Connectivity Hiccups
- In 2024, Beyond FBX Cutting-Edge Options for Game Recorders
- In 2024, The Most Useful Tips for Pokemon Go Ultra League On Nokia G22 | Dr.fone
- Keys Fans' Ultimate Guide to Score Lifetime Windows 11 at Unbeatable Price
- Proven Fix-It Steps to Eradicate Win10 Blue Screen
- Simplifying Cross-Platform Video Sharing Between Twitter & Snapchat for 2024
- The Ultimate Playbook: Winning at PS1 Gaming on Windows - Duckstation Edition
- Unveiling Differences Between Apple's IPad Pro M4 and MacBook Air M3: A Side-by-Side Review
- Why Is My Samsung Galaxy S24+ Offline? Troubleshooting Guide | Dr.fone
- Title: Personalize Your CMD Window: Set as Default
- Author: Richard
- Created at : 2025-01-11 20:18:28
- Updated at : 2025-01-12 21:01:27
- Link: https://win11-tips.techidaily.com/personalize-your-cmd-window-set-as-default/
- License: This work is licensed under CC BY-NC-SA 4.0.


