
Pushing Past Disabled Script Constraints in Windows PS

Pushing Past Disabled Script Constraints in Windows PS
You’re running some commands on PowerShell and suddenly see an error message that reads, “PowerShell cannot be loaded because running scripts is disabled on this system.”
Wondering what causes this issue and how you can resolve it? We’ll take you through the easy methods that can help you tackle this issue once and for all.
Let’s dive in!
Disclaimer: This post includes affiliate links
If you click on a link and make a purchase, I may receive a commission at no extra cost to you.
1. Run PowerShell in Administrator Mode
Are you currently running PowerShell without proper administrative rights? If so, then perhaps that’s where the issue lies.
So, let’s explore the steps you should apply to run the tool in administrator mode:
- Press Win + X to open the Quick Access menu.
- Select the Windows PowerShell (Admin) option.
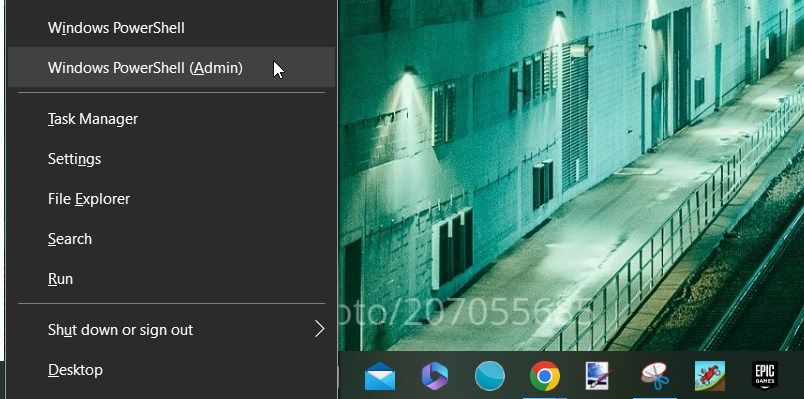
And if that doesn’t help, check out the various ways to open Windows PowerShell . But you should only focus on the methods that show you how to run the tool with administrative privileges.
2. Change the Execution Policy in PowerShell
In some instances, changing the execution policy could help. But before we explore the solutions, let’s first take you through what the execution policy is and how it works.
What Is the Execution Policy, and How Does It Work?
The execution policy is a security feature that controls the way you run PowerShell scripts on your device. It simply determines which types of scripts can be run and which ones should be avoided. The best part is that you can configure this policy to your liking.
Here are the options you can pick from when configuring the execution policy:
- Restricted: This policy prohibits you from running any PowerShell script.
- Unrestricted: Allows you to run any script but shows you a warning message when you run suspicious scripts.
- RemoteSigned: This policy requires a digital signature when you run the scripts that you downloaded online. However, it doesn’t require a signature for local scripts.
- ByPass: This allows you to run any script without any restrictions. Unlike the “Unrestricted” policy, the “ByPass” policy won’t show you any warning messages when you run suspicious scripts. So, always apply this policy only when running legit scripts.
- AllSigned: This policy only runs scripts that are signed by a trusted publisher.
Now, if you use PowerShell regularly, then you might want to change the execution policy from time to time. However, some execution policies might display error messages when you run your PowerShell scripts.
For example, enabling the “Restricted,” “AllSigned,” or “RemoteSigned” policies might lead to error messages like the “running scripts is disabled” error.
To resolve the problem, you’d simply have to change the execution policy to “Unrestricted” or “ByPass.” But that’s not all; you’d also need to decide how the policy should be implemented. For example, do you want to apply the policy for all users or just for your current PowerShell session?
Let’s explore all the additional PowerShell commands you’ll have to add when changing the execution policy:
- CurrentUser: This policy will only be applied to all the PowerShell sessions of the person who has currently logged in on the device.
- LocalMachine: Applies to all the users that have an account on the device. This policy can only be configured by local users that have administrative privileges.
- Process: Only applies on the current PowerShell session. This means you’ll have to execute the policy again if you start a new session.
- MachinePolicy: This policy applies to all the users who have an account on your device. However, it can only be configured by network administrators who have appropriate permissions. But it’s often possible for local administrators to configure this execution policy using the Local Group Policy Editor.
- UserPolicy: Applies to all PowerShell sessions and the scripts executed by a particular user.
Now that everything is clear, let’s explore how you can execute the relevant policies to tackle the “PowerShell cannot load” issue.
How to Change the Execution Policy to “Unrestricted”
The best way to tackle the issue at hand is to change the execution policy to “unrestricted.” But before that, you need to check how each execution policy is configured.
Here are the steps for checking how the execution policies are configured:
- Press Win + X to open the Quick Access Menu.
- Select Windows PowerShell (Admin) from the options.
- Type the following command and press Enter:
Get-ExecutionPolicy -List
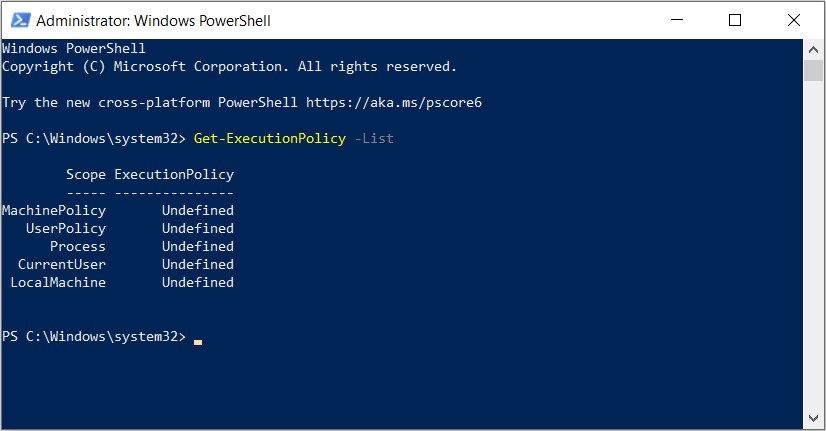
This should show you how the execution policies are configured for different users and systems.
To can change the execution policy to “Unrestricted” for the current active user, type the following command and press Enter:
Set-ExecutionPolicy Unrestricted -Scope CurrentUser
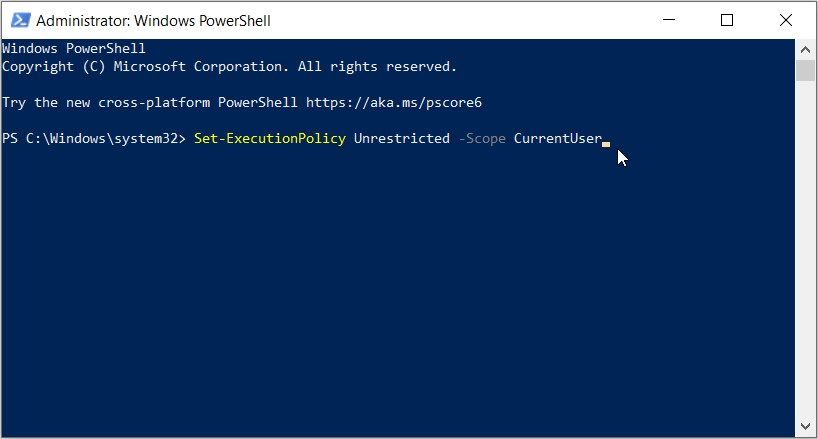
To change the execution policy to “Unrestricted” for all users, type the following command and press Enter:
Set-ExecutionPolicy Unrestricted -Scope LocalMachine
When you finish running the command, close PowerShell and restart your PC to save these changes.
How to Change the Execution Policy to “ByPass”
The “ByPass” execution policy will allow you to run any PowerShell script without a hassle. But remember that it might also allow you to run buggy files. So, always configure this execution policy only when running trustworthy PowerShell files.
To change the execution policy to “ByPass” for the current active user, type the following command and press Enter:
Set-ExecutionPolicy ByPass -Scope CurrentUser
And to change the execution policy to “ByPass” for all users, type the following command and press Enter:
Set-ExecutionPolicy ByPass -Scope LocalMachine
When you finish, close PowerShell and then restart your device.
3. Change the Execution Policy Via the Local Group Policy Editor

The Local Group Policy Editor (LGPE) also makes it easy for you to change the execution policy. In fact, this tool can also help you configure various system settings or troubleshoot tons of PC issues.
Remember, the main aim is to change the execution policy such that you’ll be able to run your PowerShell scrips without a hassle. And by so doing, you’ll get rid of the “running scripts is disabled” error on PowerShell.
Here’s how to change the execution policy in the LGPE:
- Type Edit group policy in the Start menu search bar and select the Best match. Alternatively, check out the various ways to open the LGPE .
- Navigate to Computer Configuration > Administrative Templates > Windows Components > Windows PowerShell.
- Double-click on the Turn on Script Execution option.
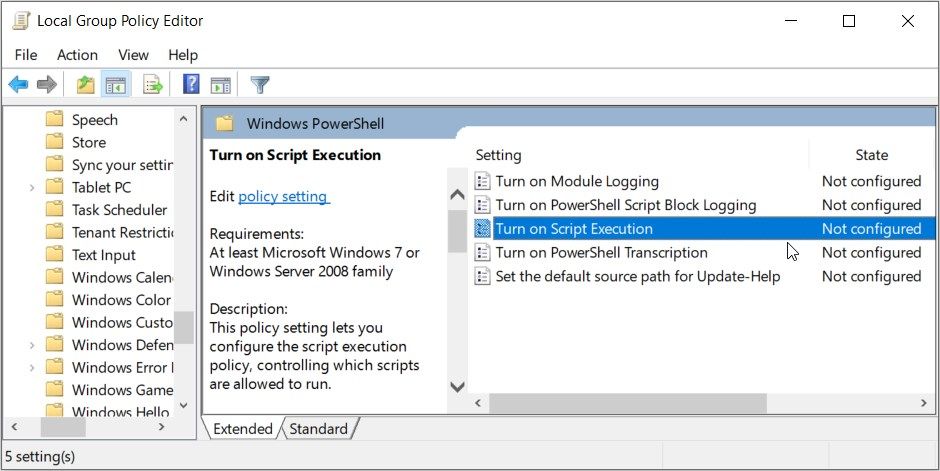
Check the Enabled box. From there, click the Execution Policy drop-down menu and select Allow local scripts and remote signed scripts. This option is similar to the “RemoteSigned” option that we discovered earlier.
If you want to run all scripts without restrictions, pick the Allow all scripts option from the “Execution Policy” drop-down menu.
From there, click Apply and then click OK to save these changes.
4. Change the Execution Policy Using the Registry Editor

If the other methods didn’t help, then try changing the execution policy using the Registry Editor. However, you need to be careful when editing Registry keys. If you tweak the wrong keys, then you might end up damaging your PC.
Now, here’s how to change the execution policy via the Registry Editor:
- Press Win + R to open the Run command dialog box.
- Type Regedit and press Enter to open the Registry Editor.
- Copy-paste the following command into the address bar and press Enter:
HKEY_LOCAL_MACHINE\SOFTWARE\Microsoft\PowerShell\1\ShellIds\Microsoft.PowerShell
Locate the ExecutionPolicy value on the right-hand side.
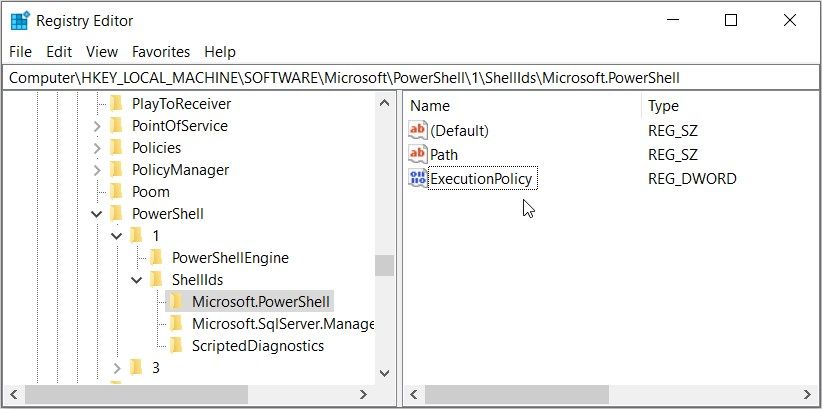
If the value is missing, create it through these steps:
- Right-click on a blank space on the right-hand side.
- Select New > DWORD (32-bit) Value.
- Name the value as ExecutionPolicy and press Enter.
Double-click on the ExecutionPolicy value. Next, type RemoteSigned in the “Value data” section. This will allow PowerShell to execute local and signed scripts.
Alternatively, type ByPass in the “Value data” section. This will allow PowerShell to execute any script without limitations.
After entering your preferred value in the “Value data” section, press OK to save the changes. Finally, close the Registry Editor and then restart your device.
Run Your PowerShell Scripts Without Any Restrictions
It can be quite frustrating when you suddenly can’t execute certain commands on Windows PowerShell. But if you come across the “scripts is disabled” error, the solutions we’ve covered should help.
Now, does PowerShell often give you other issues? Well, there are more solutions that can help you out.
Wondering what causes this issue and how you can resolve it? We’ll take you through the easy methods that can help you tackle this issue once and for all.
Let’s dive in!
Also read:
- [New] 2024 Approved Harness the Full Potential of Your YouTube Content Using WMM
- [New] Unleashing Potential Key Tips for Hospitals' FB Ad Reach
- [Updated] Harmonizing Visual Narratives with Live Sounds for 2024
- [Updated] In 2024, Strategies for Crafting Intriguing Vlog Storylines
- [Updated] Mastering iPhone's Playlist Paradise Podcast Edition
- 史上最佳的中英文字幕來源站 - 獲得免費電影及美國式劇集之字幕資料
- Ensuring Secure Windows TCP/IP Network Configuration
- HumorHexagonHub PhotoFunniesFactory for 2024
- In 2024, Composing Persuasive Podcast Introductions
- Maximize Social Status Top 8 Apps for Gaining More FB Fans
- Unleash the Power of Customization in Win11 Layouts
- Unlocking Win Access: Fixing Epic Launcher Login Gaps
- Winning Strategies: Overcoming OBS Studio Connection Failures
- Title: Pushing Past Disabled Script Constraints in Windows PS
- Author: Richard
- Created at : 2025-02-28 02:34:57
- Updated at : 2025-03-05 01:38:58
- Link: https://win11-tips.techidaily.com/pushing-past-disabled-script-constraints-in-windows-ps/
- License: This work is licensed under CC BY-NC-SA 4.0.