Redefine Windows 11 Account Hierarchy: Update Admin Role

Redefine Windows 11 Account Hierarchy: Update Admin Role
When you initially configure a Windows computer with a Microsoft account, you will be asked to create an administrator name. This is the profile that grants access to make administrative changes on the device.
But if you ever decide to alter this username, there are different options available for doing so. This tutorial will show you how to change the Microsoft account administrator name in Windows 11.
Disclaimer: This post includes affiliate links
If you click on a link and make a purchase, I may receive a commission at no extra cost to you.
1. How to Change the Administrator Name Through System Settings
The Settings app is a built-in application on Windows that allows you to customize and manage settings on your computer. To change the Microsoft account administrator name in Windows 11,open the System Settings and follow these steps:
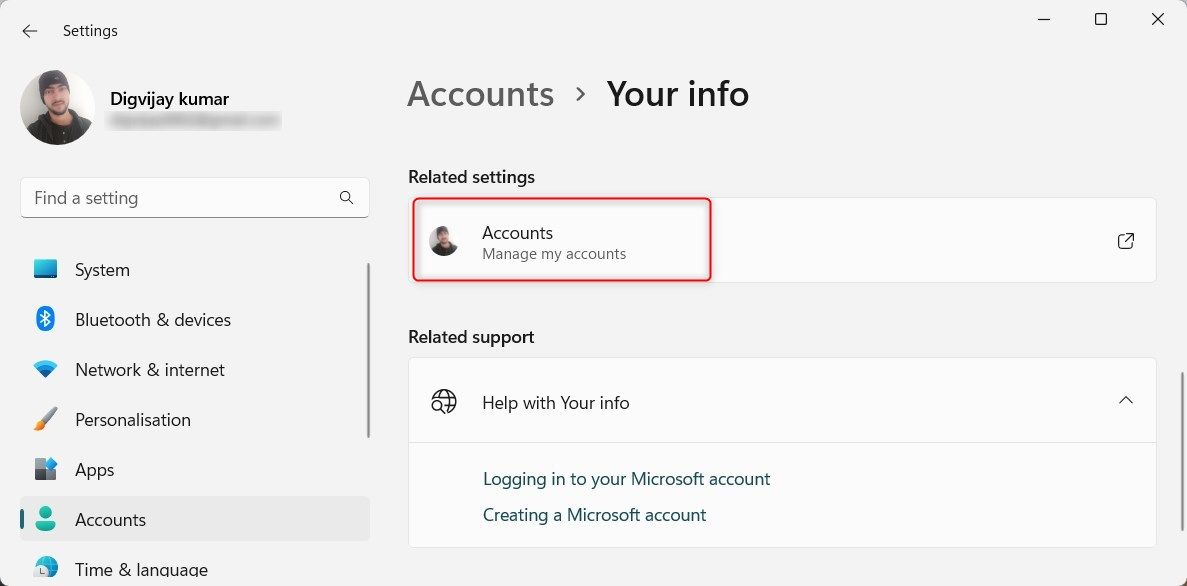
- Go to theAccounts section.
- Move to the right pane and clickYour info .
- UnderRelated settings , clickManage my accounts . This will take you to the “Manage accounts” page.

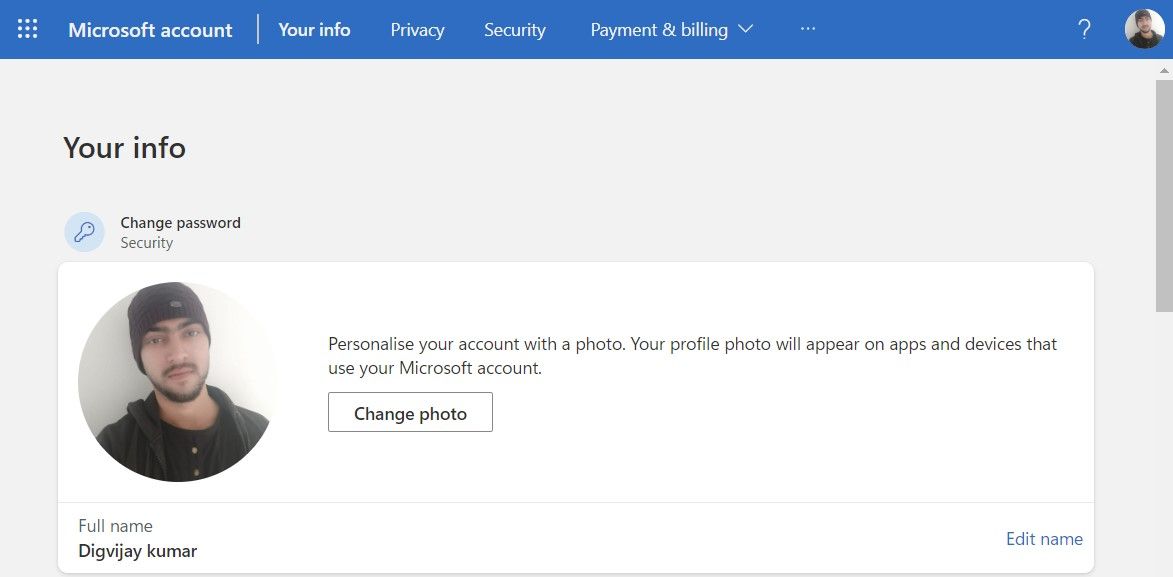
- Sign in with the Microsoft account you need to change the name of.
- After signing in, clickYour info option from the top section.
- Under your Profile photo, you’ll see your name. Click theEdit name option and enter your new name.

- To ensure that you are a real person and not an automated program, type the characters in the Captcha field.
- Click theSave changes button, and you’re all set.
Your Microsoft account administrator name has been successfully changed.
2. How to Change the Administrator Name Through Control Panel
The Control Panel is a graphical user interface (GUI) in Microsoft Windows that you can use to change your computer’s hardware and software features.
To change the Microsoft account administrator name on your computer, follow these steps:
- Click on Start and search for Control Panel. Select the Control Panel option to open it.
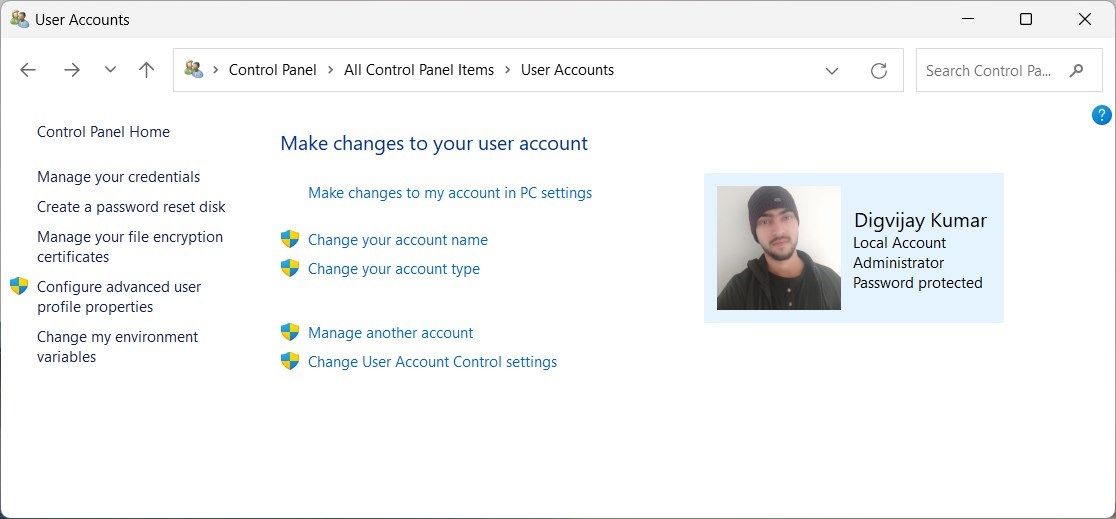
- In the Control Panel window, scroll down and clickUser Accounts .
- On the right side of the page, click theChange your account name link.

- Enter the new name and clickChange Name .
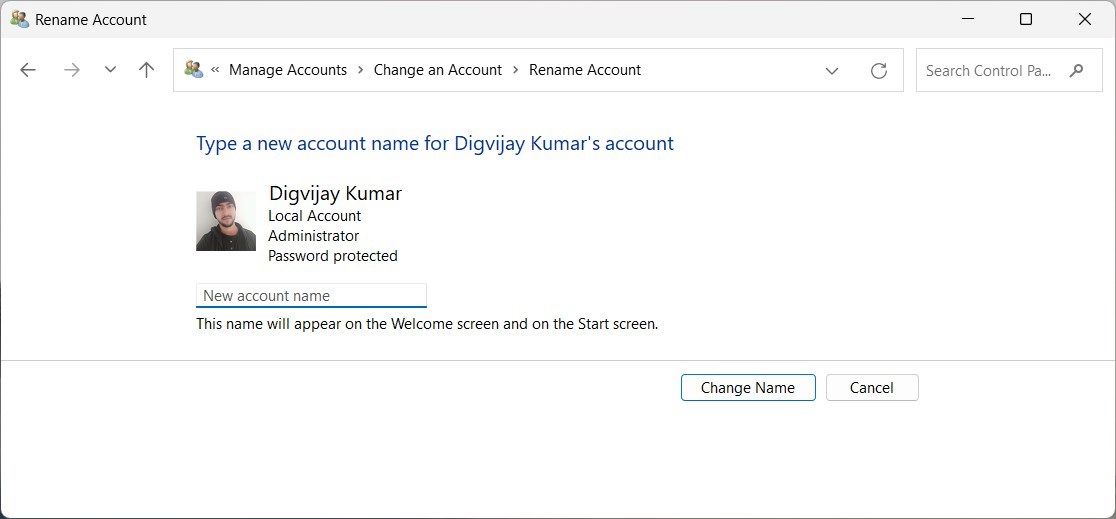
Your Microsoft account administrator name will now be changed. Now you can access all the services provided by Windows with your new name.
3. How to Change the Administrator Name Through Command Prompt
If you prefer using the Command Prompt instead of the Settings app or Control Panel, you can also change your Microsoft account administrator name through it. This is a command line interpreter tool that allows you to control your Windows computer system with instructions.
To change the Microsoft account administrator name through Command Prompt, follow these steps:
- Run the Command Prompt as an administrator .
- In the elevated command prompt, type the following command:
wmic useraccount where fullname='userame' rename 'newname'
In the above command, replaceusername with the current administrator name andnewname with what you want to set as your new name. For example, if you want to change the administrator name from Paul to Michael, your command will look like this:
wmic useraccount where fullname=’Paul’ rename ‘Michael’
PressEnter to apply the changes. Your Microsoft account administrator name has been successfully changed. You can now sign in with your new Microsoft account administrator.
4. How to Change the Administrator Name Through Run Command
Another tool you can use to change the Microsoft account administrator name is the Run dialog command. Here’s how to do it:
- Right-click on Start and selectRun from the menu list.
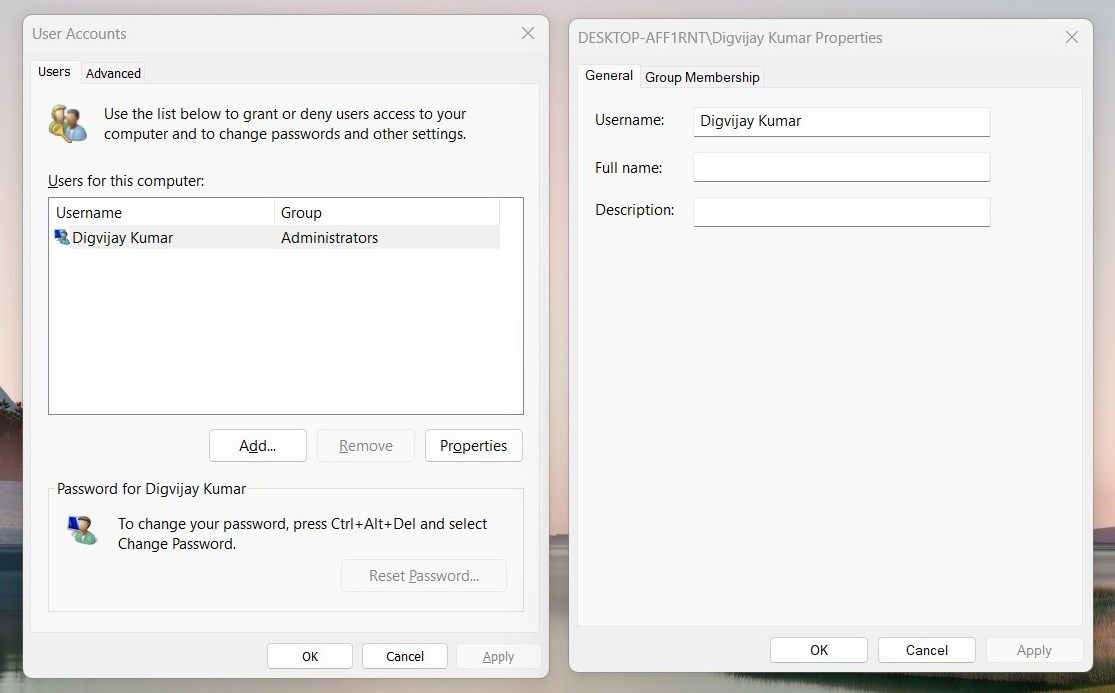
- In the Run dialog box, typenetplwiz and press Enter. This will open the User Accounts window.
- Select the Microsoft account you want to change and clickProperties .

- Under theGeneral tab, enter the new name in theFull Name field.
- ClickApply > OK to save the changes.
Your Microsoft account administrator name is now changed.
Make a Change to Your Windows Admin Name
Need to change the name of your Microsoft Account administrator? All you have to do is follow the instructions outlined in this article and your Microsoft account administrator name will be changed.
Also read:
- Become an Audio Chameleon! Learn How to Change Free Fire Voices
- Essential Windows FS Apps: Crowd-Picked Winners
- Fixer's Compendium: Tackling Active Directory Printer Errors on WIN 10/11
- High Definition Recording Mastering Live Footage Using Logitech Cam
- How Do You Unlock your iPhone 8? Learn All 4 Methods
- How To Open Your Apple iPhone 13 Pro Max Without a Home Button | Dr.fone
- How to Use Apple Maps on a Windows PC
- In 2024, Bright Ideas in Film Setup Secrets to Perfect Lighting
- In 2024, Turn Texts Into Words for TikTok Success
- Mastering Network Key Harmony: 5 Steps for Windows Error Resolution
- New In 2024, Diagnosing and Fixing Final Cut Pro X Crash Errors
- Quick Fixes: Remedying Windows 11 Package Complications
- Running Windows 11 on Classics - Utilizing Windows To Go & Rufus Guide
- Solutions for Excel Display in Windows Notepad
- Tackling Gaps Within Explore Interface Elements
- The Enchanted Realm of Bygone Writings A Literary Pilgrimage for 2024
- Troubleshoot JScript.dll Errors in Windows with These Proven Methods
- Turbocharging Yuzu's Performance on PCs
- Ultimate Car Rescue Kit Reviewed – The Acclaimed MMOCK 1000A with a 18,000mAh Battery
- Title: Redefine Windows 11 Account Hierarchy: Update Admin Role
- Author: Richard
- Created at : 2024-11-14 20:41:48
- Updated at : 2024-11-17 17:21:49
- Link: https://win11-tips.techidaily.com/redefine-windows-11-account-hierarchy-update-admin-role/
- License: This work is licensed under CC BY-NC-SA 4.0.
