
Regaining Default Energy Management in Windows 11
Regaining Default Energy Management in Windows 11
Windows 11 and 10 come with preset power plans: High Performance, Power Saver, Balanced, and sometimes Ultimate Performance. You can switch between these plans to get the best performance, more battery life or a bit of both worlds. Some laptop manufacturers, like HP, have their own power plan, like HP Recommended.
However, often after installing a Windows update, default power plans can go missing, or you may see only one power plan. This can also happen if you have made changes to your power plans recently. In any case, here are a few troubleshooting steps to help restore the missing default power plans on Windows 11 and 10 running systems.
How to Check Which Power Plan Is Missing
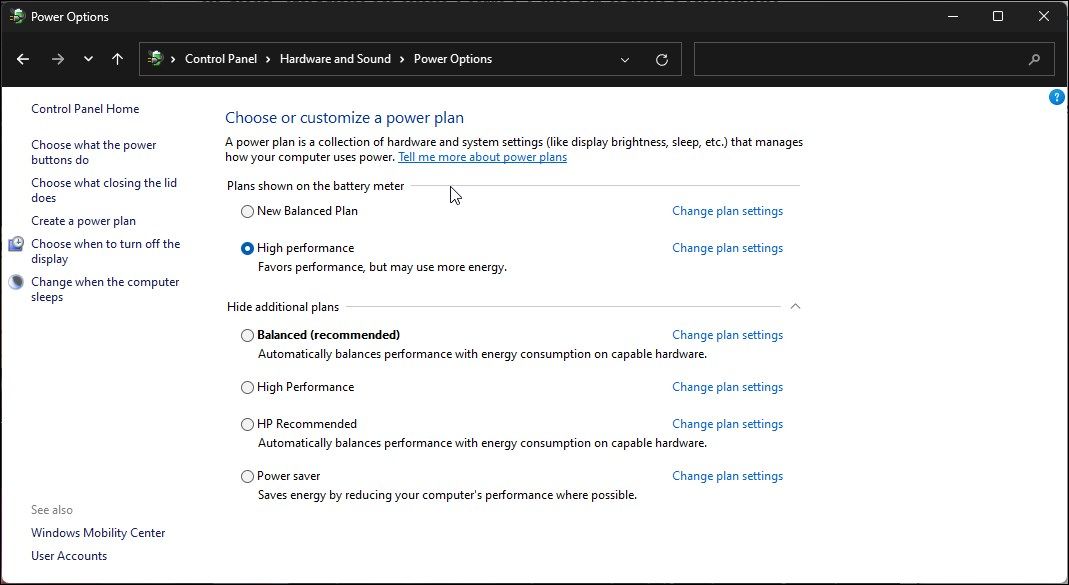
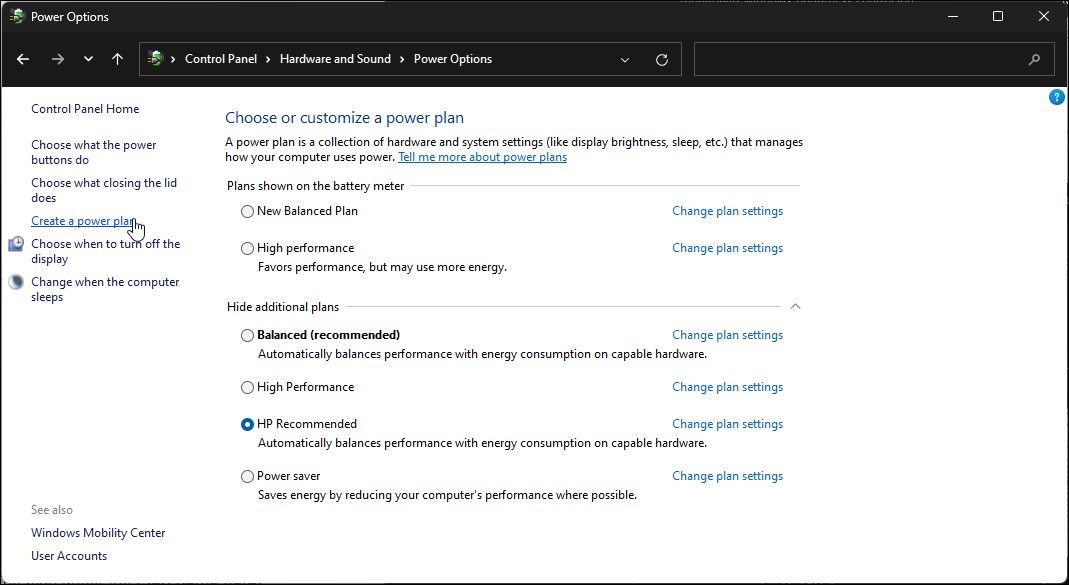
Depending on your system hardware specification, you may see three or four power plans in the Power Options panel. Balanced, Power Saver and High Performance are the most common in all Windows computers.
However, higher-end hardware running Windows 11\10 Pro can have the Ultimate Performance Power plan as well. It is a preset power plan to help boost your system performance in a professional setup. Even if available, enabling the Ultimate Performance power plan may not be necessary for most users .
You can check the available and missing power plans on Windows from Control Panel:
- PressWin + R to openRun .
- Typecontrol and clickOK
- In theControl Panel , openHardware and Sound.
- Next, click onPower Options .
- Expand theShow additional plans section.
1. Change Power Mode From the Settings Panel
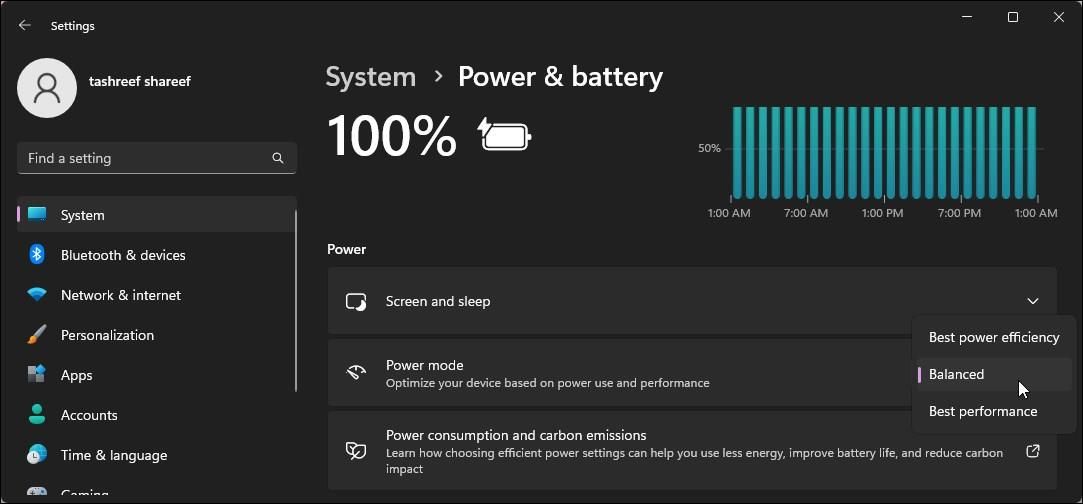

On Windows 11, you can change the power mode from the Settings app . You can choose between the Best power efficiency, Balanced, and Best performance power modes in the Power & battery settings.
To change power mode on Windows 11:
- PressWin + I to openSettings .
- In theSystem tab, scroll down and click onPower & battery .
- Click the drop-down forPower mode and select your preferred power plan.
If the Power Mode doesn’t show any or some power schemes, you’ll need to restore it using the powercfg command-line utility.

Key features:
• Import from any devices and cams, including GoPro and drones. All formats supported. Сurrently the only free video editor that allows users to export in a new H265/HEVC codec, something essential for those working with 4K and HD.
• Everything for hassle-free basic editing: cut, crop and merge files, add titles and favorite music
• Visual effects, advanced color correction and trendy Instagram-like filters
• All multimedia processing done from one app: video editing capabilities reinforced by a video converter, a screen capture, a video capture, a disc burner and a YouTube uploader
• Non-linear editing: edit several files with simultaneously
• Easy export to social networks: special profiles for YouTube, Facebook, Vimeo, Twitter and Instagram
• High quality export – no conversion quality loss, double export speed even of HD files due to hardware acceleration
• Stabilization tool will turn shaky or jittery footage into a more stable video automatically.
• Essential toolset for professional video editing: blending modes, Mask tool, advanced multiple-color Chroma Key
2. Reset the Default Power Plan Settings Using Power PowerShell
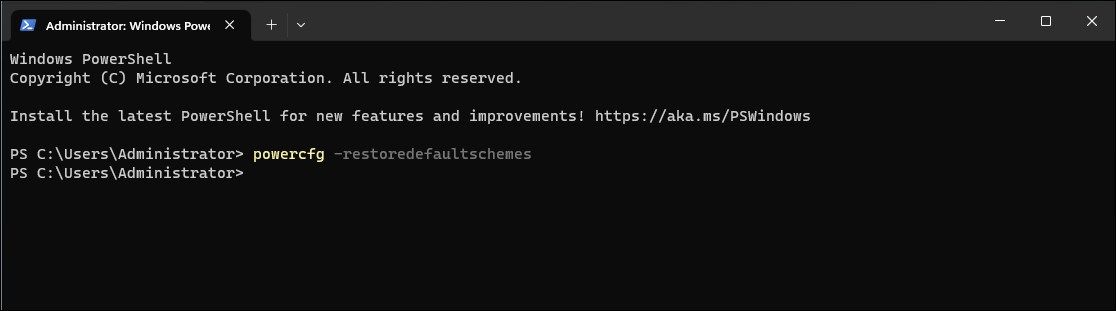

Before you try to restore the power plans, reset all the power plan settings to factory default. A reset will only fix issues that occurred due to incorrect configuration.
To reset Windows default power plans:
- Open PowerShell with administrator rights.
- In the PowerShell window, type the following command and pressEnter :
powercfg -restoredefaultschemes - The above command will reset default power schemes. Close PowerShell and check for any improvements.
3. Restore the Missing Power Plan Using the Command Prompt
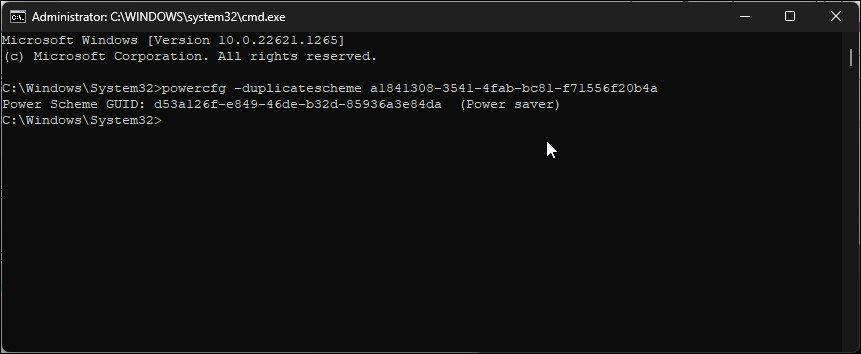
You can restore the missing default power plans on Windows using the Command Prompt. We’ll use thepowercfg command-line feature to duplicate the existing but missing power plans.
Follow these steps to restore the missing control power schemes. Make sure to only execute the commands for the power control schemes that are missing. Otherwise, it will create duplicate entries for the same power plan in Power Options.
- Press theWin key and typecmd .
- Right-click onCommand Prompt and selectRun as administrator .
- In the Command Prompt window, type the following command and press Enter:
[High Performance] powercfg -duplicatescheme 8c5e7fda-e8bf-4a96-9a85-a6e23a8c635c [Balanced] powercfg -duplicatescheme 381b4222-f694-41f0-9685-ff5bb260df2e [Power Saver] powercfg -duplicatescheme a1841308-3541-4fab-bc81-f71556f20b4a [Ultimate Performance] powercfg -duplicatescheme e9a42b02-d5df-448d-aa00-03f14749eb61 - If successfully executed, typeexit and pressEnter to close Command Prompt.
Next, openControl Panel and go toPower Options to check if the missing power plans are restored on your Windows computer.
4. Enable the High Performance Power Plan Using Command Prompt
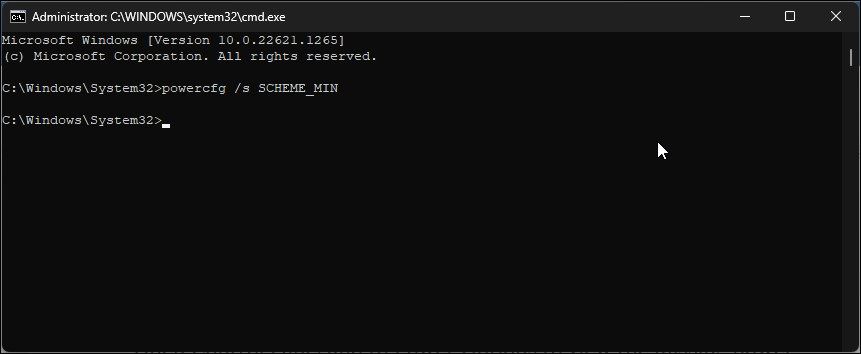

You can use a differentpowercfg command to enable the High Performance power plan on Windows. This is useful if your system is missing only the High Performance power scheme. Here’s how to do it.
- Open Command Prompt with administrator rights .
- In the Command Prompt window, type the following command and pressEnter :
powercfg /s SCHEME_MIN - After the command is executed, close the Command Prompt window.
- Next, go to Control Panel > Hardware and Sound > Power Options . Here, you can use theHigh Performance power plan.
If the power plans are still missing, check if Modern Standby (S0) is enabled. If yes, you’ll need to disable Modern Standby to restore the missing power plans.
5. Disable Modern Standby (S0) to Restore Default Power Plans
If you have a Modern Standby (S0) compatible system, check if this sleep state is enabled. When enabled, the default power plans may be disabled to prevent any conflict when the system is in a low-power idle state.
As you may have guessed already, in this situation, you’ll need to disable Modern Standby (S0) on Windows to restore the default power plans on Windows. After you disable Modern Standby (S0), open Power Options to use the default power plans.
Conversely, you may encounter BSOD and other critical errors after disabling Modern Standby (S0). If yes, enable Modern Standby again to fix the issues.
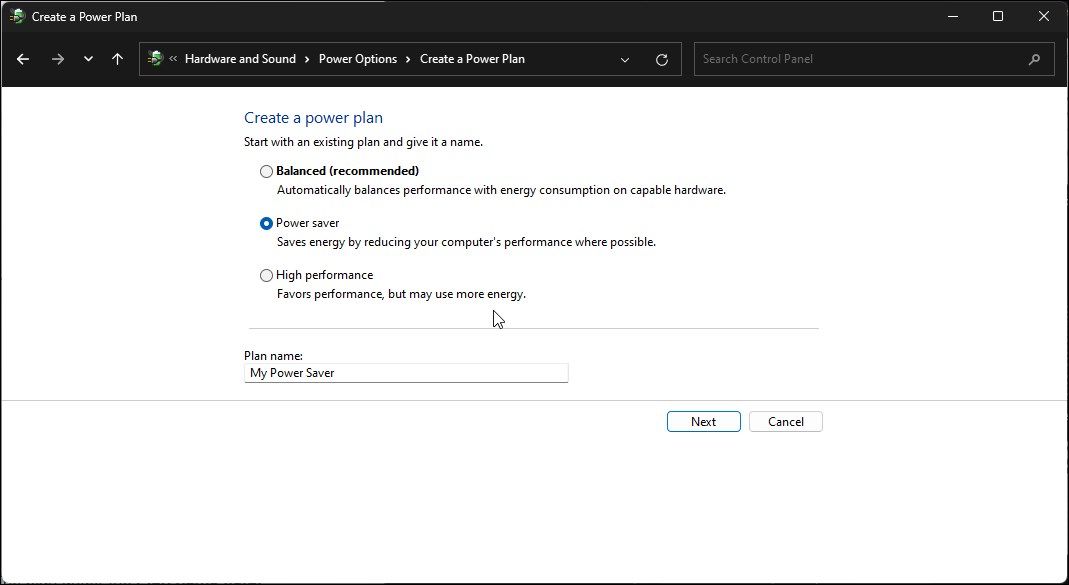
6. Manually Create the Power Plans
If you don’t want to use the preset power plans, you can create your own power plans on Windows. This should work irrespective of the Modern Standby state of your computer.
To create a custom Power Plan on Windows:
- PressWin + R to openRun .
- Typecontrol and clickOK to openControl Panel.
- Go toHardware and Sound.
- Next, click onPower Options .
- In the left pane, click onCreate a Power Plan.
- Next, select the power plan you want to restore and enter a name for the plan under thePlan name field.
- Next, configure the settings for the new power plan.
- ClickCreate .`
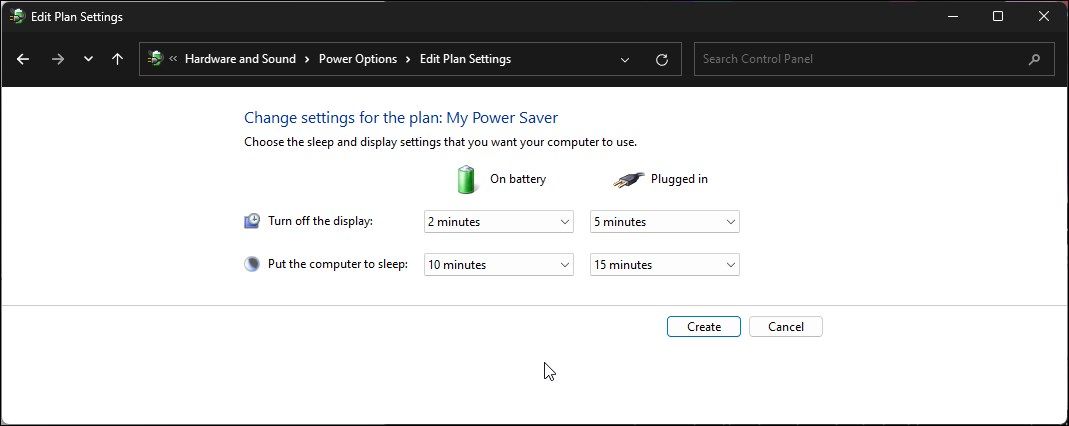

Your new custom power plan will appear in Power Options. To remove the power plan, unselect the plan and click onChange plan settings. Next, click onDelete this plan and clickOK .
Restore the Missing Default Power Plans on Windows
Power plans on your Windows laptops help you manage how your device uses power. If you don’t see the power schemes on Windows, try to reset the default power plans using PowerShell. Similarly, you can also use PowerShell to duplicate and restore the existing power plans.
That said, not seeing the Ultimate Performance power plan in Power Options is not unusual. By default, it is only available on high-end Windows hardware and disabled to prevent battery draining. But you can still enable it using a PowerShell cmdlet. For most users, however, the balanced power plan offers a great balance between performance and battery life.
- Title: Regaining Default Energy Management in Windows 11
- Author: Richard
- Created at : 2024-08-16 02:11:31
- Updated at : 2024-08-17 02:11:31
- Link: https://win11-tips.techidaily.com/regaining-default-energy-management-in-windows-11/
- License: This work is licensed under CC BY-NC-SA 4.0.