Resolving Excessive CPU Consumption by Vanguard's UMS in Windows

Resolving Excessive CPU Consumption by Vanguard’s UMS in Windows
Is the “Vanguard user-mode service” process consuming too much of your CPU resources when playing Valorant? This indicates that Riot Vanguard, an anti-cheat software that prevents unfair gameplay in Valorant, isn’t working as it should. High CPU usage can cause lag and stutter in Valorant, completely ruining its performance.
If you want to reduce the CPU usage of the Vanguard user-mode service process and play Valorant seamlessly, here are some fixes you can try.
1. Apply Some Preliminary Checks
Start de-stressing your CPU by taking the following basic steps, as they may reduce resource usage immediately:
- Restart Valorant or any other game that spikes the Vanguard user-mode service’s CPU consumption.
- Whitelist Vanguard from Windows Defender (see how to allow apps through the Microsoft firewall ) and the antivirus software you use to ensure your security suites don’t cause Vanguard to consume more CPU resources than necessary.
- Be sure to turn off any cheat software you’re using to manipulate Valorant or any other Riot Games game.
- Use the Task Manager to filter the processes consuming the most CPU resources by descending order to determine if Vanguard overstresses the CPU the most. If another process turns out to be more burdensome, turn it off.
If none of the above checks fixes the problem, apply the remaining fixes.
2. Disable and Restart Valorant and Vanguard Processes
First off, ensure that a temporary glitch hasn’t fueled the high CPU usage by the Vanguard user-mode service process. The easiest way to rule out this possibility is to close Valorant, turn off the Vanguard services, and restart them.
To disable them, right-click the Windows Start button and open the Task Manager. Here, locate the Vanguard and Valorant-related processes, right-click on each process, and select End task.
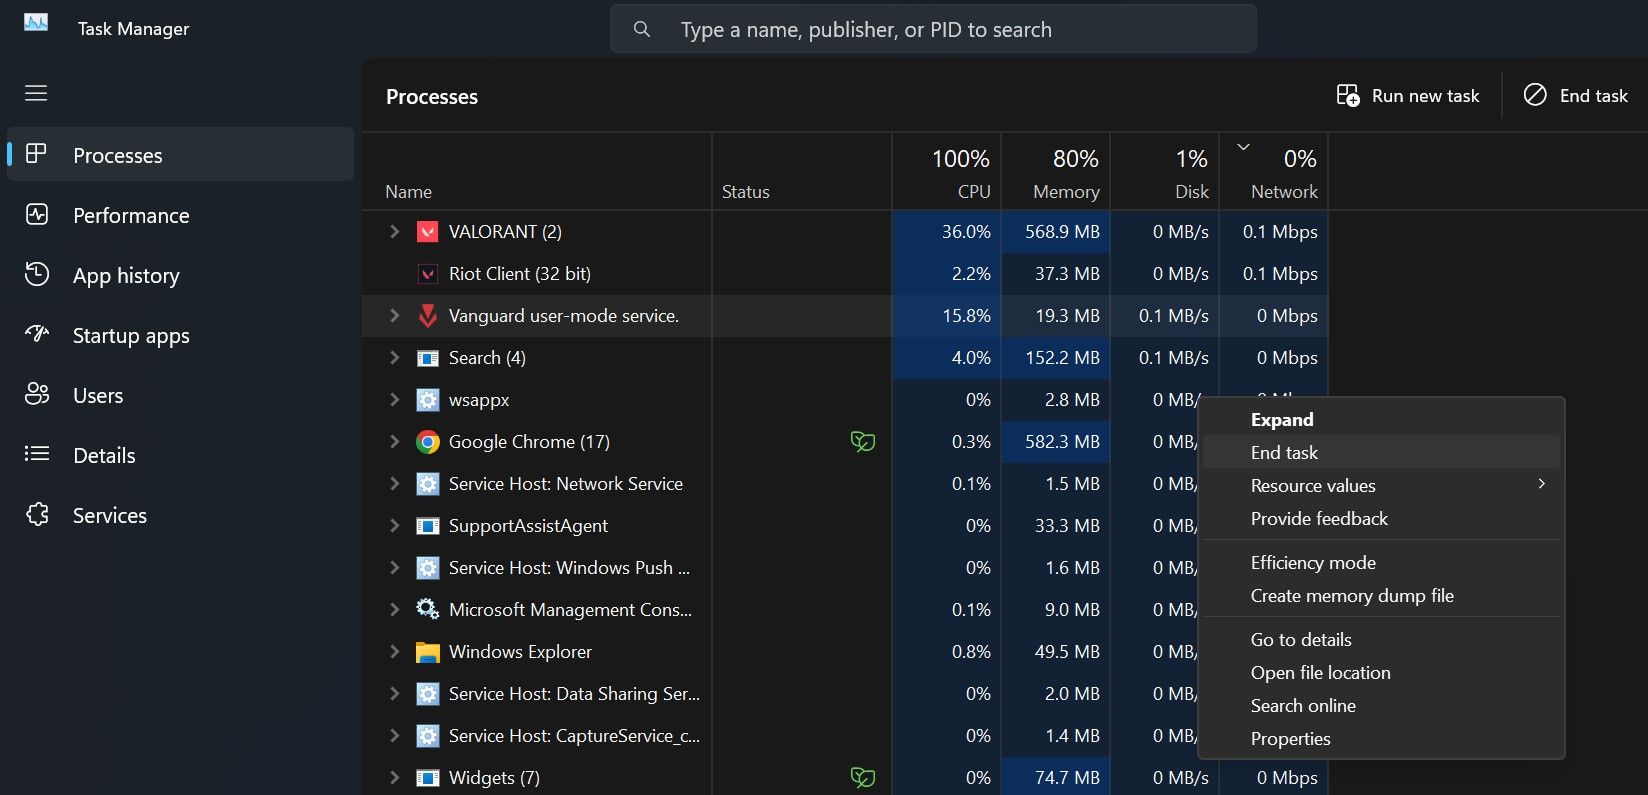
Once these processes are disabled, give Valorant a fresh start, which will automatically restart Vanguard. If restarting the processes doesn’t make a difference and the process continues to overstretch the CPU, move on to the next step.
3. Make the Vanguard User-Mode Service Process a Low Priority
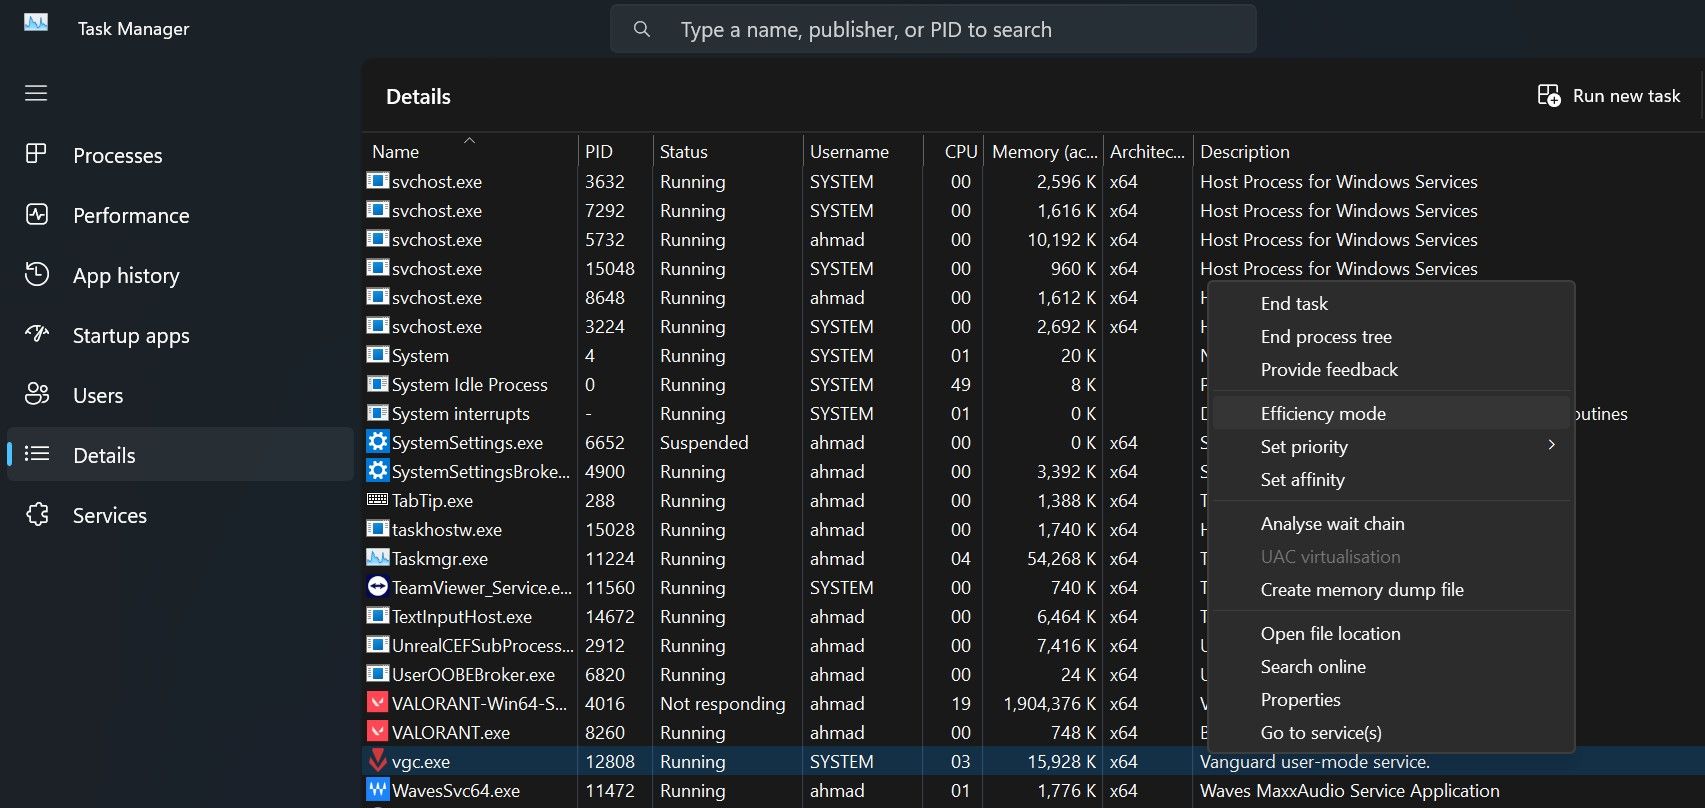
Windows allows users to limit the CPU resource usage of processes in two different ways. The first is to change the priority of the process, and the second is to turn on the efficiency mode. Using either of these methods limits the allocation of CPU resources to less essential processes, limiting their CPU usage.
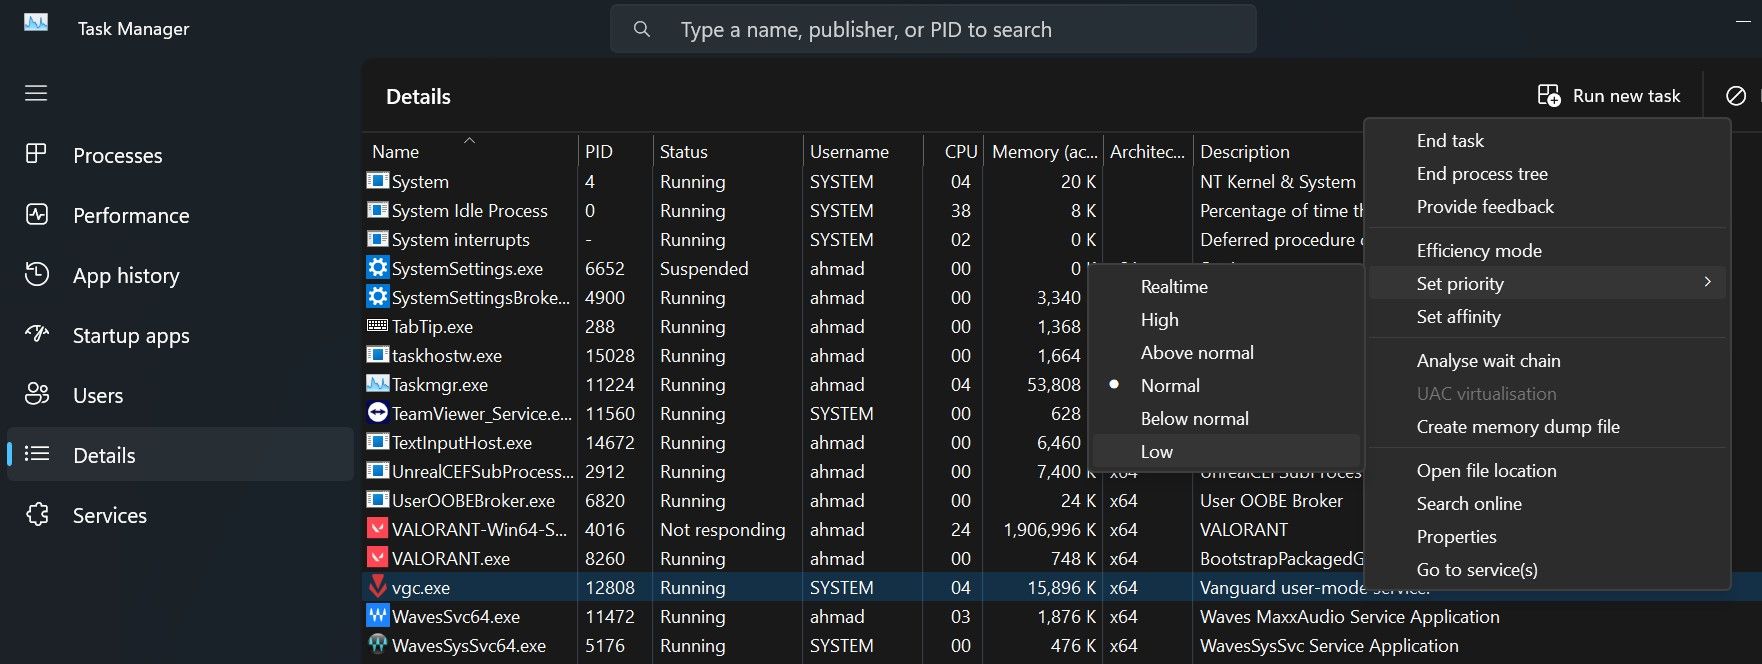
To change the priority of Vanguard-related processes, go to the Details tab, right-click on the vgc.exe or any other process, and select Low from the Set Priority menu.
If you choose the latter option to control CPU resource consumption, right-click on the same process and choose Efficiency mode.
4. Change the Processor Affinity
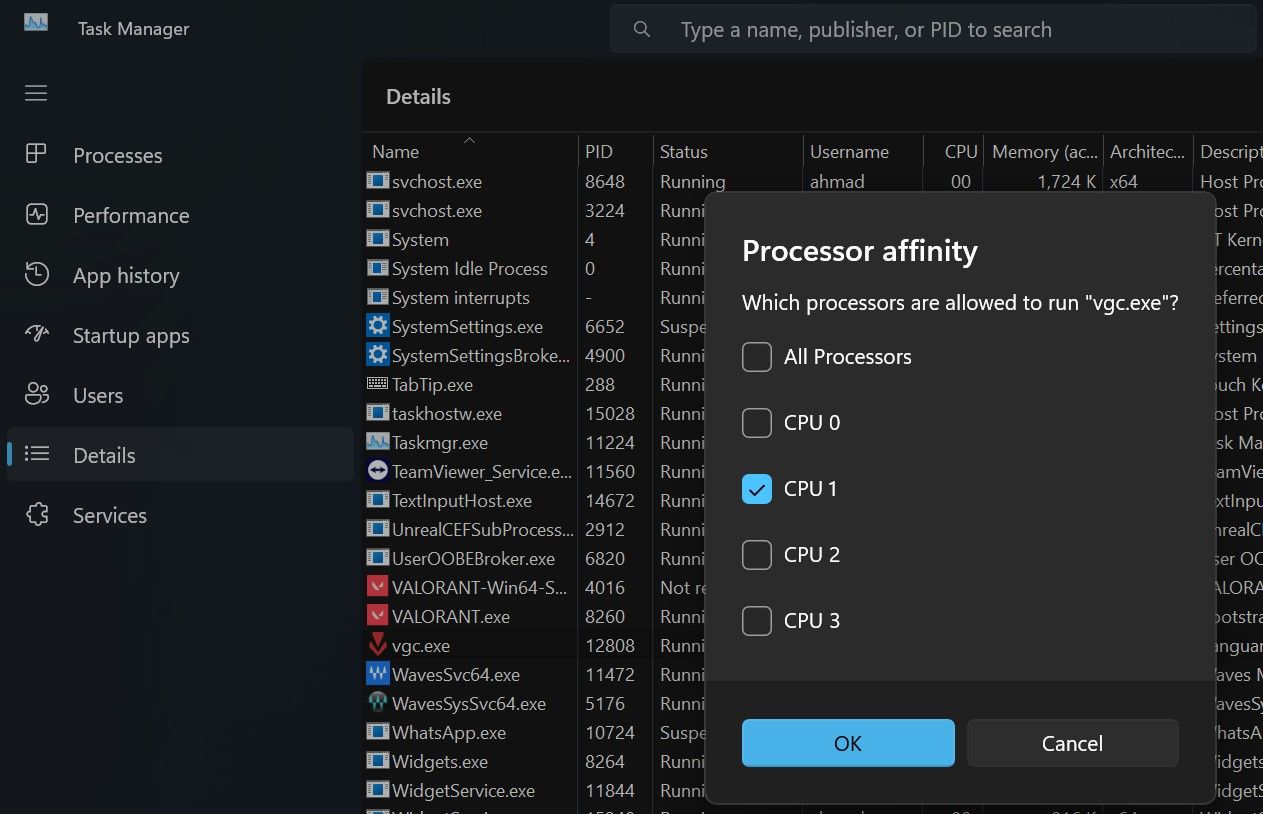
The processor affinity setting in Task Manager allows you to limit the number of processors a process can use. Using this setting, you can instruct the process to use only a few processors while leaving others free. In general, the fewer processors a process is permitted to use, the lower its overall resource consumption will be.
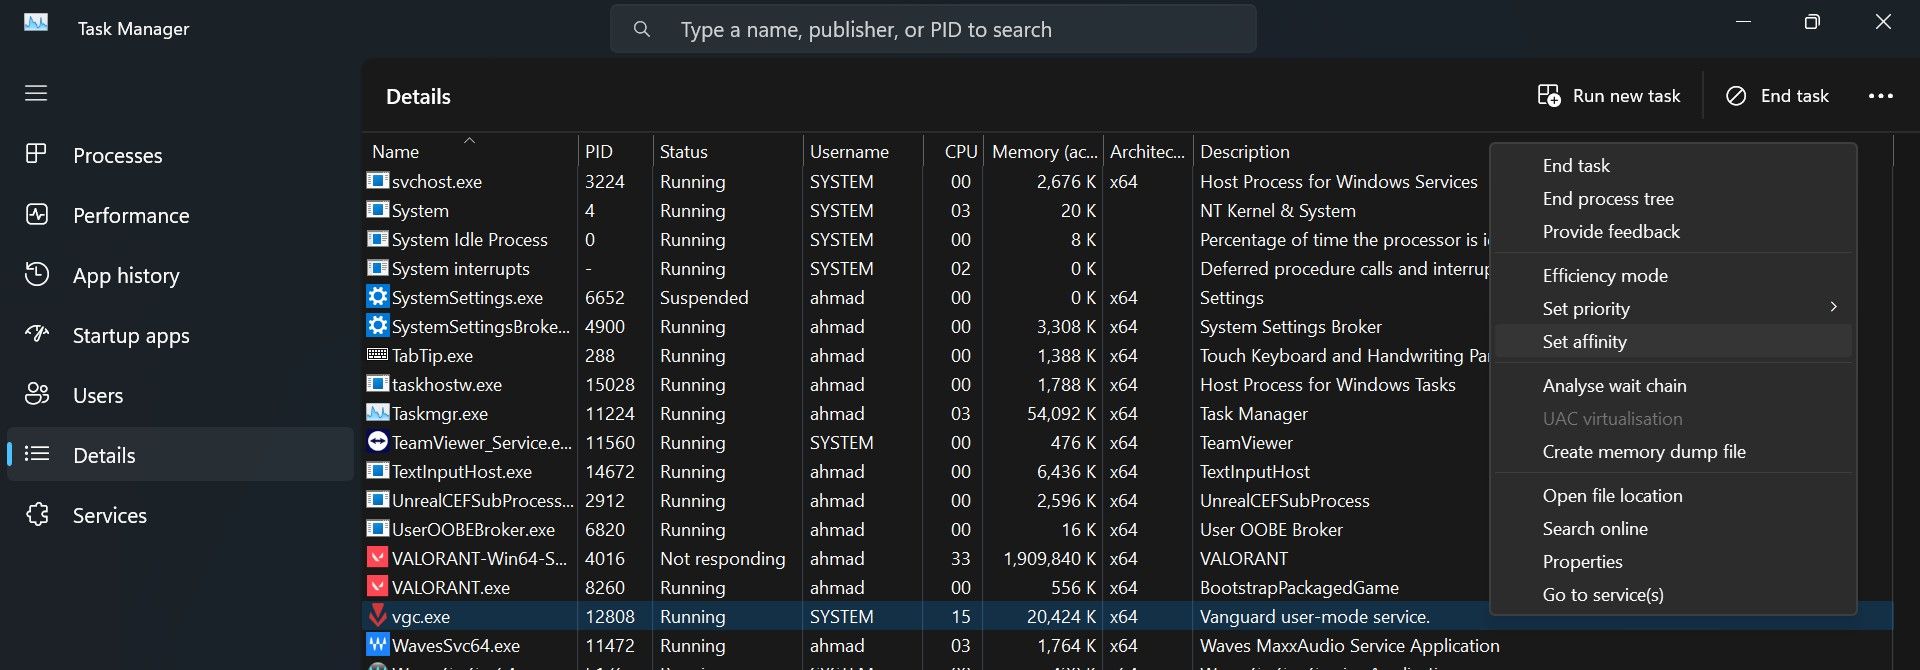
In light of that, changing the processor affinity for the Vanguard process may resolve the issue at hand. To do that, right-click the vgc.exe or any other process you want to change the affinity for, then click Set affinity.
Here, uncheck the boxes besides most of the CPUs and keep only a few of them checked.
5. Stop the Vanguard Service and Restart It
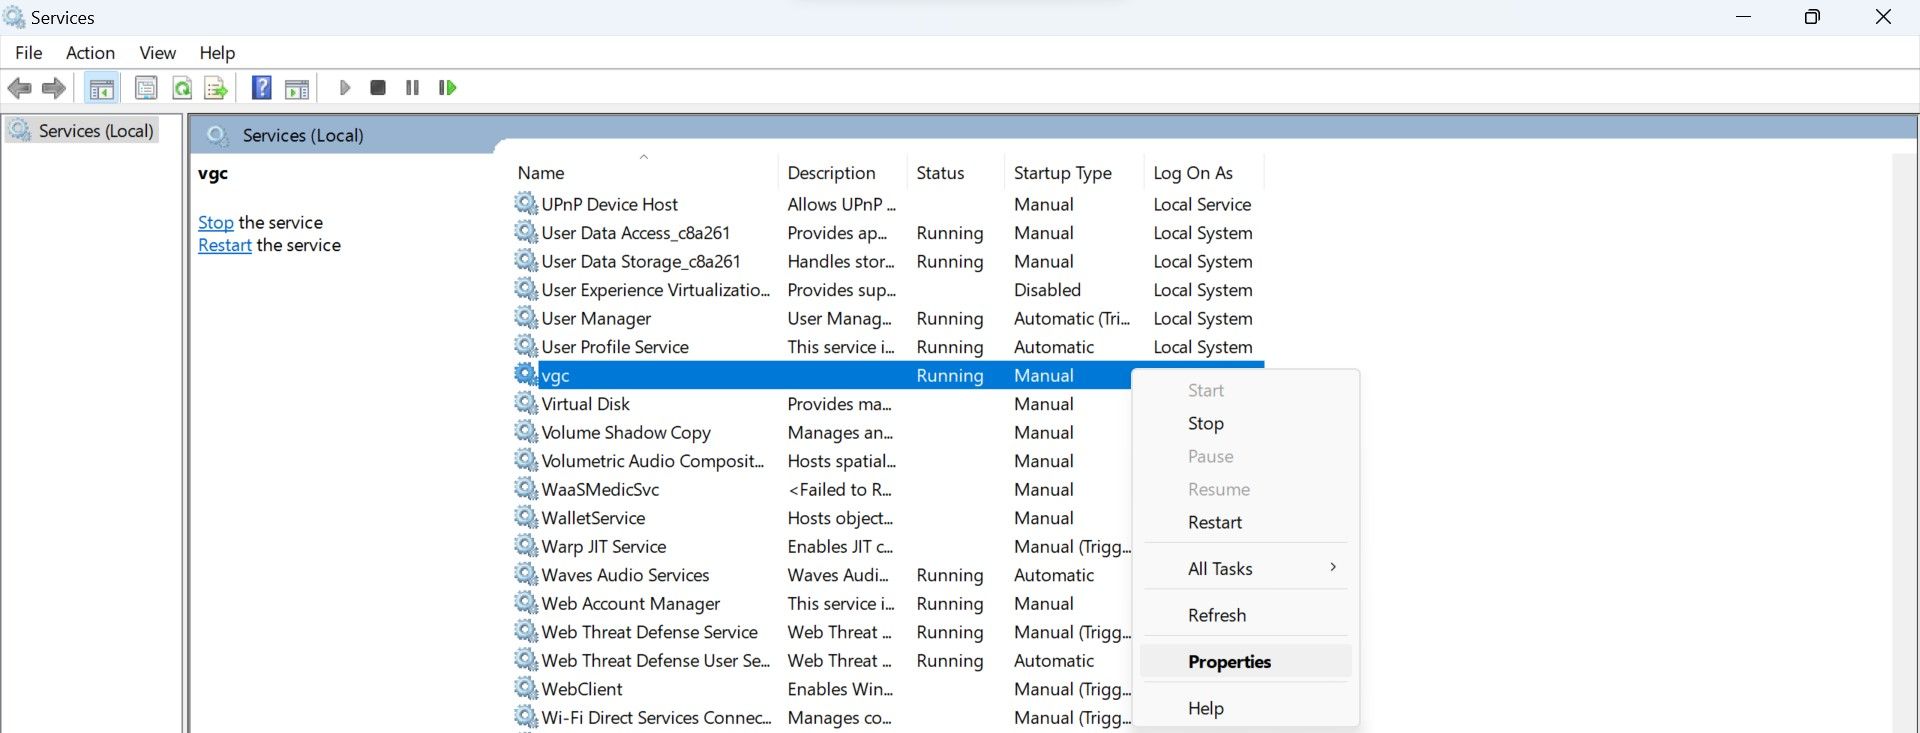
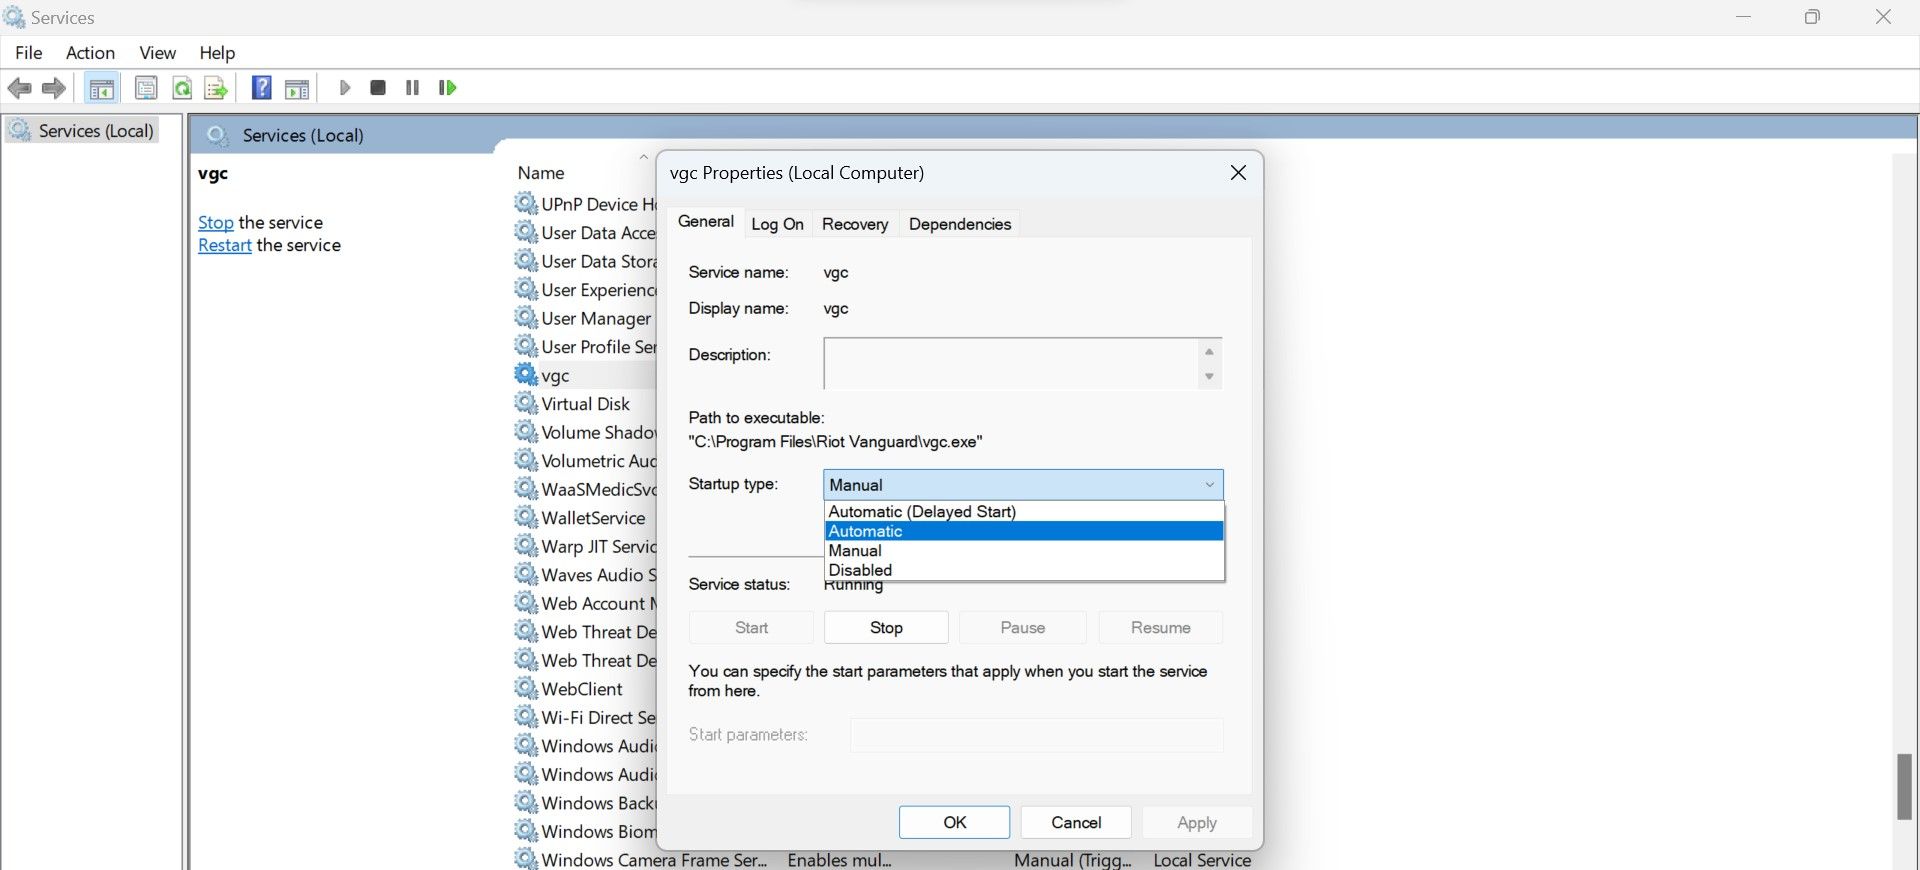
You may also be able to fix the high CPU resource usage of the Vanguard user-mode service by stopping and starting the Vgc service. Follow these steps to do that:
- Type “Services” in Windows Search and open the Services app.
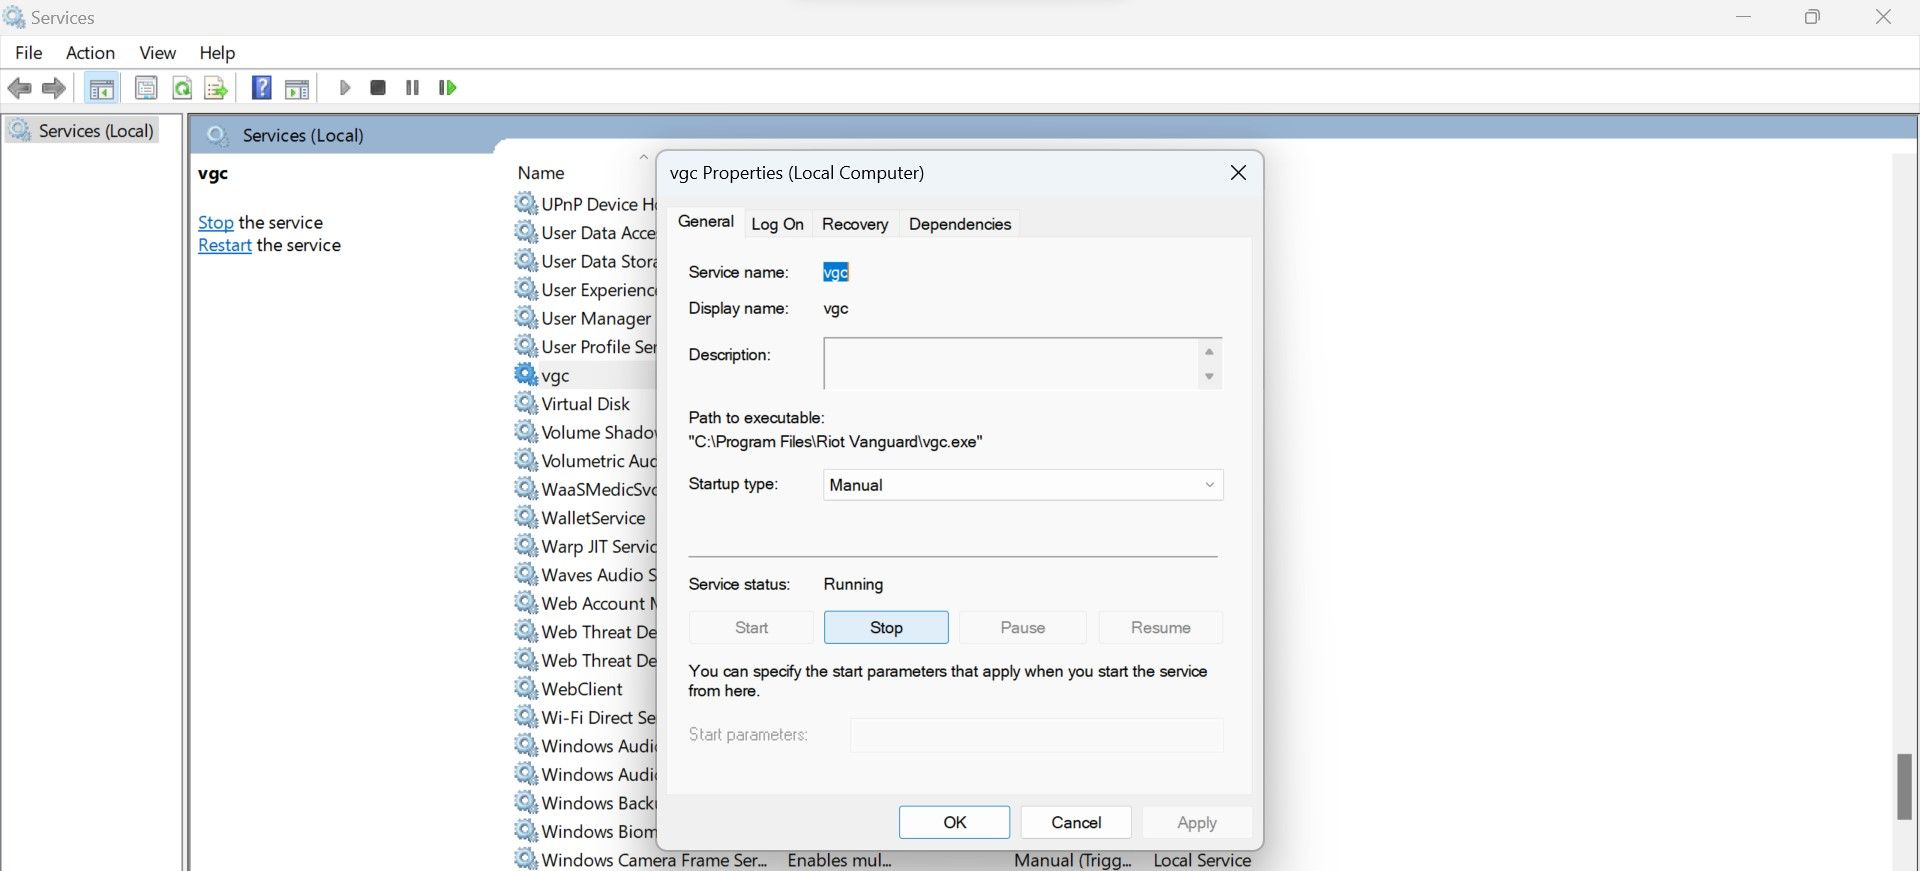
- Locate the Vgc service, right-click on it, and hit Properties.

- Navigate to the General tab, and click on the Stop button.
- After that, restart the service by clicking on the Start button again.

- Also, choose Automatic from the dropdown menu next to Startup type.
6. Disable Third-Party Overlays
Riot Vanguard is an anti-cheat program. It prevents cheating and bans users who attempt to hack into the game. It does this by detecting unauthorized changes made to the game files and settings using third-party cheat software.
As reported by some users, using the in-game overlays can also spike CPU resource usage for the Vanguard user-mode service process. Turning off the third-party overlays resulted in a reduction in resource consumption for those users.
Therefore, if you’re using any third-party app to enable in-game overlay, especially Discord, turn it off. Hopefully, this will reduce CPU usage.

7. Move Valorant to a Different Drive
Installing Valorant on the same drive as your operating system has been reported to cause problems. If you’ve also installed the game on the same drive where your OS resides, it’s possible that Windows security could be hindering Vanguard’s activity, making it consume more resources.
To ensure that’s not the case, you should move Valorant to a different drive. Not sure how to do that? Refer to our guide on how to move the installed apps and programs in Windows 10 or 11.
8. Install a Fresh Copy of Vanguard
If none of the potential fixes have worked, you can use the least desirable option; uninstall Vanguard and reinstall it. However, you need to stop the Vgc service first, as described in the above step; otherwise, you may encounter issues when uninstalling the software. You should also close Valorant and exit Vanguard from the system tray before uninstallation.
Once that’s done, follow the instructions in our guide on uninstalling software on Windows 11 and uninstall Vanguard. Afterward, rerun Valorant and Riot Vanguard will be installed automatically.

Valorant and other Riot Games products require Vanguard to function. If Valorant (or any other game) fails to install Vanguard on its own after uninstallation, restart your device once and then run the game again.
Don’t Let Vanguard Overstress Your CPU
The consumption of excessive CPU resources by a single process can affect the game’s performance and degrade the overall system performance. Hopefully, you now better understand what causes the CPU spike for the Vanguard user-mode service process and the best ways to bring it down to a normal level.
If none of the fixes above lower CPU consumption, your last resort should be to uninstall Valorant (or any other game) and reinstall it fresh.
If you want to reduce the CPU usage of the Vanguard user-mode service process and play Valorant seamlessly, here are some fixes you can try.
Also read:
- How to Hide a Drive in Windows 11/10
- In 2024, Easy Guide to Asus FRP Bypass With Best Methods
- In 2024, Proven iPhone Markers Our Reviewed Top 9 Water-Marking Apps
- In 2024, Screen-to-File Solutions with Apowersoft
- In 2024, Secure Your Live Streams on FireFox/Chrome
- MP4をAAC形式に移し替えるためのフリーソフト3選とワザ
- Navigating Constant TechSign In Issues in Microsoft Teams
- Overcoming MSIE 0X80073D26 in Microsoft Store on Windows 11
- Patched Past: Microsoft's Cutoff of Windows 7 and 8.1 Security Updates
- Recovering Original Windows Backup Configs
- Resolved: Fixes for Persistent Reboot Loop in Windows 11 and 10
- Resolving Win11's Camera Not Recognized Problem
- Sony WH-1000XM Series - Fixing PC Mic Connection Problems Efficiently
- Steam Login: Correcting Invalid CAPTCHA
- Steps to Overcome Frozen Context Items on Windows 11 PC
- Top 6 Benefits: Mastering ChatGPT for Career Enhancement
- Unleash Windows Update: 9 Hacks to Sidestep Verification Slowdowns
- Title: Resolving Excessive CPU Consumption by Vanguard's UMS in Windows
- Author: Richard
- Created at : 2024-11-30 01:49:45
- Updated at : 2024-12-07 01:18:45
- Link: https://win11-tips.techidaily.com/resolving-excessive-cpu-consumption-by-vanguards-ums-in-windows/
- License: This work is licensed under CC BY-NC-SA 4.0.
