Simplified Linux Setup: Embedding Linux VMs Into Windows Using Hyper-V

Simplified Linux Setup: Embedding Linux VMs Into Windows Using Hyper-V
Virtual Machines enable you to experience multiple operating systems on a single system while keeping them isolated from the host OS. You must have tried creating virtual machines to try out a new OS you don’t want to install directly. But have you ever tried using Hyper-V inside a virtual machine?
Hyper-V is Windows inbuilt hypervisor that allows you to create virtual machines and run them. But it is also possible to use Hyper-V inside a VMware Windows virtual machine. So, you can create a Hyper-V virtual machine inside a VMware virtual machine and run it without any issues. Here’s how to do it.
Disclaimer: This post includes affiliate links
If you click on a link and make a purchase, I may receive a commission at no extra cost to you.
The Prerequisites for Running a Linux Virtual Machine Inside Hyper-V
Firstly, you will need a Windows virtual machine that is completely functional inside VMware. We would suggest Windows 10 or 11 virtual machines for this project. Moreover, you must pick either Windows Pro or Enterprise edition because Hyper-V isn’t available for Windows Home edition.
Make sure to dedicate an adequate amount of hardware resources to the virtual machine. The reason behind this is that you will try to run a virtual machine inside a virtual machine. So, the Windows virtual machine can dedicate only a portion of its resources to running a Linux virtual machine using Hyper-V. We tested this using a Windows 11 system with 16GB of RAM and an eight-core AMD processor.
Also, update the VMware Workstation Player to the latest version before you begin the installation method.
How to Create a Linux Virtual Machine Inside Windows Virtual Machine Using Hyper-V
We will break the steps into three parts. Firstly, you must enable the virtualization features for the Windows virtual machine. Then you need to enable Hyper-V on this virtual machine. Lastly, you need to create a Linux virtual machine using Hyper-V.
1. Enable Virtualization for Windows Virtual Machine in VMware
To enable Virtualization, do as follows:
- Launch the VMware app on your system. Click on the Windows virtual machine you want to use.
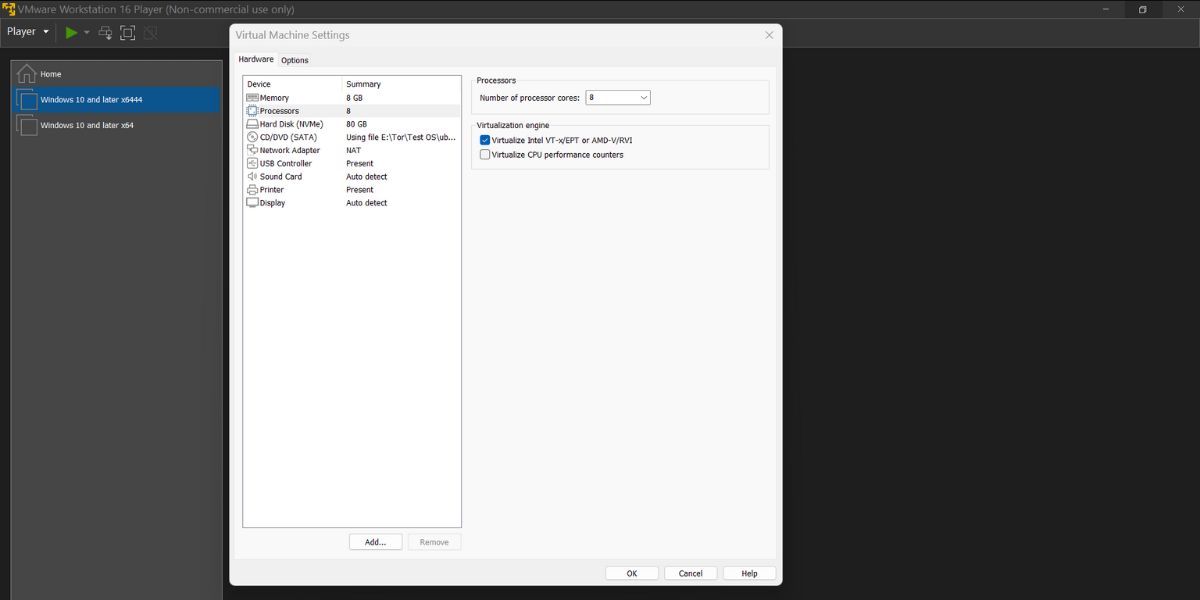
- Virtual machine details will pop up on the right side. Click on theEdit Virtual Machine settings option.
- TheHardware tab will open by default. Click on theProcessors option.
- Locate the Virtualize engine section and click onVirtualize Intel VT-x/EPT or AMD-V/RV option.

- Click on theOK button to apply changes.
Virtualization features are now active for the above Windows virtual machine. Next, you need to install Hyper-V.
2. Install Hyper-V on the Windows Virtual Machine
To install Hyper-V on the VMware Windows virtual machine, repeat the following steps.
- Launch the VMware app on your system. Double-click on the Windows virtual machine to boot it up.
- Once you boot to the desktop, press theWin + R key tolaunch the Run command box .
- Typeappwiz.cpl and press the enter key.
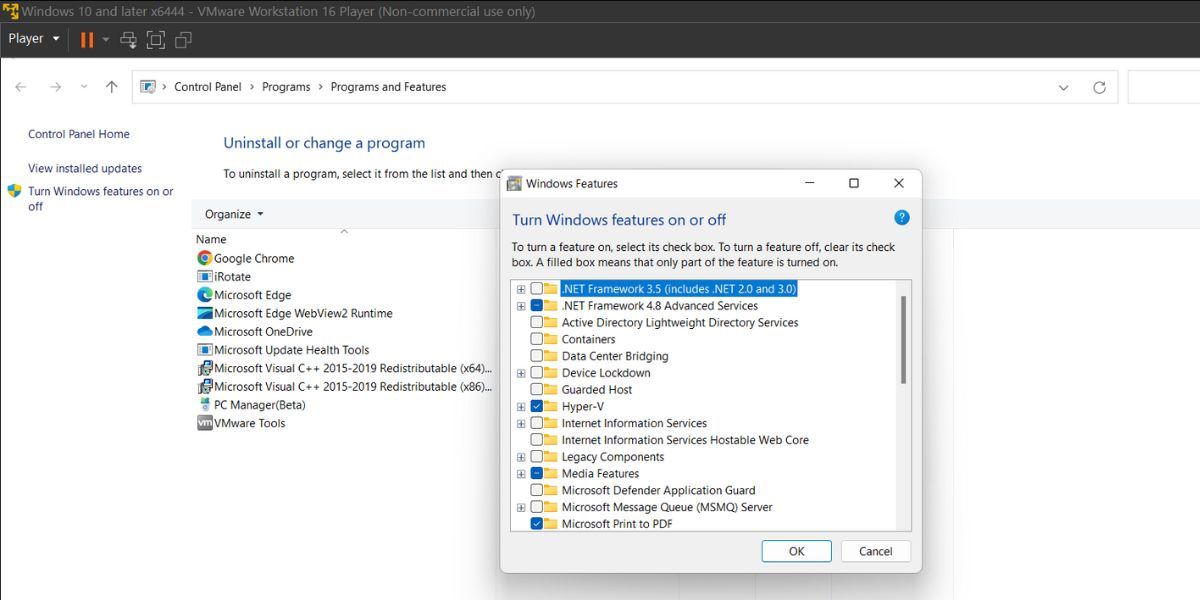
- The programs and features window will launch. Click on theTurn Windows Features on or off option.
- Scroll down and click on theHyper-V checkbox in the Windows Features list.

- Click on theOK button to install the feature on your system.
- Restart your system to apply changes when the installation completes.
Hyper-V is now active on your Windows virtual machine. Next, you need to create a Linux virtual machine it.
3. Create a Linux Virtual Machine Using Hyper-V
The last piece of the puzzle is to create a Linux virtual machine inside the Windows virtual machine using Hyper-V. You can pick any Linux distribution that you want. We will go with Ubuntu for this experiment. You have to download the Ubuntu ISO file inside the virtual machine from theUbuntu website before starting with the steps.
To create an Ubuntu virtual machine, do as follows:
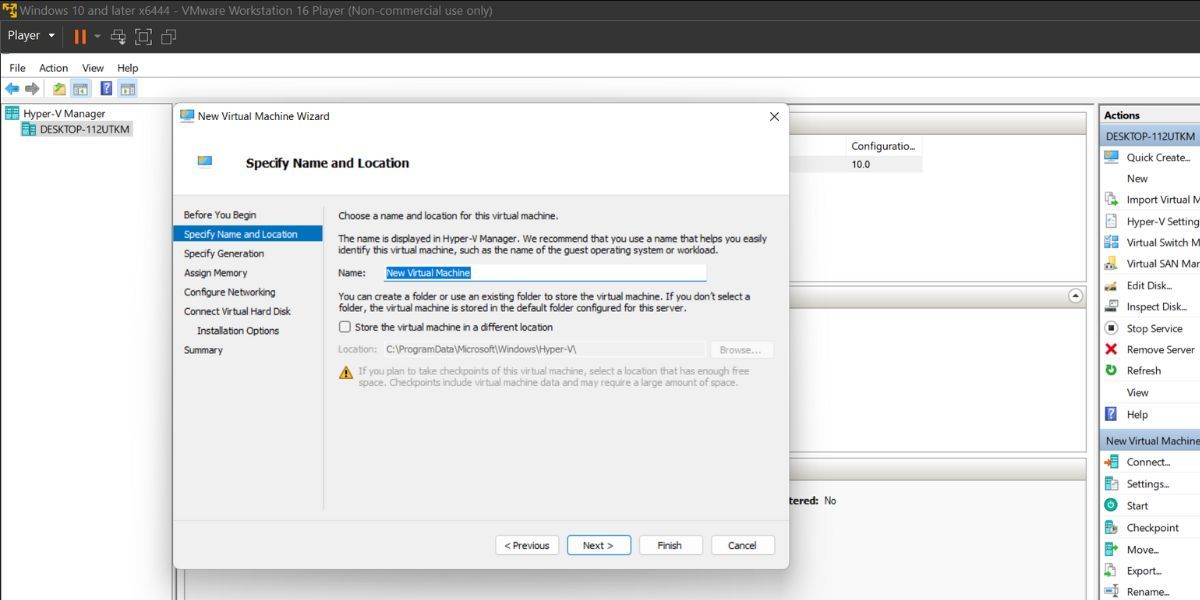
- Boot up the Windows virtual machine. Press theWin key and type Hyper-V manager. Launch the app.
- Navigate to the right-hand side section and click onNew > Virtual Machine .

- Click on theNext button. Enter the name of the virtual machine and click onNext .
- Click on theGeneration 1 radio button and click on Next.
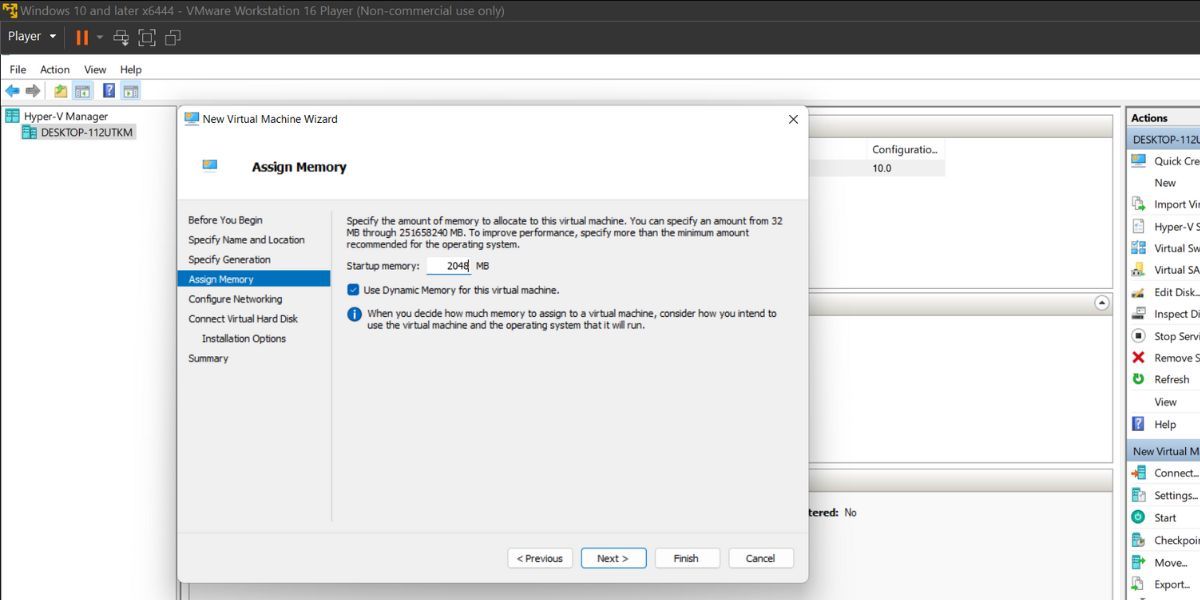
- Keep theStartup Memory as2GB and enable theUse Dynamic memory for this virtual machine option.

- Then, click onNext button and select theDefault switch option in the Configure Networking section.
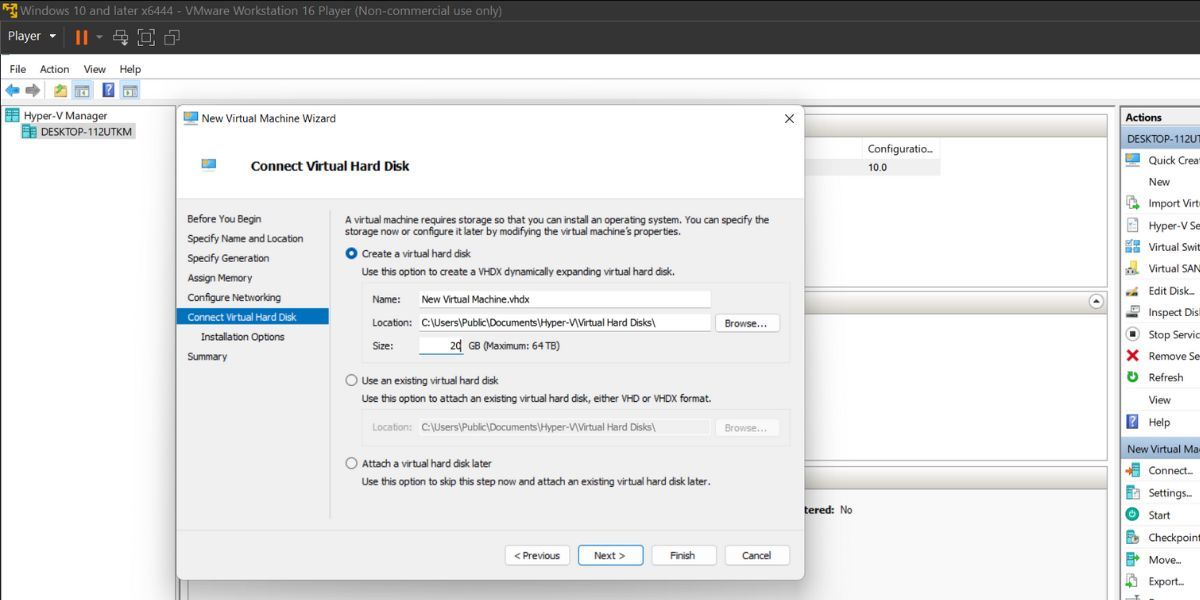
- Click on theCreate a virtual hard disk option and allocate20GB to the virtual hard disk. Move to the next section.

- Pick theInstall an operating system from a bootable CD/DVD-ROM option located under the Installation options section. Select the Ubuntu Image file (.iso) you downloaded before beginning this step.
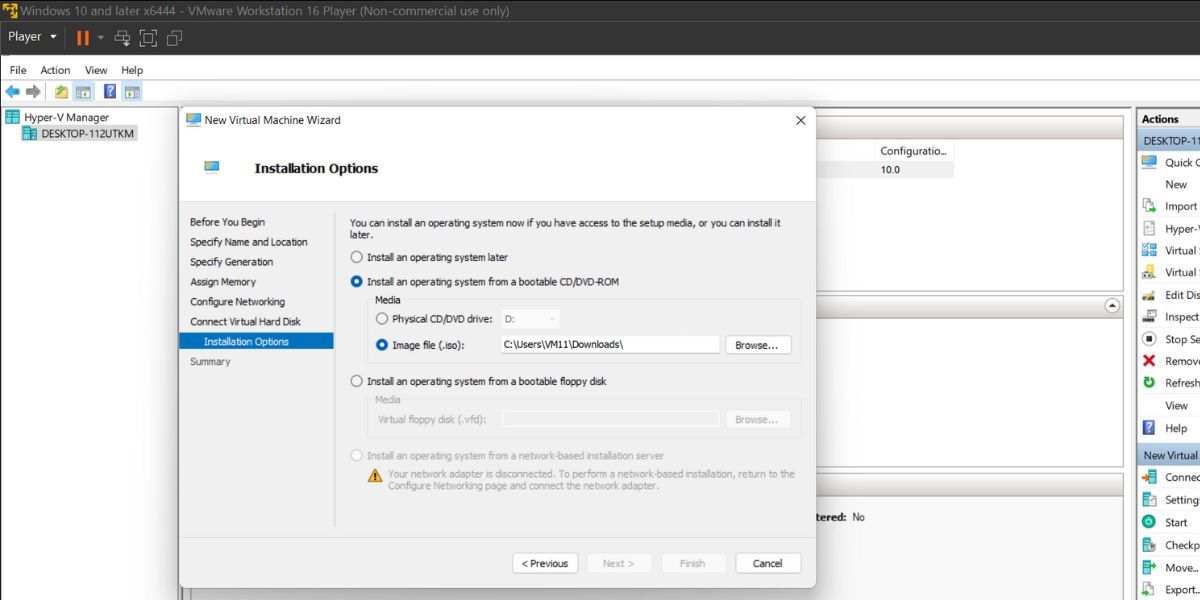
9. Click on theNext button and review the virtual machine configuration. Then, click on theFinish button to create the virtual machine.
Now that the virtual machine is ready, it’s time to get Ubuntu up and running:
- Select the newly created virtual machine in the list and click on theStart option to launch the virtual machine.
- Ubuntu setup will launch. Select theInstall Ubuntu option and proceed with the installation.
- Click onMinimal Installation and uncheck theDownload updates while installing Ubuntu option.
- Then, pick theErase disk and install Ubuntu option and click on theInstall Now button.
- Select your geographical location and enter your username and password. Then, click on theContinue button.
- Wait for the installation to complete. It may take longer if you have a SATA HDD installed on your system.
- The installer will prompt you to restart the system. Click on theRestart Now button.

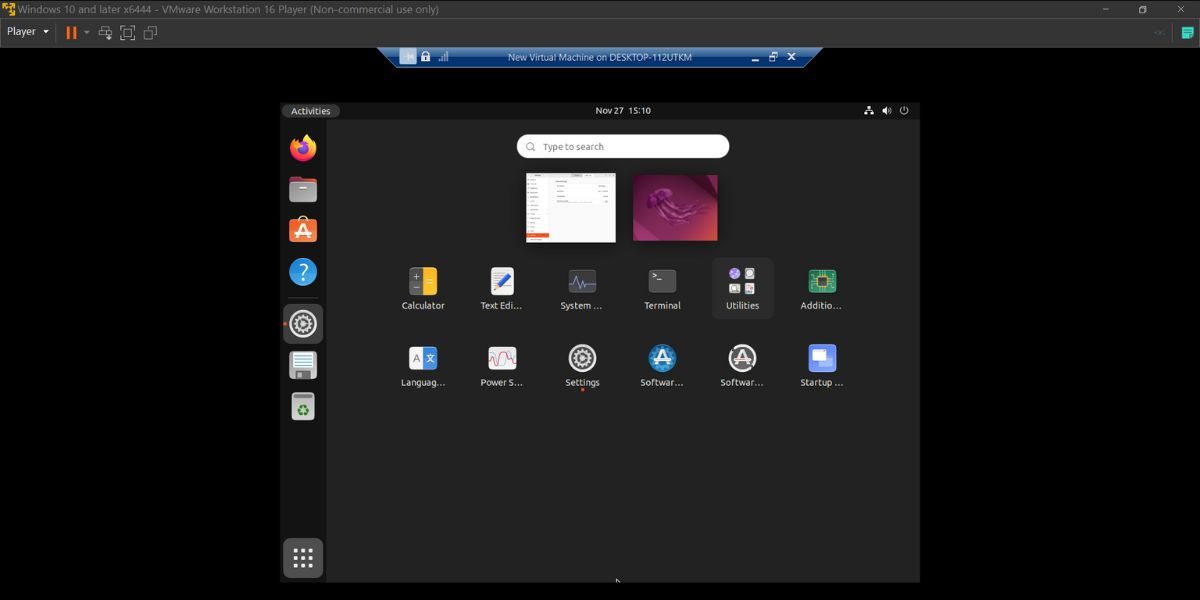
The virtual machine will boot to the Ubuntu desktop. You can use Ubuntu and notice that the system runs fine inside Hyper-V just like it does on any other virtualization software.
A Few Things to Remember
Creating a virtual machine inside a virtual machine is possible. But you have to remember that the underlying configuration of the host system must be such that it can run a virtual machine inside a virtual machine without any issue. If you attempt this experiment on a low-end system with 4GB RAM and a dual-core processor, it will choke the system.
So, you need to use a system that can devote ample hardware resources to the Windows virtual machine. Only, then you would be able to use Hyper-V and create a Linux virtual machine and allocate run it without any issues. After you try our Ubuntu using Hyper-V, you can power off the virtual machine. Or you can take the extra step and delete the virtual machine from Hyper-V Manager. It will free up a lot of space inside the Windows virtual machine.
Also, uninstall the Hyper-V feature if you don’t need it any further in your Windows virtual machine. Check out our guide onhow to disable or remove Hyper-V in Windows 11 for more information.
Use Virtual Machine Inside a Virtual Machine With Hyper-V
VMware supports hardware virtualization and can extend the feature to its virtual machines. VirtualBox is yet to catch up in this aspect because Hyper-V doesn’t work in a VirtualBox virtual machine as of writing this post. Make sure that you turn off virtualization features for the Windows virtual machine when you no longer need it.
Also read:
- [New] Privacy Prowess How to Disconnect on Insta
- [Updated] 2024 Approved Heaviest Lifting UAVs The Definitive Top 10
- [Updated] Basic Framework for Crafting Persuasive Social Media Messages for 2024
- [Updated] Crafting Powerful Partnerships A Guide to Choosing YouTube Allies for 2024
- [Updated] Hands-Free Tricks Capturing GoToMeetings on the Fly for 2024
- 2024 Approved Unlock the Potential of HD Videos on Android Devices
- 5 Pioneering Portals to Streamline Your Text Effects Search
- Disabling Invalid User Alerts: Fix Guide for Windows 11/11
- Exclusive Data Recovery Offer: Immediate Access & Assurance
- Mastering Troubleshooting: Address the Common Causes of Valorant's PC Malfunctions
- Modernizing the User Experience with Windows 10/11 Shortcuts
- Patching Up a Purple Problem: Desktop Restoration Steps
- Professional Technical Help at the Movavi Service Hub
- Streamlining Tasks with MSPCM Toolbar in Windows 11
- Tips for Managing Text Highlighting in Windows 11
- Unraveling the Mysteries of Windows iSCSI Initiator Access
- Update Windows 11 Admin Credentials Quickly
- Winning Strategies for Outlook Malfunctions
- Zet Alles Netjes En Vrijwel Integraal Af: Gratuit Vervaardiging Van Online TOD Documenten Met Movavi
- Title: Simplified Linux Setup: Embedding Linux VMs Into Windows Using Hyper-V
- Author: Richard
- Created at : 2024-09-27 22:04:50
- Updated at : 2024-10-03 16:38:01
- Link: https://win11-tips.techidaily.com/simplified-linux-setup-embedding-linux-vms-into-windows-using-hyper-v/
- License: This work is licensed under CC BY-NC-SA 4.0.
