
Strategies for Ceasing Random Windows Key Activation
Strategies for Ceasing Random Windows Key Activation
If typing on your keyboard activates shortcuts rather than typing letters, it can be because you have pressed the Win + Alt combo that activates shortcuts for supported apps in Windows. Other reasons for the issue include a faulty or stuck Win key, Stickey and Filter key issues, and a malfunctioning keyboard driver.
Fortunately, fixing this problem is easy. Here we show you what to do when your keyboard opens random applications and shortcuts when pressing any key.
1. Press Win + Alt to Deactivate the Shortcut Combo
An easy way to fix this issue is to use the Win + Alt key combo. This combo deactivates the shortcut function, and once pressed and you should be able to start typing again.
While we are unsure of what causes the issue, and there’s much less information on what the Win + Alt key combo does, it is an easy fix to resolve this problem.
 Software Update Pro - Check and update software installed on your computer.
2. Turn Off Sticky and Filter Keys


Sticky Keys and Filter Keys are Windows accessibility features that can be activated by pressing Shift repeatedly or for a long period. If you haven’t activated any of these accessibility features intentionally, make sure it is turned off and see if that returns things back to normal.
To disable the Sticky and Filter Keys:
- Press Win + I to open Settings.
- Open the Accessibility tab in the left pane.
- Scroll down to the Interaction section and click Keyboard.
- Next, toggle the switch for the Sticky and Filter Keys.
- Close the Settings app and restart your computer. After the system restarts, check if your keyboard is working.
3. Run the Keyboard Troubleshooter (Windows 10 Only)
 Forex Robotron Basic Package
Windows 10 and older versions feature a built-in keyboard troubleshooter to fix commonly known problems with the keyboard. However, the newer iteration of Windows 11 has done away with the keyboard troubleshooter, so you are unlikely to benefit from these steps.
To run the Keyboard troubleshooter on Windows:
- Press Win + I to open Settings.
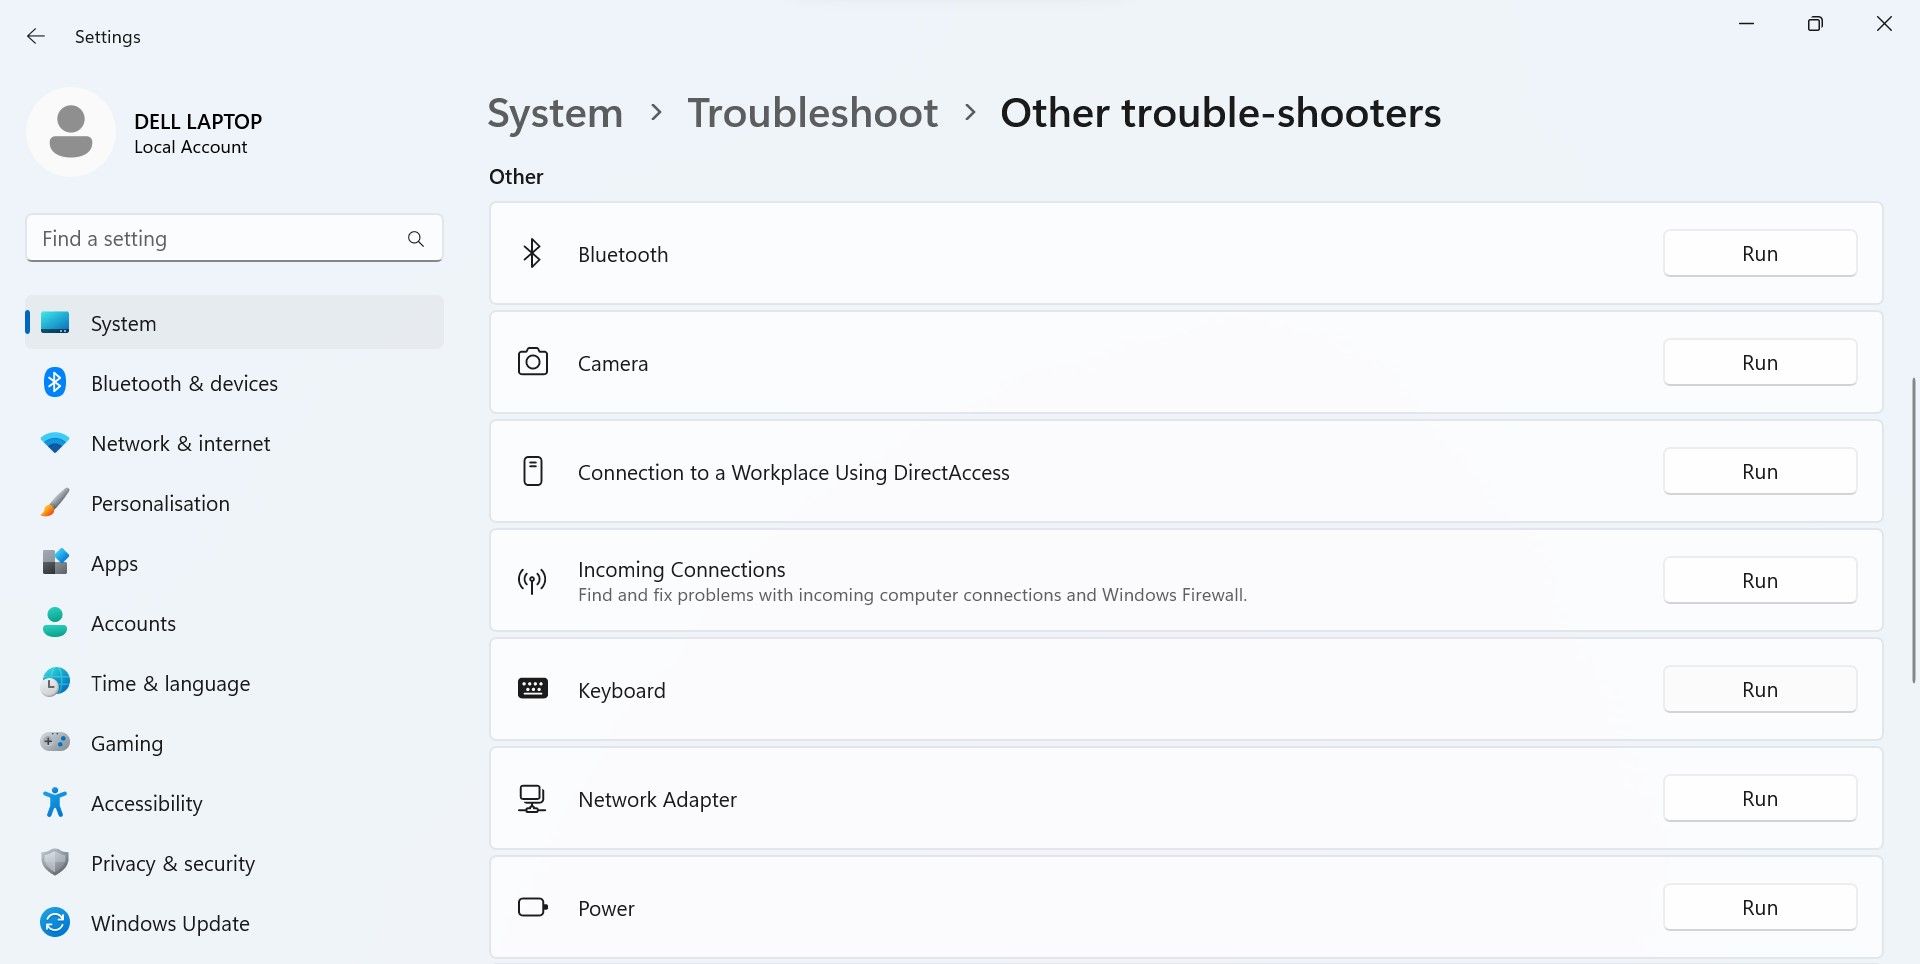
- In the System tab, scroll down and click on Troubleshoot:
- Click Other troubleshooters.
- Next, click the Run button for the Keyboard option.
- As the troubleshooter dialog opens, follow the on-screen instructions and apply any recommended fixes.
4. Reinstall the Keyboard Drivers

A corrupt driver may cause the keyboard to malfunction. To fix the issue, you can uninstall the driver from Device Manager. Upon restart, Windows will automatically detect the connected keyboard and install the necessary drivers.
To reinstall the keyboard driver:
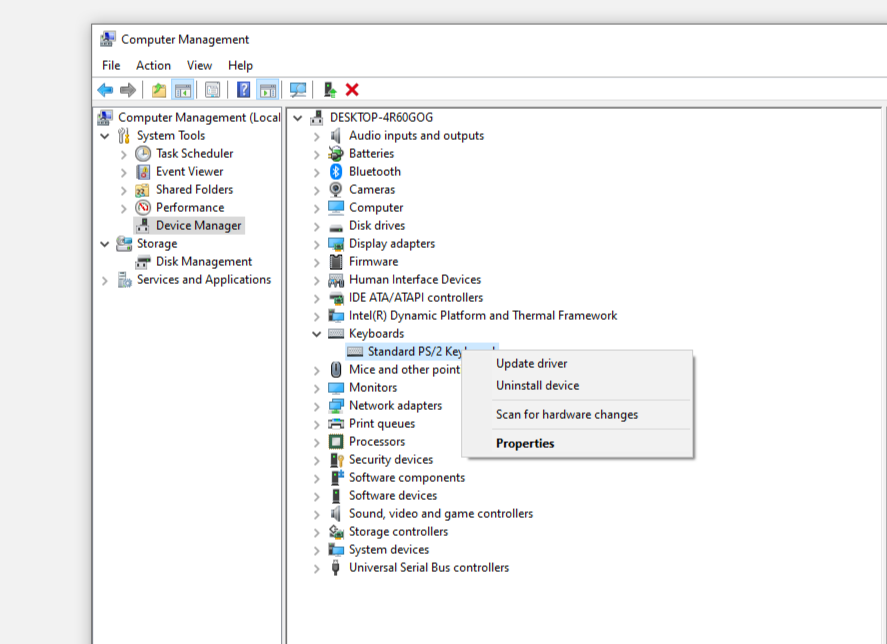
- Right-click on the Start menu and select Device Manager.
- In Device Manager, right-click on your HID keyboard device and select Uninstall the device. If you have multiple entries, double-click on the device entry to view more information.
- Click Uninstall to confirm the action.
- Once uninstalled, restart your computer.
- After the restart, Windows will automatically reinstall the necessary driver for the keyboard.
5. Reconfigure or Disable the Windows Ink Workspace Service
If you use a pen-based or touch device, check if Windows Ink Workspace is enabled. By default, the letter I is a shortcut assigned to open the Windows Ink Workspace app. If so, you may want to disable the app to prevent Windows from accidentally triggering and opening the app when you press the keyboard keys.
Windows 10 comes with the Windows Ink Workspace app built-in to it. Windows 11, by default, may enable the app on only touch-enabled devices. If you want to continue to use the app, you can disable the activation shortcut.
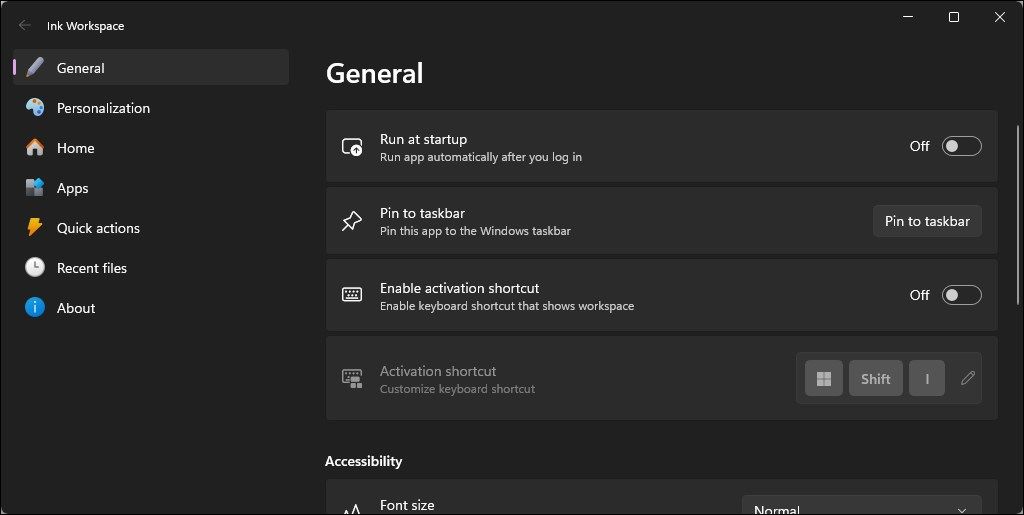
Disable Ink Workspace Activation Shortcut on Windows 11
To get rid of the shortcut:
- Right-click the Windows Ink Workspace app icon in System Tray and select Settings.
- Next, toggle the Enable activation shortcut switch to disable the activation shortcut.
- Close the Settings dialog and check for any improvements.
Quit and Disable Auto Startup for Windows Ink Workspace
If you’d prefer that Windows Ink Workspace didn’t start up by itself:
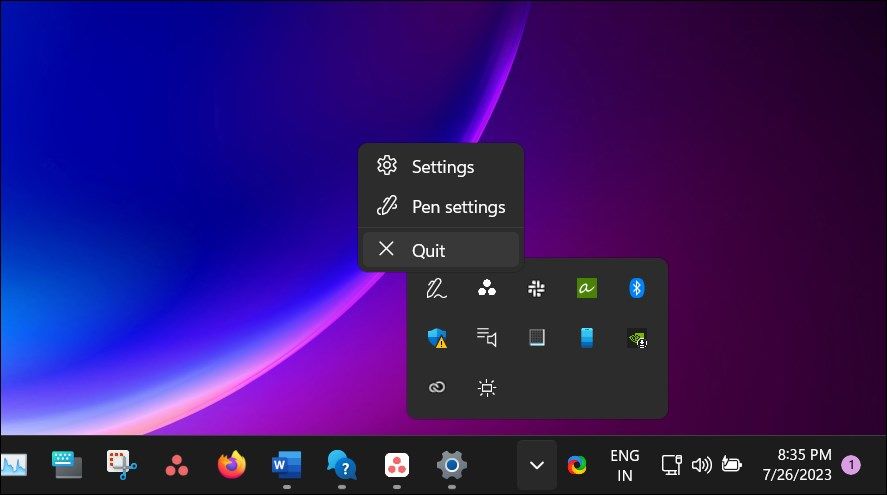
- Click the System Tray icon in the bottom left corner of your desktop.
- Right-click on Windows Ink Workspace and select Quit.
- Next, right-click on the Taskbar and Task Manager.
- Open the Startup Apps tab.
- Select Ink Workspace and select Disable.
- Close Task Manager and check if you can type on your keyboard without triggering the app.

 DLNow Video Downloader
Disable Windows Ink Workspace
If the issue persists, you can completely disable Windows Ink Workspace using the Registry Editor. This process involves making modifications to the Windows Registry. We recommend you create a restore point and take a registry backup before proceeding with the steps below.
To disable Windows Ink Workspace using Registry Editor:
Press Win + R to open Run.
Type regedit and click OK to open Registry Editor.
In the Registry Editor, navigate to the following location:
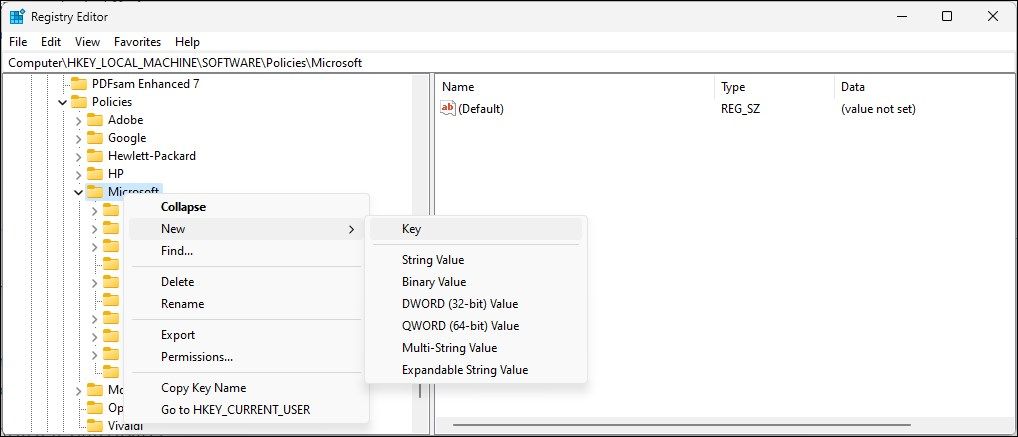
HKEY_LOCAL_MACHINE\SOFTWARE\Policies\Microsoft\Next, select the sub-key WindowsInkWorkspace. If no such folder exists, then you need to create one. Else, skip to step 9 below.
Right-click the Microsoft key in the left pane, select New > Key.
Rename the key as WindowsInkWorkspace.
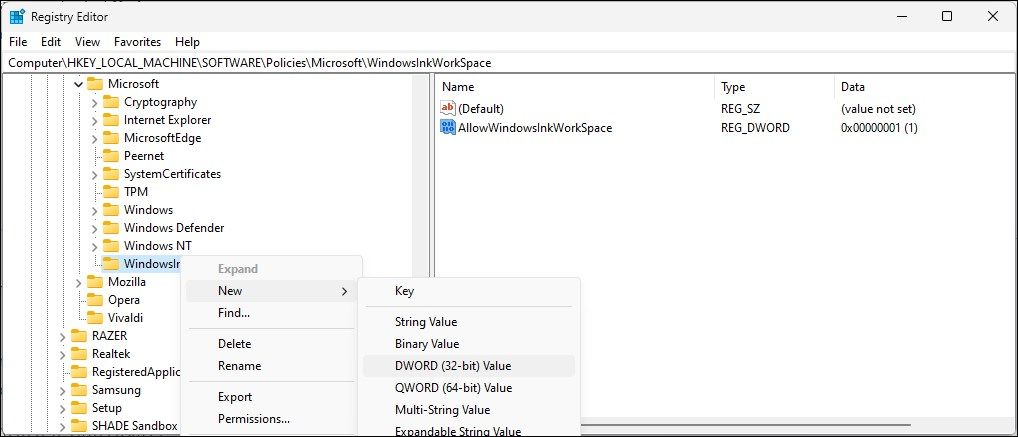
Next, right-click on the WindowsInkWorkspace key and select New > DWORD (32-bit) Value.
Rename the new values as AllowWindowsInkWorkspace.
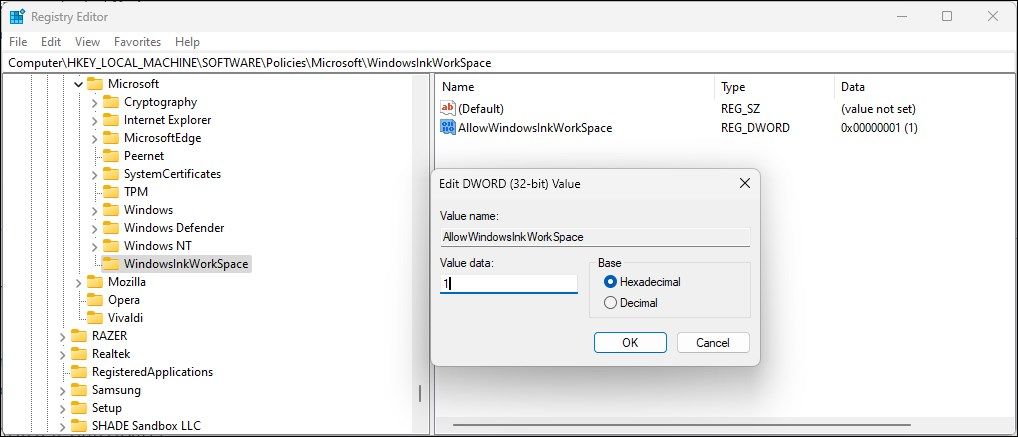
Next, double-click on the AllowWindowsInkWorkspace value to open its properties.
Type 0 in the Value data field and click OK.
Close the Registry Editor and restart your computer.

6. Other Troubleshooting Steps You Can Try
If none of the above worked, here are a few quickfire solutions to try:
- Check and uninstall any hotkey software – If you have a third-party hotkey software installed, exit the app and check if it helps resolve the problem. Also, disable or quit any proprietary tool to customize the keyboard.
- Check if the Win key is stuck – Check if one or more keys on your keyboard are stuck. For example, the Win key is responsible for triggering most shortcuts on Windows.
- Check for hardware problems with an external keyboard – Connect an external USB/Bluetooth keyboard to your computer and see if the problem persists. On a laptop, you may want to disable the built-in laptop keyboard and then connect an external keyboard to diagnose the problem.
- Uninstall recent Windows updates – At times, newer Windows updates can introduce new bugs. If you have recently installed an update, try to manually remove the latest Windows update and see if the issue is resolved.
- Perform a system restore – If the error occurred after installing an update and you can’t uninstall it, you can use a system restore to undo the update or recent changes made by you .
Get Your Keyboard to Type Again on Windows
It is easy to assume your keyboard to be malfunctioning when it starts acting up and activates shortcuts or open applications instead of typing letters. However, in most instances, it is due to accidentally activating the shortcut function or a hotkey software working in the background.
If typing on your keyboard activates shortcuts rather than typing letters, it can be because you have pressed the Win + Alt combo that activates shortcuts for supported apps in Windows. Other reasons for the issue include a faulty or stuck Win key, Stickey and Filter key issues, and a malfunctioning keyboard driver.
Fortunately, fixing this problem is easy. Here we show you what to do when your keyboard opens random applications and shortcuts when pressing any key.
- Title: Strategies for Ceasing Random Windows Key Activation
- Author: Richard
- Created at : 2024-08-16 02:02:31
- Updated at : 2024-08-17 02:02:31
- Link: https://win11-tips.techidaily.com/strategies-for-ceasing-random-windows-key-activation/
- License: This work is licensed under CC BY-NC-SA 4.0.