
Streamline Storage with NTFS Compression in Win11
Streamline Storage with NTFS Compression in Win11
Is your Windows computer running out of storage? There are plenty of ways to remove redundant data and free up some extra space. Among all, the most preferred method is using NTFS file compression.
NTFS file compression is a Windows feature that compresses files and folders by removing reductant data from them. The best part about this feature is that it does its job without damaging the file and losing the data.
Nevertheless, let’s check out some ways to enable NTFS file compression in Windows 11.
1. Enable NTFS File Compression Through the File Explorer
The quickest way to enable NTFSfile compression is through File Explorer. Below are the steps to compress a folder:
- Open the File Explorer and head toward the folder you want to compress.
- Right-click on the target folder and chooseProperties from the context menu.
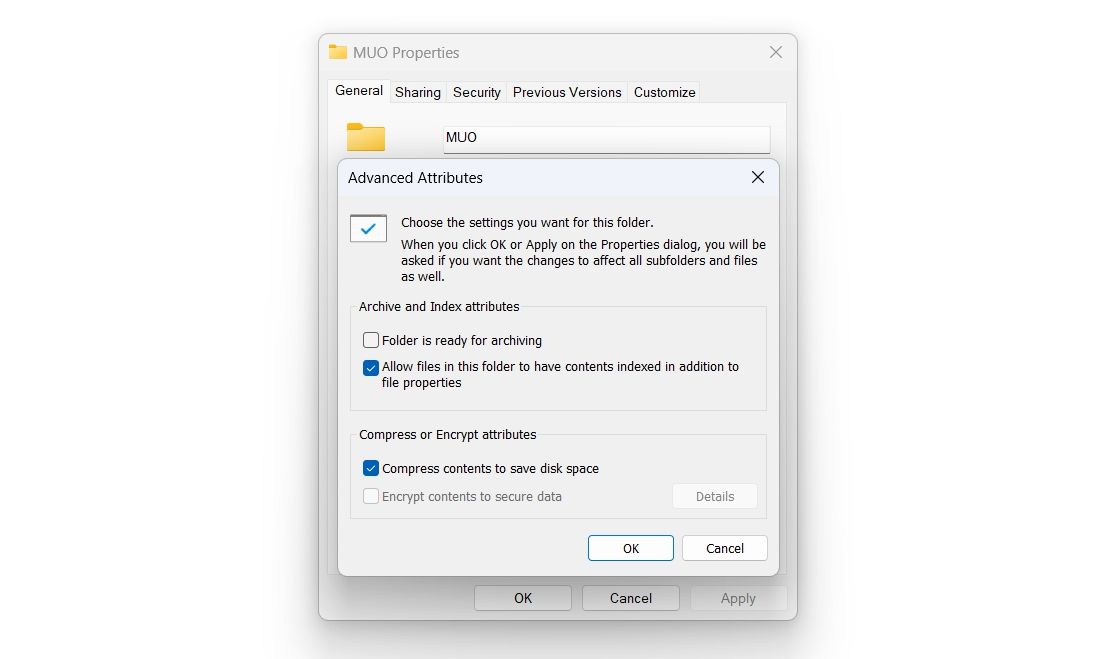
- In theGeneral tab, select theAdvanced option.
- Under theCompress or Encrypt attributes section, check theCompress contents to save disk space box and clickOK .

- ClickApply >OK to save the changes.
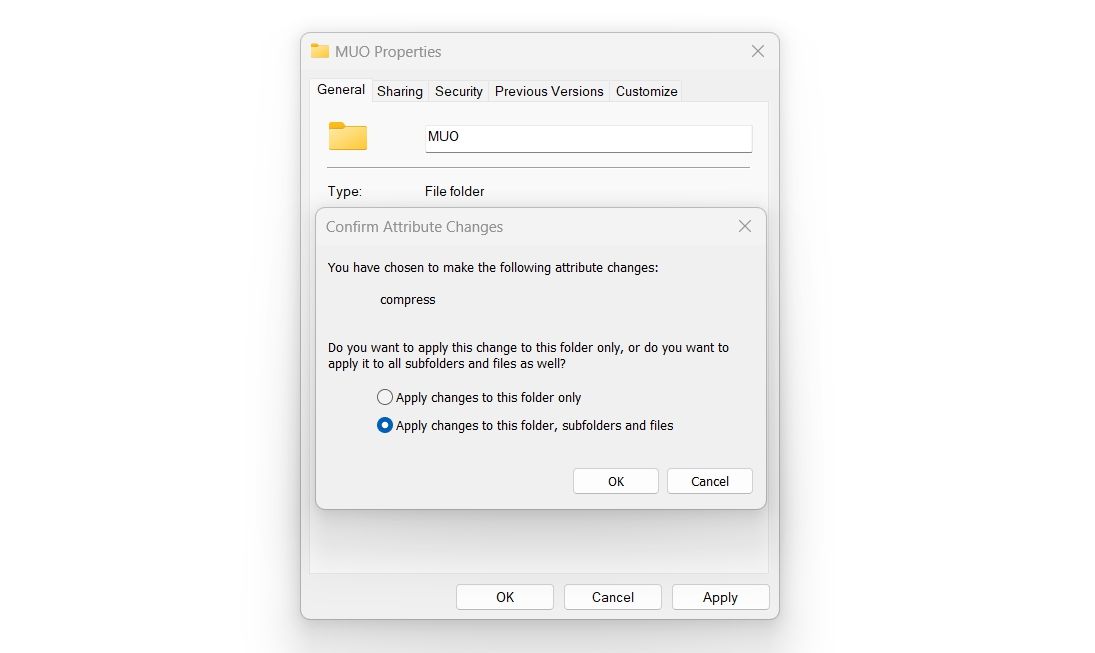
- In the confirmation dialog box that crops up, choose the Apply changes to this folder, subfolders, and files option .
- ClickOK.
That’s it, the folder has now been compressed. You can confirm this by comparing the current folder size with its previous size.
From now on, every file or folder that you will move inside the compressed folder will be compressed automatically. To disable compression, uncheck theCompress contents to save disk space box and save the changes.
Similarly, you can compress an entire drive. Here’s how:
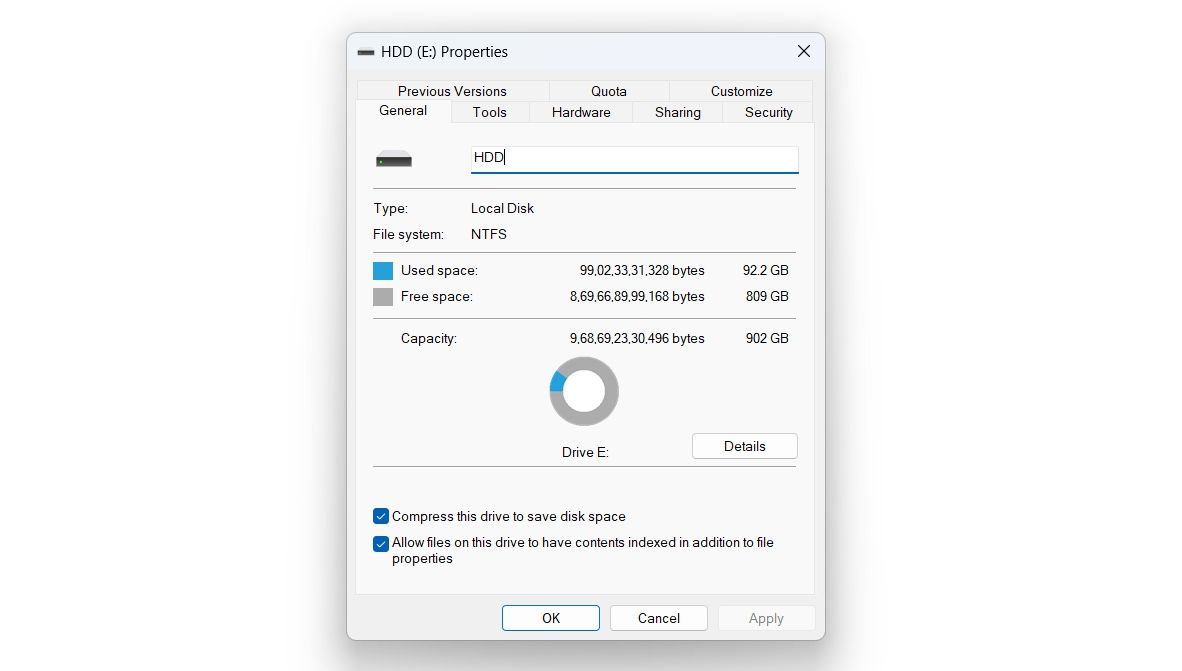
- Open the File Explorer, and right-click on the drive you want to compress.
- In theGeneral tab, check theCompress this drive to save disk space box.
- ClickApply and then clickOK on the confirmation box that crops up.
2. Enable NTFS File Compression Using the Command Prompt
If you are a power user, you can use the Command Prompt to enable file compression on Windows 11. Here are the steps to do it:
- Press theWin + S hotkeys to open theWindows Search.
- In the search bar, typeCommand Prompt and chooseRun as administrator from the right pane. If this method is not working, you can use any other way toopen Command Prompt with admin rights .
- Type the following command and pressEnter to enable file compression.
fsutil behavior set disablecompression 0
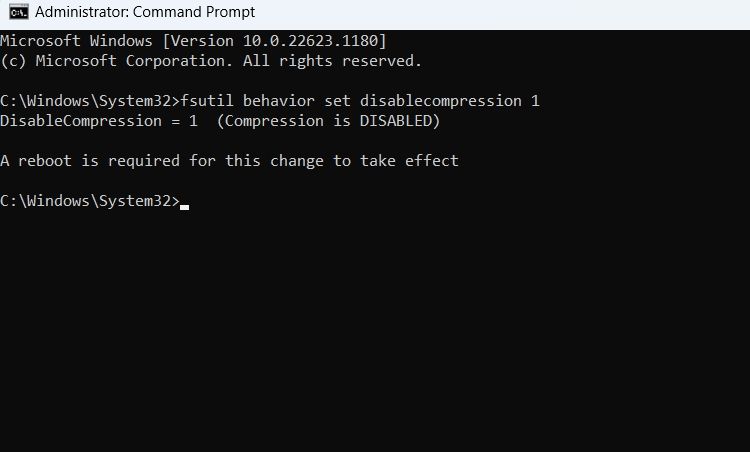
You’ll see the “A reboot is required for this change to take effect “ message on the console. So, restart your computer to apply the changes.
If you want to disable File Compression, execute the following command in the elevated Command Prompt window, followed by a system restart.
fsutil behavior set disablecompression 1
3. Enable NTFS File Compression Using the Registry Editor
Another quick way to enable compression is through the Registry Editor. Follow the below steps to do it:
- Open theRun dialog box by pressing theWin + R hotkeys.
- Typeregedit in the text field and clickOK.
- In the Registry Editor, navigate to the below location:
Computer\HKEY_LOCAL_MACHINE\SYSTEM\CurrentControlSet\Policies - Right-click on thePolicies folder in the left sidebar, hover the cursor toNew, and chooseDWORD (32-bit) Value from the context menu.
- Right-click on the newly created value and chooseRename .
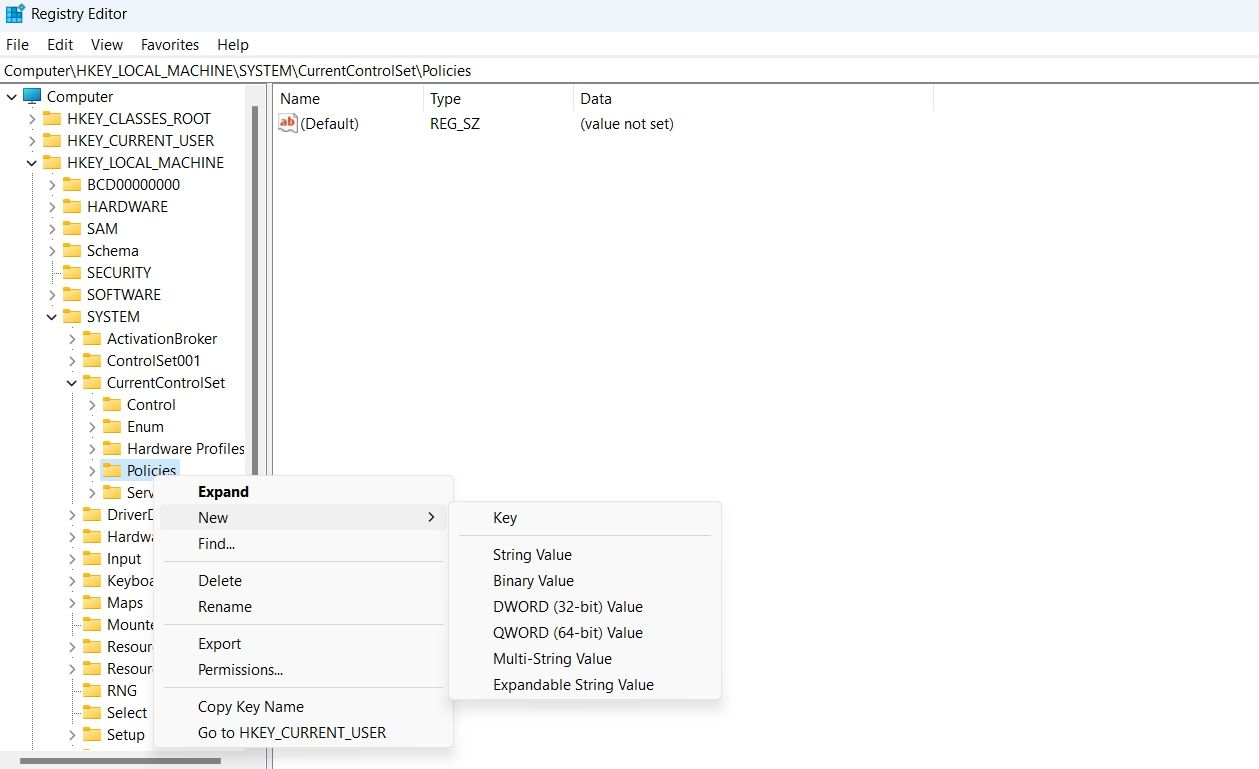
- TypeNtfsenablecompression in the text field.
- Select and right-click onNtfsenablecompression again, and chooseModify .
- Type1 in theValue data .
- ClickOK to save the changes.
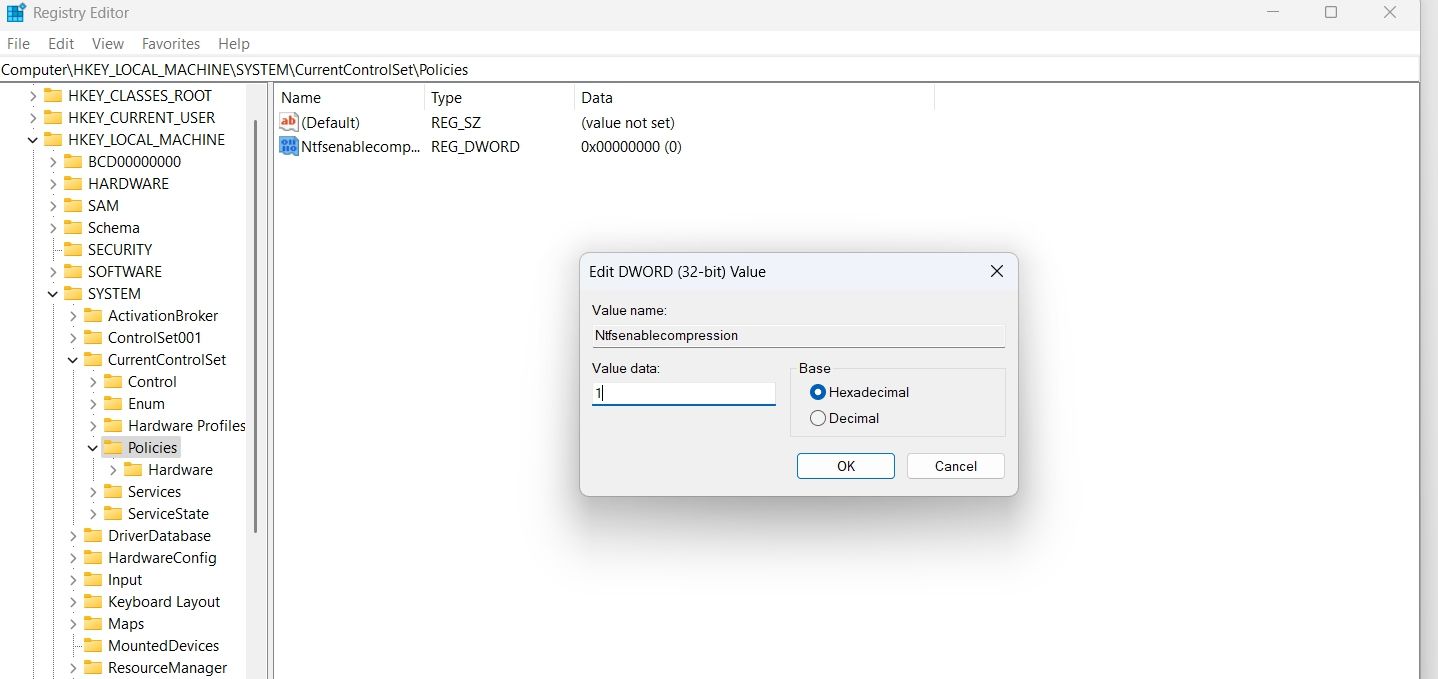
File compression is now enabled on your computer. If you want to disable it, type 0 in Value data and save the changes.
4. Enable NTFS File Compression Using the Local Group Policy Editor
The Local Group Policy Editor is the go-to place to configure important Windows policies. To use it to enable file compression, follow the below instructions:
- In the Run dialog box, typegpedit.msc and clickOK.
- Head towards the following location in the Local Group Policy Editor:
Computer Configuration\Administrative Templates\System\Filesystem\NTFS - Double-click on theDo not allow compression on all NTFS volumes policy to open its properties window.
- Choose theDisabled option.
- ClickApply >OK to enable file compression.
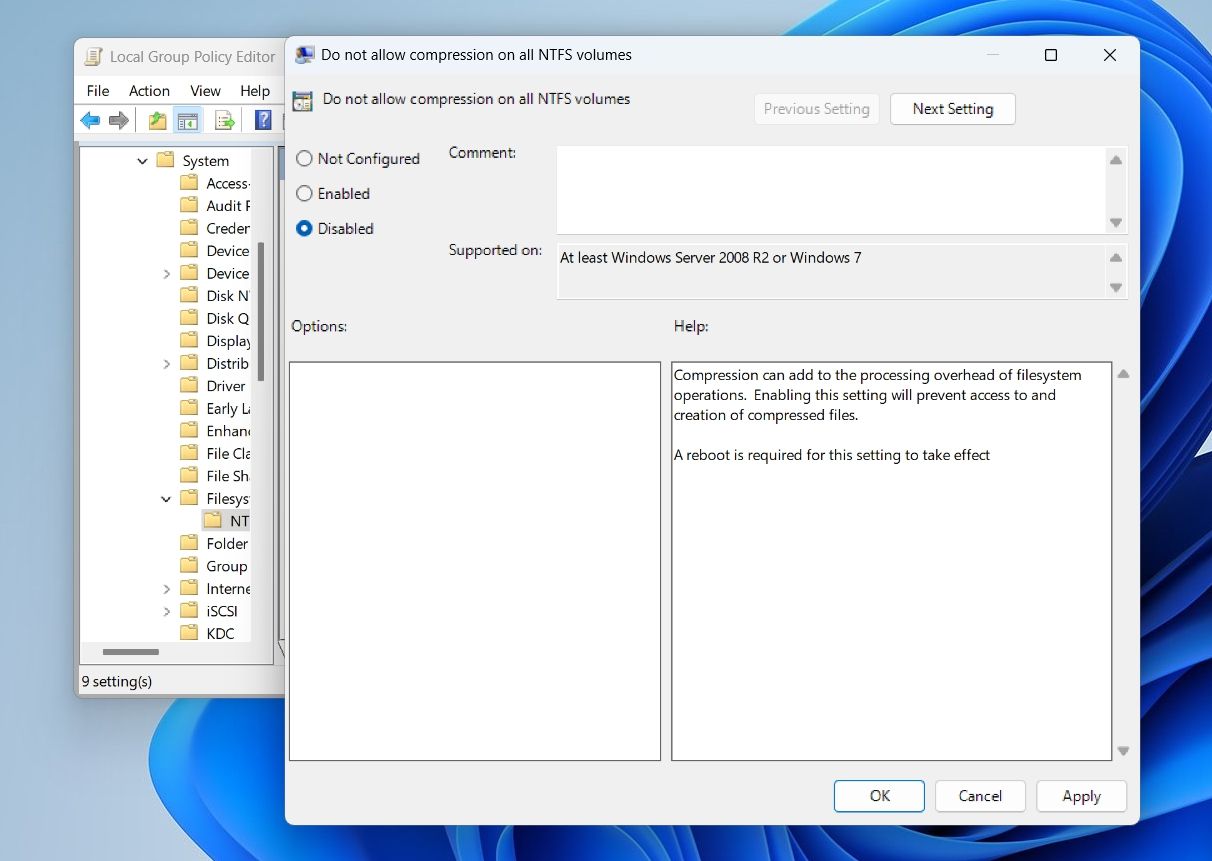
You can disable the file compression by choosing theEnabled option in theDo not allow compression on all NTFS volumes policy properties window.
Free Up Space on Windows 11 With File Compression
Enabling file compression is a great way to free up some space on Windows 11. Using this feature can come in handy when you are running out of space but also don’t want to compress your files using third-party compression tools.
Meanwhile, you might be interested in learning more about the NTFS file system.
Also read:
- [FIXED] How to Successfully Continue Configuring Windows When Stuck
- [New] Aligning Objectives Brands and YouTube Collaborative Moves
- Breaking News: Apple's Anticipated Artificial Intelligence Integration Postponed to October, Insiders Reveal
- Effective Methods for Disabling Sleep Function on a Mac Computer
- Elevate Visual Excellence in Videos: Harness the Power of WinxVideo AI
- Enlightening on High-Fidelity Window Images
- Fixing GeForce Now Glitch XC0F1103F in Win 10/11 OSes
- From Closed to Open Mastering SRT Files in macOS for 2024
- Halt Default Search Window Action, Windows 11 Guide
- In 2024, 3 Solutions to Find Your Meizu 21 Current Location of a Mobile Number | Dr.fone
- In 2024, Top 10 Password Cracking Tools For Realme GT 5 Pro
- Push Beyond the Limits: Yuzu Emulator Speed
- Resolving Nvidia Display Issue in Control Panel
- Title: Streamline Storage with NTFS Compression in Win11
- Author: Richard
- Created at : 2025-01-14 17:32:22
- Updated at : 2025-01-18 17:48:45
- Link: https://win11-tips.techidaily.com/streamline-storage-with-ntfs-compression-in-win11/
- License: This work is licensed under CC BY-NC-SA 4.0.