
Streamlining Your Windows 11'S Access to 5G Wi-Fi

Streamlining Your Windows 11’S Access to 5G Wi-Fi
Are you having trouble connecting to 5GHz Wi-Fi on your Windows 11 computer?
When encountering this problem, it might be difficult to identify the exact cause. It might be a problematic network driver, incorrect system settings, a Windows bug, or maybe you’re not using the right internet protocol.
If you’re sure your computer supports 5GHz connections but have no success when trying to connect to 5GHz Wi-Fi, go through the solutions below.
Disclaimer: This post includes affiliate links
If you click on a link and make a purchase, I may receive a commission at no extra cost to you.
1. Update Windows
As always, when running into a problem, you should check if you’re running the latest Windows version. The 5GHz connectivity problem might be a glitch caused by an outdated OS version.
Here’s how to update Windows 11:
- Press Windows key + I to launch Windows Settings.
- From the left pane, select Windows Update.
- Click the Check for updates button.
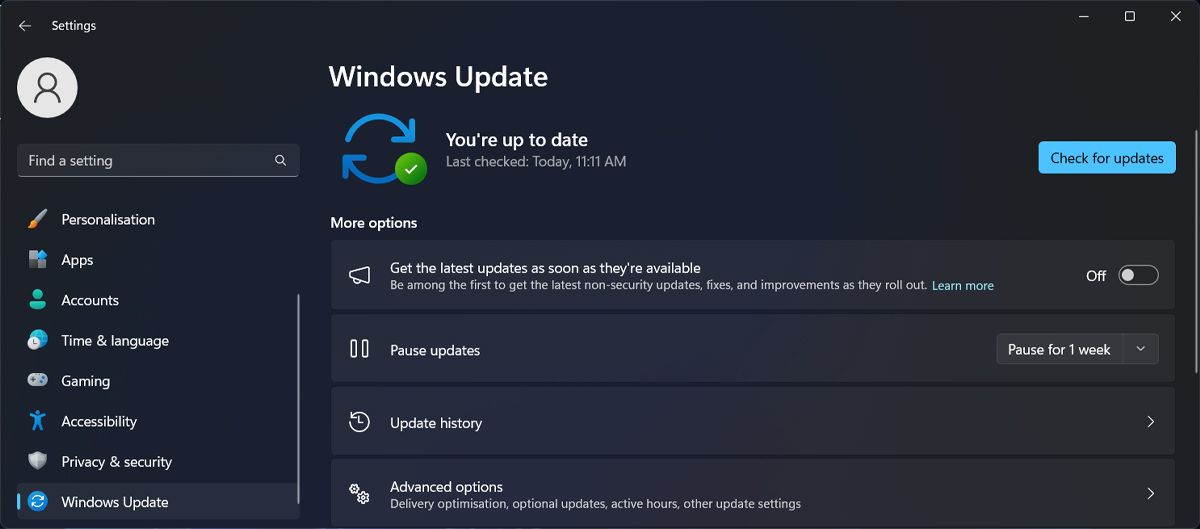
Now, if you don’t want to miss any more updates, you can have Windows get the latest features as soon as they become available .
2. Check the Credentials
Before diving deep into the troubleshooting process, make sure you enter the correct password and username when connecting to the 5GHz band. Even if you’re using the same router, the network administrator might’ve set different passwords for the 2.4 GHz and 5GHz Wi-Fi bands.
If you’ve previously connected your phone to the same network, you can check our guide on how to view saved Wi-Fi passwords on Android to find out the password.
3. Run the Network & Internet Troubleshooter
It can be really frustrating whenever you run into a network problem on your computer. Fortunately, Windows has a built-in troubleshooter to help you fix it, including when you can’t connect to 5GHz Wi-Fi.
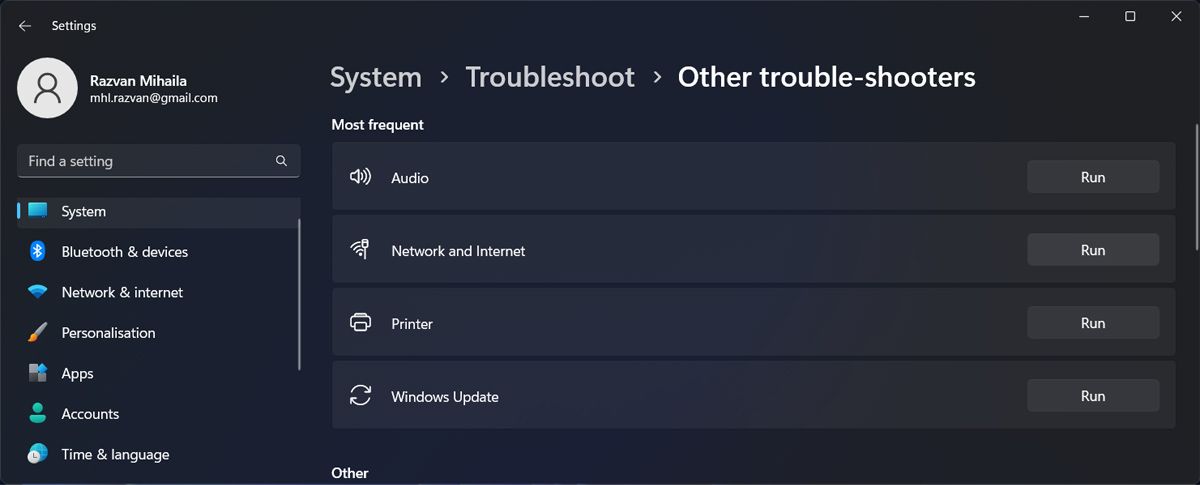
- Right-click the Start button and select Settings.
- Go to System > Troubleshoot > Other troubleshooters.
- From the Other list, click the Run button next to Network and Internet.
- Wait for Windows to find the issue and follow the on-screen instructions.
4. Restart Your Router
Windows 11’s inability to connect to 5GHz Wi-Fi might be due to a router glitch. While we often ignore it, we should restart the router to keep it working smoothly. However, simply unplugging it for a few minutes might not be enough to fix the issue. Instead, use the correct way to restart your router .
5. Forget the Wi-Fi 2.4GHz Network
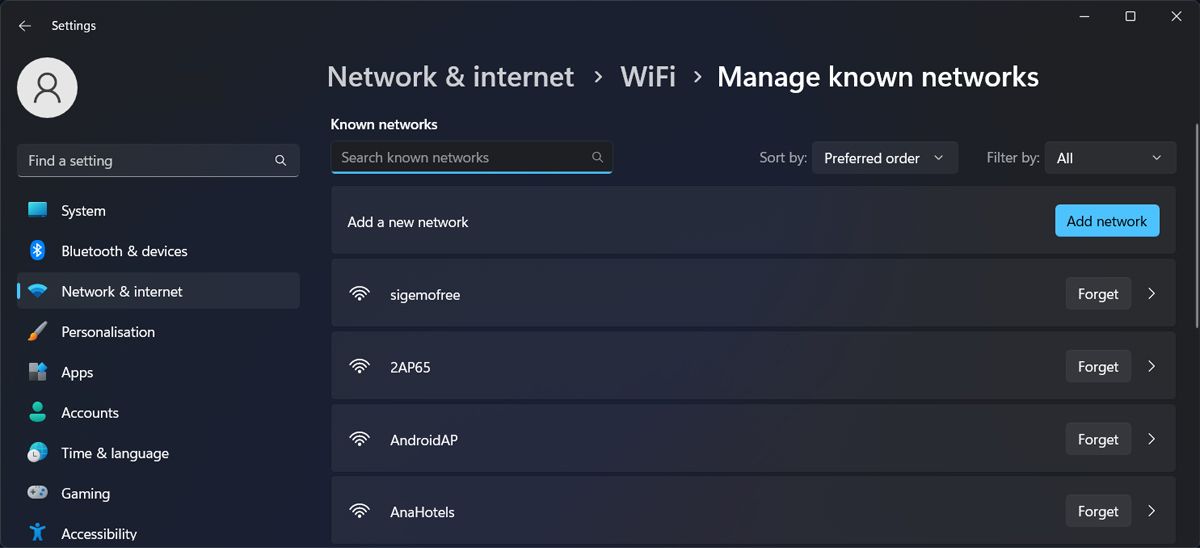
If your computer is automatically connecting to the 2.4 GHz Wi-Fi band, it might help to remove it from the known network lists. Here’s how you can manage your networks list in Windows 11:
- Press Windows key + I to bring up the Settings window.
- Head to Network & internet > Wi-Fi.
- There, select Manage known networks.
- Find the 2.4 GHz network and click the Forget button next to it.
- Try to connect to the 5GHz Wi-Fi band.
6. Set 5GHz as Your Preferred Band
The 2.4GHz has better coverage, so it makes sense if you don’t want to remove it from your computer. However, you can have Windows switch from 2.4 to 5 GHz if you want to enjoy higher speeds.
If you aren’t that close to the router and the signal is getting weak, you should manually switch back to the 2.4 GHz band.
7. Update the Network Driver
Another possible reason for Windows’s issue when it comes to connecting to the 5GHz band might be an outdated or corrupt Wi-Fi driver. Fortunately, you can easily update it through Device Manager.
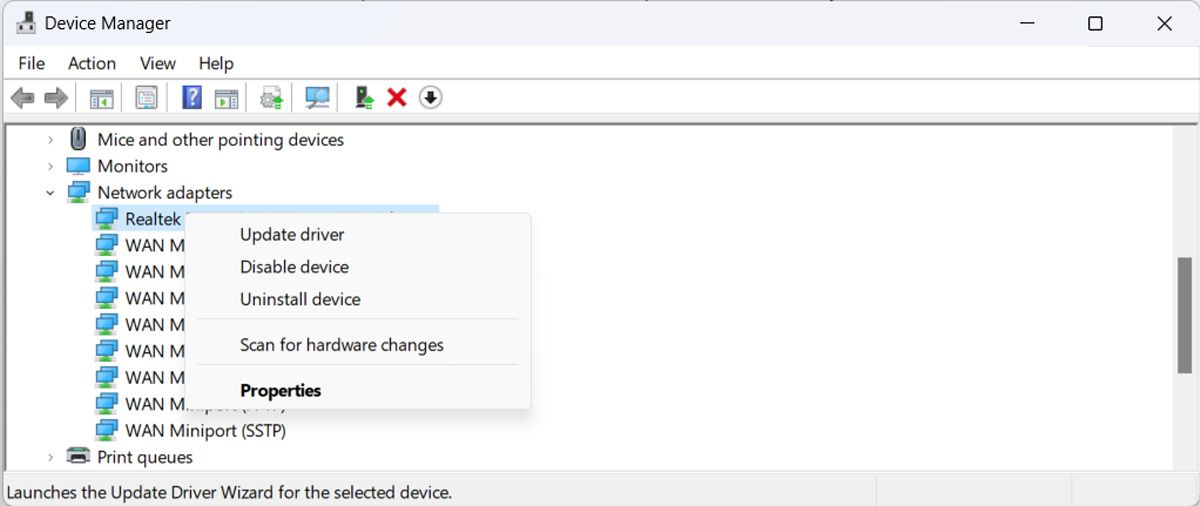
- Right-click the Start button and go to Device Manager.
- Extend the Network adapters list.
- Right-click the Wi-Fi driver and select Update driver.
If Windows is showing The best drivers for your device are already installed message, head to the manufacturer’s website and check if there are any updates available.
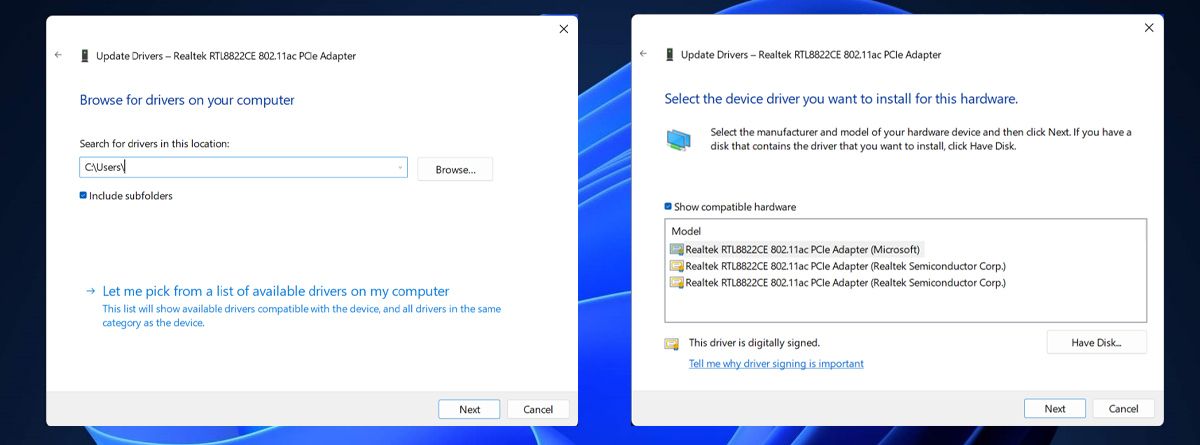
8. Install a Different Wi-Fi Driver Version
If you’ve updated the Wi-Fi driver and still can’t connect to 5GHz, you can switch to a different Wi-Fi driver version.
- Open Device Manager > Network adapters.
- Right-click the Wi-Fi driver and select Update driver.
- In the driver properties window, click Browse my computer for drivers.
- Choose Let me pick from a list of available drivers on my computer.
- Check the Show compatible hardware option.
- Select one of the available drivers and click Install.
9. Enable IPv6
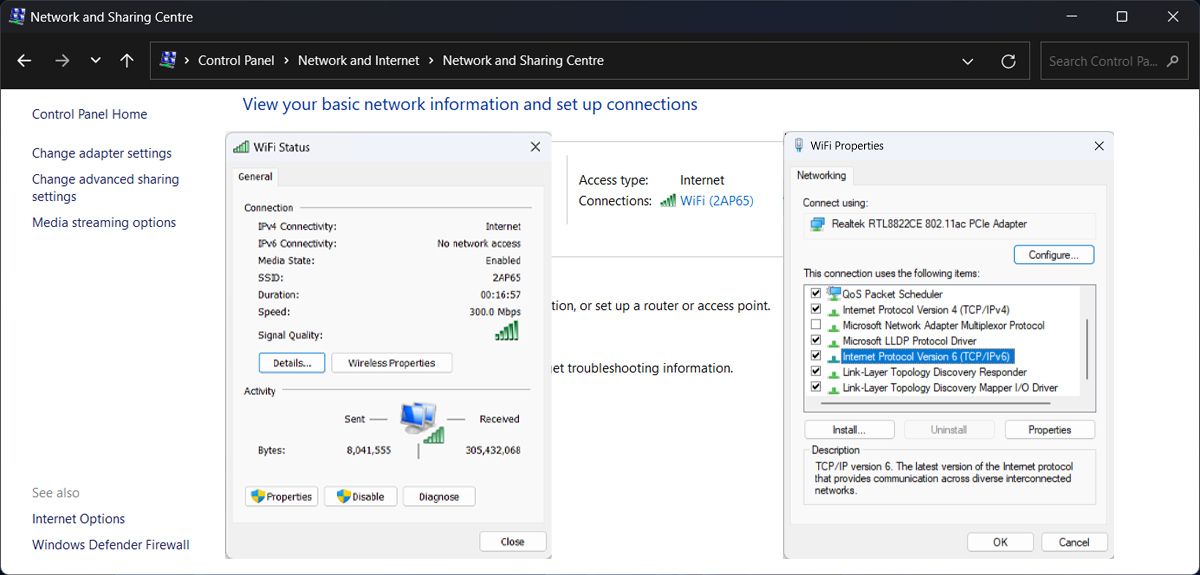
Internet Protocol version 6 (or IPv6) is the newest version of Internet Protocol (or IP) and newer routers and networks are already using it. If IPv6 is turned off on your Windows computer, it might lead to conflict, which is why you can’t connect to the 5GHz band.
To fix it, you should turn on the IPv6 feature on your computer.
- Launch Control Panel.
- Head to Network and Internet > Network and Sharing Center.
- Select your Wi-Fi network and click Properties.
- Check the Internet Protocol Version 6 (TCP/IPv6).
- Click OK to save the new network settings.
- Restart your computer and try to connect to the 5GHz Wi-Fi band.
10. Use a Dual Band USB Wi-Fi Dongle
If you already own a Dual Band Wi-Fi Dongle, you can use it to solve the connectivity issue. However, if you plan on buying one, it might be better to just stick with using the 2.4GHz band as Wi-Fi dongles don’t have the best performance .
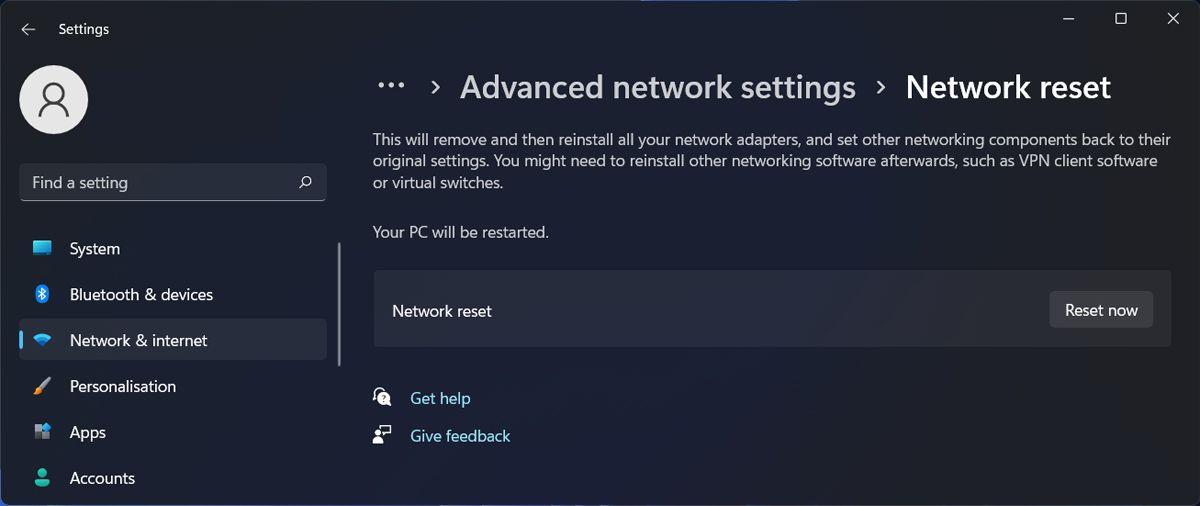
11. Reset the Network Settings
If you can’t find anything wrong on your computer, there’s a chance that improper network settings are stopping you from connecting to the 5GHz band. In this case, you should reset your network settings to their default values . Before doing so, it’s best to save any work in progress as Windows will ask you to restart your device once the reset is complete.
Connect Windows 11 to 5GHz Wi-Fi Again
Fixing Windows network issues can be a frustrating task, especially when you can’t find any logical reasons for them. However, we hope the above fixes helped you, and now you’re connected to 5GHZ Wi-Fi.
While 5GHz should provide better internet speed, it doesn’t have the same coverage ability as the 2.4GHz band. Especially if your Wi-Fi signal has to travel through thick concrete walls. If you move around the house, it might be better to switch between the two Wi-Fi bands to get the best of both options.
If you’re sure your computer supports 5GHz connections but have no success when trying to connect to 5GHz Wi-Fi, go through the solutions below.
Also read:
- ¡No Te Preocupes Si Borraste La Partición De Recuperación: Soluciones Fáciles Y Efectivas
- [Updated] 2024 Approved Top Tricks in Sports Video Production
- [Updated] Mastering Privacy Stopping Followers on IG for 2024
- [Updated] Superior Sound Capture Insider's List of the Best 9 Microphones Online for 2024
- 2024 Approved Low Profile YouTubing Broadcasting without a Huge Sublist
- Clearing Up No Sound Issue From Connected Hardware in WINDOWS
- Finding and Starting Snipping Tool with Ease
- How to Bring Back Your PC’s Bluetooth in Windows 11 with These 9 Tips
- In 2024, Best 3 Vivo Y100i Power 5G Emulator for Mac to Run Your Wanted Android Apps | Dr.fone
- In 2024, Full Guide to Fix iToolab AnyGO Not Working On Vivo Y100 | Dr.fone
- PSD Mastery Journey Unlimited Complimentary Texts
- Solutions for Persistent Windows 10 BSOD Problems
- Top 8 Cross-Platform Apps for Windows/Android
- Updated In 2024, Transform Your Photos Best Vignette Editing Apps for Mobile
- Title: Streamlining Your Windows 11'S Access to 5G Wi-Fi
- Author: Richard
- Created at : 2025-03-04 03:28:48
- Updated at : 2025-03-04 22:42:02
- Link: https://win11-tips.techidaily.com/streamlining-your-windows-11s-access-to-5g-wi-fi/
- License: This work is licensed under CC BY-NC-SA 4.0.