Tailor Your Desktop Experience with WinBubble's Best Practices
Tailor Your Desktop Experience with WinBubble’s Best Practices
The default customization options within Windows 11 and 10 are relatively limited. However, some third-party software packages give you lots more options for customizing Microsoft’s desktop operating system. WinBubble is freeware customization software that enables you to tweak the Windows platform in many different ways. Here are eight ways you can tweak Windows 11/10 with WinBubble.
First, Download and Extract WinBubble
The latest version of WinBubble is primarily designed for customizing Windows 10. Its WinBubble for Windows 10 title makes it clear what platform it’s intended for. There are older versions of the software for Windows 7 and Vista.
You can still tweak Windows 11 with WinBubble. However, some of its customization settings may not work right in Microsoft’s latest desktop OS. So, consider creating a restore point backup before utilizing WinBubble in Windows 11.
WinBubble is a portable app, meaning it doesn’t have an installer. It downloads as a ZIP archive you’ll need to extract before running the software.
To get the ZIP file, open the WinBubble for Windows 10 Softpedia page and selectDownload Now >Softpedia Mirror (US) .
You can extract the archive as covered in our guide on how to unzip files on Windows . Double-clickWinBubble.exe in the extracted WinBubbles directory to open the software.
1. How to Customize Desktop Shortcut Icons With WinBubble
The icons for desktop shortcuts on Windows include little arrows on them. However, you can change that with WinBubble’s Customize Shortcut Icon option. That option enables you to remove the arrow or change it to a star, heart, or Windows logo. You can tweak the desktop shortcut icons like this:
- Select WinBubble’sSpecific tab.
- Then click theCustomize Shortcut Icon drop-down menu to select aNo Arrow ,Heart ,Star , orWin (Windows logo) option.

- Press theSet button.
- ClickOK on the dialog box that prompts a restart.
- Then you’ll need to restart Windows for this customization to take effect.
2. How to Customize Windows’ Screensavers With WinBubble
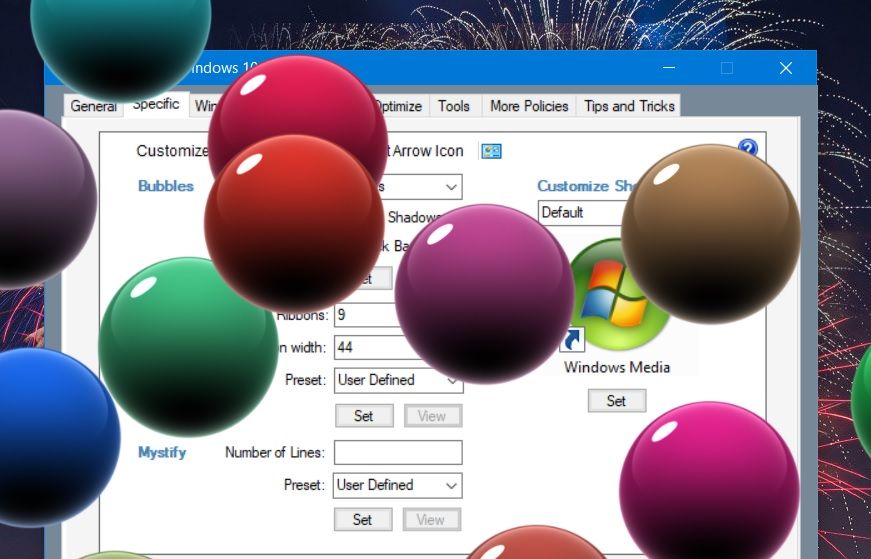
Windows 10 and 11 include Bubbles, Mystify, and Ribbon screensavers, but there aren’t any customization options for them. You can tweak those screensavers by manually editing the registry. However, WinBubble’s customization settings for the Bubbles, Mystify, and Ribbon screensavers make life easier for us.
TheSpecific tab in WinBubble includes the options for tweaking those screensavers. You can change presets for the screensavers by clicking theirPreset drop-down menus and selecting alternative options.
For example, you can selectGlassy Bubbles orMetallic Bubbles options with different sizes for the Bubbles screensaver. Selecting theMetallic Bubbles option will give you multicolored bubbles shown in the snapshot below.

You can also adjust the number of ribbons or lines for the differentRibbon andMystify screensaver presets. Select a preset and then input values in the number boxes to change how many lines or ribbons are included in the screensavers. You can also input a width value in theRibbon width box.
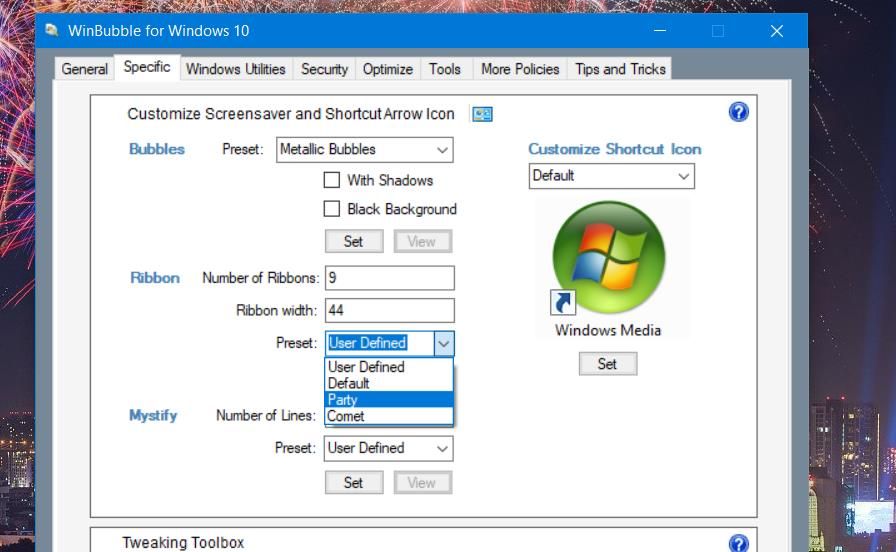

When you’ve customized a screensaver, click theView button to preview it. SelectSet to save the settings. You might also need to select and set the customized screensaver in the Change screensaver Control Panel applet.
 OtsAV DJ Pro
3. How to Change the Menu Delay With WinBubble
You can speed up menus a bit by reducing the menu delay. By default, Windows has a 400-millisecond menu delay, which you can cut to zero. WinBubble includes aMenu Show Delay option you can configure among numerous other optimization settings.
To configure that setting, select theOptimize tab. Click theMenu Show Delay option to choose a value less than 400; selectApply to save the new value.
While you’re at it, you can also speed up the Window shutdown process a little. To do this, select WinBubble’sDecrease Shutdown Time for services andDo not Clear Pagefile at Shutdown checkboxes on the sameOptimize tab.
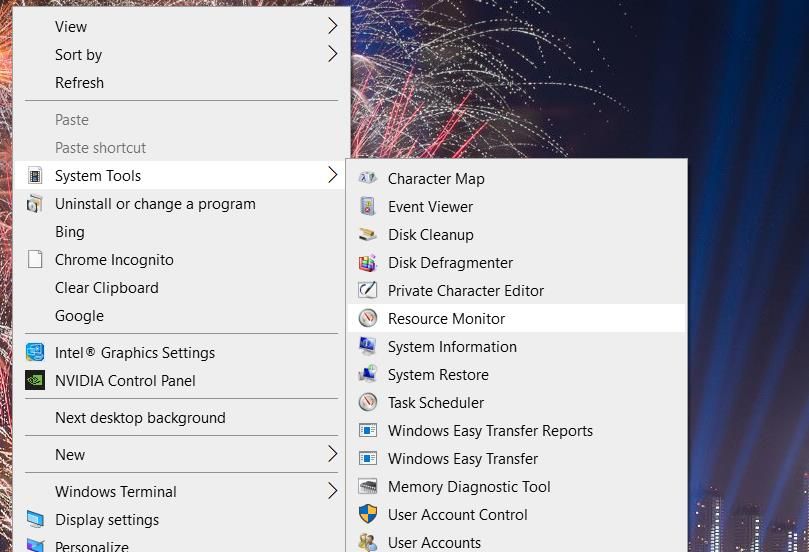
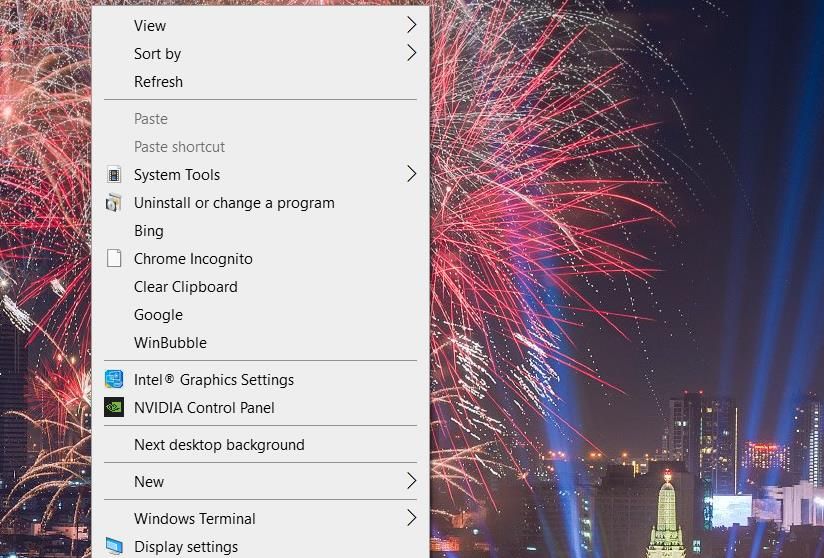
4. How to Add New Submenus to the Context Menu
WinBubble includes lots of customization settings for the desktop context menu in Windows. It enables you to add three alternative shortcut submenus to the desktop context menu. You can select to add context menu submenus for opening Control Panel applets, Microsoft apps, and system tools.
Click theGeneral tab to view those customization settings for the context menu. Select aControl Panel Menu ,MS Software Menu , orSystem Tools Menu option on that tab to add one of those submenus. ClickRun on any Open File warning dialog box to apply.
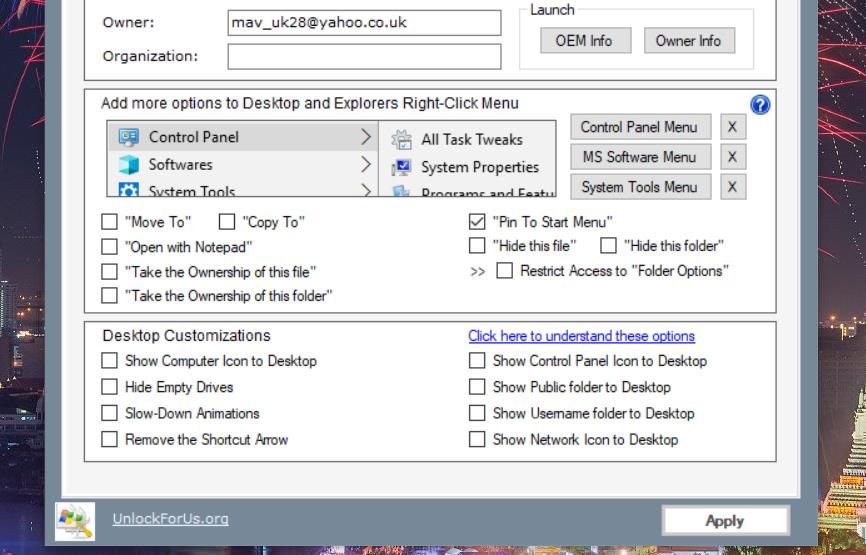
Then right-click a desktop area to view your newControl Panel ,System Tool , orSoftware submenus. In Windows 11, you’ll also need to clickShow more options since this tweak is applied to the classic context menu. Each submenu includes a variety of handy shortcuts.

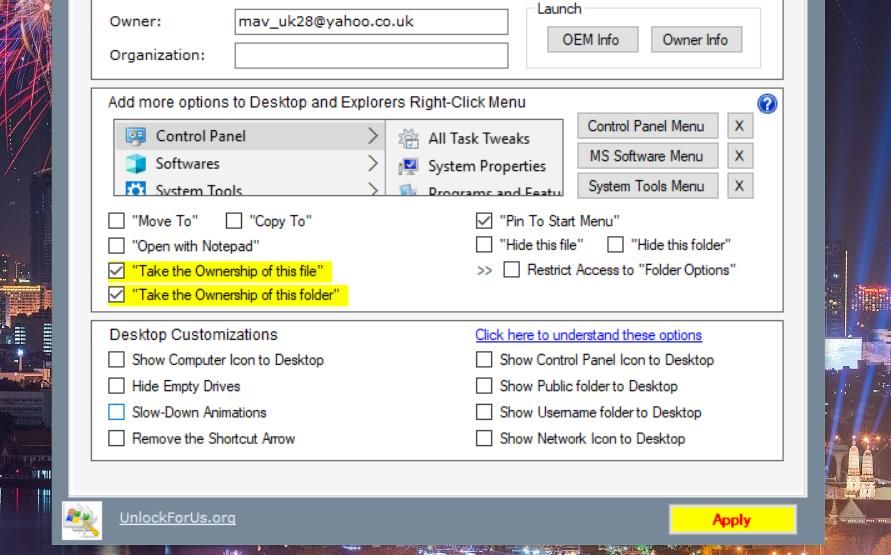
5. How to Add New Take Ownership Explorer Options for Files and Folders
You can’t open folders with restricted access unless you take ownership of them in Windows 11/10. To manually take ownership of a folder, you’ll need to change its security settings via its properties window.
However, it’s much simpler to add options for taking ownership of folders and files to the context menu with WinBubble. Then you can right-click a folder or file in Explorer to select aTake the Ownership option.
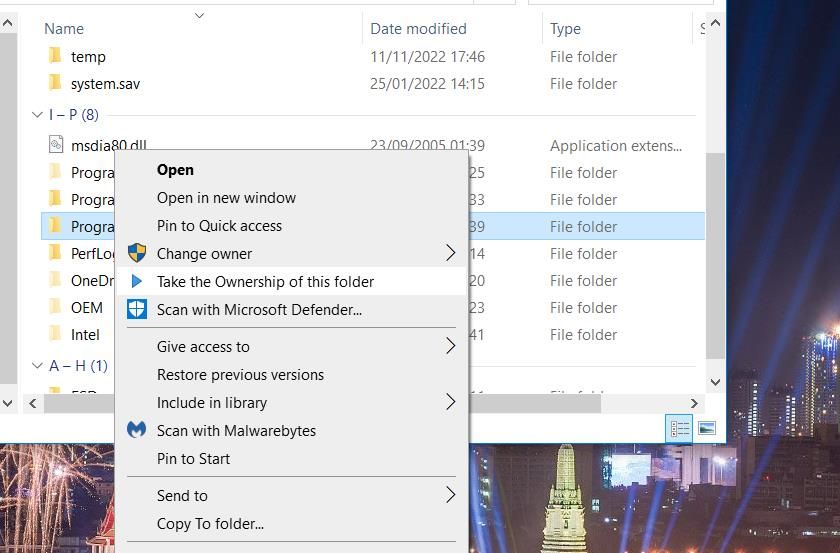
WinBubble’sGeneral tab includes two settings for adding take ownership options to File Explorer’s context menu. Select both the“Take the Ownership of this folder” and“Take the Ownership of this folder” checkboxes to add those options. You’ll also need to clickApply for this tweak.

6. How to Add New Software Shortcuts to the Context Menu
If you prefer not to stuff your desktop area with too many software shortcuts, the context menu is an ideal alternative space for them. You can add lots of shortcuts to different context menus with WinBubble without manually editing the Windows registry . This is how to add shortcuts for opening programs to the desktop’s right-click menu in Windows:
- Select theTools tab in WinBubble.
- Press theExplorer/Desktop button on that tab.
- Click theellipses button for theCommand box.
- Select software to add to the menu, and click theOpen option.
- Input the software’s title in theName box.
- Press theAdd button.
- SelectOK on the prompt that appears.
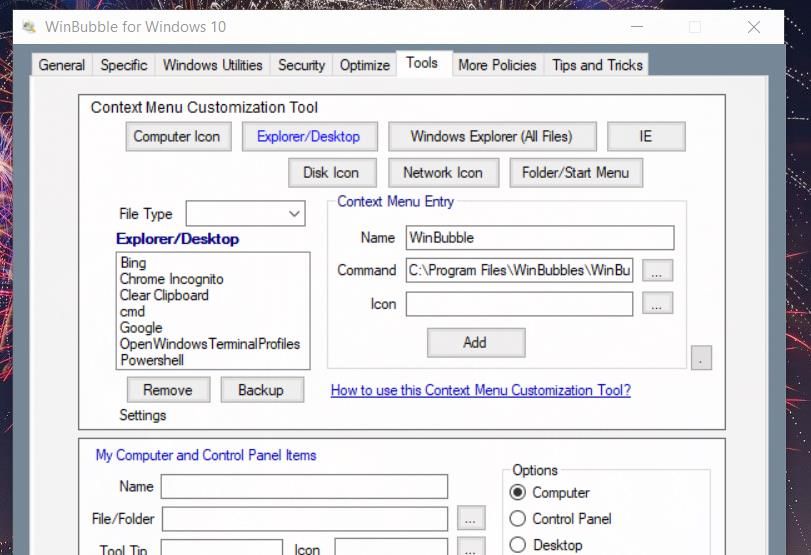
Now, look at the context menu by right-clicking the desktop (select Show more options in Windows 11). You’ll see a shortcut for opening the software you added there. Click that shortcut to launch the program.
You can remove shortcuts added by selecting them in the Explorer/Desktop box within WinBubble’sTools tab. Click theRemove option there. Then chooseYes when asked to confirm the deletion.
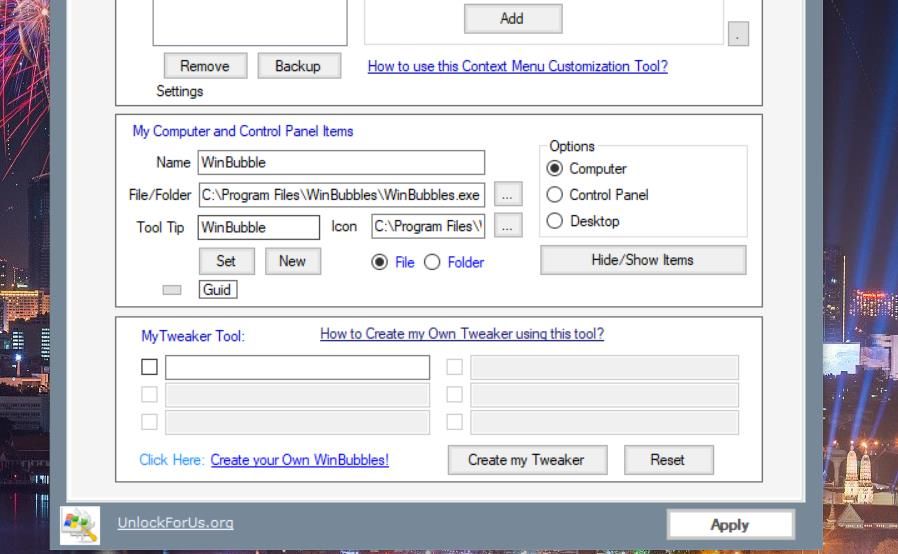
7. How to Add New Items to the Control Panel
WinBubble’sTools tab also includes a section that enables you to add new items to the Control Panel. You can add third-party software shortcuts to the Control Panel from there in the following steps:
- Select theControl Panel radio button.
- Press theellipsis button for theFile/Folder box on theTools tab.
- Choose a program to include on the Control Panel.
- ClickOpen to add the software’s path.
- Enter a title for the selected software in theName box.
KoolReport Pro is an advanced solution for creating data reports and dashboards in PHP. Equipped with all extended packages , KoolReport Pro is able to connect to various datasources, perform advanced data analysis, construct stunning charts and graphs and export your beautiful work to PDF, Excel, JPG or other formats. Plus, it includes powerful built-in reports such as pivot report and drill-down report which will save your time in building ones.
 KoolReport Pro is an advanced solution for creating data reports and dashboards in PHP. Equipped with all extended packages , KoolReport Pro is able to connect to various datasources, perform advanced data analysis, construct stunning charts and graphs and export your beautiful work to PDF, Excel, JPG or other formats. Plus, it includes powerful built-in reports such as pivot report and drill-down report which will save your time in building ones.
It will help you to write dynamic data reports easily, to construct intuitive dashboards or to build a whole business intelligence cockpit.
KoolReport Pro package goes with Full Source Code, Royal Free, ONE (1) Year Priority Support, ONE (1) Year Free Upgrade and 30-Days Money Back Guarantee.
Developer License allows Single Developer to create Unlimited Reports, deploy on Unlimited Servers and able deliver the work to Unlimited Clients.
- Press theSet button.
- Then clickOK to close the message dialog that pops up.
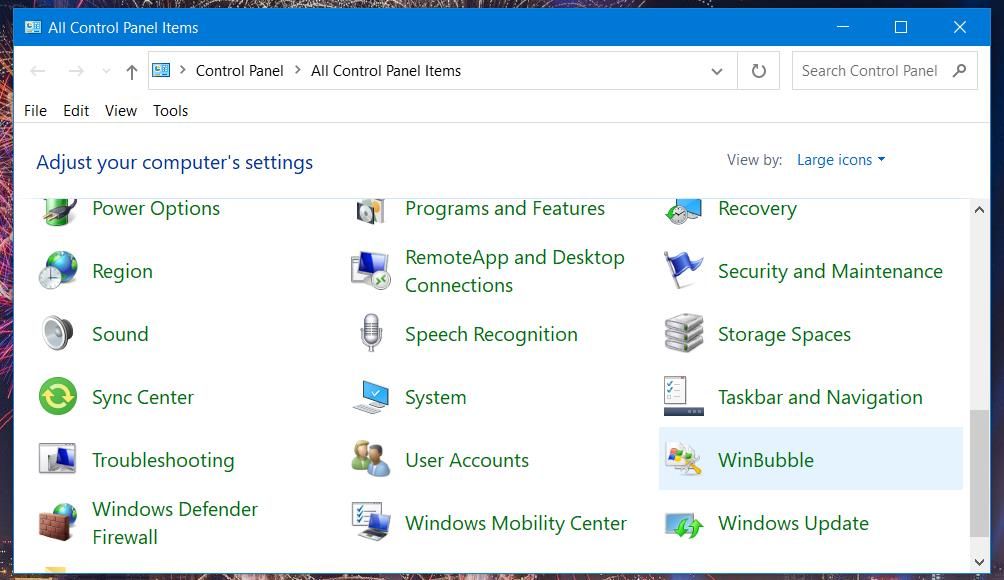
Now you’ll be able to open the software added from the Control Panel. Bring up the Control Panel window, and selectLarge icons from theView by drop-down menu there. Click the new software shortcut there.
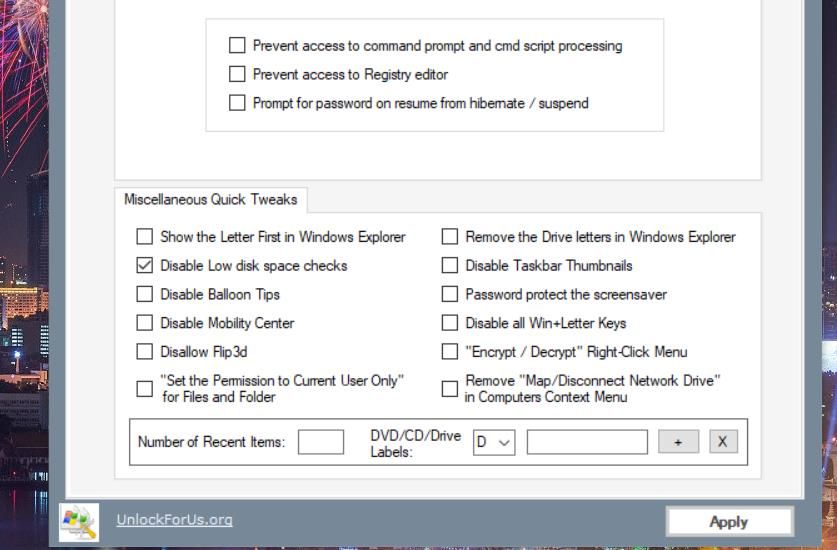
8. How to Disable the Registry Editor in WinBubble
TheMore Policies tab in WinBubble enables you to disable many things in Windows. It incorporates four subtabs from which you can disable desktop, Start menu, taskbar, machine, system, and Control Panel features. Plus, there are also some additional miscellaneous quick tweak settings available.
For example, you can select to disable the Registry Editor if you don’t want other users messing around with the registry. To do so, click theMore Policies >System tabs. Select thePrevent registry access to Registry Editor checkbox andApply option. An access denied message will then pop up when users try to open Registry Editor.

WPS Office Premium ( File Recovery, Photo Scanning, Convert PDF)–Yearly
Customize Windows to Your Liking With WinBubble
Those are just some of the different ways you can customize Windows 10 and 11 with WinBubble. WinBubble is packed to the rafters with many more handy settings for tweaking Windows to your heart’s content. So, have fun customizing Windows with WinBubble!
- Title: Tailor Your Desktop Experience with WinBubble's Best Practices
- Author: Richard
- Created at : 2024-08-16 02:32:35
- Updated at : 2024-08-17 02:32:35
- Link: https://win11-tips.techidaily.com/tailor-your-desktop-experience-with-winbubbles-best-practices/
- License: This work is licensed under CC BY-NC-SA 4.0.