The Complete Guide to Managing Win11 Applications via Winget

The Complete Guide to Managing Win11 Applications via Winget
Winget is a command-line tool that can download and install app packages from MS Store and the apps available in its repository. Windows users yearned for a dedicated package manager built into the OS until Microsoft decided to give them one. It is better than using an additional package manager but not all users love the terminal.
If you have used Winget even once, you know that knowing the correct commands is of absolute importance if you want to avoid errors. But what if you had a GUI version of Winget? WingetUI is one such app that slaps a coat of UI on Winget. Curious? Let’s begin.
What Is WingetUI, and How Is It Different From Winget?
WingetUI is a GUI implementation of the Winget tool that makes it super easy to manage app packages. It also supports Scoop and Chocolatey and can act as GUI forefront for all these three tools. If you’d like to know more about those, check out our comparison between Chocolatey and Windows Package Manager , and how to install Scoop on Windows .
Currently, WingetUI offers more than 4700 packages for Winget. If you combine the package list for all three package managers (including Chocolatey and Scoop ), the numbers stand at a staggering 14000.
So, you can directly access 14000 packages without leaving the app and will have to rarely search the web. WingetUI can help you to manage all the installed packages, discover and install new ones, batch install multiple packages , export or import package list, search for packages inside the app, and more.
The fun doesn’t stop there. You can switch to dark mode in the app, and it even notifies you about the app updates whenever you launch the app and can even auto-update them. Furthermore, you can even view the package details, and its commands, and can share the packages with your friends.
How to Download and Install WingetUI on Windows11
WingetUI is available on GitHub and also has a dedicated website to keep you updated about the new features. However, you will find the download links on GitHub , Softpedia, and Uptodown only. Download the installer file from any of these hosts and then install it on your PC. Make note that WingetUI only works with Windows 10 and Windows 11 (64-bit versions only).
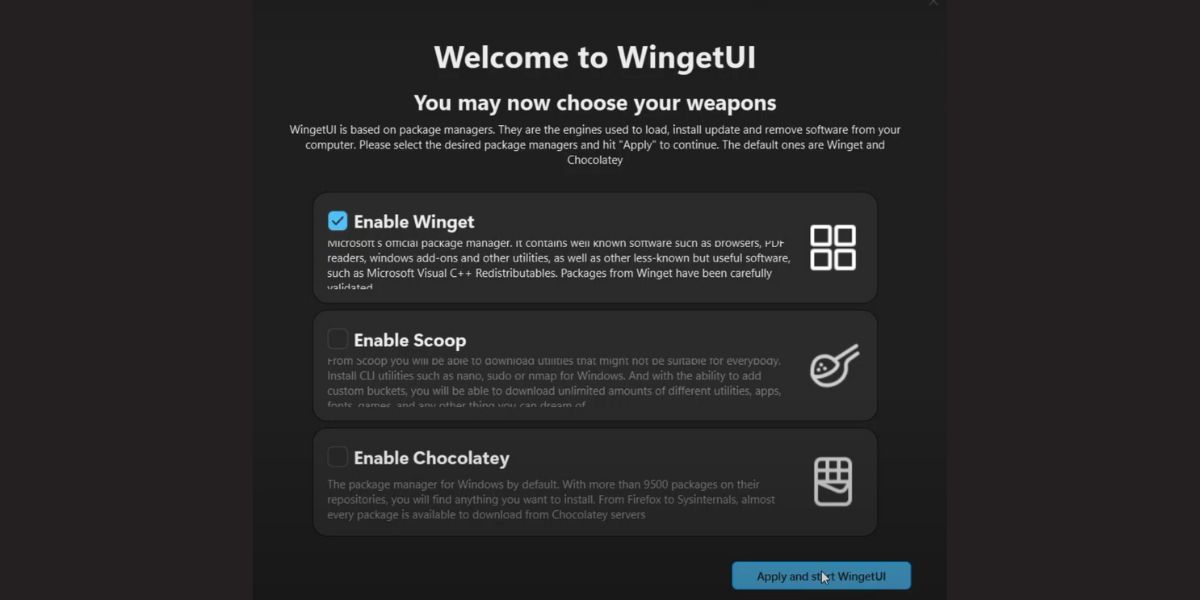
After the installation completes, the app will ask you to select the package managers you want to use. Select the Enable Winget option for now, and click on the Apply and Start WingetUI button.
How to Manage App Packages Using WingetUI on Windows 11
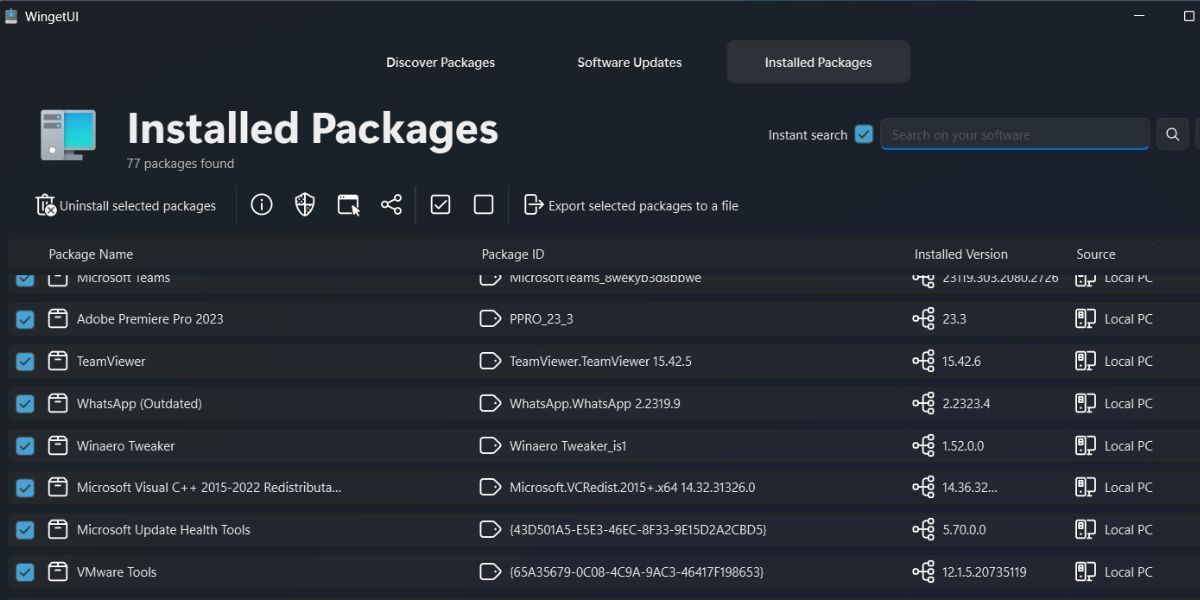
WingetUI divides the whole app into three sections: Discover Packages, Software Updates, and Installed packages. You can view all the available packages in the app using the Discover Packages section, while the Software Updates section list all the app that have a new version available. Lastly, the Installed Packages section allows you to manage the app packages on your PC.
Here are the following things you can do using WingetUI:
1. Browse List
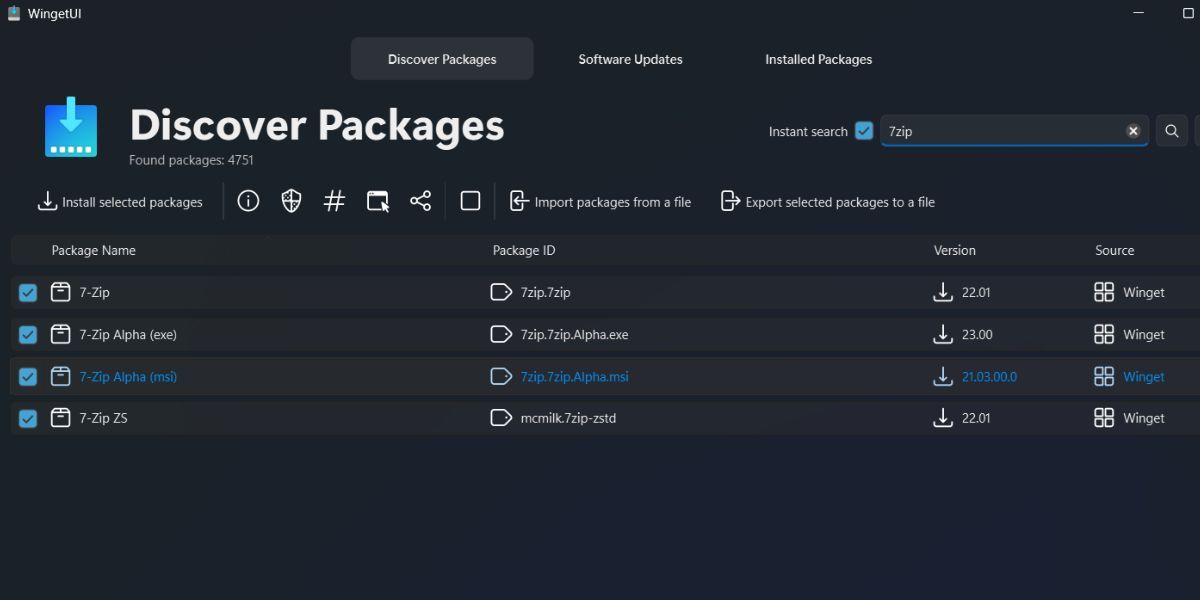
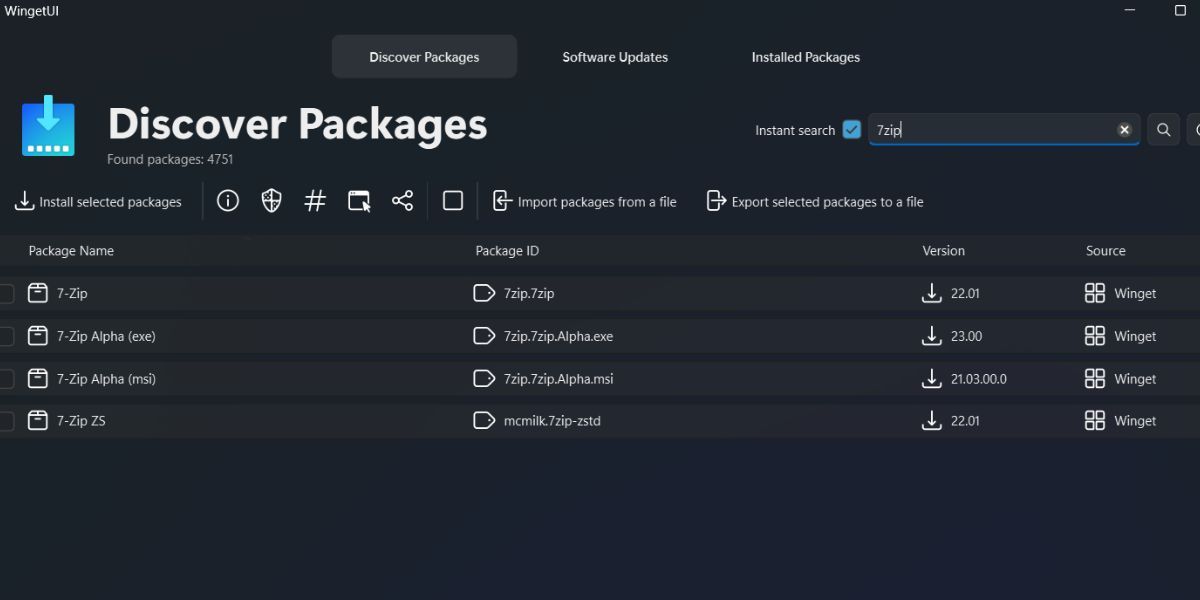
To browse the app list, click on the Discover Packages button on the top. WingetUI will list all the available packages with the source Winget. You will also see a counter indicating the total number of apps listed in the repository.
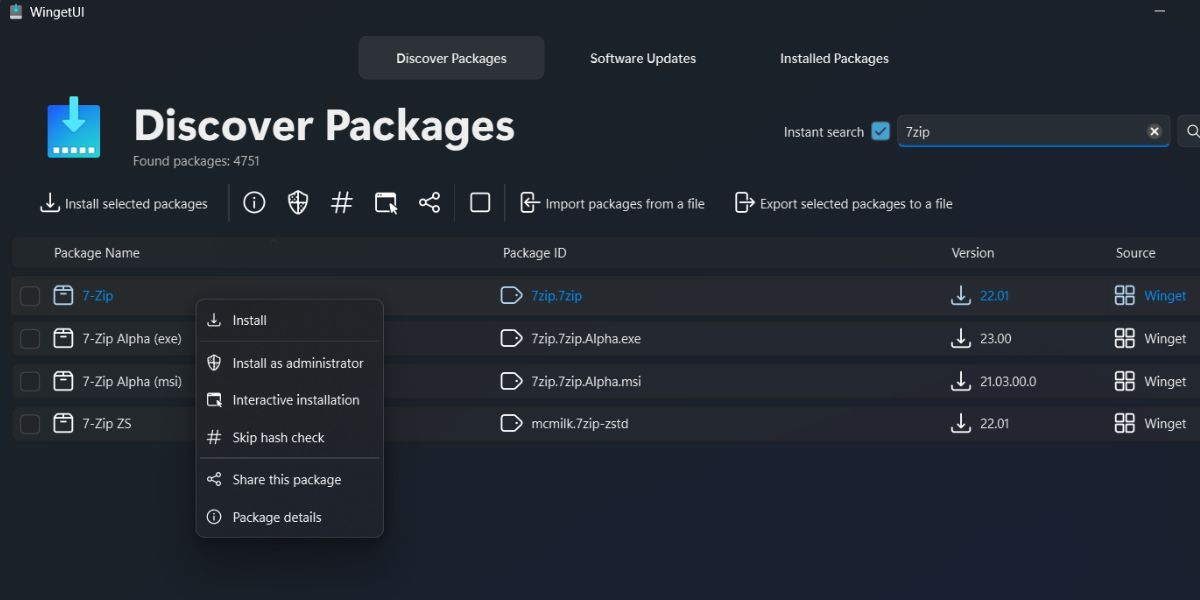
Click on the search bar and type the name of the app package that you want to install on your PC. It will list all the available versions of the app package along with its package ID and version.
2. Install a Package
To install a package, you will have to use the Discover Package tab:
After searching and locating the package, click on it to select it.
Then, right-click on it to open the context menu. Before starting the installation, you must configure the installation.
Select the Package details option from the context menu.

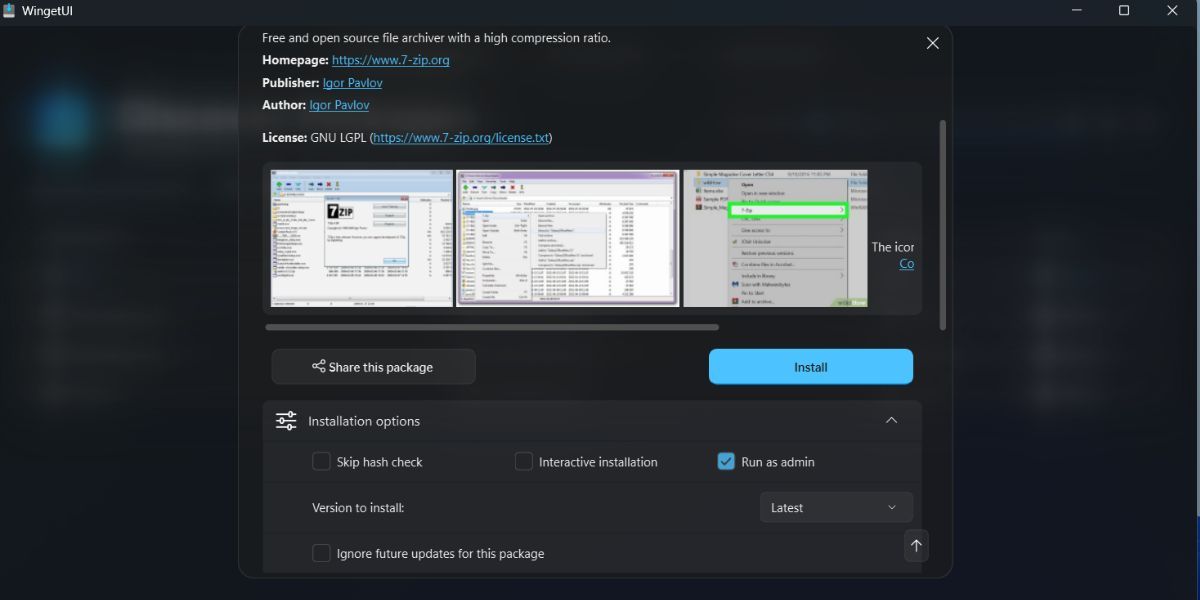
Check the source of the package. Also, check the image gallery to get an idea of the app’s UI.
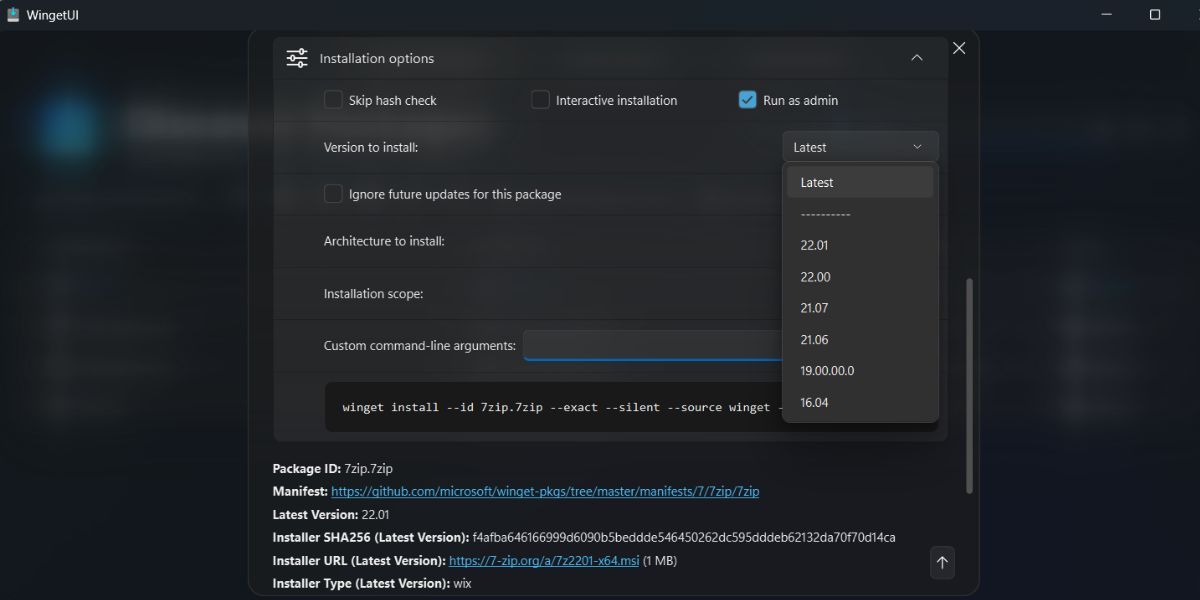
Move down to the Installation options. Keep the Skip hash check and Interactive installation unchecked. If you enable the interactive installation, you will have to manually perform the installation which can take longer.
Some apps cannot install on your PC without administrator rights. So, select the Run as admin checkbox.

You can also select a particular version of the app you are trying to install. Expand the Version to install dropdown list. You can select any version from here. Keep the Ignore future updates for this package option untouched.

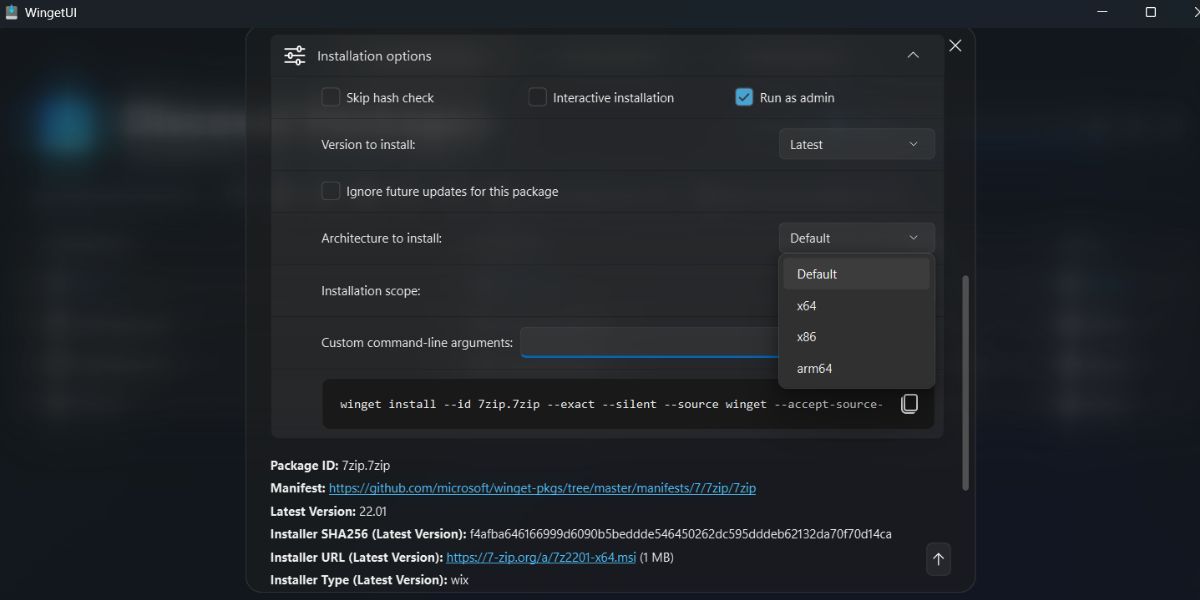
Next, you can pick the package architecture: x64, x86, or arm65, depending upon your OS and CPU architecture.
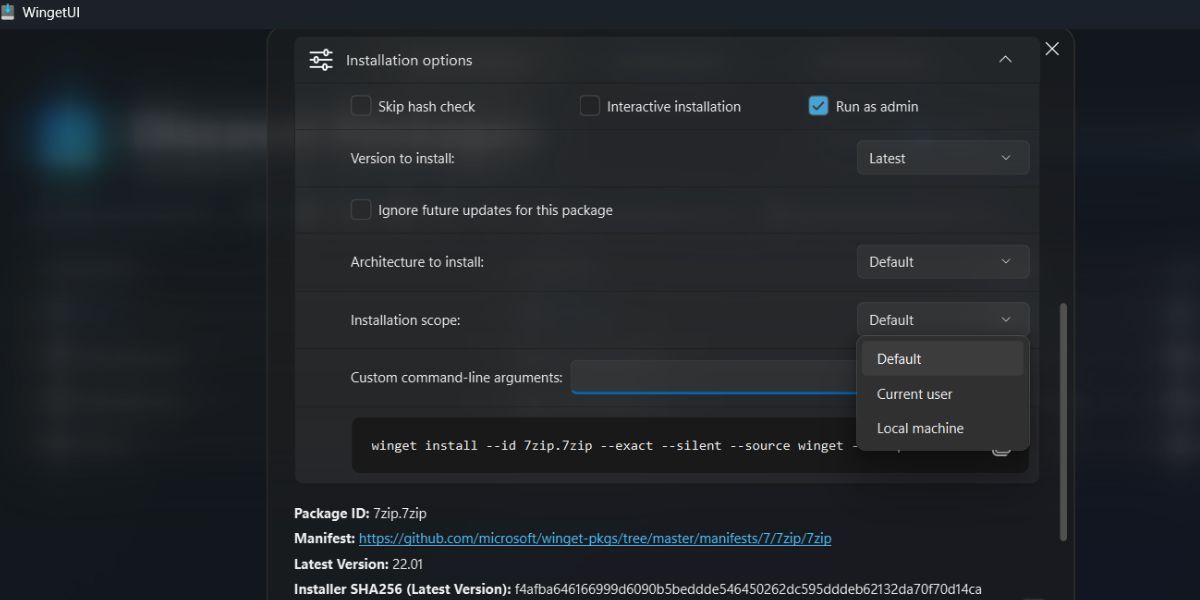
Lastly, pick the Scope of the package installation. If you want to do a machine-wide install, pick the local machine option. Or pick the Current user if you want to install the app only for one user profile.

Click on the Install button. UAC will pop up. Click on the Yes button.

You will see the installation status at the button of the WingetUI window. Windows will produce a notification when the installation completes.
2. Uninstall a Package
Repeat the following steps to uninstall a package using WingetUI:
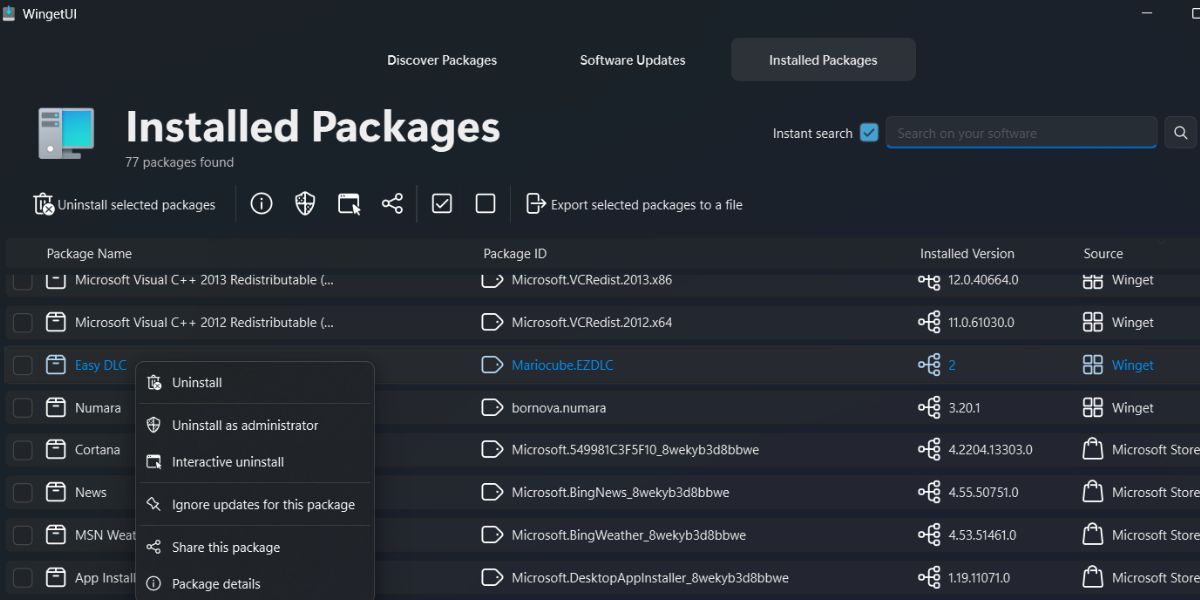
- Switch to the Installed Packages tab. Right-click on the package you want to uninstall.
- Select the Uninstall as administrator option.

- UAC will pop up. Click on the Yes button.
- WingetUI will remove the installed package.
3. Batch Install or Uninstall Packages
Batch installation and uninstallation are a breeze with WingetUI. Here’s how to do it:
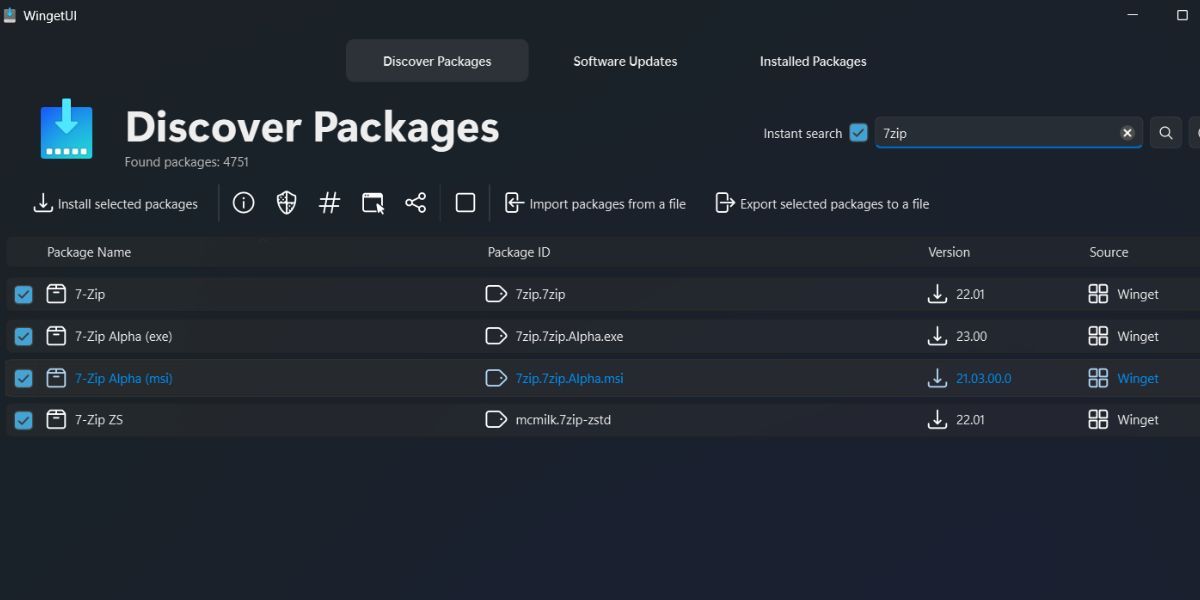
- Individually select each package you want to install.
- Then click on the Install the selected packages button on the top.


- WingetUI will install these apps one by one.
To batch uninstall packages, repeat the following steps:
- Switch to the Installed Packages tab. Then, click and select all the packages you want to remove from your PC.
- Click on the Uninstall selected packages button to remove the selected packages one by one.

4. Import Export Packages List
You can create a custom package export list and store them in a JSON or Txt file. Here’s how:
- Firstly, select all the packages you want to export either from the Discover Packages section or the Installed Packages section.
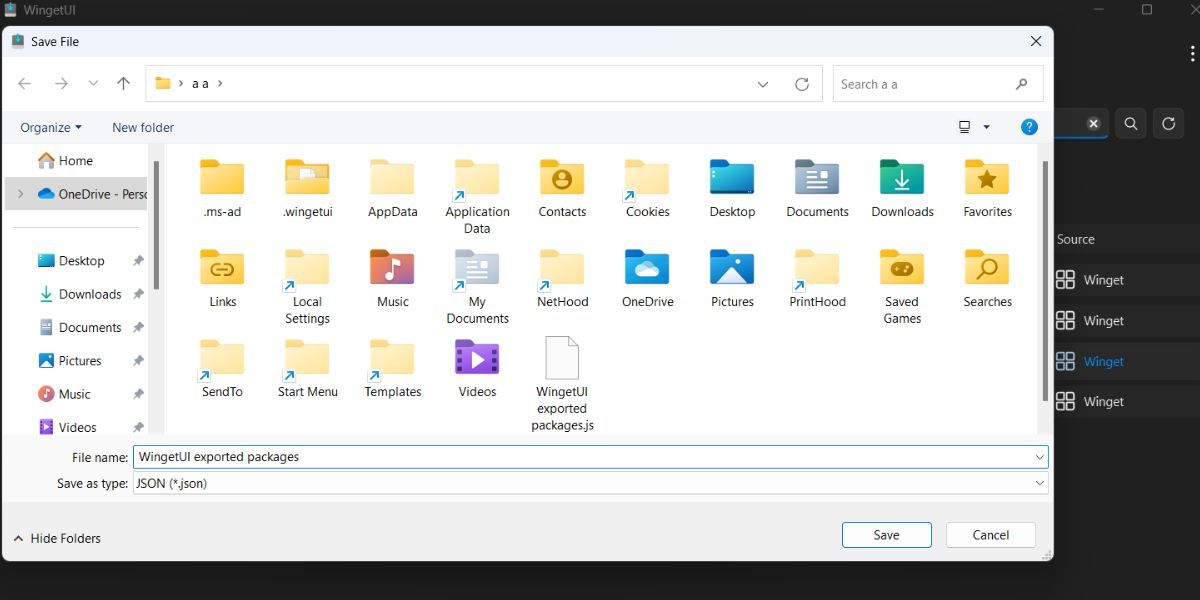
- Then, click on the Export selected packages to a file option.

- Enter a name for the export file and save it to any location on your PC.

- You can later import this file to another PC or even your PC using Winget or Winget UI.
Repeat the following steps to import a Winget JSON file in WingetUI:
- Switch to the Discover Packages section in the app.
- Click on the Import packages from a file option.
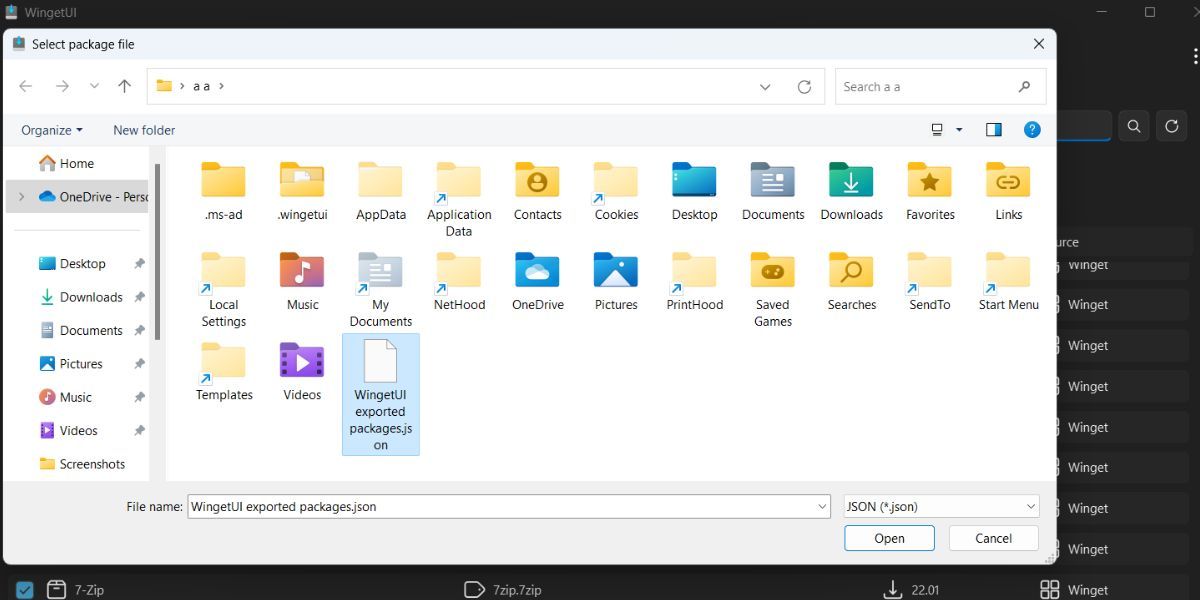
- Browse your PC for the Winget import file and select it. Click on the Open button.

- WingetUI will automatically start installing all the packages listed in the import file.
5. Check Software Updates
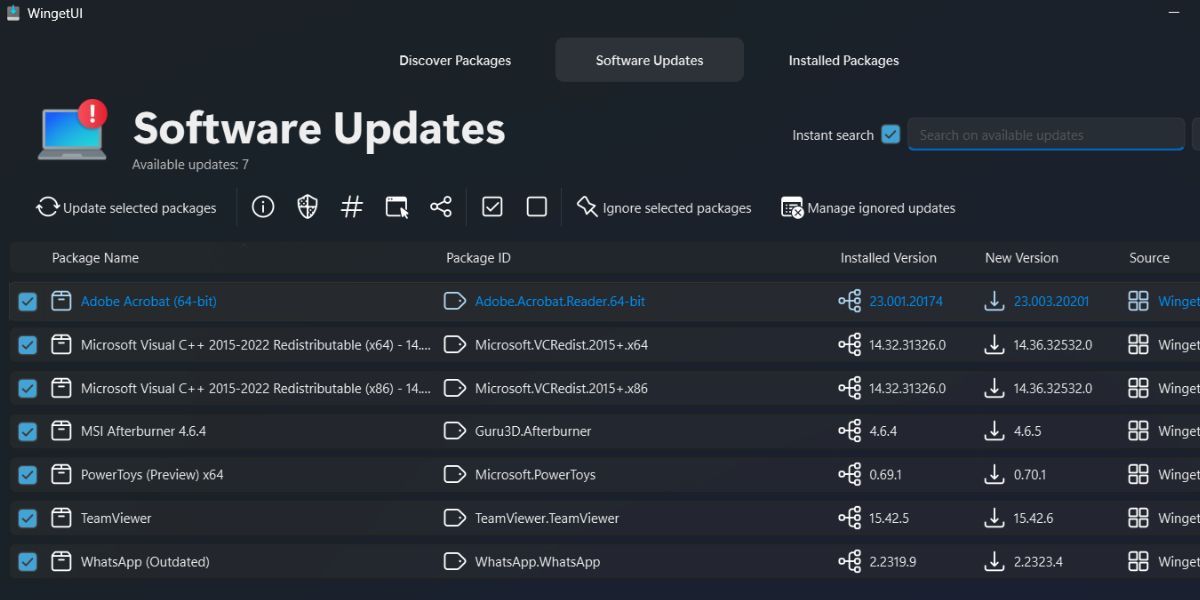
Switch to the Software Updates section. WingetUI will list all the packages which have an update available. To update a single app, right-click on it and select the Update as administrator option.
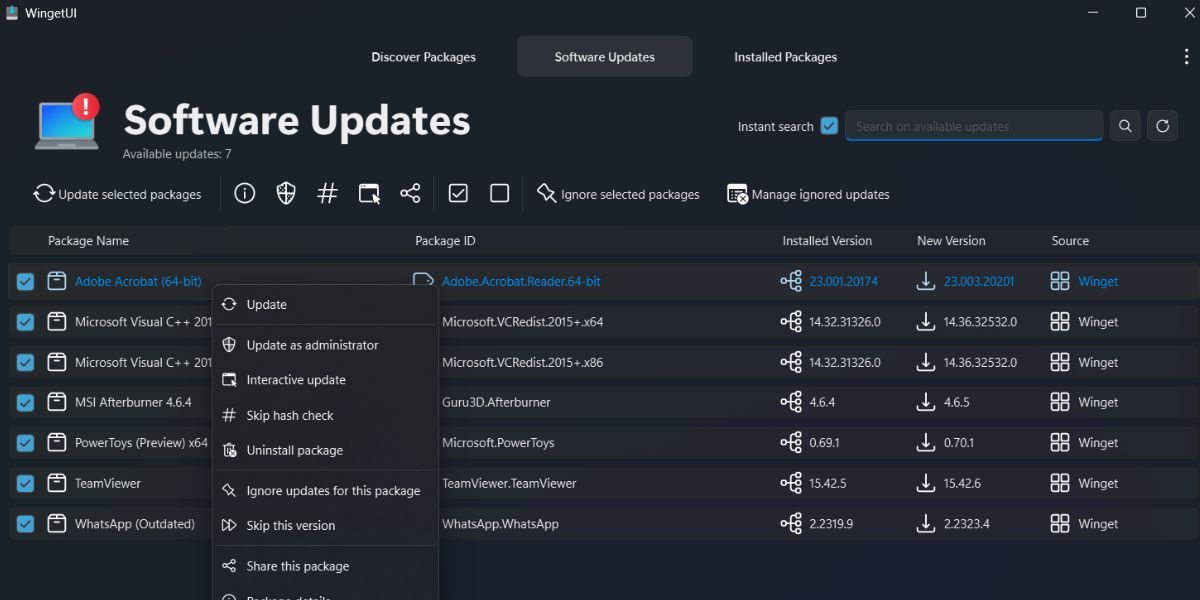
If you want to update all packages at once, click on the tick mark icon to select all the packages. Then, click on the Update selected packages button.
No More Terminal Woes
WingetUi makes it easy for the average Joe to manage app packages on a Windows PC. There is a similar web-based GUI package manager called Winstall for batch-installing apps, but it only generates codes for it. You will have to manually run the commands in the Terminal. So, you can use WingetUI instead if you want zero interaction with Windows Terminal.
If you have used Winget even once, you know that knowing the correct commands is of absolute importance if you want to avoid errors. But what if you had a GUI version of Winget? WingetUI is one such app that slaps a coat of UI on Winget. Curious? Let’s begin.
- Title: The Complete Guide to Managing Win11 Applications via Winget
- Author: Richard
- Created at : 2024-07-29 08:09:54
- Updated at : 2024-07-30 08:09:54
- Link: https://win11-tips.techidaily.com/the-complete-guide-to-managing-win11-applications-via-winget/
- License: This work is licensed under CC BY-NC-SA 4.0.
 Epubor Audible Converter for Mac: Download and convert Audible AAXC/AA/AAX to MP3 with 100% original quality preserved.
 PDF application, powered by AI-based OCR, for unified workflows with both digital and scanned documents.