The Ultimate Guide to Rectifying Windows Resolution Problems

The Ultimate Guide to Rectifying Windows Resolution Problems
You could spend thousands on a monitor, but if you’ve managed to mess up with display settings in Windows, or within an app or game, it will ruin your viewing experience. In some cases, it could be the driver or a hardware component giving you trouble.
Regardless of the reason for your viewing perils, we’re going to help troubleshoot the display issue, so you can go back to enjoying high-quality viewing. We’ll talk about the problems that can lead to a screen resolution issue and how you can fix them.
Disclaimer: This post includes affiliate links
If you click on a link and make a purchase, I may receive a commission at no extra cost to you.
1. Incorrect Resolution Settings
Resolution can often change by itself on Windows because of a corrupted graphics driver, a new Windows update, or a conflicting third-party app. If this is the case with your display, you can easily fix it by changing the resolution settings.
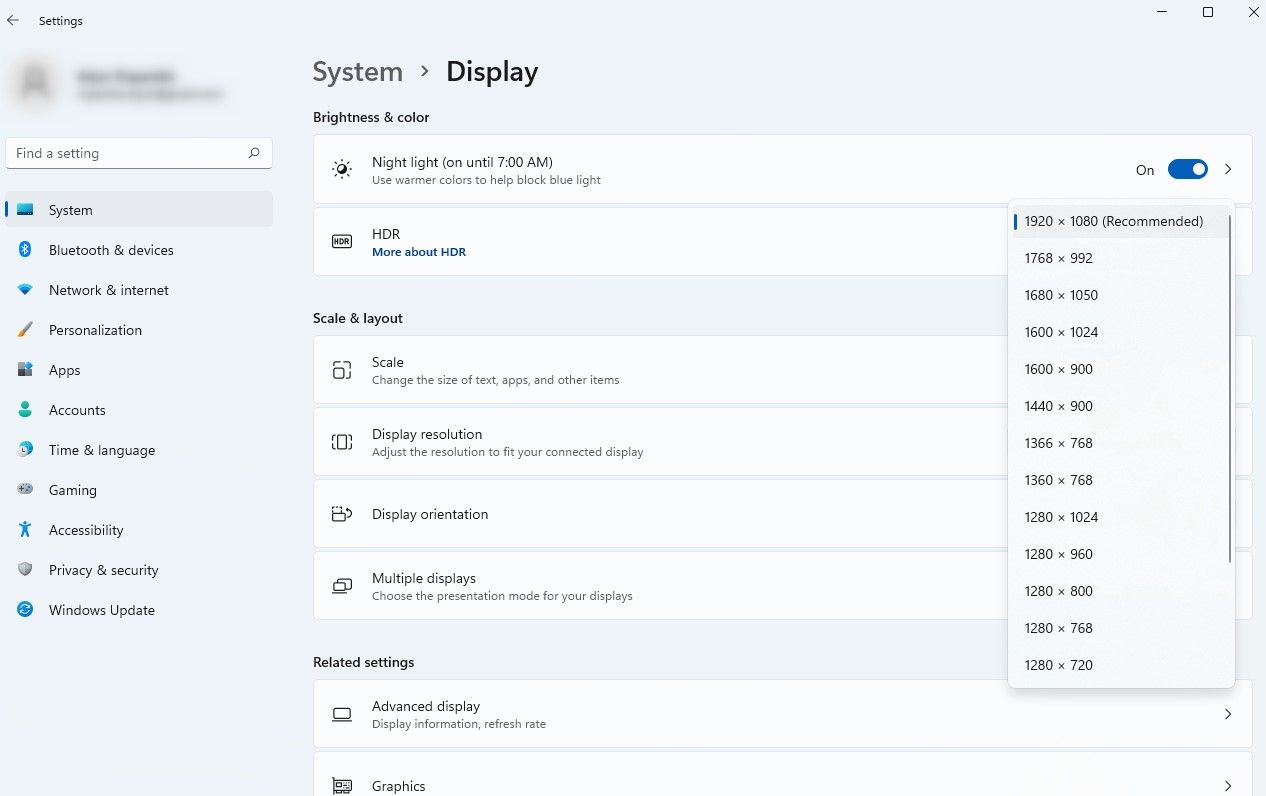
Press Win + I to launch Settings and navigate to System > Display. Click on the drop-down menu next to Display Resolution and select the recommended option from the list.
2. Incorrect App-Specific Settings
A third-party app may override the screen resolution you set on Windows and apply a resolution it requires to properly run and display its content. The most common example is games. Games typically have an option to change the resolution within their settings, and that’s where you’ll be able to control it.
It doesn’t require much fixing after you exit the app, though. In most cases, the resolution should revert to what you’ve set in Windows by default. If it doesn’t, just go to Setting and change the resolution as explained in the previous section.
3. Problems With the Hardware
The resolution issue could also result from hardware issues. There are two components you need to check: the graphics card, and the display cable.
When your display’s resolution is higher than the resolution that either or both of these hardware components support, you could have a problem.
For instance, if you’re using an integrated graphics card or a very old one, your 4K display probably won’t live up to your expectations. On the other hand, if you’re using a single or double-link DVI, 4K isn’t an option.
If you’re using an HDMI cable, you’ll need to check for two things. First up is the type of HDMI cable. A category 3 HDMI supports 4K @60Hz. But there’s another variable in this equation. You need to check what type of HDMI your graphics card supports. You’ll need HDMI 1.3 at a minimum to view 4K @60Hz.
If the issue is with your cable, try switching from HDMI to DisplayPort . If that’s not an option, you’ll need to spend some money upgrading your hardware.
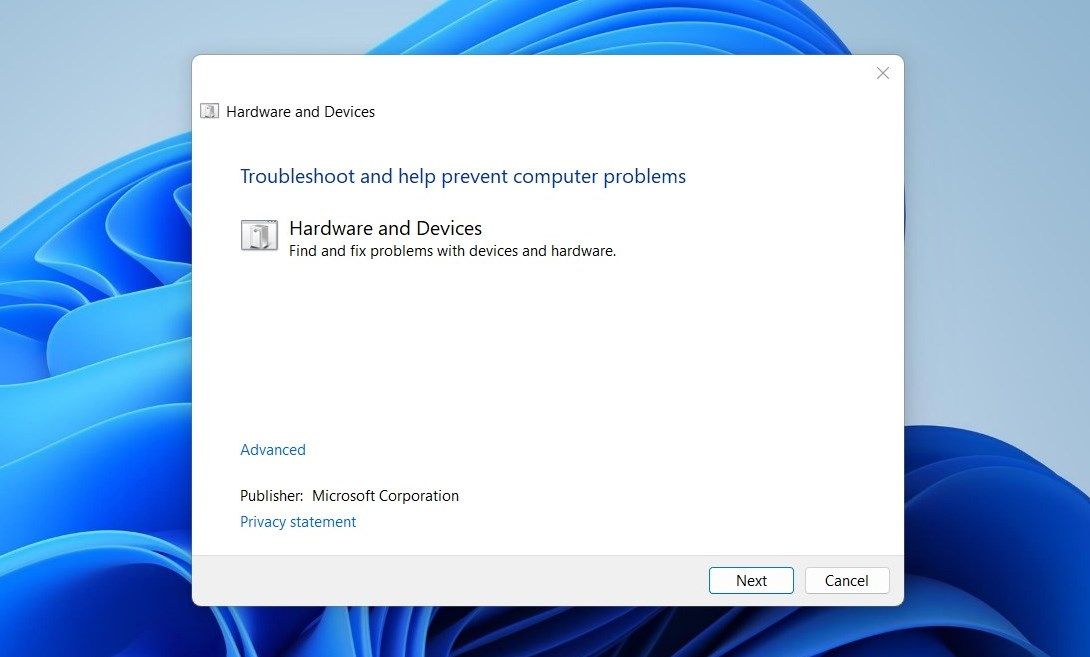
You can also diagnose problems with the hardware using the Hardware and Devices troubleshooter that is built into Windows by default.
Here is how you can run it:
- Press the Win + R keys together to open Run.
- Type “cmd” in Run and press Ctrl + Shift + Enter to open Command Prompt as an administrator.
- Click Yes in the User Account Control prompt.
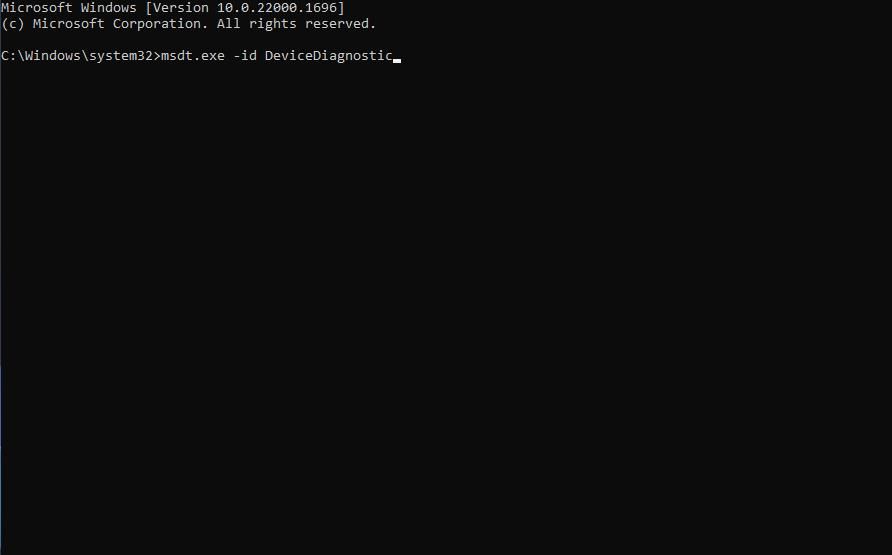
- Once you are inside the Command Prompt, execute the command below:
msdt.exe -id DeviceDiagnostic
- In the following dialog, click Next and wait for the troubleshooter to scan the system. If it finds an issue, it will notify you and suggest a fix. In that case, click on Apply this fix.
4. Faulty or Corrupt Display Drivers
Drivers are necessary for your hardware to function properly. If your display driver is corrupt or outdated, it could lead to a problem with your display. Fortunately, it’s easy to update the display or graphics driver. Below, we walk you through the steps of both updating and reinstalling drivers in detail.
Update Drivers
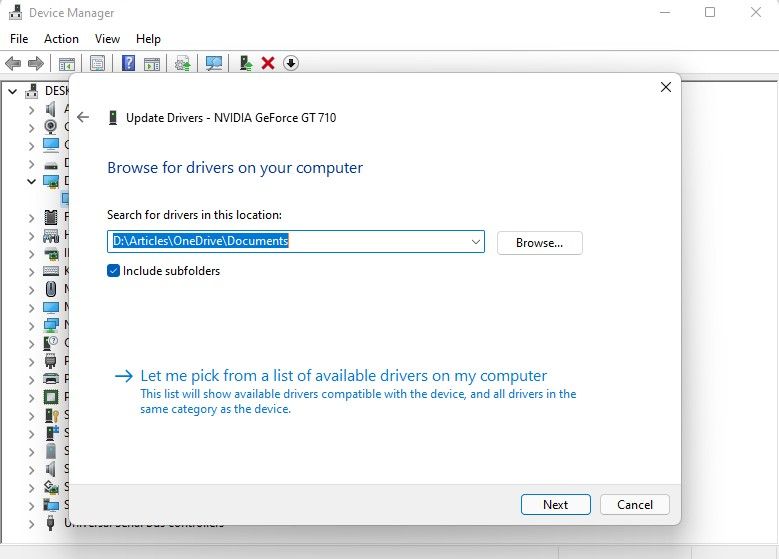
Press Win + R, type devmgmt.msc, and press Enter to launch Device Management. Expand the category called Display adapters by clicking on the tiny arrow to its left. Right-click on the display adapter you want to update and select Update driver.

You can search for drivers automatically, but there’s a good chance Windows won’t find anything. The second option will let you install the driver manually.
To use the second option, you’ll need to first download driver installation files from the manufacturer’s website. When you’re done, add the driver folder’s location in the wizard and follow the wizard’s prompts.
Rollback or Reinstall Drivers
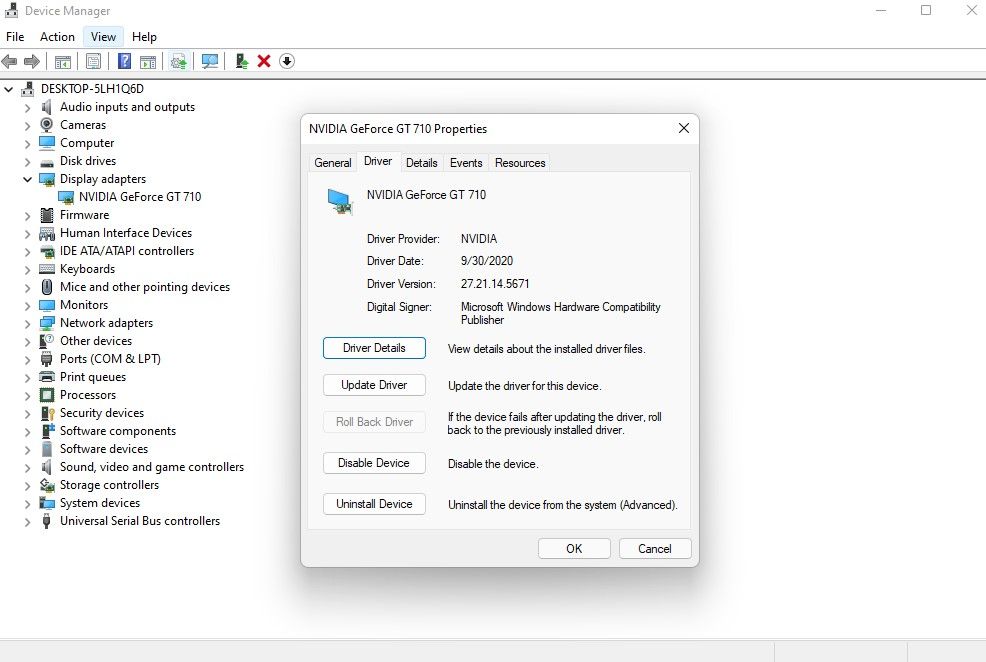
In some cases, the updated driver can cause a problem instead of fixing it. If you started encountering the resolution issue after an update, consider rolling back the updated driver. Doing so uninstalls the updated driver and reverts to the previous driver.
You’ll first need to check if the option to roll back is available. You can do this by clicking on the relevant device and selecting properties. Switch to the Driver tab and select Roll Back Driver. If the option isn’t grayed out, it’s available. Click on it and follow the on-screen prompts to roll back the driver.
Finally, if updating the driver or rolling it back to a previous version has not worked for you, you can consider reinstalling the driver using the manufacturer’s website. Follow the steps in our guide on cleanly installing and reinstalling GPU drivers on Windows for step-by-step instructions on this.
5. An Incorrect Display Adapter Mode
If you’ve got multiple monitors connected to your PC, and one or more of them seem to have a resolution problem, try checking the Display Mode settings on Windows. If you’re duplicating a display on two screens that have different resolutions, one of them will have the wrong resolution.
Unfortunately, there’s no way to use the right resolution for each screen when using duplicate screens. You can either “extend” the display, or use the Display Adapter mode to select the right resolution for one display and let the other one stay as-is.
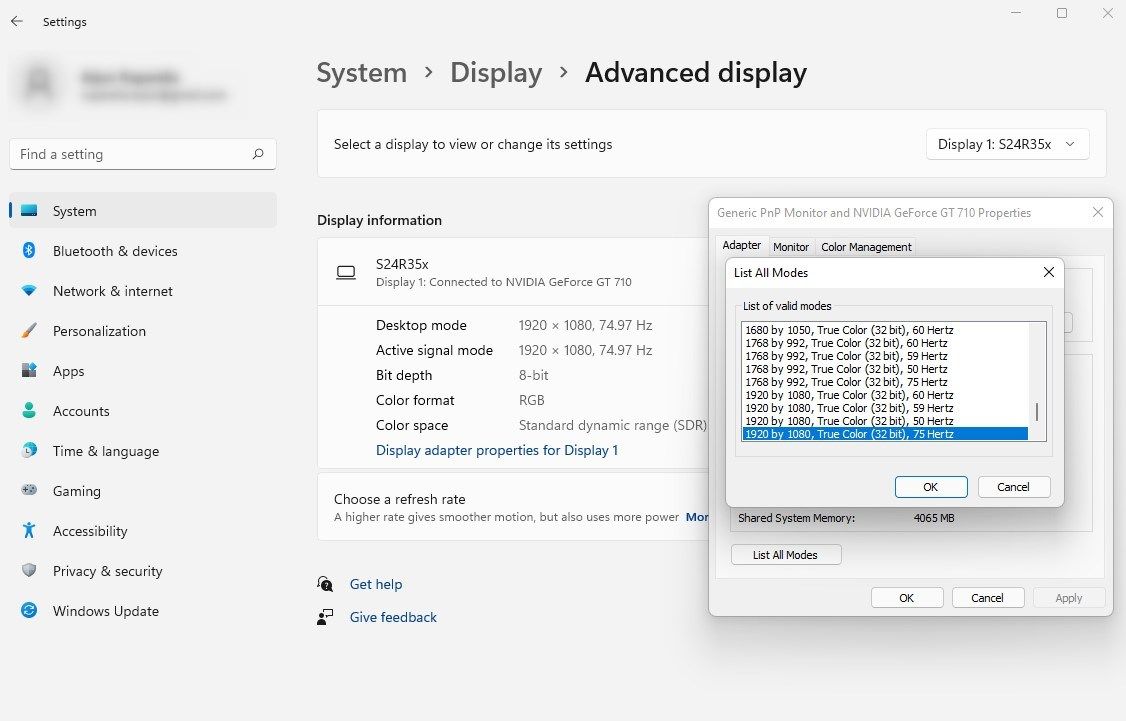
To change the Display Adapter mode, go to Settings and navigate to System > Display > Advanced Display. Click on Display adapter properties for Display 1 (click this option for the relevant display). Click on List All Modes, select the correct resolution, and click OK.
6. Incorrect Font and Icon Sizes
If you’ve set the correct resolution, but the text and icons on your screen appear too small, you might consider tweaking the DPI (Dots Per Inch). Usually, this happens on small-sized high-resolution screens, like a 4K screen 15.6-inch.
Changing DPI scaling is pretty easy, but not recommended. You might end up with illegible text and fuzzy-looking apps. Plus, it can often be difficult to revert to the original settings. If you decide to go ahead, be conservative with changing these numbers. The smaller the change, the better.
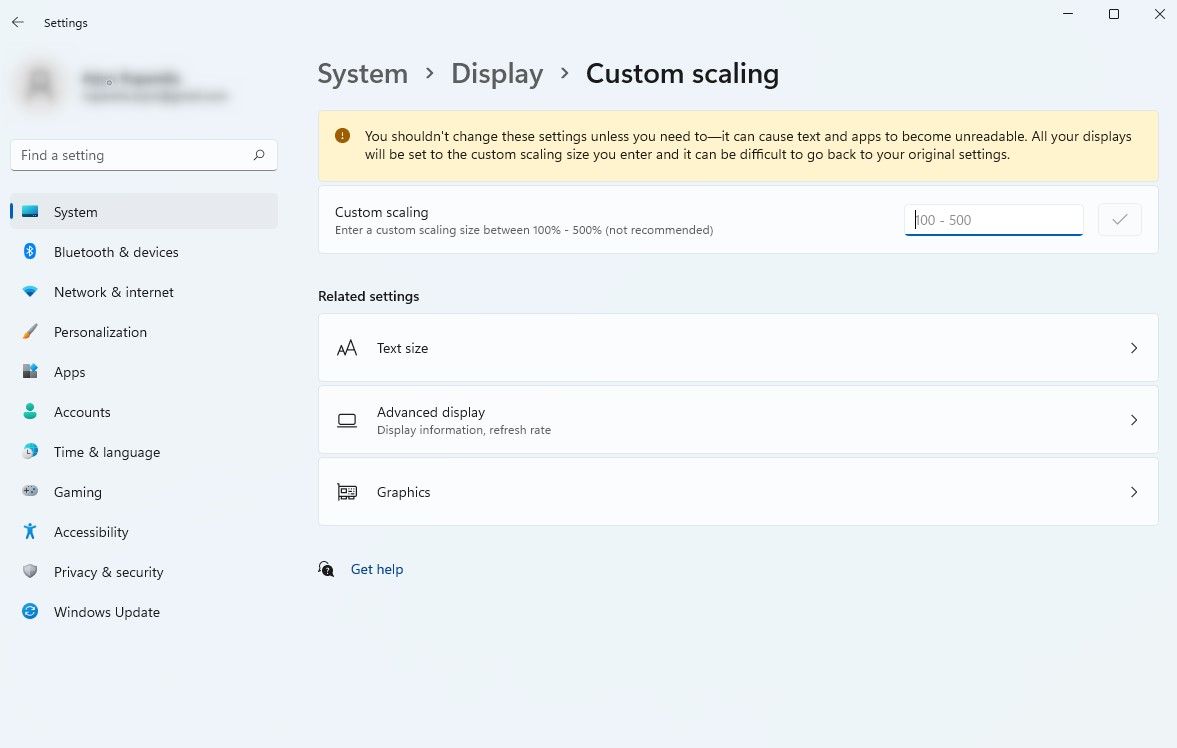
You can change DPI scaling by going to Settings and navigating to System > Display. Click on the right arrow next to Custom scaling. On the next screen, you’ll see a box where you need to enter a number between 100 and 500. That’s the percentage for DPI scaling you’d like to use.
Windows Resolution Issues Resolved
Hopefully, you were able to identify the issue and fix it. If you’re facing a resolution issue while gaming, you might be tempted to choose the highest resolution from within the game. However, for you to be able to run the game at that resolution, your hardware will need to support it. It’s best to get a basic idea of the best gaming resolution for your PC before you change it.
Regardless of the reason for your viewing perils, we’re going to help troubleshoot the display issue, so you can go back to enjoying high-quality viewing. We’ll talk about the problems that can lead to a screen resolution issue and how you can fix them.
Also read:
- [New] Invisible Audiences Viewing Instagram Stories Privately From PC/Android/iOS Screens for 2024
- [New] Reviewing the Best Screen Recorders on the Market for 2024
- [Updated] '3DR' The Soloist’s Voyage in 3D Printing Tech
- 2024 Approved 18 Steps to Make Your Instagram Unboxing Content Stand Out
- 2024 Approved Full Guide on Making a Big-Budget Cinematic Look Video with Final Cut Pro X
- Comprehensive Solutions for Fixing PNP Watchguard BSOD Glitch in Device Drivers
- Discover These 5 Exceptional Free Tools That Outshine Freemake Video Downloader: Get Them Now
- Exploring New Realms A Detailed Jaunt VR Review for 2024
- Fix Guide for Windows Bluetooth Headphones with Music Only Option
- Fix the Unresponsive Shift on Your PC Now
- Fixing Failed Windows Update (Error 0X8024800C)
- How to Increase Your Download Speed in the Microsoft Store
- Is It Time to Switch to a State-of-the-Art Apple Watch Version
- Mastering the Windows Ping: When and How to Use It Right
- Overcome Your PC's Grounded Issues with Top Tips & Tricks for Reliable Operation
- Revolutionize Your Day: Top 7 Productive Tools for Window 11
- Steps to Rectify Xbox Live Glitches in Windows Computers
- Thermal Management Tips for Windows 11
- Unraveling Windows' Mysterious AggregatorHost.exe Process
- Title: The Ultimate Guide to Rectifying Windows Resolution Problems
- Author: Richard
- Created at : 2024-10-10 02:10:54
- Updated at : 2024-10-15 04:30:35
- Link: https://win11-tips.techidaily.com/the-ultimate-guide-to-rectifying-windows-resolution-problems/
- License: This work is licensed under CC BY-NC-SA 4.0.
