Tips for Undoing Personalization Changes to Search on Windows 11

Tips for Undoing Personalization Changes to Search on Windows 11
Like any other computer program, Windows Search can sometimes develop issues that require you to reset its settings to work properly. This article explains two simple ways to reset Windows Search settings back to default. Let’s look at each one in detail.
Disclaimer: This post includes affiliate links
If you click on a link and make a purchase, I may receive a commission at no extra cost to you.
Why Should You Reset Windows Search Settings?
Windows Search tracks files and folders on your hard drive, so you can find them more quickly. However, over time search settings and preferences can become corrupted, leading to incorrect search results or slow performance. To get the most effective results from Windows Search, you should periodically reset your search settings.
Resetting search settings on Windows can improve search speed and accuracy. It gets rid of useless data and resolves errors or conflicts due to stored information. This can ultimately enhance your computer’s performance and provide a more efficient search experience.
Let’s now explore how to reset Windows Search settings.
1. Tweak the Registry Editor
If you want to reset Windows Search settings back to default, you can modify the registry editor. It involves directly changing certain keys in the Windows Registry, which can sometimes become risky if done incorrectly.
To avoid this issue, be sure to create a registry backup before proceeding. Once done, follow these steps.
- Press Win + R on your keyboard to open the Run command.
- Type regedit in the dialog box and hit the Enter key.
- When the UAC prompt appears on the screen, click Yes to continue.
- In the Registry Editor window, navigate to the following path:
HKEY_LOCAL_MACHINE\SOFTWARE\Microsoft\Windows Search
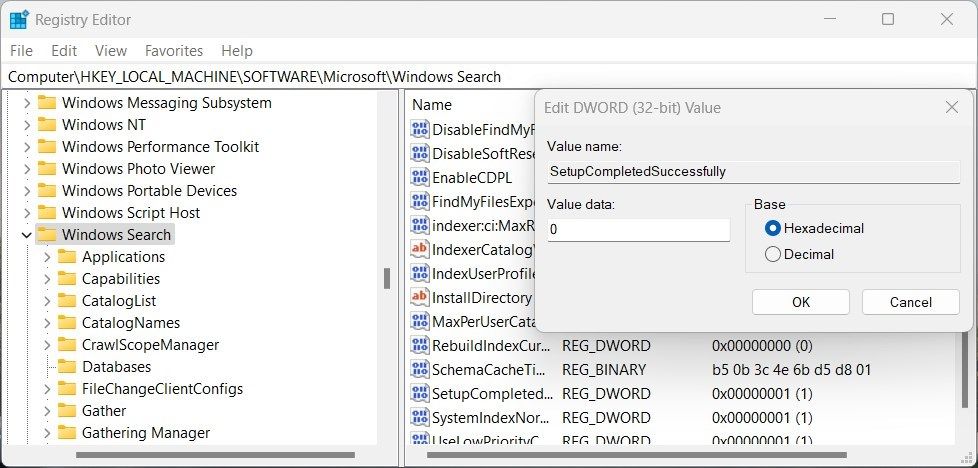
You can also copy and paste the path into the address bar at the top of the window and hit the Enter key. This will take you to the Windows Search section. - Now move to the right pane and search for the key named SetupCompletedSuccessfully.

- Select this key, right-click on it, and choose Modify.
- Set the value to 0 and click OK to save the changes.
If the SetupCompletedSuccessfully key is missing, you will have to manually create it. To do this, right-click on the Windows Search key and select New > DWORD (32-bit) Value. Name this newly created key as SetupCompletedSuccessfully and set its value to 0.
After performing the steps above, close the Registry Editor and restart your computer for the changes to take effect.
2. Use Windows PowerShell
If you prefer command-line solutions, you can use PowerShell to reset Windows Search settings. It involves running a few simple commands to restore search settings. Here’s how to do it.
Open the Microsoft Download Page and download the ResetWindowsSearchBox.ps1 PowerShell script. Once downloaded, right-click on the file and select Run with PowerShell.
If you see an error message “Cannot be loaded because the running script is disabled on this system” you need to enable script execution first. To do that, open PowerShell as a system administrator . Then type Get-ExecutionPolicy and press Enter.

If the output is Restricted, execute the following command to allow PowerShell scripts:
Set-ExecutionPolicy -Scope CurrentUser -ExecutionPolicy Unrestricted
After setting the execution policy, try running the ResetWindowsSearchBox.ps1 file again. Once the script is executed successfully, it resets Windows search settings.

After resetting the Windows Search settings, you can restore the execution policy to its original settings. To do that, open PowerShell as an administrator again and execute the following command:
Set-ExecutionPolicy -Scope CurrentUser -ExecutionPolicy Restricted
Once the execution policy is set back to its original value, restart your computer. The Windows Search settings should now be restored to their default state.
Easy Ways to Reset Windows Search
Resetting Windows search settings can fix any issues you may have with your search experience. This guide will teach you how to reset Windows Search settings to their original values.
Also read:
- [New] 2024 Approved CaptureWin10 Top-Tier Recorder
- [Updated] In 2024, A Comprehensive Walkthrough WMP Caption Addition
- 1. Reduce AVI Video Sizes Perfectly for YouTube Uploads & Compact Email Attachments
- 2024 Approved Ultimate Guide to Cheap Subtitles & Downloaders
- ASUS Zenbook 14 OLED Review: PC/Mac Comparison?
- Best File Sync Solutions for Windows Users
- Correcting Failures: 'Qt Platform Support' Error at Launch
- Guía Paso a Paso Para Insertar Texto en Un GIF: Métodos De Vanguardia
- In 2024, Best No-Entry Price Voice Transformation for Valorant Gamers
- In 2024, Facebook Live Vs YouTube Live Vs Twitter Periscope
- Master the Art of Perfect Spelling on Your iPhone – Fixing 6 Common Autocorrect Faults!
- Mastering Directory Management without Renaming Features in Windows 11
- Methods to Restart Printer's Automatic Service in Win
- Restoring Functionality to Disabled Volume Snapshots
- Tackling Windows 11'S GeForce Now Error Xc0f1103f
- The Truth Behind FraudGPT: Strategies for Avoiding Harmful Bot Interactions
- Title: Tips for Undoing Personalization Changes to Search on Windows 11
- Author: Richard
- Created at : 2024-11-30 22:40:40
- Updated at : 2024-12-06 21:32:41
- Link: https://win11-tips.techidaily.com/tips-for-undoing-personalization-changes-to-search-on-windows-11/
- License: This work is licensed under CC BY-NC-SA 4.0.
