Total Eradication of WSL From Windows 11 OS

Total Eradication of WSL From Windows 11 OS
If you don’t want or need Windows Subsystem for Linux on your computer, you can remove it. However, that process can include more than just clicking the uninstall button in Windows Settings. It isn’t difficult, but it’s important to remove files in the correct order.
Here are the steps you need to follow to completely remove WSL from your Windows PC.
Why Uninstall Windows Subsystem for Linux?
WSL is a very handy tool that allows you to easily run Linux distros in a virtual environment on your Windows computer. Although it doesn’t have much impact on storage space, if you have no interest in using Linux, there’s no need to have it installed.
There are also good alternatives to WSL for running Linux available, and you might decide to use one of those instead of the Microsoft solution. Not only would you not need WSL, but there is also a slight risk of conflict between the Windows Subsystem and your alternative choice.
Remove All Installed Linux Distros on Windows
This step won’t be relevant to everyone, but if you have installed any Linux distros, you should remove them first. This helps to ensure that no files associated with the Linux installations remain on your computer when you uninstall WSL.
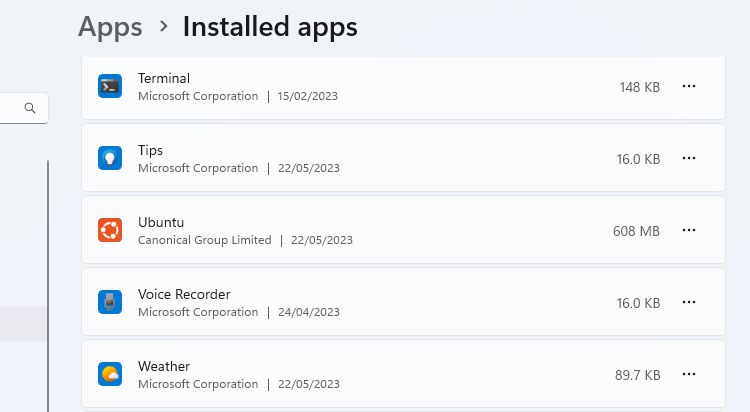
- You can find your installed Linux distros listed with your other installed apps in Settings > Apps > Installed Apps.
- Uninstall each of the Linux Distros, such as Ubuntu, in exactly the same way you would uninstall any other Windows app .

If the computer came to you with the apps already installed, you might not know what is or isn’t a Linux distribution. Here are some of the most common Linux distros , but you can also simply do a Google search for the name of the app you are unsure about.
When all versions of Linux have been uninstalled, you can move on to the next step in the process.
Uninstall the WSL Components
With all versions of Linux removed, you can remove the WSL app and its related components. As with the previous step, you can remove WSL in the same way you would remove any other app.
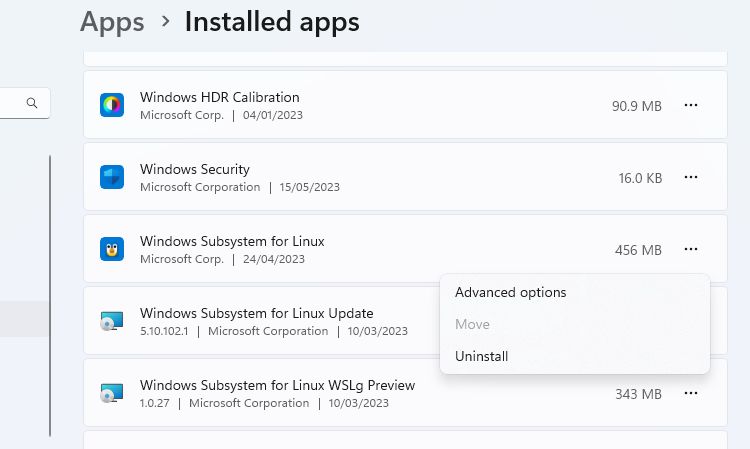
Go to Settings > Apps > Apps & Features. Scroll down to the bottom of your apps list to find Windows Subsystem for Linux. Click the More button and select Uninstall. On Windows 10, click on the app name and then click Uninstall.

If you see any additional WSL components, such as the WSL update or WSLg Preview, uninstall these in the same way.
Uninstall WSL and Virtual Machine Platform
The final part of the process is to uninstall the WSL core files and disable the option in the Windows Optional Features panel.
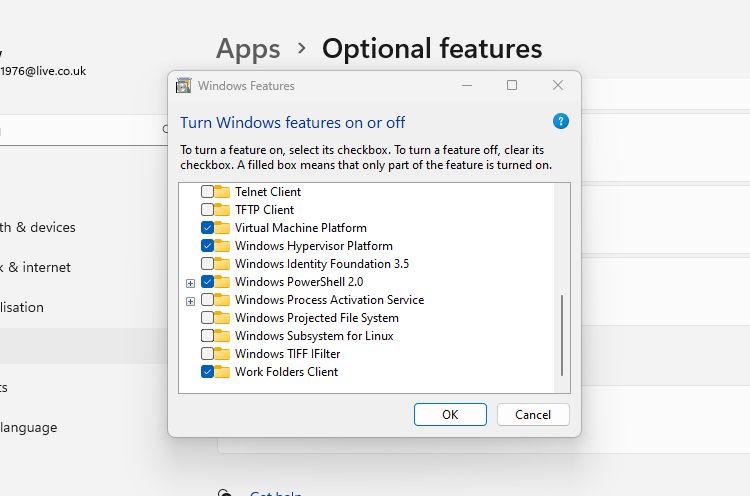
- Open the Windows Features panel by going to Settings > Apps > Optional Features > More Windows Features. You can also search for Windows Features and click Turn Windows features on or off.
- Scroll down the list of features to find and deselect the Windows Subsystem for Linux option.
- If you don’t need to run any other virtual environments, you can also deselect the Virtual Machine Platform option.
- Click Ok, and then restart your computer.

WSL should now be completely removed from your computer. It will receive no automatic updates, and you won’t be able to interact with it in any way. If you need it in the future, here’s how to install WSL through the Microsoft Store on a Windows PC.
Removing WSL From Your Windows PC
You can install WSL on your Windows computer with a single command. Uninstalling it, if you no longer need or want it on your PC, is not quite as simple. By following the three simple steps detailed here, you can ensure that all WSL files and components are removed.
If you don’t want or need Windows Subsystem for Linux on your computer, you can remove it. However, that process can include more than just clicking the uninstall button in Windows Settings. It isn’t difficult, but it’s important to remove files in the correct order.
Here are the steps you need to follow to completely remove WSL from your Windows PC.
Also read:
- [New] Discovering 8 Cost-Effective Video Meeting Software Options
- [New] In 2024, UltimateVision Recorder for W10
- [Updated] 2024 Approved Expert Advice on YouTube Short Pitfalls
- [Updated] 2024 Approved Speech Recognition and Use It Free
- Cut Back on Windows' High Contrast Glare
- Detailed Guide to Fixing WinError 0X80071a90
- Fix That Frozen Trackpad: Effective Techniques to Restore Laptop Functionality
- Getting Up-to-Date with Apple's Latest Software: Current iOS and iPadOS Releases Unveiled!
- How to Use Telnet Effectively on Windows 10/11 Devices
- In 2024, Turbo Speed for Snapchat Newcomers Video Edition
- Perfect Pensmanship: ChatGPT for Academic Notes
- Restoring Original Windows Search Settings
- Solving Graphics Error: Fix for Windows Device Hang
- Steps to Resolve SystemSettings.exe Errors in Win11
- Tales That Echo Through Time Top 8 Halls for Storytellers
- Techniques for Overcoming Inaccessible Windows Files
- Troubleshoot and Reactivate Stalled WSReset in Windows
- Unleashing Power: How These 10 Tailored GPTs Surpass Standard ChatGPT Features
- Unveiling BlueScreenView: Usage Guide
- Title: Total Eradication of WSL From Windows 11 OS
- Author: Richard
- Created at : 2024-11-30 00:05:29
- Updated at : 2024-12-07 00:43:19
- Link: https://win11-tips.techidaily.com/total-eradication-of-wsl-from-windows-11-os/
- License: This work is licensed under CC BY-NC-SA 4.0.