
Troubleshooting Disabled User Sign-In on Windows
Troubleshooting Disabled User Sign-In on Windows
A PIN is a convenient way to sign into your computer. However, when you try to sign in with a PIN, you may encounter the “this sign-in option is disabled because of failed sign-in attempts” error. This is followed by a message asking you to use a different sign-in method or wait for 2 hours and try again.
Windows may show this error for various reasons, including a temporary glitch, corrupted login PIN, or incorrect account configuration. Here, we guide you through a few troubleshooting steps to resolve the error and regain access to your computer.
What Causes the “Sign-In Option Is Disabled Because of Failed Sign-In Attempts” Error?
The error message indicates the possible causes for the error are multiple failed sign-in attempts or repeated shutdowns. However, in most instances, the error pops up without reason, even when you are using the correct PIN.
To bypass this error, you can sign in using a different login option, such as a password. If you don’t have a password, you’ll need to wait at least 2 hours before attempting to sign in again.
The exact reason for the issue is unknown. What we do know is that Windows uses a dictionary attack mitigation feature to prevent threat actors from breaking into your computer to gain unauthorized. When triggered, Windows will temporarily ignore the provided authorization, which, in this instance, is your sign-in PIN.
Furthermore, common contributing factors to this error include a recent Windows upgrade, a corrupted login PIN or user profile, or a damaged Windows image.
Fortunately, you can fix this error by resetting the login PIN and a registry tweak to disable the account lockout option. Follow all the steps in the given order, and you should be able to fix the error and log in to your Windows computer.
1. Keep Your Device Powered On for Two Hours
If you don’t have an alternate sign-in option enabled or have forgotten the password, you’ll need to wait for two hours and then try to sign in again with the sign-in PIN. Make sure your PC remains turned on for two hours for it to work.
The two-hour cooling period seemingly comes with strings attached. Once you see the wait for two hours message after entering the PIN, reboot your computer. When the login screen appears, don’t sign in immediately. Wait for two hours and then put in your PIN to sign in.
That said, if you can’t wait for two hours, try to log in using an alternate sign-in option, such as a password or biometric authentication. To use the alternate sign-in option, click the dotted icon under the Sign-in options in the error screen to log in with your password.
2. Reset the Account Password from the Sign-In Screen
If you have forgotten your password, you can reset your sign-in password from the sign-in screen. To confirm the authenticity of the user, Windows will need you to answer the security questions correctly to perform a reset.
In some instances, Windows may prompt you to sign in with your Microsoft account password and send a 4-digit code to your backup email address to authenticate the password reset attempt.
To reset a Windows account password:
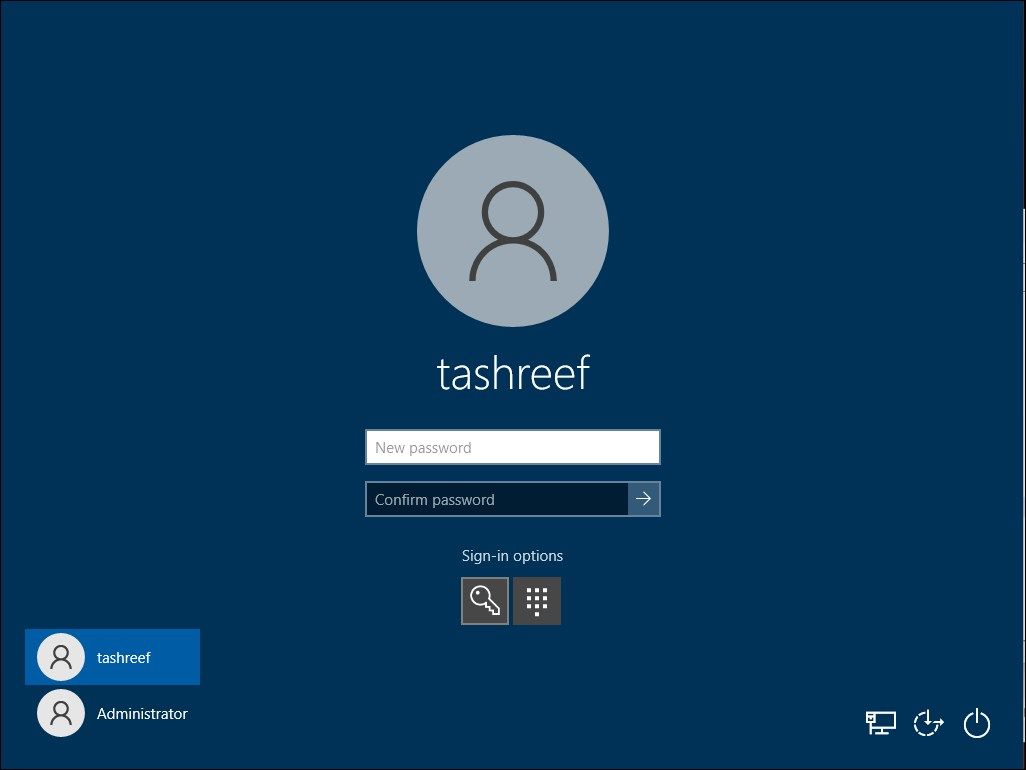
- On the login screen, type any password and hit Enter. Windows will show the password as incorrect; click OK.
- Next, click the Reset password option.

- Now, you must answer the three security questions and press Enter. If the password is correct, a password reset option will appear.
- Enter your new password and then re-enter the password to confirm the same.
- Press Enter to sign-in to your user account.

After a successful login, you can reset your PIN, disable the sign-in attempt threshold, and check the user profile configuration to see if your account is disabled. Needless to say, you must be signed to apply this fix.
If you can’t sign in, use a different user account on your computer and follow the steps below. If you have forgotten the account password, follow this resource to reset a forgotten Windows administrator password .
If you don’t have an alternate user account setup, enable the built-in administrator account in Windows 11 . Skip to the later part of the article that shows how to enable the built-in administrator account without the need to sign in.
Once you can sign in, follow these steps to check your account status.
3. Check Your Account Status Using Local Users and Groups
Windows system administrators can manage user accounts and groups on a local computer using the Microsoft Management Console (MMC) snap-in, Local User, and Groups. To fix the problem, check if the account is configured as locked or disabled in the account properties.
Local Users and Groups is only available on the Pro and Enterprise edition of the OS. If you are using Home, skip to the next solution.
- Press Win + R to open Run.
- Type lusrmgr.msc and click OK. This will open the Local User and Groups snap-in.
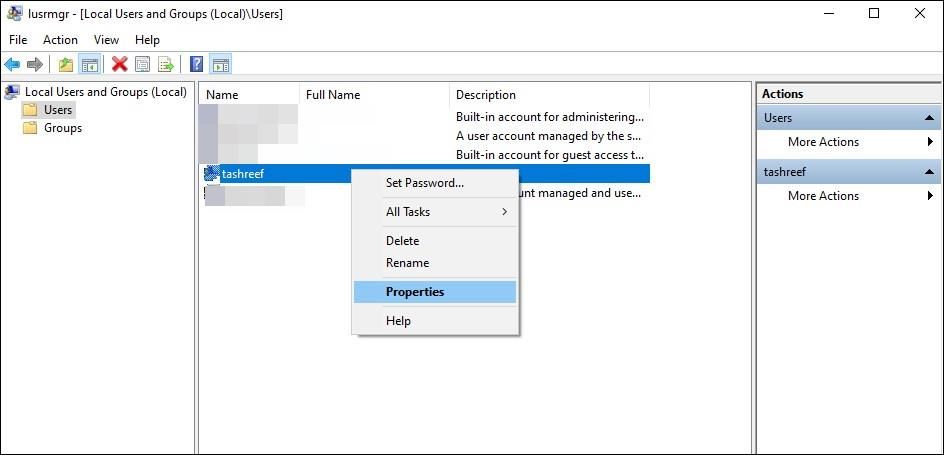
- Double-click on the Users folder.
- Locate and right-click on your user account name.
- Next, select Properties.
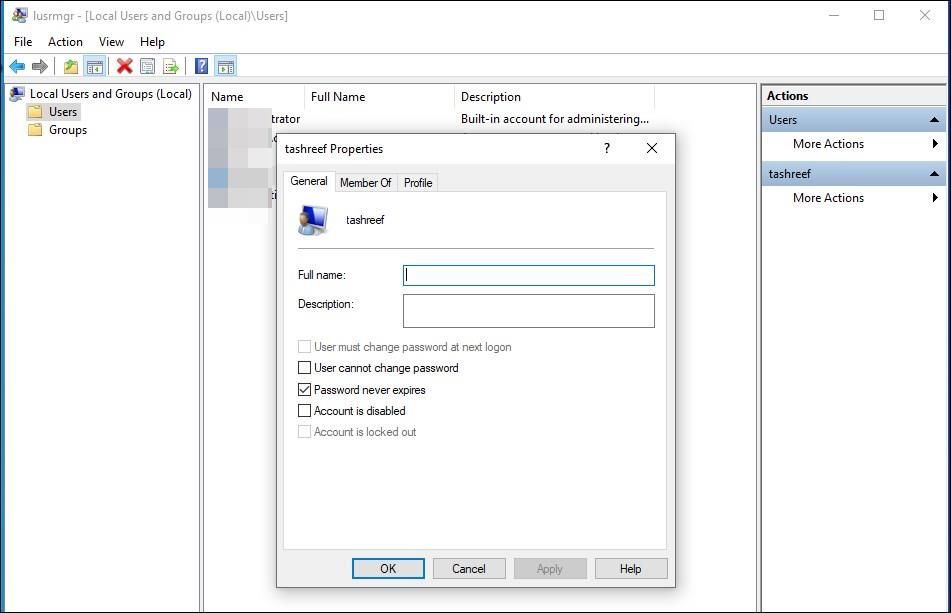
- In the Properties dialog, open the General tab.
- Here, uncheck Account is disabled, and Account is locked out option.
- Click Apply and OK to save the changes.
If both the options are already unchecked, proceed to the next solution.
4. Reset the Windows Account PIN
Assuming the problem is due to a corrupt account PIN, a PIN reset can help you fix the problem. You can change your account PIN in Windows from the Settings app. You’ll need to authenticate the PIN change process with your current PIN, so keep that handy.
If you have forgotten your PIN, use the I forgot my PIN option to reset your PIN using your Microsoft account. After resetting the PIN, log in with the new PIN and check if the error is resolved.
If that doesn’t work, run the following batch script to remove Pin for all users. However, you must be signed in with an administrator account to execute this script. Here’s how to do it.
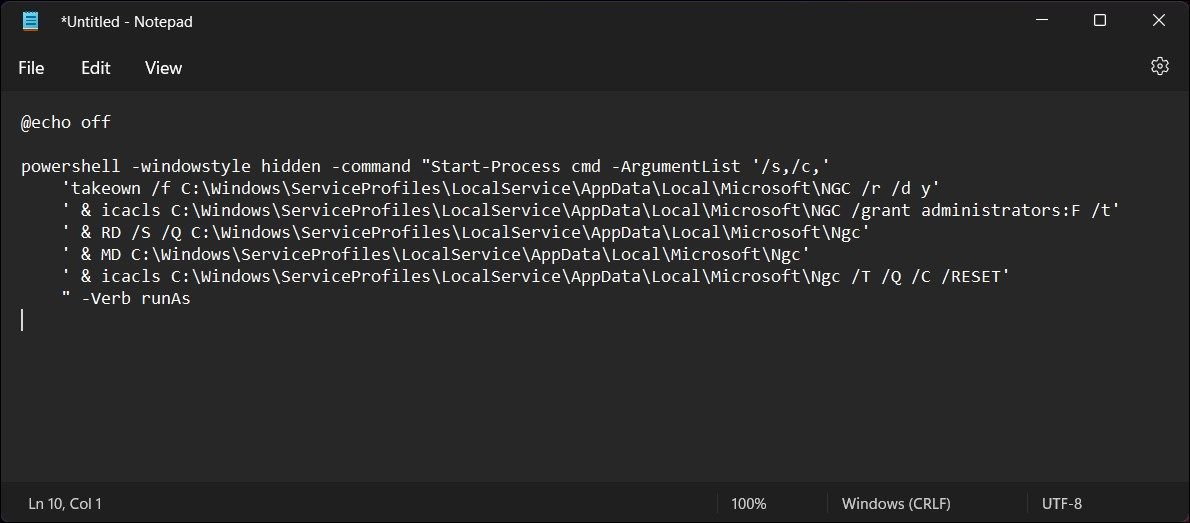
- Open the Notepad app. Search for Notepad in Windows search and open the app.
DLNow Video Downloader
- Next, copy and paste the following script into the Notepad file:
@echo off powershell -windowstyle hidden -command "Start-Process cmd -ArgumentList'/s,/c,' 'takeown /f C:\Windows\ServiceProfiles\LocalService\AppData\Local\Microsoft\NGC /r /d y' '& icacls C:\Windows\ServiceProfiles\LocalService\AppData\Local\Microsoft\NGC /grant administrators:F /t' '& RD /S /Q C:\Windows\ServiceProfiles\LocalService\AppData\Local\Microsoft\Ngc' ' & MD C:\Windows\ServiceProfiles\LocalService\AppData\Local\Microsoft\Ngc' '& icacls C:\Windows\ServiceProfiles\LocalService\AppData\Local\Microsoft\Ngc /T /Q /C /RESET' "-Verb runAs - Press Ctrl + S to open the Save dialog and name the file Remove-Win-Account-PIN.bat.
- Next, click the Save as type drop-down and select All files.
- Click Save to create the batch script.
 DLNow Video Downloader
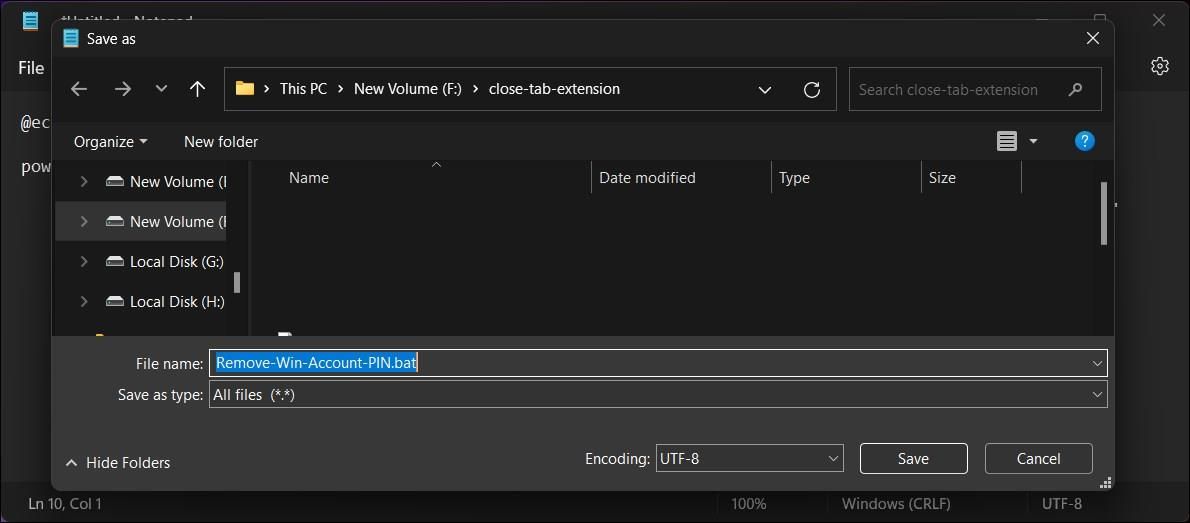
To execute the script, double-click on it and click Yes when prompted by User Account Control.
Upon execution, the script will PIN for all the user accounts on your computer. Once done, you can set up a new PIN for your user account on Windows .
5. Change the Account Lockout Threshold Policy
Like the dictionary attack mitigation feature, the administrator can configure a local computer to specify the maximum number of incorrect login attempts. This is done by modifying the Account lockout threshold policy in Group Policy Editor.
Similar to Local Users and Groups, by default, the Group Policy Editor is only available on the Pro, Enterprise, and Education editions of the Windows operating system. While not included out of the box, you can still enable Group Policy Editor in Windows Home using a batch script hack .
To change the Account Lockout Policy:
- Press Win + R to open Run.
- Type gpedit.msc and click OK to open the Group Policy Editor.
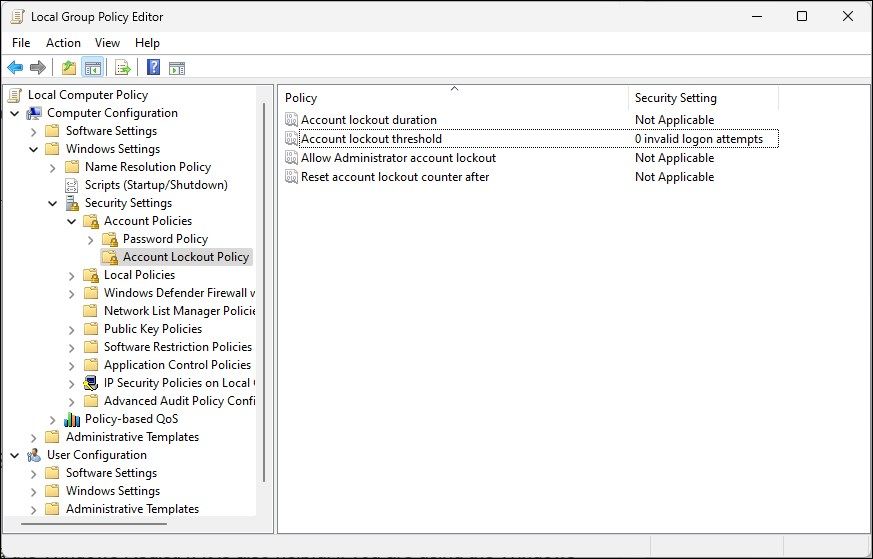
- Next, in Group Policy Editor, navigate to the following location:
Computer Configuration\Windows Settings\Security Settings\Account Policies\Account Lockout Policy - In the right pane, double-click on Account lockout threshold.
OtsAV Radio Webcaster
- Type 0 in the Account will not lock out field.
- Click Apply and OK to save the changes.
 OtsAV Radio Webcaster
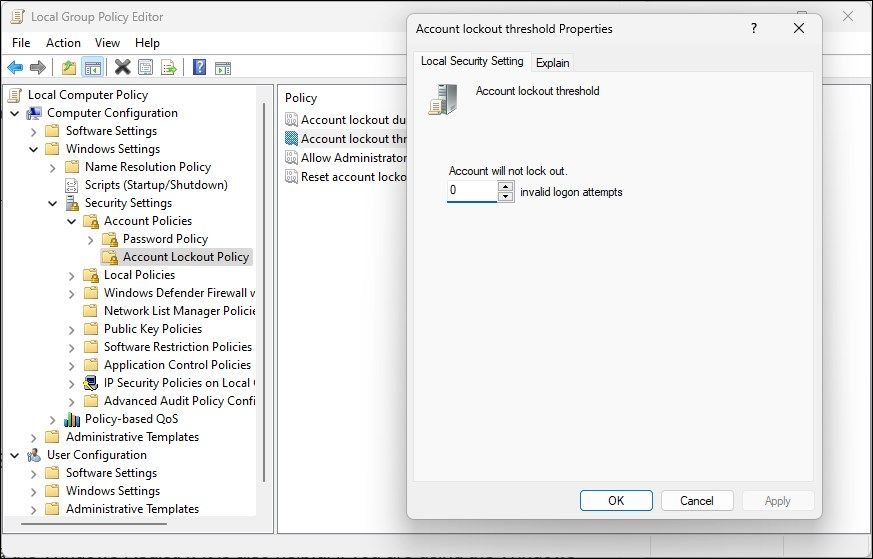

6. Edit the Account Lockout Policy Using Registry Editor
You can also configure the account lockout policy on your machine via the Windows Registry. It is also helpful if you are using the Windows Home edition without Group Policy Editor.
Making modifications to the Windows Registry involves risk.Create a restore point and make a registry backup before applying any changes to the registry entries.
To change the Account Lockout policy in Registry Editor:
- Press Win + R to open Run.
- Type regedit and click OK to open Registry Editor.
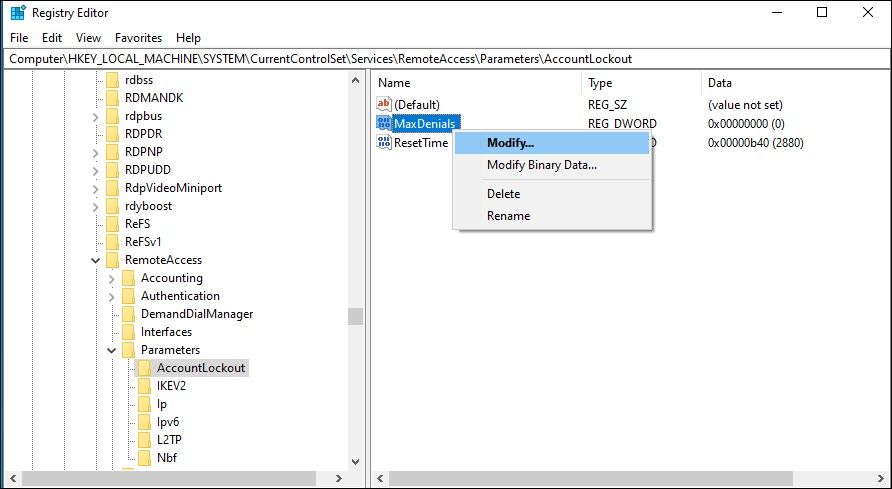
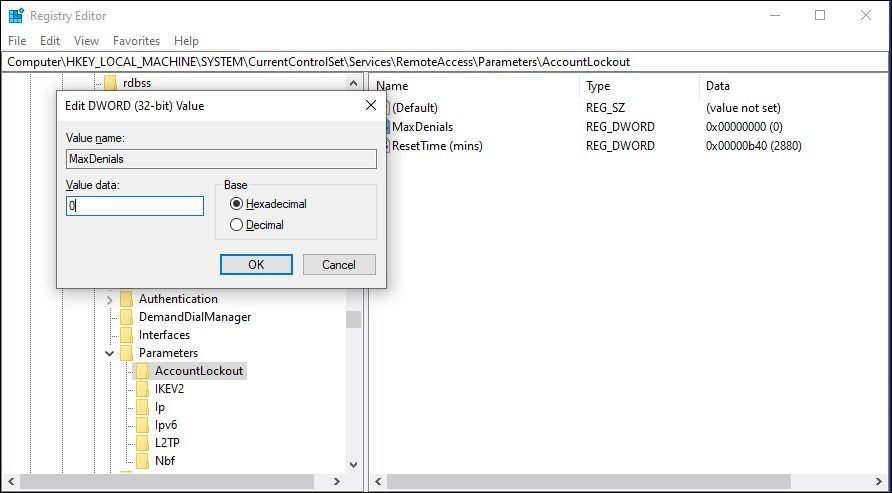
- In Registry Editor, navigate to the following location:
HKEY_LOCAL_MACHINE\SYSTEM\CurrentControlSet\Services\RemoteAccess\Parameters\AccountLockout - In the right pane, locate and right-click on MaxDenials.
- Select Modify.
- Type 0 in the Value data field and click OK to save the changes.
- Close Registry Editor and reboot your computer to apply the changes.
After the restart, you can sign in without receiving the sign-in is disabled notification. If the issue persists, try to clear the TPM on Windows . This can be a tricky solution depending on how your account is set up. Clearing TPM may lock you out of your computer. Attempt this only if you have a password-based sign-in option enabled.
If all else fails, try third-party recovery tools like the Trinity Rescue Kit. It is a useful little utility that can help you reset your password.
Resolving the “Disabled Sign-In Options Due to Failed Attempts” Error on Windows
Windows 10 and 11 computers can act up and lock you out of your system due to a glitch or system malfunction. However, you can bypass this cooling period by signing in with an account password or a PIN reset.
Windows may show this error for various reasons, including a temporary glitch, corrupted login PIN, or incorrect account configuration. Here, we guide you through a few troubleshooting steps to resolve the error and regain access to your computer.
- Title: Troubleshooting Disabled User Sign-In on Windows
- Author: Richard
- Created at : 2024-08-16 01:47:15
- Updated at : 2024-08-17 01:47:15
- Link: https://win11-tips.techidaily.com/troubleshooting-disabled-user-sign-in-on-windows/
- License: This work is licensed under CC BY-NC-SA 4.0.