Troubleshooting Microphone Issues: Live Recording Fixes in OBS, W11

Troubleshooting Microphone Issues: Live Recording Fixes in OBS, W11
OBS Studio is a free-to-use app that allows you to record gameplay and stream online. However, like any other application, it has its own share of flaws. Many users have reported that OBS Studio fails to record audio on their Windows 11 PC.
Luckily, it’s a very common issue and can quickly be resolved. Here are all the working solutions that will help you fix OBS Studio if it is unable to record audio.
1. Restart OBS Studio
Before getting into advanced troubleshooting, consider restarting OBS Studio. The best way is to launch the Task Manager and close all the OBS Studio-related processes.
Next, relaunch the OBS Studio and check if it is able to record audio. If not, it’s time for some more complicated fixes.
2. Launch OBS Studio With Administrative Rights
Oftentimes, issues in third-party applications occur due to a lack of administrative privileges. It can happen even when you’re using an administrator account on your computer.
The best way to resolve this problem is to configure OBS Studio to always launch as an administrator. To do that, follow the below steps:
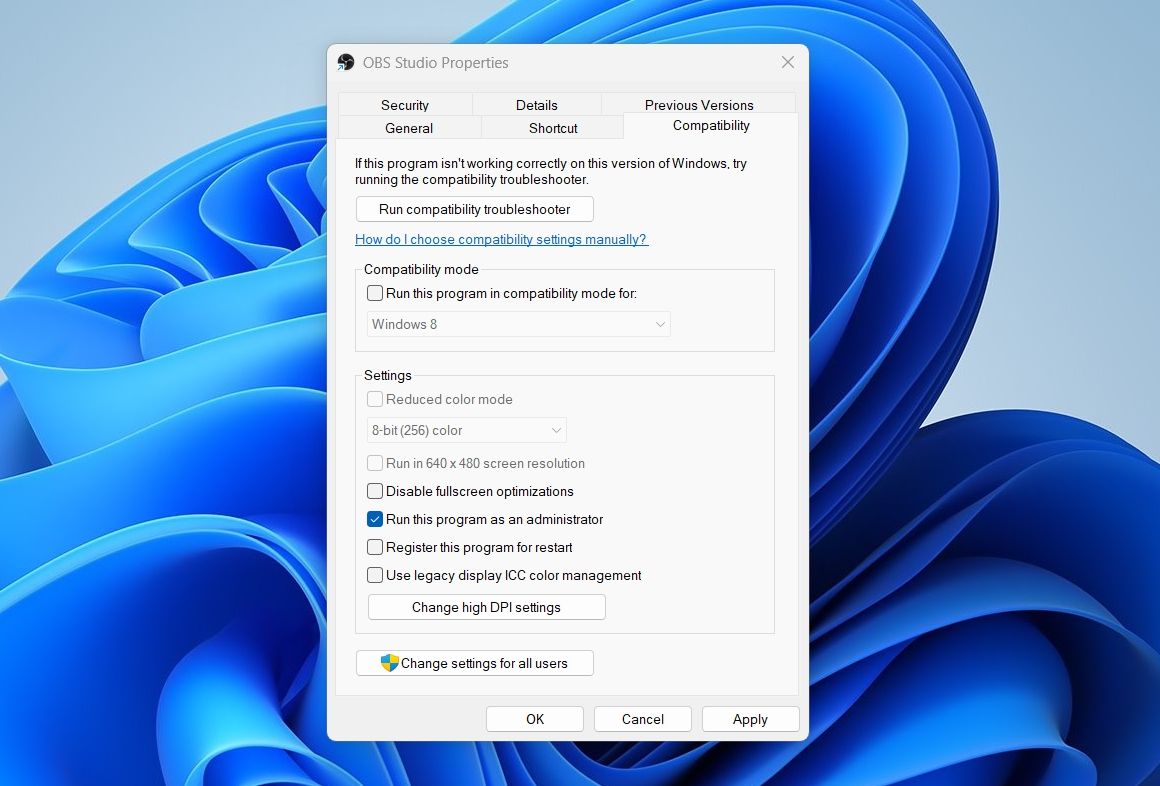
- Right-click on the OBS Studio icon and chooseProperties from the context menu.
- In the Properties window, switch to theCompatibility tab.
- Check theRun this program as an administrator option.

- ClickApply >OK to save the settings.
3. Unmute OBS Studio in the Settings App
OBS Studio will fail to record audio if it is muted in the Settings app. Here’s how to check and change OBS Studio sound settings in the Settings app.
- Open theSettings app (see how to launch the Settings app on Windows ) and chooseSystem from the left sidebar.
- SelectSound from the right pane.
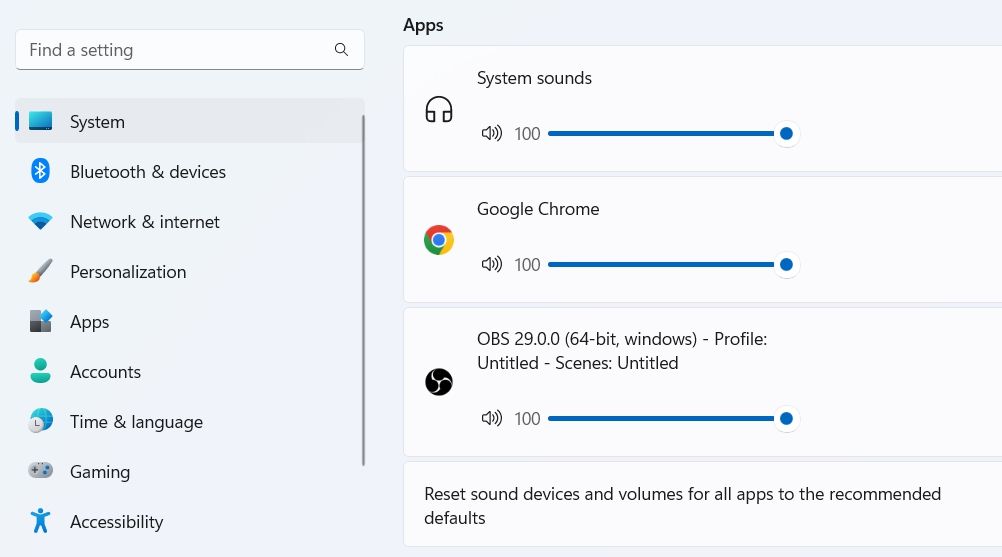
- Under theAdvanced section, choose theVolume Mixer option.
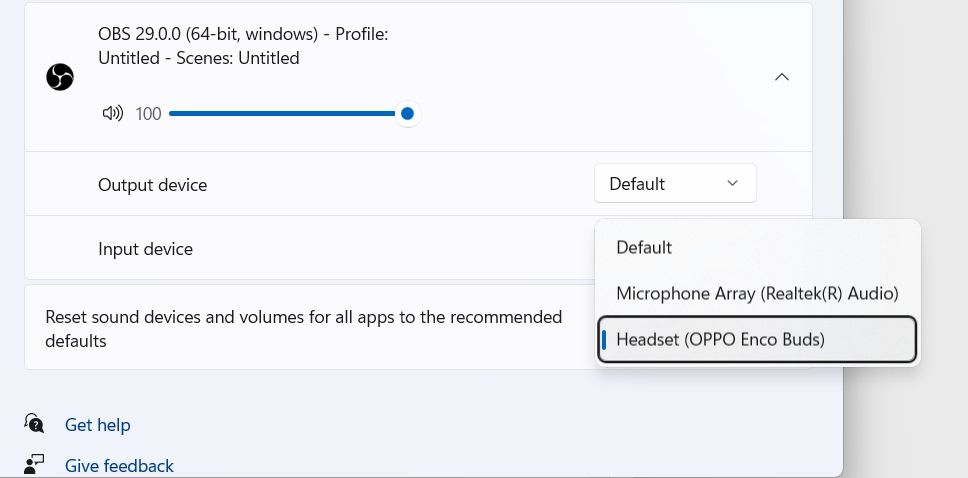
- Under theApps section, unmute OBS Studio if muted and adjust the slider accordingly.

- Also, click the drop-down icon next to OBS Studio, then choose the correct input device.

Restart OBS Studio and check if the problem persists.
4. Use the Correct Recording Device
Windows allows you to manually choose recording and playback devices. But if you’ve chosen an incorrect recording device in Settings, then you’re likely to face this issue. To fix this, you will have to configure the correct device as the default recording option. Here’s how to do that:
- Open theSettings app, and head towardsSystem >Sound.
- ChooseMore sound settings under theAdvanced section.
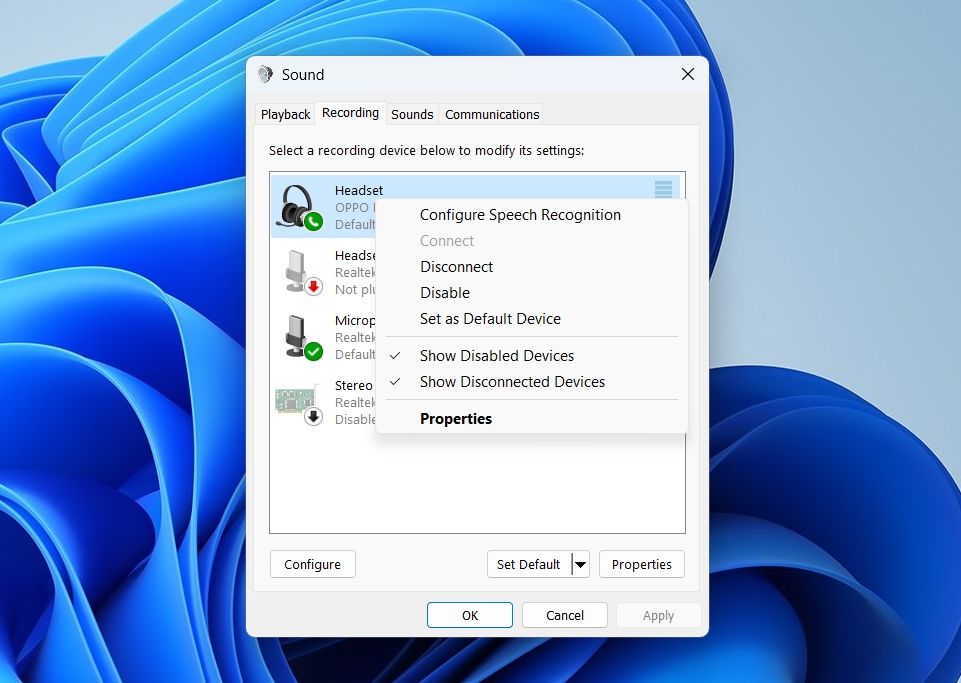
- Switch to theRecording tab.
- Right-click on the correct recording device and choose theSet as Default Device option from the context menu.

- ClickApply and thenOK.
5. Allow OBS Studio to Access Microphone
Windows 11 is big on privacy and security . The OS lets you allow or restrict apps from accessing certain services of your computer. For instance, you can restrict apps from using the microphone on your computer.
As such, if you’ve mistakenly restricted OBS Studio from accessing the microphone, then you’ll face audio issues. The solution here is to allow OBS Studio to access the microphone. Here’s how:
- Open the Settings app and choosePrivacy & Security from the left sidebar.
- Under theApp permission section, select theMicrophone option.
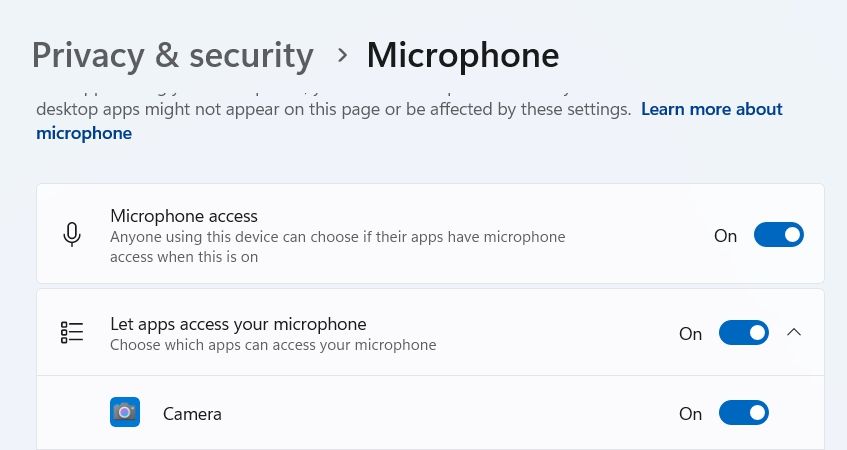
- Enable the toggle next to theMicrophone access option.

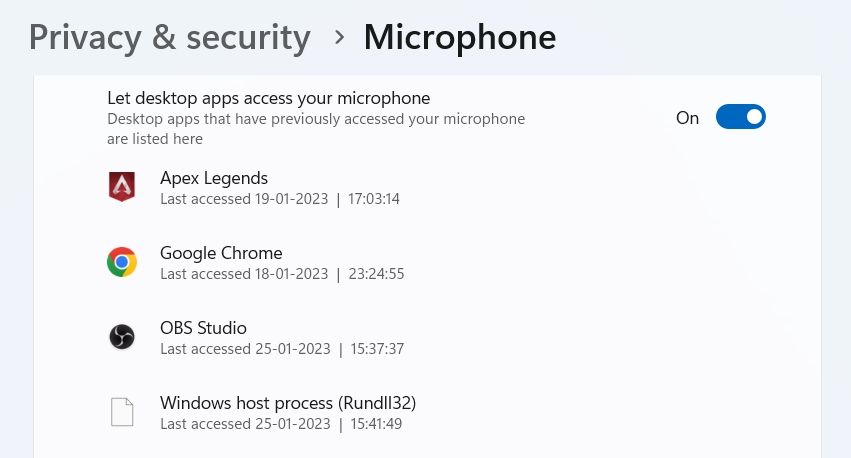
- Next, enable the toggle next toLet desktop apps to access your microphone option.

6. Change the OBS Studio Settings
OBS Studio lets you manually set audio devices and adjust their settings as per your preference. However, OBS Studio will be unable to record audio if you have chosen an incorrect audio device within its settings.
So, head toward the OBS Studio audio settings, and choose the correct audio device to solve the issue. Here are the steps to do it:
- Launch OBS Studio and chooseFile from the top-left corner.
- ChooseSettings from the context menu.
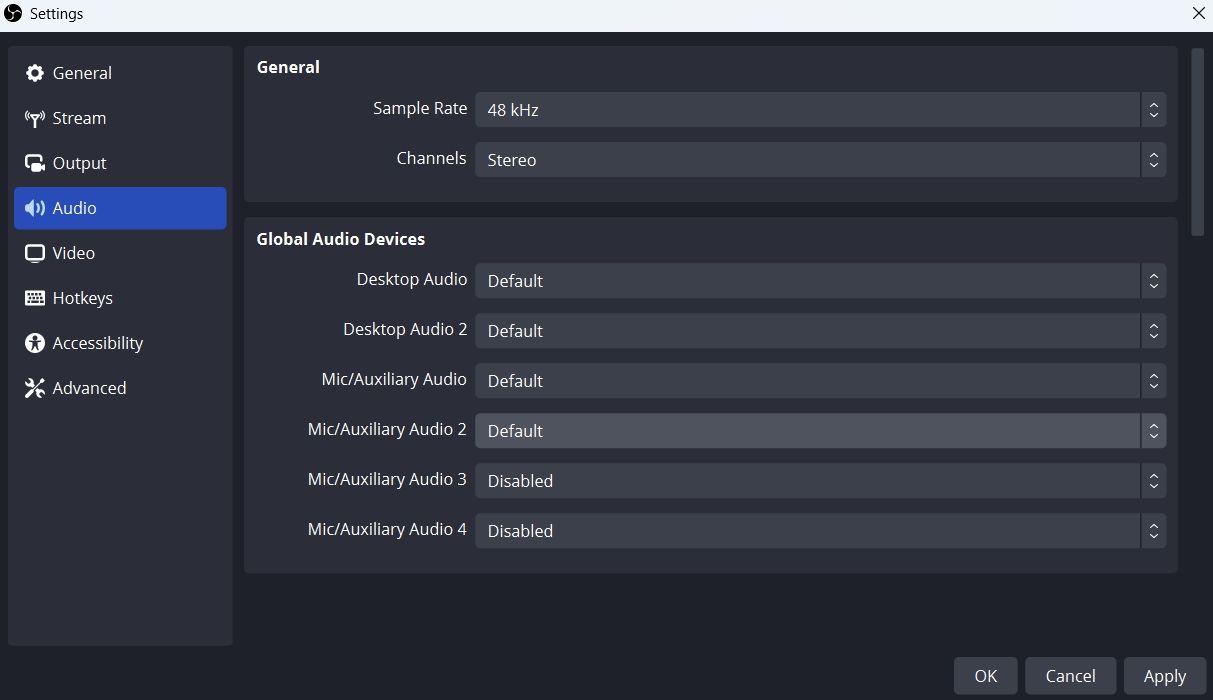
- In the Settings window, selectAudio from the left sidebar.
- Under theGlobal Audio Devices section, click the drop-down icon next toDesktop Audio andDesktop Audio 2 and chooseDefault in both options.
- Next, click the drop-down icon next toMic/Auxiliary Audio andMic/Auxiliary Audio 2 and chooseDefault in both options.

- ChooseApply >OK to save the changes.
7 . Adjust the Audio Mixer Settings
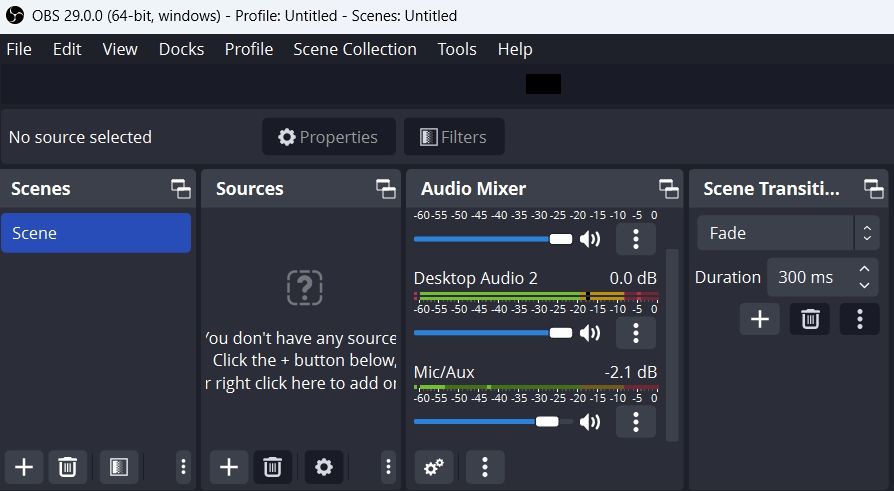
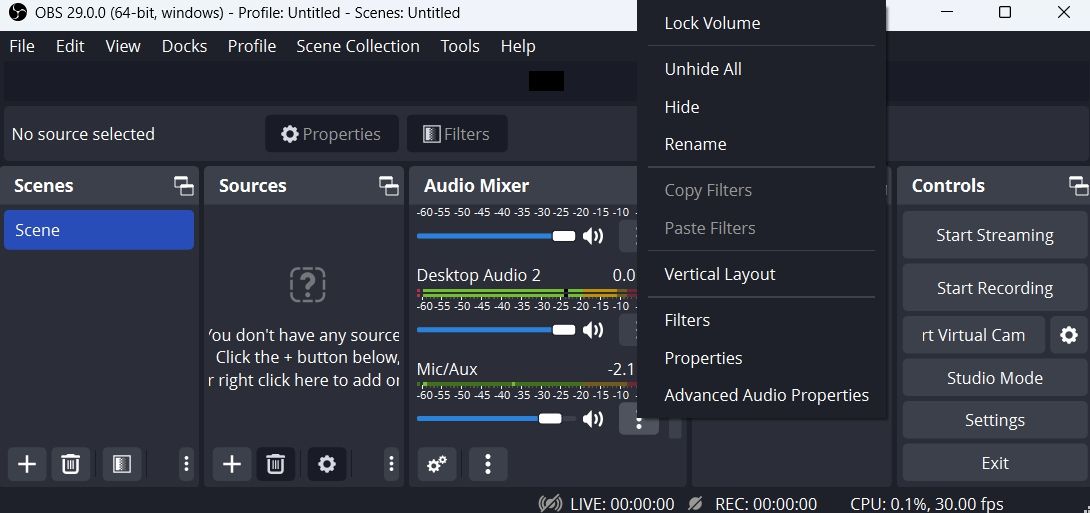
The next solution on the list is to adjust the audio mixer settings of the OBS Studio. Here’s how:
- Open OBS Studio.
- Under theAudio Mixer section, adjust theMic/Aux slider to-2.1dB.


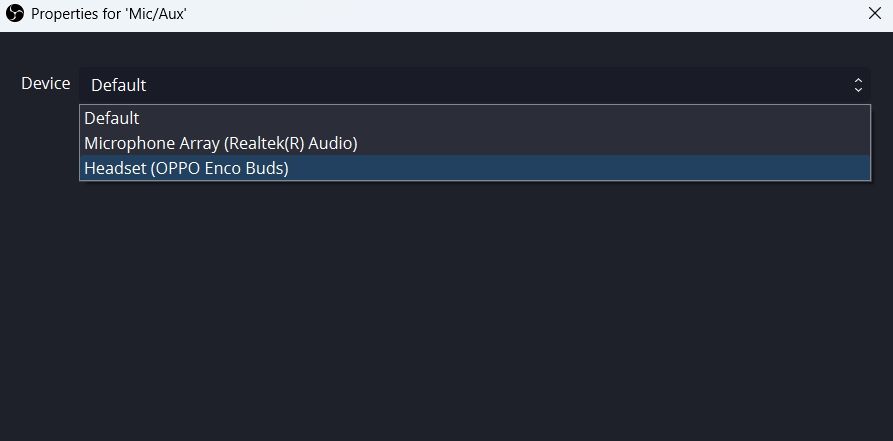
- Click the three dots next to Mic/Aux and chooseProperties.
- Click the drop-down icon next toDevice, select your default recording device and clickOK.


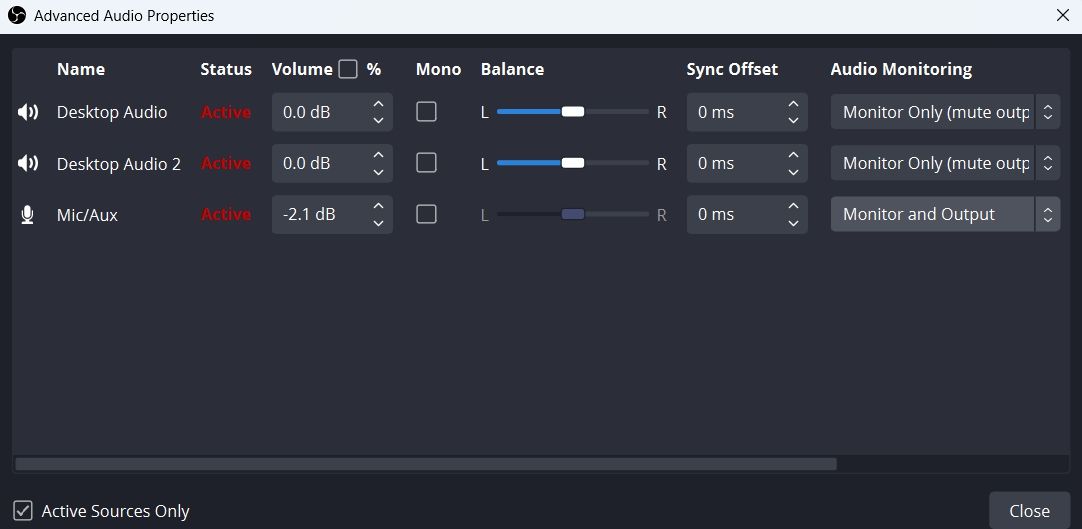
- Next, click the three dots next to Mic/Aux again and chooseAdvanced Audio Properties.

- Under theAudio Monitoring tab, chooseMonitor and Output forDesktop Audio andMonitor Only (mute output) forMic/Aux.

 PaperScan Professional: PaperScan Scanner Software is a powerful TWAIN & WIA scanning application centered on one idea: making document acquisition an unparalleled easy task for anyone.
8. Download the Latest Audio Driver Updates
A corrupt or outdated audio driver can also be a prime reason why OBS Studio is unable to record audio. To fix this, you will have to update the audio driver on Windows .
You can do that by following the below steps:
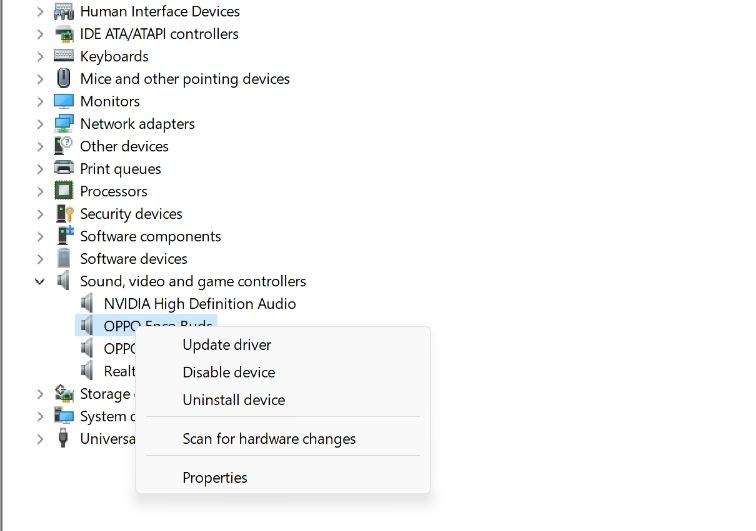
- Press theWin + X hotkeys and chooseDevice Manager from the list.
- Double-click theSound, video, and game controllers node to expand it.
- Right-click on your default recording device and selectUpdate driver from the context menu.

- ChooseSearch automatically for drivers option in the window that crops up.
Next, allow Windows to search for and download any available driver updates for your recording device.
9. Reinstall OBS Studio
Are you still facing the issue? If yes, then there’s something wrong with the OBS Studio installation file that’s causing the problem. The only solution, in this case, is to reinstall the OBS Studio.
## Enjoy Uninterrupted Recording Again on OBS Studio for WindowsOBS Studio is everyone’s first choice to stream online, and there’s a strong reason behind it. But sometimes, misconfigured Windows or OBS Studio settings can cause the audio issue. Fortunately, you can quickly get rid of this issue by following the above fixes.
However, if you think it’s time for a change, there are a few OBS Studio alternatives that are worth a try.
- Title: Troubleshooting Microphone Issues: Live Recording Fixes in OBS, W11
- Author: Richard
- Created at : 2024-08-16 02:07:46
- Updated at : 2024-08-17 02:07:46
- Link: https://win11-tips.techidaily.com/troubleshooting-microphone-issues-live-recording-fixes-in-obs-w11/
- License: This work is licensed under CC BY-NC-SA 4.0.

 vMix Pro - Software based live production. vMix Pro includes everything in vMix 4K plus 8 channels of Replay and 8 vMix Call
 OtsAV DJ Pro


 PaperScan Professional: PaperScan Scanner Software is a powerful TWAIN & WIA scanning application centered on one idea: making document acquisition an unparalleled easy task for anyone.
