Unblocking Problematic Java Setup on Windows PCs
Unblocking Problematic Java Setup on Windows PCs
Key Takeaways
- Use the Program Install and Uninstall Troubleshooter from Microsoft’s website to fix Java installation issues on your Windows 10 or 11 PC.
- Try installing Java with the offline installer for a more reliable installation process.
- Run the Java installer file with administrator rights to ensure full system access.
There are many old Java-based Windows software packages for which users still need to install Java on their PCs to run. However, some users can’t install the desktop Java software when needed because of installation issues. Or users can’t update Java when such issues arise.
Java installation errors have variable messages, but they all mean Java failed to install. Some reported error messages say, “Unable to install Java” or “Java install did not complete.” This is how you can fix Java installation errors on your Windows 10 or 11 PC.

1. Run the Program Install and Uninstall Troubleshooter
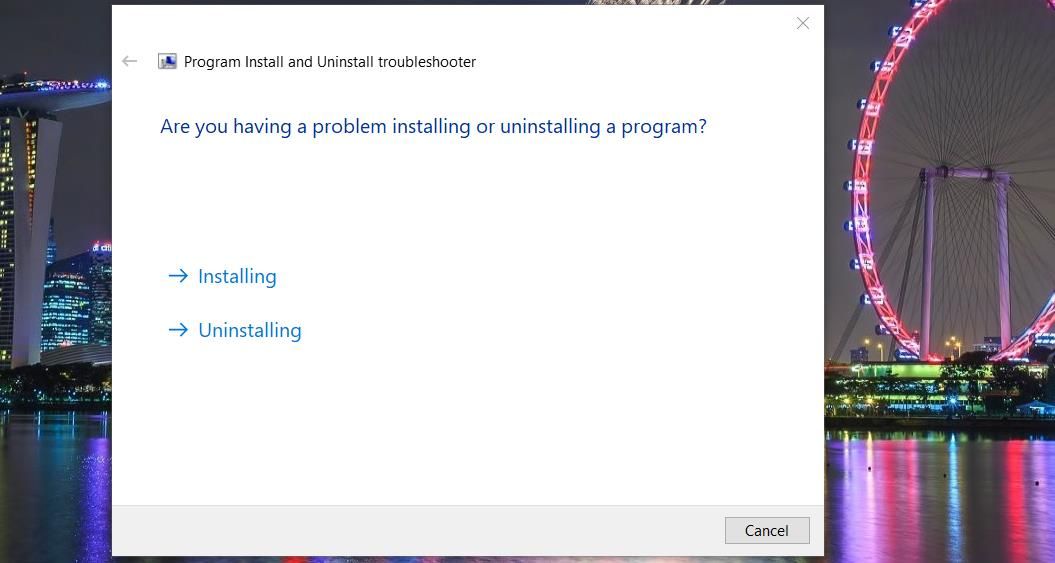
Some users have said the Program Install and Uninstall Troubleshooter for Windows helped them fix their Java installation issues. That’s not a troubleshooter included with Windows, but you can download it from Microsoft’s website. You can run the Program Install and Uninstall Troubleshooter like this:
- Select Download troubleshooter on the Microsoft website page .
- Bring up the Downloads web browser tab (accessible with a Ctrl + J keyboard shortcut in Chrome, Edge, Firefox, and Opera).
- Click the MicrosoftProgram_Install_and_Uninstall.meta.diagcab file in the Downloads tab.

- Select Next > Installing to start the troubleshooting.

2. Try Installing Java With the Offline Installer
If the Java installation error arises with the online installer or with automatic updates enabled, try utilizing the alternative offline Java installer. The offline Java installer is often more reliable than the buggy online one for which a stable internet connection is required.
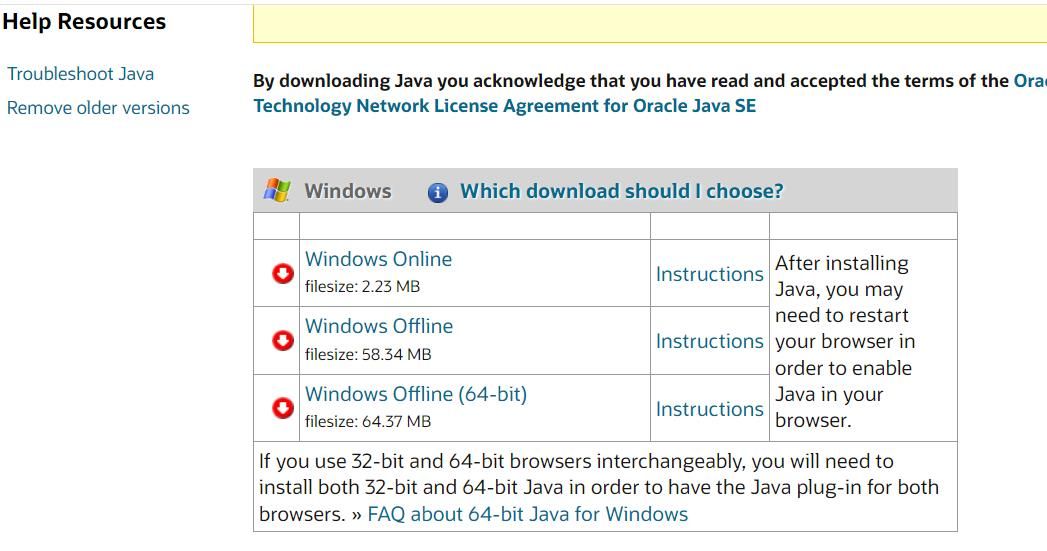
You can obtain that installation package by clicking the Windows Offline (64-bit) link on the Java download page . If you have a 32-bit Windows 10 platform, click the Windows Offline package link. Double-click the downloaded Java installation file to run the installer and select the Install option from there.

3. Run the Java Installer File With Administrator Rights
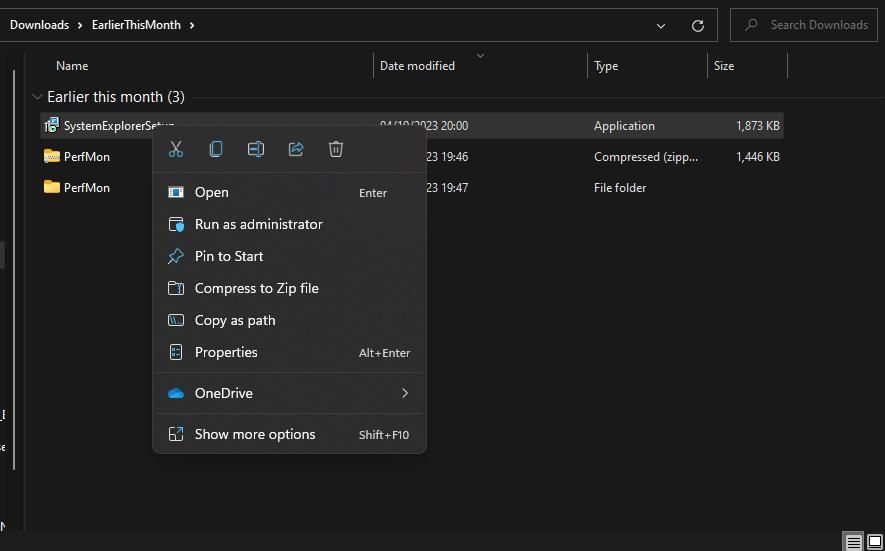
It might help to run the Java installer file with admin rights to ensure it has full system access rights. This can be done by right-clicking the Java installer file and selecting a Run as administrator context menu option.
 PCDJ Karaoki is the complete professional karaoke software designed for KJs and karaoke venues. Karaoki includes an advanced automatic singer rotation list with singer history, key control, news ticker, next singers screen, a song book exporter and printer, a jukebox background music player and many other features designed so you can host karaoke shows faster and easier!
4. Uninstall an Old Java Version
Java installation issues can often arise because of older Java packages installed on PCs. Many users have confirmed they’ve fixed the Java error code 1603 installation issue by uninstalling old Java versions. You can detect and remove outdated Java versions on your PC with the Java Uninstall Tool as follows:
- Open this Java Uninstall Tool page .
- Click I Agree to the Terms to download the Java Uninstall Tool.
- Press the Windows logo + E key combination to go to the folder containing the downloaded Java Uninstall Tool file.
- Double-click the JavaUninstallTool.exe file.
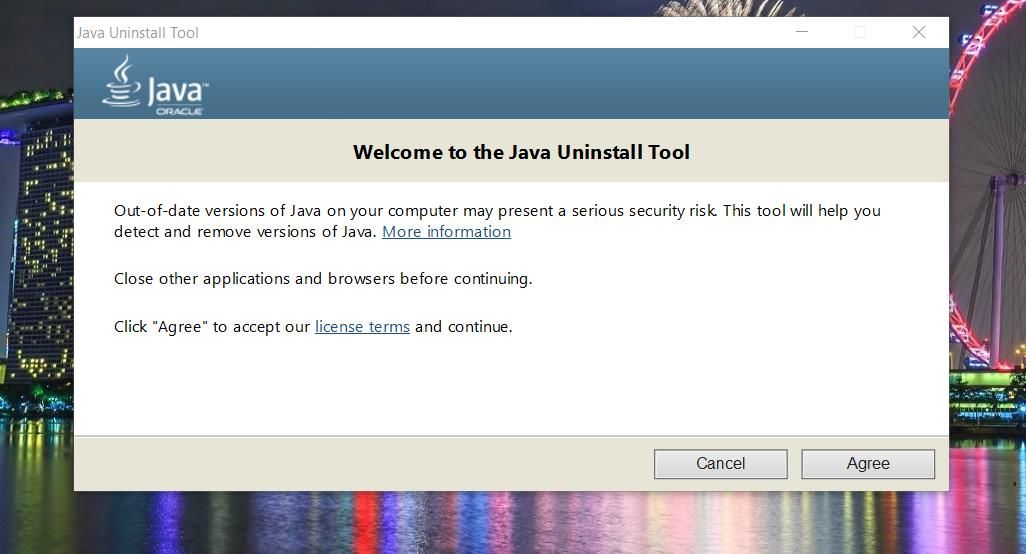
- Click Agree to continue with Java detection.
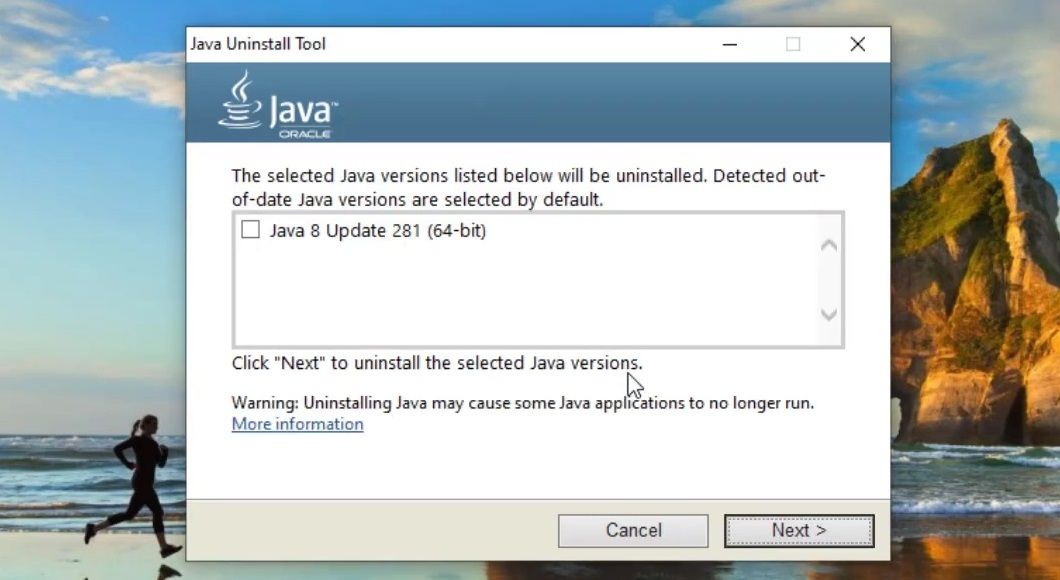
- Select the checkbox for any detected Java version.
- Click Next and Yes to remove the selected Java version.
- Select Yes again to remove the Java Cache.
- Click Get Java to download the latest version. Then try installing Java again.

5. Repair Windows’ System Files
System file corruption isn’t widely confirmed to cause any specific Java installation error. However, don’t rule out the possibility of corrupted system files causing installation issues on your PC. You can easily repair corrupted Windows files by running System File Checker and Deployment Image Servicing and Management scans with these Command Prompt commands:
`DISM /Online /Cleanup-Image /RestoreHealth
sfc /scannow`
6. Turn Off Antivirus Shields and Firewalls
Disabling antivirus protection is another resolution users confirm to have fixed Java installation issues with. Doing so will ensure a real-time antivirus shield can’t block the installation of Java. So, try temporarily off the antivirus shield for any third-party security software on your PC before attempting to install Java. Right-click the security app’s icon in the system tray to select an option for disabling it.
A firewall can also feasibly cause issues for the online Java installer at least. So, temporarily disable Microsoft Defender Firewall or a third-party alternative installed before running the Java installer to eliminate that potential cause. Our how to turn off Microsoft Defender Firewall guide includes instructions for disabling that firewall.
7. Reboot Windows With a Clean Boot
A clean boot is a stripped-down Windows startup that excludes third-party apps and services. Setting a clean boot stops third-party apps and services automatically starting with Windows. Applying this resolution can potentially fix some Java installation errors because it prevents third-party background apps or services from conflicting with the Java installation process.
Our guide on performing a clean boot on Windows tells you how to disable third-party startup items. When you’ve done that, have another go at installing Java after rebooting Windows 11/10. Then you can re-enable all the disabled startup items via Task Manager and MSConfig.

 OtsAV Radio Webcaster
Utilize Your Java-Based Software Packages Again on Your Windows PC
We can’t promise guaranteed solutions for all Java installation errors. However, the Windows troubleshooting methods above will likely fix Java not installing in most cases. Fixing your Java installation error with one of those methods will ensure you can run and utilize all Java-based programs on your Windows PC.
There are many old Java-based Windows software packages for which users still need to install Java on their PCs to run. However, some users can’t install the desktop Java software when needed because of installation issues. Or users can’t update Java when such issues arise.
Java installation errors have variable messages, but they all mean Java failed to install. Some reported error messages say, “Unable to install Java” or “Java install did not complete.” This is how you can fix Java installation errors on your Windows 10 or 11 PC.
1. Run the Program Install and Uninstall Troubleshooter
Some users have said the Program Install and Uninstall Troubleshooter for Windows helped them fix their Java installation issues. That’s not a troubleshooter included with Windows, but you can download it from Microsoft’s website. You can run the Program Install and Uninstall Troubleshooter like this:
- Select Download troubleshooter on the Microsoft website page .
- Bring up the Downloads web browser tab (accessible with a Ctrl + J keyboard shortcut in Chrome, Edge, Firefox, and Opera).
- Click the MicrosoftProgram_Install_and_Uninstall.meta.diagcab file in the Downloads tab.
- Select Next > Installing to start the troubleshooting.

 Easy GIF Animator is a powerful animated GIF editor and the top tool for creating animated pictures, banners, buttons and GIF videos. You get extensive animation editing features, animation effects, unmatched image quality and optimization for the web. No other GIF animation software matches our features and ease of use, that’s why Easy GIF Animator is so popular.
2. Try Installing Java With the Offline Installer
If the Java installation error arises with the online installer or with automatic updates enabled, try utilizing the alternative offline Java installer. The offline Java installer is often more reliable than the buggy online one for which a stable internet connection is required.
You can obtain that installation package by clicking the Windows Offline (64-bit) link on the Java download page . If you have a 32-bit Windows 10 platform, click the Windows Offline package link. Double-click the downloaded Java installation file to run the installer and select the Install option from there.
3. Run the Java Installer File With Administrator Rights
It might help to run the Java installer file with admin rights to ensure it has full system access rights. This can be done by right-clicking the Java installer file and selecting a Run as administrator context menu option.
 vMix Pro - Software based live production. vMix Pro includes everything in vMix 4K plus 8 channels of Replay and 8 vMix Call
4. Uninstall an Old Java Version
Java installation issues can often arise because of older Java packages installed on PCs. Many users have confirmed they’ve fixed the Java error code 1603 installation issue by uninstalling old Java versions. You can detect and remove outdated Java versions on your PC with the Java Uninstall Tool as follows:
- Open this Java Uninstall Tool page .
- Click I Agree to the Terms to download the Java Uninstall Tool.
- Press the Windows logo + E key combination to go to the folder containing the downloaded Java Uninstall Tool file.
- Double-click the JavaUninstallTool.exe file.
- Click Agree to continue with Java detection.
- Select the checkbox for any detected Java version.
- Click Next and Yes to remove the selected Java version.
- Select Yes again to remove the Java Cache.
- Click Get Java to download the latest version. Then try installing Java again.

5. Repair Windows’ System Files
System file corruption isn’t widely confirmed to cause any specific Java installation error. However, don’t rule out the possibility of corrupted system files causing installation issues on your PC. You can easily repair corrupted Windows files by running System File Checker and Deployment Image Servicing and Management scans with these Command Prompt commands:
`DISM /Online /Cleanup-Image /RestoreHealth
sfc /scannow`
6. Turn Off Antivirus Shields and Firewalls
Disabling antivirus protection is another resolution users confirm to have fixed Java installation issues with. Doing so will ensure a real-time antivirus shield can’t block the installation of Java. So, try temporarily off the antivirus shield for any third-party security software on your PC before attempting to install Java. Right-click the security app’s icon in the system tray to select an option for disabling it.

A firewall can also feasibly cause issues for the online Java installer at least. So, temporarily disable Microsoft Defender Firewall or a third-party alternative installed before running the Java installer to eliminate that potential cause. Our how to turn off Microsoft Defender Firewall guide includes instructions for disabling that firewall.
7. Reboot Windows With a Clean Boot
A clean boot is a stripped-down Windows startup that excludes third-party apps and services. Setting a clean boot stops third-party apps and services automatically starting with Windows. Applying this resolution can potentially fix some Java installation errors because it prevents third-party background apps or services from conflicting with the Java installation process.
Our guide on performing a clean boot on Windows tells you how to disable third-party startup items. When you’ve done that, have another go at installing Java after rebooting Windows 11/10. Then you can re-enable all the disabled startup items via Task Manager and MSConfig.

Utilize Your Java-Based Software Packages Again on Your Windows PC
We can’t promise guaranteed solutions for all Java installation errors. However, the Windows troubleshooting methods above will likely fix Java not installing in most cases. Fixing your Java installation error with one of those methods will ensure you can run and utilize all Java-based programs on your Windows PC.
There are many old Java-based Windows software packages for which users still need to install Java on their PCs to run. However, some users can’t install the desktop Java software when needed because of installation issues. Or users can’t update Java when such issues arise.
Java installation errors have variable messages, but they all mean Java failed to install. Some reported error messages say, “Unable to install Java” or “Java install did not complete.” This is how you can fix Java installation errors on your Windows 10 or 11 PC.
1. Run the Program Install and Uninstall Troubleshooter
Some users have said the Program Install and Uninstall Troubleshooter for Windows helped them fix their Java installation issues. That’s not a troubleshooter included with Windows, but you can download it from Microsoft’s website. You can run the Program Install and Uninstall Troubleshooter like this:
- Select Download troubleshooter on the Microsoft website page .
- Bring up the Downloads web browser tab (accessible with a Ctrl + J keyboard shortcut in Chrome, Edge, Firefox, and Opera).
- Click the MicrosoftProgram_Install_and_Uninstall.meta.diagcab file in the Downloads tab.
- Select Next > Installing to start the troubleshooting.
2. Try Installing Java With the Offline Installer
If the Java installation error arises with the online installer or with automatic updates enabled, try utilizing the alternative offline Java installer. The offline Java installer is often more reliable than the buggy online one for which a stable internet connection is required.
You can obtain that installation package by clicking the Windows Offline (64-bit) link on the Java download page . If you have a 32-bit Windows 10 platform, click the Windows Offline package link. Double-click the downloaded Java installation file to run the installer and select the Install option from there.
3. Run the Java Installer File With Administrator Rights
It might help to run the Java installer file with admin rights to ensure it has full system access rights. This can be done by right-clicking the Java installer file and selecting a Run as administrator context menu option.

4. Uninstall an Old Java Version
Java installation issues can often arise because of older Java packages installed on PCs. Many users have confirmed they’ve fixed the Java error code 1603 installation issue by uninstalling old Java versions. You can detect and remove outdated Java versions on your PC with the Java Uninstall Tool as follows:
- Open this Java Uninstall Tool page .
- Click I Agree to the Terms to download the Java Uninstall Tool.
- Press the Windows logo + E key combination to go to the folder containing the downloaded Java Uninstall Tool file.
- Double-click the JavaUninstallTool.exe file.
- Click Agree to continue with Java detection.
- Select the checkbox for any detected Java version.
- Click Next and Yes to remove the selected Java version.
- Select Yes again to remove the Java Cache.
- Click Get Java to download the latest version. Then try installing Java again.
 With Screensaver Wonder you can easily make a screensaver from your own pictures and video files. Create screensavers for your own computer or create standalone, self-installing screensavers for easy sharing with your friends. Together with its sister product Screensaver Factory, Screensaver Wonder is one of the most popular screensaver software products in the world, helping thousands of users decorate their computer screens quickly and easily.
5. Repair Windows’ System Files
System file corruption isn’t widely confirmed to cause any specific Java installation error. However, don’t rule out the possibility of corrupted system files causing installation issues on your PC. You can easily repair corrupted Windows files by running System File Checker and Deployment Image Servicing and Management scans with these Command Prompt commands:
`DISM /Online /Cleanup-Image /RestoreHealth
sfc /scannow`
6. Turn Off Antivirus Shields and Firewalls
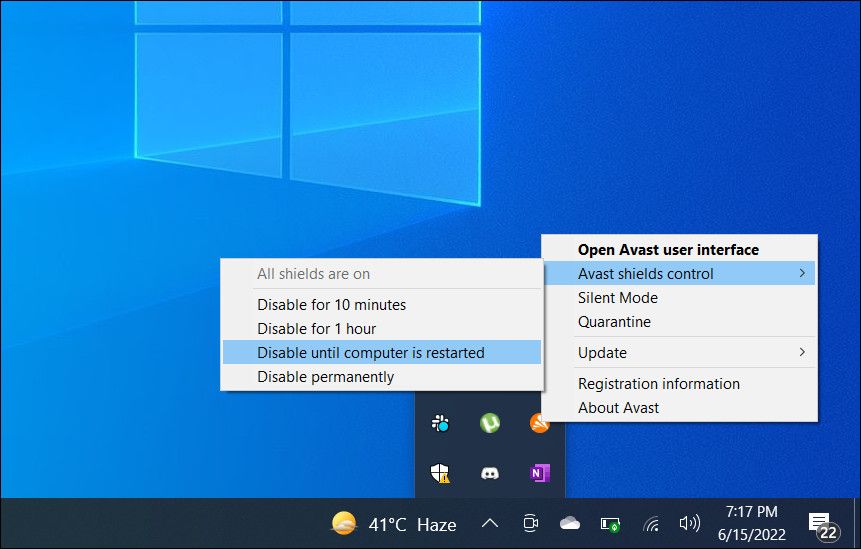
Disabling antivirus protection is another resolution users confirm to have fixed Java installation issues with. Doing so will ensure a real-time antivirus shield can’t block the installation of Java. So, try temporarily off the antivirus shield for any third-party security software on your PC before attempting to install Java. Right-click the security app’s icon in the system tray to select an option for disabling it.
A firewall can also feasibly cause issues for the online Java installer at least. So, temporarily disable Microsoft Defender Firewall or a third-party alternative installed before running the Java installer to eliminate that potential cause. Our how to turn off Microsoft Defender Firewall guide includes instructions for disabling that firewall.
7. Reboot Windows With a Clean Boot
A clean boot is a stripped-down Windows startup that excludes third-party apps and services. Setting a clean boot stops third-party apps and services automatically starting with Windows. Applying this resolution can potentially fix some Java installation errors because it prevents third-party background apps or services from conflicting with the Java installation process.
Our guide on performing a clean boot on Windows tells you how to disable third-party startup items. When you’ve done that, have another go at installing Java after rebooting Windows 11/10. Then you can re-enable all the disabled startup items via Task Manager and MSConfig.
Utilize Your Java-Based Software Packages Again on Your Windows PC
We can’t promise guaranteed solutions for all Java installation errors. However, the Windows troubleshooting methods above will likely fix Java not installing in most cases. Fixing your Java installation error with one of those methods will ensure you can run and utilize all Java-based programs on your Windows PC.
There are many old Java-based Windows software packages for which users still need to install Java on their PCs to run. However, some users can’t install the desktop Java software when needed because of installation issues. Or users can’t update Java when such issues arise.
Java installation errors have variable messages, but they all mean Java failed to install. Some reported error messages say, “Unable to install Java” or “Java install did not complete.” This is how you can fix Java installation errors on your Windows 10 or 11 PC.
1. Run the Program Install and Uninstall Troubleshooter
Some users have said the Program Install and Uninstall Troubleshooter for Windows helped them fix their Java installation issues. That’s not a troubleshooter included with Windows, but you can download it from Microsoft’s website. You can run the Program Install and Uninstall Troubleshooter like this:
- Select Download troubleshooter on the Microsoft website page .
- Bring up the Downloads web browser tab (accessible with a Ctrl + J keyboard shortcut in Chrome, Edge, Firefox, and Opera).
- Click the MicrosoftProgram_Install_and_Uninstall.meta.diagcab file in the Downloads tab.
- Select Next > Installing to start the troubleshooting.
2. Try Installing Java With the Offline Installer
If the Java installation error arises with the online installer or with automatic updates enabled, try utilizing the alternative offline Java installer. The offline Java installer is often more reliable than the buggy online one for which a stable internet connection is required.
You can obtain that installation package by clicking the Windows Offline (64-bit) link on the Java download page . If you have a 32-bit Windows 10 platform, click the Windows Offline package link. Double-click the downloaded Java installation file to run the installer and select the Install option from there.
 /a>
/a>3. Run the Java Installer File With Administrator Rights
It might help to run the Java installer file with admin rights to ensure it has full system access rights. This can be done by right-clicking the Java installer file and selecting a Run as administrator context menu option.
4. Uninstall an Old Java Version
Java installation issues can often arise because of older Java packages installed on PCs. Many users have confirmed they’ve fixed the Java error code 1603 installation issue by uninstalling old Java versions. You can detect and remove outdated Java versions on your PC with the Java Uninstall Tool as follows:
- Open this Java Uninstall Tool page .
- Click I Agree to the Terms to download the Java Uninstall Tool.
- Press the Windows logo + E key combination to go to the folder containing the downloaded Java Uninstall Tool file.
- Double-click the JavaUninstallTool.exe file.
- Click Agree to continue with Java detection.
- Select the checkbox for any detected Java version.
- Click Next and Yes to remove the selected Java version.
- Select Yes again to remove the Java Cache.
- Click Get Java to download the latest version. Then try installing Java again.
5. Repair Windows’ System Files
System file corruption isn’t widely confirmed to cause any specific Java installation error. However, don’t rule out the possibility of corrupted system files causing installation issues on your PC. You can easily repair corrupted Windows files by running System File Checker and Deployment Image Servicing and Management scans with these Command Prompt commands:
`DISM /Online /Cleanup-Image /RestoreHealth
sfc /scannow`

6. Turn Off Antivirus Shields and Firewalls
Disabling antivirus protection is another resolution users confirm to have fixed Java installation issues with. Doing so will ensure a real-time antivirus shield can’t block the installation of Java. So, try temporarily off the antivirus shield for any third-party security software on your PC before attempting to install Java. Right-click the security app’s icon in the system tray to select an option for disabling it.
A firewall can also feasibly cause issues for the online Java installer at least. So, temporarily disable Microsoft Defender Firewall or a third-party alternative installed before running the Java installer to eliminate that potential cause. Our how to turn off Microsoft Defender Firewall guide includes instructions for disabling that firewall.

7. Reboot Windows With a Clean Boot
A clean boot is a stripped-down Windows startup that excludes third-party apps and services. Setting a clean boot stops third-party apps and services automatically starting with Windows. Applying this resolution can potentially fix some Java installation errors because it prevents third-party background apps or services from conflicting with the Java installation process.
Our guide on performing a clean boot on Windows tells you how to disable third-party startup items. When you’ve done that, have another go at installing Java after rebooting Windows 11/10. Then you can re-enable all the disabled startup items via Task Manager and MSConfig.

Utilize Your Java-Based Software Packages Again on Your Windows PC
We can’t promise guaranteed solutions for all Java installation errors. However, the Windows troubleshooting methods above will likely fix Java not installing in most cases. Fixing your Java installation error with one of those methods will ensure you can run and utilize all Java-based programs on your Windows PC.
- Title: Unblocking Problematic Java Setup on Windows PCs
- Author: Richard
- Created at : 2024-08-16 01:56:28
- Updated at : 2024-08-17 01:56:28
- Link: https://win11-tips.techidaily.com/unblocking-problematic-java-setup-on-windows-pcs/
- License: This work is licensed under CC BY-NC-SA 4.0.