Understanding System Repair: The Essence of CHKDSK & SFC

Understanding System Repair: The Essence of CHKDSK & SFC
Disclaimer: This post includes affiliate links
If you click on a link and make a purchase, I may receive a commission at no extra cost to you.
Quick Links
- What Is CHKDSK and When Should You Use It?
- What Is SFC Scannow and When Should You Use It?
- What Is DISM and When Should You Use It?
- What Order Should You Run CHKDSK, SFC, and DISM In?
Key Takeaways
- CHKDSK scans your hard drive for errors and bad sectors, and you should run it if your computer isn’t booting properly.
- SFC scans and repairs Windows system files, so run it when you experience program crashes or missing DLL errors.
- DISM is the most powerful tool and fixes corrupt files in the Windows system image, use it when SFC can’t repair files.
When your PC starts reporting errors, slowing down, or misbehaving, you can use Windows’s built-in diagnostic tools to try and fix the problem. CHKDSK, SFC, and DISM check the health of your hard drive and repair corrupt files, but the three tools work in different ways and target different areas of your system.
CHKDSK, SFC, and DISM are system tools, and you can run all three. However, this can be time-consuming and unnecessary for your specific problem, so it’s best to know when and how to use this trio of troubleshooting tools.
What Is CHKDSK and When Should You Use It?
CHKDSK (Check Disk) is the first Windows diagnostic tool you should try if your PC starts acting strangely. For example, if it hangs while shutting down or becomes frustratingly slow.
CHKDSK scans your entire hard drive to find and fix errors in files and the file system itself. It also checks your drive for bad sectors (clusters of data that cannot be read), and either tries to repair them or tells your system not to use them.
Windows may run CHKDSK on startup if it detects a problem with your hard drive, sometimes for innocuous reasons such as improper shutdown, but also more serious ones, including malware infection and impending drive failure. However, it won’t actually fix any issues until instructed to do so.
To prevent future errors and potential data loss, it’s worth running CHKDSK manually as part of your PC maintenance routine. You can use one of the following methods:
1. Run CHKDSK Through File Explorer
You can run CHKDSK from the command prompt. If you’re uncomfortable using the Command Prompt, open File Explorer, click This PC, right-click the drive you want to check and select Properties.
Select the Tools tab and then select Check in the Error-checking section.
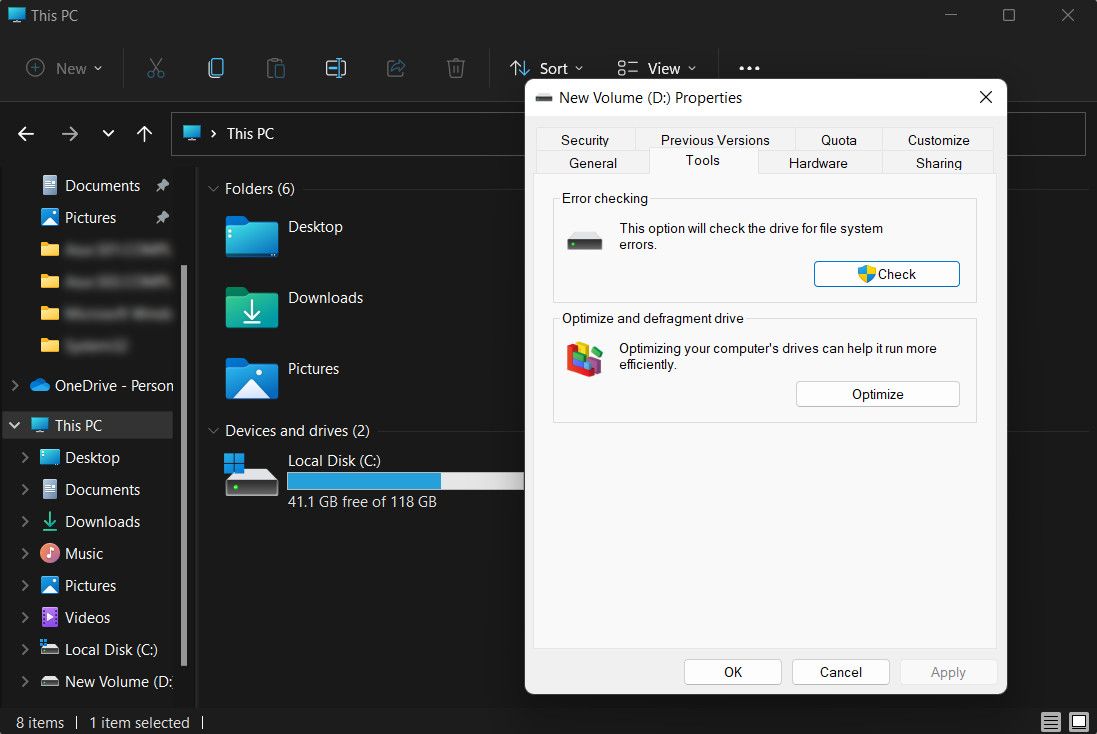
If Windows determines that everything is running smoothly, it will suggest that you don’t need to scan the drive. To run CHKDSK anyway, select Scan drive.
The scan may take anywhere from a few minutes to half an hour, depending on the size and state of your drive. Once complete, CHKDSK will either tell you that no errors were found, or if it does find any, it will suggest you fix them.
2. Run CHKDSK From the Command Prompt
For greater control over the disk-checking process, you should run CHKDSK from an elevated Command Prompt. Follow these steps to continue:
- Press the Win + R keys to open the Run dialog.
- Type “cmd” in Run and press the Ctrl + Shift + Enter keys together to open Command Prompt as an administrator.
- Click Yes in the User Account Control prompt.
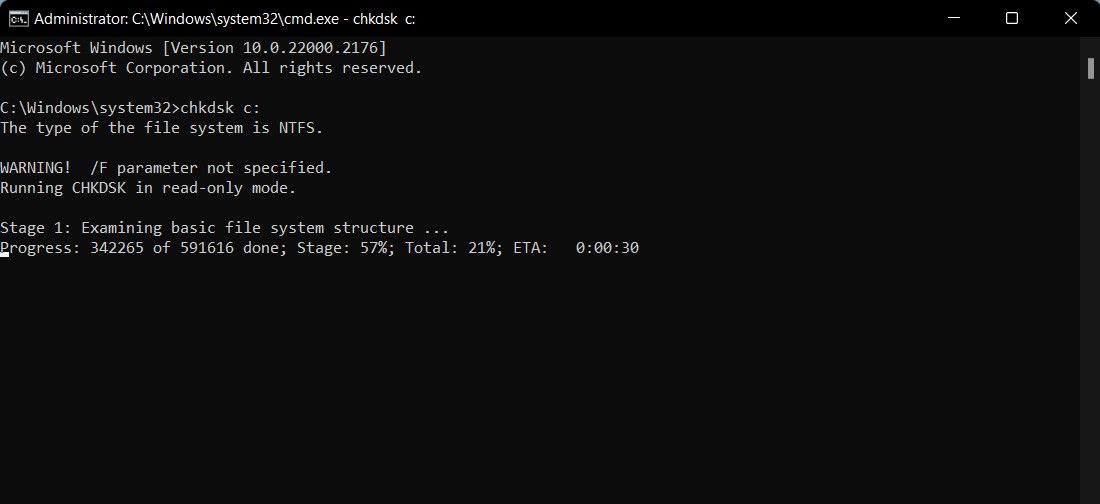
- In the Command Prompt window, type chkdsk, then space, followed by the drive letter you want to check. For example, chkdsk c: to scan your C: drive.

- Press Enter to scan for errors in read-only mode, which means no changes will be made.
To make changes, you can use parameters with the CHKDSK command. Here are two you can use to fix problems:
- To make CHKDSK fix the problems it finds, type chkdsk /f c: (for your C: drive).
- To scan for bad sectors and errors, type chkdsk /r c:
If you cannot run these commands because “the volume is in use by another process,” Command Prompt will offer to schedule the scan for when your PC restarts. This should, however, only happen once. If the tool pops up whenever you boot your PC, you can stop CHKDSK from running at every startup manually.
What Is SFC Scannow and When Should You Use It?
Whereas CHKDSK finds and fixes errors in the file system of your hard drive, SFC (System File Checker) specifically scans and repairs Windows system files. If it detects a file has been corrupted or modified, SFC automatically replaces that file with the correct version.
Knowing when to use SFC is usually more obvious than with CHKDSK, which depends on the hunch that your hard drive isn’t behaving correctly. If Windows programs are crashing, you’re getting error messages about missing DLL files, or you’re experiencing the dreaded Blue Screen of Death, then it’s definitely time to run SFC.
Open an elevated Command Prompt , then type the following command and press Enter to execute:
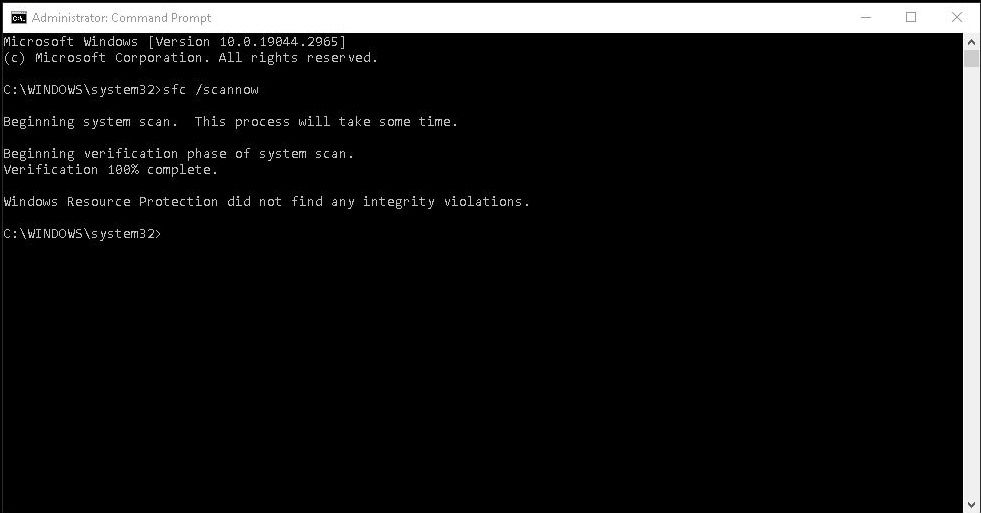
sfc /scannow
SFC will perform a full scan of your system and repair and replace any files that are damaged or missing using versions from the Windows component store (read the next section on DISM for more information on this and how SFC and DISM work can work together). The scan can take some time, but make sure you leave the Command Prompt window open until it’s complete.
If you only want to scan but not repair corrupted system files, type:
sfc /verifyonly command
Once SFC has finished scanning, you’ll see one of three messages:
- Windows Resource Protection did not find any integrity violations. This means that whatever’s causing your PC problems isn’t related to a system file.
- Windows Resource Protection found corrupt files and successfully repaired them. This should hopefully mean that your problems have been solved.
- Windows Resource Protection found corrupt files but was unable to fix some of them. This means that system files are to blame, but SFC can’t replace them. Try running the tool again in Safe Mode. If you still get the same result, don’t despair: it’s time to use DISM.
What Is DISM and When Should You Use It?
DISM (Deployment Image Servicing and Management) is the most powerful of the three Windows diagnostic tools. Although you shouldn’t usually need to use the tools, it’s the one to turn to when you’re experiencing frequent crashes, freezes, and errors, but SFC either can’t repair your system files or is unable to run at all.
While CHKDSK scans your hard drive and SFC your system files, DISM detects and fixes corrupt files in the component store of the Windows system image so that SFC can work properly. It can also help with Windows updates, driver integration, and boot issues you might be facing.
Create a backup of your data before running DISM, just in case something goes wrong.
As with CHKDSK and SFC, you’ll need to open an elevated Command Prompt (or Administrator Terminal Window on Windows 11) to run DISM. To save you the time and risk of performing repairs unnecessarily, you can first check if the image is corrupted without making any changes. Type the following command and press Enter:
Dism /Online /Cleanup-Image /CheckHealth
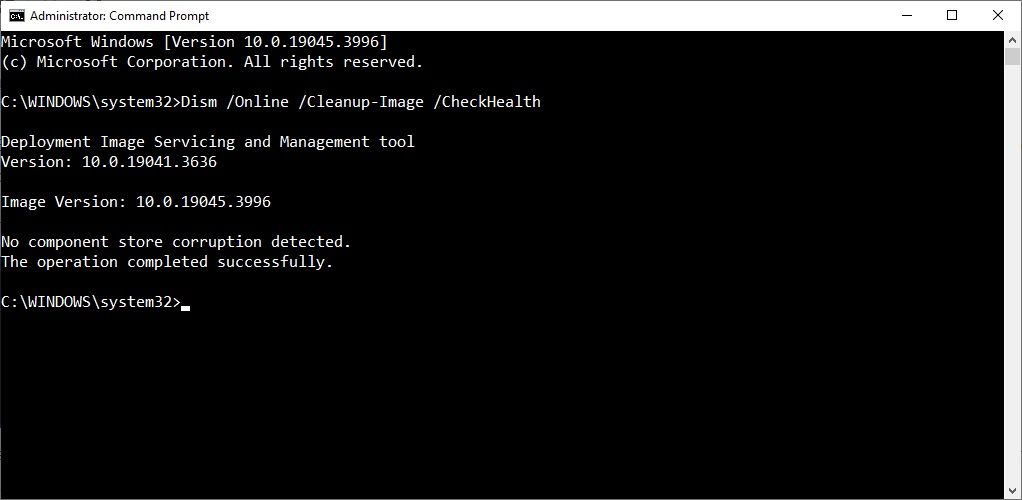
The scan should only take a few seconds. If no corruption is detected, you can run a more advanced scan to determine if the component store is healthy and repairable, again without making any changes, by typing:
Dism /Online /Cleanup-Image /ScanHealth
If DISM reports that there are problems with the system image, run another advanced scan to repair these issues automatically. DISM will connect to Windows Update to download and replace damaged files as required. Note that the process may take up to 10 minutes and hang for a while at 20 seconds, but this is normal. Type this command:
Dism /Online /Cleanup-Image /RestoreHealth

Once the scan and repairs are complete, restart your PC and run SFC again to replace your corrupt or missing system files.
What Order Should You Run CHKDSK, SFC, and DISM In?
Now that you understand what CHKDSK, SFC, and DISM do, running one or more of these Windows troubleshooting tools will hopefully help you fix your PC.
However, a common question concerns the order in which you should run these system tests. Should you always run CHKDSK first? Or how about always running DISM before SFC?
There is no specific order to CHKDSK, SFC, and DISM, as why you run each tool depends on the issue you’re experiencing. However, if you run SFC and it finds corrupt files and other issues, you should then run DISM to fix the Component Store and then run SFC again to fix any broken files.
If you’re still having trouble, perform a System Restore. This will restore your system files, settings, and programs to a time when they worked properly. If your system wasn’t damaged when the restore point was created, it may solve your corruption problems.
Also read:
- [Updated] Superior FB Video Player Reviews #10 to #1
- 2024 Approved Premier Pick Top 10 Apps to Catch Football and Tennis in the Moment
- 9 Best Phone Monitoring Apps for Oppo K11x | Dr.fone
- Clearing Up the Windows 11 Crash Code Errors
- Effortless Typography Expansion in After Effects
- Elevating Visual Performance: The Ultimate VRAM Boosters
- Expert Strategies for Customizing Windows Boot Settings
- How to Fix Windows Updates Not Installing
- KMWorld Recognizes ABBYY Compreno as the Defining Tech Product of 2016
- Lenovo's Latest Tablet, The P1 1 Pro: A Balanced Review of Advantages & Disadvantages
- Migrating Your Torrent Tracking: Moving qBittorrent Efficiently
- Overcoming Windows 11 App Restrictions for Store
- Perfect Peace Mastering the Art of Muting Individuals on GoMeet for 2024
- Resolving AnyDesk Quirks for a Smooth Windows Experience
- Senso ActiveWireless: Cost-Effective Headphone Review
- Tips and Tricks for Revoking Read-Only in Win11
- Troubleshooting 'USB Not Attached' Error in VirtualBox on Windows Platform
- Title: Understanding System Repair: The Essence of CHKDSK & SFC
- Author: Richard
- Created at : 2024-10-29 18:03:42
- Updated at : 2024-11-01 17:07:26
- Link: https://win11-tips.techidaily.com/understanding-system-repair-the-essence-of-chkdsk-and-sfc/
- License: This work is licensed under CC BY-NC-SA 4.0.
