Unify Time: A Guide to Windows Synchronization

Unify Time: A Guide to Windows Synchronization
Is your Windows system clock out of sync? Are you receiving an error message saying “Time synchronization failed”? It may cause various issues like missing reminders or emails with the wrong timestamp. Read this guide to learn how to fix the issue and synchronize your system clock accurately.
Disclaimer: This post includes affiliate links
If you click on a link and make a purchase, I may receive a commission at no extra cost to you.
What Causes Time Synchronization to Fail on Windows?
Time synchronization issues on Windows can occur for several reasons. Here are some common causes.
- Incorrect timezone settings: The time set on your PC must be accurate for synchronization to work properly. If the time zone is incorrect, synchronization will fail.
- Firewall settings: Firewalls block the Windows Time service from connecting to its hosts. This prevents time synchronization from occurring.
- System viruses and malware: Viruses or malicious software corrupt system files related to time synchronization, causing failure.
- Problems with the Windows Time service: The Windows Time (W32Time) service controls time synchronization on your system. If it’s not running properly, synchronization will fail.
Now that you know the possible causes of time synchronization failure, let’s discuss how to fix this issue.
1. Restart the Windows Time Service
The Windows Time Service keeps the computer’s time and date synchronized with other computers on the network. If this service is stopped or not functioning, it leads to time synchronization issues.
To restart the Windows Time Service, follow these steps:
- Press Win + R on your keyboard to open the Run dialog box.
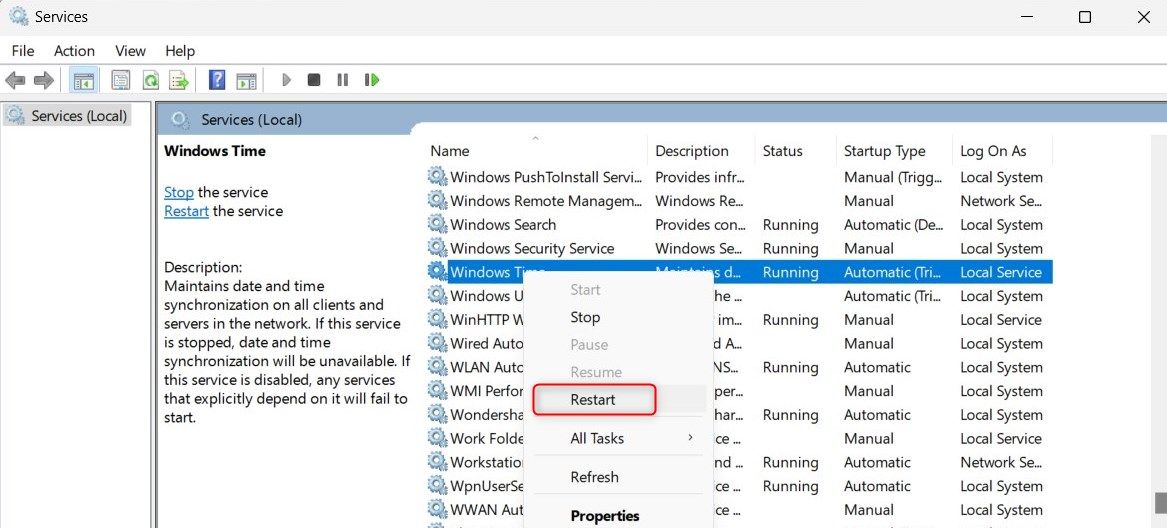
- Type services.msc in the search box and hit Enter. This will open the Services window.
- Locate the Windows Time service and right-click on it.
- Select Restart from the context menu.

Once the service is restarted, close the window and check the time synchronization.
2. Configure the Windows Time Service
If restarting the Windows Time Service doesn’t resolve the time synchronization issue, configure its settings to see if that helps.
To configure the Windows Time Service, follow these steps:
- Open the Services window .
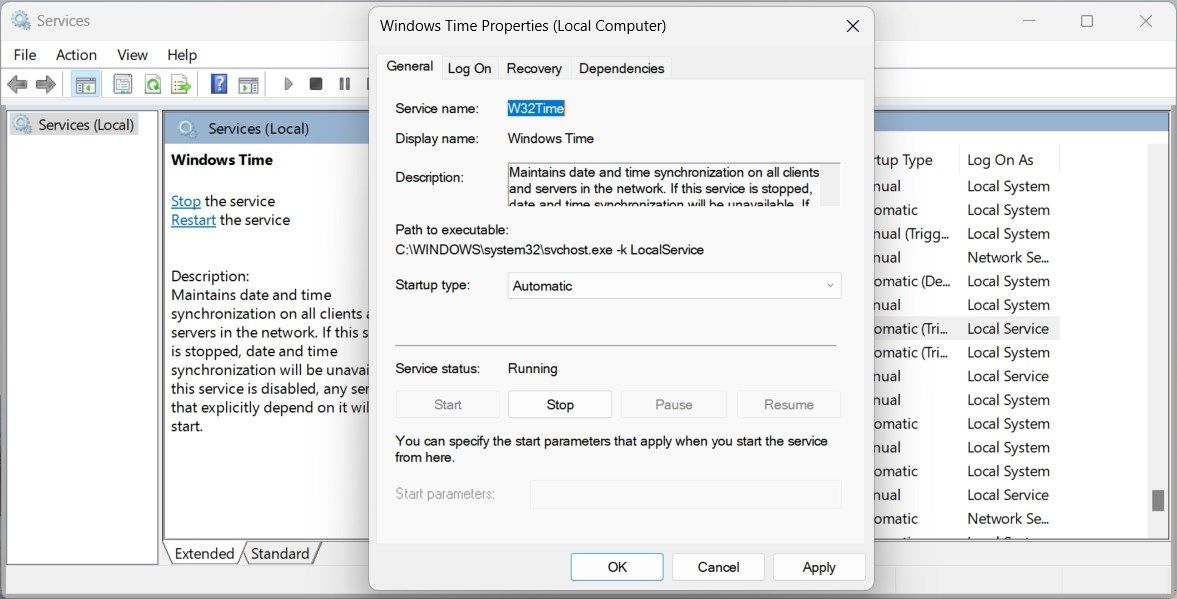
- Double-click on Windows Time to open its properties window.
- On the General tab, set the Startup Typeto Automatic.

- Now go to Service Status and click on the Start button. If the service is running, click on Stop and then Start.
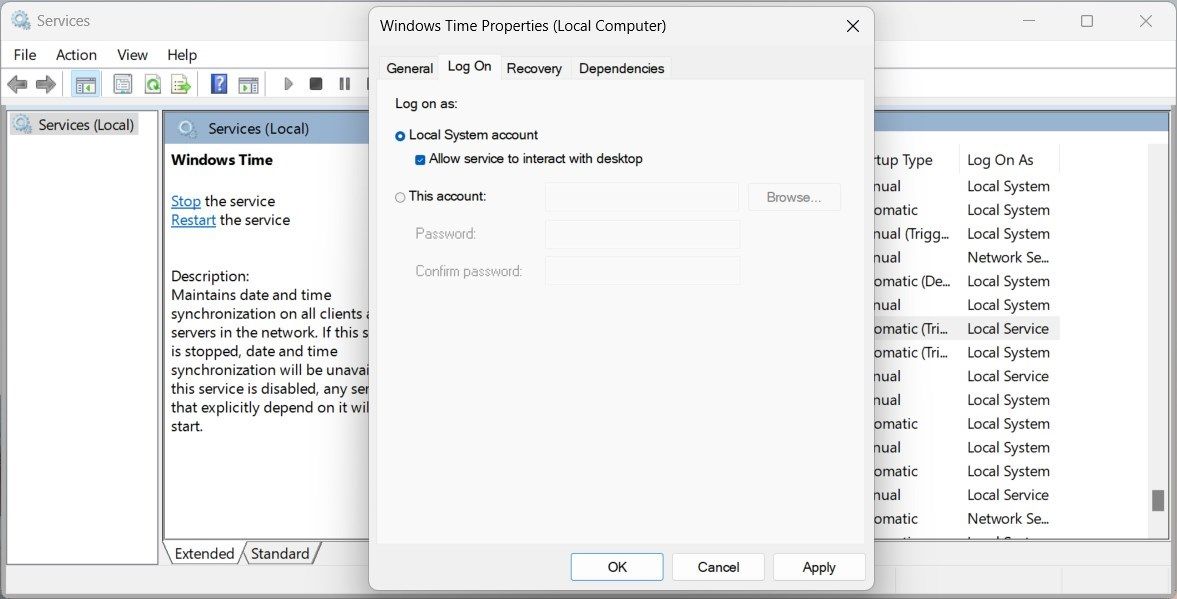
- Switch to the Log On tab and select Local System account.

- Check the Allow Service to Interact with desktop option.
- Click Apply > OK to save the changes.
Now that you have configured the Windows Time Service, close the window. After that, restart your computer and check if time synchronization works.
3. Change the Time Server
This method is suitable when the time synchronization service fails to sync with an internet time server. It syncs to a reliable internet clock manually.
To modify internet time settings, follow these steps:
- Open the Run Command dialog box .
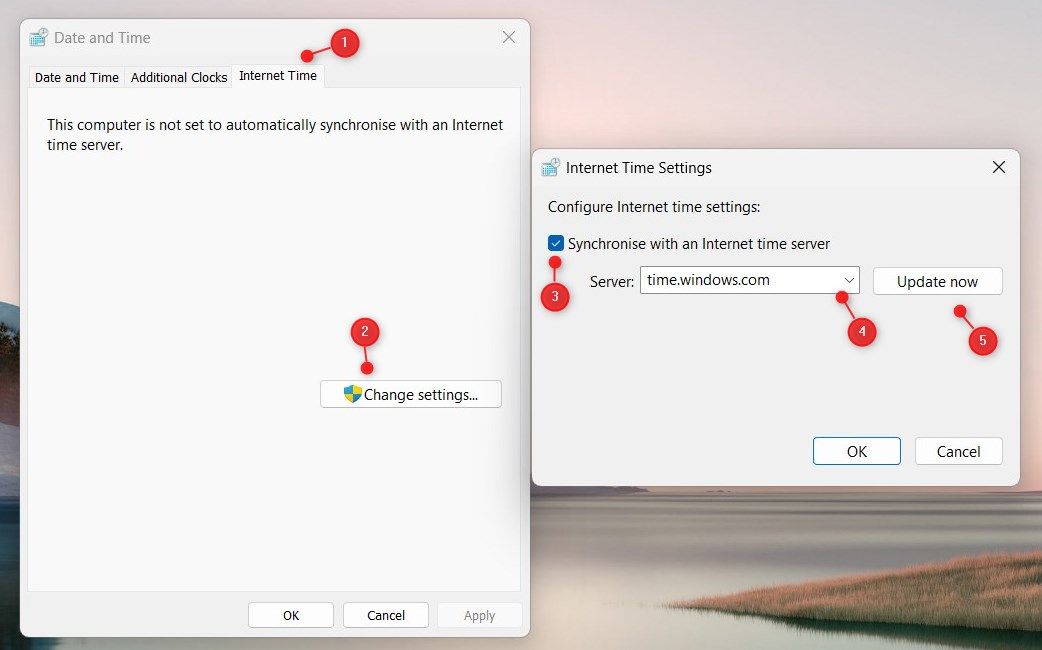
- Type timedate.cpl in the text box and press Enter. This will open the Date and Time window.
- Switch to the Internet Time tab and click on Change settings.
- Check the box next to Synchronize with an Internet time server.

- Select a different time server from the Server list.
- Click Update now to sync your PC with the selected time server.
Once you perform the above action, close all windows and restart your computer. After restarting, check if the time synchronization issue is fixed.
4. Add More Time Servers
If changing the time server doesn’t work, add more servers to the list. That way, Windows try different servers to keep time in sync. To add more time servers, follow these steps:
- Press Win + S on your keyboard to open the Windows Search box.
- Type regedit in the search box and hit Enter.
- If UAC (User Account Control) dialog appears, click Yes to continue.
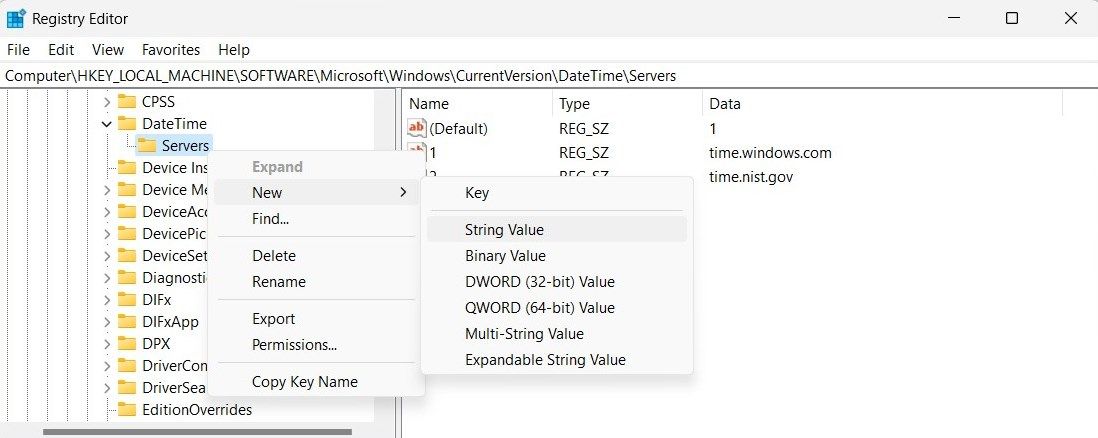
- In the registry editor, navigate the following steps.
HKEY_LOCAL_MACHINE\SOFTWARE\Microsoft\Windows\CurrentVersion\DateTime\Servers - Right-click on the Servers key and select New > String Value.

- Name the new string value ServerX, where X is the server number.
- Double-click on the new String Value and enter a valid time server URL in the Value data box.
- Repeat the above steps until you have added all the time servers to the list.
Once you are done, close the registry editor. After synchronization completes, close all windows and restart your computer. Then verify if the time is accurate.
5. Scan for Malicious Programs
If other methods fail to fix the time synchronization issue on your Windows computer, scan for malicious programs. Malicious software interrupts time synchronization processes and causes errors.
To scan for malicious programs, follow these steps:
- Press Win + S on your keyboard to open the Windows Search box.
- Type Windows Security in the search box and hit Enter.
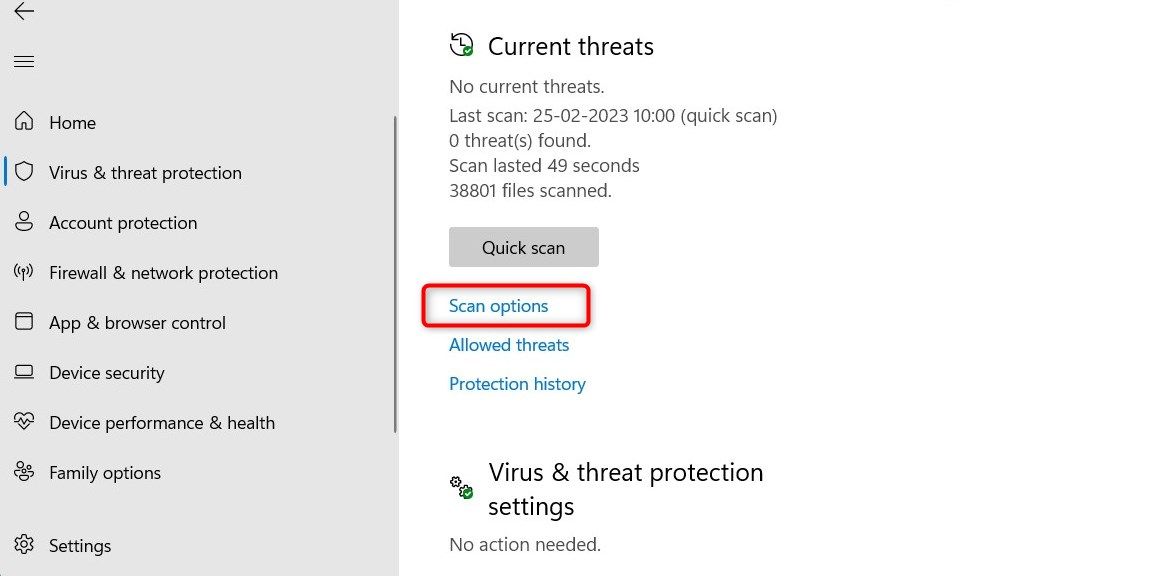
- In the Windows Security window, click on Virus & threat protection.

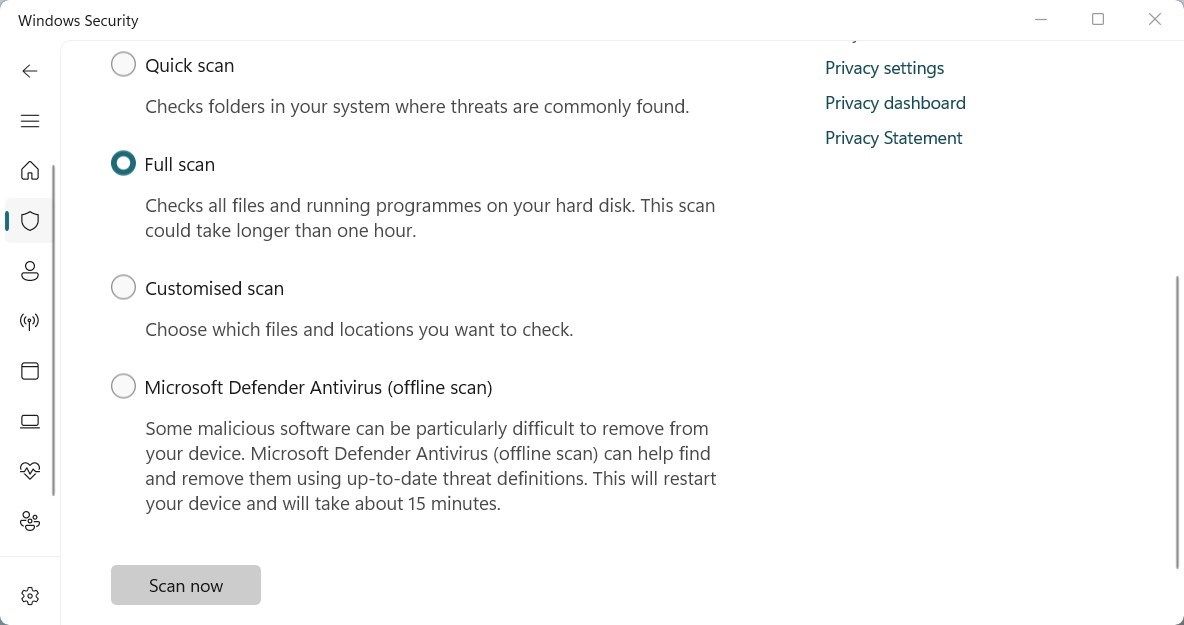
- Under Current threats, click Scan options and check Full scan from the list.

- Now click Scan now to initiate a full scan.
Once you perform the above action, close the Windows Security window and restart your computer. If malicious programs were responsible for the issue, it should now keep the time synchronized correctly.
6. Try Some Generic Fixes
Besides the specific solutions mentioned above, there are some general fixes that troubleshoot time synchronization problems.
Try these suggestions to fix time synchronization failed errors:
- Run the System File Checker tool . This tool scans system files and replaces any corrupted files that cause the time synchronization to fail.
- Perform a clean boot and check if that helps. It’s possible that some software or process running on your PC interferes with time synchronization. Doing a clean boot identifies the culprit and solves the issue.
- Temporarily disable firewall and antivirus programs . Firewall or antivirus settings can sometimes block the Windows Time service from connecting to its hosts, resulting in synchronization failure. Temporarily disabling your firewall and antivirus programs can resolve this issue.
- Run the Windows Network Connections tool to diagnose and repair network issues.
These fixes resolve time synchronization problems on your Windows computer.
Fixing Time Synchronization Issues on Windows
We hope this article resolved any timing issues you encountered on your Windows computer. If the issue continues, perform a system restore. This reverses any recent modifications that could cause the issue. Meanwhile, it is advised to regularly backup your data in case of sudden system failures.
Also read:
- [New] In 2024, Pump Up Your Viewership with These Proven Methods
- [New] The Quintessential Quest for Quality Storytellers – Top 8 Institutions
- Achieving Robust Defense: How to Upgrade Your Pin in Windows 11
- Elevate Your Windows 11 with These Top 6 Android Apps
- Enhance Your Computer's Startup: Eliminate Slow Boot Issues on Windows 7
- Explore Netstat on Windows 11: A Guide to Tracking Data Flow
- In 2024, 4 Most-Known Ways to Find Someone on Tinder For Infinix Hot 30i by Name | Dr.fone
- In 2024, iPogo will be the new iSpoofer On Infinix Note 30 VIP? | Dr.fone
- Mastering Customization in Windows 11: Adding Directories
- The way to get back lost music from Galaxy A15 4G
- Ultimate Tips and Tricks for Effortless Chapter Addition in YouTube Videos
- Understanding and Managing Win's RAM Cache
- Unlocking Diablo Secrets: Basic Techniques
- Updated The Most Direct Guide to Learning How to Clone Your Voice
- Title: Unify Time: A Guide to Windows Synchronization
- Author: Richard
- Created at : 2024-12-05 20:17:13
- Updated at : 2024-12-07 02:21:59
- Link: https://win11-tips.techidaily.com/unify-time-a-guide-to-windows-synchronization/
- License: This work is licensed under CC BY-NC-SA 4.0.
