Unsticking Windows Update: Quick Repair Tips

Unsticking Windows Update: Quick Repair Tips
Sometimes, the Windows Update Troubleshooter gets stuck while diagnosing and resolving problems. A slow or unstable internet connection, a stuck application, outdated drivers, or corrupt system files could cause this error.
But, it is not difficult to get the Windows Update Troubleshooter working again—as you will discover by exploring the following fixes.
Disclaimer: This post includes affiliate links
If you click on a link and make a purchase, I may receive a commission at no extra cost to you.
1. Restart Your Computer
You may have rebooted your phone at times to fix some lags and stuck applications. And you probably know that restarting your Windows PC works in the same way—it can fix issues like an unresponsive app and glitches too.
When you restart your PC, the system shuts down temporarily and then turns on again. The RAM is cleaned up and refreshed, and so is the processor cache. So when your PC reboots, you will get a clean start all over again.
Restarting your PC should be the first thing you do when the Windows Update Troubleshooter gets stuck on a “resolving problems” loop.
Then try running the Windows Update Troubleshooter to see if it works.
2. Clear the DNS Cache
When you run the Windows Update Troubleshooter, it checks for Windows update issues, diagnoses, and resolves problems, resets Windows Update components, clears temporary files, and more. To do all this, it needs a stable internet connection.
Often the Windows Update Troubleshooter malfunctions due to an unstable internet connection caused by an outdated or corrupt DNS (Domain Name System) cache.
The DNS cache uses stored information like IP addresses and DNS Records to load websites and pages faster. However, the DNS cache can get corrupted.
But you can clear or flush the DNS cache to resolve security and internet connectivity issues. Check outhow to flush the DNS cache on Windows for more information on how to do this.
If the process is successful, you will get the confirmation message of the DNS Resolver Cache being successfully flushed. Now try running the Windows Update Troubleshooter.
3. Restart Windows Cryptographic Services
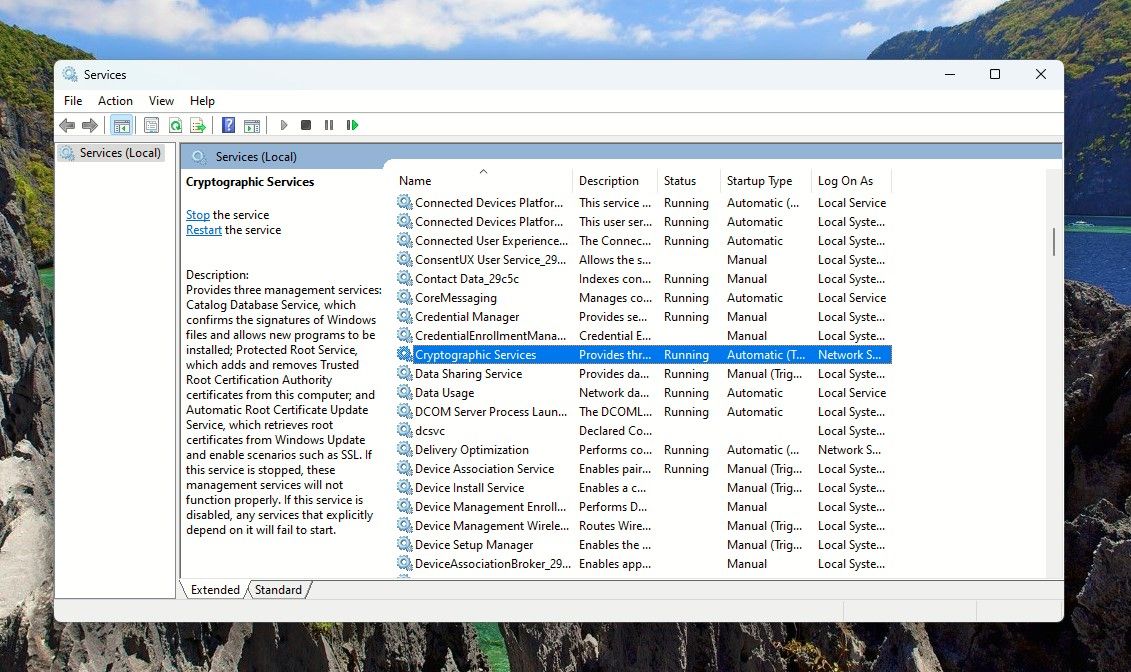
At times, an erratic or stopped Windows Cryptographic Services can cause problems in the smooth running of the Windows Update Troubleshooter.
Cryptographic Services is an inbuilt Windows feature that provides encryption, decryption, and verification services. If it doesn’t work properly, Windows Update Troubleshooter may also malfunction.
To fix this, you can try restarting Cryptographic Services.
- Search forServices inWindows Search and click on theServices app underBest match . Or use one of themany ways to open Services .
- In theServices app, look forCryptographic Services and double-click on it to open itsProperties .

- InProperties , click theStop button to stop Cryptographic Services.
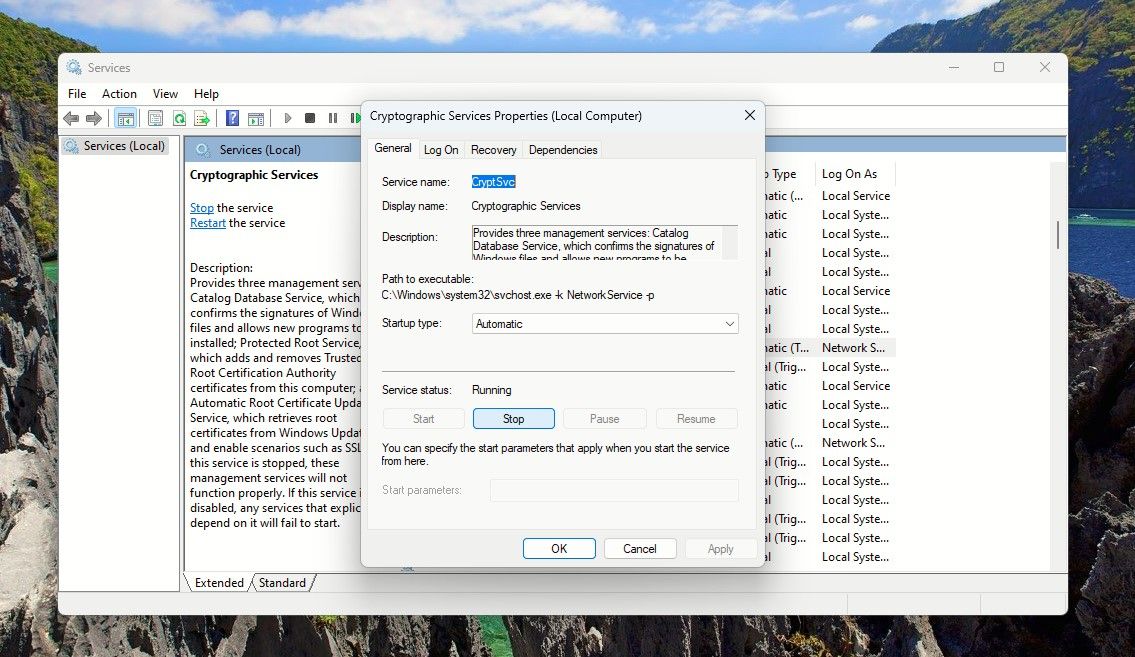
4. Now, wait a few seconds and then click on theStart button. Also, ensure that theStartup type is set toAutomatic .
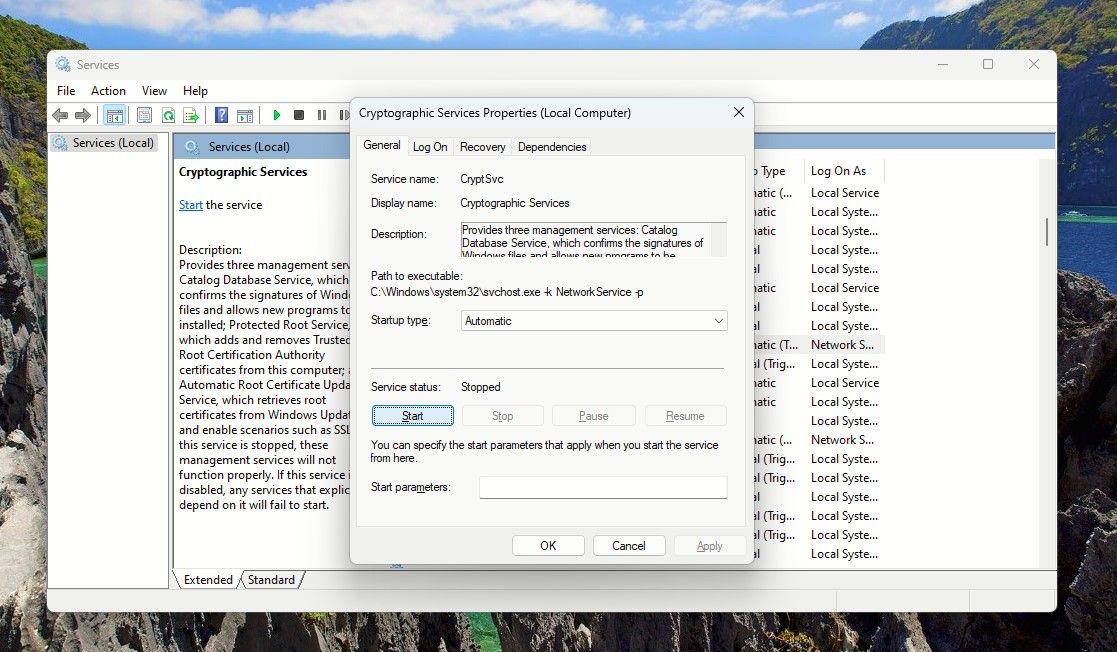
5. Then clickApply and thenOK .
Now close Services and try running the Windows Update Troubleshooter again.
4. Run System File Checker and DISM Command
The Windows Update Troubleshooter can also get stuck in a loop if system files have gotten corrupted. Fortunately, you can resolve this issue by running the SFC scan. It scans, repairs, and replaces these damaged files automatically.
Sometimes you may experience that the SFC is not working properly. To overcome that, you should run the DISM command that will service and repair Windows images.
You can quickly learn how to run the SFC and DISM, and also explore how they work. Check out our piece on thedifferences between CHKDSK, SFC, and DISM for the full low-down.
After these scans finish running, try running the Windows Update Troubleshooter again.
5. Update System Drivers
Computer drivers enable Windows and its components to communicate and function efficiently. So it’s good for you toknow what drivers are and why you should keep them updated .
If you’re regularly keeping your Windows PC updated, the drivers your system needs would automatically be getting installed with the updates.
But since the working of the Windows Update Troubleshooter may be affected by outdated or corrupt drivers, it’s best if you check for driver updates and install them manually.
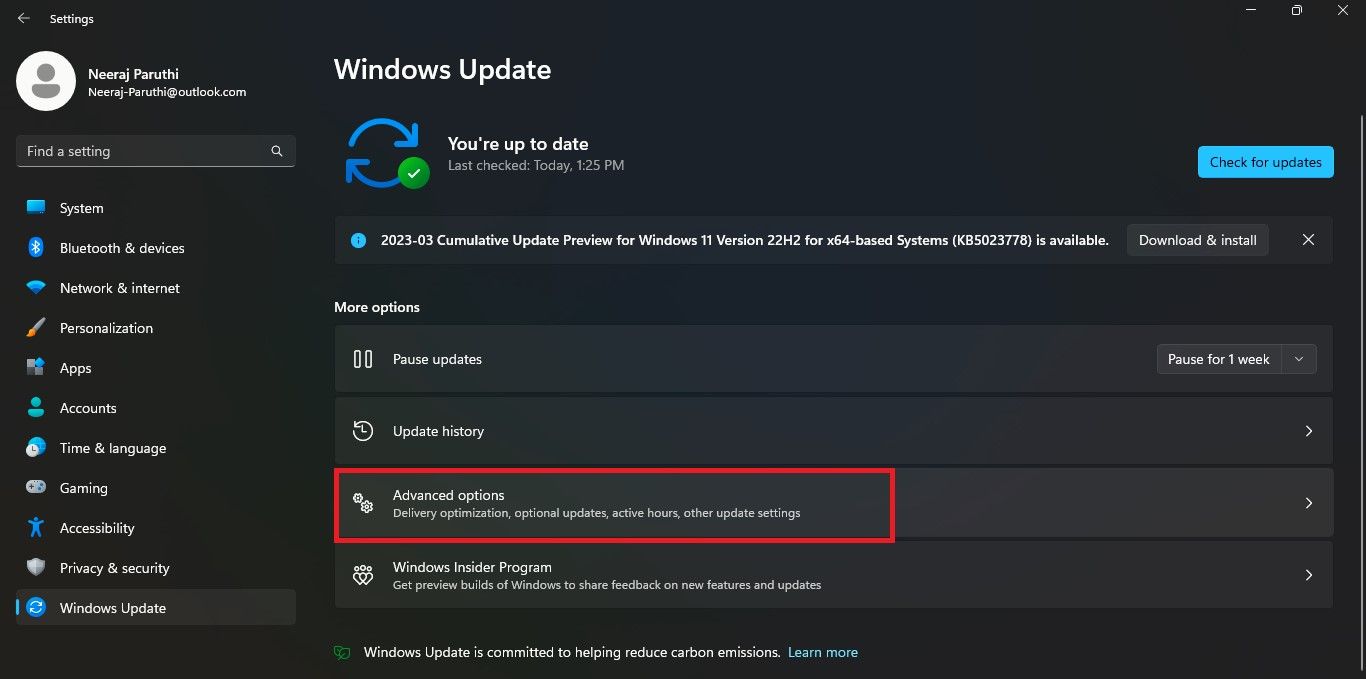
- Right-click theWindows icon on the taskbar and selectSettings from the menu.
- ClickWindows Update inSettings and then on the right pane selectAdvanced options .

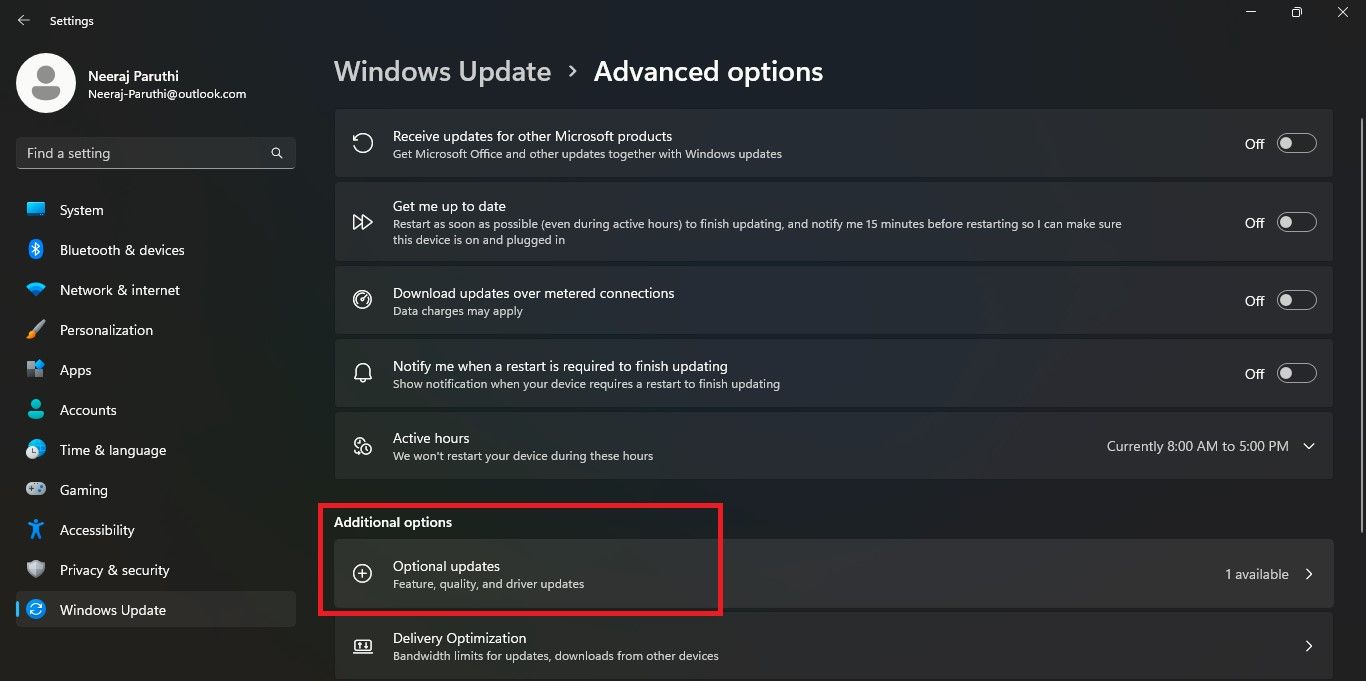
- InAdvanced options , under theAdditional options section, click onOptional updates .

- If there are driver updates available they would be listed under theDriver Updates option. Select all the driver updates and click onDownload & install .
After you’ve updated the drivers, try running the Windows Troubleshooter and see if it works properly.
6. Configure Troubleshooting in Group Policy Editor
The Windows Update Troubleshooter may be stuck if the troubleshooting service is disabled in the Group Policy Editor.
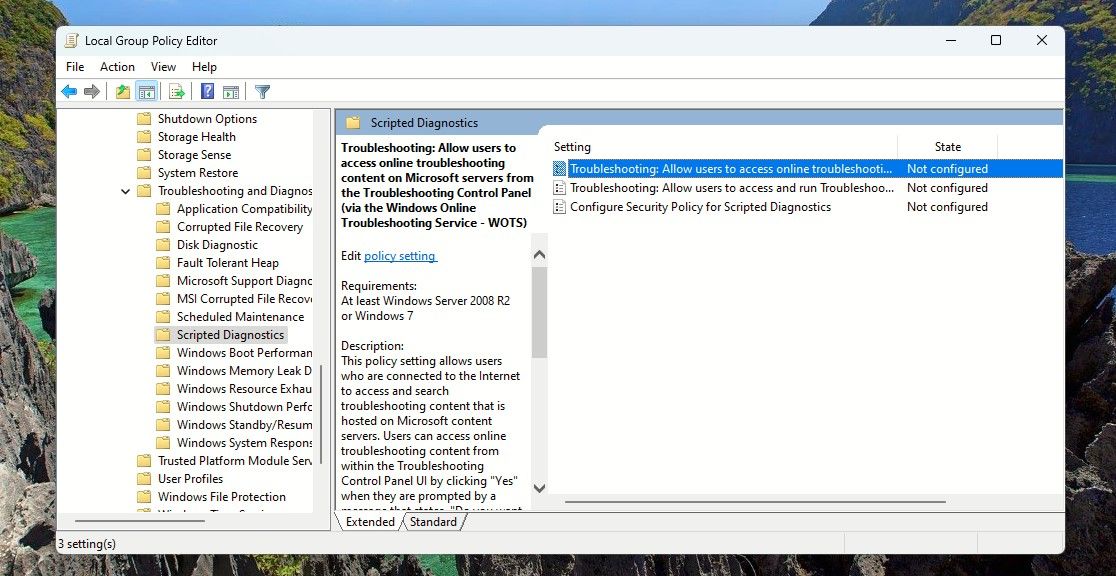
If you’re using Windows 10 Pro or Windows 11 Pro editions, you can try tweaking the Scripted Diagnostics policy in Troubleshooting and Diagnostics in the Group Policy Editor.
Though it’s not available on Windows Home, you can stillaccess the Group Policy Editor by enabling it .
To edit and enable the Scripted Diagnostics policy:
- Press theWindows +R keys together to open theRun box.
- Typegpedit.msc in the navigation bar and clickEnter .

- ClickYes on the UAC prompt. TheGroup Policy Editor will open.
- In theGroup Policy Editor , navigate toScripted Diagnostics using the following path:
Computer Configuration > Administrative Templates > System > Troubleshooting and Diagnostics > Scripted Diagnostics - In the left pane, click onScripted Diagnostics to open its three items.

- Double-click on the first item and select theEnable option in the window that opens.
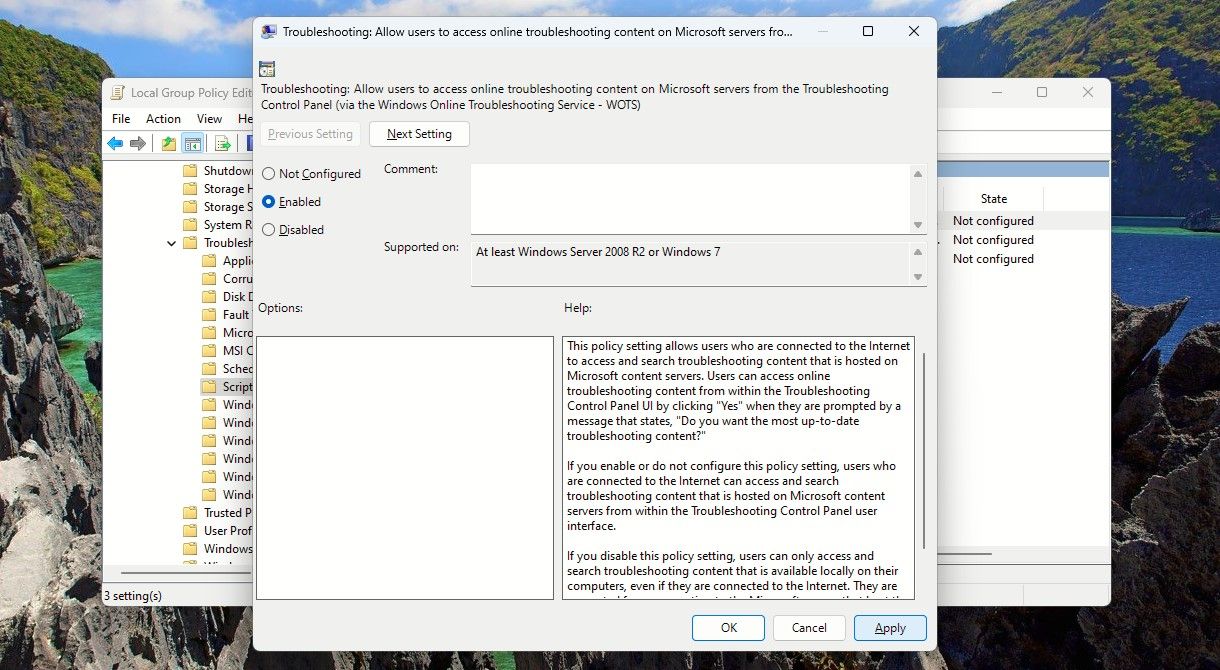
7. Finally, tap onApply and thenOK .
- Repeat steps 5 and 6 for the other two items of Scripted Diagnostics.
Now close the Group Policy Editor and run the Windows Update Troubleshooter.
Get the Windows Update Troubleshooter Working Again to Fix Update Errors
It’s important to have the Windows Update Troubleshooter running fine. Try the above fixes if it ever gets stuck or stops working. And ensure you can install essential updates to enjoy a smooth and secure Windows experience.
You can also know more about security updates and why it makes sense to install them quickly.
Also read:
- [New] 2024 Approved Navigating the Process of Voice-Over Recording in Media Production
- [New] Comprehensively Understanding and Mastering Win10's Zoom Use
- [New] In 2024, Facebook's Blue Icon Decoding Its Meaning in Chats
- [New] Professional Tips Integrating Closed Captions with Ease on YouTube
- [Updated] Mastering YouTube Títulos Con Algoritmos
- A Comprehensive Guide to Win 11'S Proxy Panel
- Comprehensive Solutions for Overcoming a 504 Gateway Delay Problem
- Decoding Windows Error 31: Steps for Fixing Network Connectivity Issues
- Leading 8 Must-Play Mobile Games for Gamers on the Go
- Resolving 0X80072f8f-0x20000 Error on PCs
- Rise to Editing Greatness with Our Top 10 YouTube Tips for 2024
- Samsung Galaxy Fit Examination: Perfect Companion for an Energetic Routine
- Tackling Taskbar Absence During Full-Screen Mode
- Unlock Potential: The Must-Have MSIStore Tools
- Unraveling Windows 11'S Mysteries: Inside Its Registry Files
- Title: Unsticking Windows Update: Quick Repair Tips
- Author: Richard
- Created at : 2024-10-01 19:45:42
- Updated at : 2024-10-09 05:09:08
- Link: https://win11-tips.techidaily.com/unsticking-windows-update-quick-repair-tips/
- License: This work is licensed under CC BY-NC-SA 4.0.
