Win11 Tutorial: Creating Personalized Soundscape Shortcuts

Win11 Tutorial: Creating Personalized Soundscape Shortcuts
Not all keyboards include volume control hotkeys for muting, maximizing, and adjusting audio levels. Nor does Windows 11 have any universal sound control keyboard shortcuts. Therefore, some users have to make do with their mouse for volume control.
However, you can set up custom volume control hotkeys in Windows 11 with some third-party software. Once set up, you’ll be able to change the volume with the press of a few hotkeys instead of fiddling around with sound control bars. Here is how to set up keyboard shortcuts for muting, maximizing, increasing, and decreasing volume with NirCmd and Volume Control.
Disclaimer: This post includes affiliate links
If you click on a link and make a purchase, I may receive a commission at no extra cost to you.
How to Download and Extract NirCmd
NirCmd is a command-line tool that can carry out many useful PC tasks. It has some volume control commands for muting, maximizing, increasing, and reducing sound levels. Although NirCmd doesn’t provide any built-in options for establishing volume control hotkeys, we can set up keyboard shortcuts for its commands.
First, however, you’ll need to download and extract NirCmd. The app comes packed in a ZIP archive that you’ll need to extract. You can download and extract NirCmd like this.
- Open the NirCmd download page.
- Scroll down to the bottom of that page, and click the Download NirCmd 64-bit link.
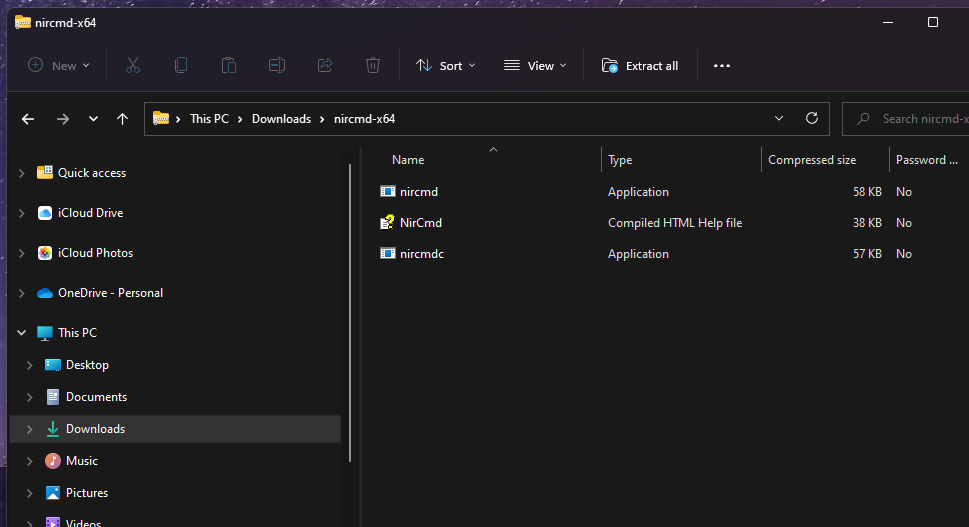
- Double-click NirCmd’s ZIP to open it.
- Click Extract all on File Explorer’s command bar.

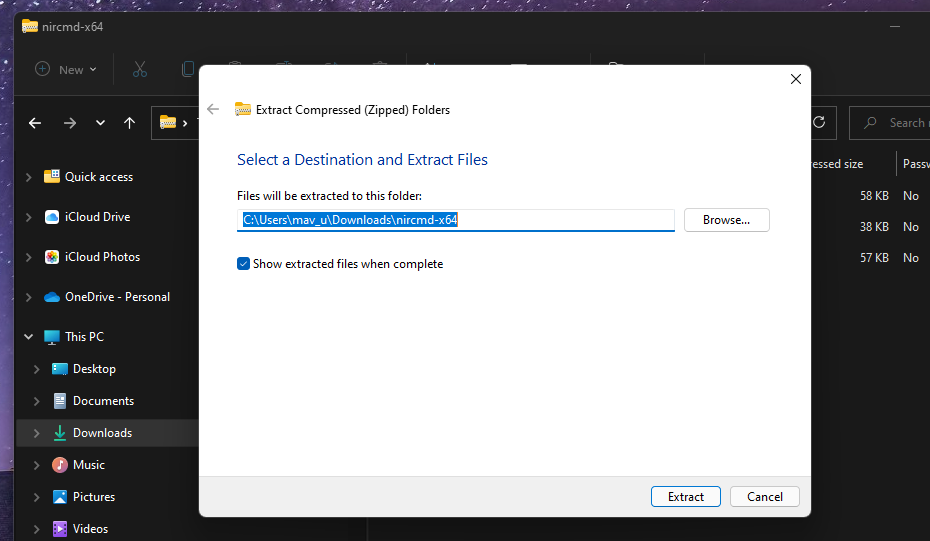
- Select the Browse option to choose an extraction path.
- Click the Show extracted files when complete checkbox to select it.

- Press the Extract button to extract the ZIP archive in Windows .
How to Set Up a Mute Hotkey
When you’ve extracted NirCmd’s archive, no program installation is required. Nor do you even need to launch it in any way. You will, however, need to note down, or copy, NirCmd’s extracted path. Then you can set up volume control shortcuts based on that utility’s commands. This is how you can establish a mute hotkey with NirCmd.
- First, open the extracted NirCmd folder.
- Right-click the nircmd EXE and select Copy as path.
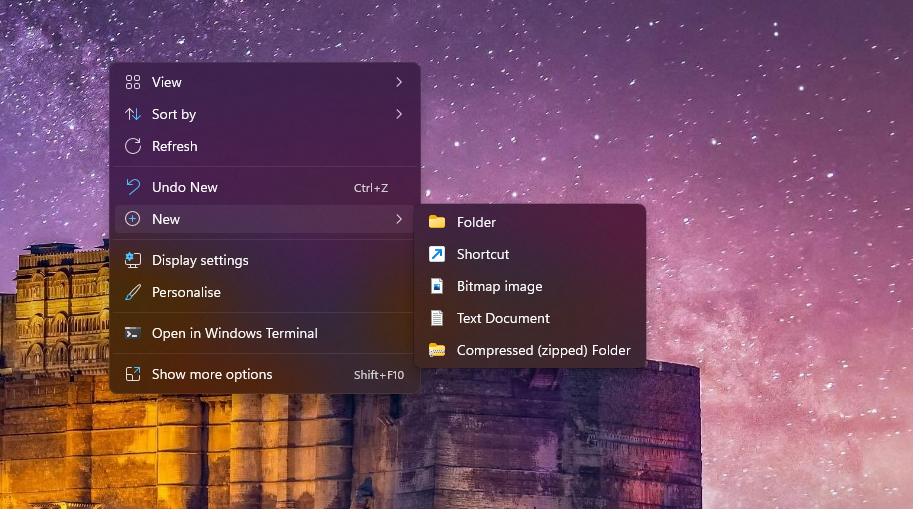
- Next, right-click an area of your desktop to select the New context menu option.
- Click Shortcut on the submenu.

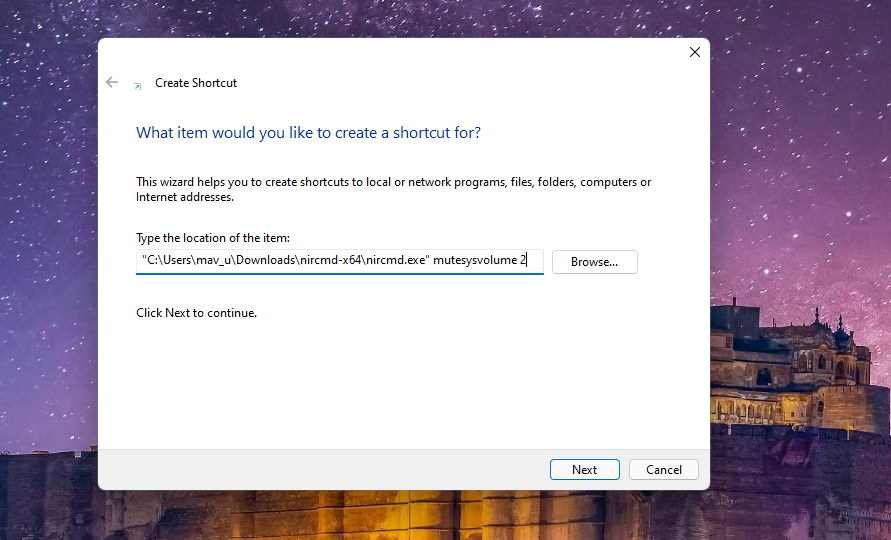
- Press the Ctrl + V keyboard shortcut to paste the copied NirCmd path into the location box.
- Then press Space key once after the NirCmd path, and enter mutesysvolume 2 in the location box as shown directly below. The location box should then include: “NirCmd folder path\nircmd.exe” mutesysvolume 2.

- Click Next to continue.
- Enter Mute in the shortcut name box, and select the Finish option.
Now you’ve got a Mute shortcut on your desktop. Start playing a video in a browser or media player, and click that shortcut to mute it. You can add a hotkey to that desktop Mute button as follows.
- Right-click your Mute desktop shortcut to select Properties on its context menu.
- Click inside the Shortcut key box to place a text cursor there.
- Press M to set up a Ctrl + Alt + M hotkey.

- Select Apply to save.
Start playing a video, and press the Ctrl + Alt + M keyboard shortcut. You can unmute the sound by pressing Ctrl + Alt + M again. Pressing that hotkey both mutes and unmutes audio.
Don’t delete the Mute desktop shortcut. Deleting that shortcut will also erase the hotkey added to it. So, you’ll need to keep all audio control shortcuts on the desktop for their hotkeys to work.
If you like, you can also change the icon for the desktop shortcut to a more appealing one. To do that, right-click the shortcut and select Properties. Click the Change shortcut button, and choose an icon on the window. Select the OK and Apply options to add the icon.
![]()
How to Set Up a Hotkey for Maximizing Volume
Aside from a mute hotkey, you can set up a keyboard shortcut for maximizing volume. If you want a hotkey to max out volume (just don’t disturb the neighbors), you can create one with NirCmd’s setsysvolume 65535 command. You can establish a max volume desktop shortcut much the same as a mute one with the Create Shortcut tool. The only difference is that you’ll need to input this command in the location box instead: “NirCmd folder path\nircmd.exe” setsysvolume 65535.
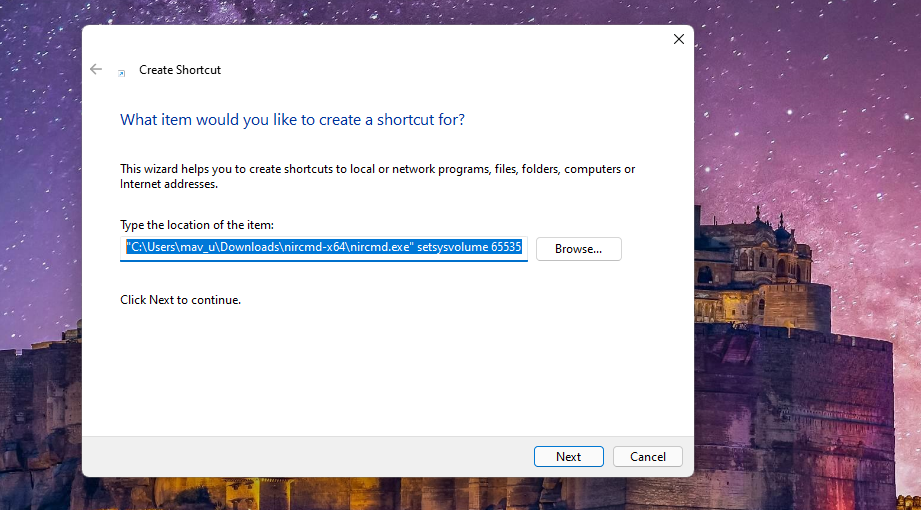
The 65,535 in that command is NirCmd’s maximum decibel value. Clicking your new maximum audio desktop shortcut will max out playback volume. Thereafter, you can apply a hotkey to the max volume desktop shortcut just the same as for the mute one.
How to Create Volume Up and Down Hotkeys
NirCmd also has commands that increase or decrease volume by specific values. You can set up hotkeys that activate those commands for raiding or reducing the decibel level. Again, you’ll need to first set up desktop shortcuts for those NirCmd commands just the same as for muting or maximizing sound. These are the commands you’ll need to enter into the “Create Shortcut” window’s location box:
Increase volume by 2,000 units: “NirCmd folder path\nircmd.exe” changesysvolume 2000
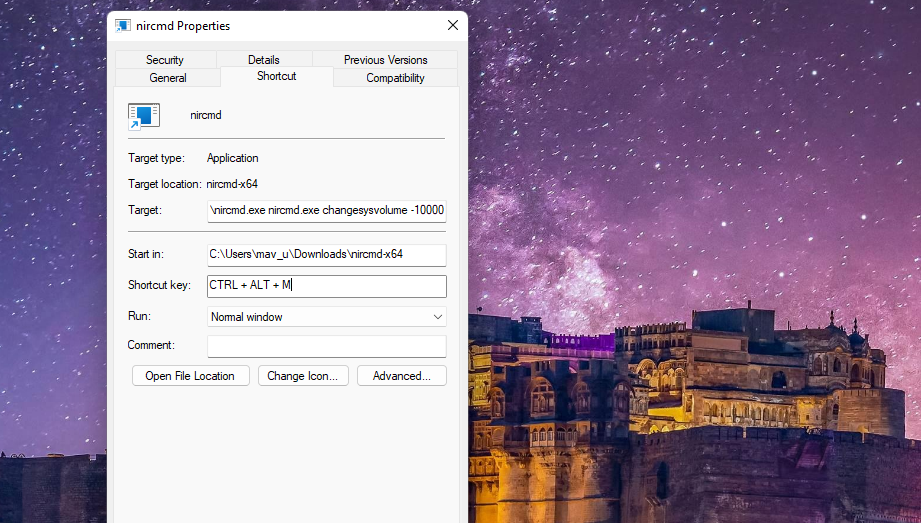
Decrease volume by 5,000 units: “NirCmd folder path\nircmd.exe” changesysvolume -5000
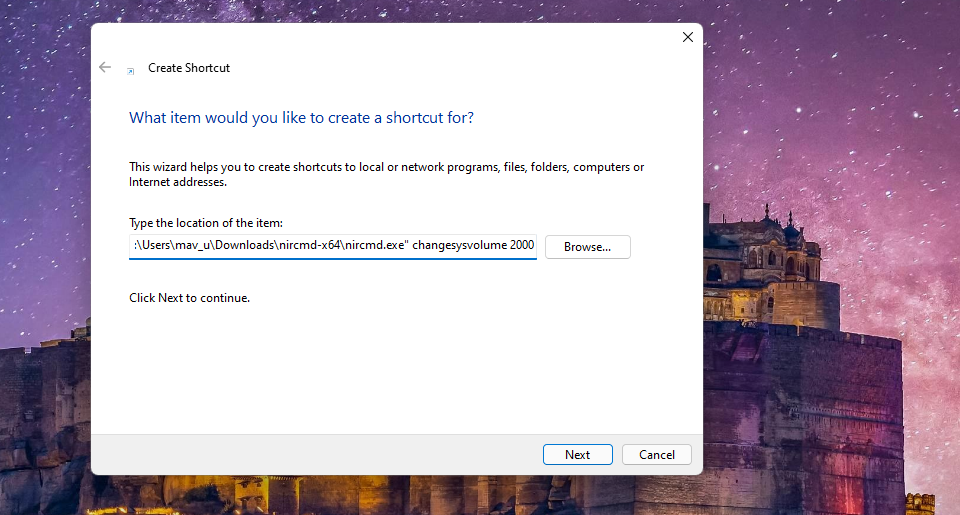
Note that you can change the unit values in those commands. To configure a shortcut to increase volume more, for example, you could input changesysvolume 5000 in the location box instead. Or enter changesysvolume -10000 to decrease the decibel level by twice as much. However, all values must be below the maximum of 65,535.
When you’ve set up some desktop shortcuts for increasing and reducing volume, right-click them and select Properties. You can add new hotkeys to them with their Shortcut key boxes as outlined for the mute command. Then press the NirCmd volume up and down hotkeys to your heart’s content to increase and lower the decibel level.
How to Set Up Custom Volume Control Hotkeys for a Specific App
Volume Control is a portable third-party app with which you can set up custom volume control hotkeys and assign them to specific apps. Then the custom keyboard shortcuts set will only change the volume for a program you’ve assigned it to. This is how you can set custom volume control hotkeys for a specific app in Windows 11 with Volume Control:
Open the Volume Control page on Softpedia.
Click Free Download to view the location options.
Select Secure Download (US), which is best for North America.
Right-click Windows 11’s Start taskbar button to select File Explorer.
Open the folder that contains the downloaded Volume Control file.
Double-click the VolumeControl file to open the software (no installation is needed).
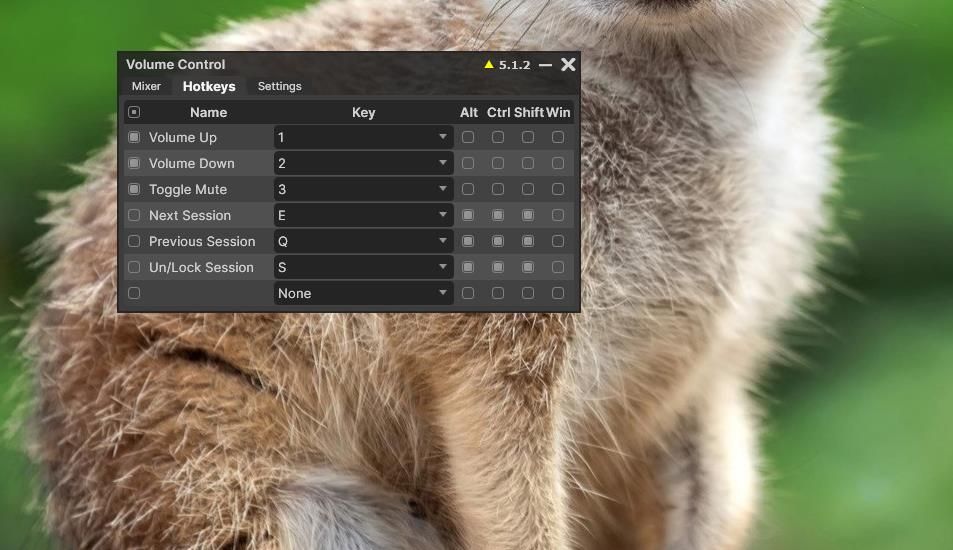
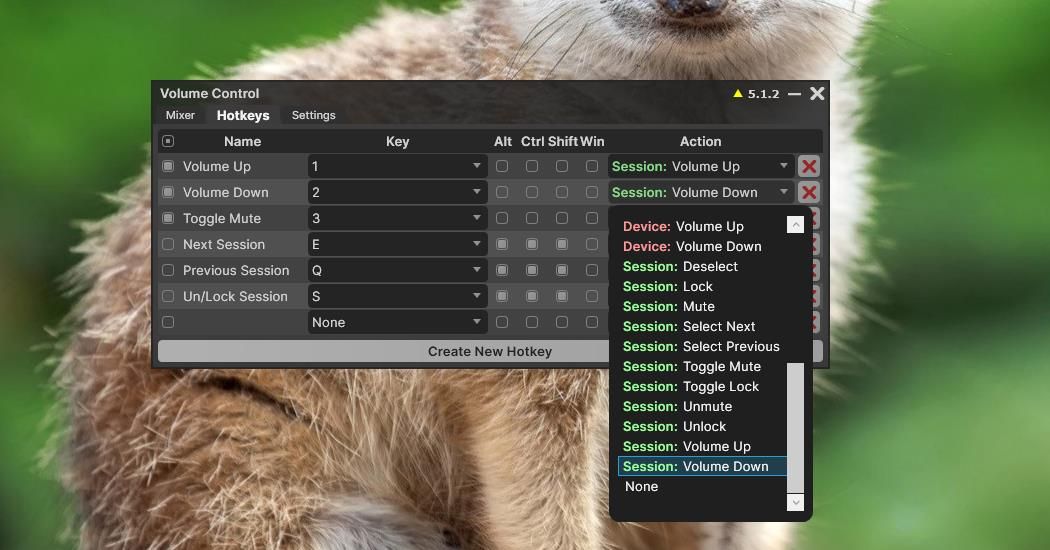
Click the Hotkeys tab in the Volume Control window.
Select the Volume up checkbox.
Click the Key drop-down menu and select a key for your hotkey there. You can also select the Alt, Ctrl, Shift, or Win checkboxes to extend your hotkey with one of those modifier keys.

Select the Volume up checkbox and repeat the previous step to set a hotkey for raising the volume.
Then select Toggle Mute and repeat step nine to set a keyboard shortcut for muting the volume.
Now open a program to assign the hotkeys to. A web browser or media player from which you can play music and videos would be ideal.
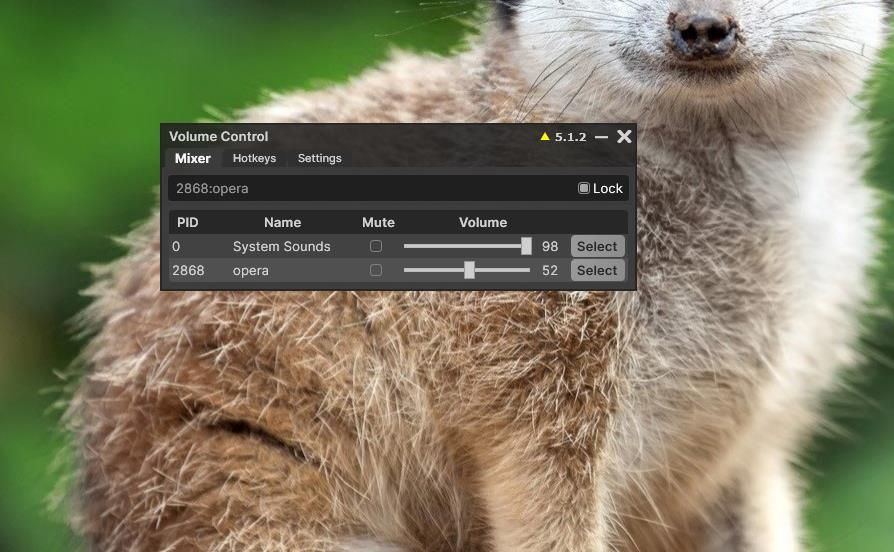
Click the Mixer tab to view a list of open apps.

Press the Select button beside the software to which you want to assign the custom hotkeys.
- Click the Lock checkbox to ensure the volume control hotkeys always remain assigned to the selected software.
Try out the custom volume hotkeys you’ve set for the software. Play a video within your software if you can. Press the keyboard shortcuts you’ve assigned to the app to raise, lower, and mute its volume. Those hotkeys will only affect the app’s volume level and won’t change the general system sound beyond it. The Volume bar within the Mixer tab shows you the audio level for the software.

You can also create new volume control hotkeys from scratch with Volume Control. To do so, select the Advanced Hotkeys checkbox on the Settings tab. Then you’ll see a Create New Hotkey button on the Hotkeys tab you can press to set up new keyboard shortcuts. You can select options on an Action drop-down menu with advanced hotkeys enabled.
Adjust Playback Volume With Your New Sound Control Hotkeys
So, you don’t need to get a new keyboard if your current one lacks volume control hotkeys. Simply set up a few custom keyboard shortcuts for muting, maximizing, lowering, and increasing volume with the NirCmd command-line utility or Volume Control. Then you can quickly mute, max out, or raise/lower the decibel level for video and music playback in Windows 11 by pressing those hotkeys.
However, you can set up custom volume control hotkeys in Windows 11 with some third-party software. Once set up, you’ll be able to change the volume with the press of a few hotkeys instead of fiddling around with sound control bars. Here is how to set up keyboard shortcuts for muting, maximizing, increasing, and decreasing volume with NirCmd and Volume Control.
Also read:
- [New] 2024 Approved Essential, Inexpensive Vlogging Tools Listed
- [Updated] 2024 Approved Instructions Removing Videos From YouTube's Watchlater
- [Updated] Channel Flair Free Download Templates for 2024
- [Updated] Top Tweets Review The Full Year in Videos
- Essential Tips for Efficient BlueScreenView Use
- In 2024, The Best of the Best Movie Trailer Creation Software for Mac and PC
- Leveraging Labels for Efficient File Management on Windows 11
- Reigning Fast: The Quintessential Win's Performance Aids
- Stop File Explorer Freezes in Win11 With These Fixes
- Streamlining Audio Software Performance on Windows with Error 9999
- Transform Videos on Windows - Discover These 8 Outstanding Apps
- Windows Audio Device Isolation Explained
- Title: Win11 Tutorial: Creating Personalized Soundscape Shortcuts
- Author: Richard
- Created at : 2024-12-03 20:04:31
- Updated at : 2024-12-06 23:32:07
- Link: https://win11-tips.techidaily.com/win11-tutorial-creating-personalized-soundscape-shortcuts/
- License: This work is licensed under CC BY-NC-SA 4.0.
