Windows 11/10 Secrets: Hidden Drive Techniques

Windows 11/10 Secrets: Hidden Drive Techniques
File Explorer in Windows displays any internal or external drives that are connected to your system by default. However, if you don’t want a certain drive to appear in File Explorer, you can always hide it.
By hiding a drive on Windows, you can prevent others from accessing sensitive files within that drive and keep them safe. If you’re interested in doing that, this guide will walk you through four different methods to hide drives on Windows.
Disclaimer: This post includes affiliate links
If you click on a link and make a purchase, I may receive a commission at no extra cost to you.
1. Hide a Drive Using the Disk Management App
The Disk Management tool on Windows makes it easy to perform various storage-related tasks such as formatting hard disk partitions, assigning drive letters, managing disk space, and more. You can also use it to hide a drive partition on Windows. Here’s how:
- PressWin + R or use one of themany ways to open the Run dialog box .
- Typediskmgmt.msc in the text field and pressEnter .
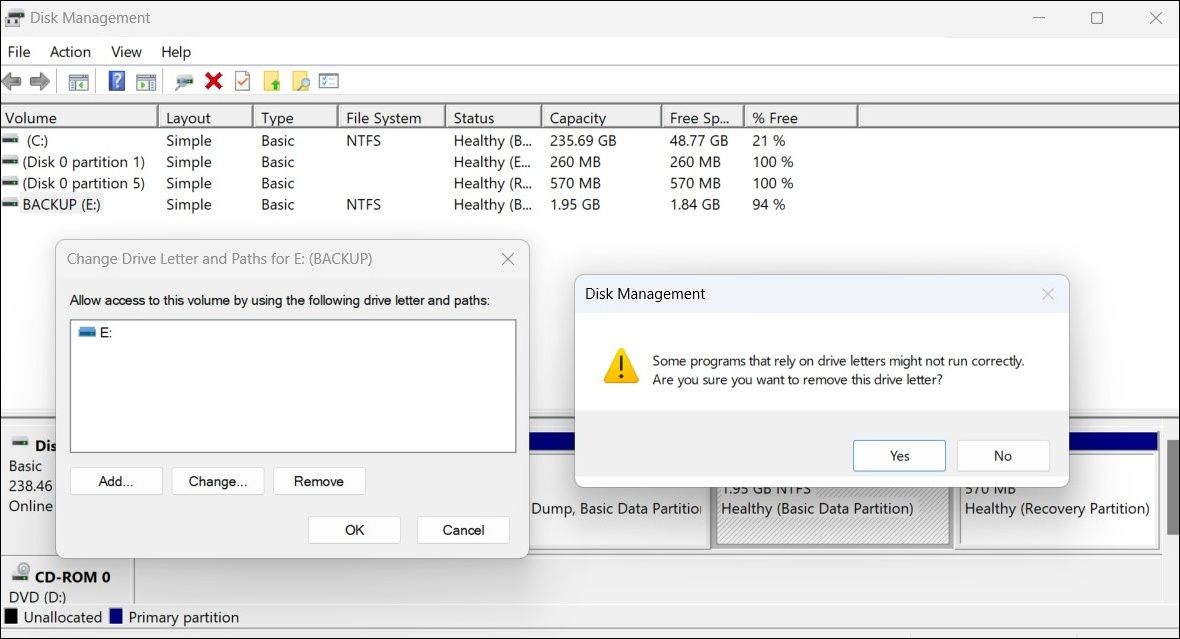
- In the Disk Management window that opens, right-click on the drive you wish to hide and selectChange Drive Letter and Paths .
- Now, click theRemove button from the pop-up window.
- ChooseYes when the warning message appears.

Once you complete the above steps, your drive will no longer appear in File Explorer.
2. Hide a Drive in Windows With Diskpart Command
If you’re a power user who prefers to make changes via the command-line interface, you can use the diskpart command to hide a drive on Windows. Fortunately, this isn’t as intimidating as it might sound.
To hide a drive in Windows with Command Prompt, follow these steps:
- PressWin + X and selectTerminal (Admin) from the menu that appears.
- SelectYes when the User Account Control (UAC) prompt shows up.
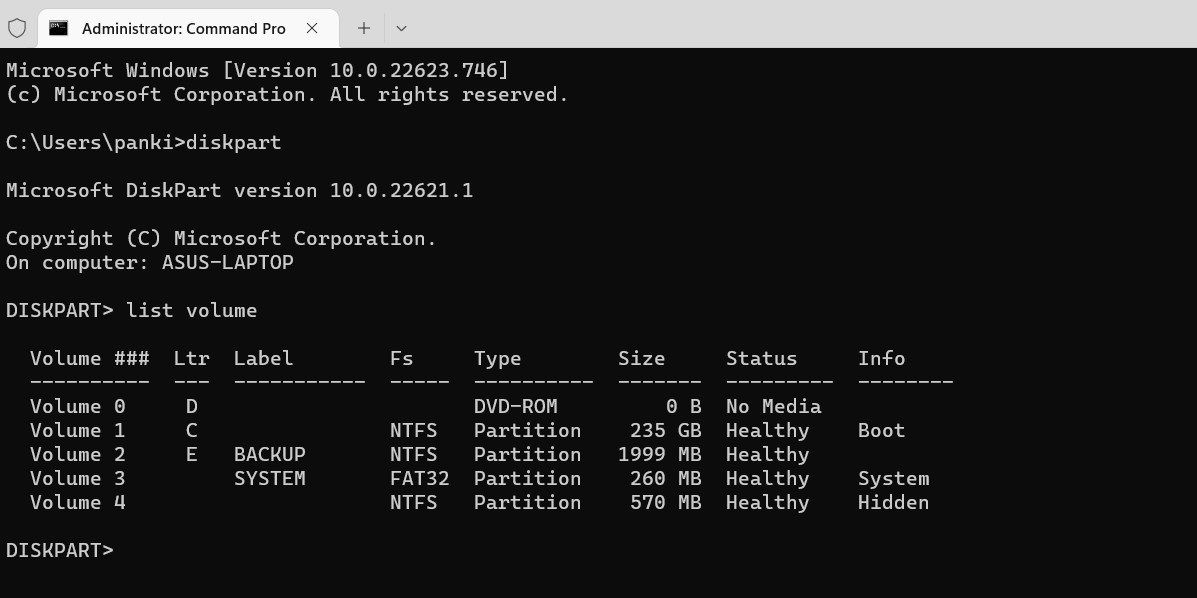
- In the console, typediskpart and pressEnter .
- Input the following command in the console and pressEnter to view a list of drives connected to your system:
list volume
- Note down the letter of the drive you want to hide from theLtr column.
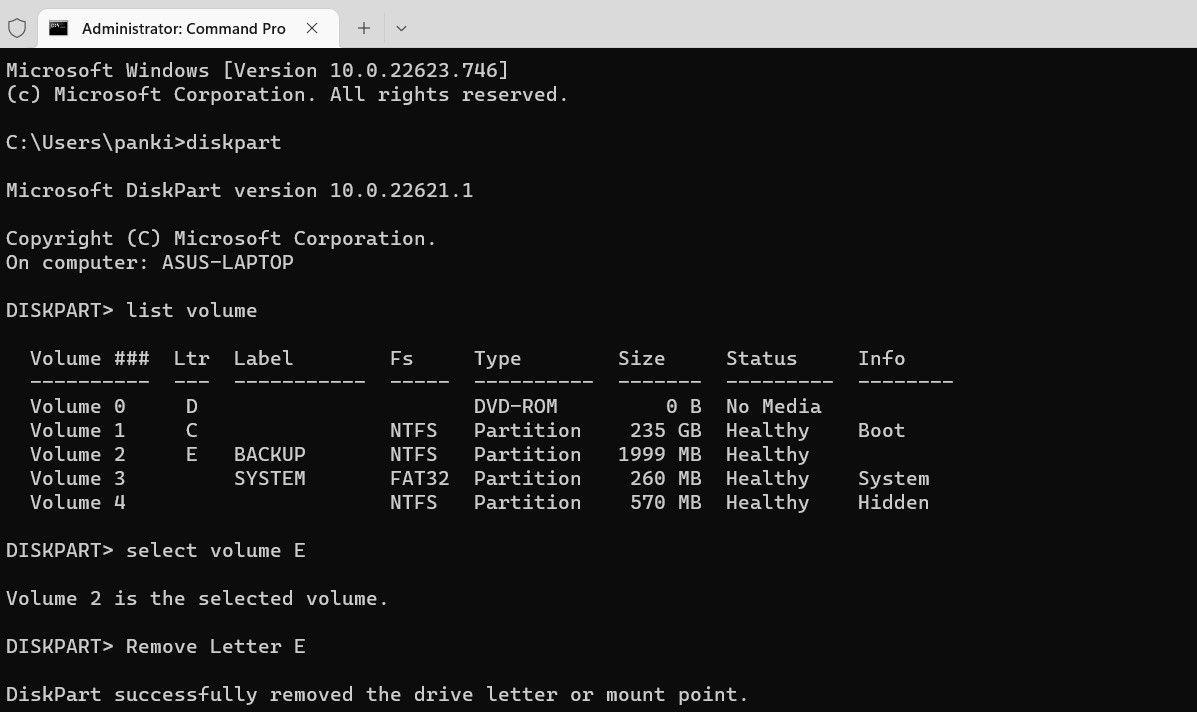
- Type the following command to select your drive. Make sure you replaceX in the command with the drive letter noted in the last step.
select volume X - Lastly, run the following command to remove the drive letter and hide the volume.
remove letter X
You should see a message that reads Diskpart successfully removed the drive letter or mount point . Following that, the drive will no longer appear on your PC.
If you like using Command Prompt, why not check our guide onhow to master the Command Prompt in Windows ?
3. Hide a Drive Using the Group Policy Editor
The Local Group Policy Editor is a tool that allows you to configure a wide range of settings on your computer. You can use it to hide a drive from your Windows computer.
The Local Group Policy Editor is only available in Professional, Enterprise, and Education editions of Windows. If you’re using the Windows Home edition, check our guide onhow to access the Group Policy Editor in Windows Home before proceeding.
Here’s what you need to do:
- PressWin + R to open the Run dialog box.
- Typegpedit.msc in the box and clickOK .
- SelectYes when the User Account Control (UAC) prompt shows up.
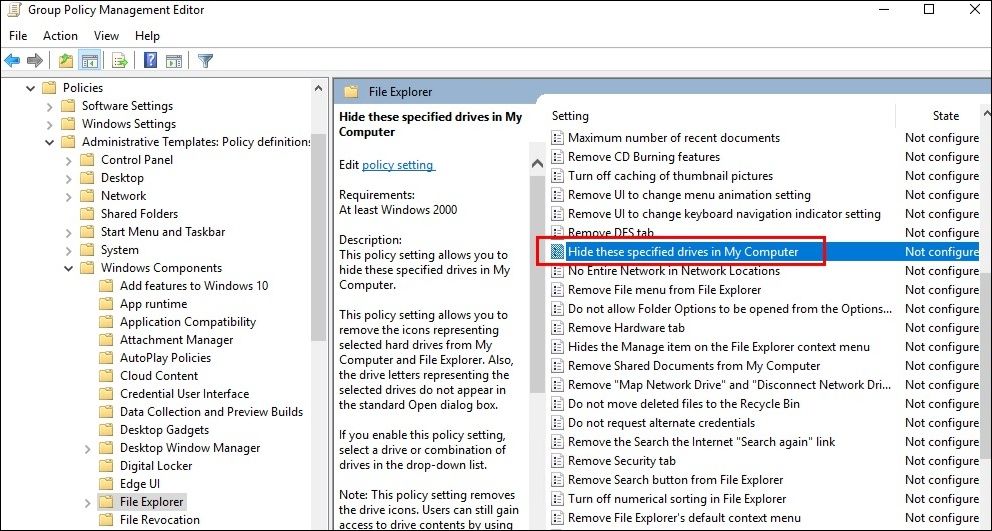
- In the Local Group Policy Editor window, use the left pane to navigate to User Configuration > Administrative Templates > Windows Components > File Explorer .
- Double-click theHide these specified drives in My Computer policy on your right.

- Select theEnabled option.
- UnderOptions , select the drive you want to hide.
- ClickApply followed byOK .
Once you complete the above steps, Windows will hide the specified drive from File Explorer. If you want to unhide the drive later, use the same steps and set theHide these specified drives in My Computer policy toNot configured .
4. Hide a Drive in Windows via the Registry Editor
Another brilliant tool that allows you to configure system settings in Windows easily is the Registry Editor. You can use Registry Editor to hide a drive if none of the above methods work. However, you must be carefulnot to accidentally mess up the Windows Registry in the process.
To be safe, you should back up all the registry files before proceeding. If you need help with that, check our guide onhow to back up the Windows registry and follow the steps outlined there.
Once you’re done with that, use the following steps to hide a drive using Windows Registry:
- PressWin + S to open the search menu.
- Typeregistry editor in the box and select the first result that appears.
- SelectYes when the User Account Control (UAC) prompt appears.
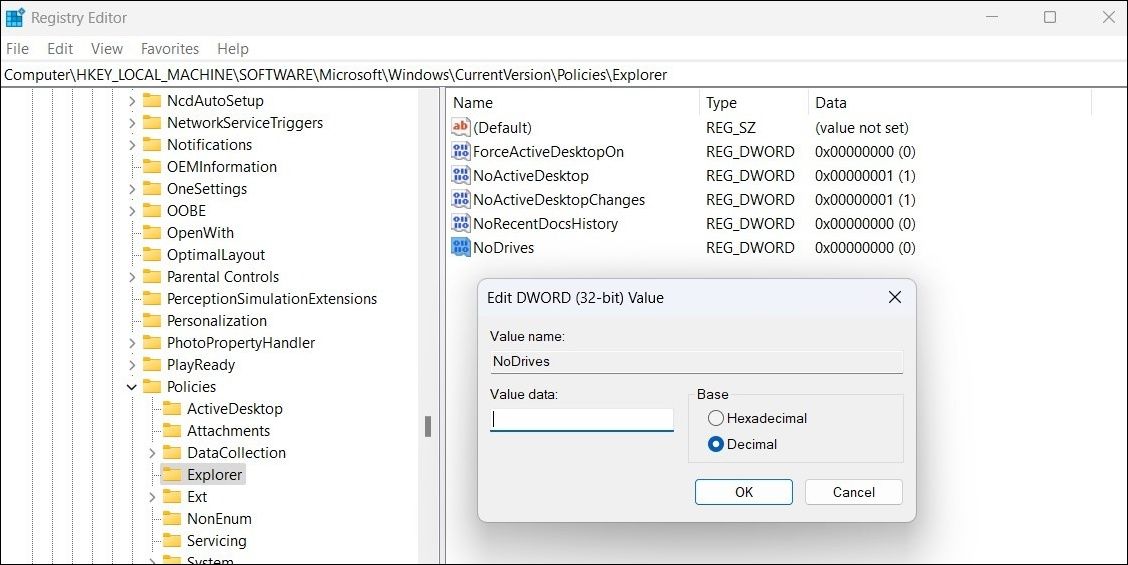
- Use the left pane to navigate to HKEY_LOCAL_MACHINE > Software > Microsoft > Windows > CurrentVersion > Policies > Explorer .
- Right-click on theExplorer key and go toNew and selectDWORD (32-bit) Value from the sub-menu.
- Rename the DWORD toNoDrives .
- Double-click theNoDrives DWORD.
- In theEdit DWORD (32-bit) Value dialog box, selectDecimal as the Base.

- Enter a number corresponding to the drive you want to hide in theValue data field and clickOK . Refer to the table below to determine which number to use.
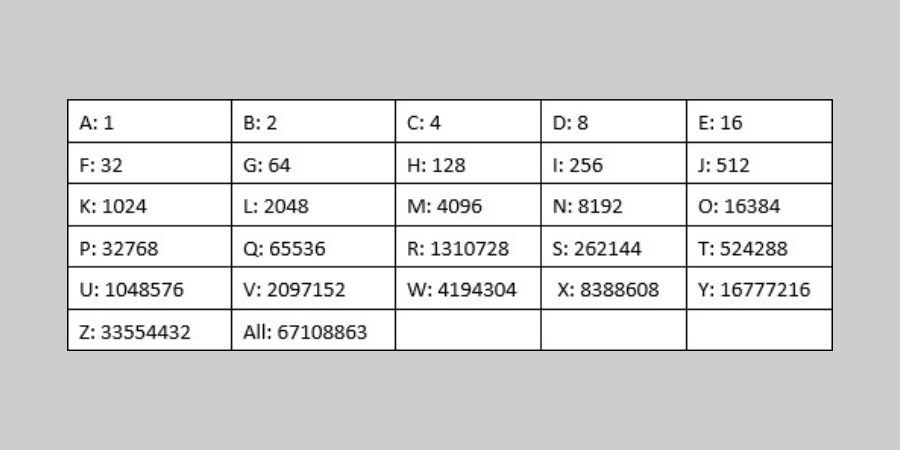
For instance, if you were to hide theE: drive from your computer, you’d enter16 in the Value data field.
You can also use this method to hide multiple drives at the same time. To do so, add the decimal numbers for both drives and enter the total in the Value data field. For example, if you’re looking to hide driveG: andH: from your computer, you should enter192 (64 + 128) in the Value data field.
You’ll have to restart your PC to apply the changes. Following that, the drive will not appear in File Explorer. You can undo the above changes at any point by deleting theNoDrives DWORD.
Hiding Drives in Windows Is Easy
Regardless of the method you use, hiding a drive on Windows is fairly simple and shouldn’t take more than a few minutes.
Alternatively, if you don’t want to hide an entire drive, Windows also lets you hide specific files and folders in a few easy steps.
Also read:
- [New] 2024 Approved Mastering Live Thumbnails for Effective Branding
- [New] In 2024, Enlightenment in Education Top 10 History YouTube Channels
- [Updated] Cutting-Edge Video Ideas for Maximum Impact
- 電源が切れない問題:パーティション削除後の調整手順
- 無限制使用的在線MP2與AVI媒體文件型式改變工具 – Movavi轉換器
- 最新AI技術で画質向上!iPhone・Android対応の2024年版動画改善ツールベスト5。
- Aumentar El Volumen De Tu Video: Guía Paso a Paso Con Movavi
- Free Online Conversion: Convert WEBM to MOV Using Movavi's Web Service
- Gratuito Online Conversor De Vídeo WMV Para Desktop - MoveIt!
- How To Unlock Any Samsung Galaxy S24 Phone Password Using Emergency Call
- Online AVI-to-OGV Kansbare Omzetting Gratis Door Movavi
- Solving Common Challenges in iOS Photo Management & Processing
- Stop the Echo: Configuring Your iPad to Remain Silent on Ringing iPhone Notifications
- Unlock the Power of Xbox Game Pass Ultimate with a Quick Cloud Gaming Guide
- Title: Windows 11/10 Secrets: Hidden Drive Techniques
- Author: Richard
- Created at : 2024-11-25 16:36:33
- Updated at : 2024-11-27 17:08:02
- Link: https://win11-tips.techidaily.com/windows-1110-secrets-hidden-drive-techniques/
- License: This work is licensed under CC BY-NC-SA 4.0.
